
Every October someone at my drawing table asks for a witch, and almost never a scary one. Here you'll learn how to draw a witch step by step as a smiling young witch zipping past a full moon, with her cat hanging on behind her. It all grows from a circle and one slanted line.
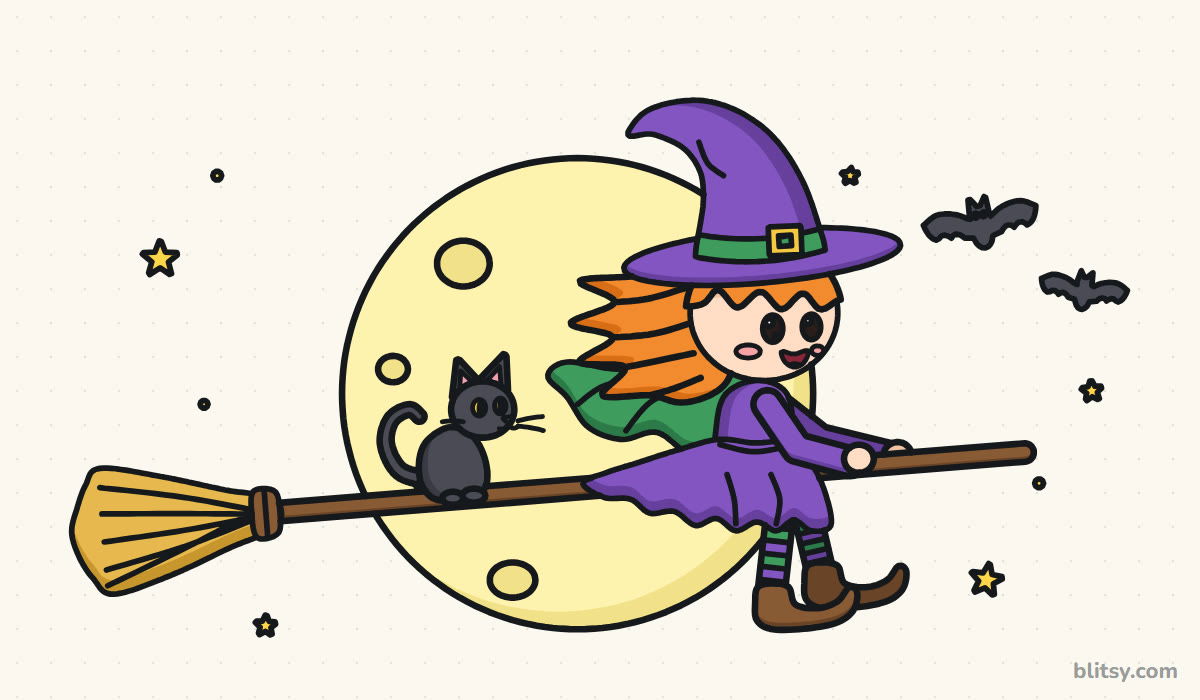
In each picture, the part you're adding right now is drawn in blue. Everything from earlier steps sits in gray, and the faint construction lines hang around until the ink step wipes them away.
Quick overview
⏱️ Time: roughly 40 minutes to an hour with coloring
🎯 Level: beginner, though the hat and boots take a little patience
✏️ Steps: 12
🧙 You'll draw: a happy witch on a broomstick flying across a big moon, with a gray cat, a few stars and two bats
Supplies for a Moonlit Witch Sketch
- An HB pencil for light guide lines
- A kneaded or soft white eraser
- A black felt pen or fineliner for the final lines
- Colored pencils or markers in purple, green, orange, peach, brown, yellow, pale yellow and dark gray
- Printer paper turned sideways, since the broom is long
If you only own a pencil and an eraser, you can still finish the drawing and color it another day.
How to Draw a Witch Step by Step
Step 1: Draw a big moon circle and a slanted broom line
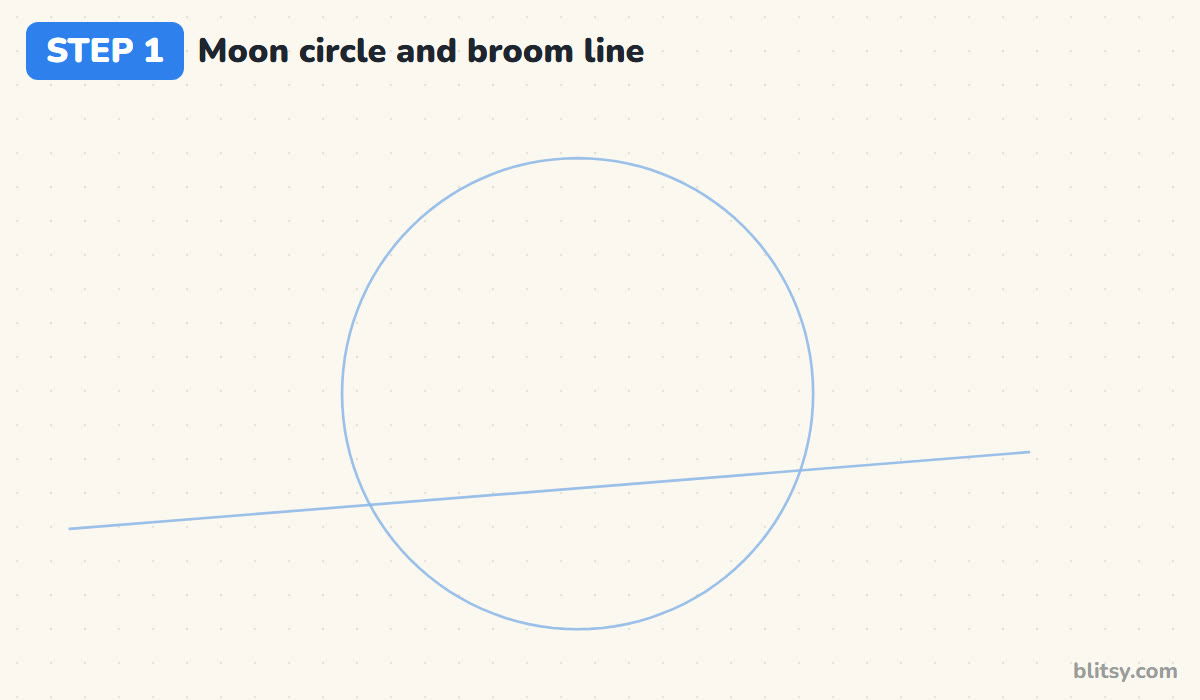
Lightly draw a large circle a little left of the middle of your page. Then draw one long straight line across the lower half of it, rising slightly from left to right. That tilt makes her climb into the sky.
💡 Tip: Trace around a small plate or a roll of tape if your freehand circle keeps turning into an egg.
Step 2: Add a head circle, a body oval and stick limbs
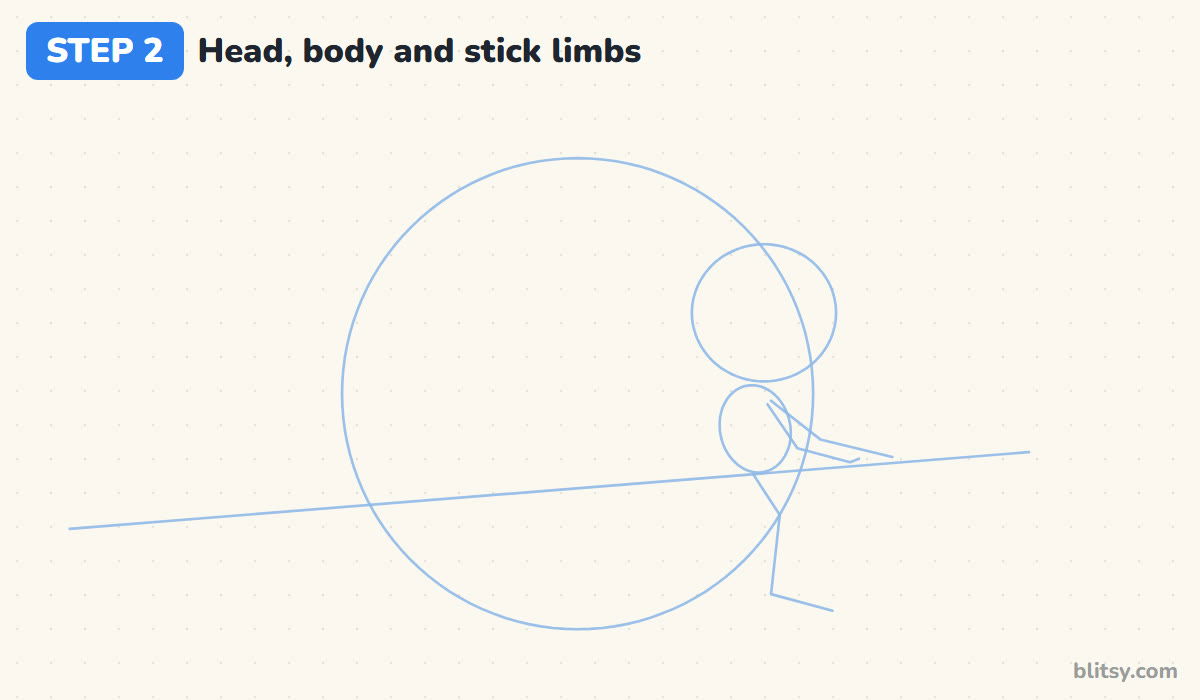
Place the head circle near the right edge of the moon, about a third as wide as the moon. Under it, draw a small tilted oval for the body; it should touch the broom line. From the shoulders, two stick arms reach forward to the line. One stick leg hangs down from the broom and kinks forward at the foot.
💡 Tip: Keep the body oval smaller than the head; a big head and a little body read as young and cute.
Step 3: Sketch the hat and cat guide shapes
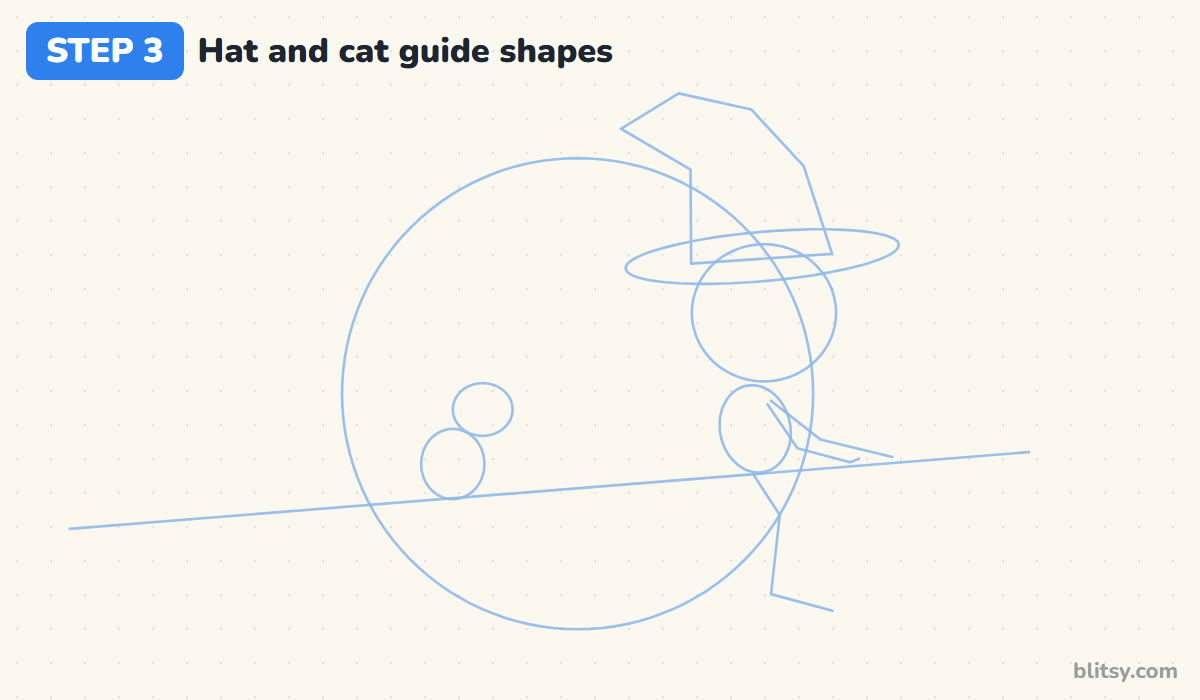
Lay a wide, flat oval across the top of the head for the hat brim. Above it, sketch a rough tall cone that bends back to the left near the top. Now move to the left half of the broom line and stack two small circles there: a bigger one sitting on the line for the cat's body and a smaller one for its head.



💡 Tip: Make the brim almost twice as wide as the head, because a narrow brim turns the hat into a party cone.
Step 4: Draw the face shape, the bangs and the flying hair
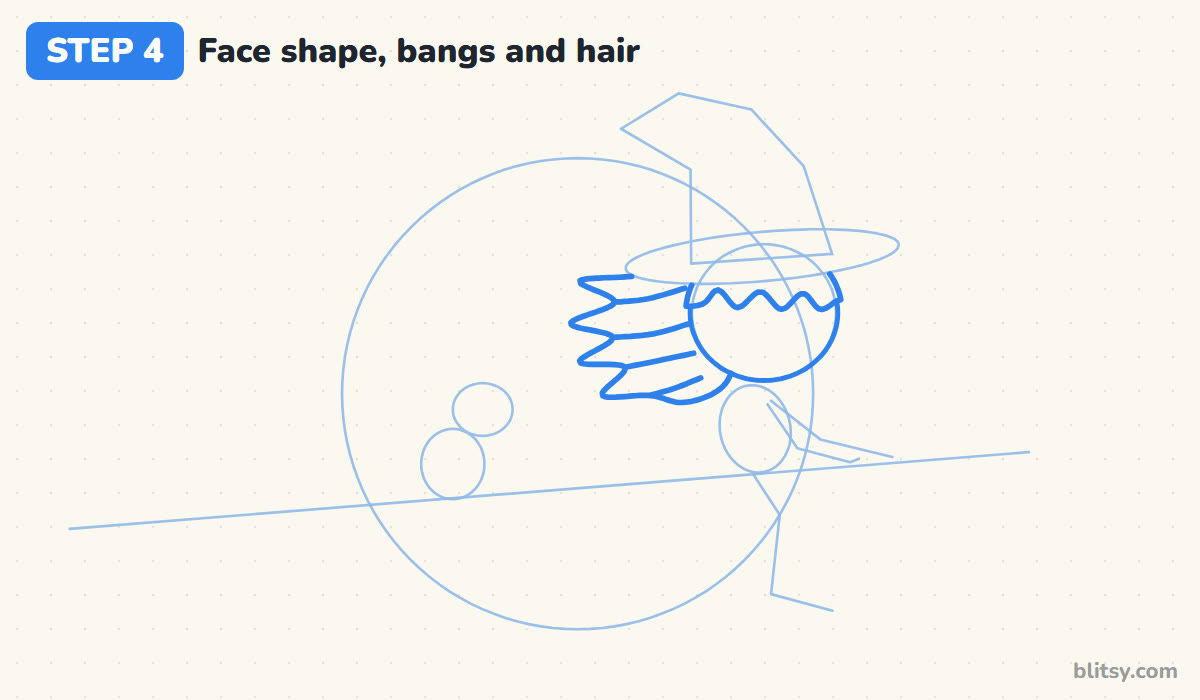
Go over the head circle with a firm line. Near the top, draw the bangs as a wavy edge that dips into small points across the forehead. Behind the head, pull the hair back to the left in long, pointed locks, as if wind were blowing it. I give her four locks of different lengths so the hair doesn't look like a comb.
💡 Tip: Draw each lock with a quick flick toward the back; slow strokes make hair look stiff.
Step 5: Draw the pointed hat with a buckle
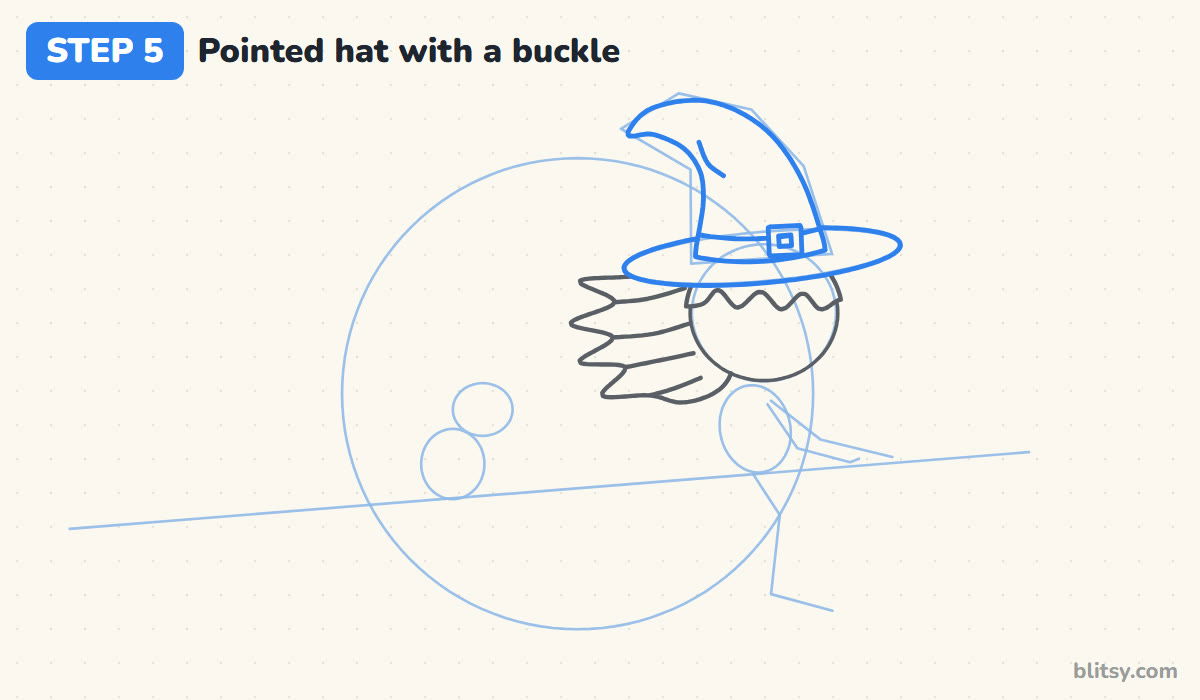
Trace the brim oval, but skip the part hidden behind the crown. The crown starts as a wide cone on the brim; its top third folds back to the left and ends in a soft point. Draw a band around the bottom of the crown and a small square buckle on the front of it. Add a short crease at the bend.
💡 Tip: Curve the bottom edge of the crown downward a little, so the hat sits on the head instead of floating above it.
Step 6: Add the dress, the cape and both arms
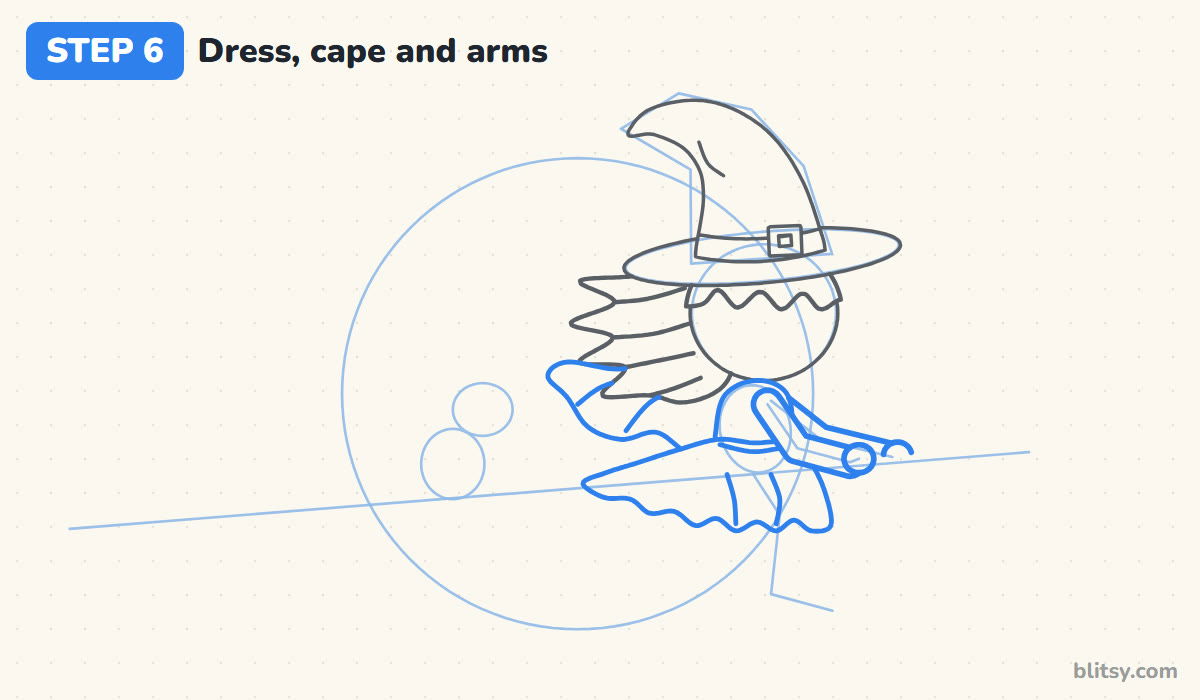
Draw a short rounded top under the head, then a skirt that covers the broom and flares back toward the moon with a wavy hem. Add the cape behind her shoulders, flowing back in a wide wave. For the arms, draw two soft sleeves reaching forward, each ending in a round hand resting on the broom line.
💡 Tip: Give the sleeves real width, about as thick as her hand; skinny arms make her look like a stick puppet.
Step 7: Draw the striped stockings and pointy boots
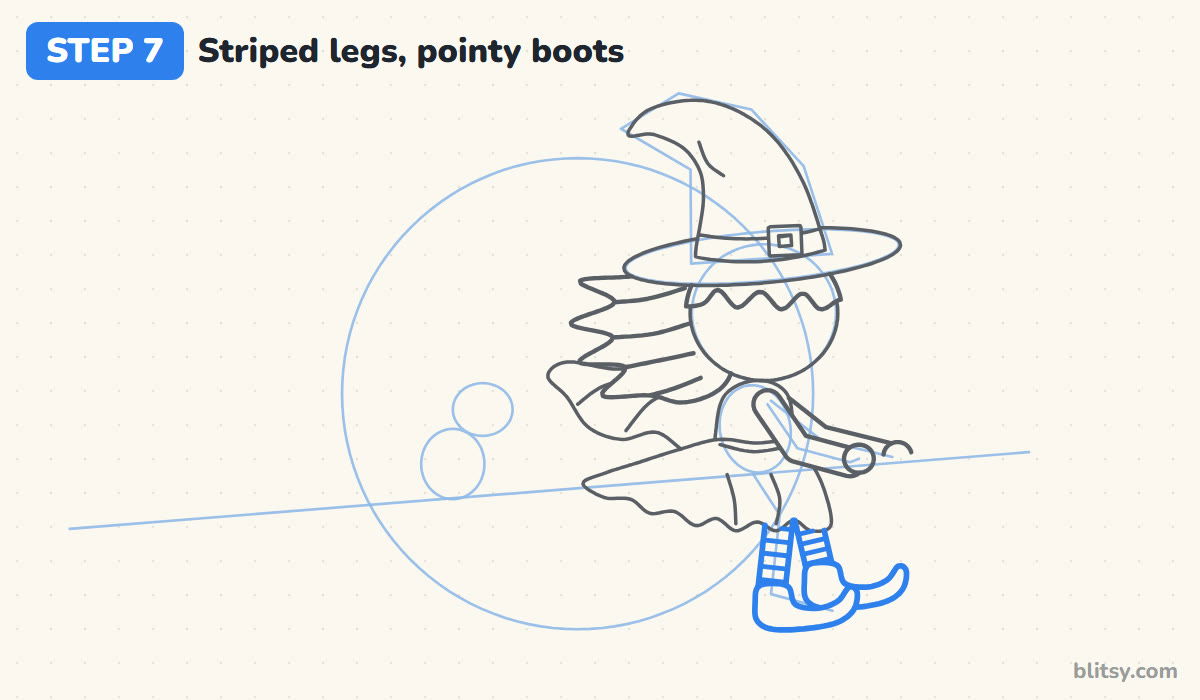
Two short legs drop from under the skirt, the far one a little higher and further forward. Each boot starts at the ankle, runs forward into a long toe and curls up at the tip. Cross each leg with five evenly spaced lines for the stripes. Keep them light until you like the spacing.


💡 Tip: Space the stripes by eye from the top down, then check that the last one sits just above the boot.
Step 8: Draw the broom handle and the bristles
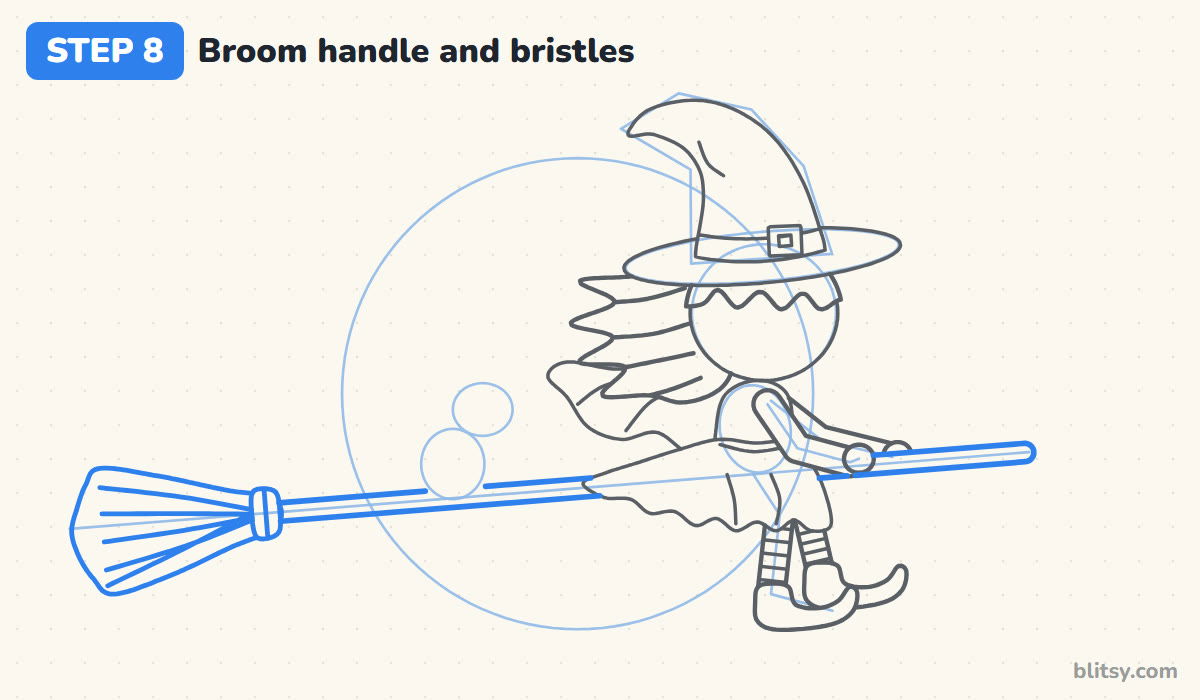
Follow the broom line with two parallel lines to make the handle, rounding off the front end. Leave gaps wherever her hands, her skirt and the cat's body will sit in front. At the back, draw a tie band and a bundle of straw that fans out wider toward the end, with a ragged edge. A few long lines inside show the straw.
💡 Tip: Let the bristles spread wider than the handle by about four times, otherwise the broom looks like a paintbrush.
Step 9: Draw the cat riding behind her
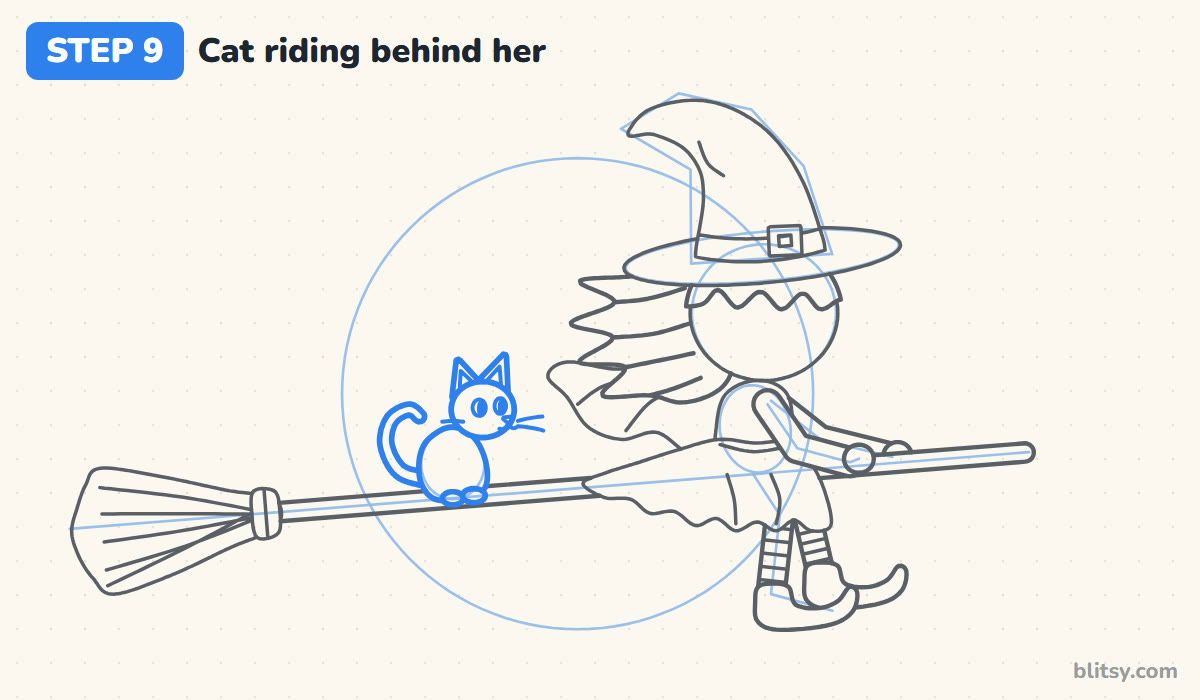
Turn the cat guide circles into a round body and head. Add two pointed ears, two little front paws resting on the handle and a tail that curls up behind its back. Then draw the face facing forward: oval eyes with thin upright pupils, a tiny triangle nose and whiskers. In old folk tales a cat often travels with a witch, so I always include one.
💡 Tip: Tilt the cat's ears slightly forward, so it looks like it's watching where they're going.
Step 10: Add the happy face, the moon and the bats
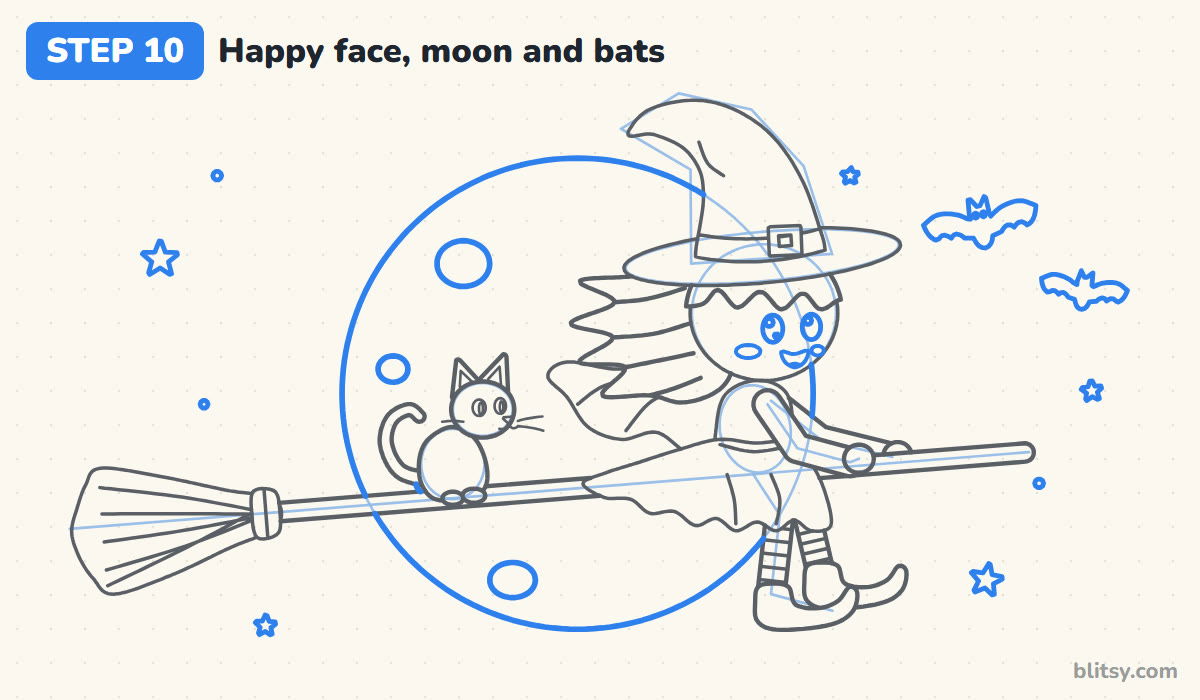
Place two tall oval eyes on the right side of her face, since she's turned toward the way she's flying. Below them, draw an open smile with a small tongue, plus a blush on each cheek. Now go over the moon circle where it shows, add a few round craters, scatter some stars and draw two bats with scalloped wings.
💡 Tip: Put the bats near the top right, ahead of her, so the eye travels across the whole picture.
Step 11: Ink the lines and erase the guides
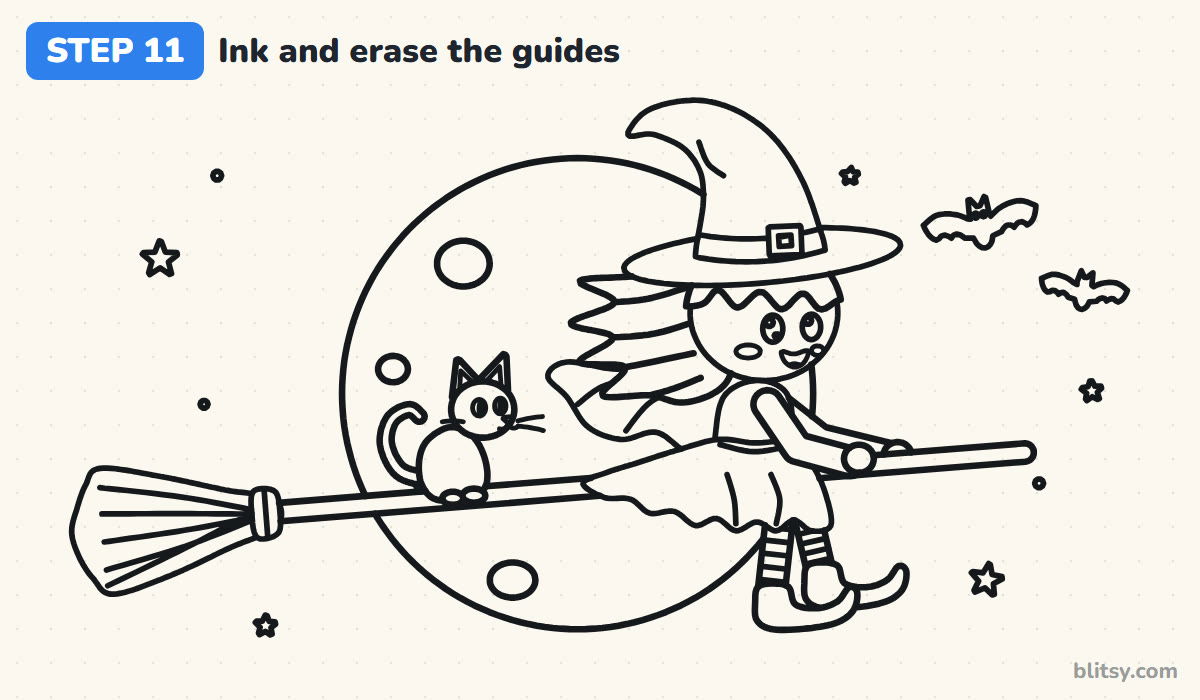
Trace every line you want to keep with the black pen. I start with the face, because a shaky line there is the hardest to hide, then move outward to everything else. Skip the guides. Once the ink is dry, erase all the pencil.
💡 Tip: Turn the paper as you ink the long broom handle, so your hand always pulls the pen toward you.
Step 12: Color your witch
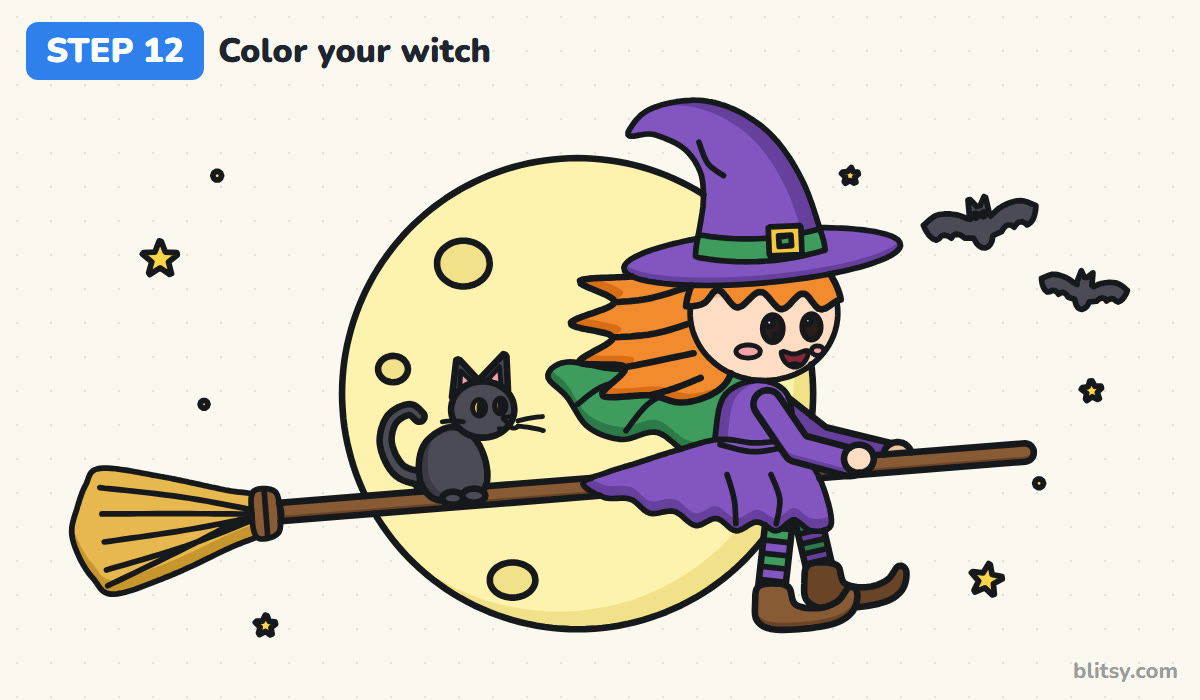
Color the hat and the whole dress purple. I make the cape and hat band green. Her hair is orange, her face and hands peach, and her boots and the broom handle brown. Alternate purple and green on the stockings. Yellow goes on the straw and the stars. The moon is pale yellow; the cat and bats are dark gray with yellow eyes.
💡 Tip: Press a little harder on the lower edge of the skirt and cape to make them look like they have folds.
Broomstick Problems That Trip Up Beginners
- A broom drawn flat across the page. She looks parked instead of flying. Tilt the line upward toward the front.
- Hands floating above the handle. Place the hand circles right on the broom line so they overlap it.
- A hat that is too small. The hat is half the character, so make the crown at least as tall as the head.
- Hair falling straight down. When she flies, her hair and cape should both point back the same way as the skirt.
- Black filling everything. A witch colored solid black loses all her details. Purple or dark green keeps the lines readable.
Spell Swaps for Your Next Witch
Once this version feels easy, change one thing at a time. Give her black braids instead of orange hair, swap the cat for an owl. She can also stand on the ground stirring a bubbling cauldron. For a whole spooky scene, the Halloween drawing tutorial adds a haunted house to fly past, and how to draw a moon step by step shows other ways to draw the night sky.
Witch Coloring Page and Step Guide to Print
The free witch coloring page has the thick outline, a small colored example and a key that matches each color to its part. The step-by-step guide PDF holds all 12 steps with their tips, ready for Letter or A4 paper.
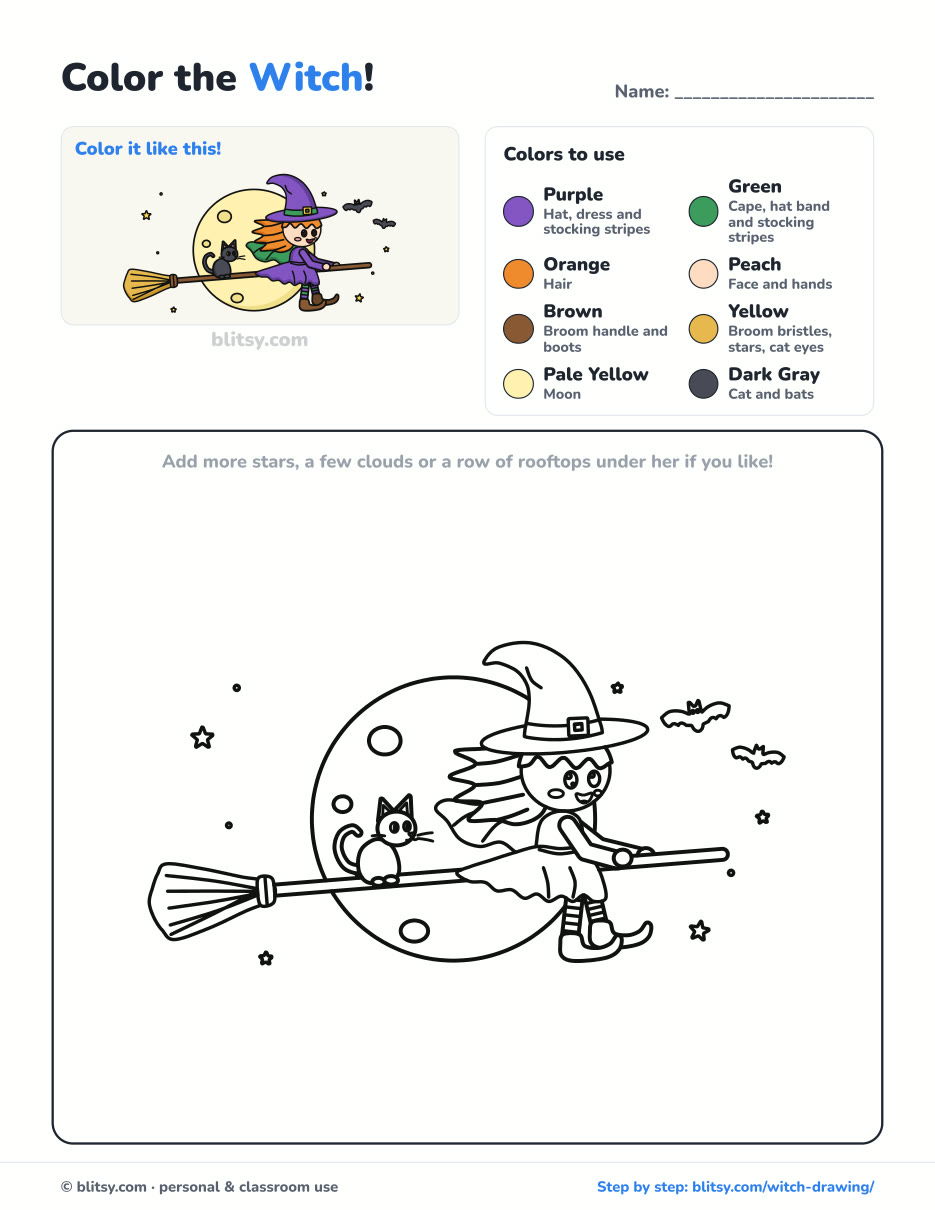
Black outlines with a colored example and the color names at the top. Ready to print and color.
⬇️ Download Coloring PageEvery step picture with its instructions and tips, to keep beside your paper while you draw.
⬇️ Download Drawing Guide📱 On a phone? Tap a download button, then open the file and choose Share → Save to Files or Print. On a computer, the PDF opens or saves straight to your Downloads folder.
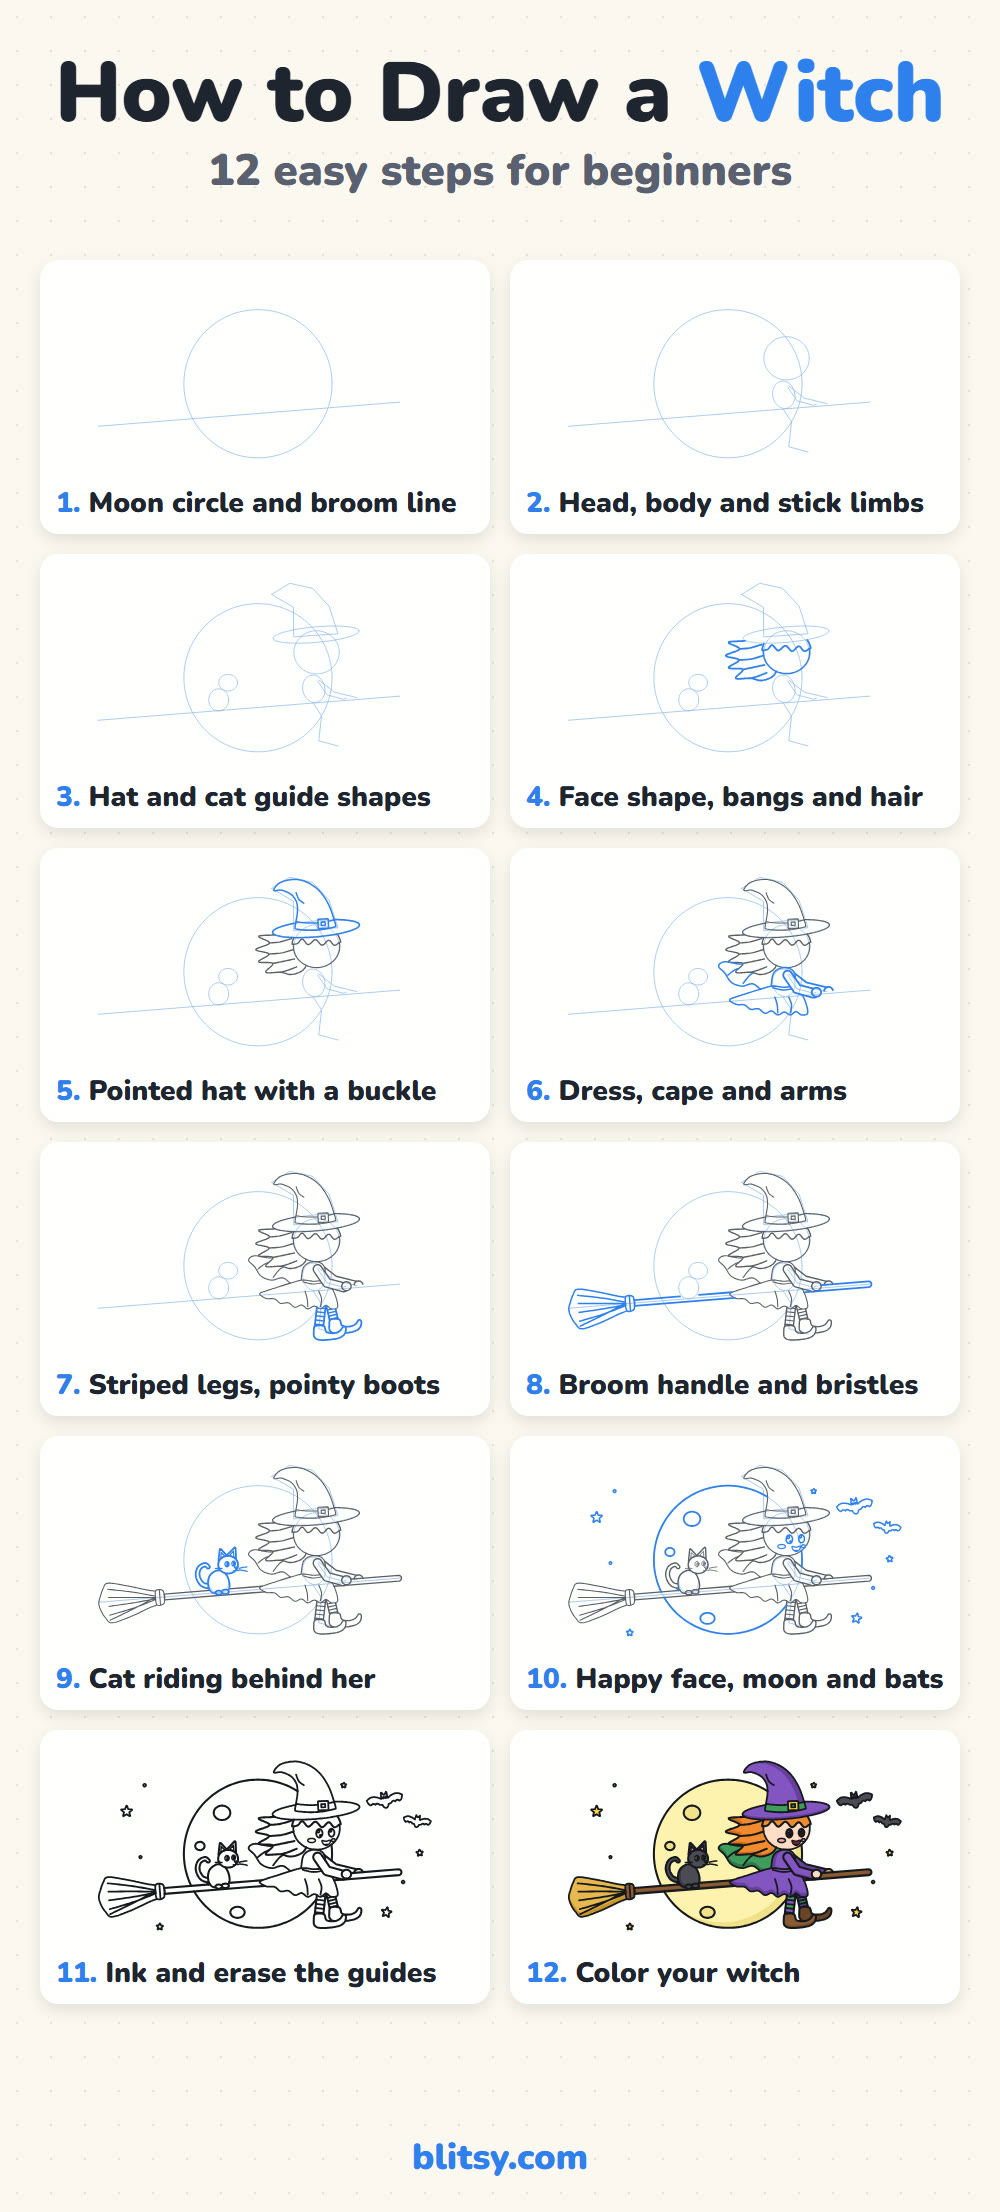
Keep the Flying Witch Steps on Pinterest
Witch Drawing Questions Kids Often Ask
What is the easiest way to draw a witch?
Start with a circle for the head and a big triangle hat on top. The bent tip, the broom and the cat can come later, once the head and hat look right.
Why do witches wear pointed hats?
Nobody knows for sure. The tall pointed hat became the standard look for witches in old book pictures and later in cartoons, so most people recognize it right away.
How do you make a witch drawing look cute instead of scary?
Use a big round head, large eyes with white shines, a wide smile and rosy cheeks. Bright purple and orange keep it friendly.
Is this witch drawing good for kids?
Yes, children from about 6 can follow it with a grown-up nearby. Younger kids can skip the stripes and bats.
Hang your witch on the fridge before Halloween night and see who spots the cat first. 🧹🌕
Related posts:
 How to Draw a Tooth Step by Step (Cute and Easy for Kids)
 How to Draw a UFO Step by Step (Cute Alien Saucer)
 How to Draw an Astronaut Step by Step (Cute and Easy)
 How to Draw an Owl Step by Step (Cute Night Owl)
 How to Draw an Axolotl Step by Step (Cute and Easy)
 How to Draw an Octopus Step by Step (Cute and Easy)
 How to Draw Freddy Krueger Step by Step (Cute Chibi Version)
 How to Draw a Frog Step by Step (Cute Frog on a Log)
 How to Draw a Jellyfish Step by Step (Cute, Easy Guide)
 How to Draw a Care Bear Step by Step (Cute Fan Art for Kids)
 How to Draw Cerberus Step by Step (Cute and Easy)
 How to Draw a Monster Step by Step (Cute and Easy)

