
Most rabbit drawings look like cartoon bunnies because the head ends up as big as the body. I fix that the same way every time: shrink the head, stretch the body into a long egg, and suddenly it looks like the wild rabbit you spot on a lawn at dusk. This lesson shows how to draw a rabbit step by step in that more natural style, still simple enough for a beginner: a sitting rabbit seen from the side, nibbling a carrot.
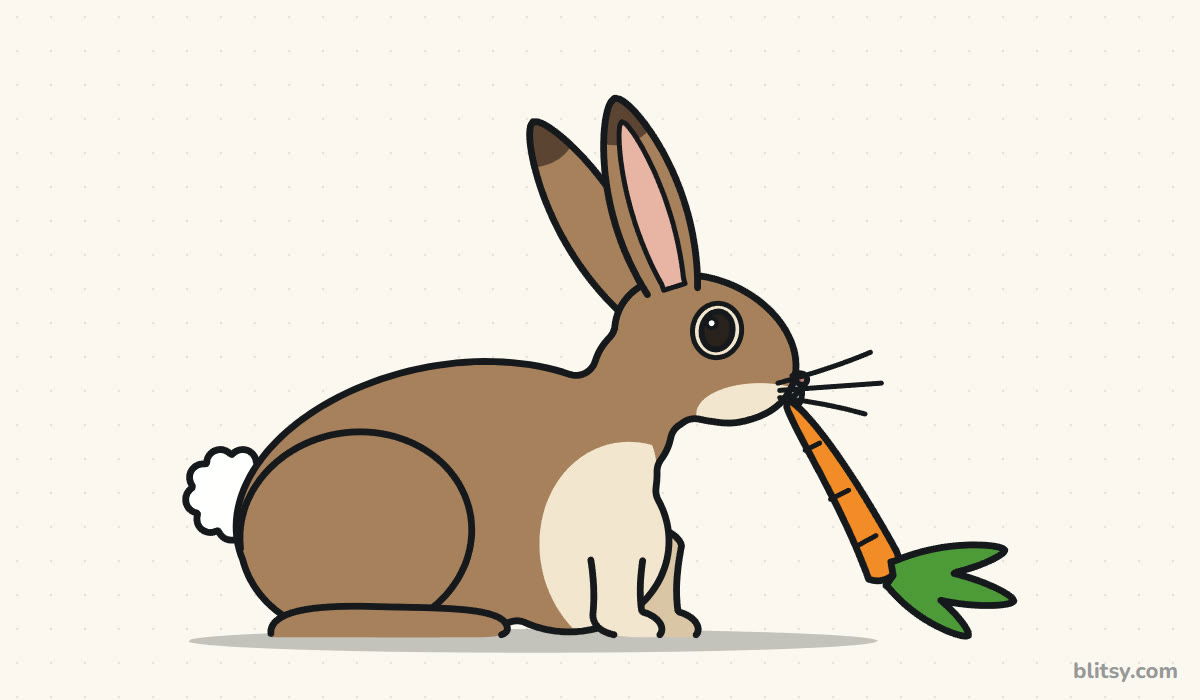
Inside every step picture, the fresh lines are blue and the older ones fade to gray. Copy the blue, then carry on.
Quick overview
⏱️ Time: about 30 minutes, plus 10 for coloring
🎯 Level: easy, good for kids from about 7 and for adults starting out
✏️ Steps: 11
🐇 You'll draw: a natural-looking rabbit sitting in side view with a carrot
A Rabbit Sketching Kit
- A pencil that makes a soft, light line (HB works)
- An eraser that doesn't smudge
- A black fineliner or thin marker for the final outline
- Colored pencils or crayons in light brown, dark brown, cream and light pink, plus orange and green for the carrot
- Plain white paper, turned sideways
A sideways sheet matters here, because the rabbit is long and the carrot sticks out to the right.
How to Draw a Rabbit Step by Step
Step 1: Sketch the body egg and the head oval
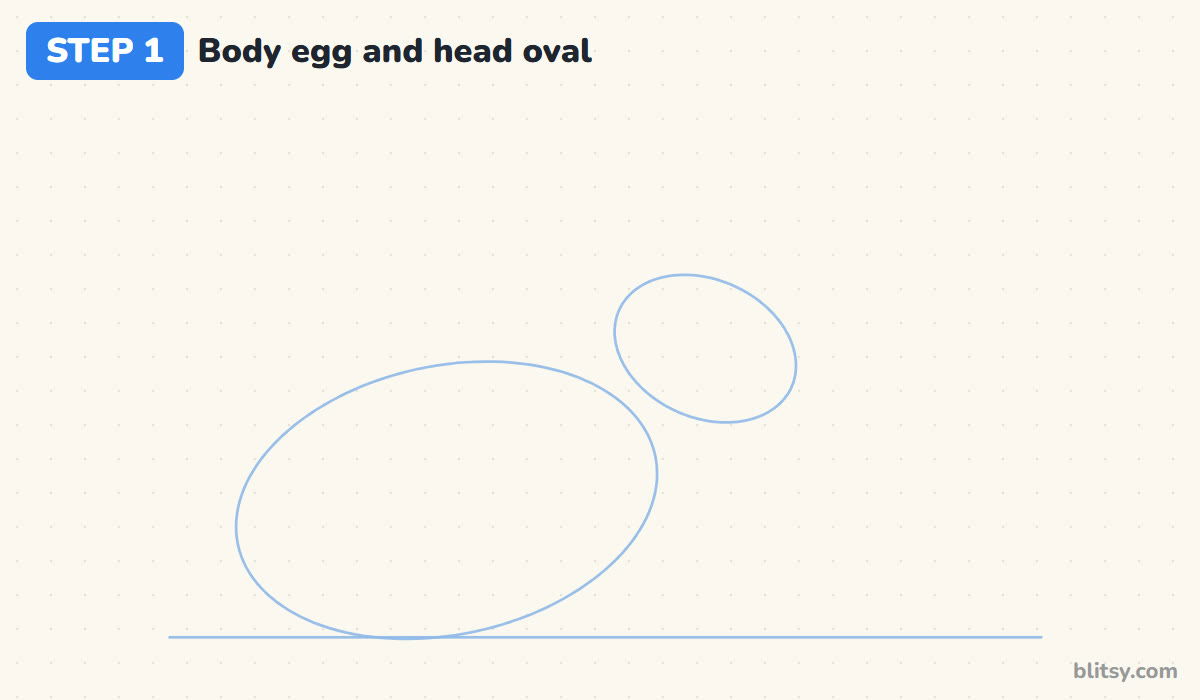
Draw a light ground line near the bottom of the page. On it, sketch a long egg for the body, tilted so the back end sits a little higher than the front. Then place a smaller oval up and to the right for the head, tipped down at the front as if the rabbit is lowering its nose. I aim for a head about half as tall as the body.
💡 Tip: Keep a small gap between the head and the body for now. The neck will fill it later.
Step 2: Add the haunch circle, ear lines and a carrot line
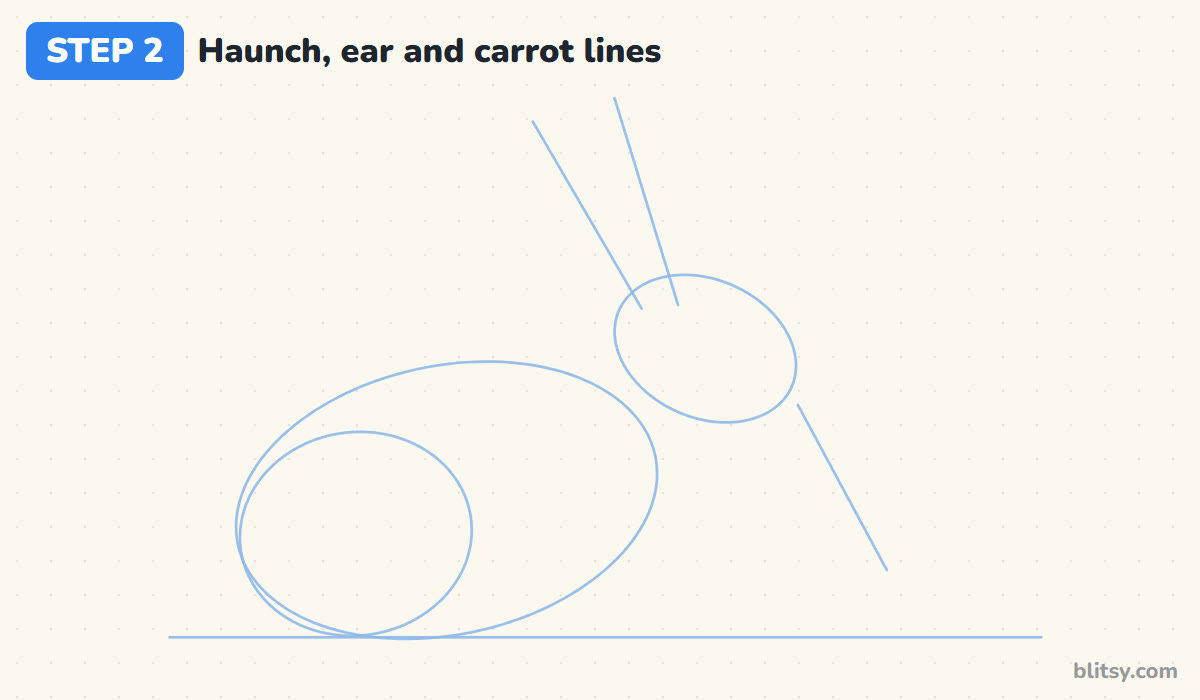
Inside the back end of the egg, draw a circle that touches the ground line. That's the haunch, the big muscle a rabbit jumps with. From the top of the head, draw two straight lines leaning back for the ears, one further back than the other. Then add a slanted line from the nose down toward the ground on the right for the carrot.
💡 Tip: Make the ear lines longer than you think. Real rabbit ears are taller than the head is long.
Step 3: Draw the head with a soft muzzle
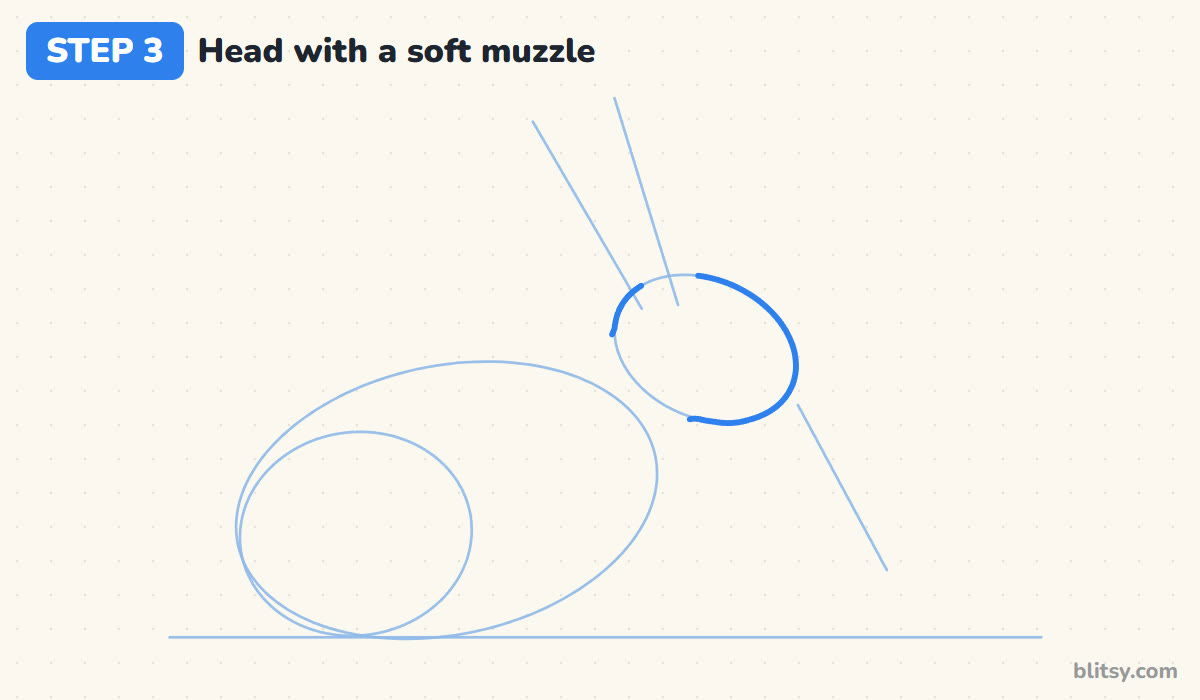
Trace around the head oval with a firmer line. Round off the lower front into a full cheek, so the face bulges gently just behind the nose. Leave the top open where the ears will join, plus a tiny gap at the nose tip for the carrot.
💡 Tip: A rabbit's face is longer than a bunny cartoon's. Let the nose sit well forward of the eye.




Step 4: Draw two tall ears
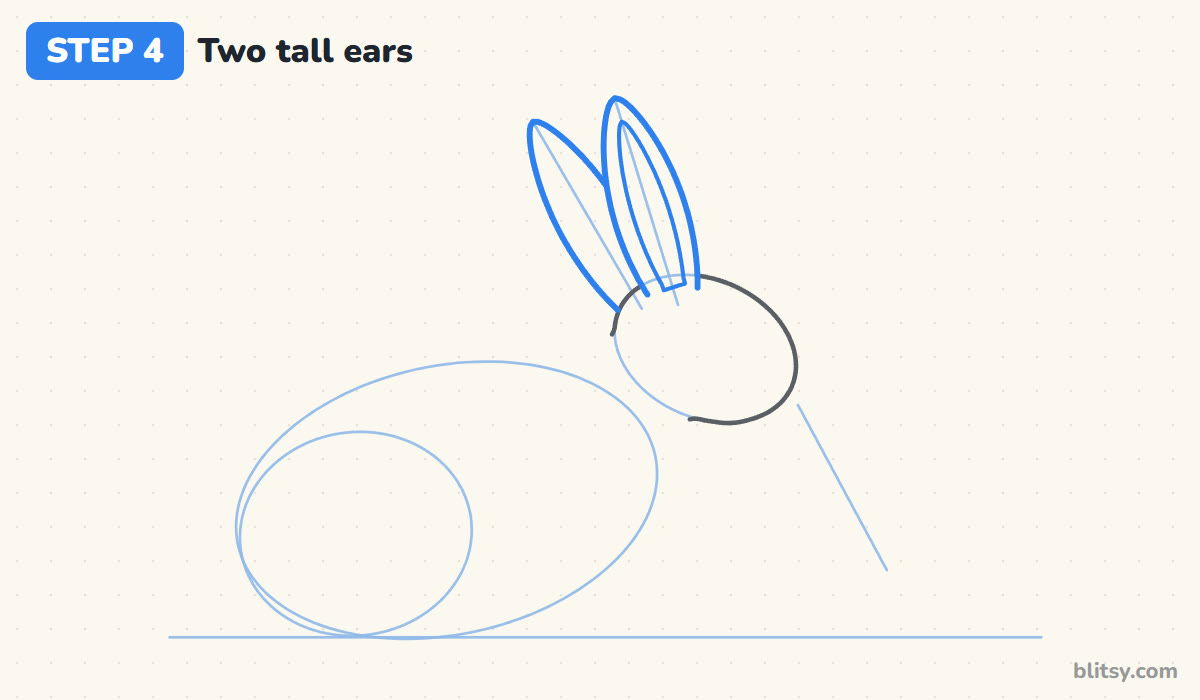
Build each ear around its guide line as a long leaf shape, narrow at the base, widest past the middle and rounded at the tip. The near ear goes in front and gets a second line inside it for the pink part. The far ear sits behind and to the left, so part of its base hides behind the near ear and the head.
💡 Tip: If the ears look like a donkey's, they're too thick at the base. Slim them down where they meet the head.
Step 5: Draw the round back and the chest
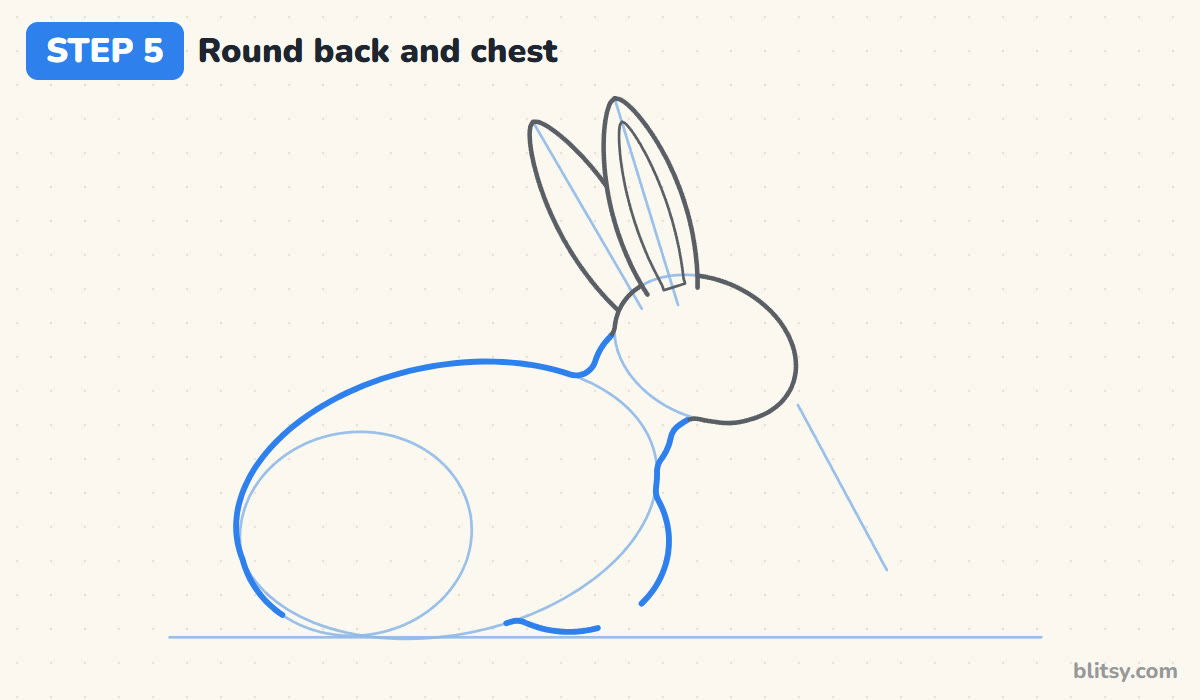
Start at the back of the head and let one smooth curve run down the neck, over the rounded back and around the rump to the ground. Then draw a short curve from under the chin down the throat to the chest. This outline is what sells the rabbit, so I always take my time with the hump of the back.
💡 Tip: The highest point of the back sits over the haunch, not in the middle of the body.
Step 6: Add the haunch and the long hind foot
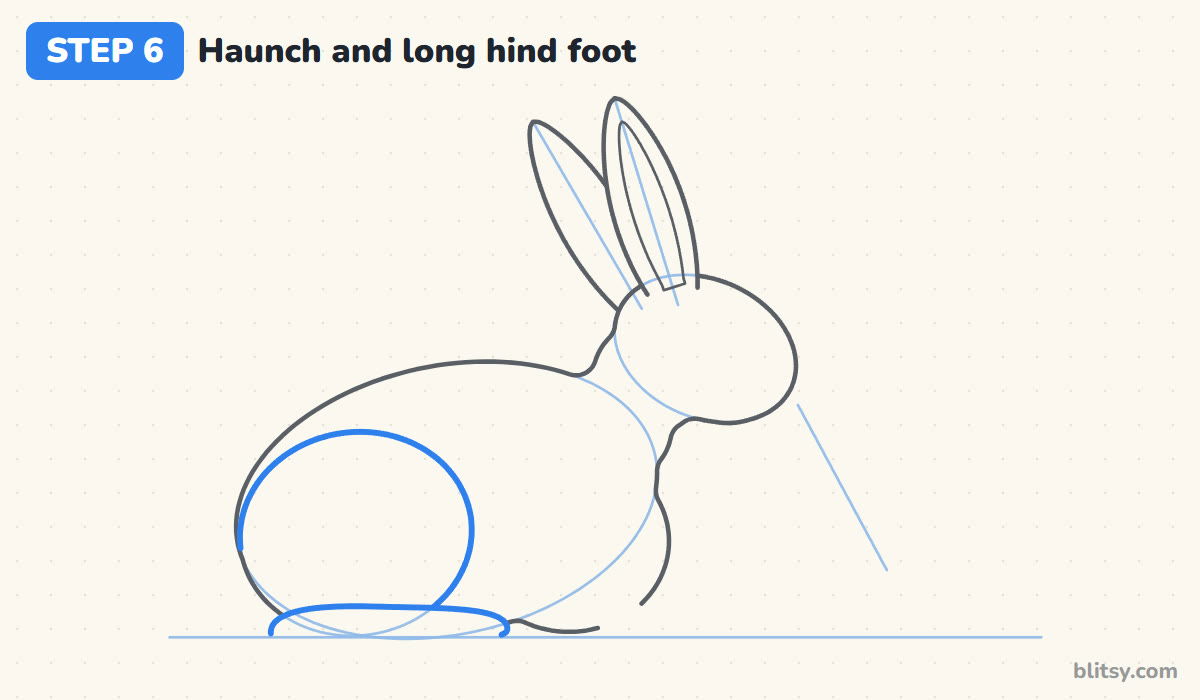
Trace the haunch circle firmly so it shows as a big round thigh inside the body. Below it, draw the hind foot as a long, flat shape lying along the ground and pointing forward, with a rounded toe end. A sitting rabbit rests on that whole foot, which is why it looks so long from the side.
💡 Tip: The foot reaches almost to the middle of the body. A short foot makes the rabbit look like a cat.
Step 7: Draw the front legs and the cotton tail
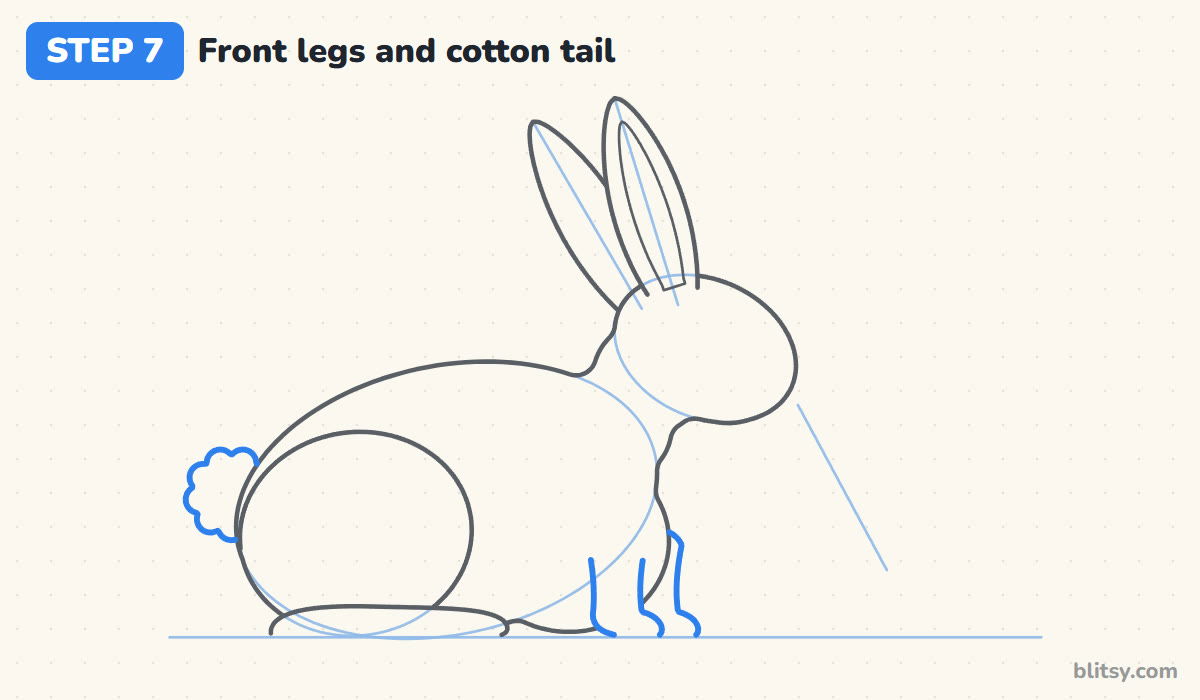
Under the chest, draw two slim front legs straight down to the ground with small rounded paws. The far leg peeks out behind the near one, slightly to the right. At the back end, draw the tail as a small fluffy cloud of bumps, half tucked behind the body.
💡 Tip: Front legs are much thinner than the haunch. Keeping them slim is what keeps the rabbit looking light on its feet.


Step 8: Add the eye, nose and whiskers
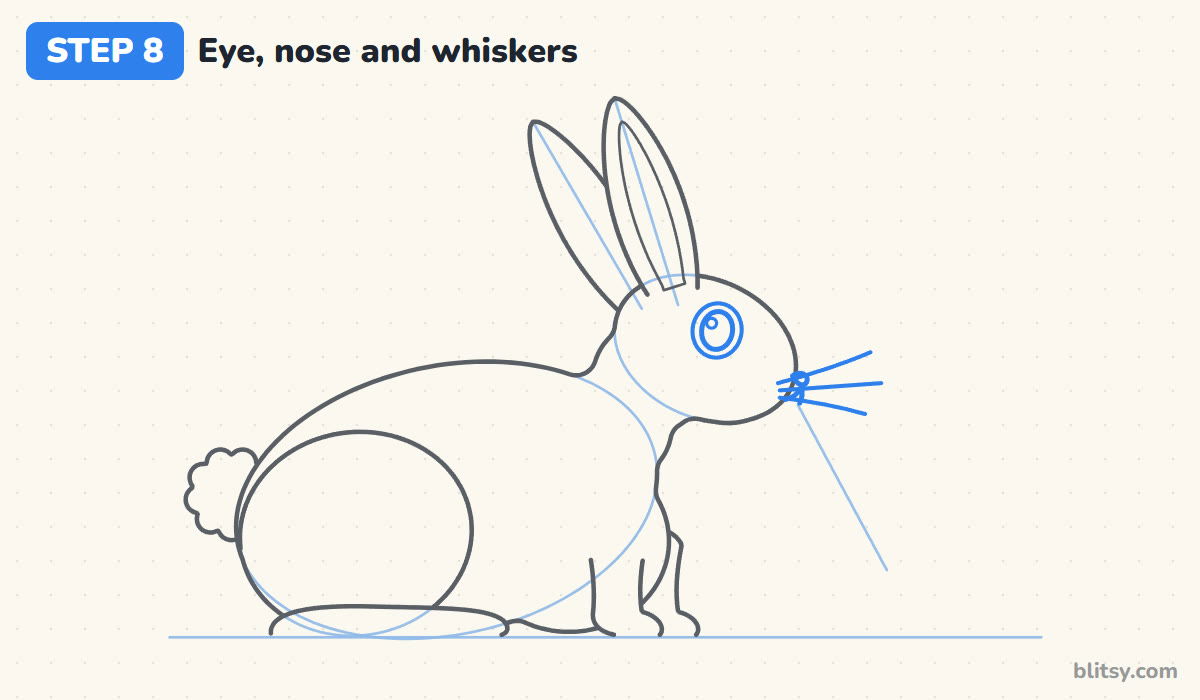
Place the eye in the upper middle of the head, a bit closer to the nose than to the ears. Draw it as an upright oval with a ring around it for the light fur rabbits have there, and leave a small dot for the shine. At the tip of the face, add a tiny nose with a short split mouth under it. Three long whiskers fan out to the right.
💡 Tip: Rabbit eyes sit on the side of the head. In side view you only ever see one, so don't add a second.
Step 9: Draw a carrot to nibble
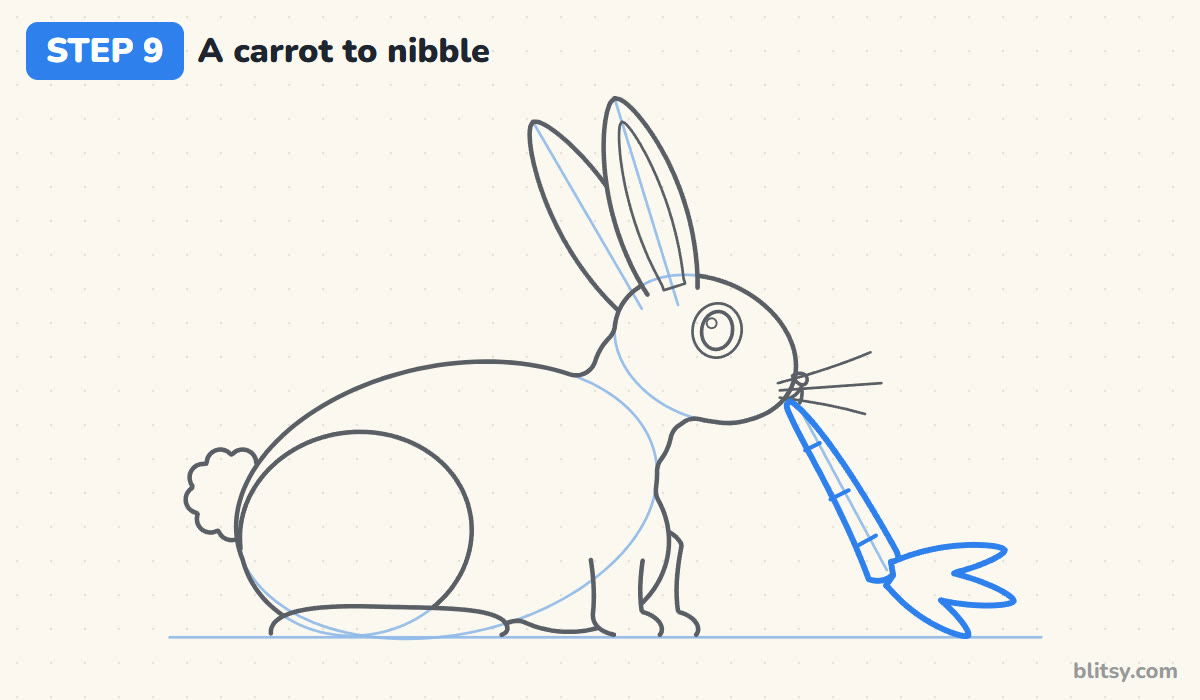
Following the slanted guide, draw a long, thin carrot whose narrow tip sits in the rabbit's mouth and whose wide end rests near the ground. Add three short ring lines across it. At the wide end, draw three leafy tops that spread out along the ground.
💡 Tip: Keep the carrot thin. If it's as wide as the rabbit's head, it steals the whole picture.
Step 10: Ink the outline and erase the guides
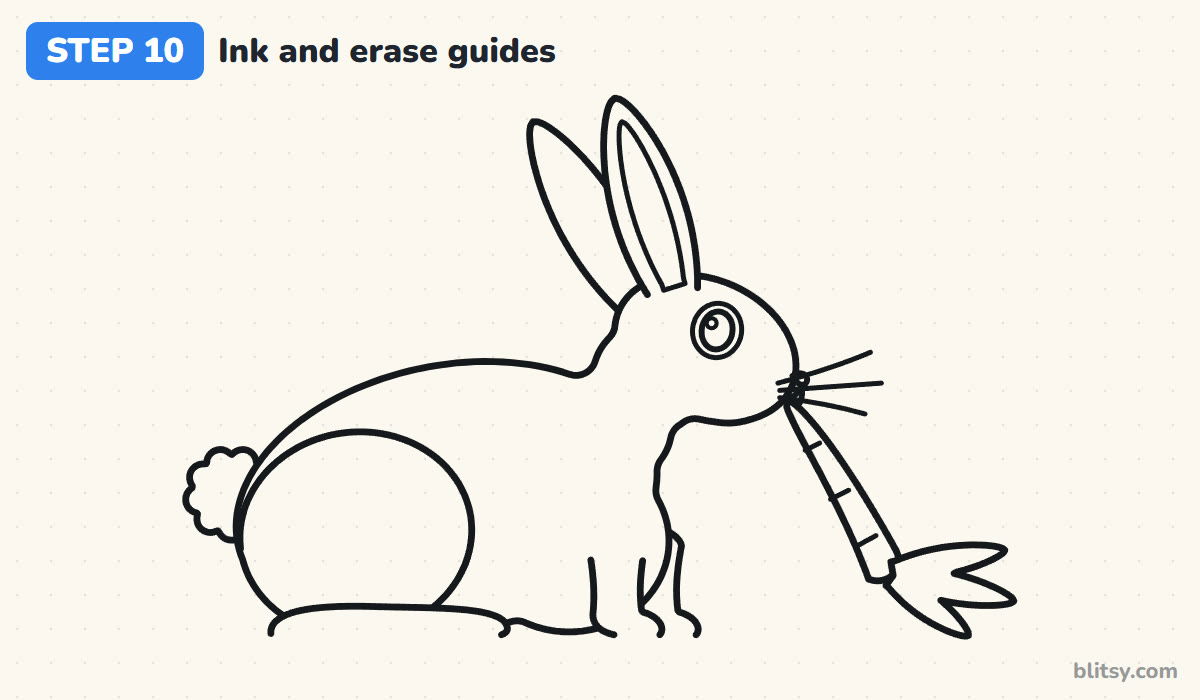
Go over every keeper line with your fineliner, from the ear tips down to the carrot leaves. Wait a minute for the ink to dry, then erase all the pencil guides, including the egg and the ear lines. What's left should be a clean outline you could color or photocopy.
💡 Tip: Ink in one direction, from left to right if you're right-handed, so your hand never drags through wet lines.
Step 11: Color your rabbit
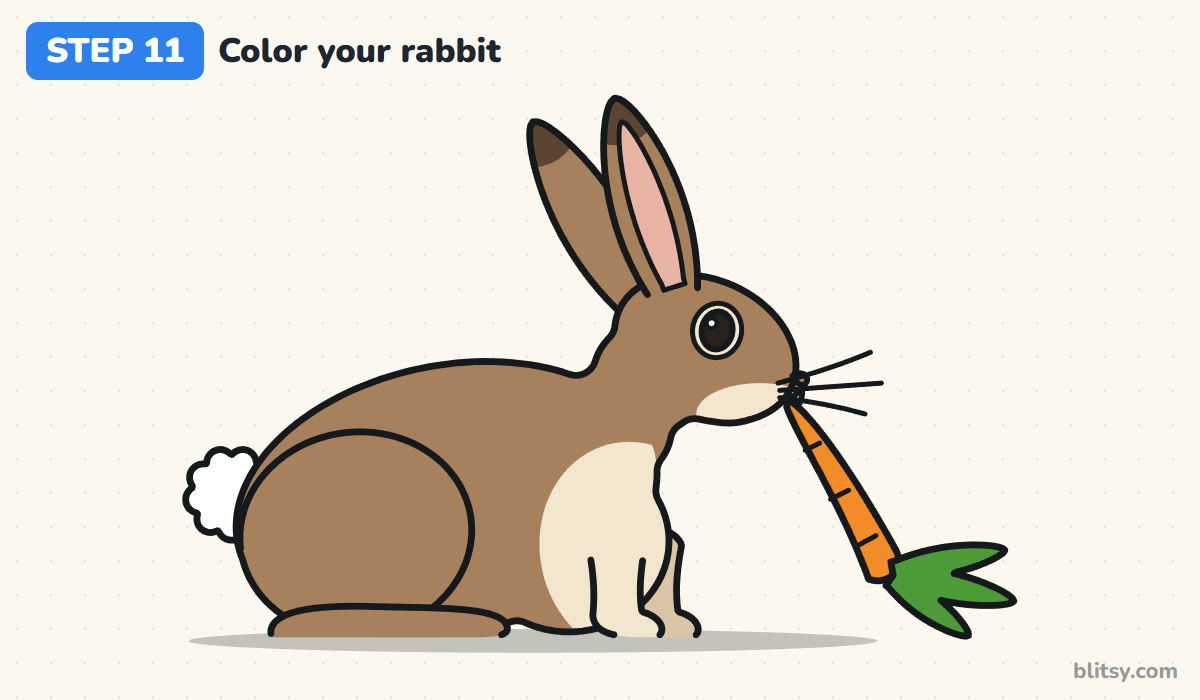
Fill the head and body with light brown, the ears too. Cream goes on the chest, the front legs and the chin, and around the eye. The tail stays white. Color the inside of the near ear light pink, then darken both ear tips with dark brown. Finish with an orange carrot with green leaves, and a dark eye with its shine dot left white.
💡 Tip: Press lightly with the brown first and add a second layer along the back and the top of the haunch for a bit of shading.


Rabbit Proportions That Go Wrong
- A head as big as the body. That's the cartoon bunny look. Keep the head about half the body's height for a natural rabbit.
- Ears standing straight up like sticks. Real rabbit ears lean back a little and widen past the middle. Tilt them and give them a leaf shape.
- No haunch. Without the big round thigh the body looks like a potato. Draw the haunch circle early and keep it.
- A short back foot. The hind foot of a sitting rabbit is long and flat. Stretch it forward along the ground.
- Thick front legs. Chunky front legs make it look like a dog. Rabbits have slim front legs and small paws.
Rabbit Ideas Beyond the Brown Coat
Once the shape feels easy, I like to change the coat: a gray rabbit with a white belly, or a snowshoe hare in winter white. Flop one ear down for a pet lop, or swap the carrot for a clover leaf, which is closer to what wild rabbits eat. Younger kids can skip the eye ring and the carrot rings. If you'd like the rounder, cartoon version, our bunny drawing step by step lesson draws a cute bunny with a big head. For another small field animal, the mouse drawing tutorial starts from similar shapes, and the arctic fox drawing tutorial is a good next challenge.
Free Rabbit Coloring Page and Printable Steps
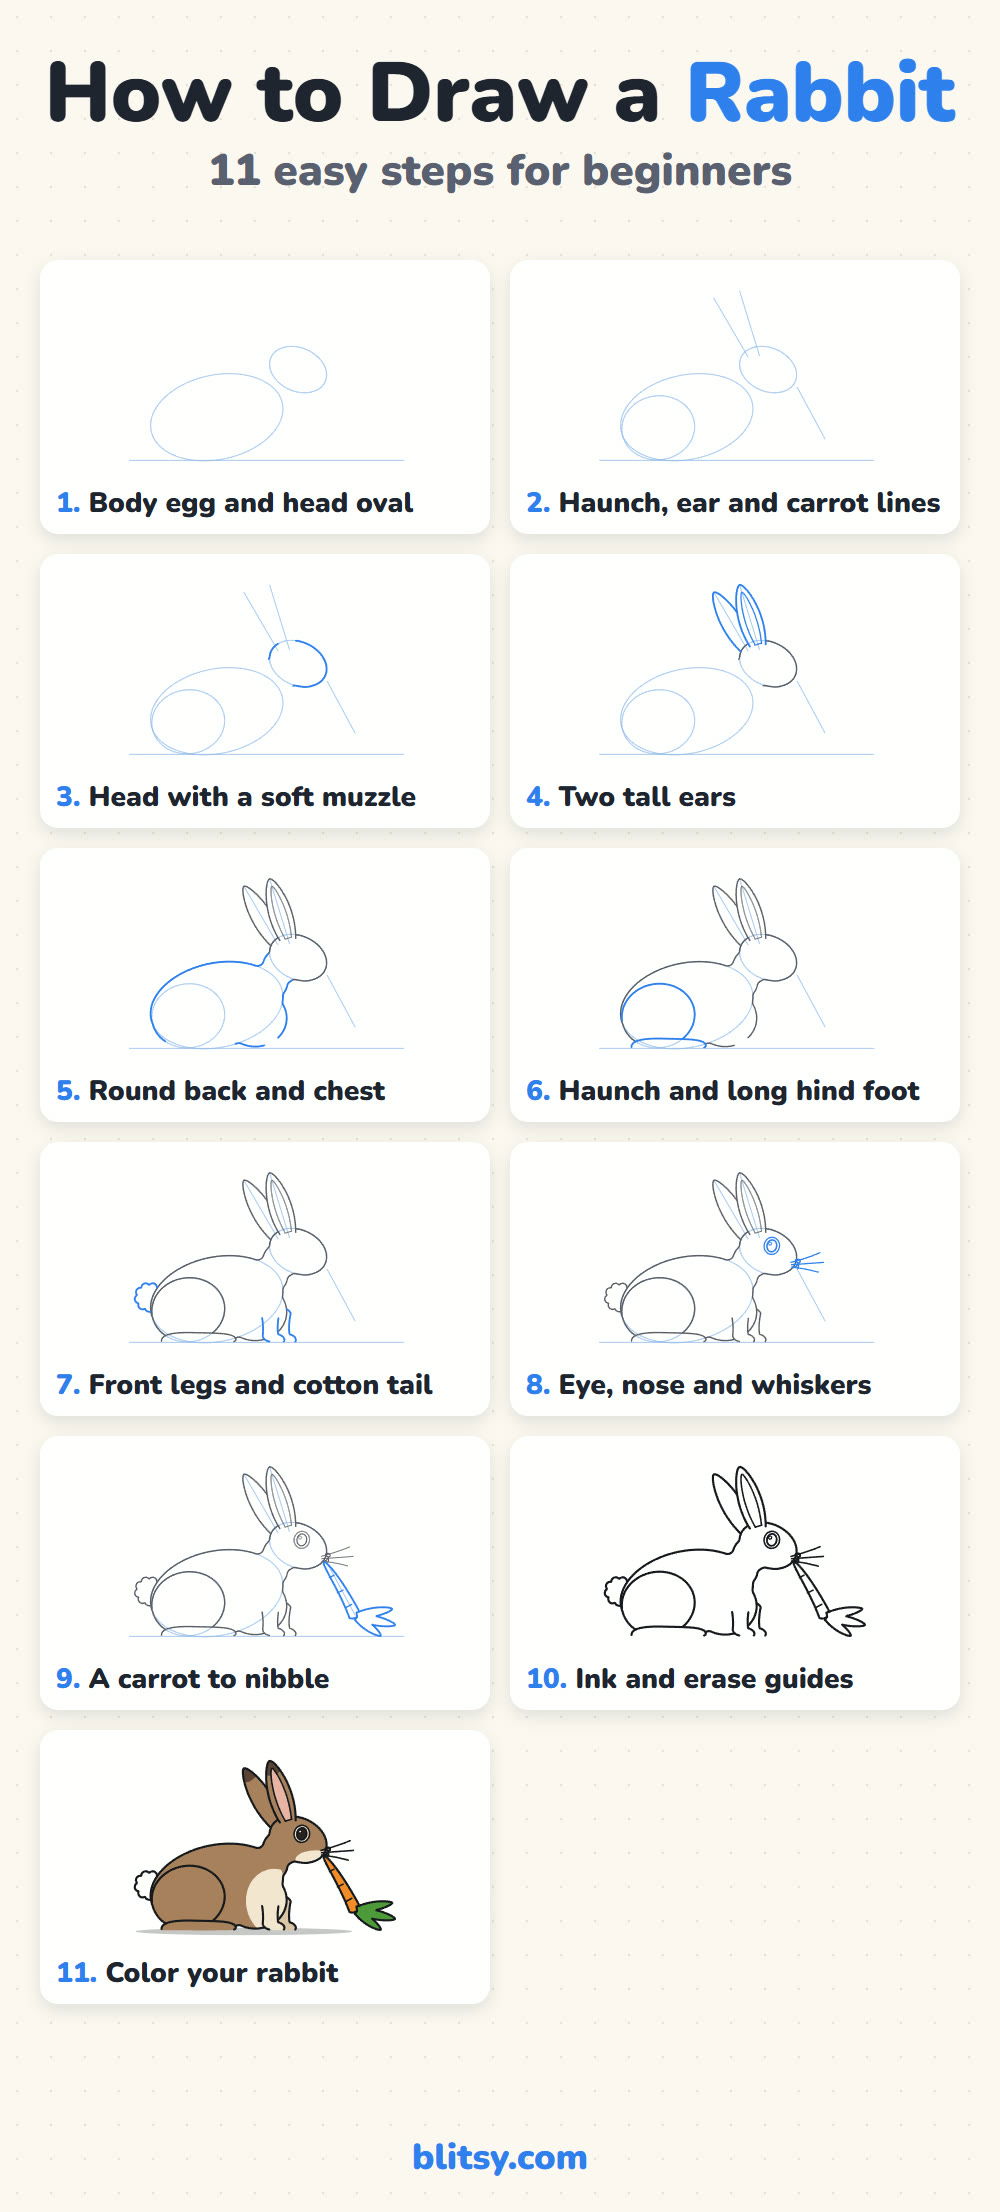
The free rabbit coloring page shows a colored rabbit at the top to copy, with a key that matches each color to its part. Underneath is a large outline to color. The step-by-step PDF guide puts all 11 steps and tips on paper, handy when you want to draw away from the screen. Both print on Letter or A4.
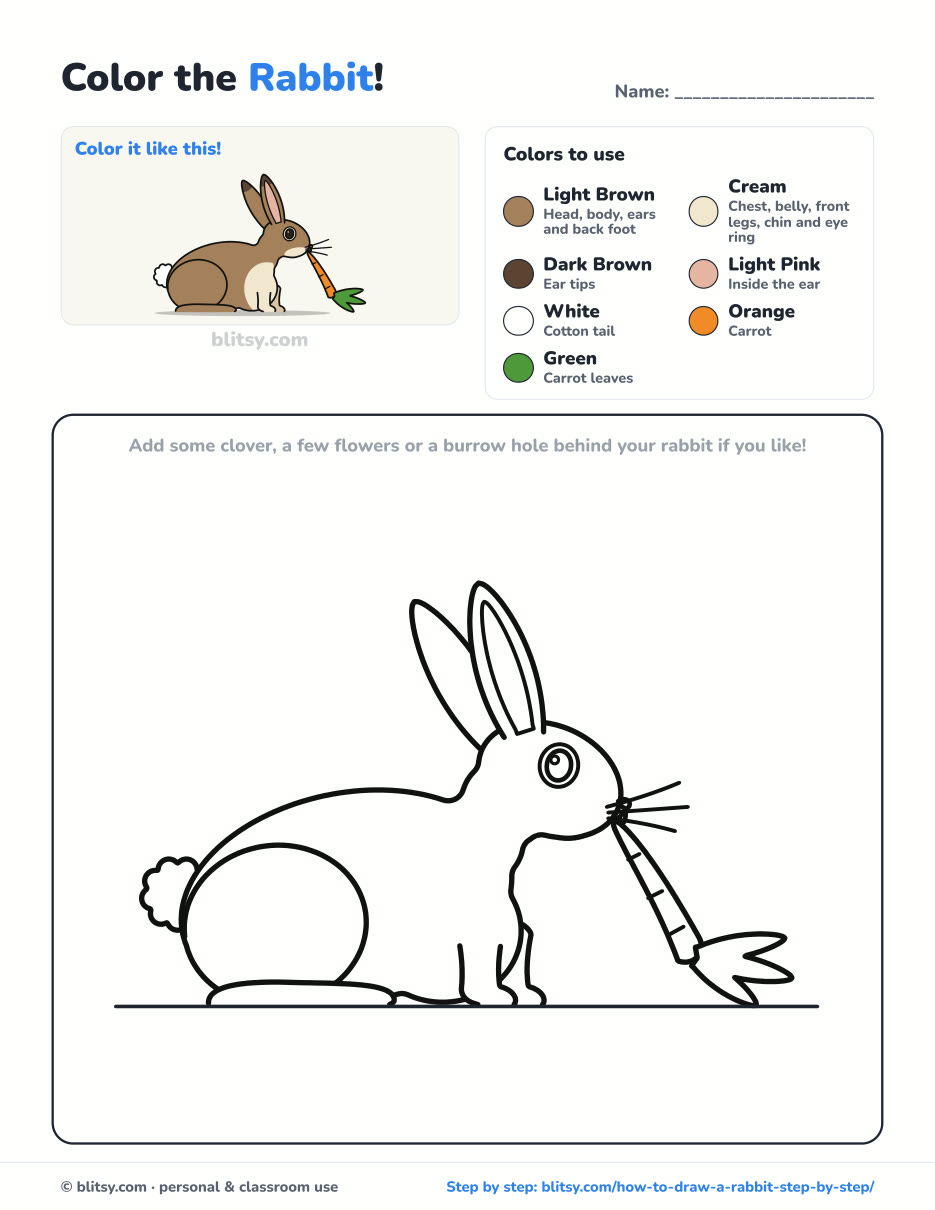
Black outlines with a colored example and the color names at the top. Ready to print and color.
⬇️ Download Coloring PageEvery step picture with its instructions and tips, to keep beside your paper while you draw.
⬇️ Download Drawing Guide📱 On a phone? Tap a download button, then open the file and choose Share → Save to Files or Print. On a computer, the PDF opens or saves straight to your Downloads folder.
Save the Rabbit Lesson to Pinterest
More Furry Animals to Draw Next
Every link below is a full step-by-step lesson with one picture per stage, built from simple shapes like this rabbit.
- Kitten Drawing: A sitting ginger kitten with tabby stripes starts from two ovals in this kitten drawing tutorial.
- Puppy Drawing: Draw a sitting puppy with floppy ears and an eye patch in the how to draw a puppy step by step lesson.
- Raccoon Drawing: A masked gray raccoon walks on all fours with its striped tail up in this raccoon drawing tutorial.
- Duck Drawing: A mallard drake and a little duckling float on a pond in the duck drawing step by step guide.
- Frog Drawing: A smiling frog sits on a mossy log in this easy frog drawing tutorial.
Rabbit Drawing Questions Answered
What is the easiest way to draw a rabbit?
Start with a long egg for the body and a smaller oval for the head. Add a circle for the haunch and two long ears, then the back foot, the tail and the face.
What's the difference between drawing a rabbit and a bunny?
Usually it's the style. A bunny drawing tends to be a cartoon with a big round head and huge eyes. A rabbit drawing like this one keeps natural proportions, with a smaller head and a strong haunch.
How do you draw rabbit ears?
Draw each ear as a long leaf shape that leans back from the top of the head, narrow at the base and round at the tip. Add a line inside the near ear for the pink part.
What colors are wild rabbits?
Most wild rabbits are gray-brown on top with a cream belly, a white tail underside and darker ear tips. Pet rabbits come in many more coats, from pure white to spotted.
That long egg shape is all it takes to start. Put one on paper tonight and let your rabbit hop out of it. 🐇✏️
Related posts:
 How to Draw a Car Step by Step (Easy Drawing for Beginners)
 How to Draw a Whale Step by Step (Easy for Beginners)
 How to Draw an Arctic Fox Step by Step (Easy for Beginners)
 How to Draw a Shark Step by Step (Easy for Beginners)
 How to Draw a Chicken Step by Step (Easy for Beginners)
 How to Draw a Fish Step by Step (Easy Goldfish for Beginners)
 How to Draw a Snowman Step by Step (Easy for Beginners)
 How to Draw Hands Step by Step (Easy Palm View for Beginners)
 How to Draw an Airplane Step by Step (Easy Jet for Beginners)
 How to Draw a Mouse Step by Step (Easy for Beginners)
 How to Draw the Joker Step by Step (Easy Chibi for Beginners)
 How to Draw a T-Rex Step by Step (Easy for Beginners)

