
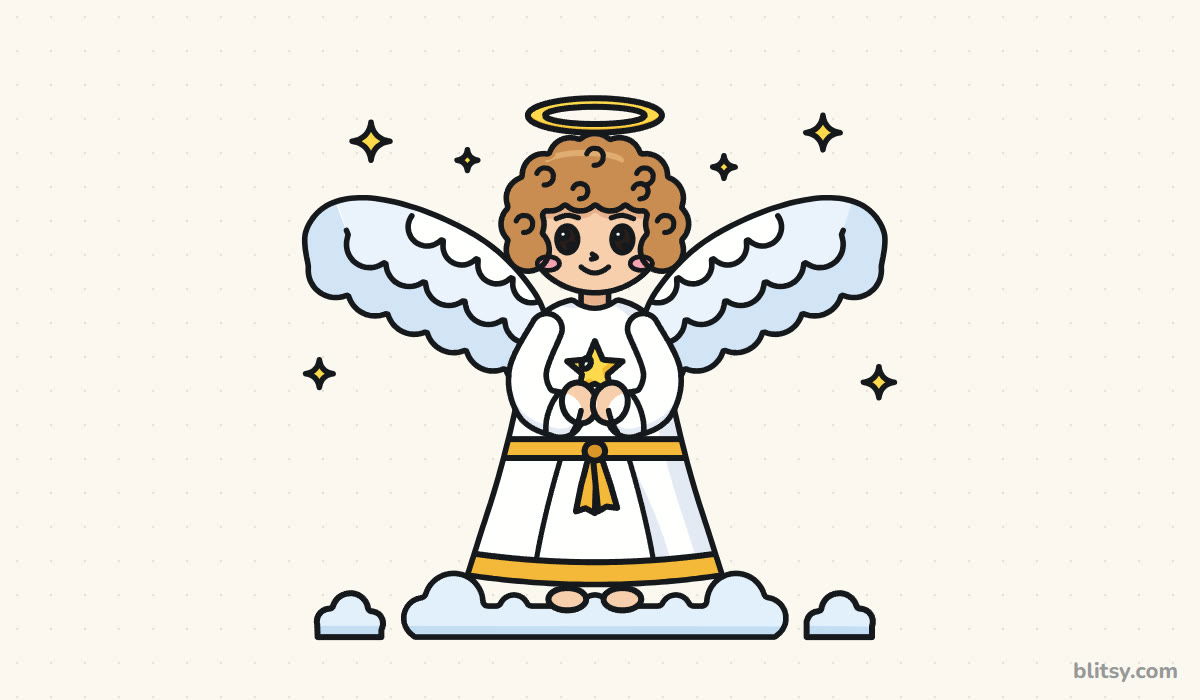
Angels show up on holiday cards, tree toppers and window drawings every December, and kids love making their own. This one is a little cartoon angel child standing on a cloud, holding a tiny star. Below I'll walk you through how to draw an angel step by step, starting from a circle, a triangle and two ovals. The wings look tricky, but they're just rows of rounded bumps, and I'll show you how to stack them.
Follow the color code in the step pictures: blue marks what's new in each one, and gray is what you already have on your paper. Copy only the blue part, check it against the picture, then move on.
Quick overview
⏱️ Time: around 30 to 45 minutes with coloring
🎯 Level: easy, fine for kids about 6 and older
✏️ Steps: 11
😇 You'll draw: a smiling angel child with wings, a halo and a star
Supplies for a Cloud-Top Angel
- A pencil for light guide lines (HB or 2B)
- A clean eraser
- A black marker or fineliner for the outline
- Colored pencils or crayons in yellow, gold, light brown, peach, light blue and pink
- Plain paper turned sideways, since the wings spread wide
A white crayon is handy too, because pressing it over the robe and wings before you shade keeps those parts bright.
How to Draw an Angel Step by Step
Step 1: Draw a center line, the head circle and a halo oval

Lay down a light ground line near the bottom of the page, then one straight line up through the middle. The head is a circle near the top of that line, about a fifth of the page tall. Just above it, float a flat oval for the halo, a bit wider than the head.
💡 Tip: Leave a small gap between the halo oval and the circle. Curly hair will fill some of that space later.
Step 2: Sketch guides for the robe, arms, wings and cloud

Put a cross line through the head a little below the middle for the eyes. Under the head, a small flat box makes the shoulders, and a tall triangle flares from it to a wide base for the robe. Two tilted ovals go behind the shoulders for wings, and a short bent line on each side shows where the arms fold in. Finish with a wide flat oval at the bottom for the cloud.
💡 Tip: Tilt the wing ovals upward. Wings that point down make the angel look sleepy instead of cheerful.
Step 3: Add curly hair, the face edge and the halo

Around the top of the head circle, draw a ring of round bumps, like a fluffy cloud of curls, coming down to about ear height. Across the forehead, four smaller bumps make the bangs. Add a few tiny "c" swirls inside the hair, trace the cheeks and chin, then draw two short neck lines. Last, go over the halo with two ovals, one inside the other, so it looks like a ring.
💡 Tip: Make the curls different sizes. Perfectly even bumps start to look like a flower instead of hair.




Step 4: Outline a long flowing robe

Start at the neck with a small curved neckline. The shoulders slope gently, and the sides follow your triangle guide all the way down to a curved hem. I stop the robe's side lines where the sleeves will sit, which saves erasing later. Two long soft lines on the skirt make folds, and one more curve just above the hem marks the gold trim.
💡 Tip: Let the robe reach almost to the cloud. A long robe is what makes the figure read as an angel and not just a kid in a dress.
Step 5: Draw the sleeves, mitten hands and a little star

Each sleeve starts at the shoulder, bulges out at the elbow and comes back in toward the middle of the chest, getting wider at the end like a bell. Where the sleeves meet, draw two rounded mitten hands touching each other. Then sit a small five-point star on top of the hands, with a tiny shine dot on it.
💡 Tip: Give the sleeves real width all the way along. Thin arm lines make the angel look like a stick figure under a sheet.
Step 6: Add a gold sash with ribbons

Just below the hands, two lines straight across the robe make the sash. In the middle, a small circle becomes the knot, and two ribbon ends hang down from it with little notches at the tips.
💡 Tip: Keep the sash narrow. If it gets too wide, the top of the robe looks squashed.
Step 7: Draw two feathered wings

Use the oval guides to draw each wing's top edge, curving up and out to a rounded tip. The bottom edge is a row of big round bumps, which are the long feathers. Inside the wing, draw a second, smaller row of bumps, and a third short row near the top. Three rows are enough to say "feathers" without hours of work.
💡 Tip: Hide the wing behind the shoulder and sleeve. If the wing line crosses the robe, it looks pinned on from the front.

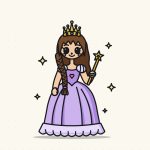

Step 8: Draw little feet and a puffy cloud

Two small oval feet peek out under the hem. Around them, draw the cloud: a big round puff on each side, a few small bumps in between, and a flat bottom along the ground line. Two tiny clouds on the sides fill the empty corners.
💡 Tip: Give the cloud a flat bottom. Round all the way around, it looks like a balloon rather than a cloud.
Step 9: Give the angel a sweet face and add sparkles

Place two tall oval eyes on the cross line with a gap of about one eye between them. Leave a big and a small shine circle in each, and add soft curved brows. A tiny hook makes the nose, a short curve makes the smile, and an oval on each cheek gets colored pink. Scatter a few four-point sparkles in the sky around the wings.
💡 Tip: Keep the smile small and close to the nose. That gentle look suits an angel better than a wide grin.
Step 10: Ink the lines and erase the guides

Trace every keeper line with the marker. I start with the face while my hand is fresh, then the hair and the robe, then the wings, with the clouds last. Once the ink is fully dry, erase every guide line.
💡 Tip: Wait a minute before you erase. Fresh marker smears straight across a white robe.
Step 11: Color your angel

Color the halo bright yellow, along with the star and sparkles, and use a deeper gold for the sash and hem trim. The curls are light brown and the skin is peach. Leave the robe and the top of the wings white, then add light blue to the lower feather rows and the clouds. Finish with pink cheeks and black eyes.
💡 Tip: Shade one side of the robe with a very light gray or blue. A white robe with no shading looks like a hole in the page.


Where Angel Sketches Tend to Slip
- Wings that are too small. Tiny wings look like a costume. Let each wing reach about as wide as the robe is tall from shoulder to sash.
- A halo stuck to the head. A halo touching the hair reads as a hat. Leave a thin gap so it floats.
- Stick arms. Draw each sleeve with two lines and some width so the arms look soft.
- Feathers all the same size. Bigger bumps at the bottom and smaller ones higher up make the wings look layered.
- A plain white robe with no shade. Add a light gray or blue edge down one side so the robe looks round.
Trumpets, Snowflakes or a Sleeping Angel
Once the basic angel feels easy, change one thing at a time. Swap the star for a candle, a small trumpet or a snowflake, give the robe a pale blue or pink color, or close the eyes into two curved lines for a sleeping angel on a Christmas card. Little kids can skip the inner feather rows. If you liked drawing the wings, my fairy drawing step by step lesson uses see-through wings and a toadstool seat. The star in the angel's hands also works on its own, and the star drawing tutorial shows how to keep all five points even.
Free Angel Coloring Page and Printable Guide
The free angel coloring page shows a colored example and a key at the top, with a large outline below to color however you like. The step-by-step PDF guide puts all 11 steps with pictures and tips on paper, so you can draw away from a screen. Both fit Letter or A4 paper.

Black outlines with a colored example and the color names at the top. Ready to print and color.
⬇️ Download Coloring PageEvery step picture with its instructions and tips, to keep beside your paper while you draw.
⬇️ Download Drawing Guide📱 On a phone? Tap a download button, then open the file and choose Share → Save to Files or Print. On a computer, the PDF opens or saves straight to your Downloads folder.
Keep the Angel Steps on Your Pinterest Board
More Sweet Characters and Sky Shapes to Draw
Each of these is a full lesson with a picture for every step, so the shapes you used here carry right over.
- Fairy Drawing: A little fairy with a petal skirt and see-through wings sits on a spotted toadstool in this fairy drawing step by step guide.
- Princess Drawing: A cartoon princess with a crown and a bell-shaped gown in this how to draw a princess step by step lesson.
- Star Drawing: Learn to draw a neat five-point star with even arms in this star drawing tutorial.
- Cloud Drawing: Puffy, friendly clouds made from simple bumps in this cloud drawing step by step lesson.
- Snowman Drawing: Another winter favorite, built from three circles in this how to draw a snowman tutorial.
Angel Drawing Questions Kids Often Ask
How do you draw an easy angel for kids?
Start with a circle for the head and a triangle for the robe. Add two tilted ovals for wings and a flat oval halo above the head. Rounded bumps turn the ovals into feathered wings.
How do you draw angel wings?
Draw a curved top edge that rises up and out, then make the bottom edge a row of round bumps. Add one or two smaller rows of bumps inside for layered feathers.
How do you draw a halo?
Draw a flat oval just above the head, then a smaller oval inside it. Color the ring between them yellow and leave a small gap above the hair.
What colors should I use for an angel?
White for the robe and wings, yellow or gold for the halo and trim, and light blue for shading. Any robe color works, so pale blue or pink angels look sweet too.
Hang your angel on the fridge or turn it into a homemade holiday card. 😇✏️
Related posts:
 How to Draw a Mermaid Step by Step (Easy Cartoon for Kids)
 How to Draw a Bat Step by Step (Cute Cartoon Bat for Kids)
 How to Draw a Robot Step by Step (Easy Cartoon for Kids)
 How to Draw Bart Simpson Step by Step (Easy Cartoon)
 How to Draw a Tank Step by Step (Easy Cartoon Tank)
 How to Draw a Bee Step by Step (Easy Cartoon Bee)
 How to Draw a Boy Step by Step (Easy Full-Body Cartoon)
 How to Draw a Family Step by Step (Easy Cartoon Portrait)
 How to Draw a Princess Step by Step (Easy Ball Gown Cartoon)
 How to Draw a Cowboy Step by Step (Easy Cartoon Kid)
 How to Draw a Girl Step by Step (Easy Full-Body Cartoon)
 How to Draw a Knight Step by Step (Easy Cartoon Knight)

