
Almost every kid draws a school at some point, usually as a box with a door, and then wonders why it looks like a plain house. Here you'll learn how to draw a school step by step, so yours gets the things that make a school read as a school: a clock up high, a bell tower, a sign over wide double doors and long rows of classroom windows. The whole building starts as three rectangles and one triangle. Both halves match, so whatever you draw on the left just gets copied on the right.
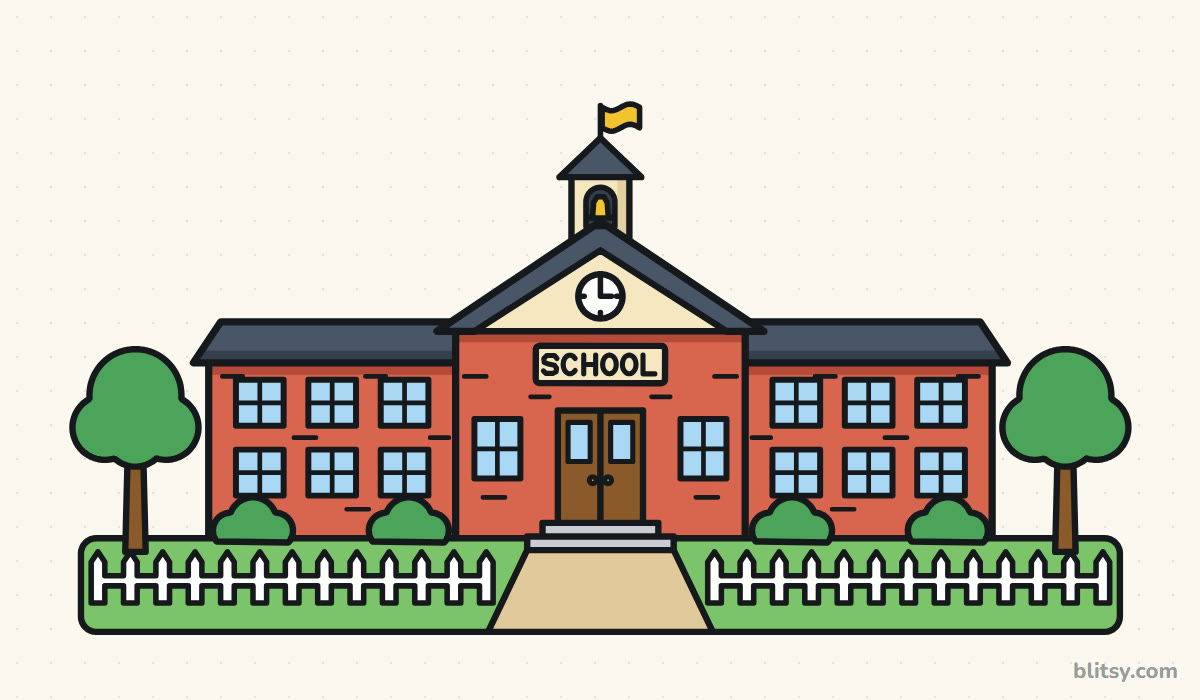
Schoolhouse sketches below use two colors: the newest lines in blue, earlier steps in gray. Keep the pale guide boxes faint, because step 11 rubs them out.
Quick overview
⏱️ Time: about 40 minutes, coloring included
🎯 Level: easy, good for kids around 6 and up
✏️ Steps: 12
🏫 You'll draw: a brick school with a bell tower, a clock and a fence
Schoolhouse Supplies Before the First Line
- A regular HB pencil
- A soft eraser that won't smudge
- A ruler for the walls and window rows
- A black fineliner or thin marker
- Colored pencils or markers in red, cream, dark gray, light blue, brown, yellow, green and tan
- Plain printer paper turned sideways
A coin or a bottle cap is handy for tracing a neat round clock.
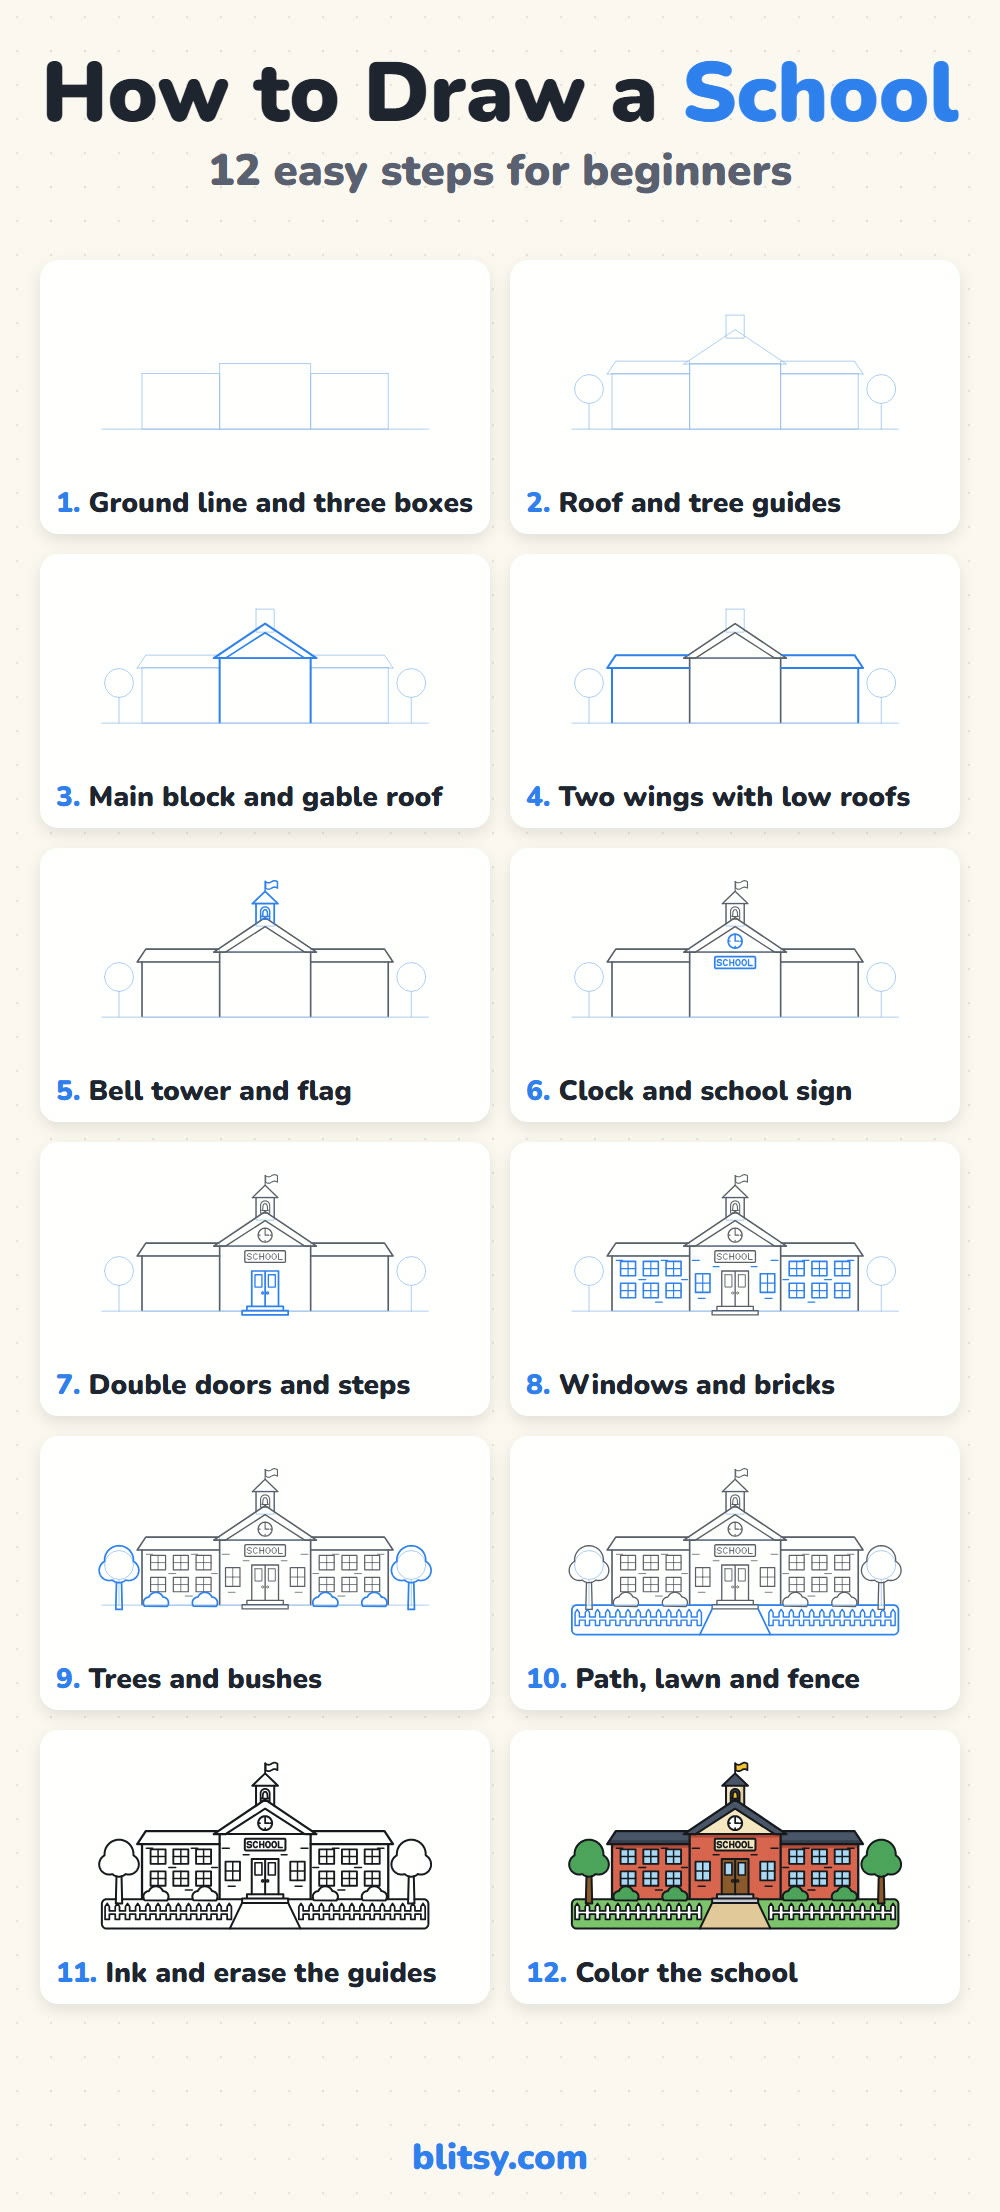
How to Draw a School Step by Step
Step 1: Draw a ground line and three boxes
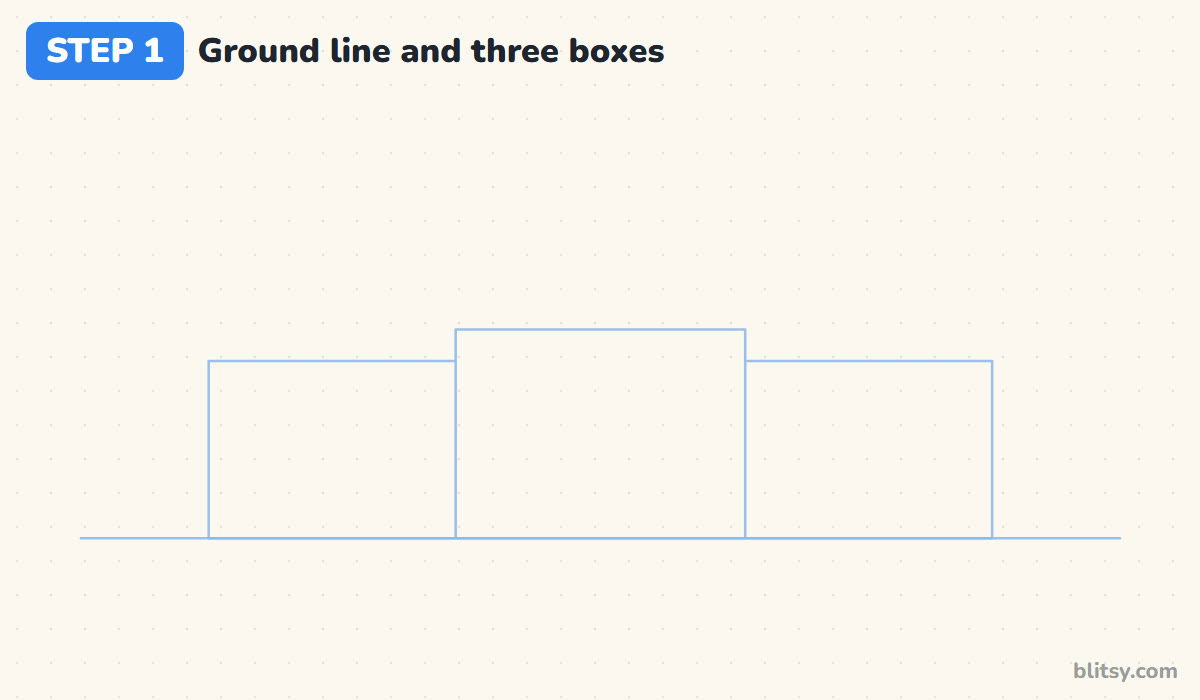
Turn the paper sideways and draw a long, light line a little below the middle. On it, stand one tall rectangle in the center and a lower, wider one on each side, touching it. The middle box is the entrance and the side boxes are the classroom wings. Leave room at both ends for trees.
💡 Tip: Find the center of your page first and mark it with a small dot.
Step 2: Sketch the roof and tree guides
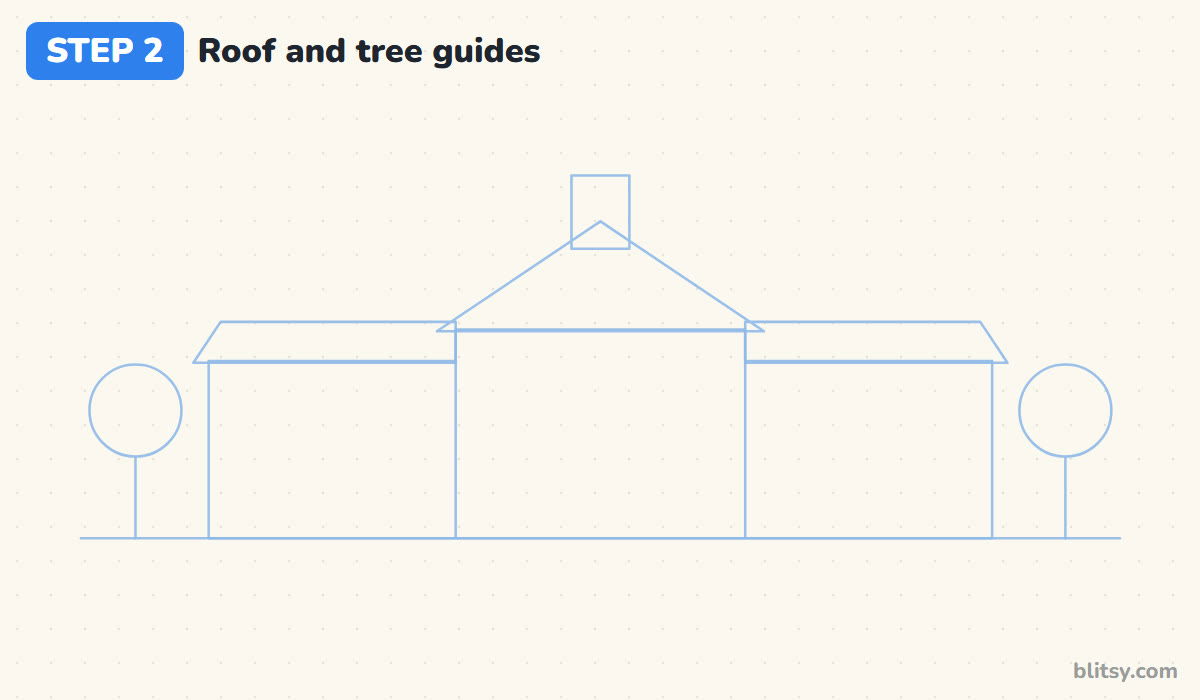
Put a wide triangle on top of the middle box, letting its corners stick out past the walls. Above its peak, add a small upright box for the bell tower. Over each wing, draw a flat-topped roof whose outer end slopes down. Then sketch a circle on a stick at each end for the trees.
💡 Tip: Overlap the tower box with the triangle's tip; the roof will hide its bottom later.
Step 3: Outline the main block and gable roof
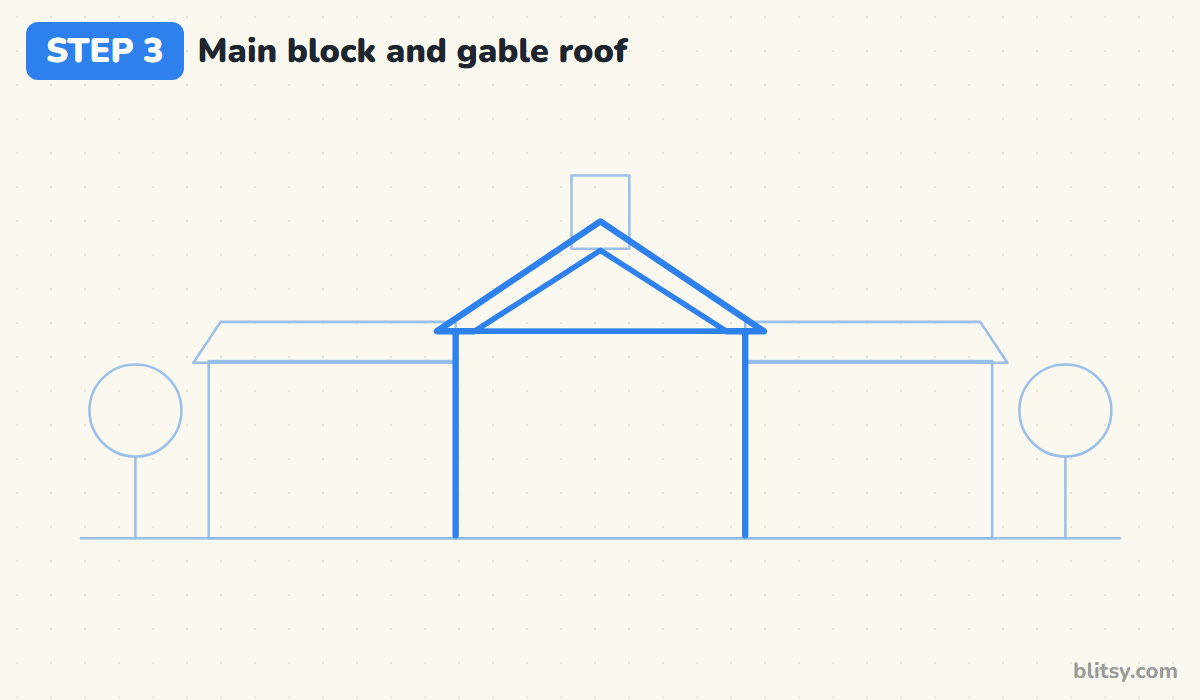
Now press a little harder. Trace the sides of the middle box and go over the big triangle. Inside it, draw a smaller triangle sharing the same base. The space between them becomes the roof edge, and the inner triangle is the cream gable for the clock. I keep that roof band equally thick on both slopes, because a band that thins on one side makes the building look tilted.




💡 Tip: Draw both slanted roof lines from the peak downward, so they meet cleanly at the top.
Step 4: Add the two wings with low roofs
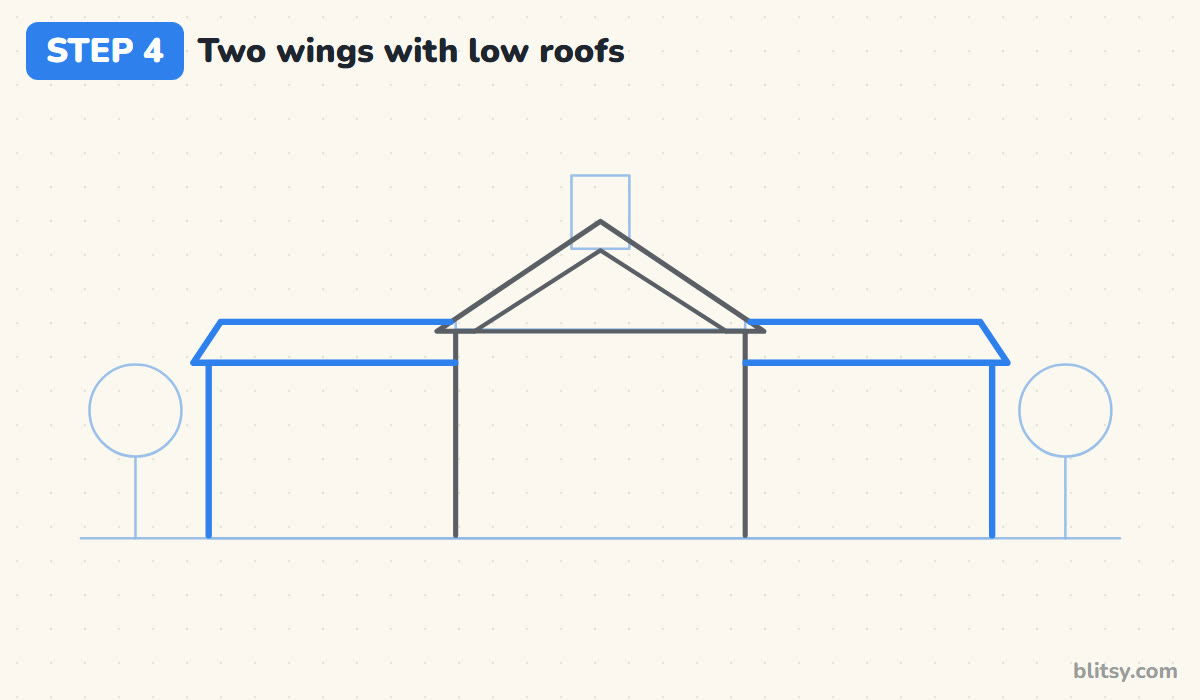
Trace the outer sides of the wings and the line where each wall meets its roof. Go over the roof shapes, stopping where they touch the middle block. The wing roofs sit lower than the gable, which makes the entrance look important. If your wings came out different widths, fix it now.
💡 Tip: Hold your ruler against both roof tops at once to check that they line up.
Step 5: Build the bell tower and flag
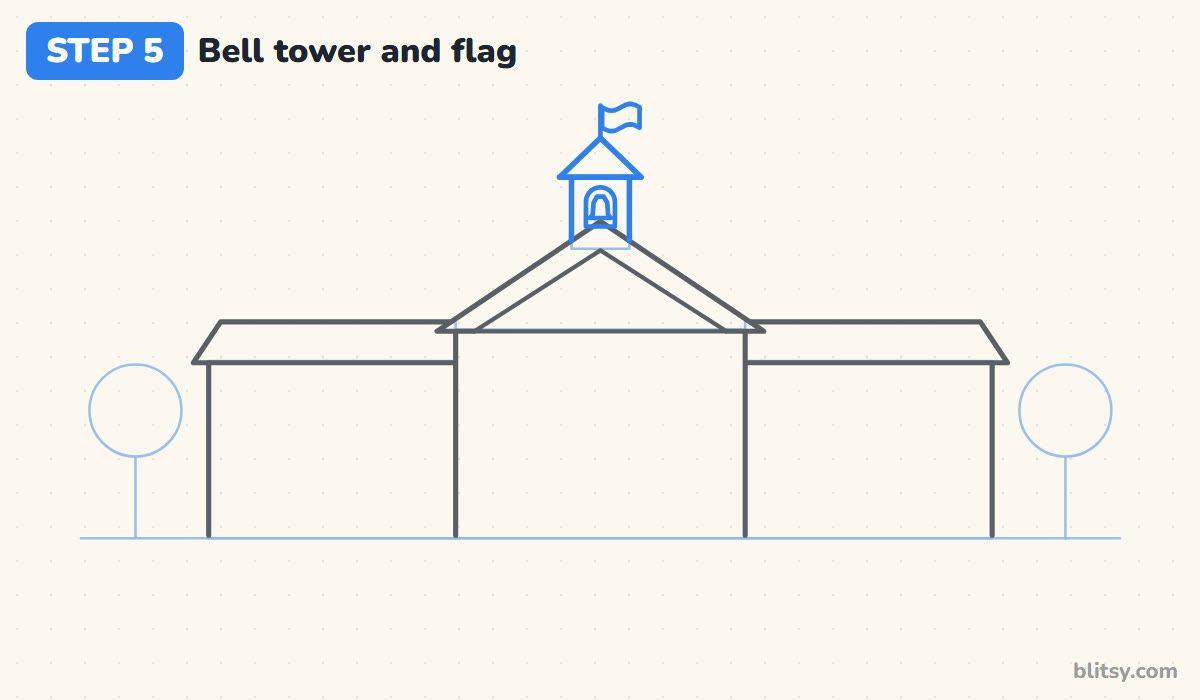
Trace the tower box and give it a tiny pointed roof. Inside, draw a narrow arched opening with a small bell, wide at the bottom like an upside-down cup. From the tip, draw a short pole and a plain flag with a gentle wave. Small kids can skip the bell and keep just the arch.
💡 Tip: Make the flag no wider than the tower roof, or it starts to look like a sail.
Step 6: Draw the clock and the school sign
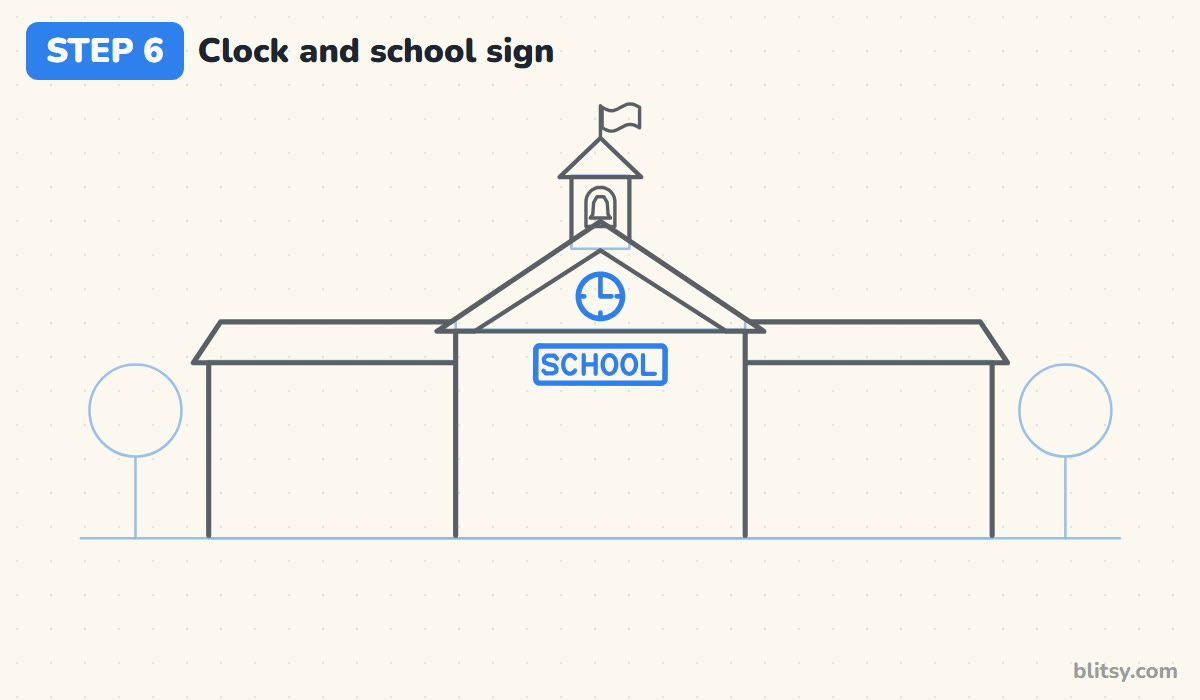
Center a round clock in the gable so it doesn't touch the roof band, and add four tick marks and two hands. Below the roof, draw a rounded sign and write SCHOOL in simple capitals. Letters are where most drawings get crowded, so lightly mark six even spaces first.
💡 Tip: Start writing from the middle two letters, the two O's, and work outward.
Step 7: Add double doors and steps
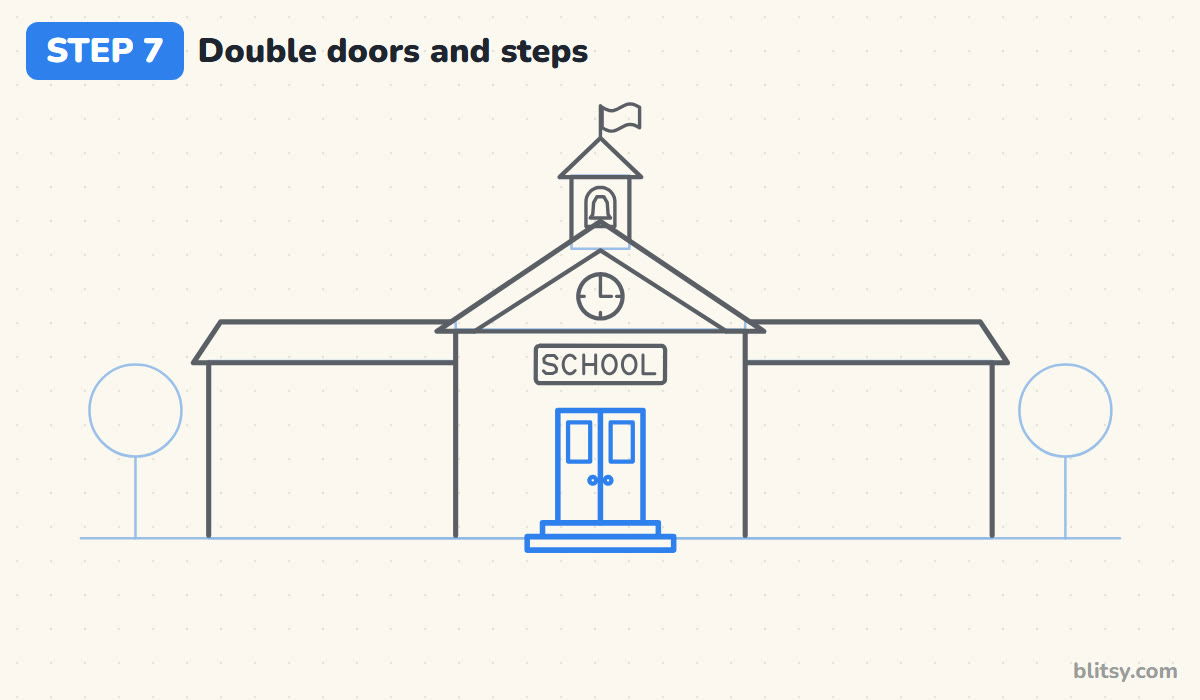
Under the sign, draw a tall rectangle for the doors and split it down the middle. Give each door a small window and a round knob by the center line. Below, stack two steps, the lower one longer. Schools have wide doors, so make yours noticeably wider than a house door.




💡 Tip: The lower step should stick out past the upper one on both sides by the same amount.
Step 8: Fill the walls with windows
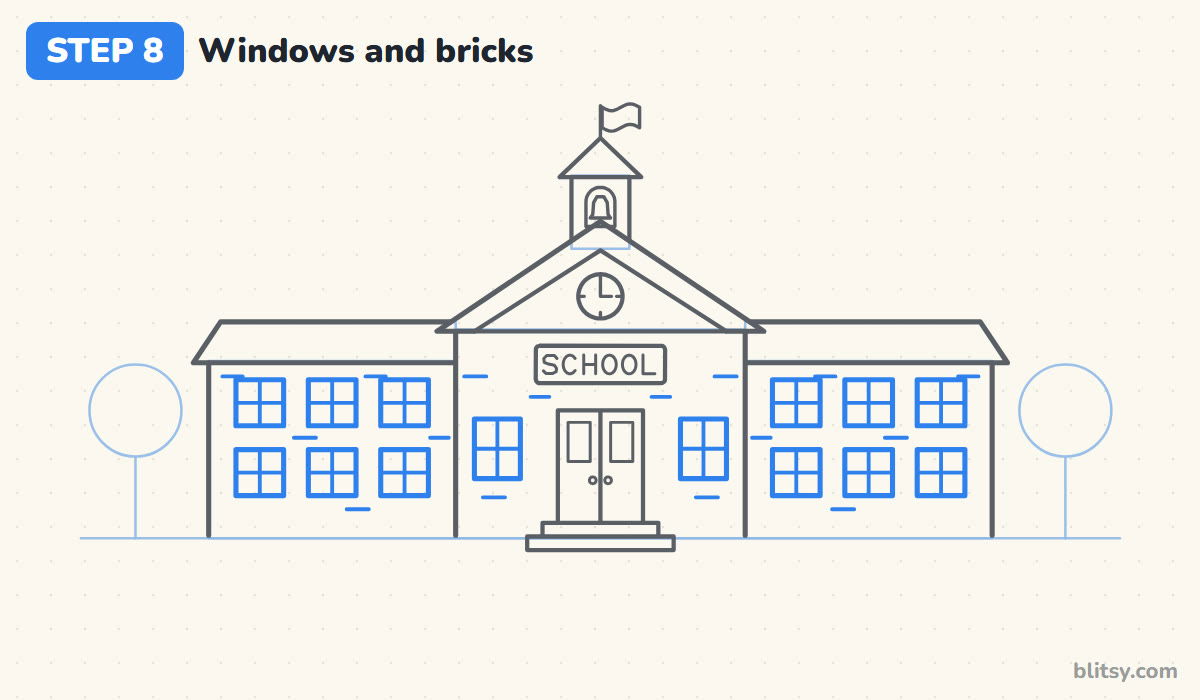
Each wing gets two rows of three square windows, and the entrance gets one taller window on each side of the doors. Draw a cross in every window. Then scatter a few short dashes as bricks. Rows are what turn a big house into a school, so keep the gaps equal.
💡 Tip: Draw every top edge in a row first, using one ruler line, then add the sides.
Step 9: Grow the trees and bushes
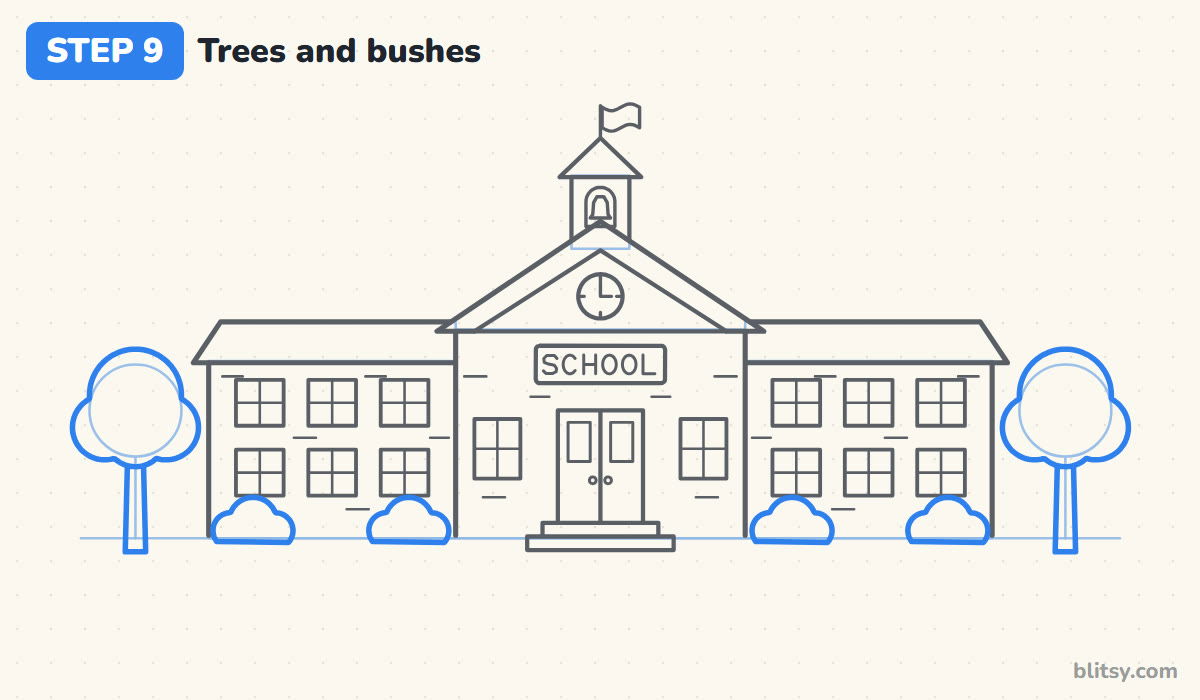
Over each tree guide, draw a bumpy crown from four overlapping round shapes and add a trunk that widens at the base. Along the wings, draw four little bushes, each three bumps with a flat bottom. Let them cover the lower edge of a few windows; it makes the picture feel deeper.
💡 Tip: Leave the line inside the crown out, so the trunk disappears up into the leaves.
Step 10: Finish with the path and fence
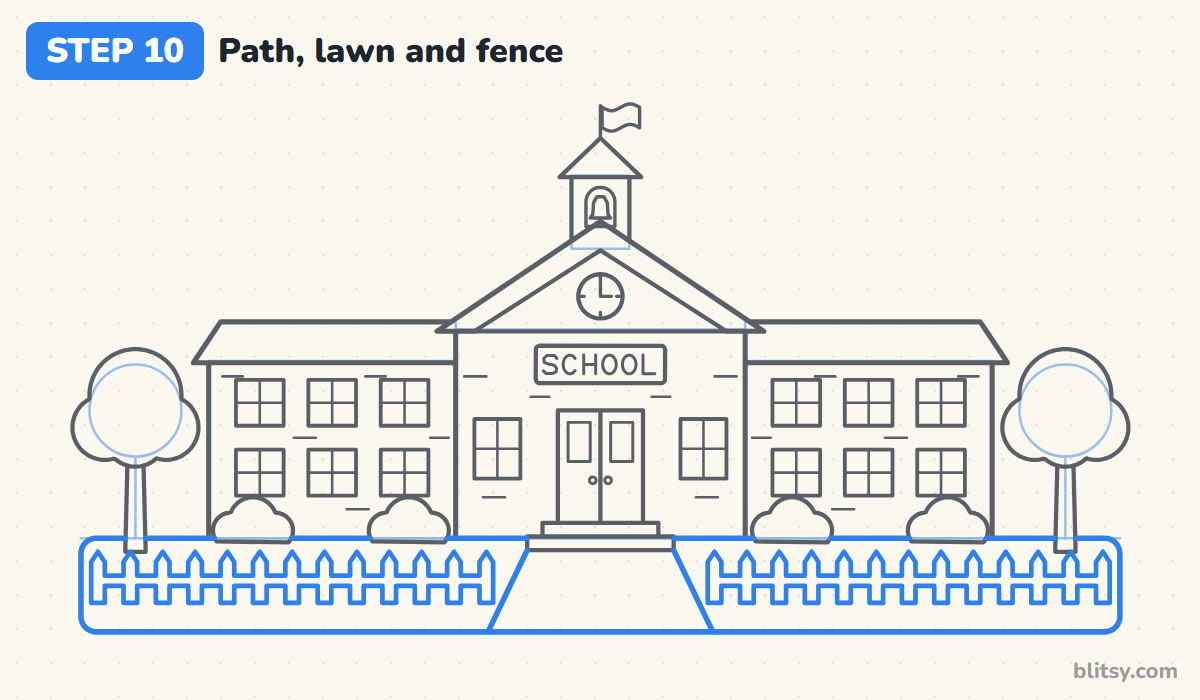
From the bottom step, draw a path that gets wider as it comes toward you. Around it, outline a long lawn with rounded corners. On both sides of the path, draw a row of pointed pickets joined by one rail. The fence takes patience; a row of grass tufts works too.
💡 Tip: Space the pickets with your fingertip as a quick measuring tool.
Step 11: Ink the drawing and erase the guides
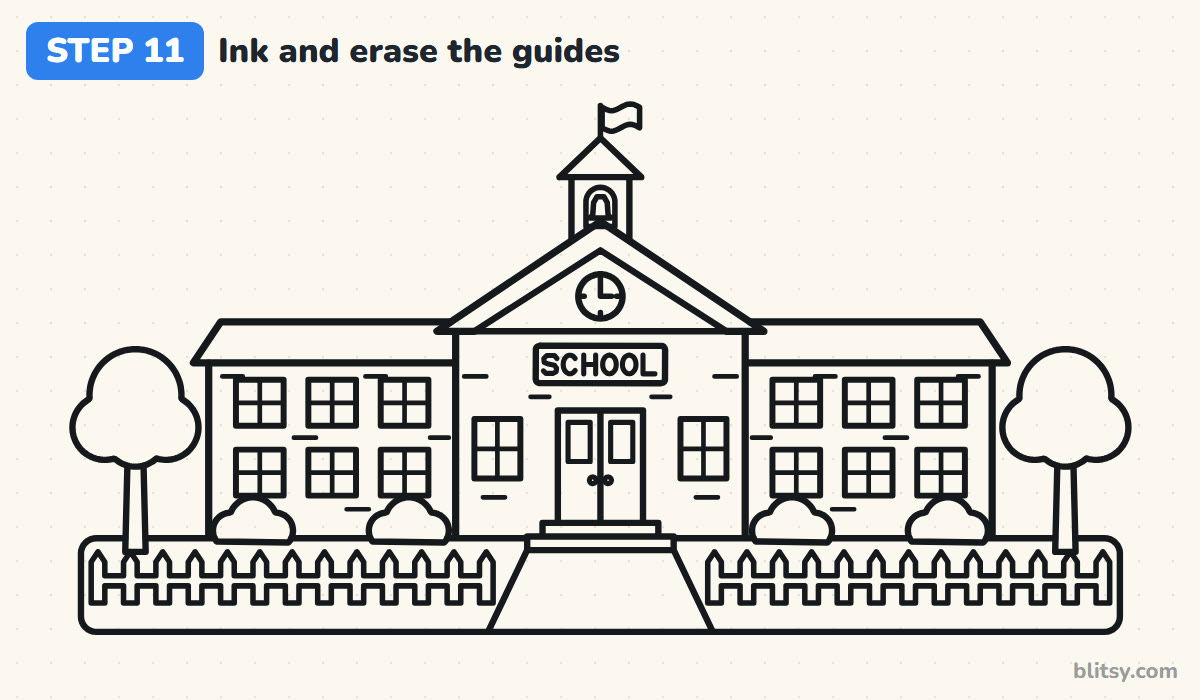
Go over every line you want to keep with the black fineliner. Start at the bell tower and work down, so your hand never rests on wet ink. Once it has dried for a minute, erase the ground line, the boxes, the triangle and the tree circles.



💡 Tip: Ink the long straight walls in one smooth stroke instead of short, scratchy ones.
Step 12: Color your school
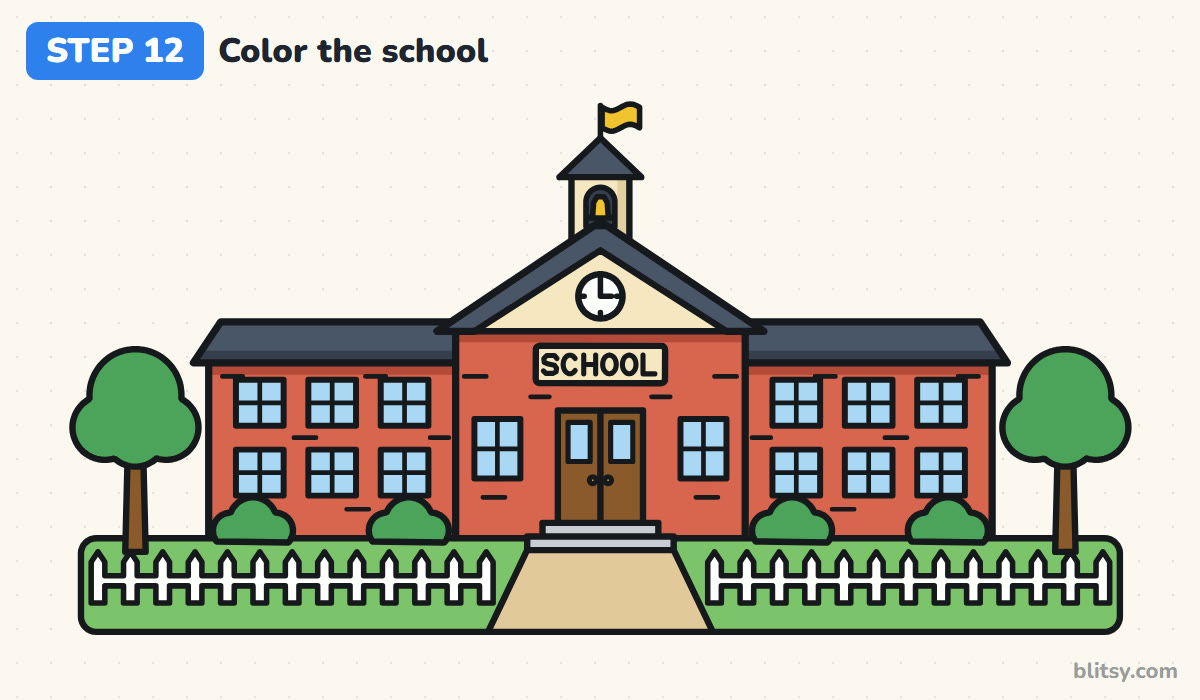
Color the walls brick red, pressing harder in a thin strip under each roof for shade. Make the gable, the tower and the sign cream, the roofs dark gray and the windows light blue. Doors and trunks are brown; the bell and flag yellow. Finish with green leaves and grass, a tan path and a white fence.
💡 Tip: Color the light blue windows before the red walls so the red can't creep into them.
Lopsided Wings and Other School Drawing Snags
- Wings of two different sizes. The building leans to one side. Measure the first wing and copy the same width onto the other.
- A roof that's too steep. A tall, narrow triangle looks like a church. Keep the gable low and wide, about as wide as the middle block plus a little overhang.
- Windows floating at random heights. Scattered windows make it look like a messy house. Line up the tops with one ruler line per row.
- Squeezed letters on the sign. The last letters end up tiny. Mark six even spaces before writing.
- A tiny front door. A house-size door makes the school feel empty. Double doors reaching about halfway up the middle block look right.
Redesigning the Schoolyard Your Way
Once the basic building works, change it to match the school you know. Paint the walls cream with a red roof, add a third row of windows for a bigger school, or park a yellow bus beside the left wing with a few kids walking up the path. A flagpole on the lawn, a playground slide or a big oak tree all fit in the space at the sides. The same box-and-triangle method carries over to the house drawing tutorial, and if you'd like a building with even more towers, try this how to draw a castle lesson.
School Coloring Page and a Printable Step Guide
For back-to-school week or a quiet afternoon, there's a school coloring page with a colored sample and a color key at the top, so kids can match the brick walls and gray roofs, and a big outline with room for a sky. The step-by-step PDF guide holds all 12 steps with their tips. Both fit Letter and A4 paper.
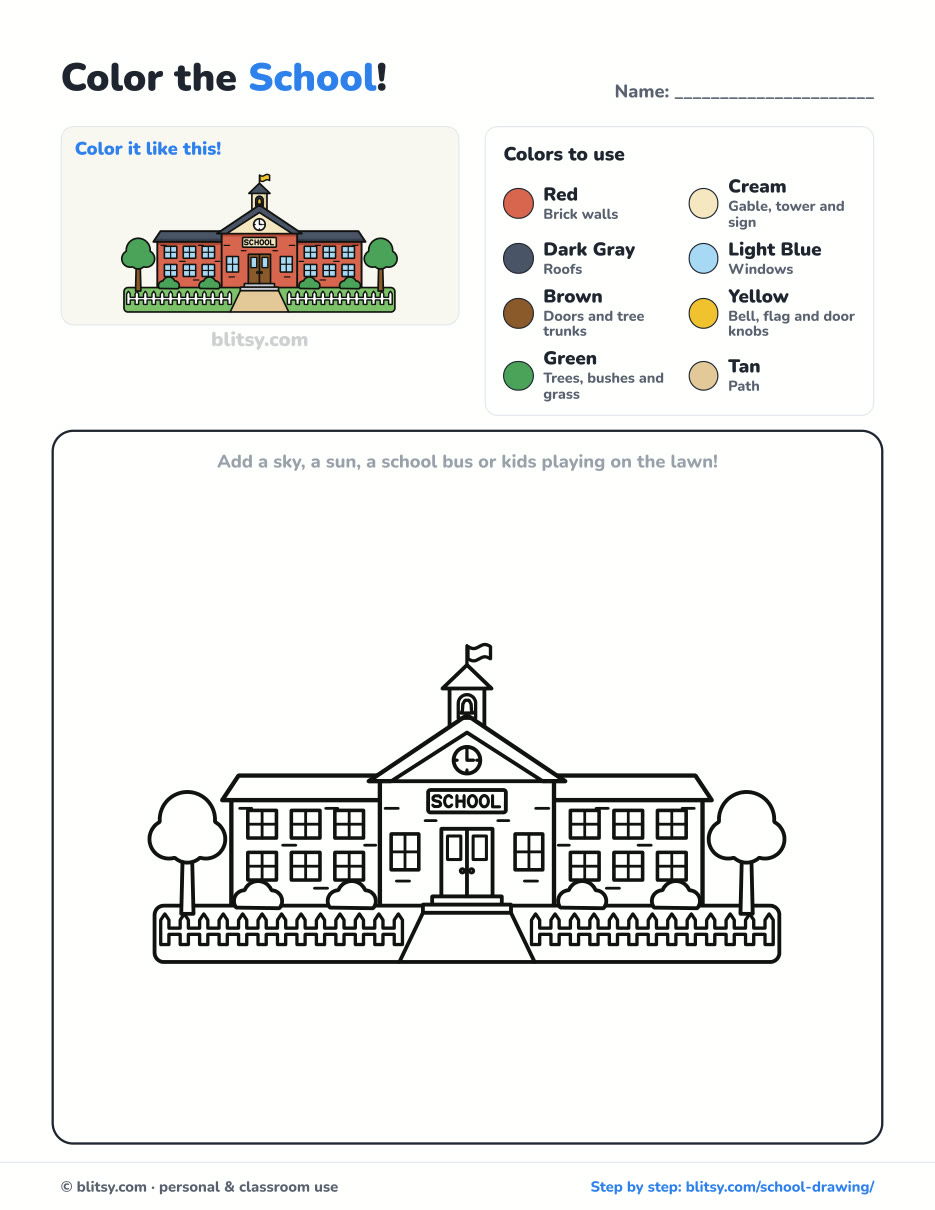
Black outlines with a colored example and the color names at the top. Ready to print and color.
⬇️ Download Coloring PageEvery step picture with its instructions and tips, to keep beside your paper while you draw.
⬇️ Download Drawing Guide📱 On a phone? Tap a download button, then open the file and choose Share → Save to Files or Print. On a computer, the PDF opens or saves straight to your Downloads folder.
Pin the Schoolhouse Steps for Class Time
Class Dismissed: Vehicles, Scenes and Science to Draw Next
All of these are step-by-step tutorials with a picture for each stage, and a few of them are handy for school projects.
- Volcano Drawing: An erupting island volcano with lava rivers and an ash cloud starts from a trapezoid in this volcano drawing tutorial.
- Police Car Drawing: Draw a black-and-white patrol car with a light bar and a gold star on the door in this how to draw a police car step by step lesson.
- Halloween Drawing: Another building, but spooky: a haunted house on a hill with bats and a pumpkin fills this Halloween drawing tutorial.
- Realistic Drawing: Shade one red apple under a lamp and learn how value makes things look solid in this realistic drawing step by step guide.
- Race Car Drawing: A low formula car with a driver in a blue helmet grows from two circles and a wedge in this race car drawing tutorial.
- Fire Truck Drawing: Boxes and circles become a long red fire engine with a ladder and hose reel in this fire truck drawing step by step lesson.
- Summer Drawing: An umbrella, a beach ball and a sandcastle by the waves make one sunny page in this summer drawing tutorial.
- Diamond Drawing: A brilliant-cut diamond and two small gems are drawn from straight lines in this how to draw a diamond lesson.
- Room Drawing: Set up one vanishing point and draw a whole kid's bedroom with this room drawing tutorial in one-point perspective.
- Solar System Drawing: For science class, this solar system drawing step by step diagram puts the planets in the correct order.
School Drawing Questions From Kids and Parents
What is the easiest way to draw a school?
Draw three boxes side by side, with the middle one taller, and put a triangle roof on the middle box. Add a clock, a door and rows of windows, and it already reads as a school.
How do I make my drawing look like a school and not a house?
Give it size and rows. Long wings with matching windows, wide double doors, a sign and a clock or bell tower tell everyone it's a school.
How long does it take to draw a school?
Around 40 minutes with coloring. The windows and the fence take the longest; the roof and tower go quickly.
How can I make this easier for a young child?
Skip the fence, the bricks and the bell. One row of windows per wing, a big door and a clock are plenty for a five or six year old.
Write your own school's name on the sign instead of SCHOOL, and you've got a drawing worth hanging on the classroom wall. 🏫
Related posts:
 How to Draw a Hoodie Step by Step (Front and Back View)
 How to Draw a Nose Step by Step (Front and Side View)
 How to Draw a Skull Step by Step (Easy Front View)
 How to Draw a Dog Step by Step (Easy Side View for Beginners)
 How to Draw an Alligator Step by Step (Easy Side View)
 How to Draw a Horse Step by Step (Easy Side View)
 How to Draw Hands Step by Step (Easy Palm View for Beginners)
 How to Draw a Brain Step by Step (Easy Side View)
 How to Draw a Dragon Head Step by Step (Easy Side View)
 How to Draw a Whale Step by Step (Easy for Beginners)
 How to Draw Lungs Step by Step (Easy Science Diagram)
 How to Draw a Pineapple Step by Step (Easy Crown and Slice)

