
Peppa's head looks a lot like a hair dryer turned on its side, and once you see that, she gets much easier to draw. This lesson shows you how to draw Peppa Pig step by step, starting with a circle and two straight snout lines and ending with her jumping-ready pose in a brown puddle. What you'll make is my simple fan-art version for practice, not official artwork from the show. Small kids love this one because almost every part is a basic shape.
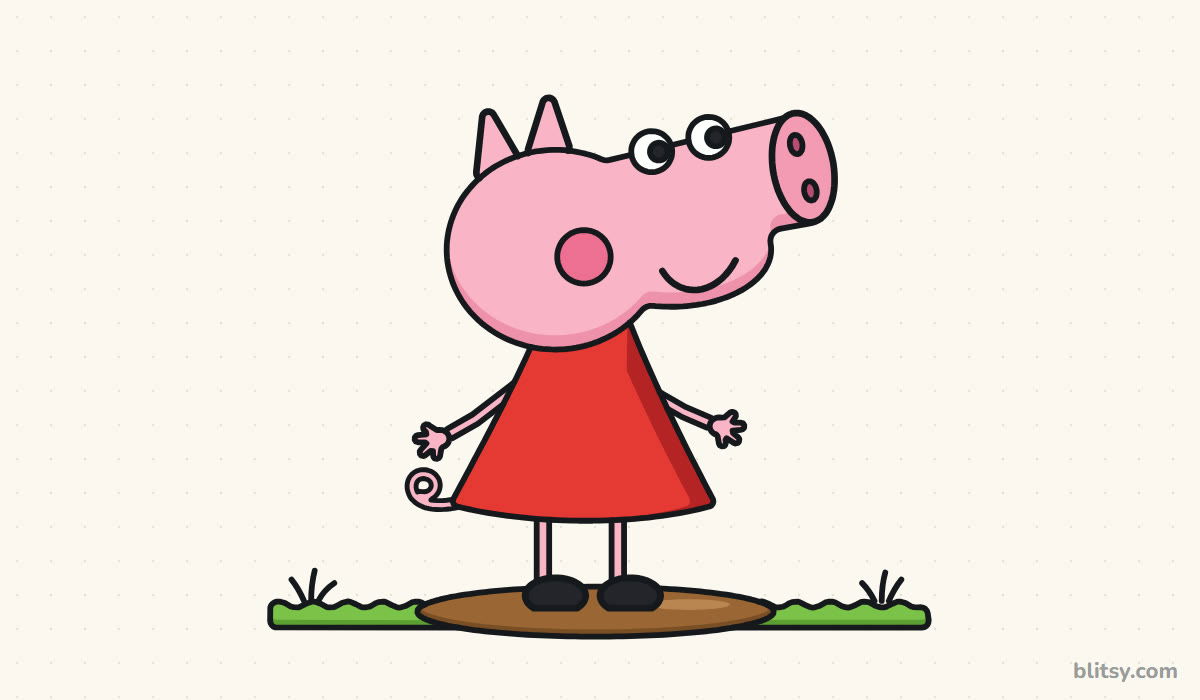
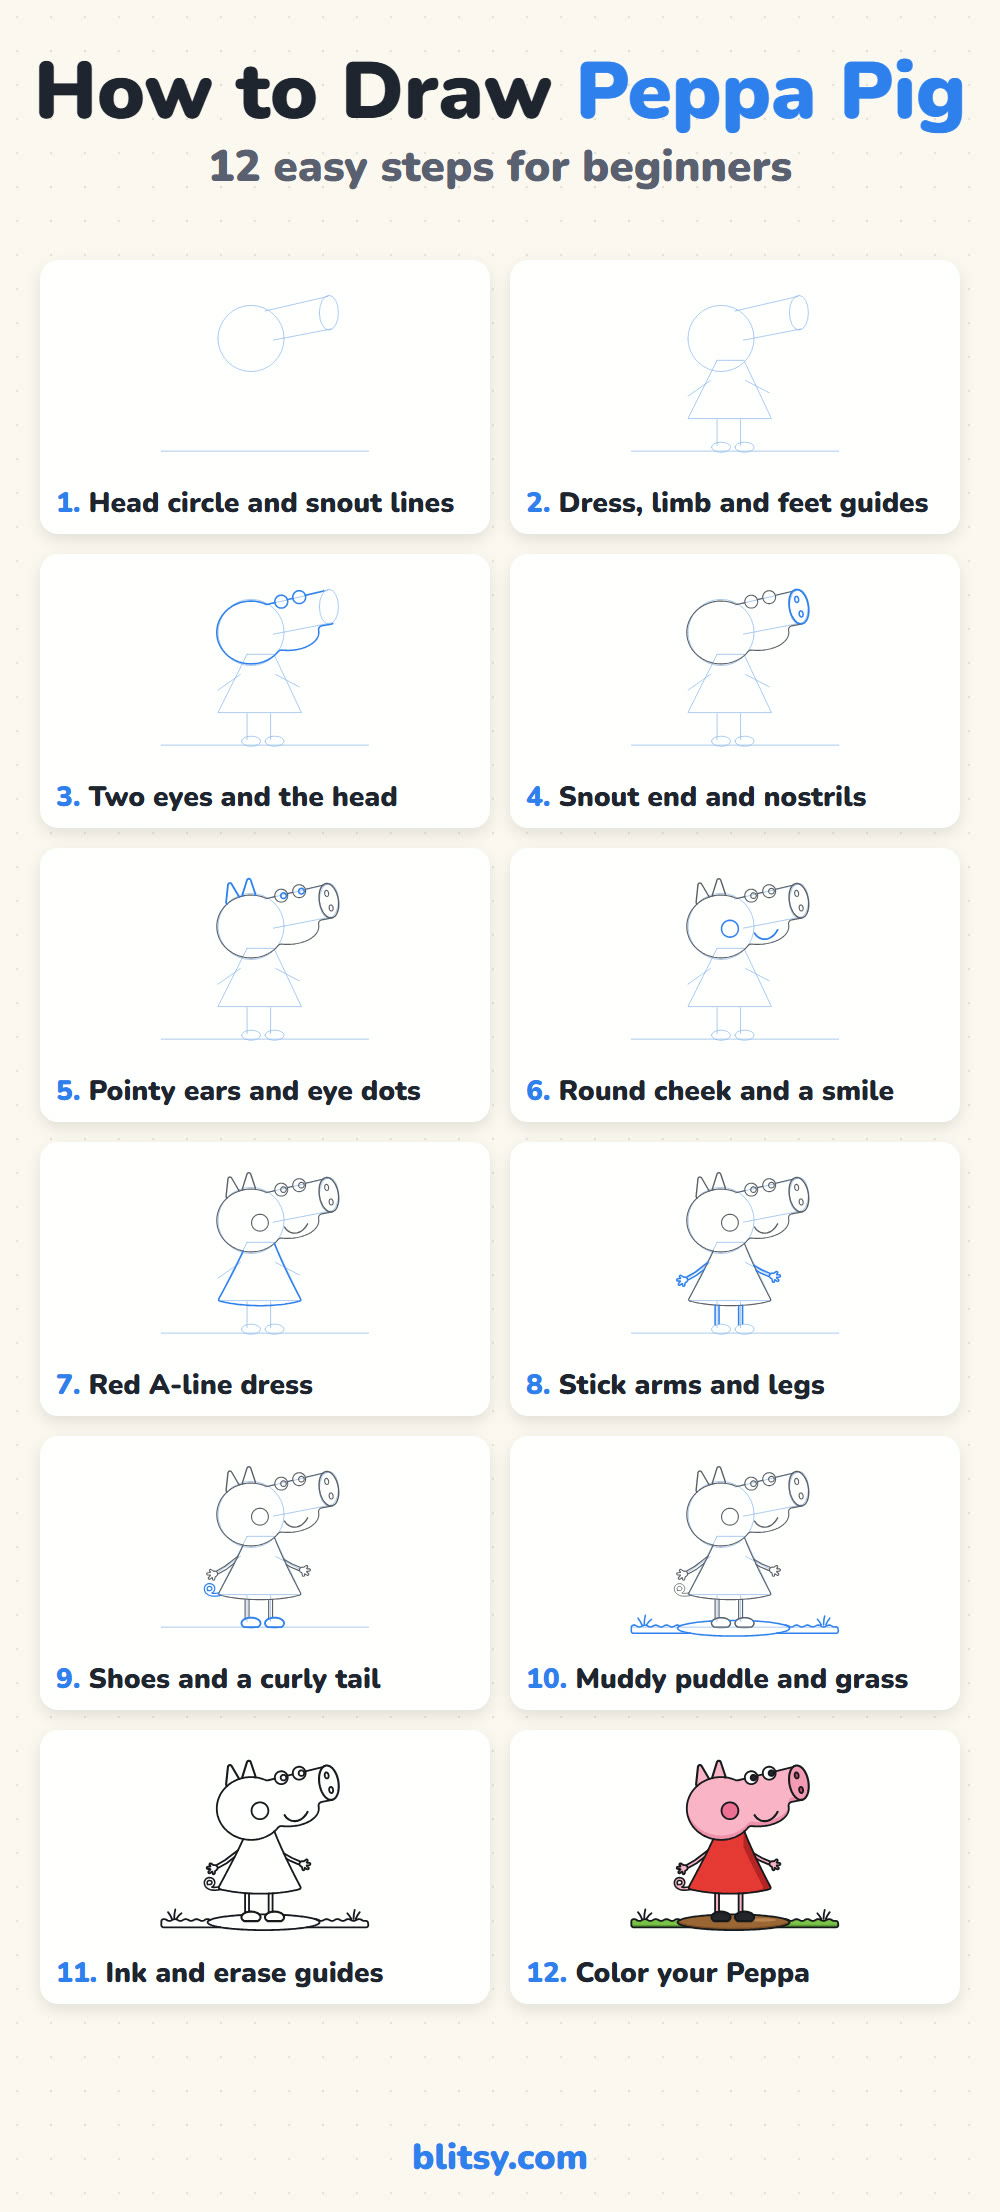
In the images, the part each step adds is shown in blue. Gray lines are already on your paper, and the pale blue helpers get erased after you ink.
Quick overview
⏱️ Time: about 20 to 30 minutes, coloring included
🎯 Level: very easy; good for kids from about 5 with a little help
✏️ Steps: 12
🐷 You'll draw: Peppa in side view, standing in a muddy puddle
Pencils and Pinks for a Peppa Sketch
- A soft pencil (HB or 2B) for the light helper lines
- A clean eraser
- A black felt-tip or fineliner for the outline
- Colored pencils or markers: light pink and a darker pink, red, black, brown and green
- Plain white paper turned the long way up
If you only own one pink, press harder with it for the cheek and the snout end instead of buying a second shade.
How to Draw Peppa Pig Step by Step
Step 1: Draw a head circle and two snout lines
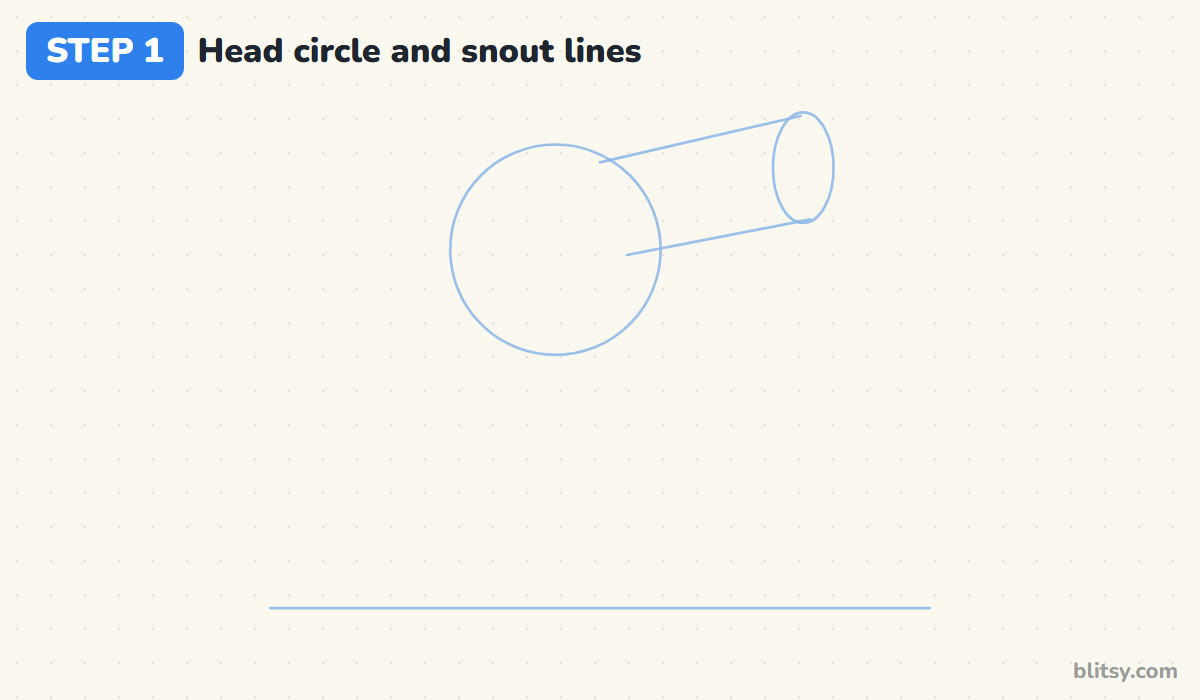
Begin with a flat ground line near the bottom of the page. In the upper part of the paper, a little left of center, draw a circle for the back of the head. From the top right of that circle, run two straight lines out to the right, tilting slightly upward, and close them with a tall narrow oval. Keep every line faint.
💡 Tip: Leave a wide margin on the right; the snout needs more room than most people expect.
Step 2: Add guides for the dress and the limbs
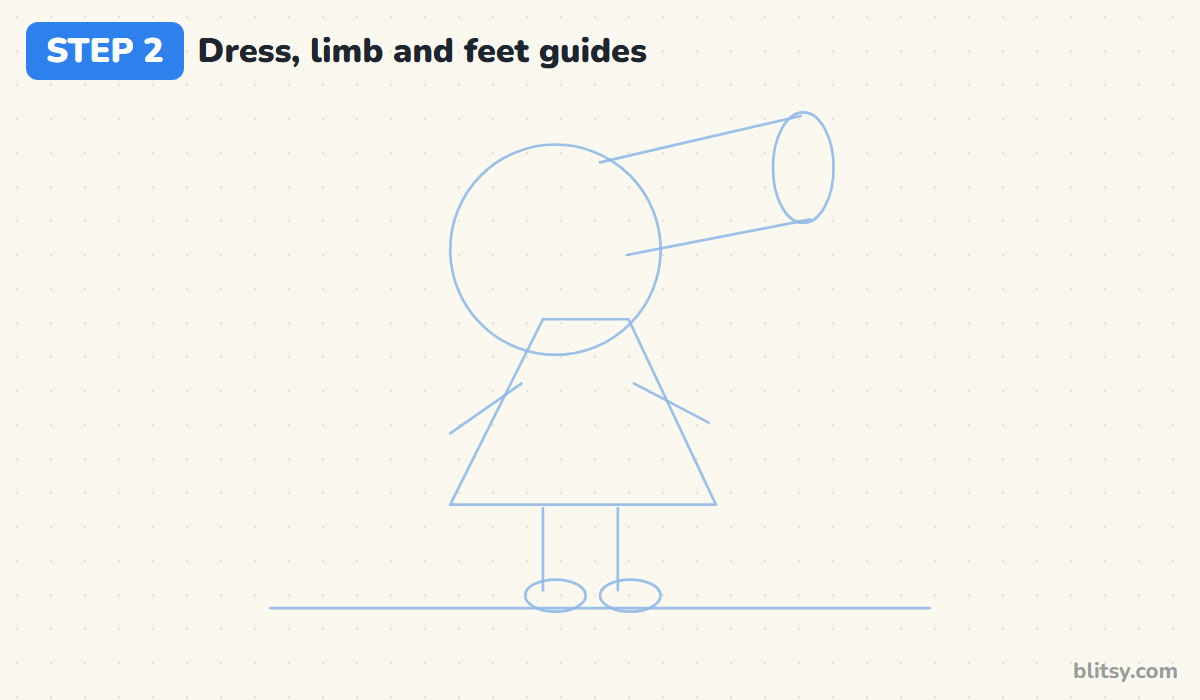
Under the circle, sketch a triangle with its top cut off: narrow at the neck, wide at the hem. Two slanted lines come out of the sides for arms. Below the dress, drop two short straight legs to the ground line and put a small flat oval at the bottom of each one for the feet.
💡 Tip: Make the dress about as tall as the head circle so she keeps her chunky little-kid build.
Step 3: Draw two eyes, then the hair-dryer head
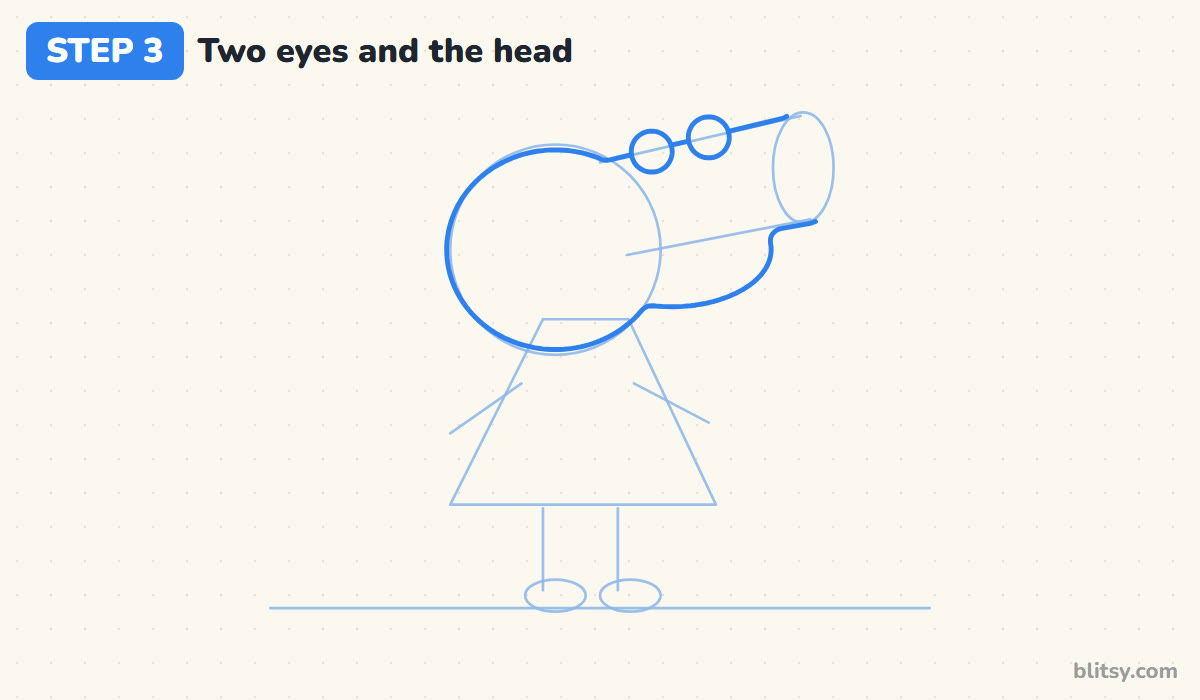
Put the eyes in first: two small circles sitting on the top snout line, one behind the other, both on the same side of the face. That's the odd but famous part of her design. Now outline the head. Go around the circle, follow the top snout line between and past the eyes, and bring the lower line back in a soft bulge that makes her chin.


💡 Tip: Let the eyes poke slightly above the outline; it gives her that curious, peeking look.
Step 4: Shape the snout end and nostrils
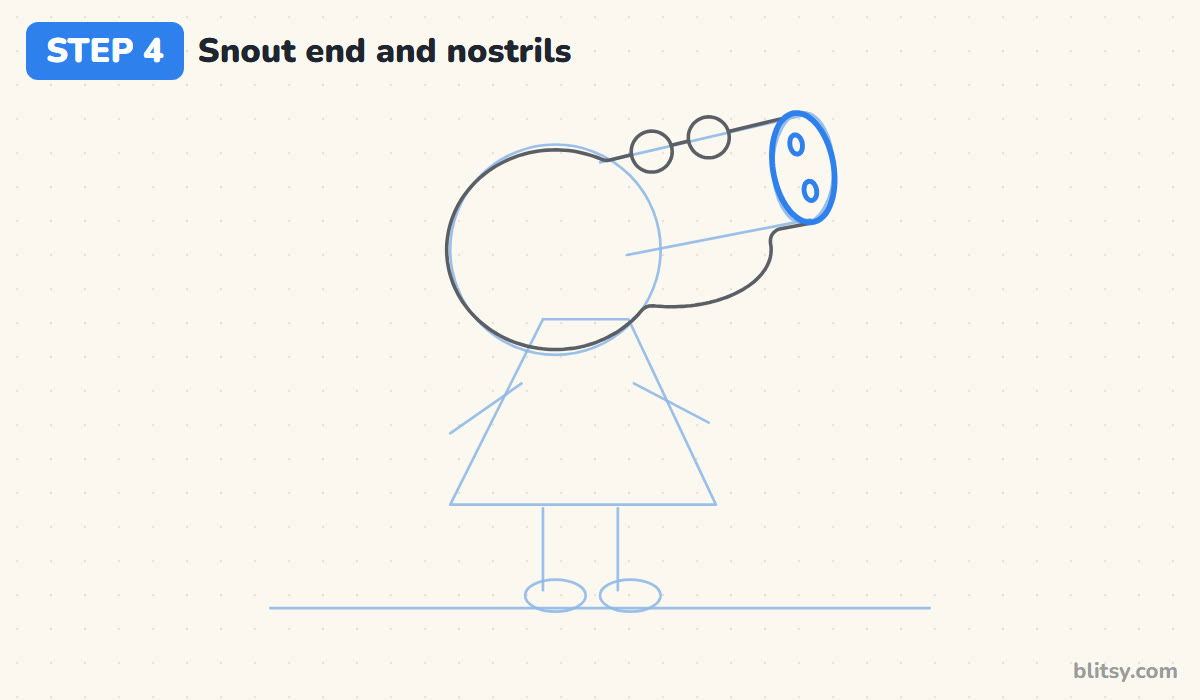
Trace the tall oval at the tip of the snout so the head outline tucks into it. It should be a touch wider than the snout itself, a bit like the round end of a hair dryer. Inside it, draw two small upright ovals for nostrils, one near the top and one near the bottom.
💡 Tip: Tilt the snout oval slightly toward you; a perfectly upright one looks flat.
Step 5: Add pointy ears and eye dots
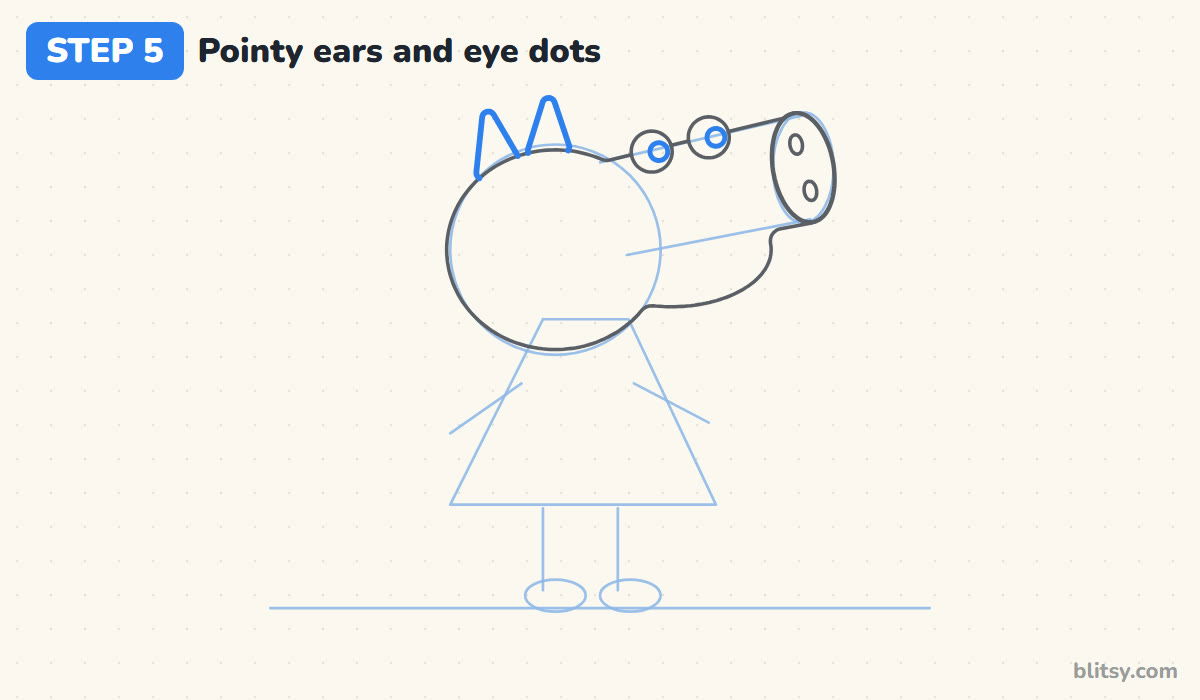
Peppa's ears are two small pointed triangles on the back half of her head, close together. Round off the tips just a little. Then fill a dark dot in each eye, set toward the front so she looks the way her snout points. I keep the dots fairly large, because tiny dots make her look surprised.
💡 Tip: Draw the back ear a bit shorter than the front ear to hint at depth.
Step 6: Draw a round cheek and a smile
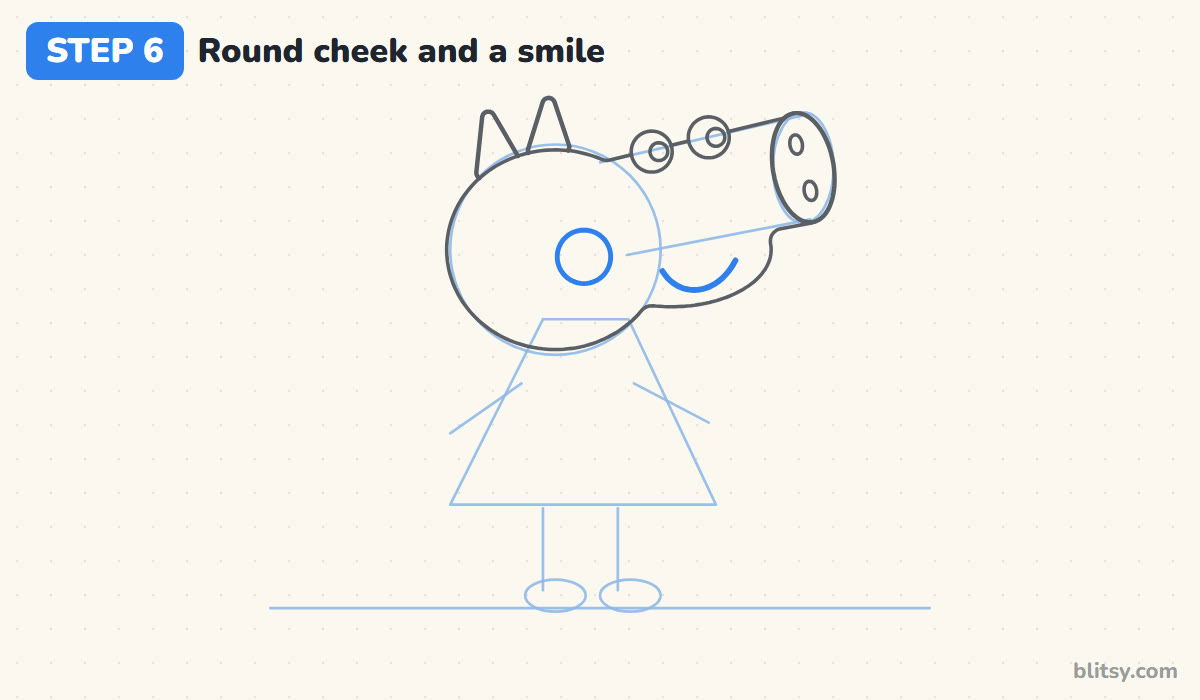
Her cheek is a neat circle placed on the round part of the head, just below and behind the eyes. Make it roughly the size of a nostril oval doubled. For the mouth, draw a curve under the snout that tips up at the front end. Most beginners put the smile too low, so keep it snug under the snout.
💡 Tip: Trace around a small button or bead if your circle cheek keeps going lumpy.
Step 7: Outline the red A-line dress
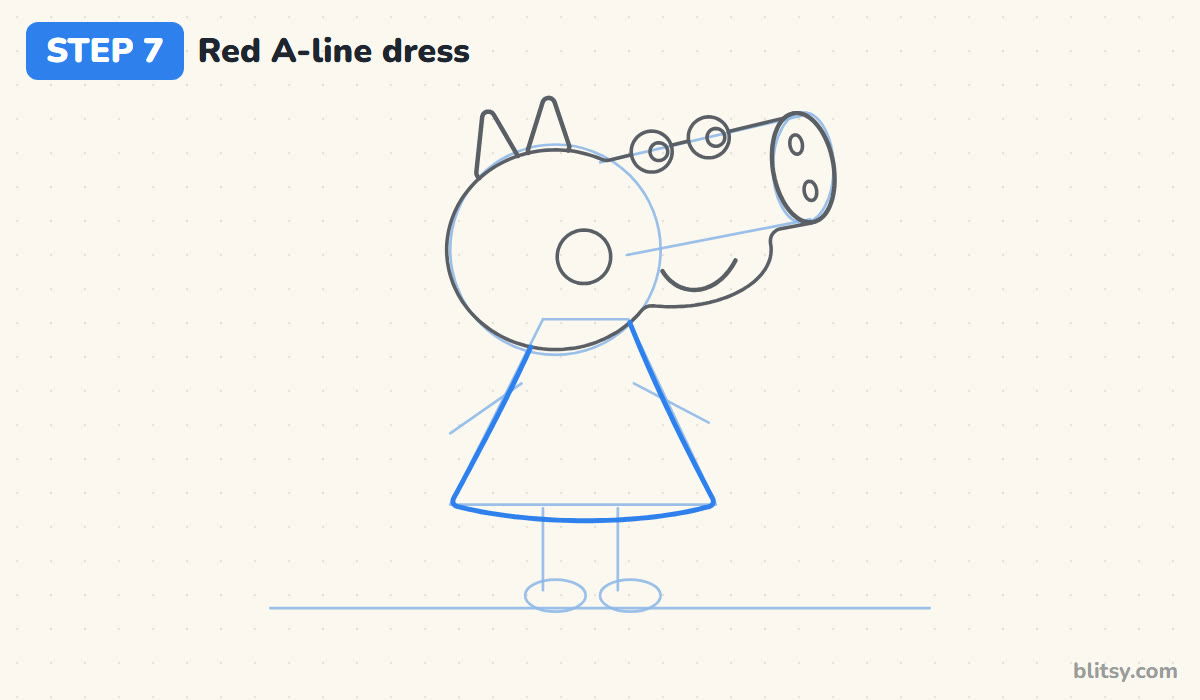
Using the triangle guide, draw her dress with straight sides that flare out toward the hem. Curve the bottom edge gently downward instead of keeping it flat, which makes the fabric look soft. The top of the dress tucks right under the head, so she has no visible neck at all.


💡 Tip: Press evenly along each side so both edges look like the same weight of line.
Step 8: Add stick arms and legs
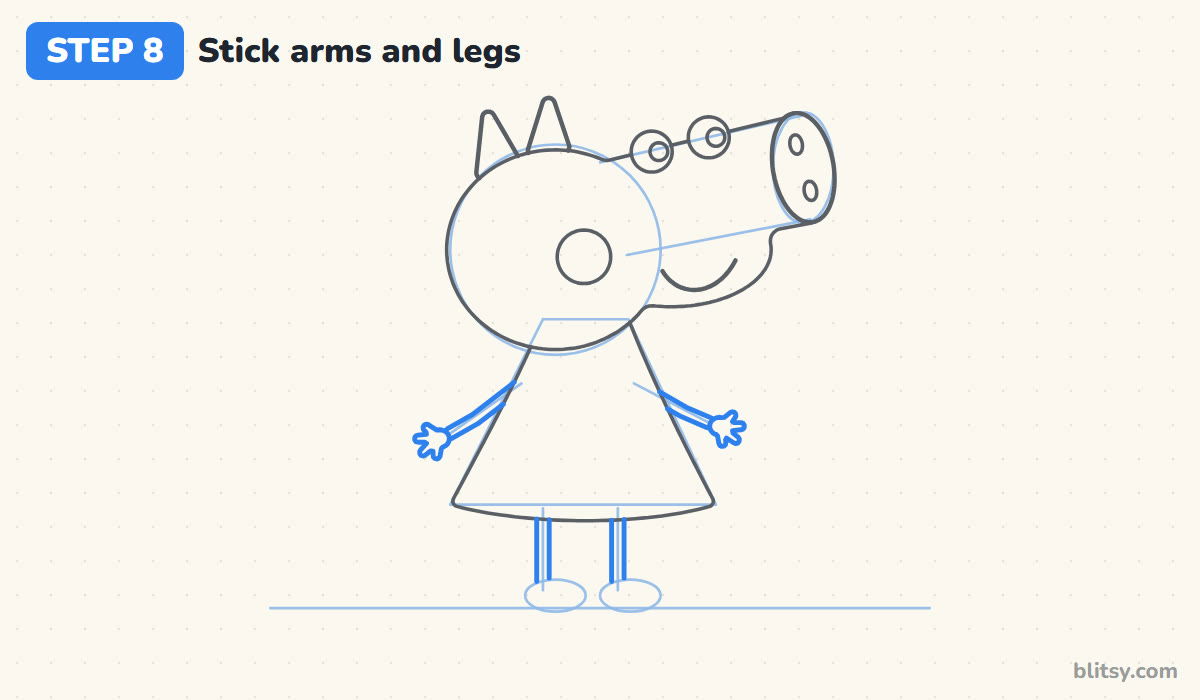
Her arms and legs are very thin, almost like two lines close together. Follow each arm guide out from the side of the dress and finish with a tiny hand made of a small circle and four short fingers. The legs drop straight down from the hem. I draw both legs the same length first and check them against the ground line before going on.
💡 Tip: Small children can draw single lines for the limbs; it still reads as Peppa.
Step 9: Draw the shoes and a curly tail
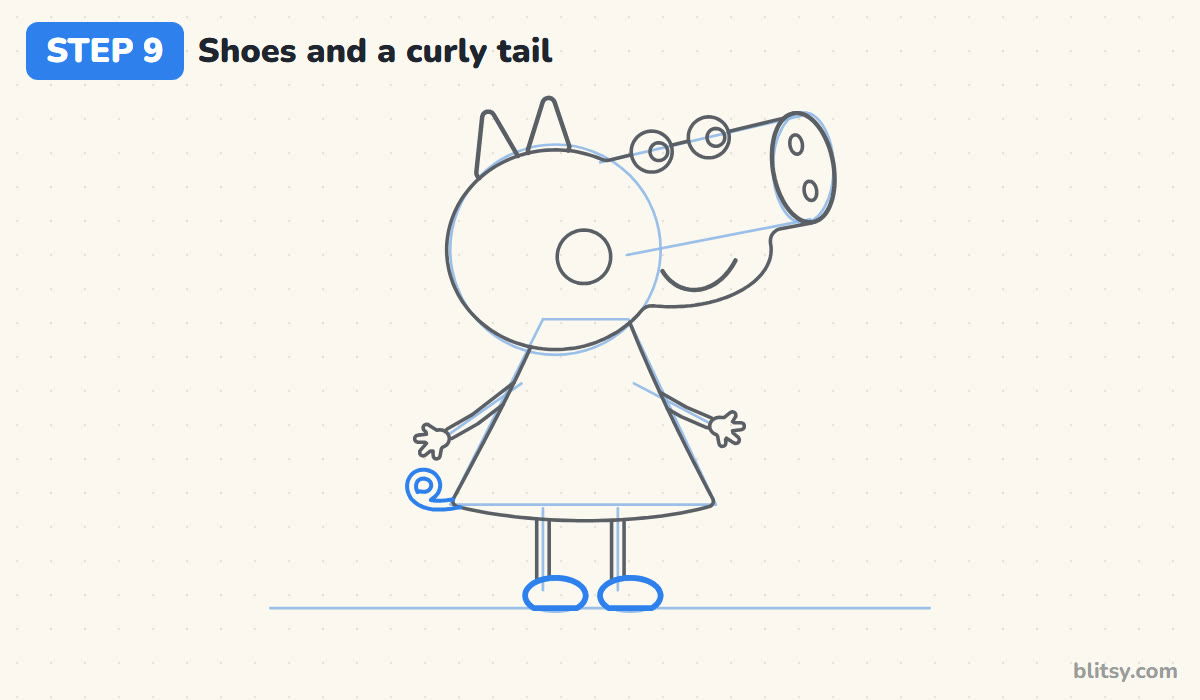
On each foot oval, draw a rounded shoe that points forward, the same way as the snout. Flatten the bottom so both shoes rest on the ground line. Then add the tail at the back of the dress, near the hem: a short line that curls into one small loop.
💡 Tip: One loop is plenty for the tail; extra curls start to look like a spring.
Step 10: Add a muddy puddle and a strip of grass
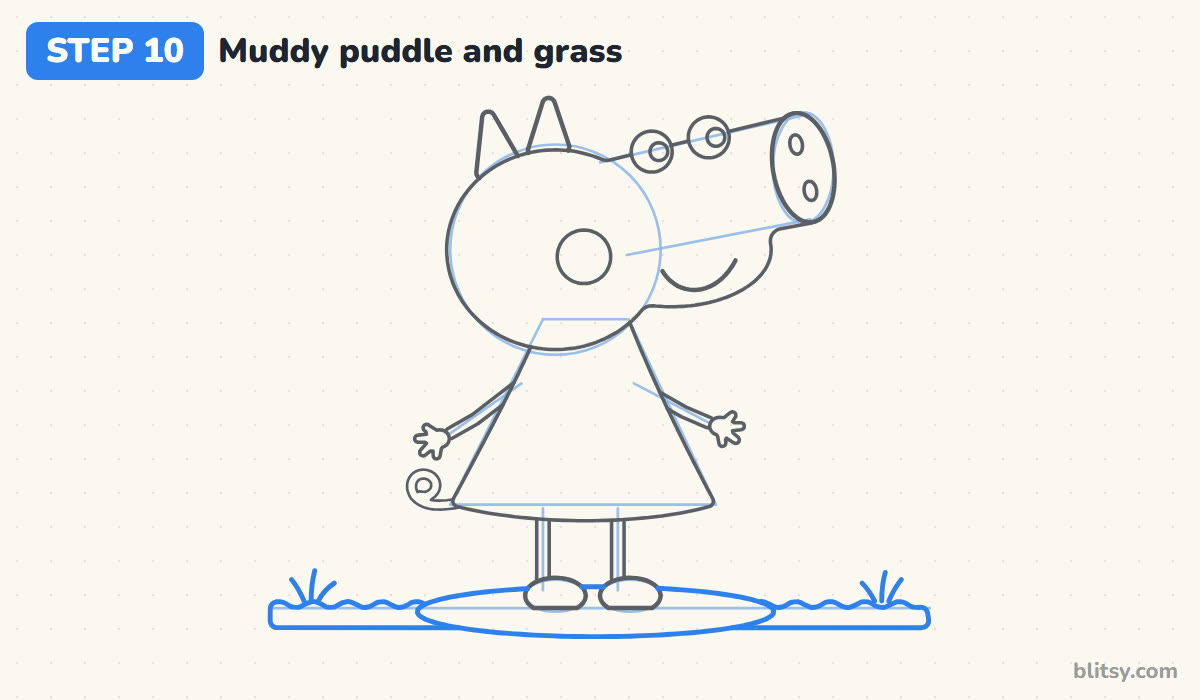
Peppa loves jumping in muddy puddles, so give her one. Draw a wide, flat oval around her feet, with the shoes standing inside it. Run a bumpy grass line on both sides of the puddle and add a couple of little grass tufts at the ends. This scene part is optional; skip it if your page is full.
💡 Tip: Keep the puddle shallow and wide, otherwise it looks like a hole in the ground.
Step 11: Ink the outline and erase the guides
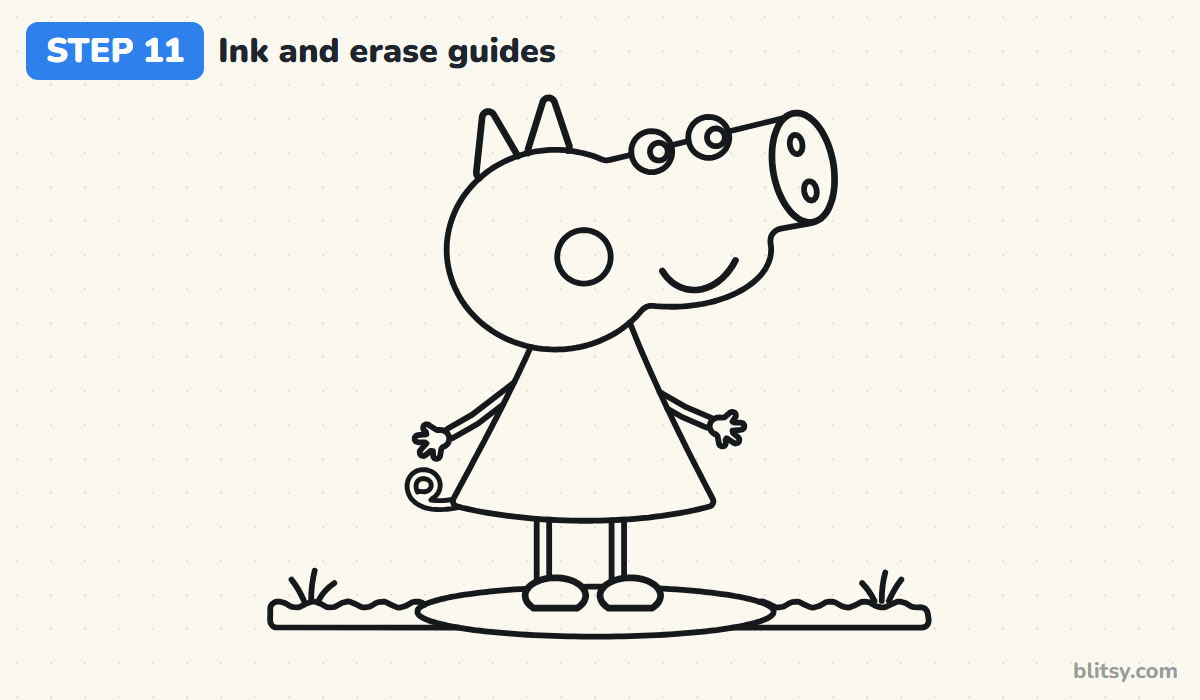
Go over every line you want to keep with the black pen. I start with the snout and the eyes, since those small curves need the steadiest hand while you're still fresh. Skip the circle, the triangle and the stick guides. Give the ink a minute to dry, then rub the pencil lines away gently.
💡 Tip: Pull the pen toward you and turn the paper for each curve instead of twisting your wrist.
Step 12: Color your Peppa
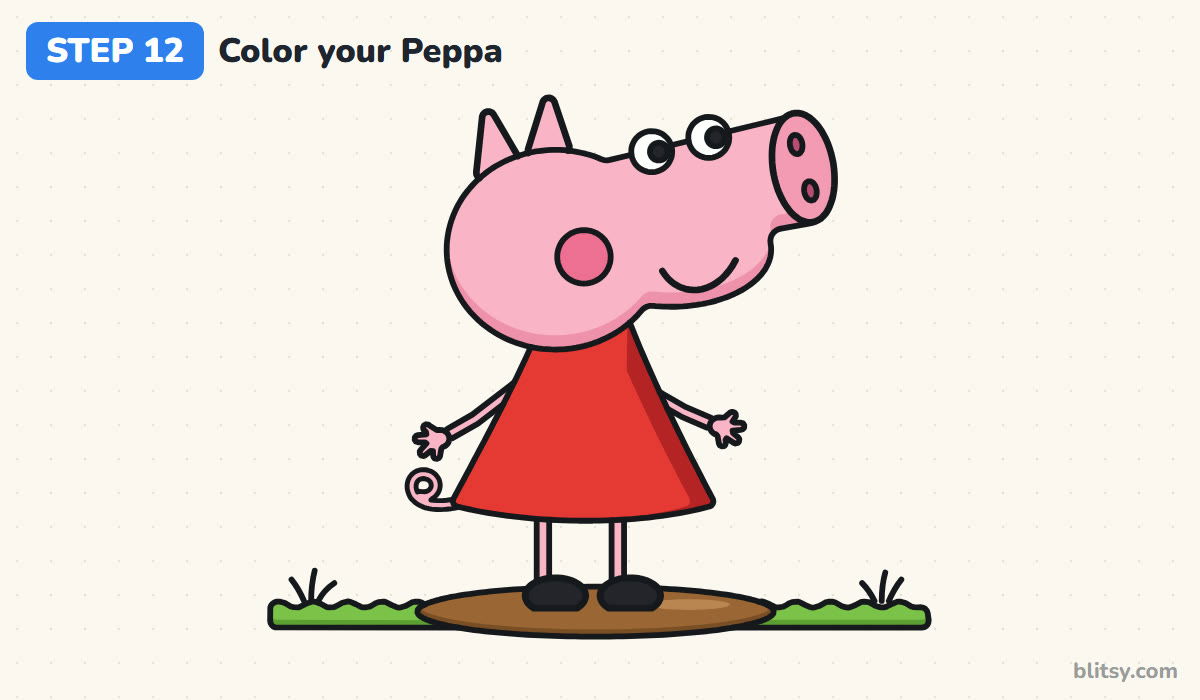
Color her head, ears, arms, legs and tail light pink. Use a deeper pink for the snout end and the cheek, and add a soft band of darker pink along the bottom of her head for roundness. The dress is red, with a darker red on the right side. Shoes and eye dots are black, the puddle brown and the grass green.
💡 Tip: Leave the eyes paper white; coloring them in takes away her friendly look.
Snout and Eye Slips That Change Peppa
- A short snout. A stubby nose turns her into an ordinary cartoon pig. Stretch the snout until it's almost as long as the head circle is wide.
- One eye on each side. That front-facing habit is hard to break. Both eyes go on the same side, on top of the snout.
- A neck. Any gap between head and dress makes her look stiff. Tuck the dress straight under the head.
- Thick limbs. Chunky arms and legs fight with the big head. Keep them thin, nearly like lines.
- A cheek in the wrong spot. Placed on the snout, it reads as a third nostril. Put it on the round part of the head.
Rain Boots and Splashes for Your Own Peppa
Once the basic pose feels easy, change one thing at a time. Give her yellow rain boots and draw splash drops flying out of the puddle, swap the red dress for another color, or turn her around so the snout points left. You can also draw a smaller pig in blue beside her for a family scene. Kids who enjoy simple cartoon characters often move on to the Hello Kitty drawing tutorial, and the easy cow drawing tutorial is a good farm-animal follow-up.
Peppa Pig Coloring Page and Printable Steps
Want something ready for a rainy afternoon? The free Peppa Pig coloring page has a bold outline, a colored example and a color key kids can copy. The step-by-step drawing guide puts all 12 steps and tips on a few pages that print on Letter or A4.
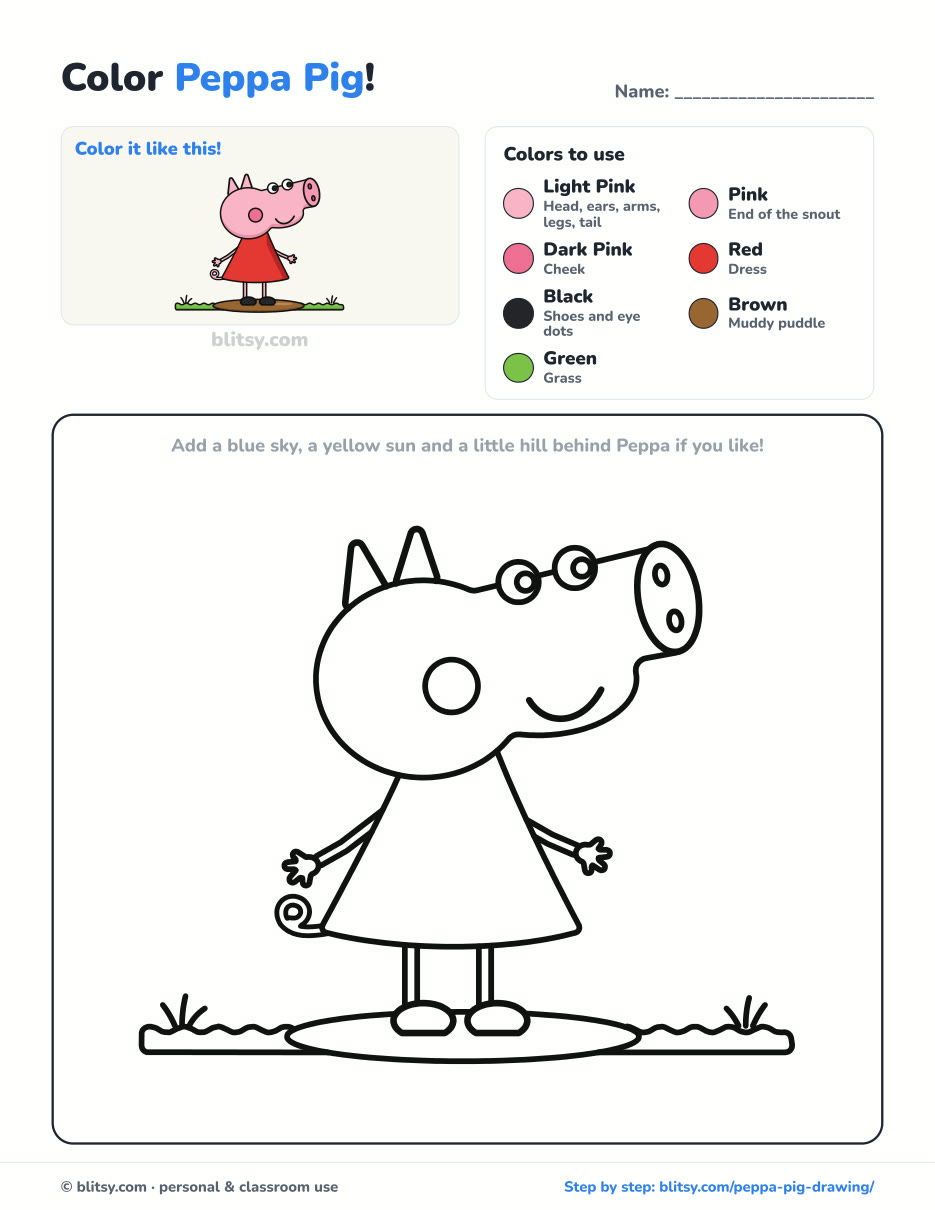
Black outlines with a colored example and the color names at the top. Ready to print and color.
⬇️ Download Coloring PageEvery step picture with its instructions and tips, to keep beside your paper while you draw.
⬇️ Download Drawing Guide📱 On a phone? Tap a download button, then open the file and choose Share → Save to Files or Print. On a computer, the PDF opens or saves straight to your Downloads folder.
Pin Peppa's Puddle Lesson for Later
Animal Tutorials for Young Peppa Pig Fans
Kids who liked this one can keep going with these step-by-step animal tutorials, each split into small, numbered pictures.
- Cat Face Drawing: A gray tabby looking straight at you starts from a plain circle in the how to draw a cat face tutorial.
- Gorilla Drawing: Draw a calm silverback sitting on the grass with a banana in this easy gorilla drawing tutorial.
- Simba Drawing: Two pencil ovals become the curious lion cub in the Simba drawing step by step guide.
- Bunny Drawing: The bunny drawing tutorial ends on a sitting bunny eyeing its carrot.
- Parrot Drawing: Learn how to draw a parrot with a hooked beak and a tail longer than the bird itself.
- Butterfly Drawing: Spread an orange butterfly's wings and place every dot in the easy butterfly drawing tutorial.
- Cat Eye Drawing: One circle and a cross start both the slit and the round pupil in this cat eye drawing tutorial.
- Snow Leopard Drawing: A snow leopard resting on a mountain rock is what the snow leopard drawing step by step lesson builds.
- Polar Bear Drawing: Paws up and snout forward, the bear sits on the ice in our how to draw a polar bear tutorial.
- Leopard Drawing: Amber eyes and a tail curled at the tip finish the leopard drawing tutorial.
- Alligator Drawing: Two ovals walk their way into a smiling gator in the alligator drawing step by step guide.
Peppa Drawing Questions From Little Artists
What is the easiest way to draw Peppa Pig?
Think of a hair dryer: a circle for the back of the head plus a long tube for the snout. Put both eyes on top of the tube, then hang a triangle dress underneath.
Why are both of Peppa's eyes on one side?
That's simply how the character is designed in side view. Drawing both eyes on the snout side is what makes people recognize her right away.
Can a 4 or 5 year old draw Peppa Pig?
Yes, with a grown-up drawing the guide circle and snout lines first. Young kids can use single lines for arms and legs and leave out the puddle.
How long does it take to draw Peppa Pig?
Around 20 to 30 minutes with coloring. The outline alone often takes only ten minutes once you've done it a couple of times.
Grab a pink pencil, start with that circle, and see whose Peppa makes the biggest splash. 🐷💦
Related posts:
 How to Draw a Tooth Step by Step (Cute and Easy for Kids)
 How to Draw a Mother and Daughter Step by Step (Easy for Kids)
 How to Draw Wonder Woman Step by Step (Chibi for Kids)
 How to Draw the Hulk Step by Step (Easy Chibi for Kids)
 How to Draw Iron Man Step by Step (Easy Chibi for Kids)
 How to Draw a Police Car Step by Step (Easy for Kids)
 How to Draw a Monster Truck Step by Step (Easy for Kids)
 How to Draw a Fire Truck Step by Step (Easy for Kids)
 How to Draw a Mermaid Step by Step (Easy Cartoon for Kids)
 How to Draw a Boat Step by Step (Easy Sailboat for Kids)
 How to Draw a Care Bear Step by Step (Cute Fan Art for Kids)
 How to Draw Hello Kitty Step by Step (Easy for Kids)

