
Long nose, fat tires, a wing at each end and a helmet poking out of the cockpit: a formula racer is one of the most fun vehicles to put on paper. In this lesson you'll learn how to draw a race car step by step, starting from a flat line and two circles. I chose the open-wheel shape on purpose, because the wheels sit outside the body and that makes the whole car easier to build than a closed sports car. Keep your first lines soft and you'll be fine, even if you have never drawn a vehicle before.
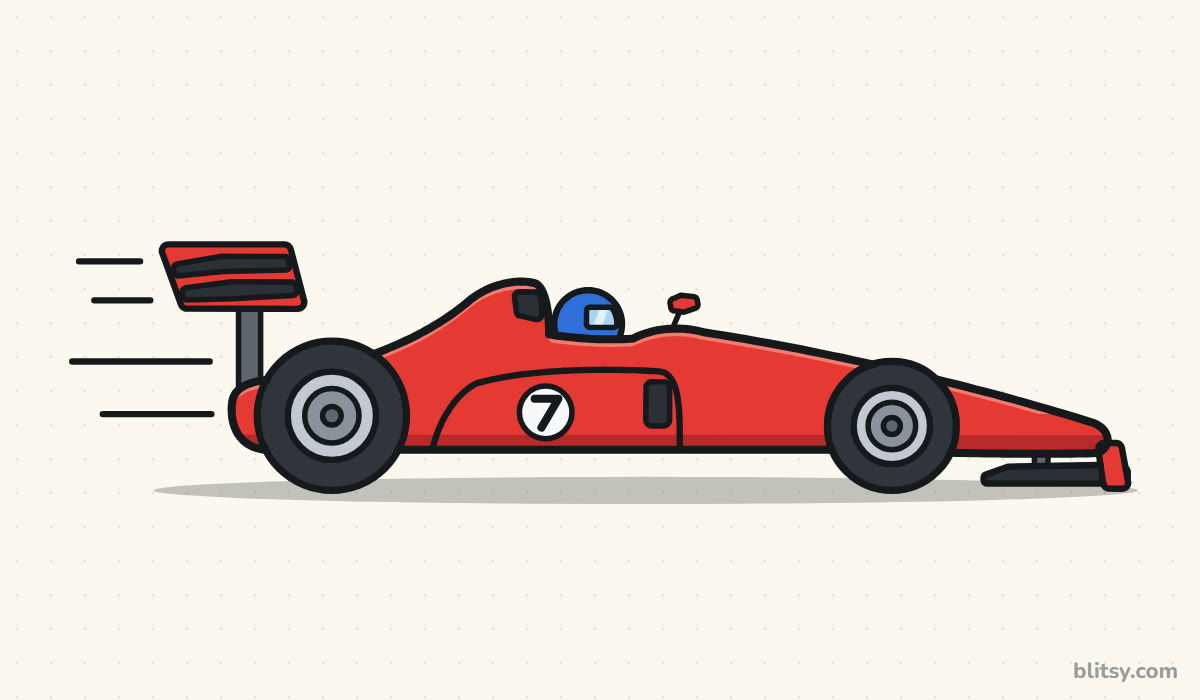
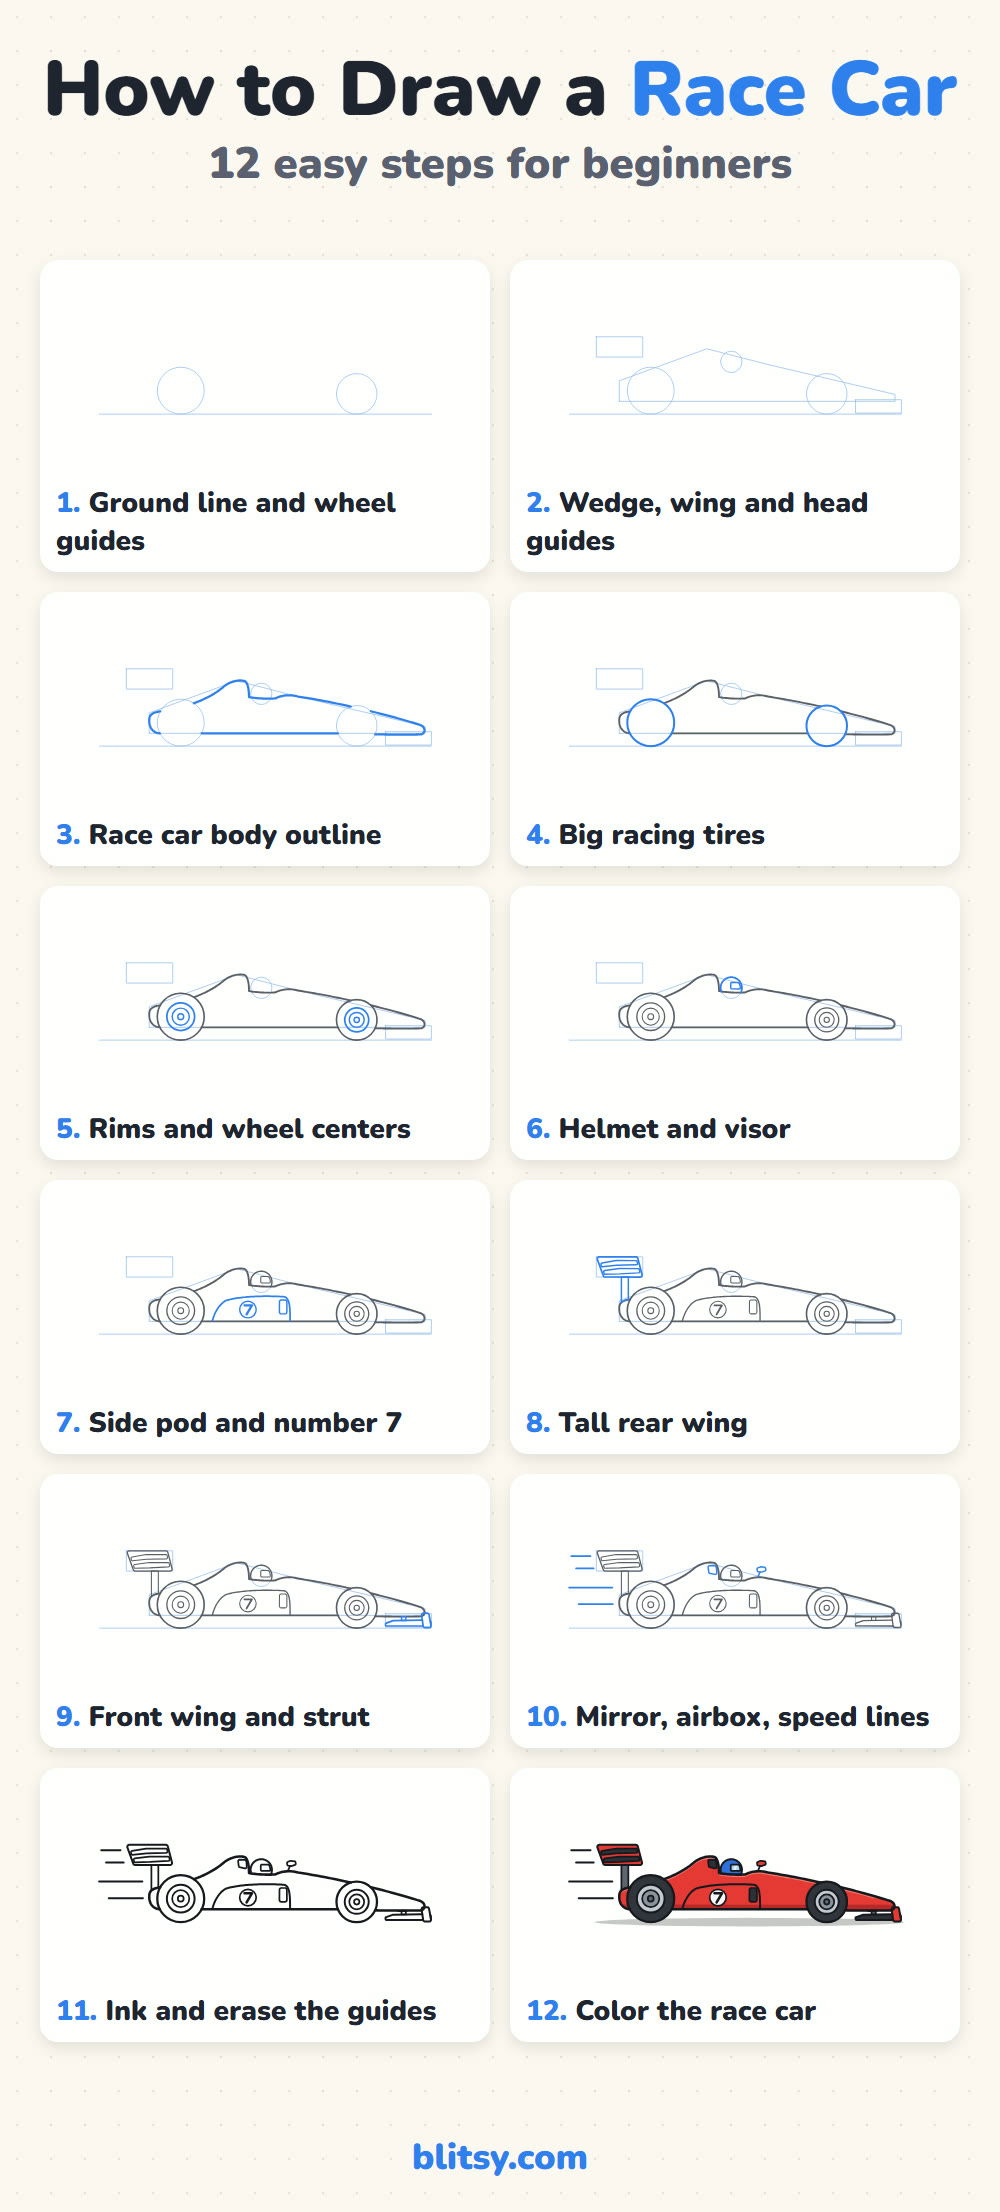
Think of the pictures as a pit crew working in order: the blue lines are that step's new job, and the gray ones are already finished. The pale construction shapes from steps 1 and 2 are temporary, so sketch them lightly; you'll rub them out in step 11.
Quick overview
⏱️ Time: 30 to 40 minutes with coloring
🎯 Level: easy, fine for kids from about 6
✏️ Steps: 12
🏎️ You'll draw: a red formula race car with a driver, wings and speed lines
Supplies Before the Green Flag
- A regular pencil, kept sharp
- A soft eraser
- A black fineliner or marker
- Colored pencils or markers in red, blue, black and two grays
- A sheet of paper turned sideways
- A coin or bottle cap for tracing the wheels (optional)
No ruler? Freehand speed lines look faster anyway, since a little wobble suggests motion.
How to Draw a Race Car Step by Step
Step 1: Draw a ground line and two wheel circles
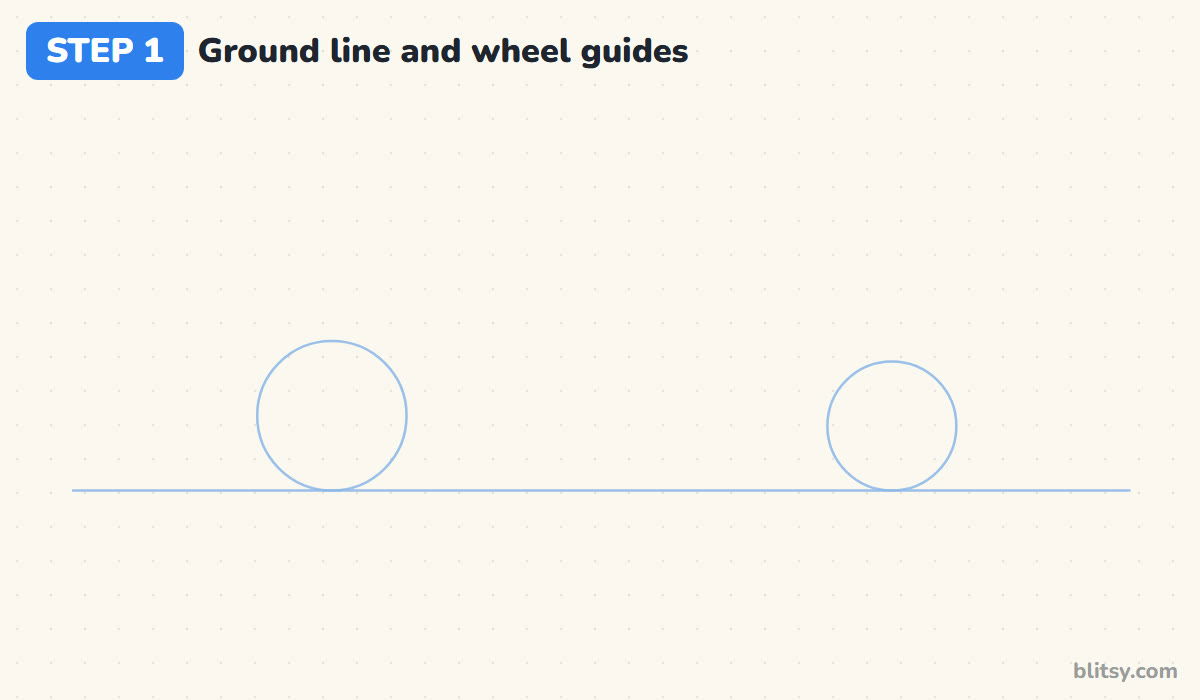
Turn your paper sideways and draw a long, light line near the bottom third. Put a big circle on it toward the left, and a slightly smaller one far to the right. Leave a gap of about three and a half big wheels, because a short gap turns a race car into a go-kart.
💡 Tip: Trace a coin if your circles keep coming out lumpy.
Step 2: Sketch a wedge, a head circle and two wing boxes
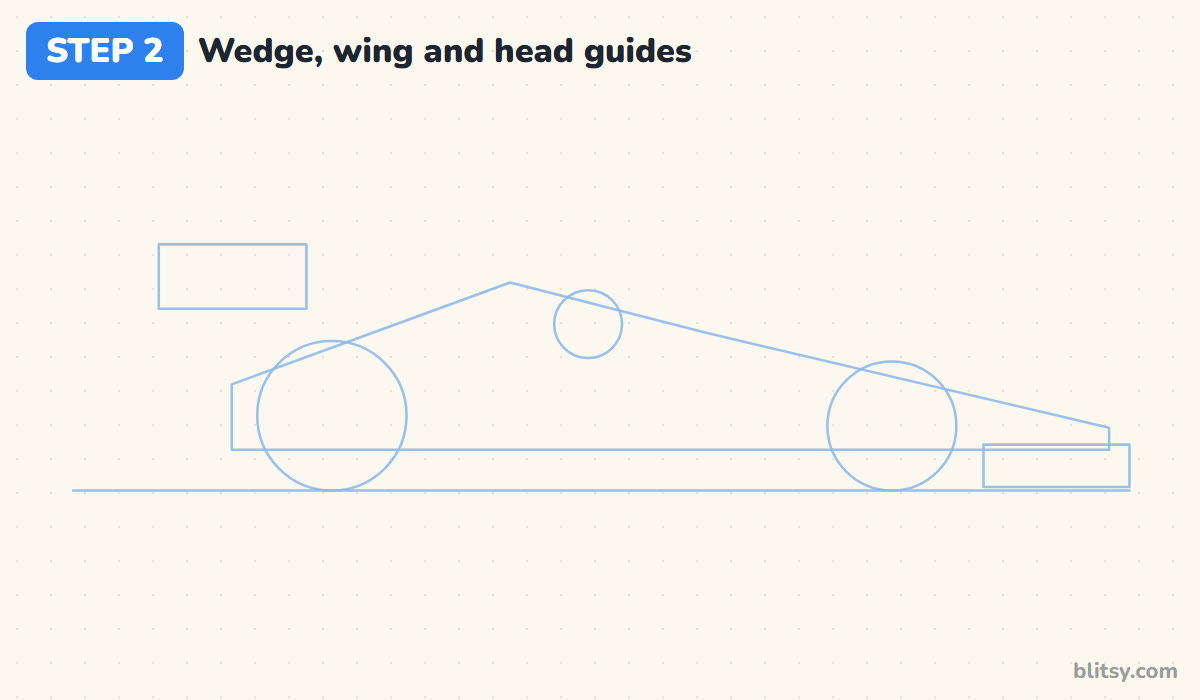
Draw a long wedge over the wheels: low and blunt at the back, peaking a little behind the middle, then sloping down past the front wheel. Add a small circle near the peak for the driver's head. Then place one box above and behind the rear wheel and a flat box in front of the front wheel to mark the wings.
💡 Tip: Press so lightly that the lines are barely there.
Step 3: Trace the race car's body outline
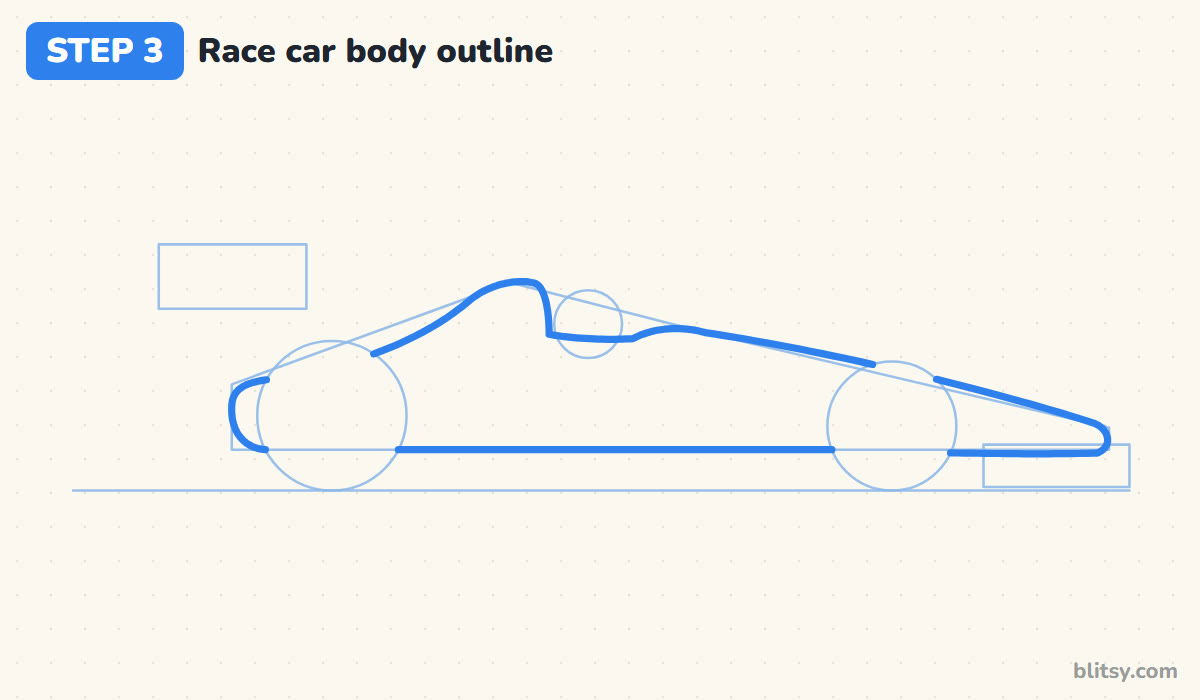
This is the most important line in the drawing. Start at the rounded back end, rise along the engine cover into a little hump behind the head circle, then dip down for the cockpit. A long, gentle slope carries the nose down to a rounded point, and the bottom edge runs flat. I stop the outline wherever it meets a wheel guide, because the tires will cover those parts.



💡 Tip: Draw the long nose slope in one slow, steady pull.
Step 4: Go over the tires with firm circles
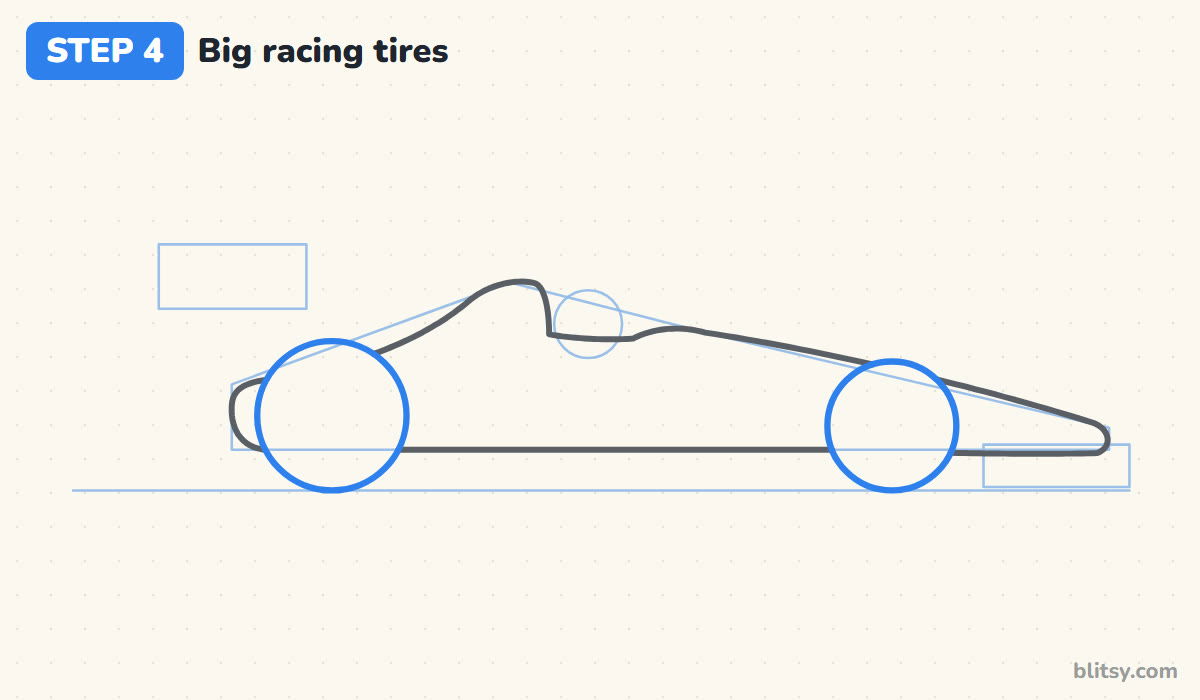
Trace both wheel guides again, this time with a confident line. Racing tires are wide and chunky, and they sit in front of the body, so nothing should cross them. Notice that the back tire is bigger than the front one. That small difference is what makes the car look ready to leap forward.
💡 Tip: Spin the paper a little as you go around each circle.
Step 5: Add rims and wheel centers
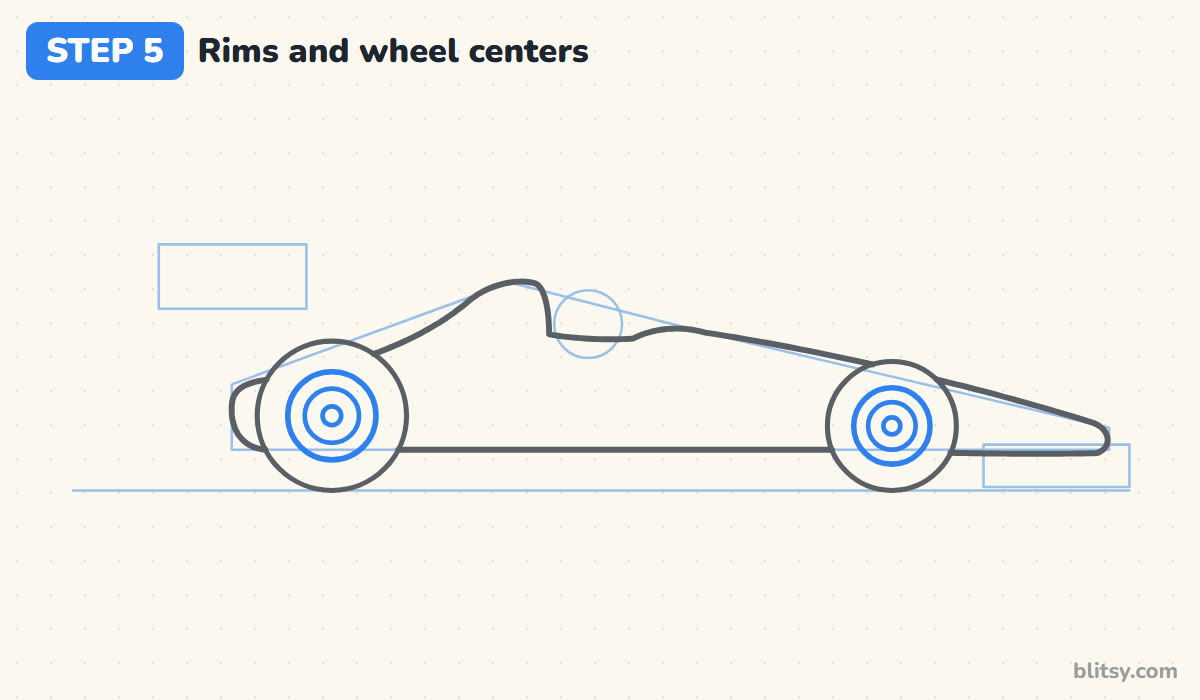
Inside each tire, draw a circle a bit more than half as wide for the rim. Put a smaller circle inside that, and then a tiny dot-sized circle right in the middle. Keep all three centered on the same point. If they drift, the wheel looks wobbly, like it's about to fall off.
💡 Tip: Mark the center with a dot first and circle around it.
Step 6: Draw the driver's helmet and visor
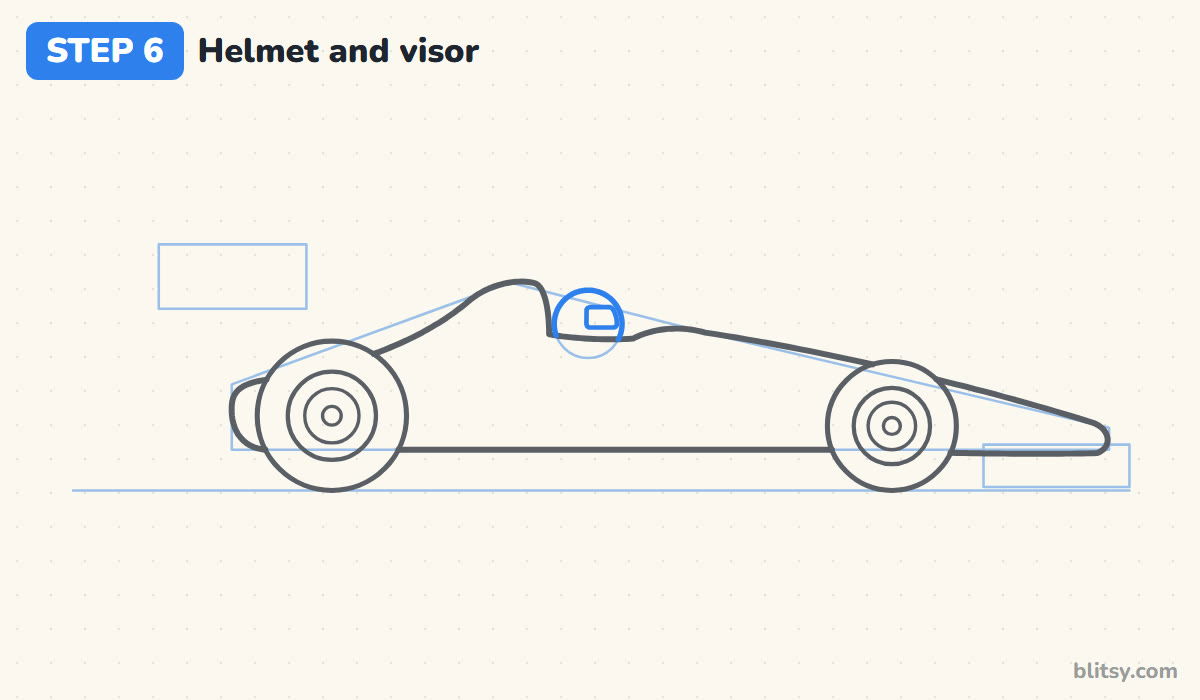
Go over the head guide, but only the part above the cockpit edge; the driver's shoulders are hidden inside the car. Then draw a short, rounded slot on the front of the helmet for the visor. Kids often make the head too big here. Only the top of the helmet should show, which keeps the car looking low.
💡 Tip: Keep the visor on the side facing the nose.
Step 7: Shape the side pod and the number disc
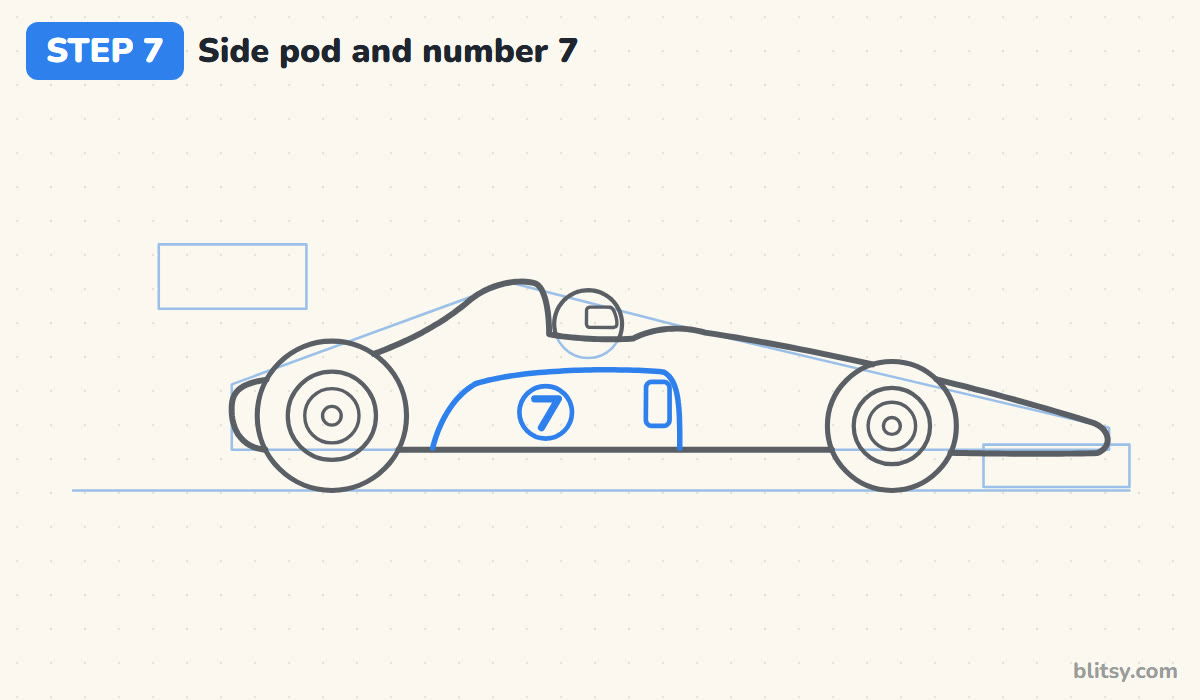
Below the cockpit, draw a curved line that rises from the floor, runs flat toward the front and drops down with a rounded corner. That's the side pod. Put a small tall rectangle at its front for the air intake. Then add a circle on the pod and write a big 7 inside with two straight strokes.




💡 Tip: Pick a number with straight lines, like 1, 4 or 7.
Step 8: Build the tall rear wing
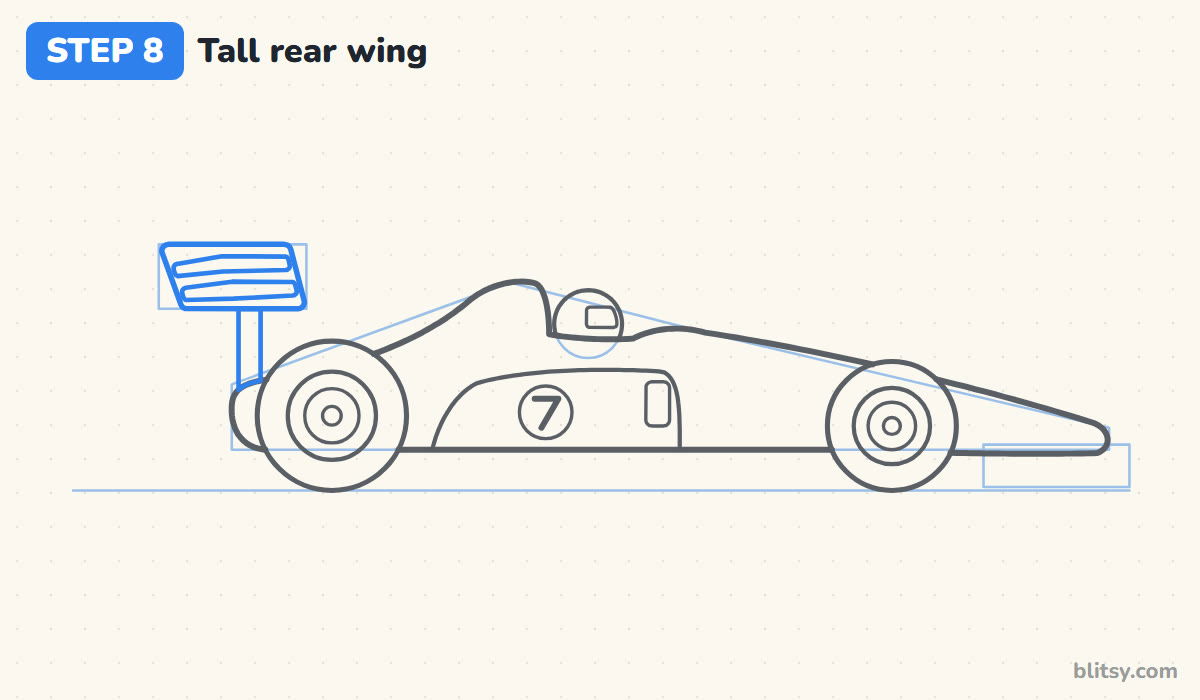
Turn the back box into a slanted plate with rounded corners. Inside it, draw two long, thin slats stacked one above the other, then connect the wing to the back of the car with one sturdy post. I like a wing that sits higher than the helmet, because it gives the car its racing silhouette.
💡 Tip: Slant both slats the same way so the wing looks neat.
Step 9: Add the front wing and its strut
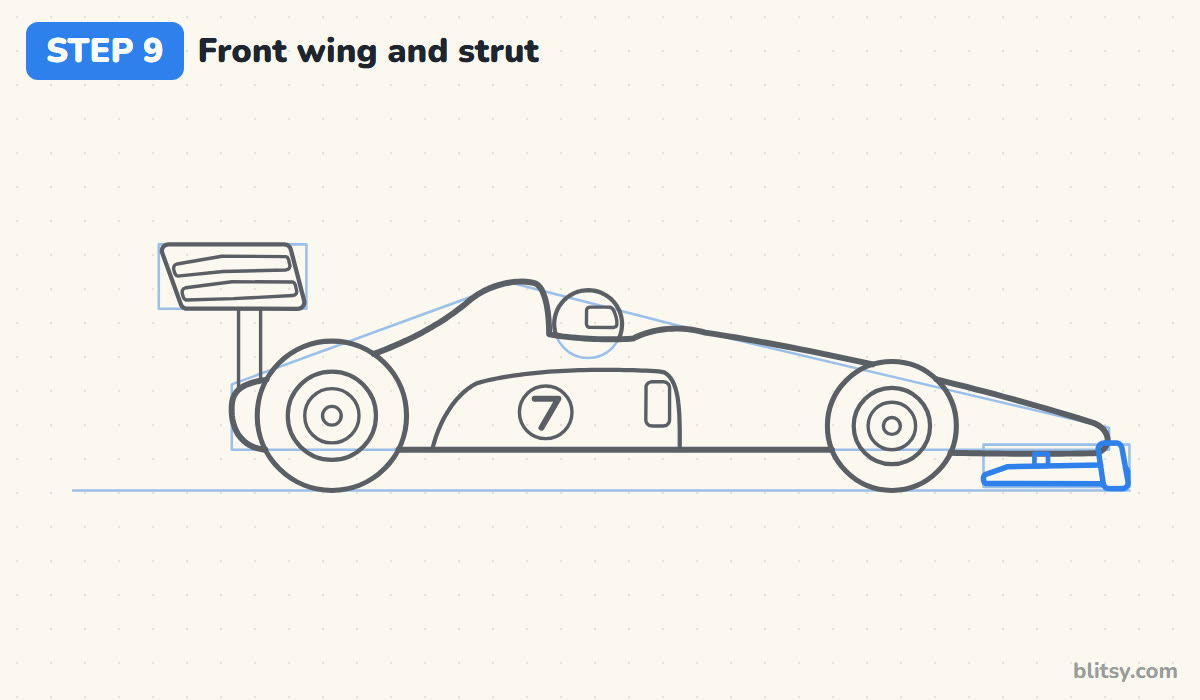
Under the tip of the nose, draw a long, flat wing that sits just above the ground line. Give it a small upright plate at the very front. A short strut joins the wing to the underside of the nose. This part is small and fiddly, so younger kids can draw the wing as a simple flat bar and skip the strut.
💡 Tip: Leave a sliver of space between the front wing and the ground.
Step 10: Finish with a mirror, an airbox and speed lines
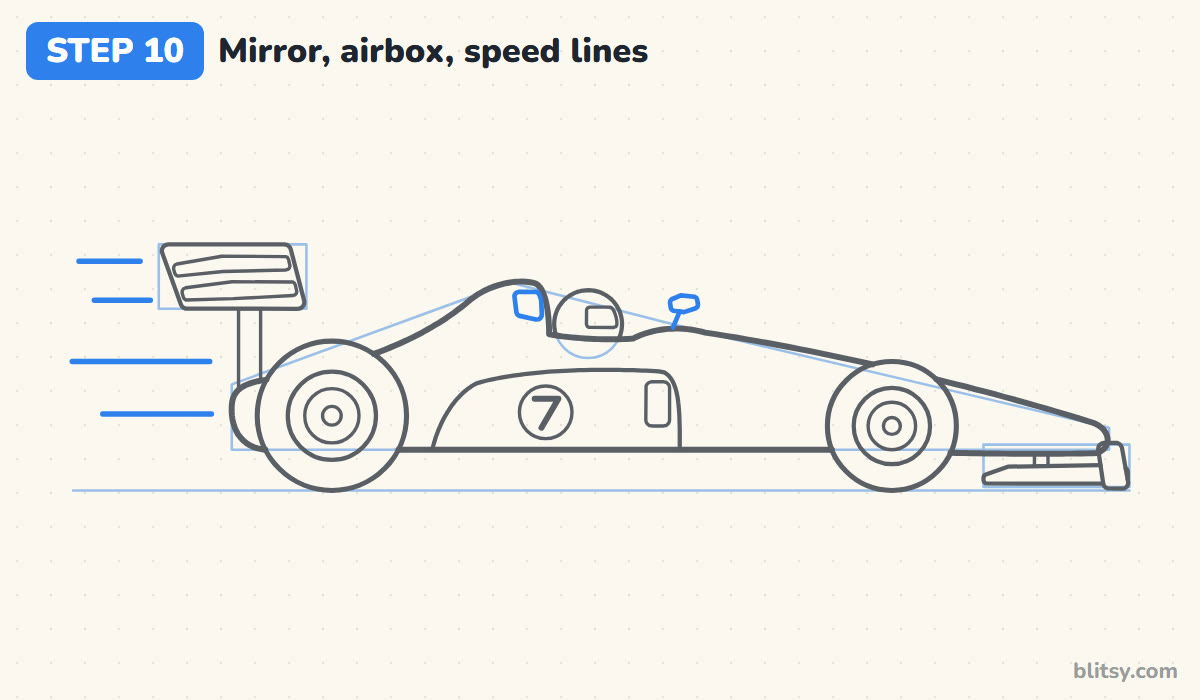
Draw a tiny mirror on a short stick just in front of the cockpit. Behind the helmet, at the top of the hump, add a small rounded square for the airbox opening. Then sweep a few straight lines out behind the car. Make them different lengths and space them unevenly; identical lines in a neat stack look like a ladder instead of motion.
💡 Tip: Draw speed lines from the car outward, in quick flicks.
Step 11: Ink the keeper lines and erase the guides
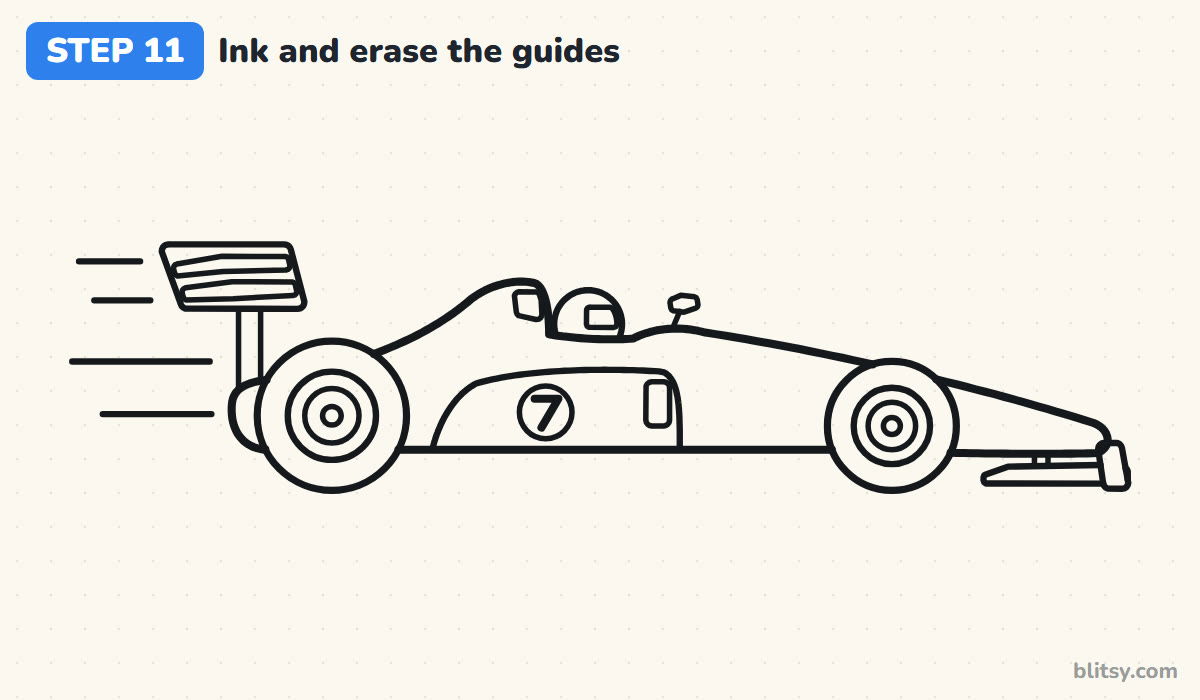
Go over every line you want to keep with the black pen. My order is the body first, then the wings and helmet, and the small wheel circles last, when my hand has warmed up. Wait until the ink is properly dry. After that, erase the ground line, the wedge, the head circle and the two wing boxes.



💡 Tip: Test the ink with a fingertip in a corner before you erase.
Step 12: Color the race car
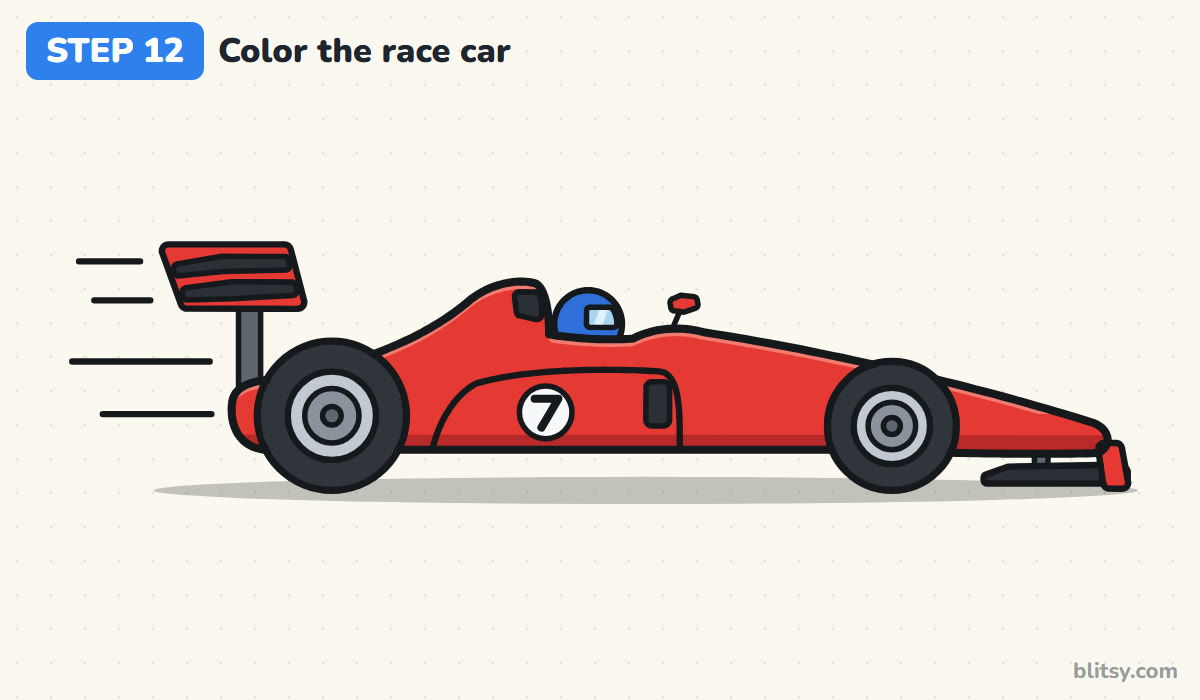
Color the body bright red, along with the wing end plates and the mirror. Press harder along the bottom for a darker strip, and leave a thin light edge on top so the paint looks glossy. The helmet is blue with a light blue visor, the number disc stays white, and the tires, slats and intakes go black. Finish with light gray rims, dark gray centers and a soft shadow underneath.
💡 Tip: Color the big red areas in long strokes that follow the nose.
Pit Stop Fixes for Wobbly Race Cars
- A tall, bulky body. It looks like a family car with wings stuck on. Keep the body low and let the nose taper into a long point.
- Both wheels the same size. The car loses its forward lean. Make the back tire clearly bigger than the front one.
- The whole driver showing. A head and shoulders sticking up look like a bumper car. Only the top of the helmet should rise above the cockpit edge.
- A rear wing that floats. Without a post it seems to hover over the car. Always connect it to the back with a solid support.
- Body lines running through the tires. The wheels then look transparent. Erase any line that crosses a tire, since the tires sit in front.
Racing Liveries and Other Twists to Try
Real racing teams change their paint every season, so you can too. Try a yellow car with black stripes or a blue one with a white nose, swap the 7 for your lucky number, and add a checkered flag behind the car. The monster truck drawing tutorial is great practice for huge tires, and how to draw a police car gives your racer a chase partner.
Race Car Coloring Page and Printable Step Guide
Want the racer on paper without drawing it first? The race car coloring page shows a colored example and the colors to use at the top, with a thick outline below and a track line under the wheels. The step-by-step PDF guide has all 12 steps with their tips, handy for a classroom or a rainy afternoon. Both print on Letter or A4 paper.
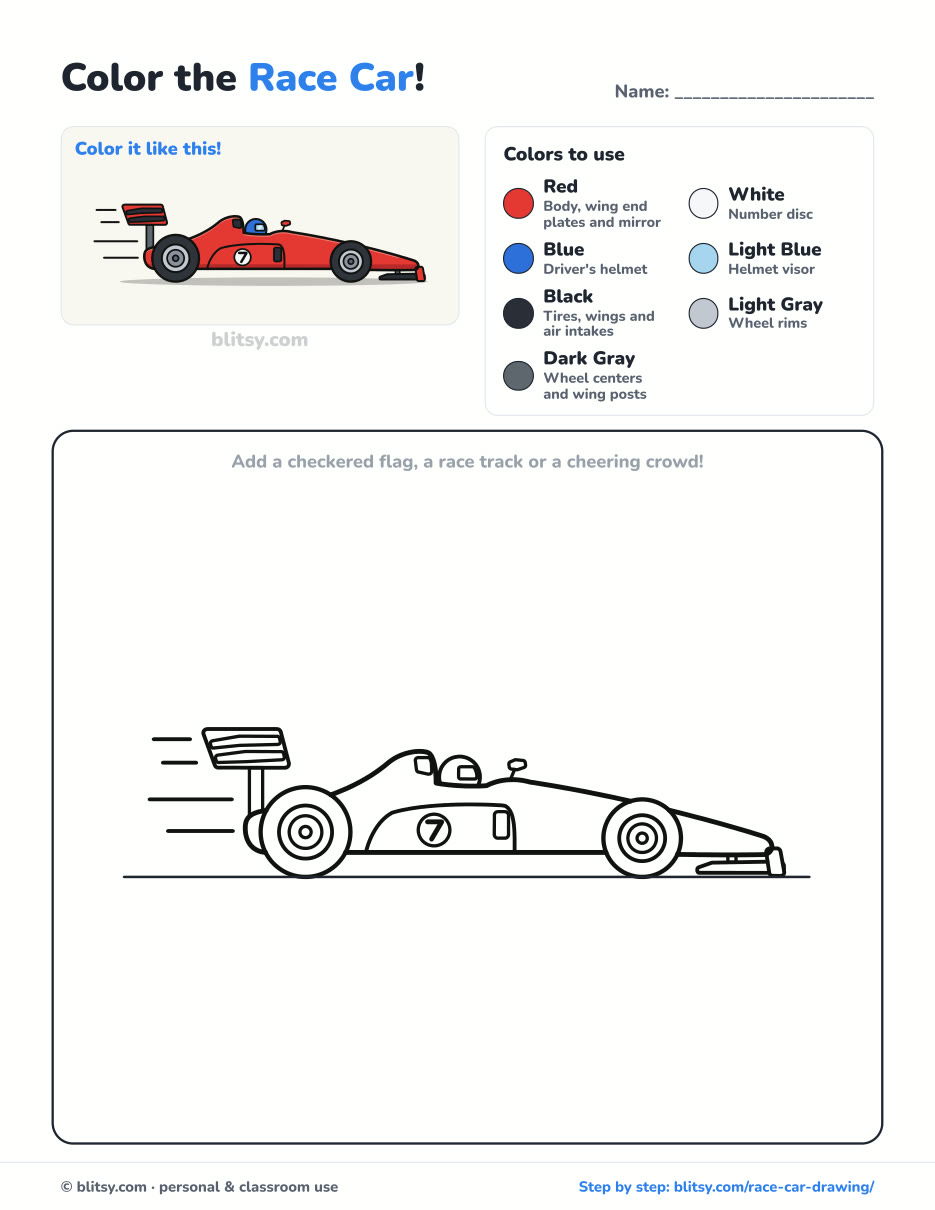
Black outlines with a colored example and the color names at the top. Ready to print and color.
⬇️ Download Coloring PageEvery step picture with its instructions and tips, to keep beside your paper while you draw.
⬇️ Download Drawing Guide📱 On a phone? Tap a download button, then open the file and choose Share → Save to Files or Print. On a computer, the PDF opens or saves straight to your Downloads folder.
Keep the Formula Car Steps Handy
Race Car on the Grid? Try These Tutorials Next
Each of these is a step-by-step tutorial, so the vehicles, places and scenes below all come in small numbered steps.
- Police Car Drawing: Give your racer company with the police car drawing tutorial, lights on and star polished.
- Halloween Drawing: A haunted house with a witch-hat tower is the goal of this Halloween drawing tutorial.
- School Drawing: Draw a brick schoolhouse with a clock and bell tower using how to draw a school step by step.
- Diamond Drawing: Straight lines build a faceted gem and two small ones in the diamond drawing tutorial.
- Volcano Drawing: An island volcano erupts between palm trees in this volcano drawing step by step lesson.
- Summer Drawing: Set up a beach with toys on the sand and an umbrella in the summer drawing tutorial.
- Solar System Drawing: Put every planet on its own curved path with the how to draw the solar system diagram.
- Realistic Drawing: Learn to shade a shiny apple lit by one lamp in the realistic drawing tutorial.
- Fire Truck Drawing: Another vehicle with lots of parts: the fire truck drawing tutorial adds a ladder, a hose reel and lights.
- Room Drawing: Set one vanishing point and build a bedroom around it in the room drawing step by step lesson.
Race Car Drawing Questions Answered
What is the easiest way to draw a race car?
Draw a long, low wedge on two circles, add a small half circle on top for the helmet and a box on a stick at the back for the wing. Those four shapes already read as a race car; everything else is extra detail.
How do you draw a race car for kids?
Keep the big shapes and drop the small parts. Younger children can skip the airbox, the mirror and the front wing strut, and draw the wheels as plain circles with a dot in the middle.
How long does it take to draw a race car?
Plan on 30 to 40 minutes including color. The body outline takes the most care; the wheels and wings go quickly once the outline is in place.
What colors should I use for a race car?
Red is the classic choice, but racing cars come in every color. Pick one bright main color for the body, keep the tires and wings dark, and let the number disc stay white so it stands out.
Line your racer up next to a friend's drawing and see whose car looks faster. 🏁
Related posts:
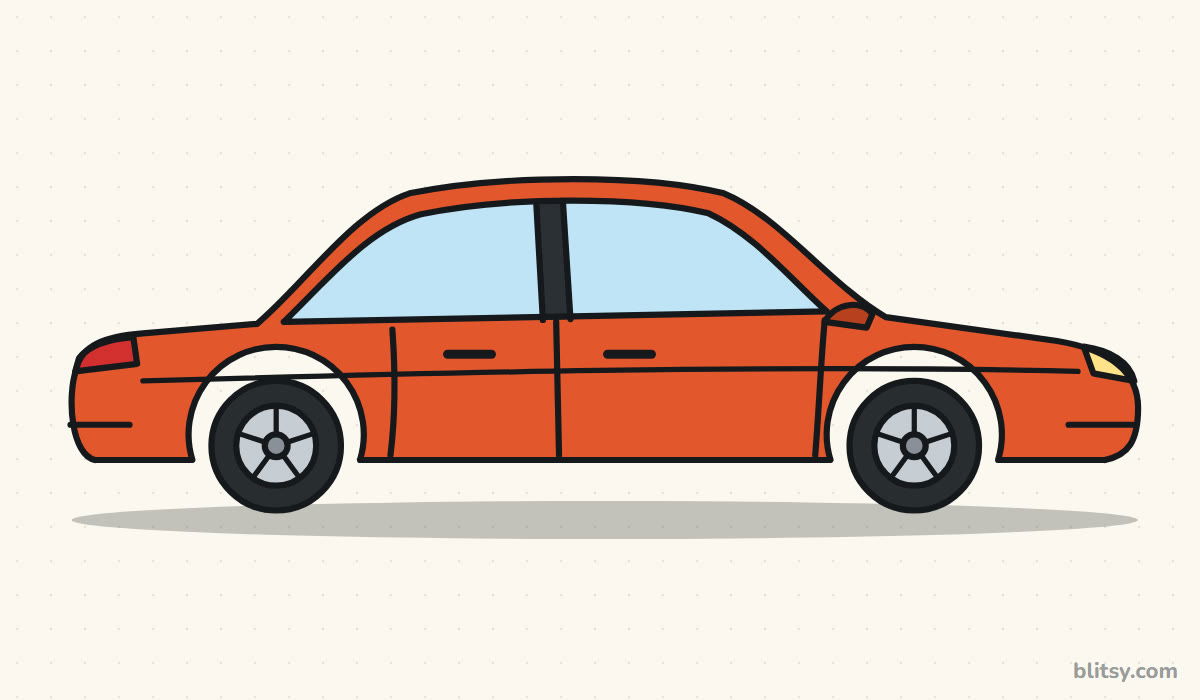 How to Draw a Car Step by Step (Easy Drawing for Beginners)
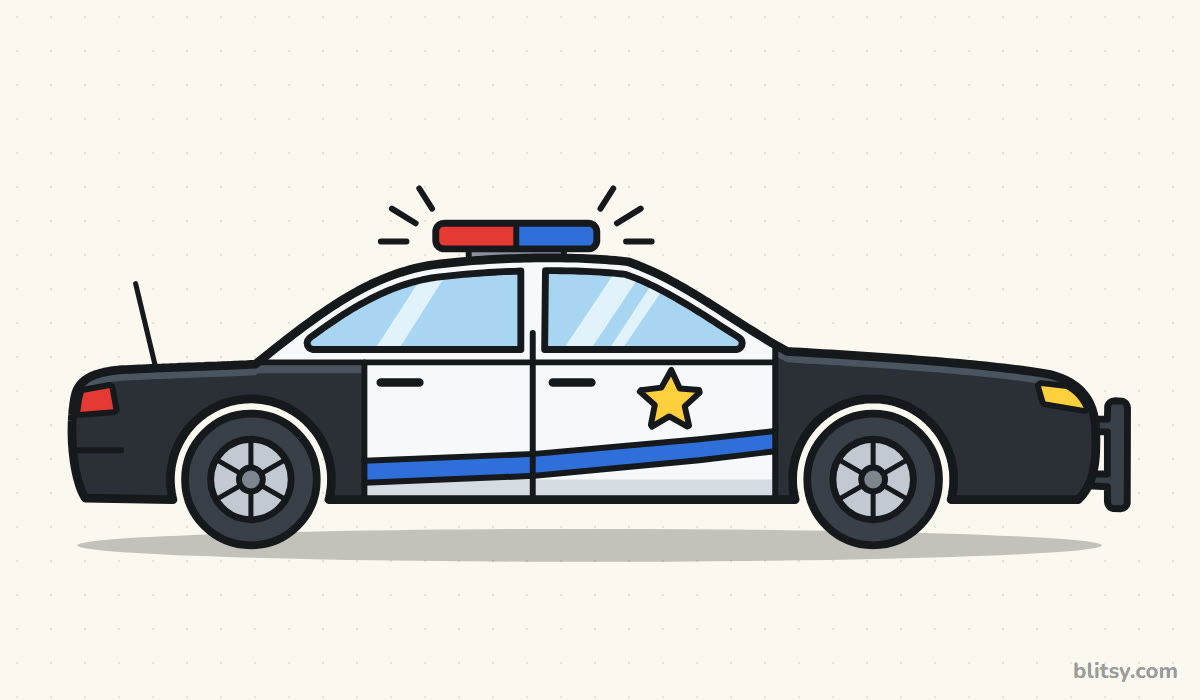 How to Draw a Police Car Step by Step (Easy for Kids)
 How to Draw a Whale Step by Step (Easy for Beginners)
 How to Draw Lungs Step by Step (Easy Science Diagram)
 How to Draw a Pineapple Step by Step (Easy Crown and Slice)
 How to Draw Iron Man Step by Step (Easy Chibi for Kids)
 How to Draw a Dress Step by Step (Easy Party Dress)
 How to Draw a Chicken Step by Step (Easy for Beginners)
 How to Draw a UFO Step by Step (Cute Alien Saucer)
 How to Draw a Volcano Step by Step (Easy Erupting Volcano)
 How to Draw a Crow Step by Step (Easy for Beginners)
 How to Draw a Tiger Step by Step (Easy Walking Pose)

