
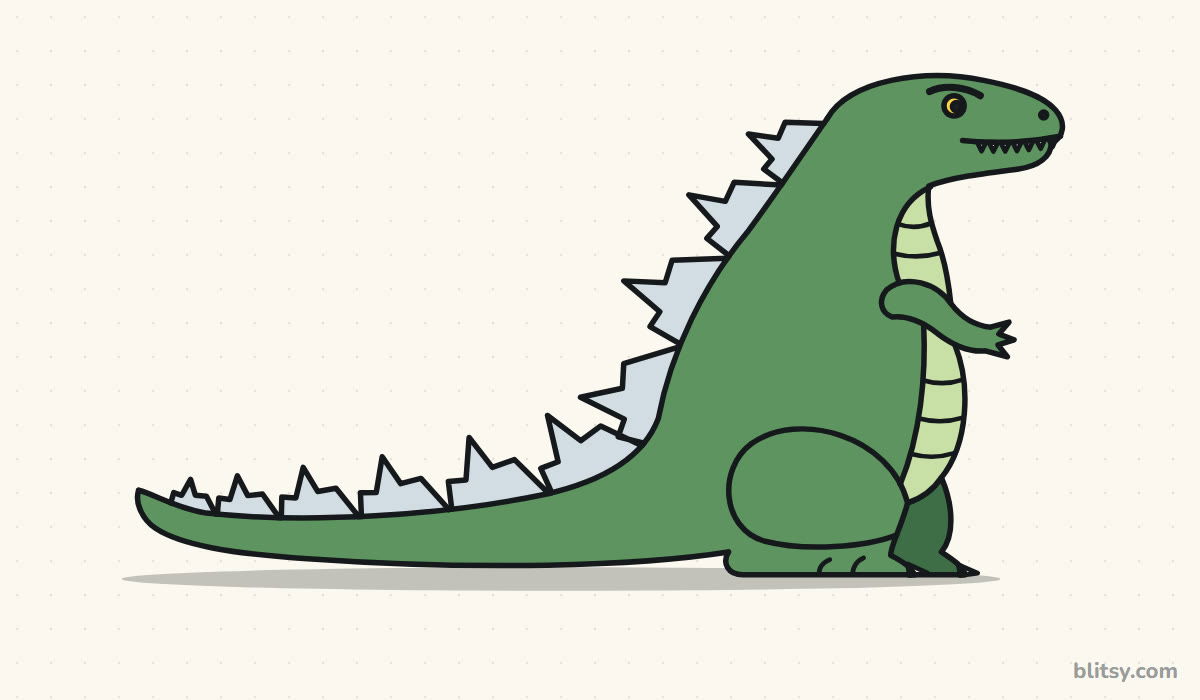
Godzilla looks hard to draw because of all those jagged plates, but underneath he is mostly one big oval with a tail. Once you see that, the rest falls into place. Here I'll show you how to draw Godzilla step by step, starting with a few light guide shapes and ending with an inked, colored monster that stands on his own two feet. This is my simple fan-art version for practice, not official artwork, so feel free to make him your own.
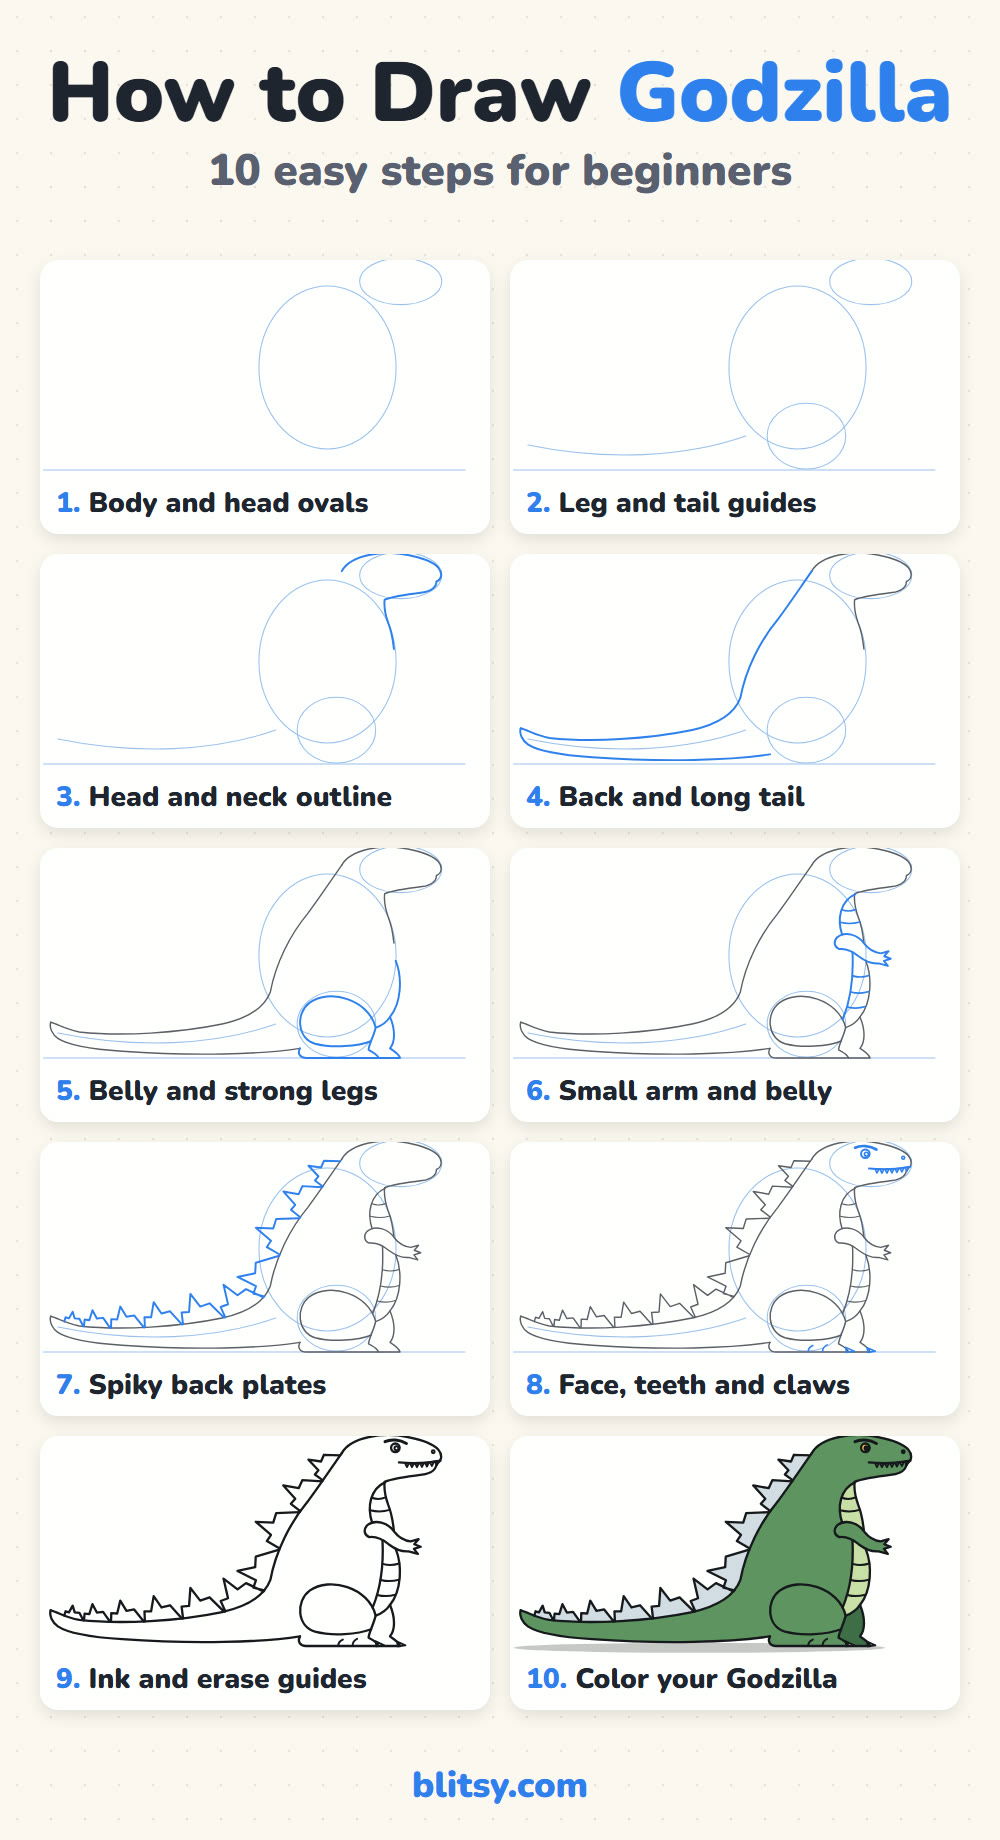
Each picture adds one small chunk of the drawing. Anything new in that step is drawn in blue, and everything from earlier steps turns gray, so your eye goes straight to the lines you need to add. Keep your pencil handy and match one picture before you scroll to the next.
Quick overview
⏱️ Time: about 30 to 40 minutes
🎯 Level: easy to medium, fine for kids aged 8 and up
✏️ Steps: 10
🦖 You'll draw: Godzilla standing side-on, tail on the ground
Supplies for a Monster-Sized Sketch
- A pencil (HB or 2B works well for light guides)
- A soft eraser that won't smear graphite
- A black fineliner or thin marker for inking
- Colored pencils or markers in greens, gray and yellow
- A sheet of plain paper, turned sideways
Turn the paper landscape before you start, because the tail needs a lot more room than you'd expect.
How to Draw Godzilla Step by Step
Step 1: Sketch the body and head ovals
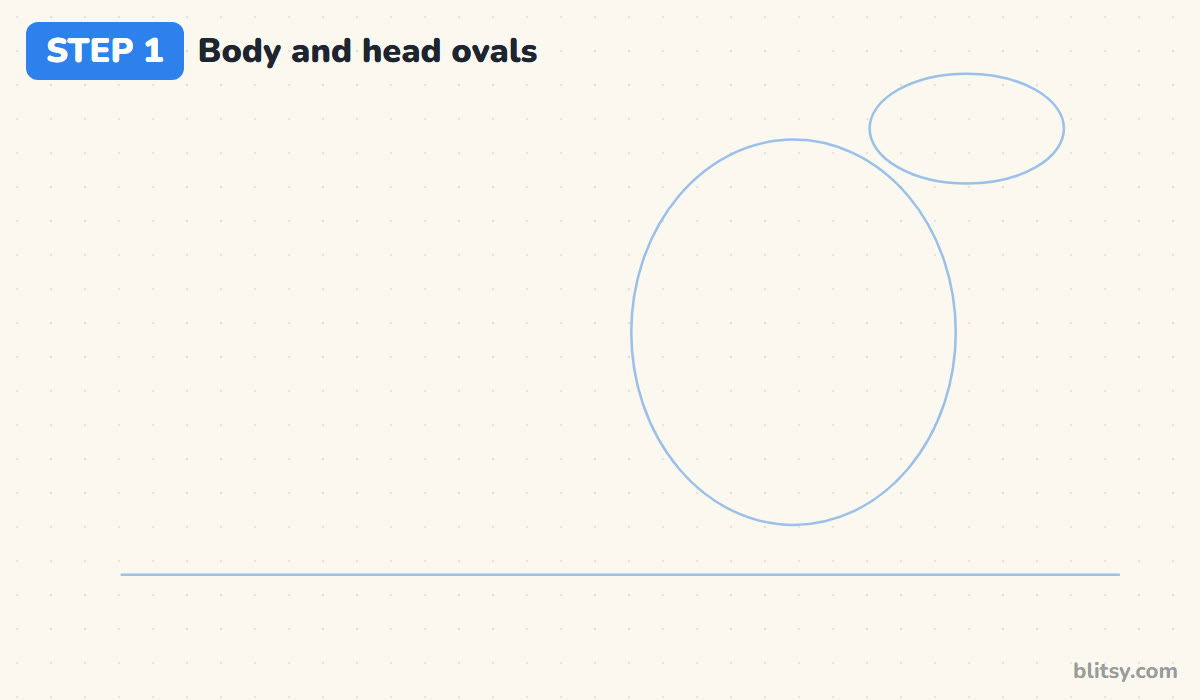
Draw a light ground line near the bottom of the page. Just above it, slightly right of center, sketch a tall oval for the body. Then add a smaller, wider oval up at the top right for the head. I place the head oval so it overlaps the corner of the body oval only a little, because Godzilla carries his head forward, not perched straight on top.
💡 Tip: Sketch so lightly you can barely see it. Every one of these lines gets erased later.
Step 2: Add the leg circle and tail line
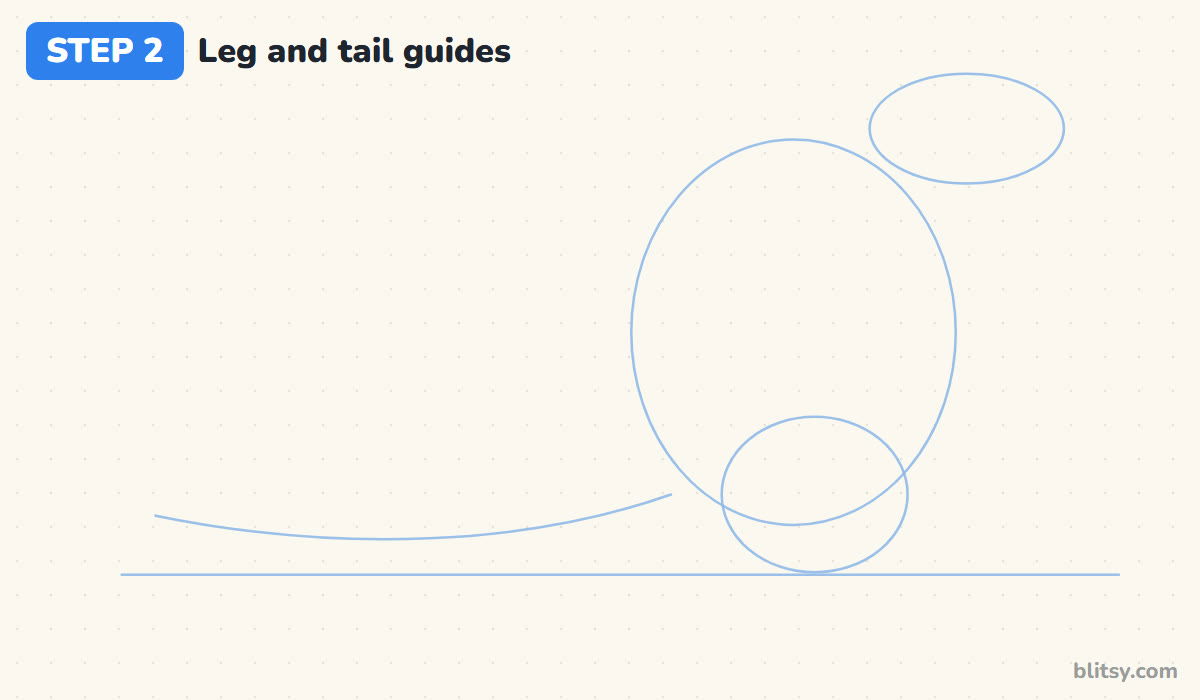
Put a circle at the bottom of the body oval, resting on the ground line. That's the big thigh. Next, run one long, gently curved line from behind the leg all the way to the left side of your paper. This is the center of the tail, and it should be almost as long as the whole body is tall.
💡 Tip: If the tail line hits the paper edge too soon, your body is too far left. Shift it now while it's cheap.
Step 3: Draw the head and neck outline
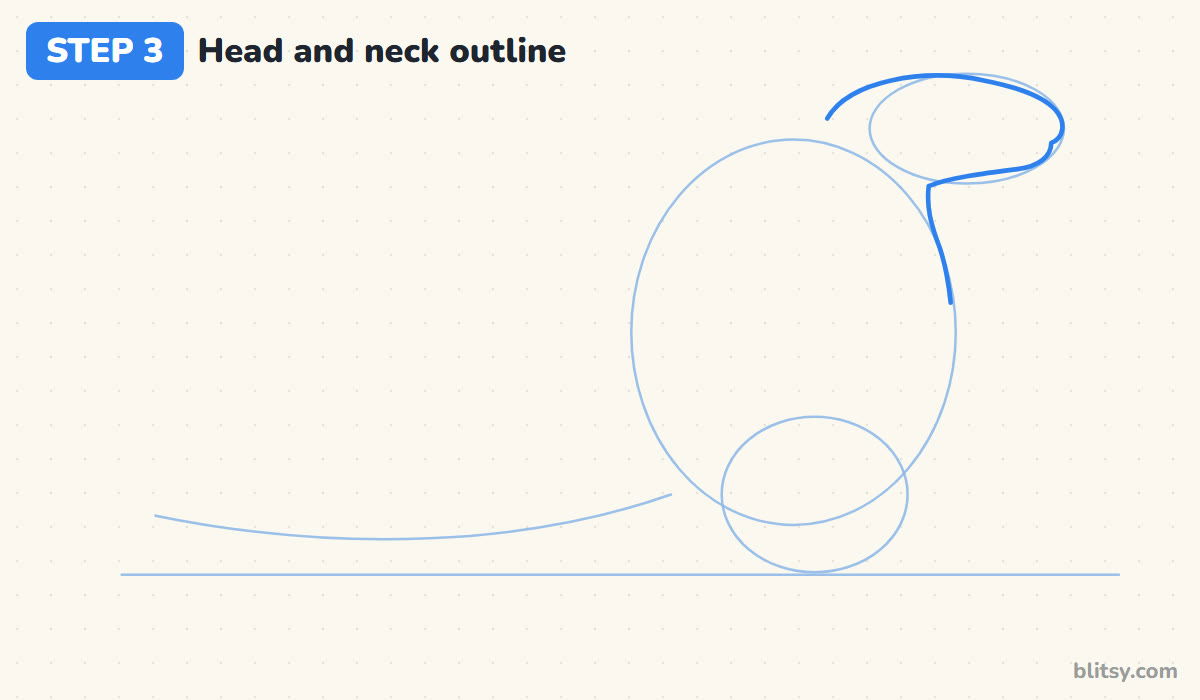
Start at the back of the head and draw a rounded top that flattens into a long snout. Curve down around the nose, tuck in under the chin, and run the line along the jaw. From there, drop a thick neck down the front of the body oval. Stop the line about halfway down the chest, since the arm will cover the next part.


💡 Tip: Keep the head small compared with the body. A big head makes him look like a baby dinosaur.
Step 4: Shape the back and the long tail
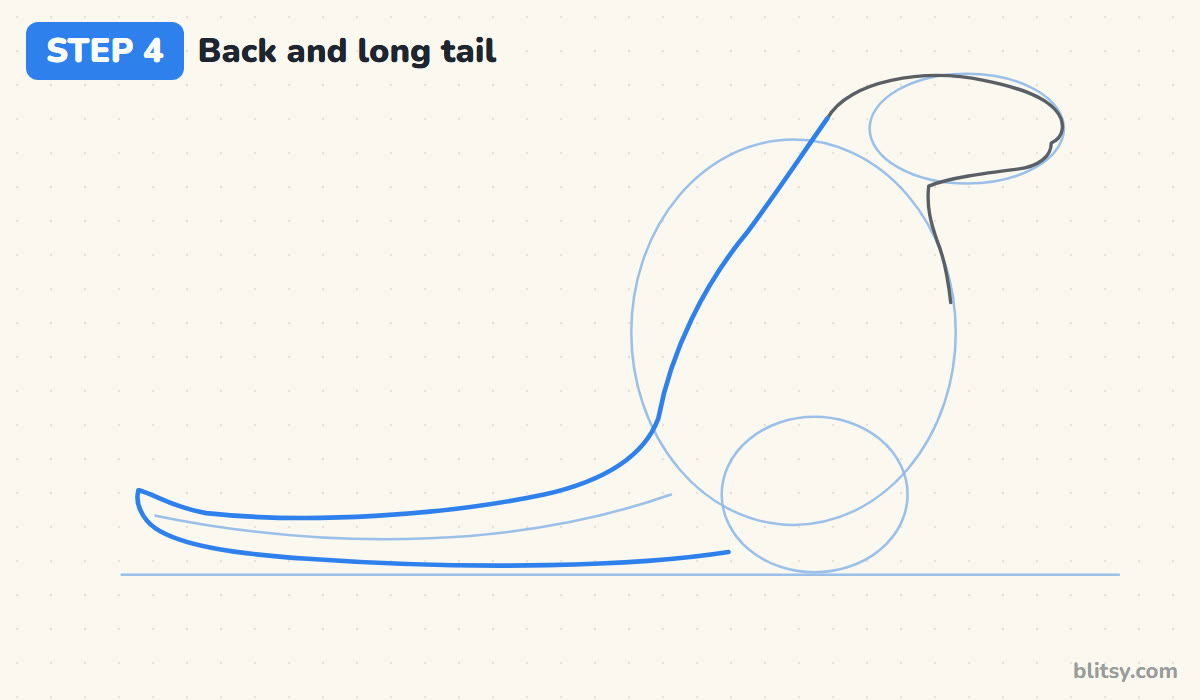
Begin at the tip of the tail, with a small upward flick, and draw along the top of your tail guide. As you reach the body, sweep the line up the back in one smooth curve until it meets the back of the head. Then go back to the tip and draw the underside of the tail, keeping it close to the ground line so the tail rests on the floor.
💡 Tip: Make the tail thick where it joins the body and thin at the tip. That taper is what makes it look heavy.
Step 5: Draw the belly and strong legs
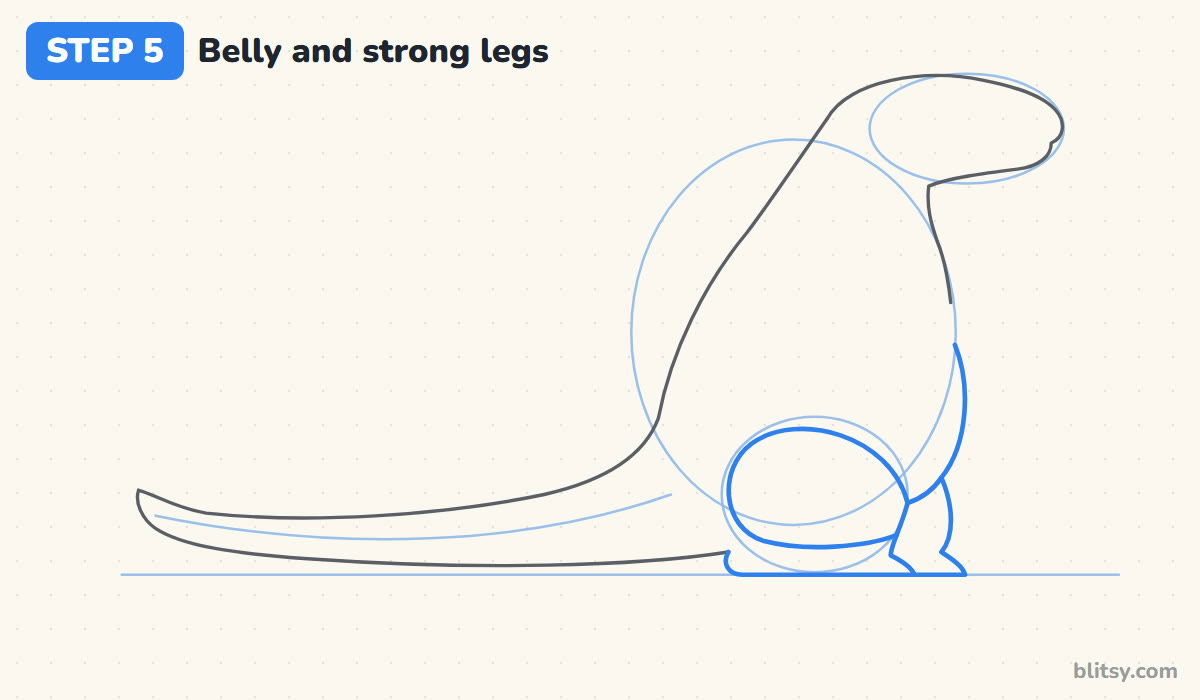
Continue the front line down past the arm area, bulging the belly out, and bring it into the front of the leg. Draw the foot flat along the ground and finish with a rounded heel. Inside, draw a large rounded thigh shape over your leg circle. Then add the second leg peeking out just in front of the first, so you can tell he has two.
💡 Tip: Keep the bottom of both feet sitting exactly on the ground line, or he will look like he is tipping over.
Step 6: Add the small arm and belly
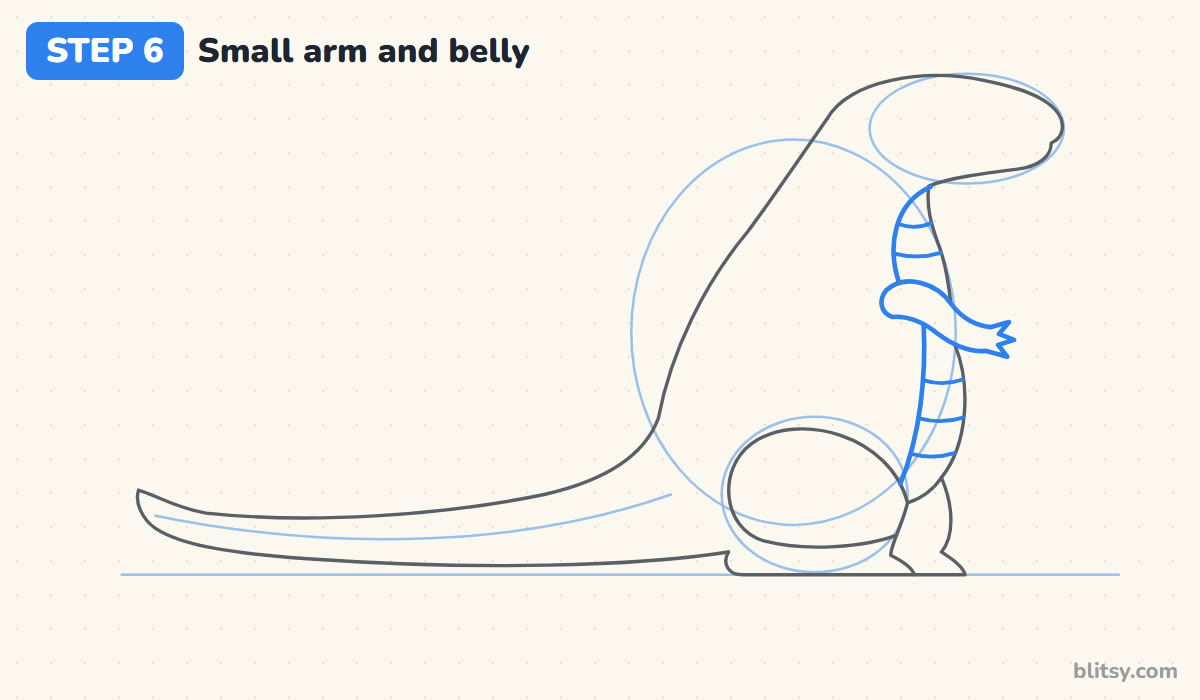
Godzilla's arms are short for his size, which is part of his charm. Draw one arm starting at the shoulder, bending forward, with three pointed fingers at the end. Now draw a curved line inside the front edge, from under the jaw down to the thigh, skipping the part behind the arm. Add a few short curved stripes across that strip for the belly scales.
💡 Tip: Space the belly stripes evenly, with the same gap each time, and they'll read as scales instead of scribbles.
Step 7: Draw the spiky back plates
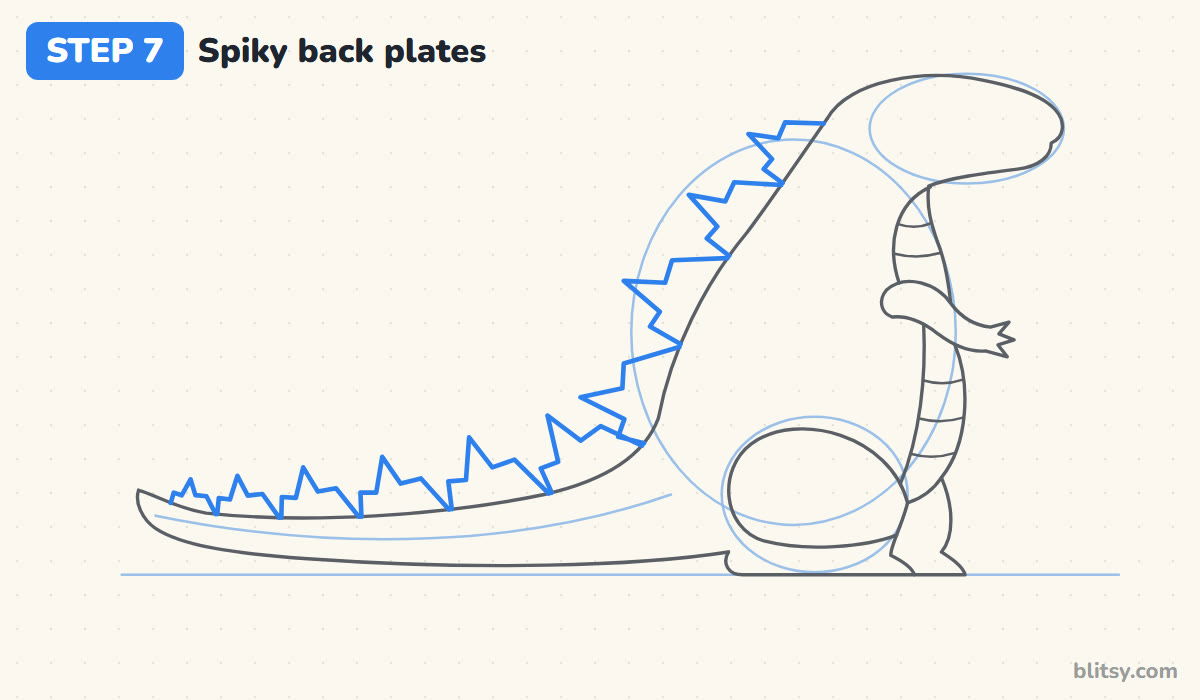
These plates are the part everyone recognizes, so take your time. Start at the neck with two medium plates, then draw the biggest ones over the middle of the back. Let them shrink as you move down the tail until they're tiny near the tip. Each plate is a tall point with one smaller point on each side, a bit like a pointy leaf, and each one leans slightly toward the tail.

💡 Tip: Draw the tallest plate first, then size the rest from it. It's much easier than guessing one by one.
Step 8: Add the face, teeth and claws
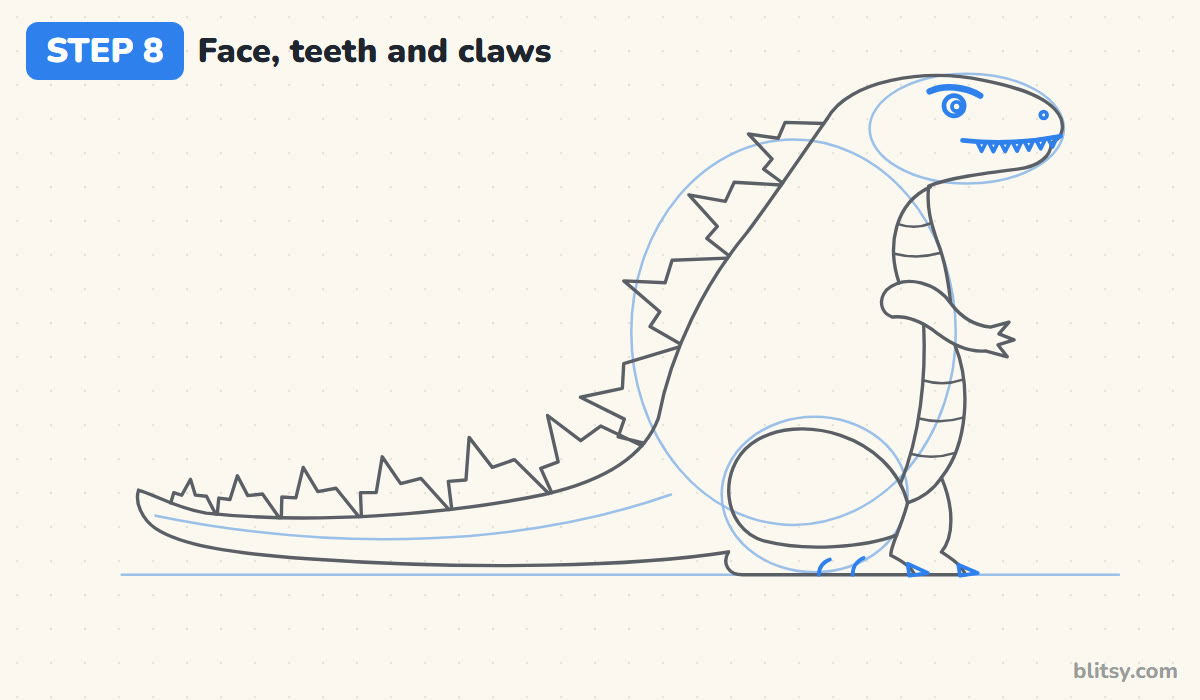
Place a small round eye near the top of the head, with a dot for the pupil and a thick, slanted brow line above it. That brow is what gives him a grumpy look. Add a tiny nostril at the end of the snout and a long mouth line underneath. Hang a row of small triangle teeth from the mouth line, then finish the feet with a couple of toe lines and little claws.
💡 Tip: Tilt the brow down toward the snout for a fierce face, or keep it flat if you want a friendlier monster.
Step 9: Ink the lines and erase the guides
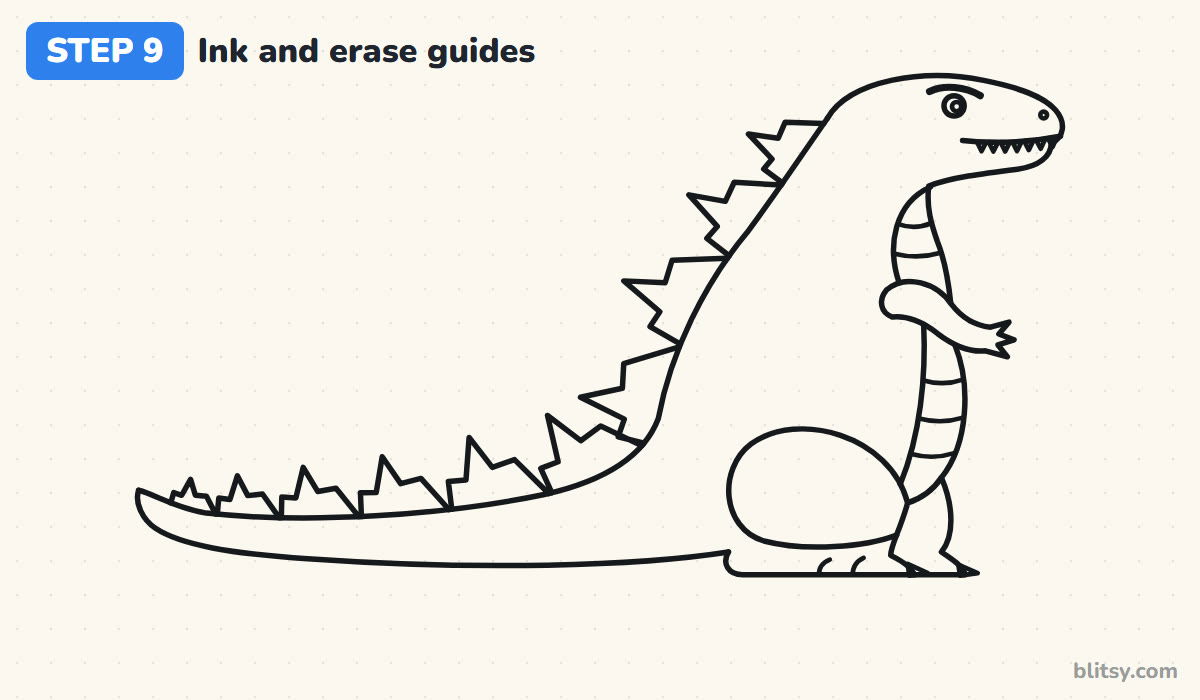
Trace over every line you want to keep with a black fineliner. I go slowly on the back plates, because the corners look best when the pen stops at each point and then changes direction. Leave the ovals, the leg circle and the tail guide alone. Wait a minute for the ink to dry, then erase all the pencil underneath.
💡 Tip: Rest the side of your hand on a scrap of paper while inking so you don't smudge the wet lines.
Step 10: Color your Godzilla
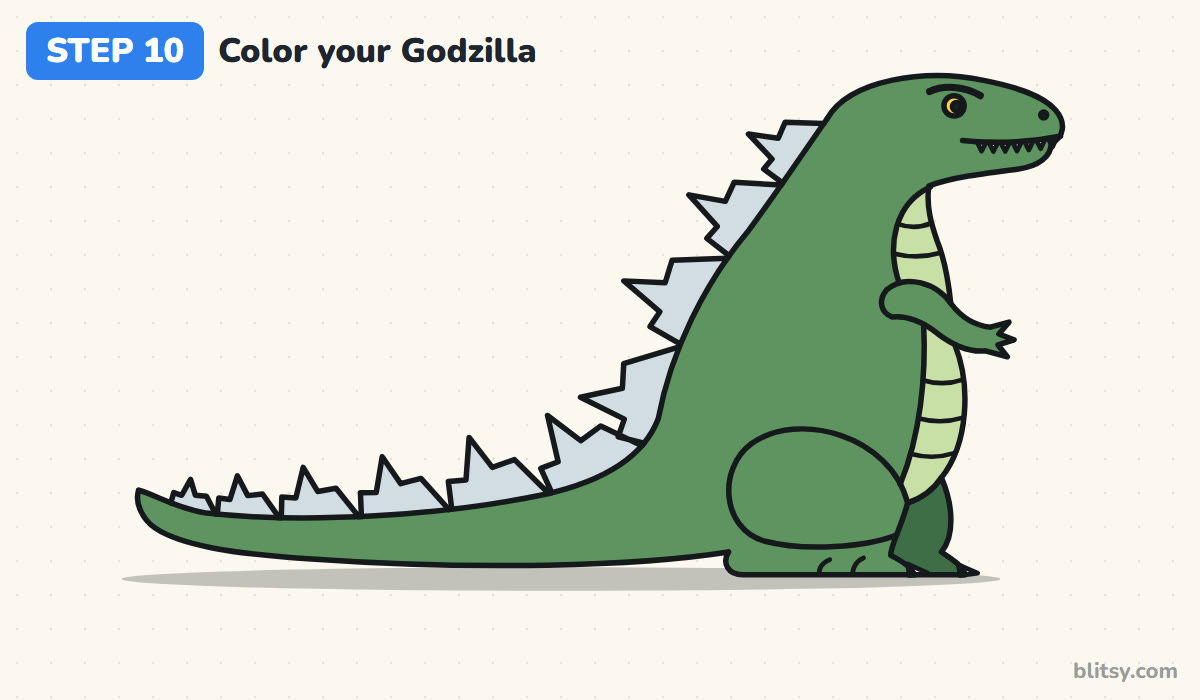
Color the body, tail and arm in a medium green, and use a darker green for the second leg so it stands apart. Give the belly a light green, and make the back plates pale gray. Yellow for the eye, white for the teeth and cream for the claws. A soft gray shadow under the feet and tail plants him on the ground.
💡 Tip: Layer two greens on the body, pressing harder along the back, and you get easy shading without extra lines.
Where Kaiju Drawings Tend to Go Wrong
- A tail that's too short. Godzilla's tail balances his whole body. Let it run almost the full width of the paper.
- Plates that are all the same size. Same-size spikes look like a saw blade. Make them big over the back and small at both ends.
- A head that is too big. A large head turns him into a cartoon dinosaur. Keep it clearly smaller than the chest.
- Feet floating above the ground. Draw the ground line first and set both feet flat on it.
- Coloring before the ink dries. Markers drag wet ink into gray streaks. Give it a minute first.
Ways to Change Up Your Kaiju
Once the basic pose feels easy, start playing. Open the mouth wide and add a glowing blue atomic breath, color the back plates bright blue, or put a row of tiny buildings by his feet so he looks truly giant. Smaller kids can skip the belly stripes and the toe lines entirely. If you want a rival for him, try our step-by-step King Kong lesson, or print a few Jurassic World coloring pages for more prehistoric fun.
Free Godzilla Coloring Page and PDF Guide
Prefer paper over a screen? Grab the free Godzilla coloring page, which has a colored example at the top and a key that tells kids which color goes on each part, plus the step-by-step PDF guide with all 10 steps and tips. Both print on regular Letter or A4 paper.
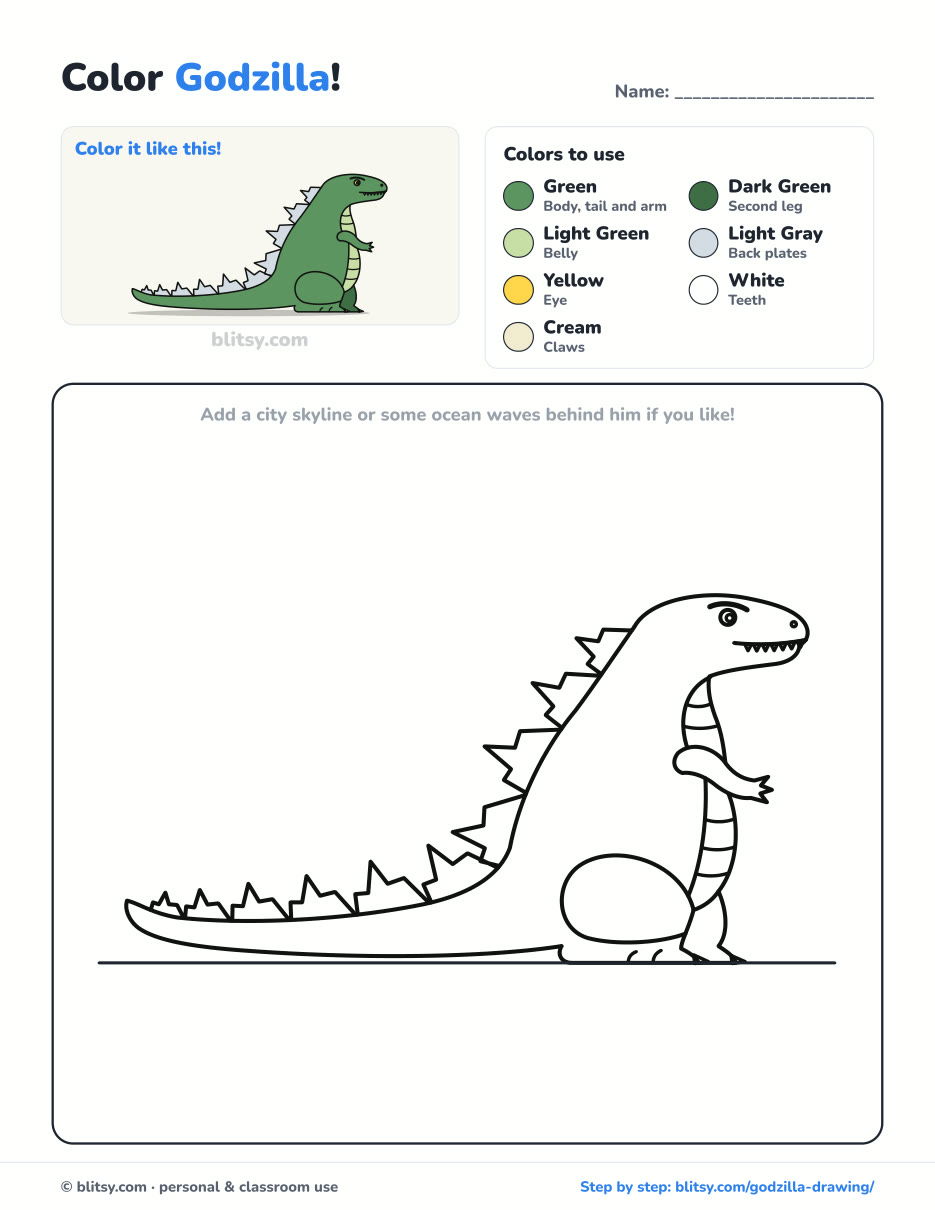
Black outlines with a colored example and the color names at the top. Ready to print and color.
⬇️ Download Coloring Page
Every step picture with its instructions and tips, to keep beside your paper while you draw.
⬇️ Download Drawing Guide📱 On a phone? Tap a download button, then open the file and choose Share → Save to Files or Print. On a computer, the PDF opens or saves straight to your Downloads folder.
Pin This Kaiju Lesson for Later
Godzilla Done? Meet More Creatures to Draw
Every link below opens a full step-by-step tutorial with numbered pictures, so you can pick your next creature and start right away.
- Arctic Fox Drawing: Sit a fluffy fox down with its tail curled to one side in this how to draw an arctic fox step by step lesson.
- Puppy Drawing: This easy puppy drawing tutorial ends with a pup sticking its tongue out, collar on and ready for a walk.
- Narwhal Drawing: Trade the kaiju for a gentle sea creature. The narwhal drawing tutorial builds one with its tusk pointing up in 11 steps.
- Miraculous Ladybug Drawing: Draw a chibi Ladybug with her mask on and her yo-yo ready using this Miraculous Ladybug drawing tutorial.
- Dragonfly Drawing: Learn how to draw a dragonfly with its wings spread wide and big round eyes, all in ten steps.
- Penguin Drawing: Rosy cheeks and flippers out for balance: that's the bird waiting at the end of this step-by-step penguin drawing.
- Rat Drawing: Start at the nose and finish with a curled tail in this rat drawing tutorial for a curious gray rat.
- Whale Drawing: A smiling blue whale, spout included, takes just ten steps in the easy whale drawing lesson.
- Kitten Drawing: Follow how to draw a kitten step by step and you'll end up with a ginger kitten sitting politely.
- Ant Drawing: Three ovals become a red ant standing on all six feet in this ant drawing step by step guide.
- King Kong Drawing: Give Godzilla his old rival. This King Kong drawing tutorial finishes with the giant gorilla mid-roar, fists planted on the ground.
- Sloth Drawing: Learn how to draw a sloth step by step, ending with a slow, happy face after 11 short steps.
- Realistic Drawing: For a change of pace, the realistic drawing tutorial shows you how to shade a shiny apple lit by a single lamp.
- Paw Print Drawing: Draw a dog print, a cat print and a small heart between them with this paw print drawing tutorial.
Godzilla Drawing Questions, Answered
What is the easiest way to draw Godzilla?
Build him from simple shapes first: a tall oval for the body, a small oval for the head, a circle for the thigh and one curved line for the tail. Outline around those, then add the plates last. Leaving the plates for the end keeps the drawing manageable.
How do you draw Godzilla for kids?
Use the same steps but keep the plates to six or seven big simple triangles, skip the belly stripes, and draw with a thick marker. Younger kids often enjoy coloring him in bright, non-realistic colors too.
How long does it take to draw Godzilla?
Plan on 30 to 40 minutes with inking and coloring. The back plates take the longest, and they get quicker every time you draw them.
What do I need to draw Godzilla?
A pencil, an eraser, a black fineliner, some colored pencils or markers and a sheet of paper. Nothing special is needed.
Grab your pencil, sketch those two ovals, and see how mean (or friendly) you can make your kaiju look. 🦖✏️
Related posts:
 How to Draw a Car Step by Step (Easy Drawing for Beginners)
 How to Draw a Rat Step by Step (Easy for Beginners)
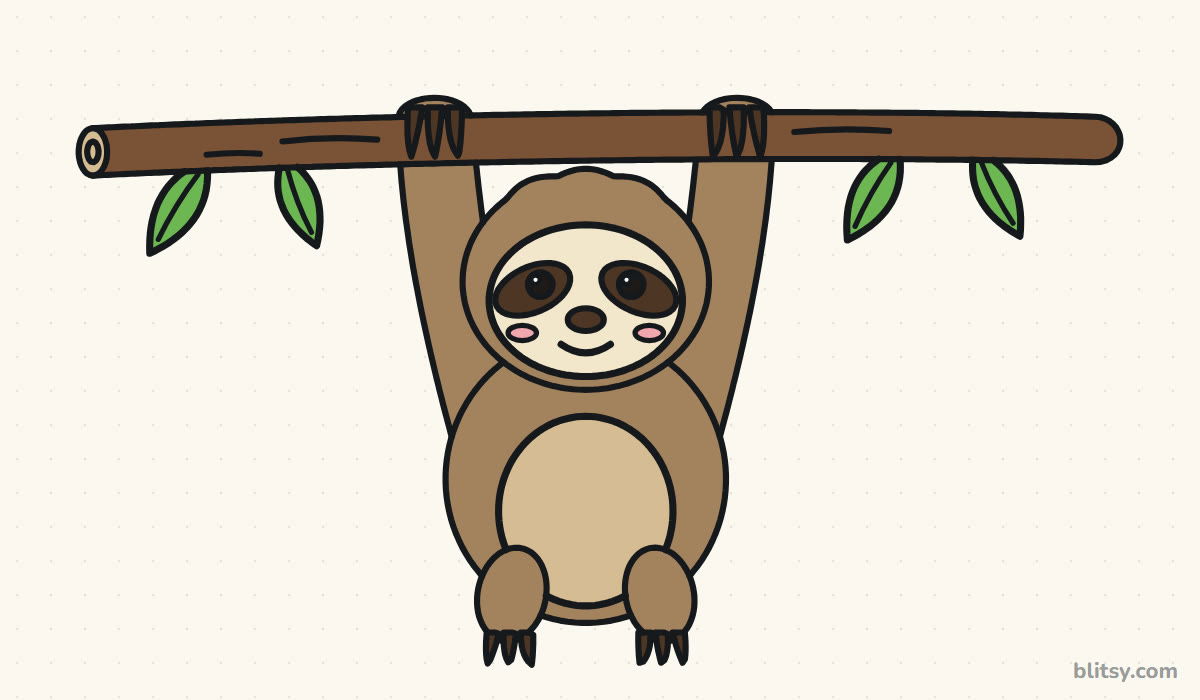 How to Draw a Sloth Step by Step (Easy for Beginners)
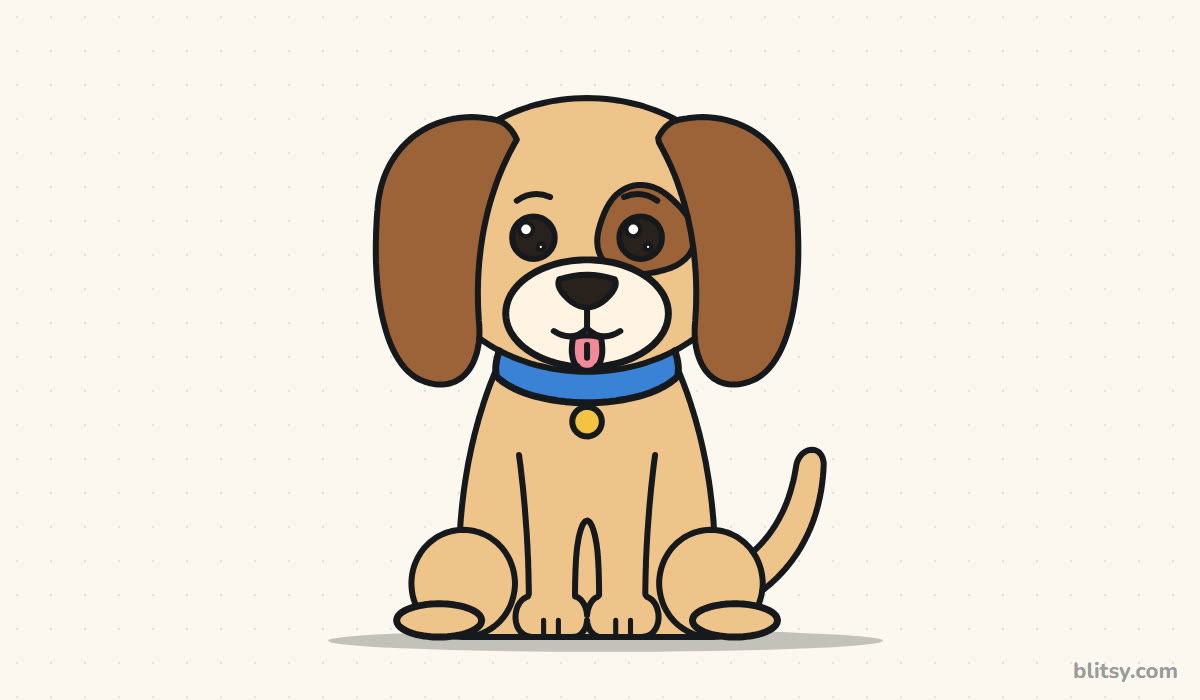 How to Draw a Puppy Step by Step (Easy for Beginners)
 How to Draw a Rose Step by Step (Spiral Method for Beginners)
 How to Draw Olaf Step by Step (Easy for Beginners)
 How to Draw a Ladybug Step by Step (Easy for Beginners)
 How to Draw a Dog Step by Step (Easy Side View for Beginners)
 How to Draw a Leopard Step by Step (Easy for Beginners)
 How to Draw a Light Bulb Step by Step (Easy for Beginners)
 How to Draw a Crow Step by Step (Easy for Beginners)
 How to Draw an Eagle Step by Step (Easy for Beginners)

