
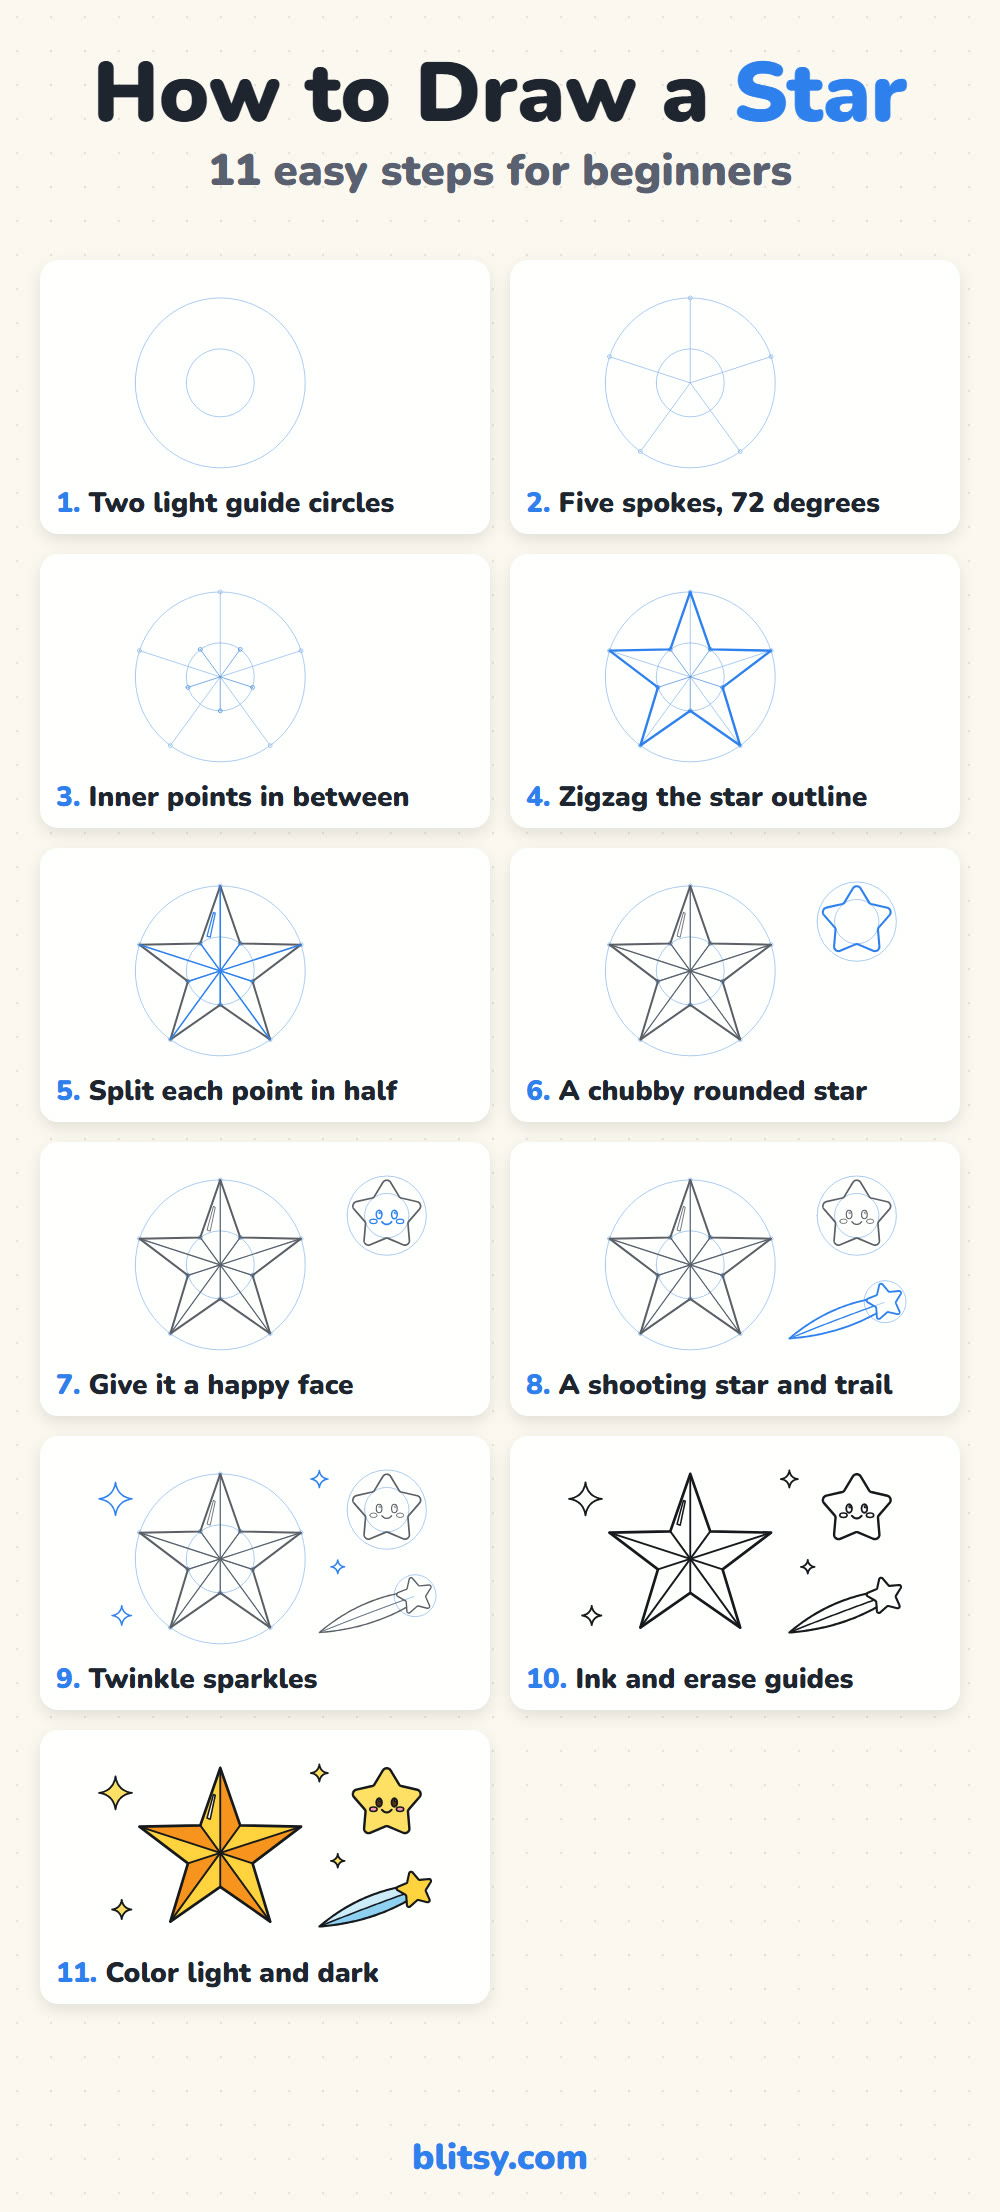
Most of us learned the five-point star as one quick scribble, and it usually comes out with one fat point and one skinny one. There's a calmer way that gives you even points every time. In this lesson you'll see how to draw a star step by step using two light circles and a few spokes, so every point lands in the right place before you draw a single outline. After that we'll turn it into a shiny 3D star and add three small extras: a smiling star, a shooting star and some twinkles.

Follow the bright blue in each picture: those are the lines for that step, while older work fades to gray. The pale blue circles are helpers you'll rub out in step 10.
Quick overview
⏱️ Time: around 20 minutes
🎯 Level: easy, good for kids from about 6 with a little help on the circles
✏️ Steps: 11
⭐ You'll draw: a 3D faceted star, a cute smiling star, a shooting star and twinkle sparkles
Kit for Neat, Even Star Points
- A pencil with a sharp tip
- A soft eraser
- A compass, or a round lid and a small cup to trace
- A ruler for the straight edges
- A black fineliner or felt pen
- Colored pencils or markers in gold, orange, yellow, pink, brown and two light blues
- Plain paper turned sideways
No compass at home? Tracing around a jar lid and a bottle cap works just as well for the two circles.
How to Draw a Star Step by Step
Step 1: Draw two light guide circles
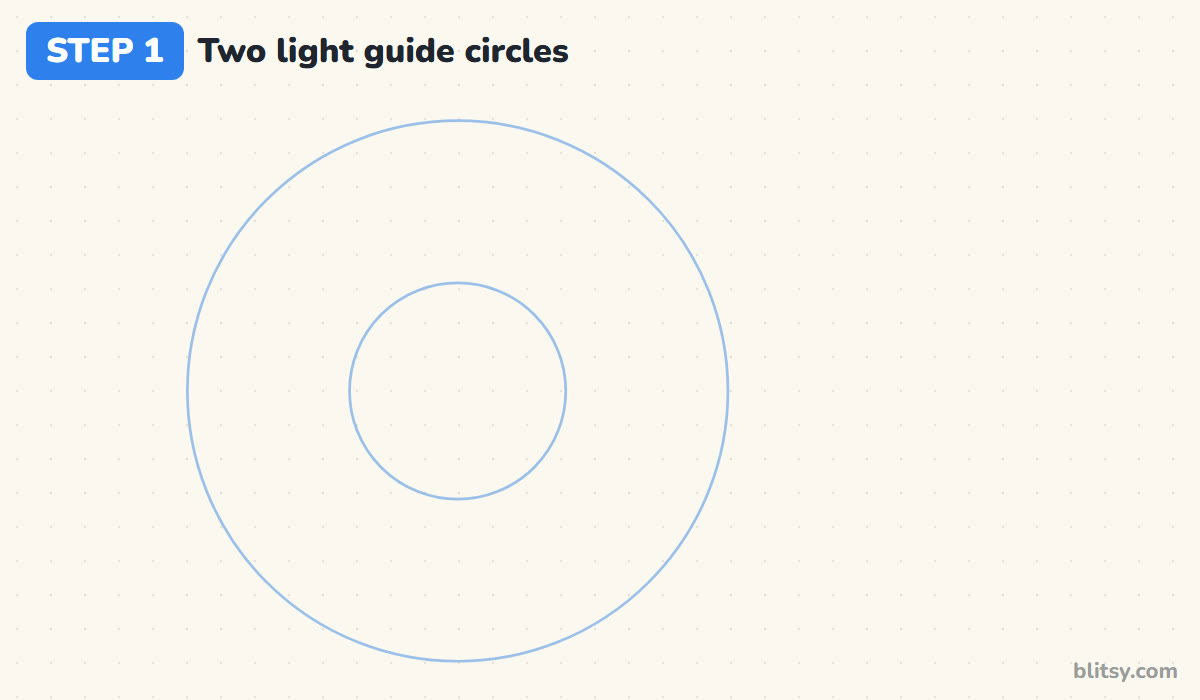
Put a small dot a little left of the middle of your page. Around it, draw a big circle, then a much smaller one around the same dot, about two fifths as wide. I place the star off center on purpose, because the right side will hold the smaller stars later.
💡 Tip: Press so softly that the circles almost disappear; they are only helpers.
Step 2: Draw five spokes 72 degrees apart
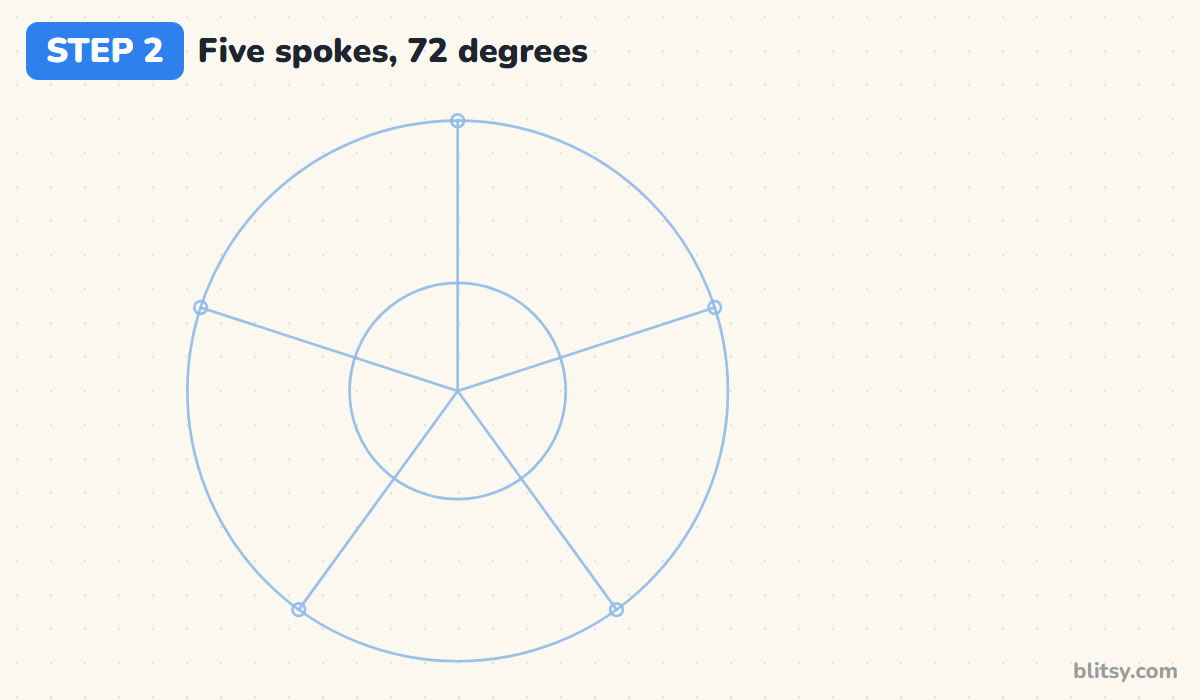
A full turn is 360 degrees, and 360 divided by 5 is 72. Draw the first spoke straight up from the center dot to the big circle. With a protractor, measure 72 degrees and draw the next one, and keep going until you have five. Put a small dot where each spoke touches the big circle. Those five dots are your star points.
💡 Tip: No protractor? Think of a clock: the spokes land near 12, a bit past 2, just before 5, just after 7 and a bit before 10.
Step 3: Mark five inner points halfway between
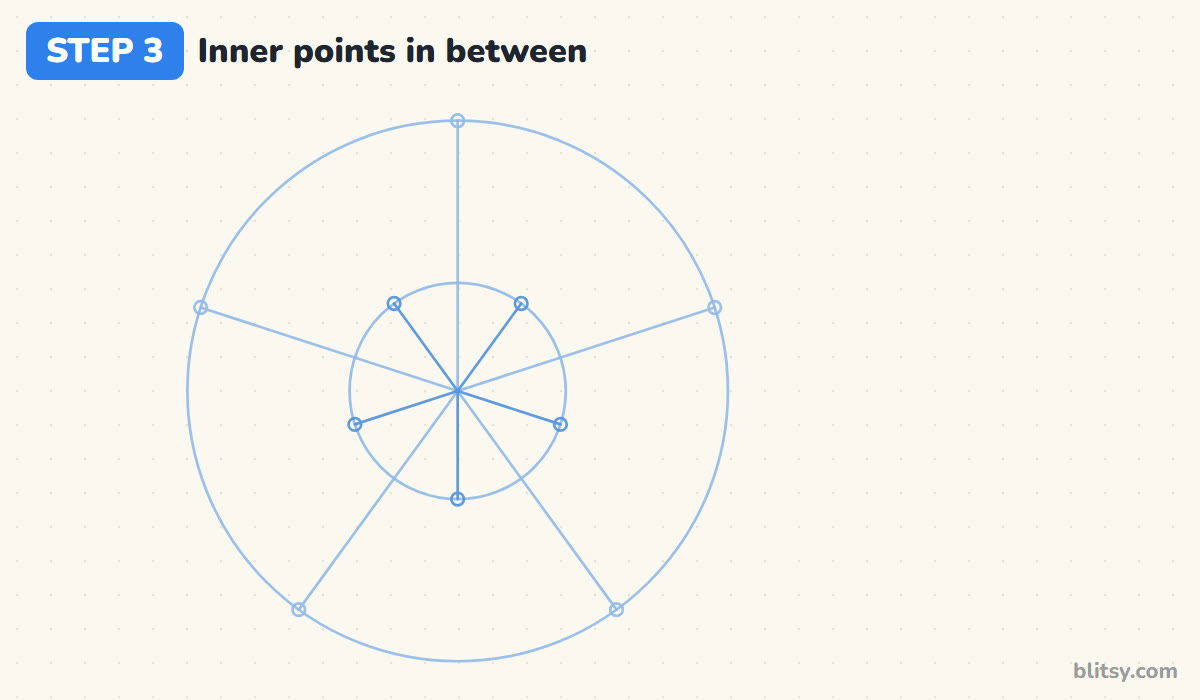
Now split every gap in half. Draw a short spoke exactly between each pair of long spokes, 36 degrees from each, but stop it at the small circle. Mark a dot there too. You now have ten dots in all, five on the outside and five on the inside, and they alternate all the way around.




💡 Tip: Count your dots before moving on; ten means you're ready.
Step 4: Zigzag the star outline
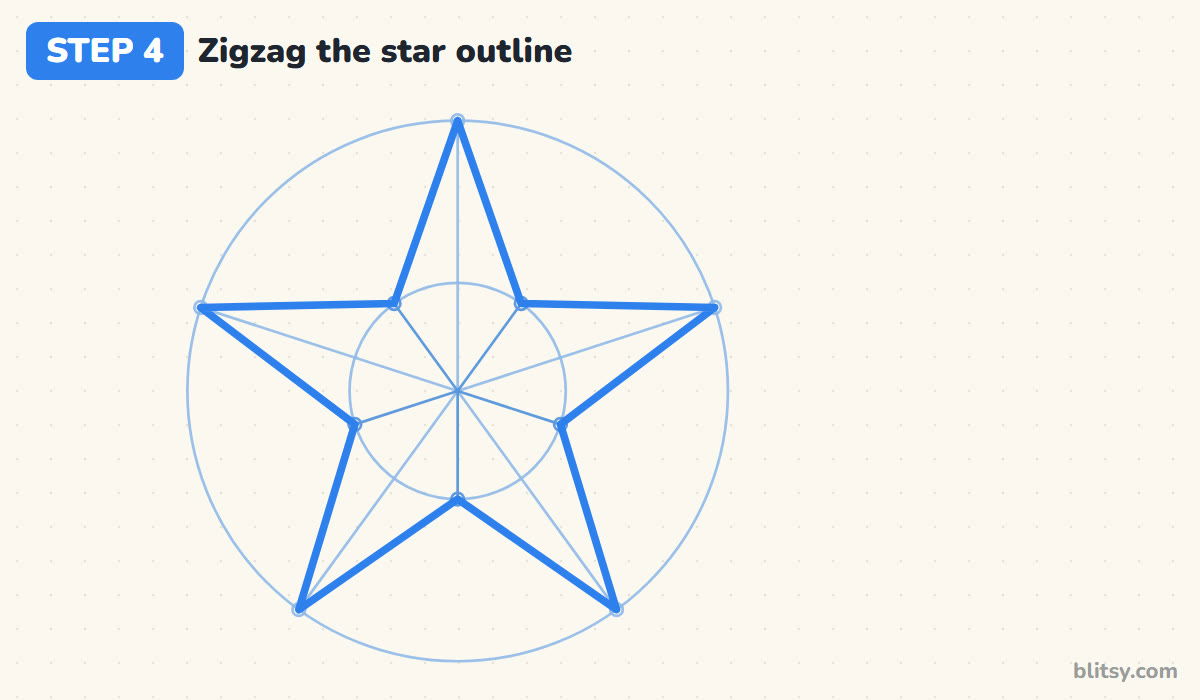
Start at the top dot and draw a straight line down to the nearest inner dot on the right, then back out to the next outer dot. Keep zigzagging out and in until you're back at the top. Because the dots were measured, every point comes out the same length. I use a ruler here, since wobbly edges spoil even a perfect layout.
💡 Tip: Turn the paper as you go so your hand always pulls the line toward you.
Step 5: Split each point into two halves
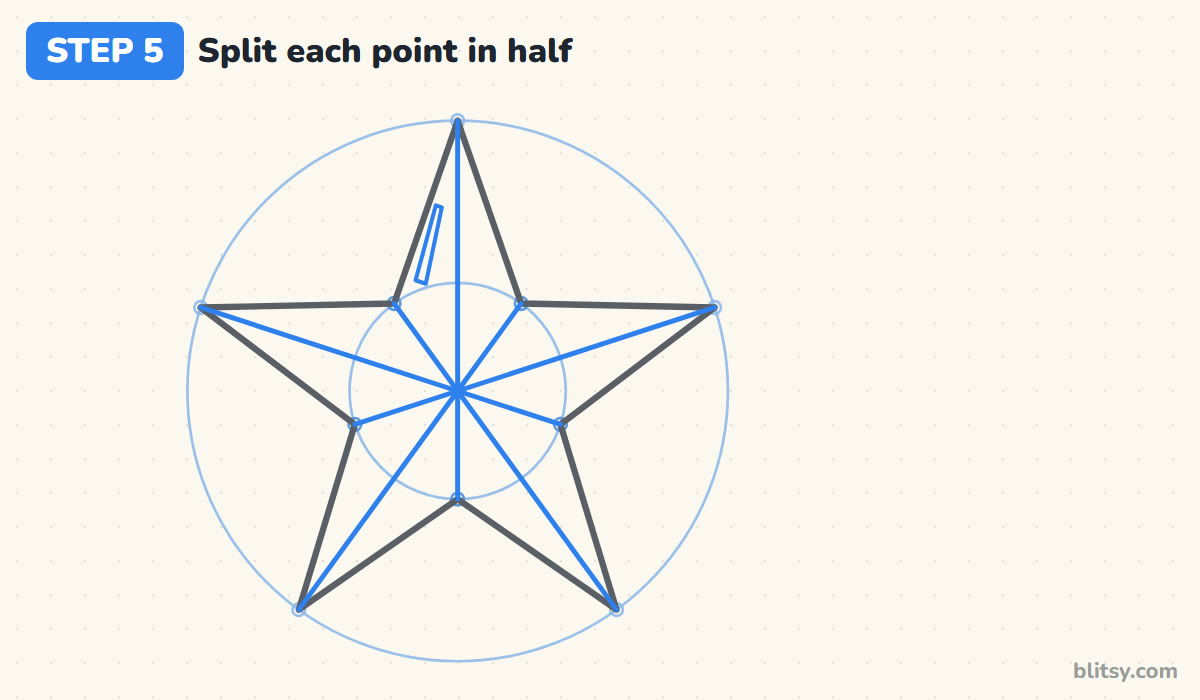
This is the step that makes the star look 3D. Draw a line from the center dot out to the tip of every point, then another from the center to every inner corner. Each point is now cut down the middle into two thin triangles. Then add a slim sliver near the left edge of the top point; it becomes a white shine.
💡 Tip: Aim each line at the exact corner, or the facets will look bent.
Step 6: Draw a chubby rounded star
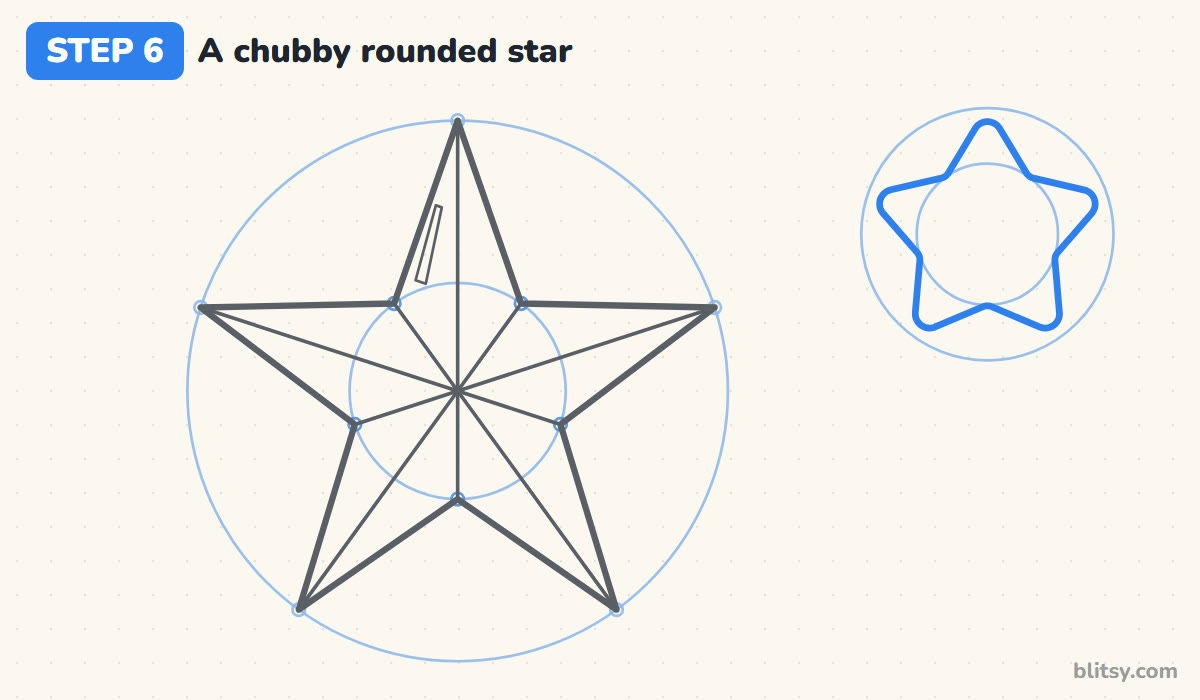
Move to the empty space on the top right. Draw a smaller pair of circles and build a star the same way, but put the inner dots further out, at about half the big radius, so the arms come out short and fat. Round off every tip and soften the inner corners. Chubby stars look friendly, which suits a face.
💡 Tip: Draw the rounded tips like the end of a thumb, not a pin.
Step 7: Give the little star a happy face
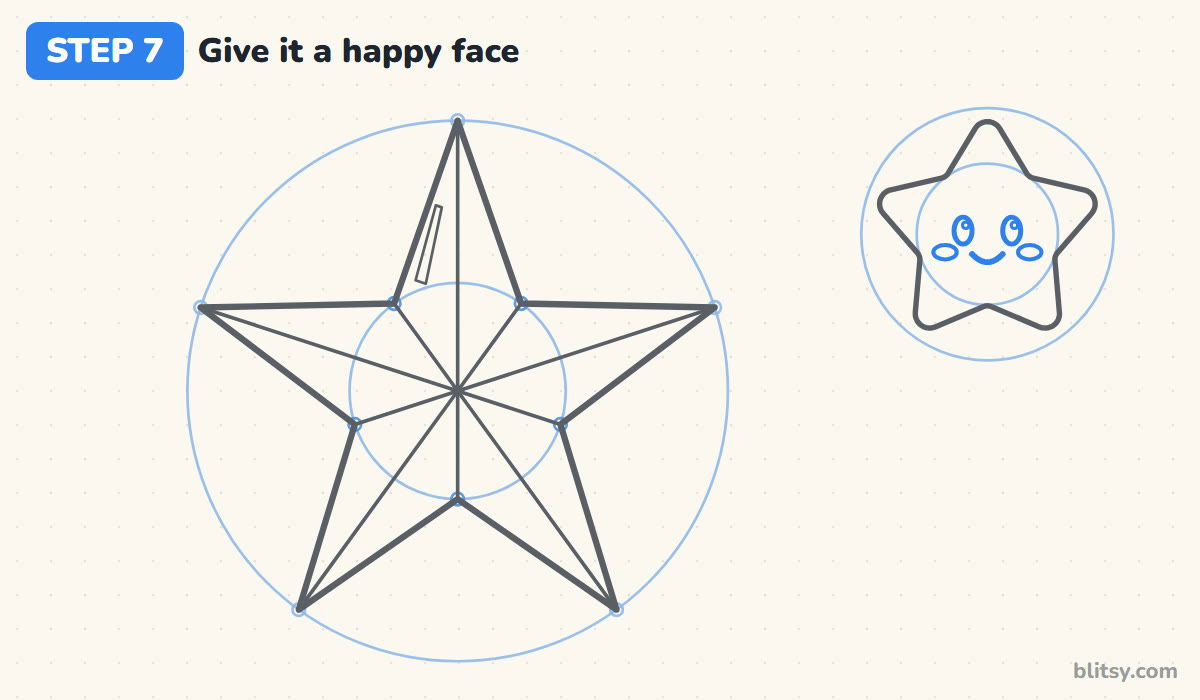
Keep the face low and close together in the middle of the star. Draw two tall oval eyes with a tiny shine circle in each, then a small curved smile between them. Add two flat ovals for cheeks just outside the eyes. When I teach this one, I point out that a face placed high and wide looks surprised instead of sweet.

💡 Tip: Leave the shine circles empty so the eyes sparkle after coloring.
Step 8: Add a shooting star with a curved trail
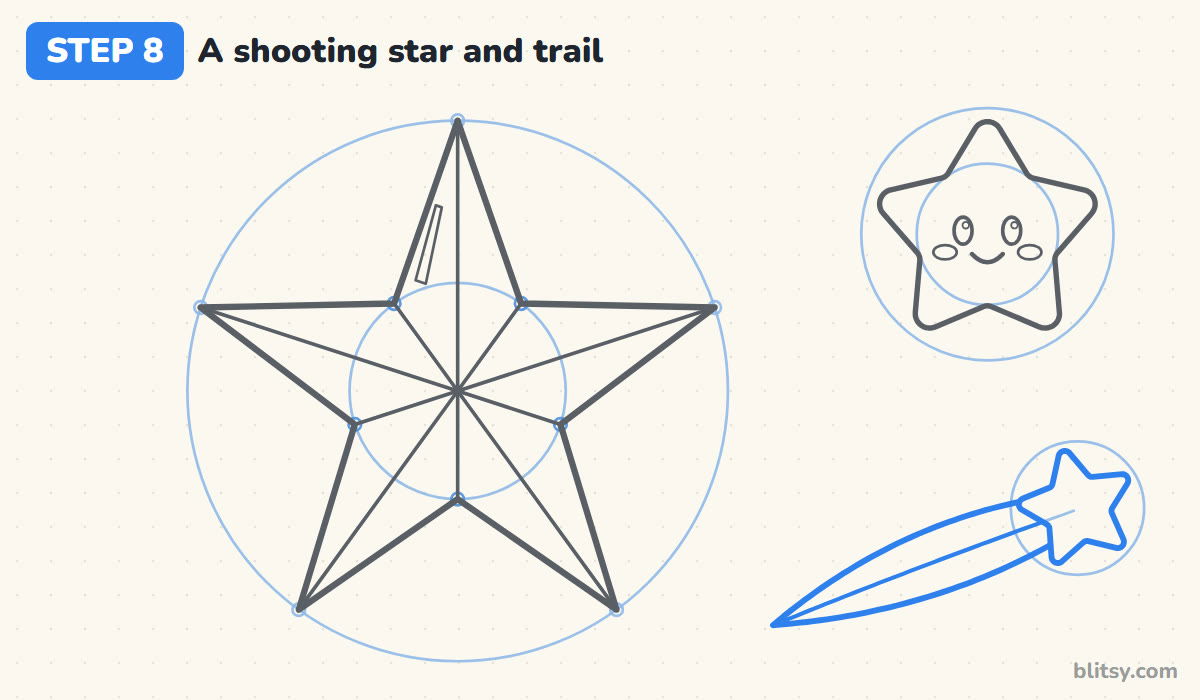
In the bottom right corner, draw a small circle and a slightly tilted star inside it. From behind its left side, sweep two long curves down to the left until they meet in a sharp point. Bow both curves downward a little so the trail looks like it's falling, not just sliding. Split the trail lengthwise with one thinner curve.
💡 Tip: Stop the trail lines where they touch the star, so the star sits in front.
Step 9: Scatter a few twinkle sparkles
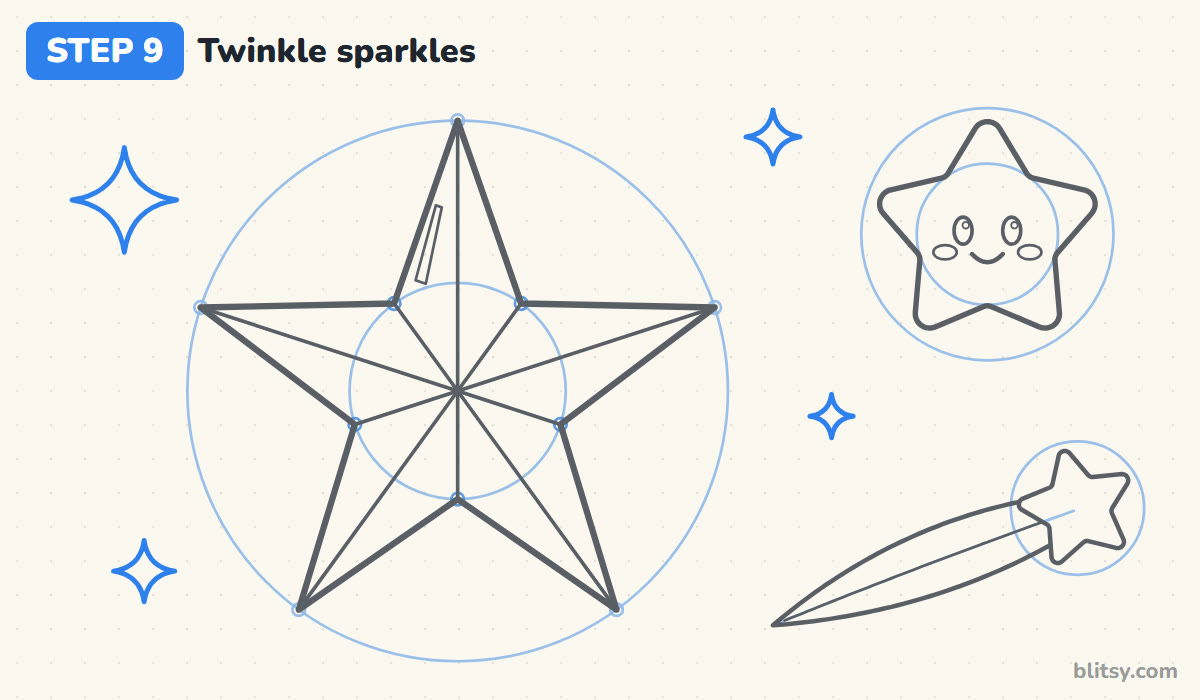
Fill the empty corners with four-point twinkles. Each one is four points joined by curves that bend inward, a bit like a diamond that's been pinched. Make one large twinkle on the top left and three smaller ones around the page. Odd gaps feel balanced when the sizes differ, so I never make them all the same.
💡 Tip: Keep sparkles away from the outlines so each shape still reads on its own.
Step 10: Ink the lines and erase the guides
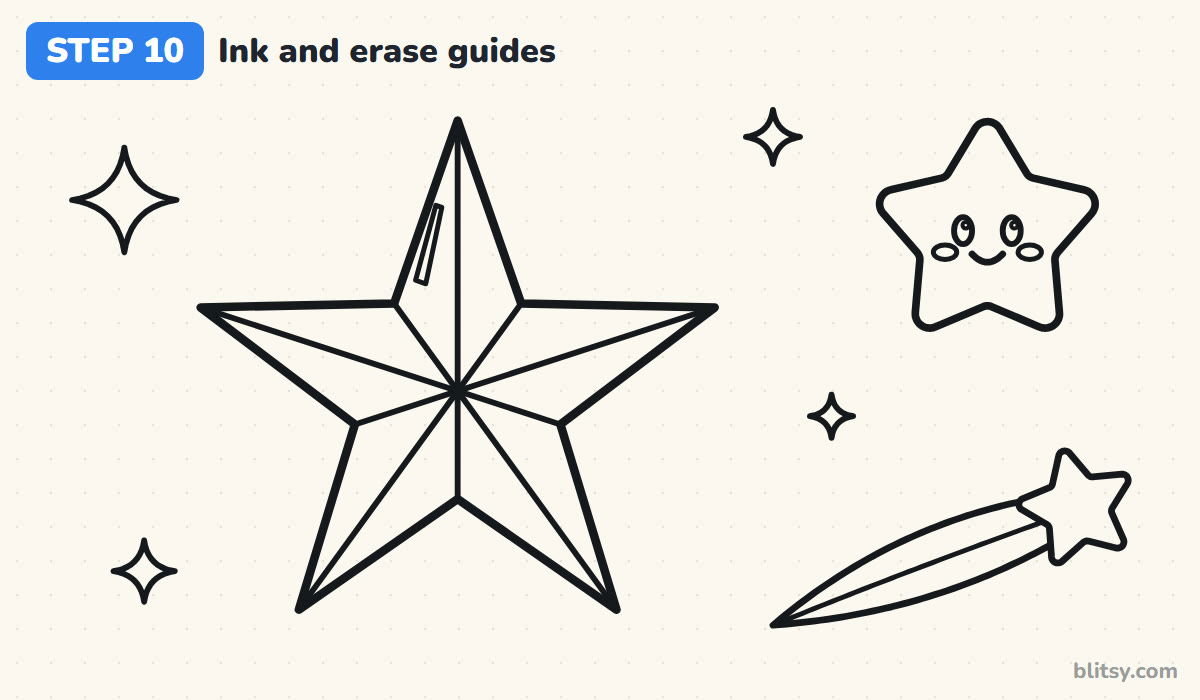
Go over every keeper line in black: the big star outline, its ten facet lines and the shine, then the cute star with its face, the shooting star, the trail and the twinkles. Leave the circles, the spokes and the dots alone. Wait a minute for the ink to dry, then erase all the pencil guides with gentle strokes.
💡 Tip: Ink the big outline a touch thicker than the lines inside it.
Step 11: Color the light and dark halves
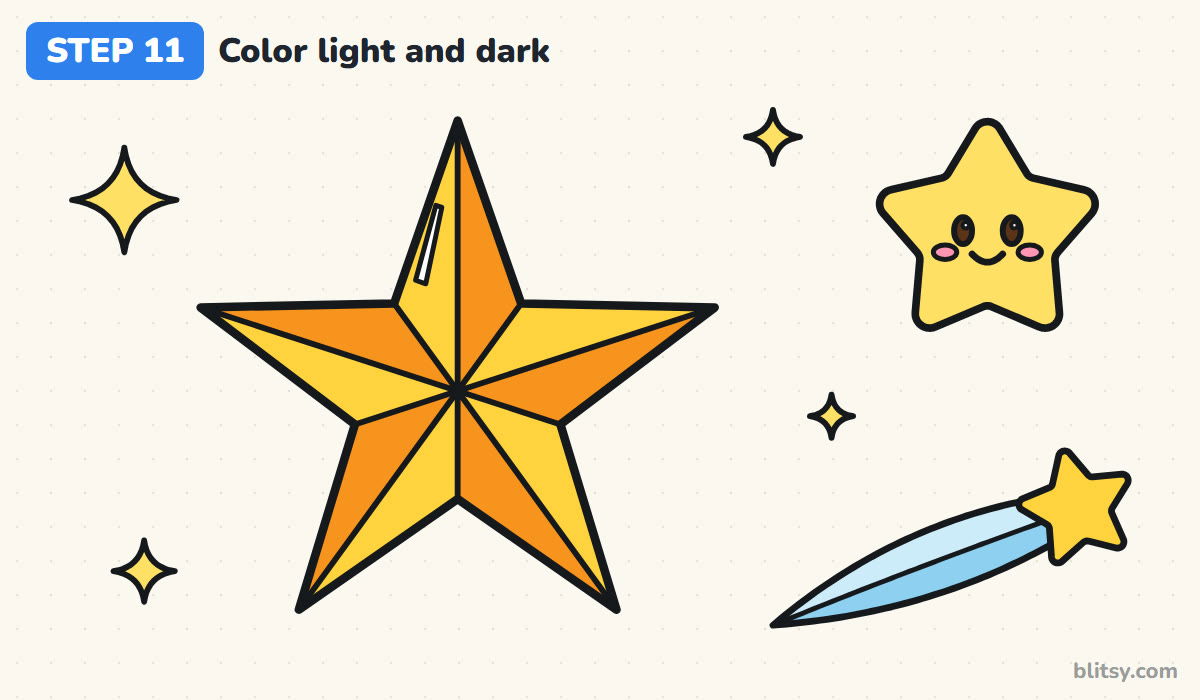
On the big star, color one half of each point gold and the other half orange, always on the same side as you go around. That steady pattern is what tricks the eye into seeing raised edges. Leave the shine white. Then color the cute star yellow with pink cheeks and brown eyes, the shooting star gold, the trail in two blues and the twinkles yellow.



💡 Tip: Color the dark halves first; it's easier to stay inside a light edge afterward.
Why Star Points Come Out Lopsided
- Guessing where the points go. Eyeballing five points almost always leaves one gap too wide. Measure the 72 degree spokes, or use the clock trick, before you draw any outline.
- An inner circle that's too big. If the inner dots sit too far out, the star turns into a puffy flower. Keep the small circle around two fifths of the big one for a classic star.
- Missing the center with the facet lines. Lines that cross beside the middle leave a messy knot. Put your ruler on the center dot first, then swing it to each corner.
- Coloring the halves in a random order. Mixing up which side is dark makes the 3D effect vanish. Pick one side, such as the right half of every point, and stick with it all the way around.
- Running the trail lines through the shooting star. Lines crossing the star make it look see-through. Stop the trail at the star's edge so it reads as being behind.
Five Fresh Star Variations to Try
Once the five-point method clicks, change the numbers: six spokes 60 degrees apart give a six-point star, and eight spokes 45 degrees apart make a compass star. Swap gold and orange for silver and gray to get a sheriff badge. Younger kids can skip the facets and color the outline yellow. Stars look even better next to a crescent, so the moon drawing tutorial makes a natural follow-up, and the faceted shading carries straight over to this diamond drawing tutorial.
Star Coloring Page and a Printable Step Guide
Prefer paper to a screen? The star coloring page has a small colored example and the colors to use at the top, with a big bold outline underneath for crayons or markers. The step-by-step PDF guide puts all 11 steps and tips on a few pages. Both print on Letter or A4.
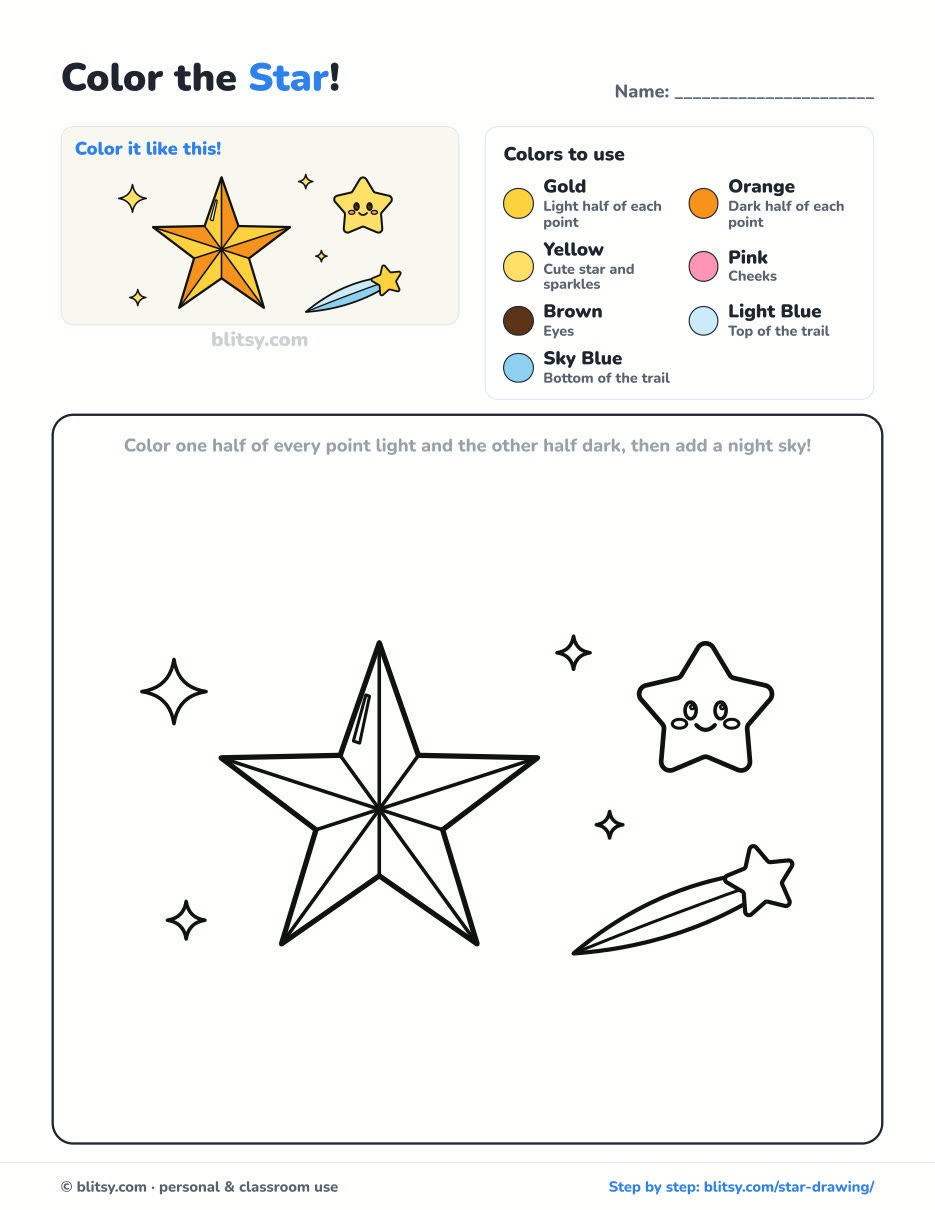
Black outlines with a colored example and the color names at the top. Ready to print and color.
⬇️ Download Coloring PageEvery step picture with its instructions and tips, to keep beside your paper while you draw.
⬇️ Download Drawing Guide📱 On a phone? Tap a download button, then open the file and choose Share → Save to Files or Print. On a computer, the PDF opens or saves straight to your Downloads folder.
Keep the Star Steps on Pinterest
Star Drawing Questions I Hear Often
What is the easiest way to draw a five-point star?
Draw a circle, mark five points spaced 72 degrees apart, then put five inner points halfway between them on a smaller circle and connect them in a zigzag. The points come out even without any guessing.
How do you draw a star without lifting your pencil?
Start at the bottom left, go up to the top, down to the bottom right, across to the upper left, over to the upper right and back to the start. It's quick, but the points are harder to keep even.
How do I make a star look 3D?
Draw a line from the center to every tip and every inner corner, then color one half of each point light and the other half dark, always on the same side.
Can young kids draw this star?
Yes. Kids around 6 can follow it if a grown-up helps with the circles and the spokes. The zigzag outline and the coloring are the parts they usually enjoy most.
Grab some dark blue paper next time, draw a whole sky of these and see how many points you can keep perfectly even. ⭐
Related posts:
 How to Draw a Whale Step by Step (Easy for Beginners)
 How to Draw Lungs Step by Step (Easy Science Diagram)
 How to Draw a Pineapple Step by Step (Easy Crown and Slice)
 How to Draw Iron Man Step by Step (Easy Chibi for Kids)
 How to Draw a Dress Step by Step (Easy Party Dress)
 How to Draw a Chicken Step by Step (Easy for Beginners)
 How to Draw a UFO Step by Step (Cute Alien Saucer)
 How to Draw Flames Step by Step (Easy Campfire Drawing)
 How to Draw a Moon Step by Step (Sleepy Crescent + Phases)
 How to Draw a Tiger Step by Step (Easy Walking Pose)
 How to Draw a Heart Step by Step (Even, Symmetric Shape)
 How to Draw a Jellyfish Step by Step (Cute, Easy Guide)

