
Floppy ears do most of the talking in a puppy drawing. Get those two long shapes hanging beside a wide, round face and almost anyone will say "puppy" before you've added a single detail. In this lesson I'll show you how to draw a puppy step by step, starting with a few light circles and ending with a sitting pup in a blue collar, tongue out, with a brown patch over one eye. If you can draw a circle, you can draw this dog.
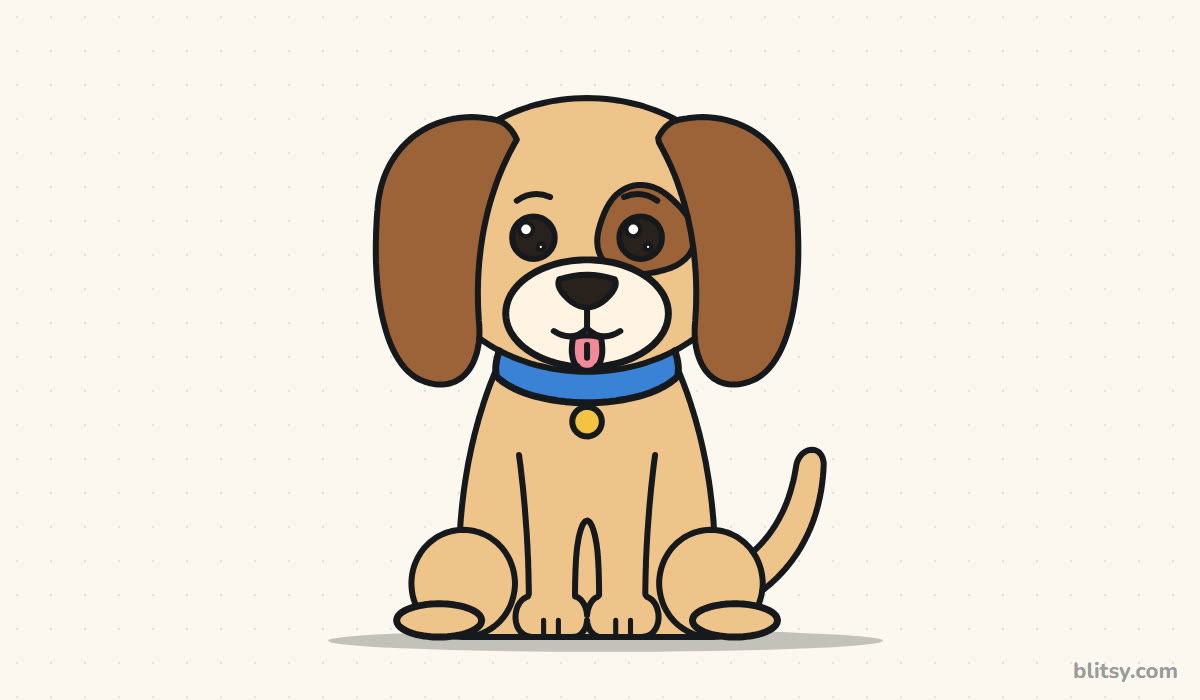
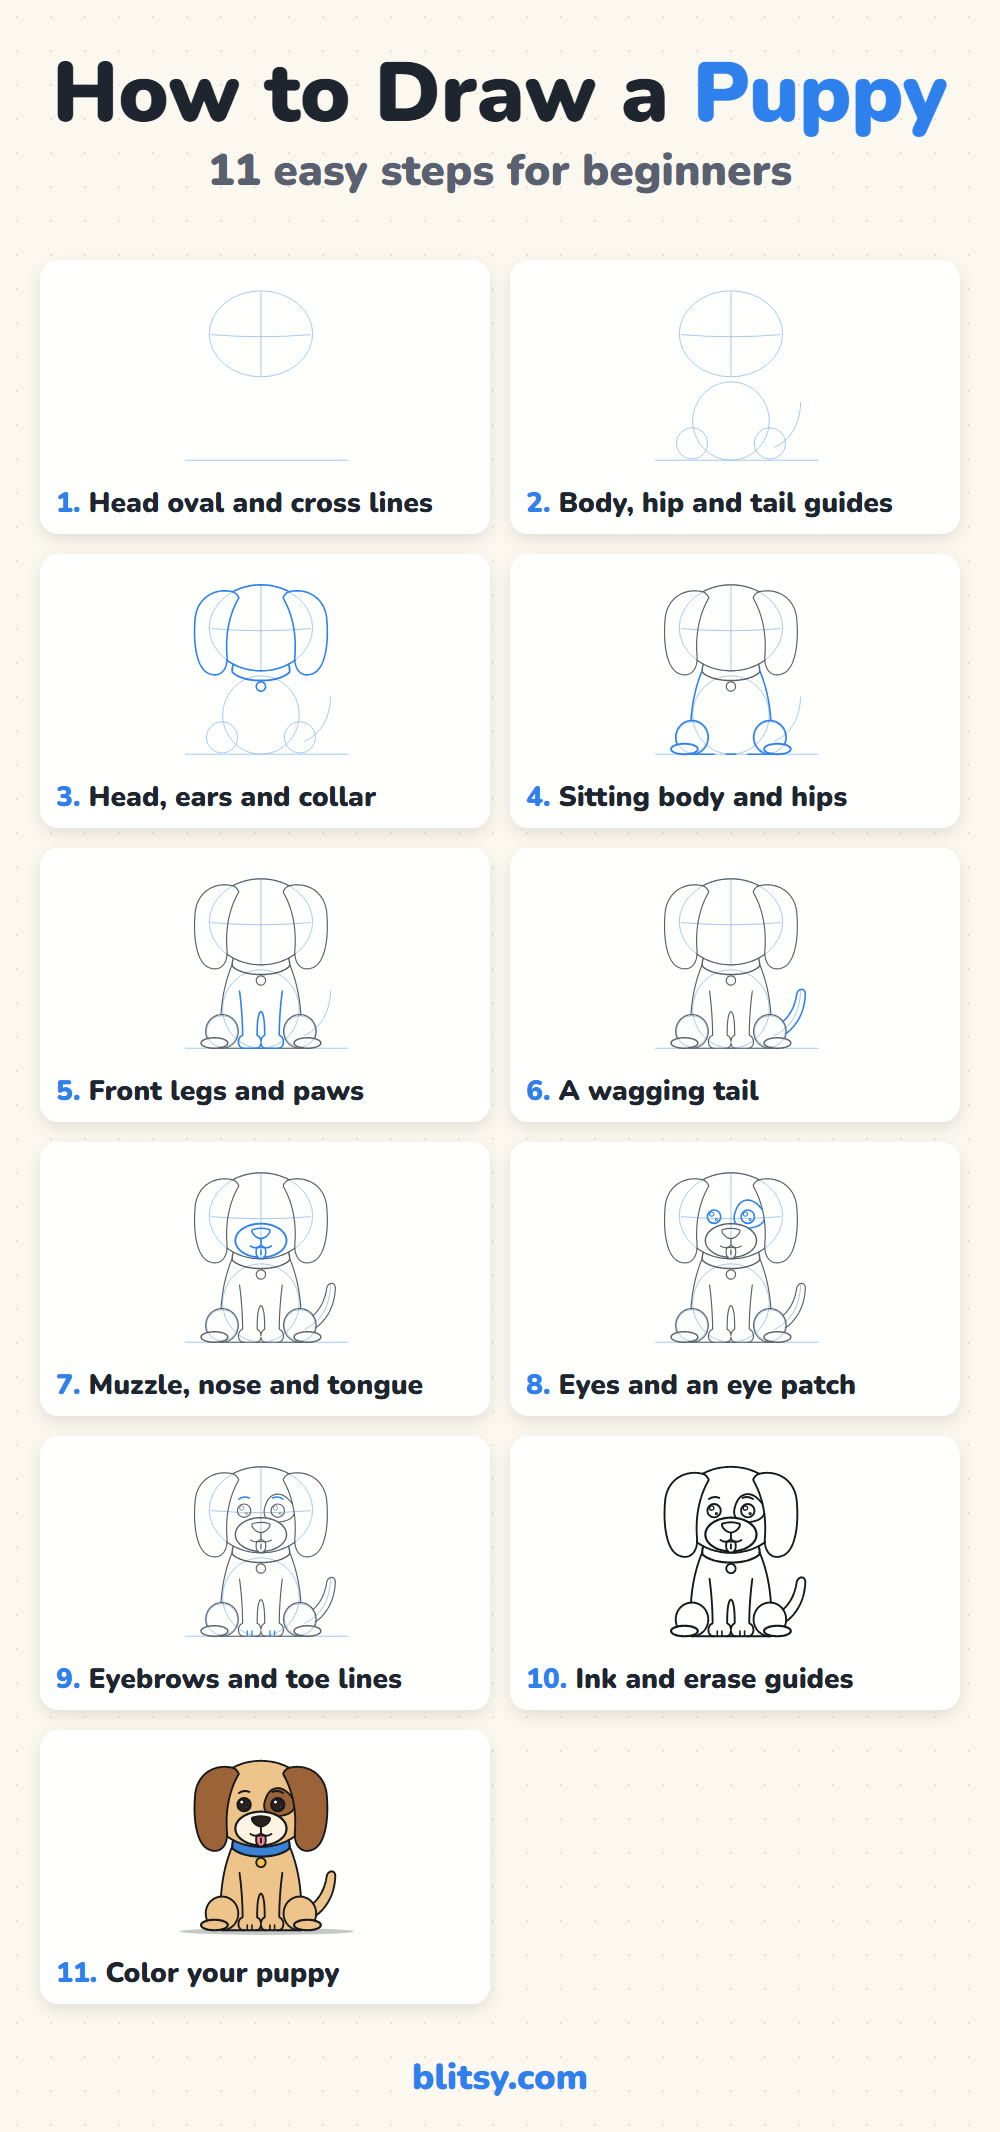
Each step picture shows the new lines in blue. Anything you already drew stays gray, so you always know exactly which part to add next. Draw just the blue lines and compare before moving on.
Quick overview
⏱️ Time: roughly 30 minutes, coloring included
🎯 Level: easy, fine for kids around 6 and up
✏️ Steps: 11
🐶 You'll draw: a sitting puppy with floppy ears and a collar
Puppy Sketch Supplies Within Reach
- A regular pencil for the light guide shapes
- A soft eraser
- A black marker or fineliner for inking
- Colored pencils or crayons in two browns plus cream and blue
- A bit of pink for the tongue and yellow for the tag
- Plain white paper, printer paper is fine
Keep the paper upright this time, because the puppy is tall and the tail only pokes out a little on the right.
How to Draw a Puppy Step by Step
Step 1: Draw a head oval with cross lines
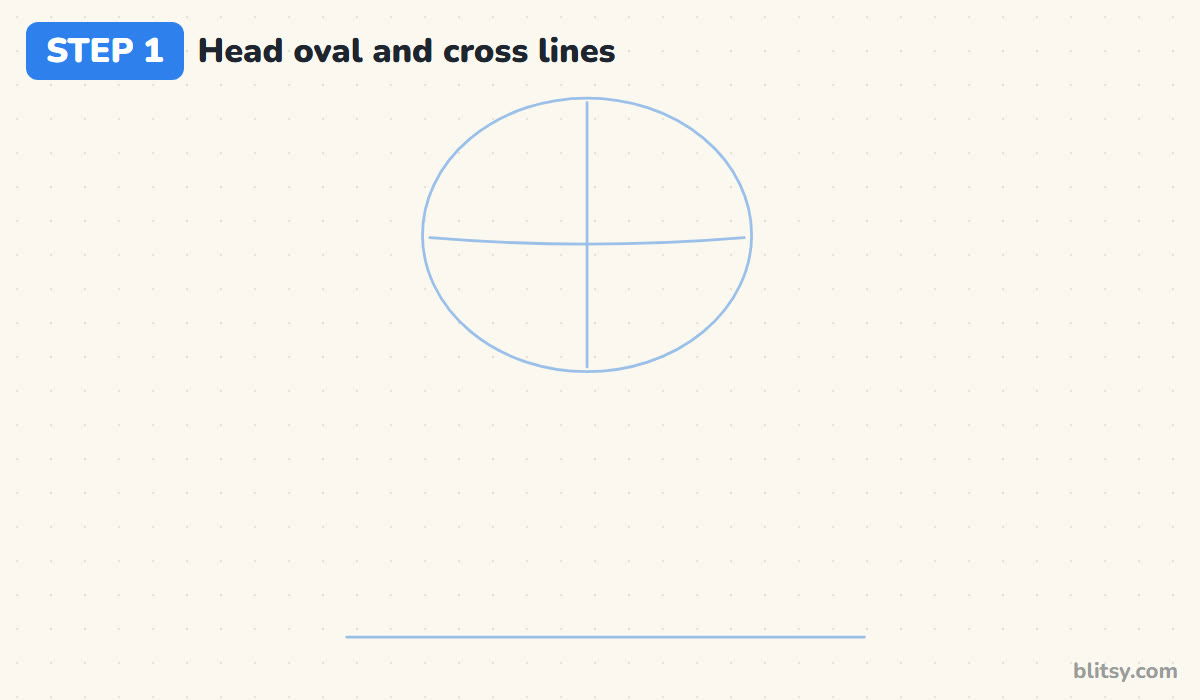
Put a light ground line near the bottom of your page first, so the puppy has something to sit on. Up high, draw a wide oval for the head. Split it with a straight line down the middle, then a soft curve across, just under halfway. The eyes sit on that curve, and the nose lands on the middle line.
💡 Tip: Barely touch the paper. These lines are scaffolding and they all disappear later.
Step 2: Add the body guide and hip circles
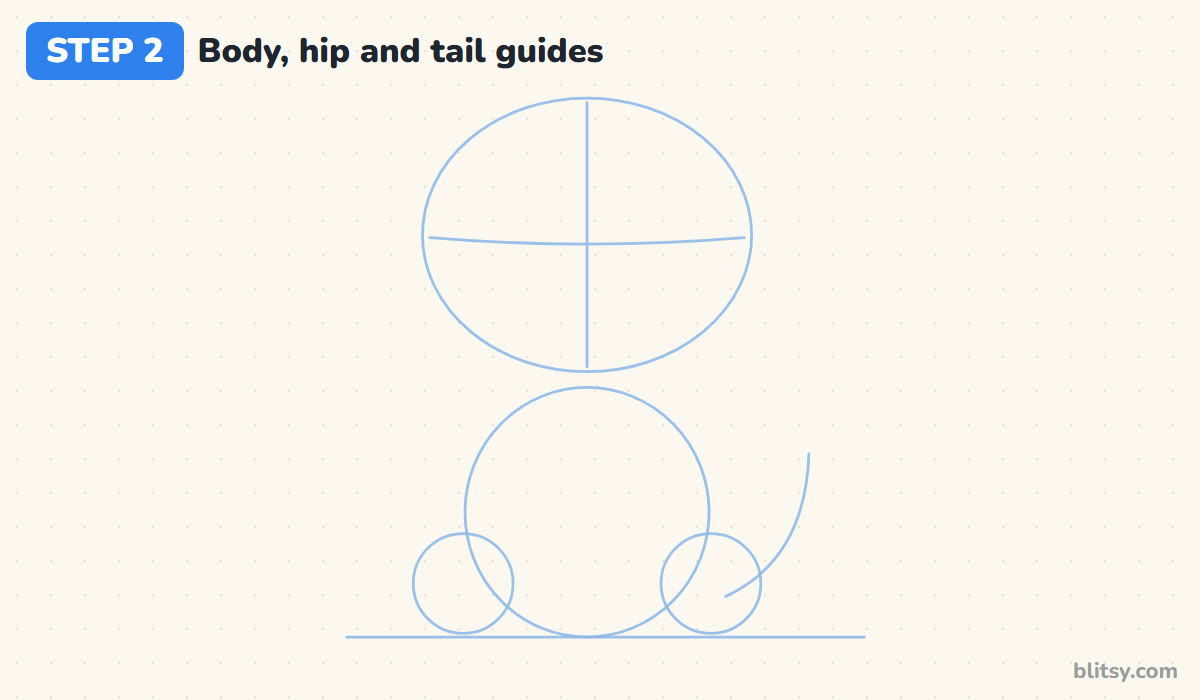
Below the head, draw a round body guide that sits right on the ground line and almost touches the chin. At the bottom of it, add two small circles, one on each side, for the hips of the back legs. One curved stroke rising on the right marks the tail. I keep the body a bit narrower than the head on purpose, since a big head is what makes a dog look young.
💡 Tip: Check the gap between head and body. If you could fit a finger in it, nudge the body up.
Step 3: Outline the head, floppy ears and collar
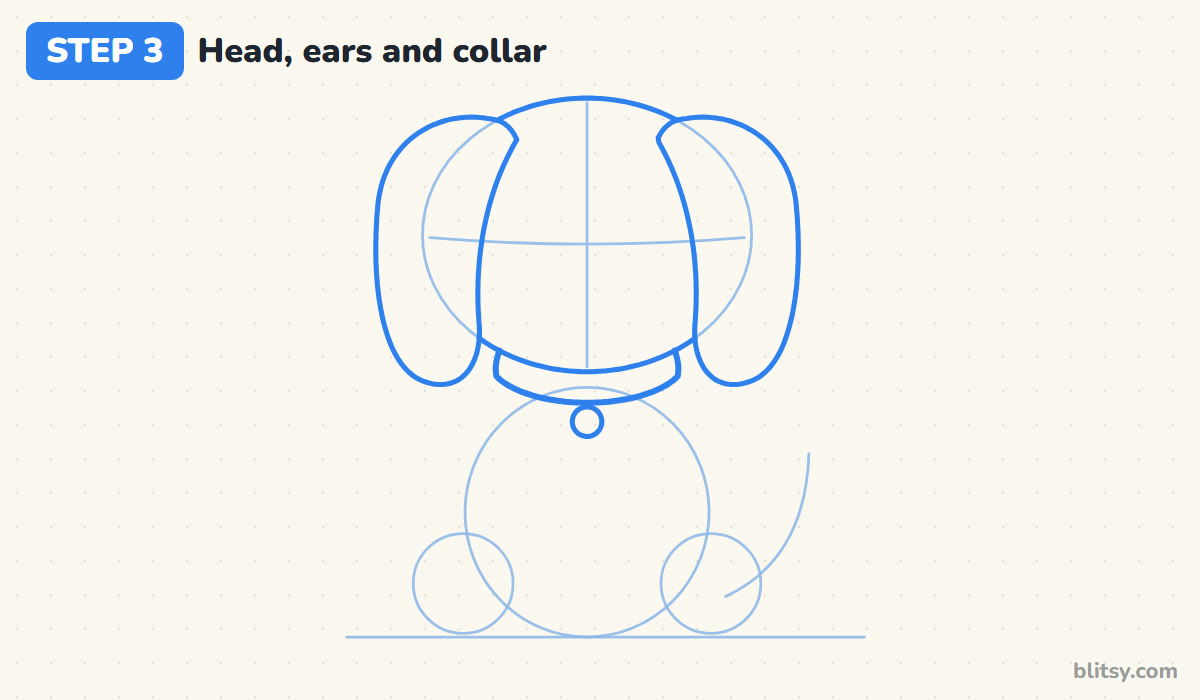
Trace the top and lower part of the head oval firmly. Now the fun part: each ear starts at the top of the head, swings out over the side of the face and hangs down past the chin, ending in a round bottom. The inner edge of each ear runs down the cheek, so the ears cover the sides of the head. Under the chin, draw a curved band for the collar and a small circle hanging from its middle for the tag.


💡 Tip: Make the ears longer than feels right. Short ears turn a puppy into a bear cub very quickly.
Step 4: Draw the sitting body and back hips
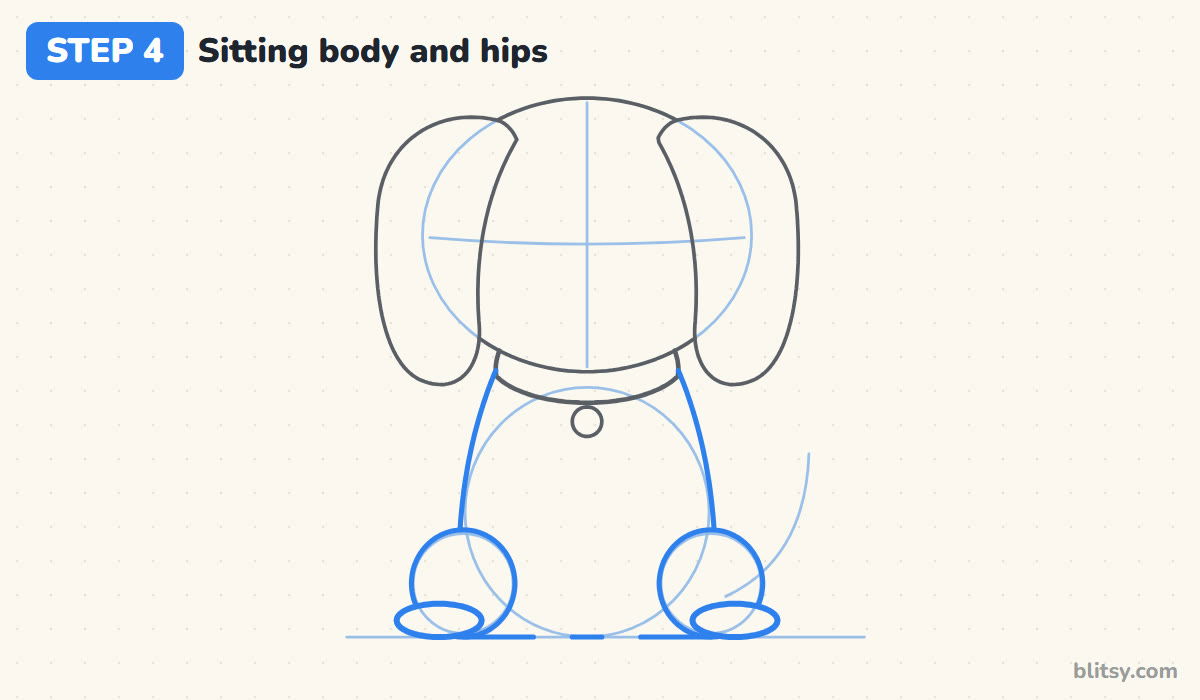
From both ends of the collar, let a line slope out and down to the ground, bulging slightly as it goes. That's the body. Over the two hip circles, draw rounder, firmer circles, then a flat oval at the front of each one for the back foot. The body lines stop where they meet the hips, because the hips sit in front.
💡 Tip: Lay the back feet flat along the ground line. Tilted feet make the puppy look like it's sliding.
Step 5: Add the front legs and paws
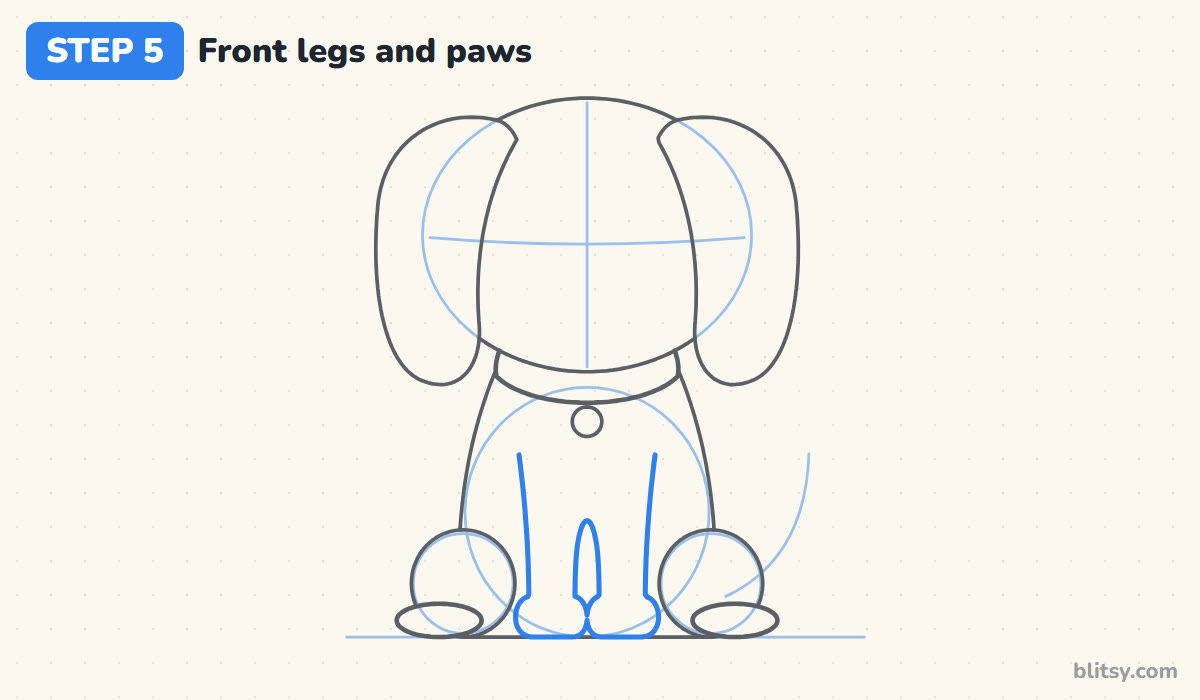
Front legs are two long, slightly tapered columns running down the chest. Start each outer line a little below the tag and bring it straight to the ground. Between the legs, draw a narrow arch so they separate near the bottom. Round each leg out into a chunky paw at the ground line. Most beginners make these legs too thin, so give them some width.
💡 Tip: Leave the tops of the legs open. They melt into the chest, and a closed top would look like a box.
Step 6: Draw a wagging tail
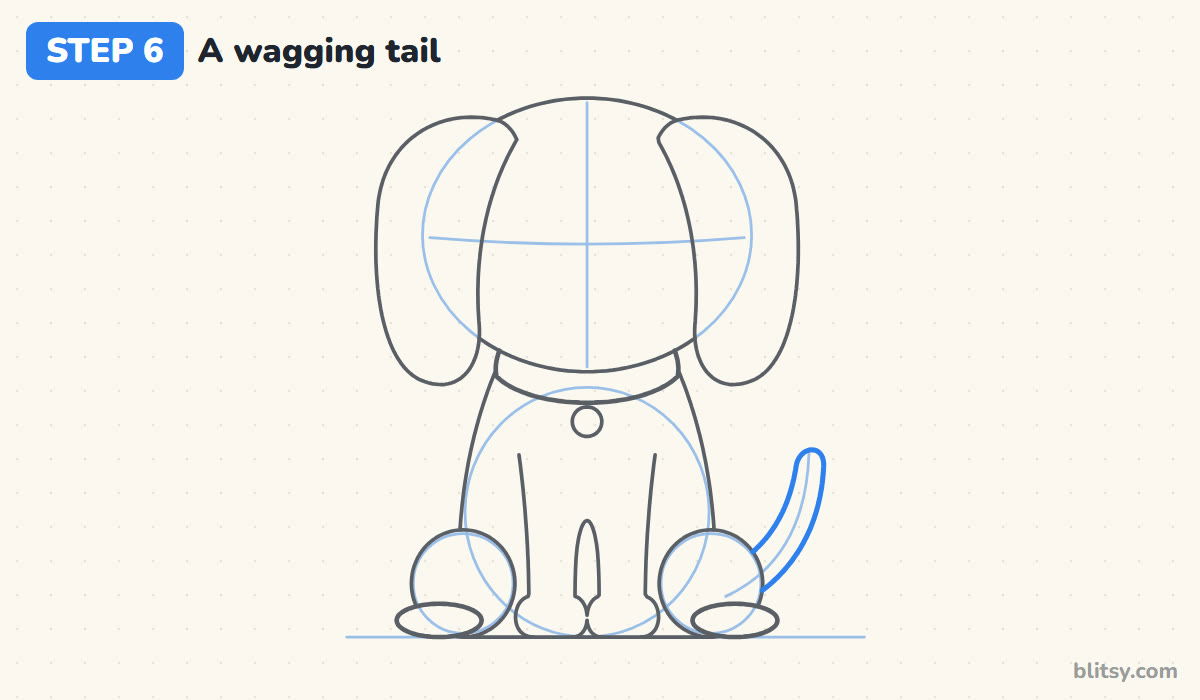
Follow your tail guide from behind the right hip and curve two lines upward together, slightly apart at the base and closer at the end. Close the tip with a small round cap. Don't draw the part of the tail that would be hidden by the hip.
💡 Tip: Draw the outside curve of the tail first, then let the inner one follow it.
Step 7: Add the muzzle, nose and tongue
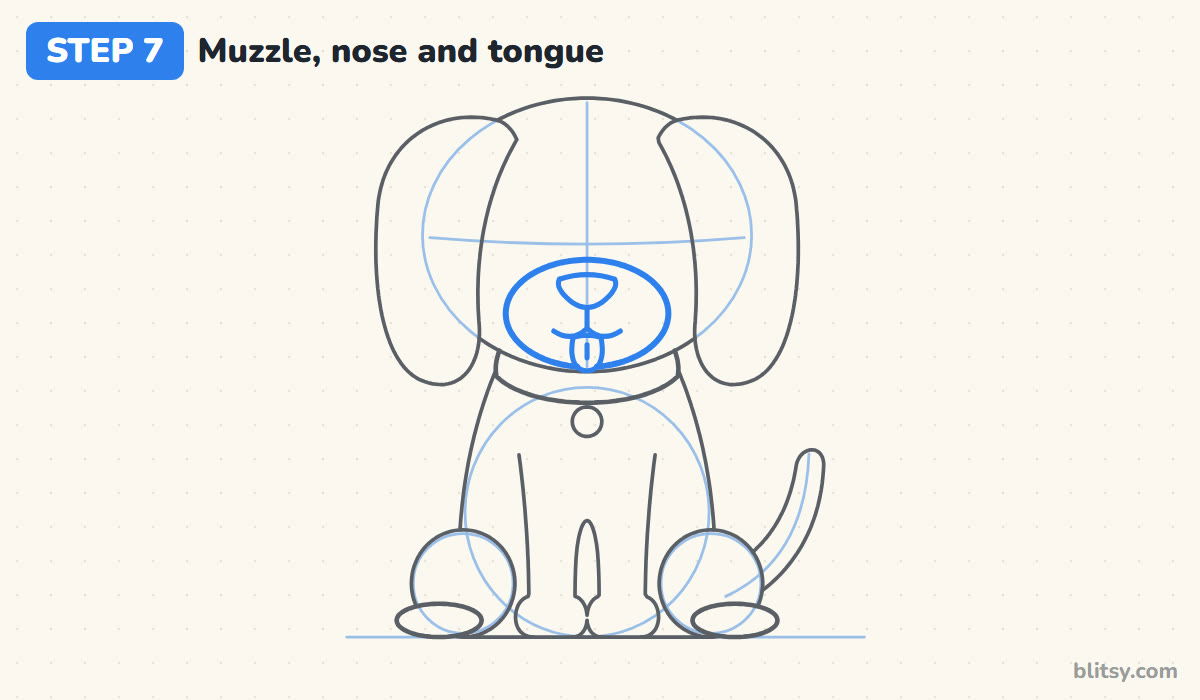
The muzzle is a wide oval sitting low on the face, centered on the middle line and reaching almost to the chin. Near its top, draw a rounded triangle for the nose, point facing down. Drop a short line from the nose and add two gentle curves for the mouth, like a stretched letter W. Below the middle, a little U shape with a line down the center becomes the tongue.

💡 Tip: A big nose reads as cute. If yours looks like a button, make it wider.
Step 8: Draw the eyes and an eye patch
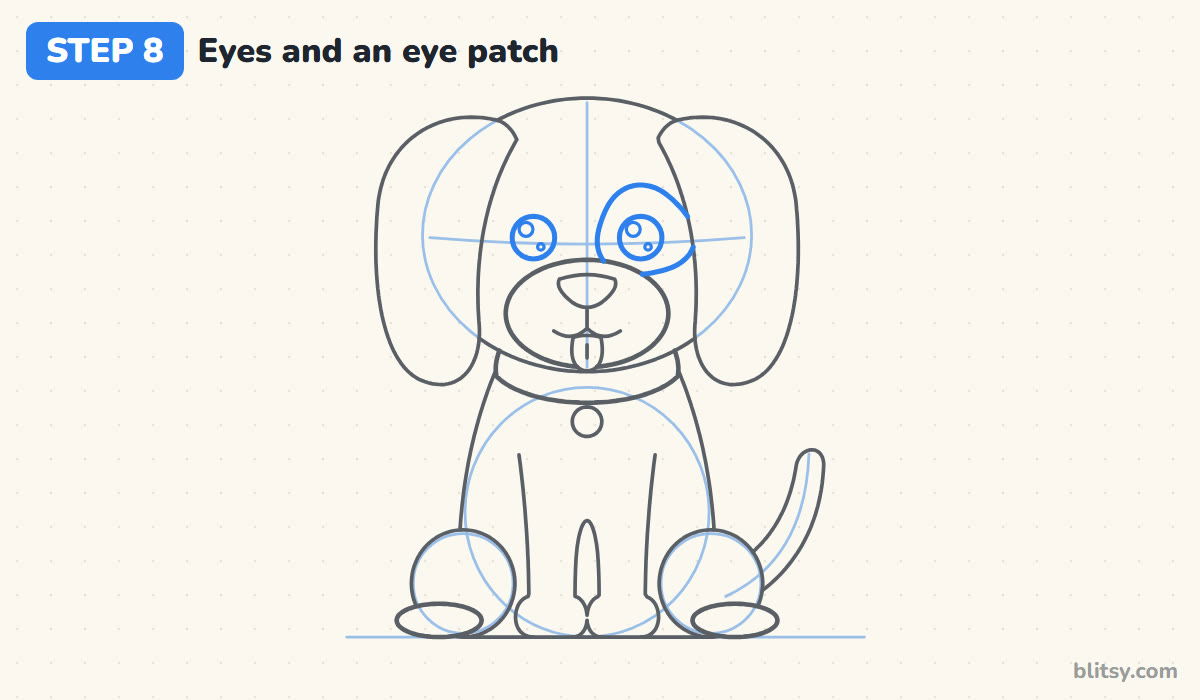
Set two round eyes on the curved cross line, one on each side of the center and well apart, about two eye widths between them. Inside each, add a large shine circle at the top left and a tiny one lower down. Then wrap a wobbly patch shape around the eye on the right. I like a patch that's a little lumpy, because perfect circles look painted on.
💡 Tip: Put the shine dots in the same corner of both eyes, so the light seems to come from one place.
Step 9: Add eyebrows and toe lines
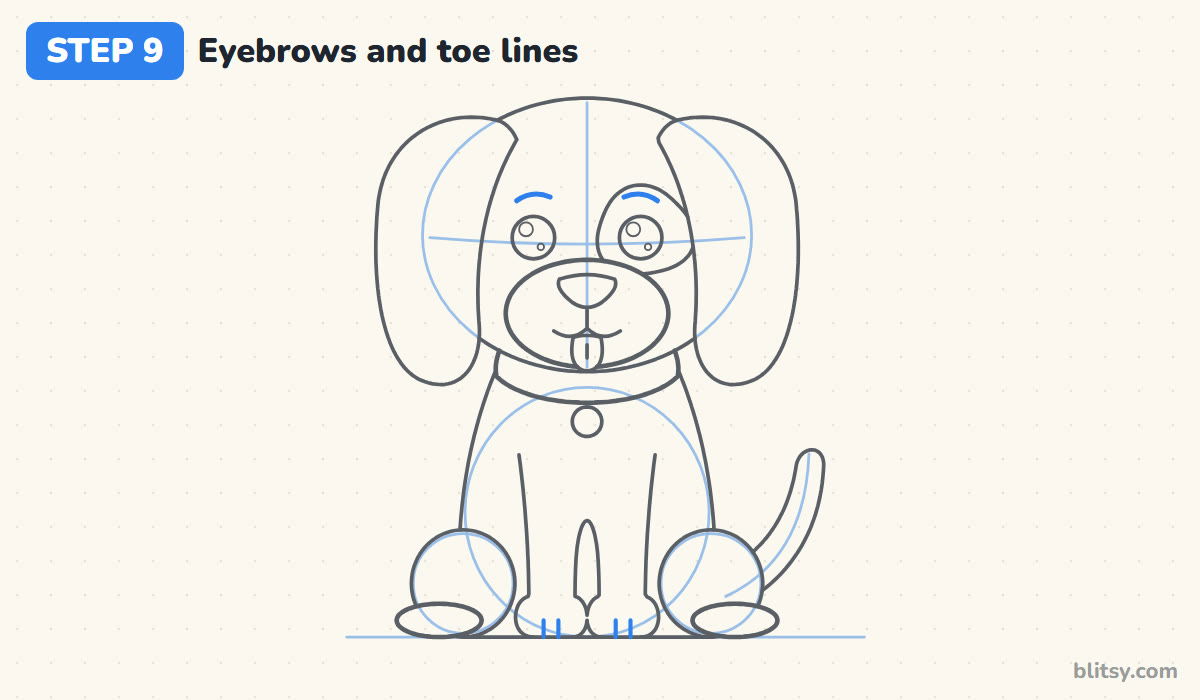
Two short curved strokes above the eyes act as eyebrows, and they change the mood more than you'd think. Lift them for a curious pup or tilt them down in the middle for a sad one. On each front paw, draw two short lines up from the ground to split the toes.
💡 Tip: Keep the eyebrows short. Long ones start to look grumpy.
Step 10: Ink the drawing and erase the guides
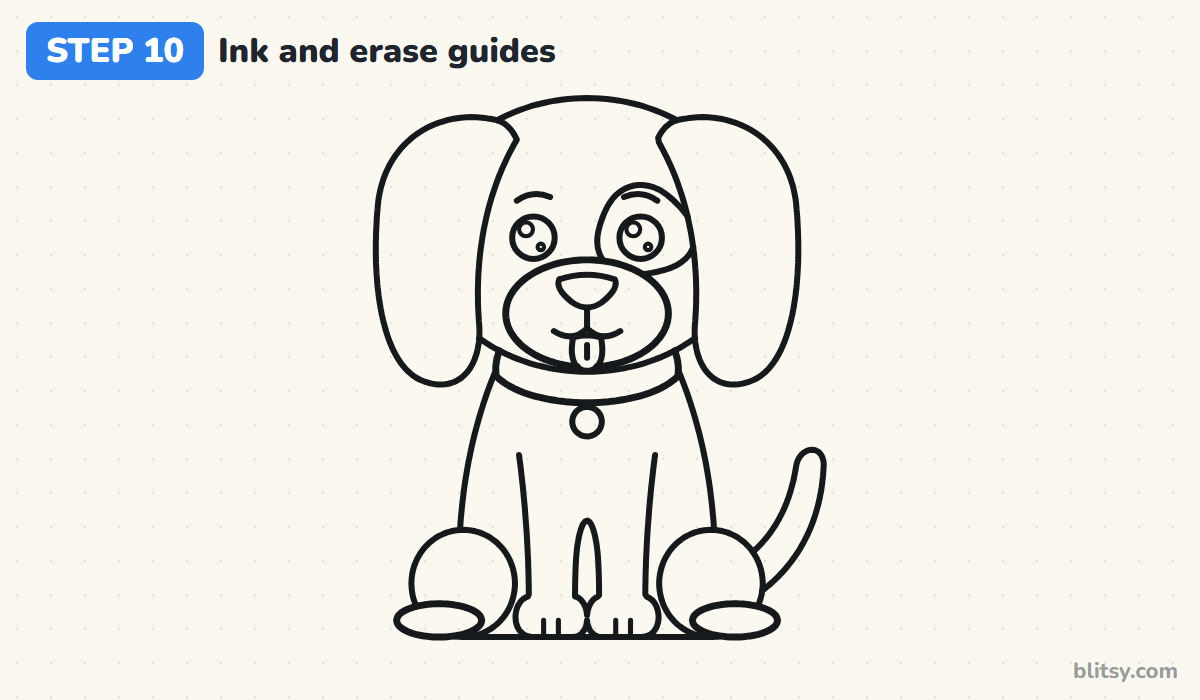
Trace over every final line with your black marker. I usually ink the face first, while I'm still careful, and do the big outline after. Skip all the guide circles and the cross lines. Wait until the ink is properly dry, then erase the pencil underneath so only the clean outline is left.
💡 Tip: Rest the side of your hand on a scrap of paper so you don't smudge the ink as you work down.
Step 11: Color your puppy
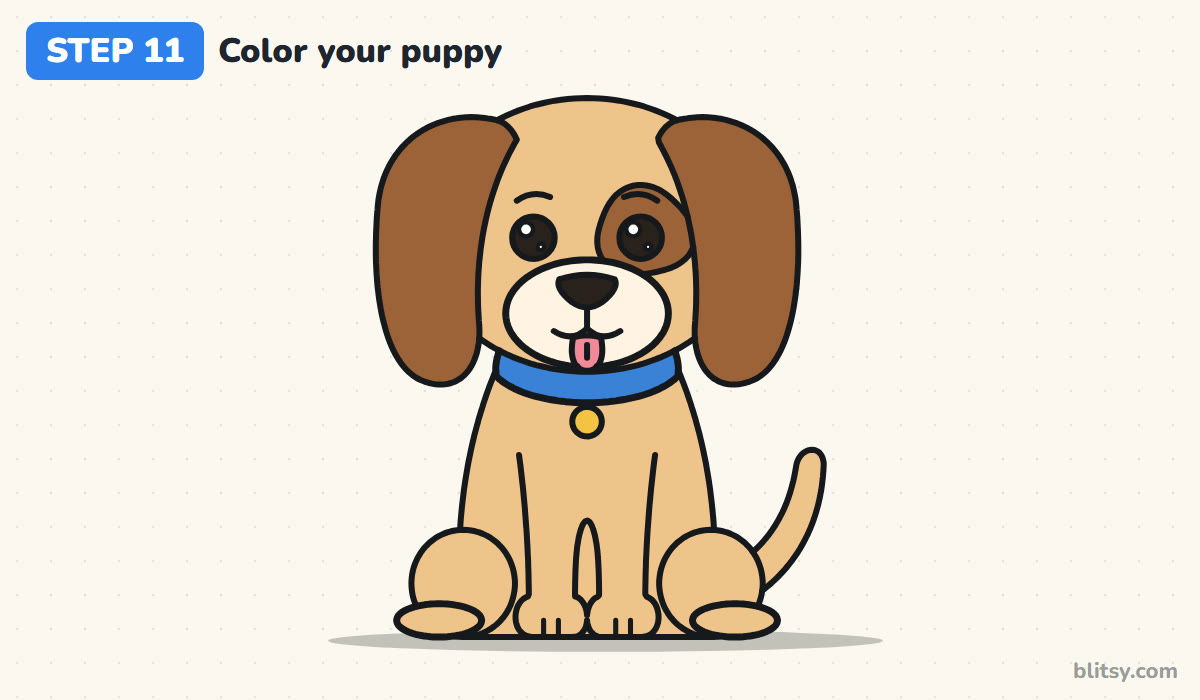
Light brown covers all the fur, from the head down to the tail. The ears and the eye patch are a darker brown. Color the muzzle cream, the tongue pink and the collar blue with a yellow tag. Fill the eyes and nose black but leave the shine dots white. A gray shadow under the puppy keeps it from floating.
💡 Tip: Color the dark brown parts last, so the darker pencil doesn't drag into the lighter fur.
Puppy Proportions That Trip People Up
- Ears glued to the top of the head. Upright ears belong to a fox or a cat. Hang them down the sides of the face instead.
- A muzzle that sticks out too far. A long snout makes the dog look grown up. Keep the muzzle short and wide, low on the face.
- Eyes set too close together. Leave about two eye widths between them, which keeps the look soft and young.
- A body as big as the head. Puppies are top heavy. Keep the head the largest shape on the page.
- Legs drawn as thin sticks. Front legs need some thickness and a chunky paw, or the puppy looks wobbly.
New Breeds and Colors for Your Pup
Once you've drawn this puppy once, it's easy to turn it into a different breed. Make the ears short and pointy with black and white fur for a husky, color everything spotty for a Dalmatian, or drop the patch and go golden all over for a retriever. A bandana works instead of the collar. Smaller kids can leave out the eyebrows and the toe lines without losing anything. If coloring is the favorite part, print a few dog coloring pages, and when your puppy needs a friend, try this easy kitten drawing tutorial.
Printable Puppy Coloring Page and Lesson PDF
The free puppy coloring page has a colored puppy at the top as a model, a small key that says which color goes where, and a big outline below to color in. The step-by-step PDF guide holds all 11 steps with their pictures and tips,. Both print on Letter or A4 paper.
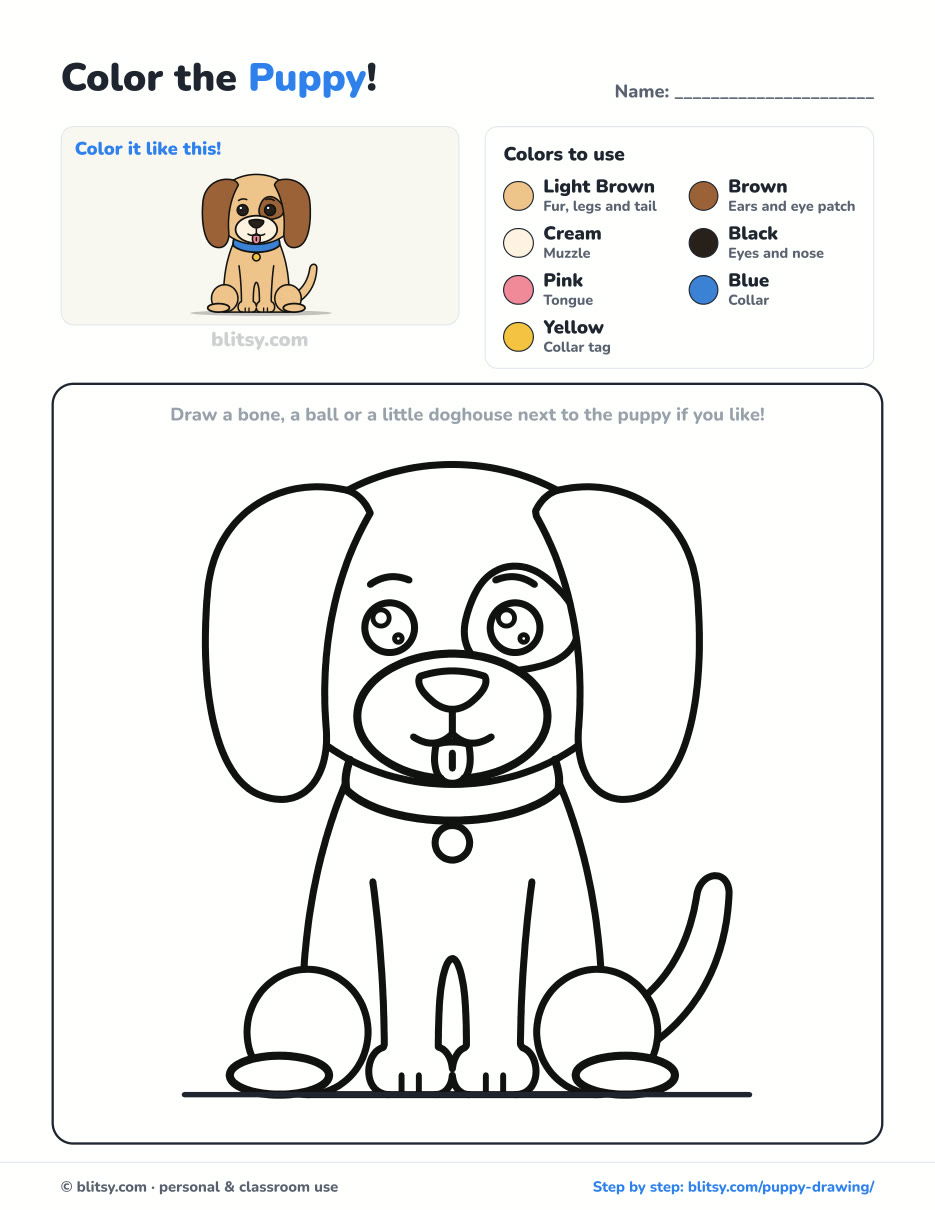
Black outlines with a colored example and the color names at the top. Ready to print and color.
⬇️ Download Coloring PageEvery step picture with its instructions and tips, to keep beside your paper while you draw.
⬇️ Download Drawing Guide📱 On a phone? Tap a download button, then open the file and choose Share → Save to Files or Print. On a computer, the PDF opens or saves straight to your Downloads folder.
Hang On to Every Puppy Step
Puppy Friends: More Animals to Draw
These are full step-by-step tutorials, each built the same way as the puppy, from light guide shapes to color.
- Paw Print Drawing: Give your pup some tracks with this how to draw a paw print step by step lesson, which covers a dog print, a cat print and a little heart.
- Godzilla Drawing: The Godzilla drawing tutorial turns two ovals into a cartoon kaiju in ten steps.
- Sloth Drawing: Draw a happy sloth hanging around in this easy sloth drawing step by step guide.
- Narwhal Drawing: A narwhal with its tusk pointing up comes together in 11 steps with this narwhal drawing tutorial.
- Miraculous Ladybug Drawing: Try a chibi hero in her mask, yo-yo in hand, with the how to draw Miraculous Ladybug lesson.
- Dragonfly Drawing: Spread four long wings with this dragonfly drawing step by step tutorial.
- Kitten Drawing: Every puppy needs a friend, and this kitten drawing tutorial ends with a ginger kitten sitting politely.
- Realistic Drawing: When you want to practise shading, the realistic drawing tutorial walks through the light and shadow on a shiny apple.
- Whale Drawing: Draw a happy blue whale, spout included, with the how to draw a whale guide.
- Arctic Fox Drawing: This arctic fox drawing tutorial shows a sitting fox with cheek tufts and a curled tail.
- Penguin Drawing: Rosy cheeks and flippers out for balance: that's the bird you get from the penguin drawing step by step lesson.
- Rat Drawing: Draw a curious gray rat, nose first, with this how to draw a rat tutorial.
- Ant Drawing: Three ovals become a red ant on six feet in the easy ant drawing tutorial.
- King Kong Drawing: For something bigger, try the King Kong drawing step by step guide, which ends with the giant gorilla mid-roar.
Puppy Drawing Questions Parents Send Me
What is the easiest way to draw a puppy?
Build it from circles: a wide oval head, a round body and two small hip circles. Then hang long ears from the head and add a short muzzle.
How do you draw a cute puppy for kids?
Give it a big head, big round eyes with shine dots and a small body. Kids can skip the eyebrows and toe lines, and a thick marker makes the outline easier to color inside.
How long does it take to draw a puppy?
About half an hour from the first circle to the last color. The ears and the face take the most care, while the body and tail go quickly.
What do I need to draw a puppy?
Just a pencil, an eraser, a black marker and something to color with. Ordinary printer paper works fine.
Grab a pencil, hang those floppy ears, and then decide on a name for your new pup. 🐶✏️
Related posts:
 How to Draw a Car Step by Step (Easy Drawing for Beginners)
 How to Draw a Whale Step by Step (Easy for Beginners)
 How to Draw a Rat Step by Step (Easy for Beginners)
 How to Draw an Arctic Fox Step by Step (Easy for Beginners)
 How to Draw a Rose Step by Step (Spiral Method for Beginners)
 How to Draw Olaf Step by Step (Easy for Beginners)
 How to Draw a Ladybug Step by Step (Easy for Beginners)
 How to Draw a Dog Step by Step (Easy Side View for Beginners)
 How to Draw a Leopard Step by Step (Easy for Beginners)
 How to Draw a Light Bulb Step by Step (Easy for Beginners)
 How to Draw a Crow Step by Step (Easy for Beginners)
 How to Draw an Eagle Step by Step (Easy for Beginners)

