
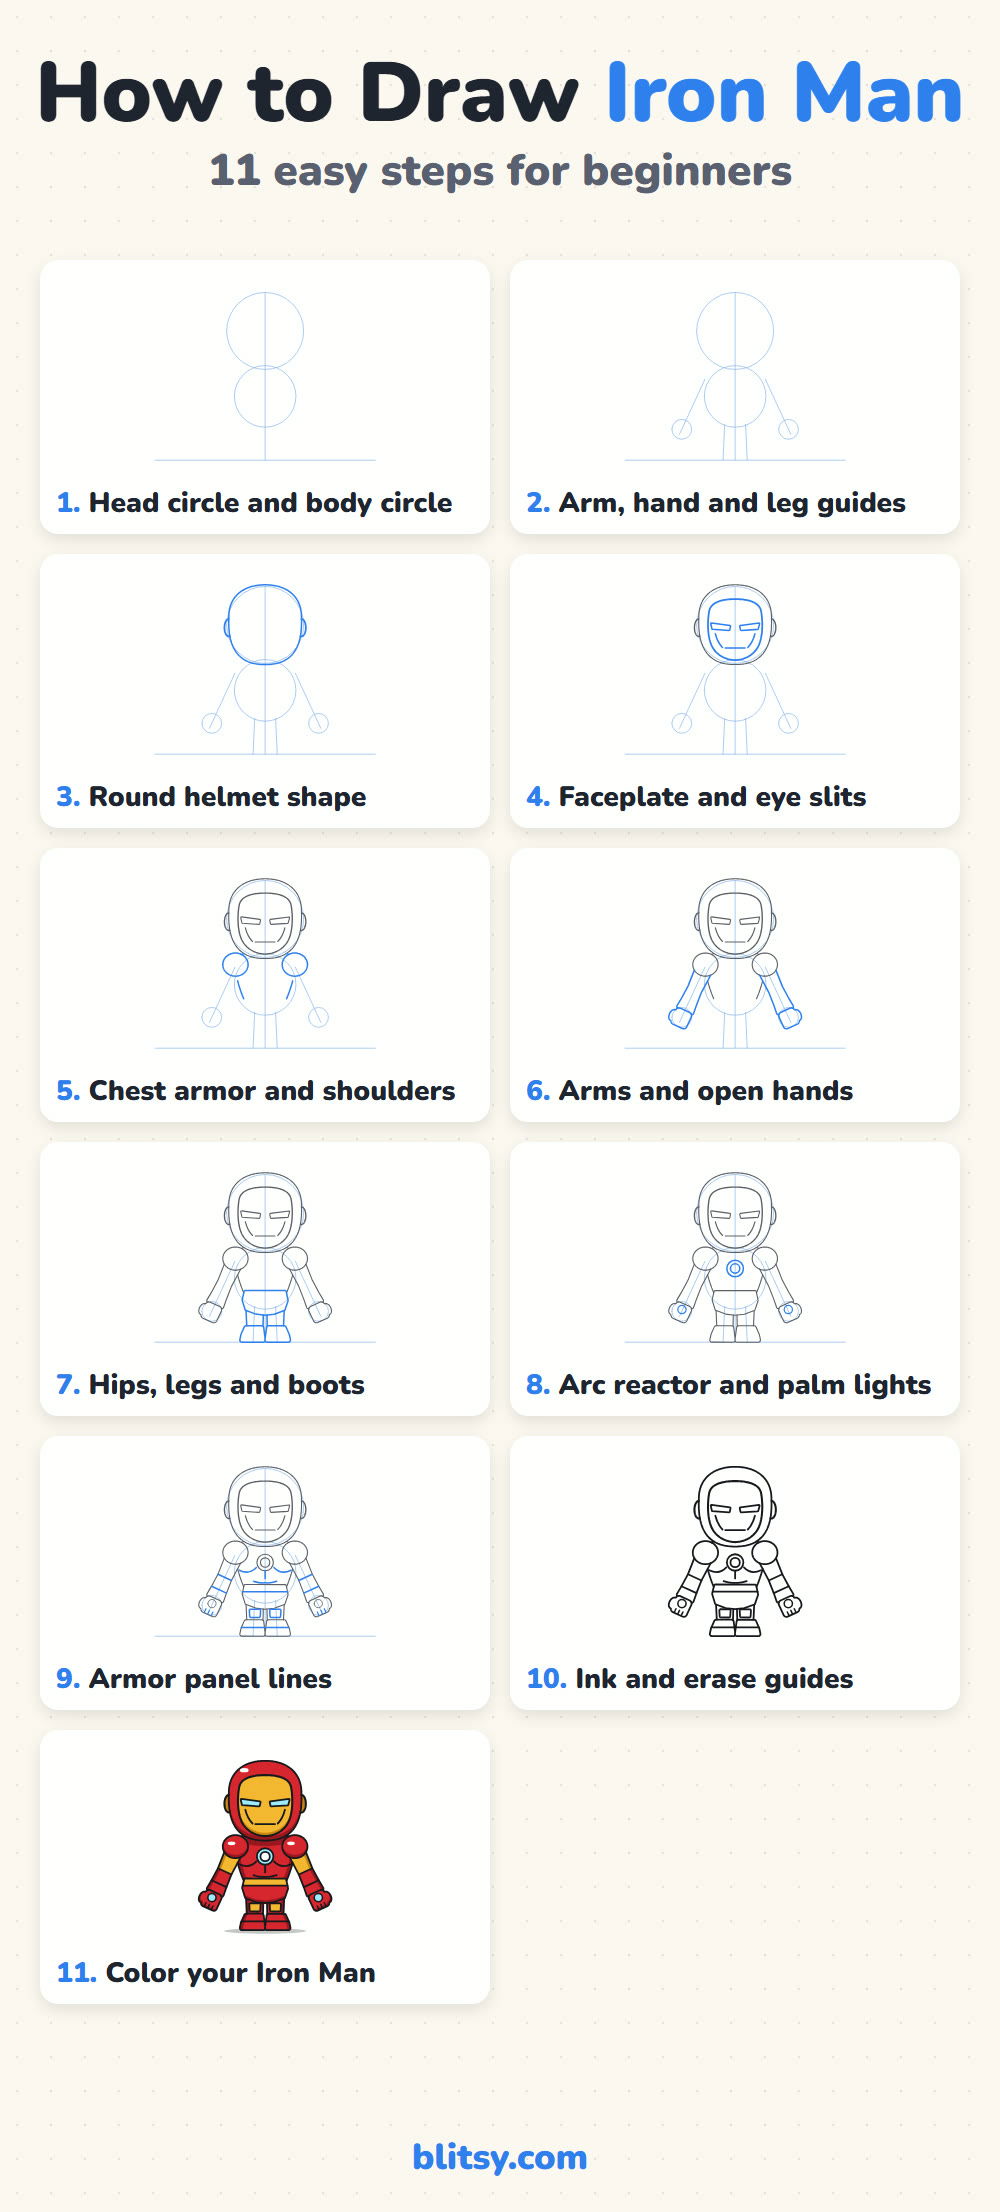
A suit of armor sounds hard to draw until you notice it's mostly rounded boxes stacked on top of each other. Give Iron Man a giant helmet and a short, chunky body, and those boxes turn friendly fast. In this lesson I'll show you how to draw Iron Man step by step, from two pale circles to a red and gold hero with a glowing arc reactor on his chest. He's my own simple fan-art version, made for drawing practice and not taken from any official Marvel artwork.

Strong blue in a picture means draw this now. Gray lines are already on your paper, and the faint blue circles at the start are guides you'll erase once the armor is inked.
Quick overview
⏱️ Time: around 35 to 45 minutes, including color
🎯 Level: easy, suited to kids aged about 7 and older
✏️ Steps: 11
🦾 You'll draw: a chibi Iron Man standing tall with his palm lights on
Supplies for Suiting Up on Paper
- A pencil that sketches lightly, HB or 2B
- A soft eraser that won't tear the paper
- A black fineliner or thin felt-tip for inking
- Coloring pencils or markers in red plus a darker red
- Yellow and orange for the gold parts, with light blue for anything that glows
- A sheet of plain paper held upright
No orange in the box? Press harder with the yellow on the gold edges and it reads the same.
How to Draw Iron Man Step by Step
Step 1: Sketch a big head circle and a smaller body circle
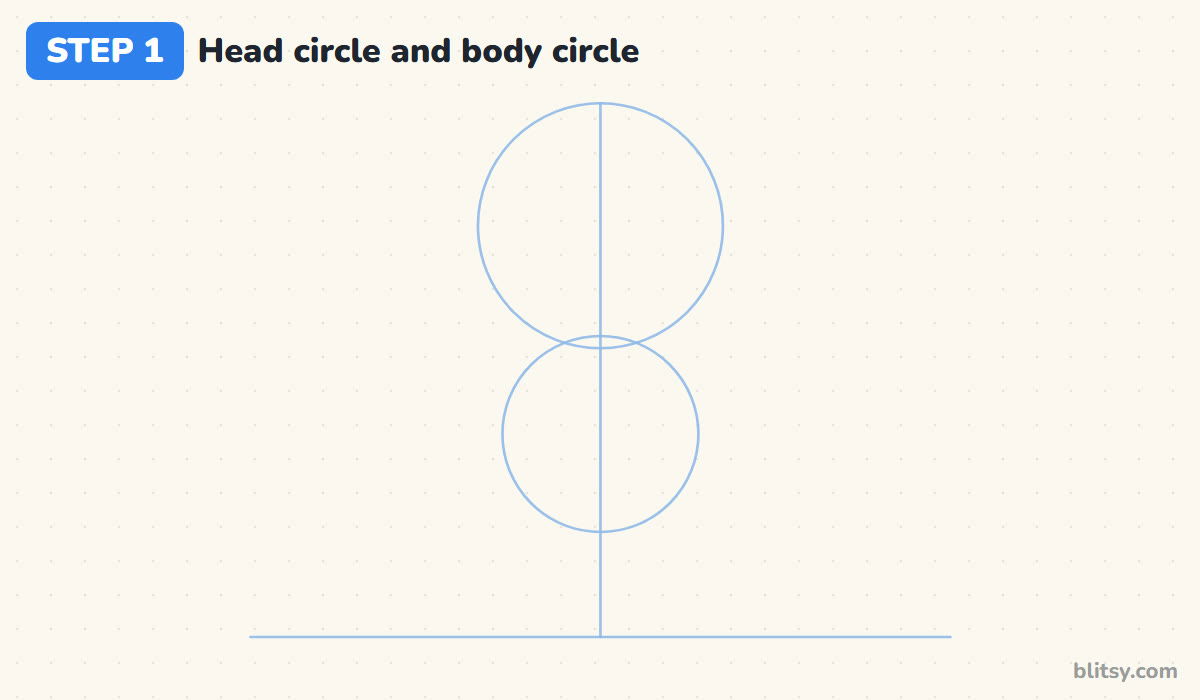
Lightly draw a ground line near the bottom of the page and a vertical line through the middle. On the upper part of that line, draw a large circle for the helmet. Below it, add a smaller circle for the body so the two just overlap. The head circle should be noticeably bigger, because a huge helmet on a little body is what makes him chibi.
💡 Tip: If your circles wobble, trace them a few times very softly. One of those faint loops will look right.
Step 2: Add arm guides, hand circles and leg lines
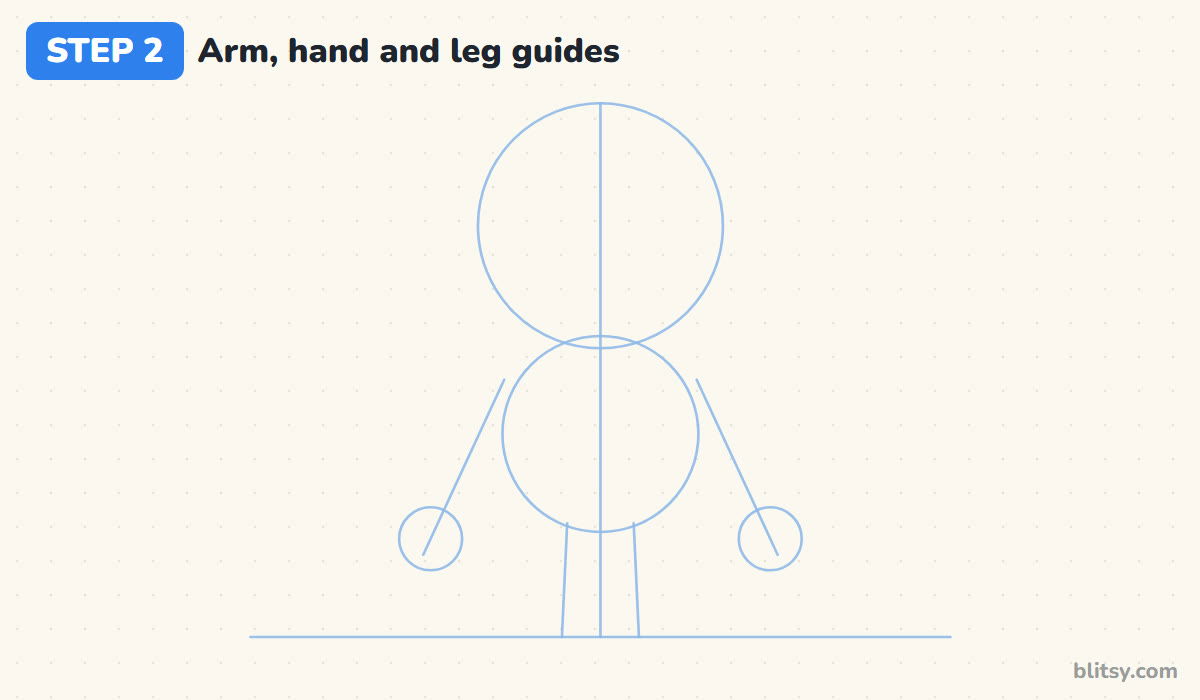
From the top corners of the body circle, draw a straight line slanting down and outward on each side. Put a small circle at the end of each line for a hand, roughly level with the bottom of the body circle. Then add two short, nearly straight lines from the body down to the ground for the legs, leaving a narrow gap between them.
💡 Tip: Angle both arm lines the same amount. A quick upside-down look shows any difference.
Step 3: Draw the round helmet
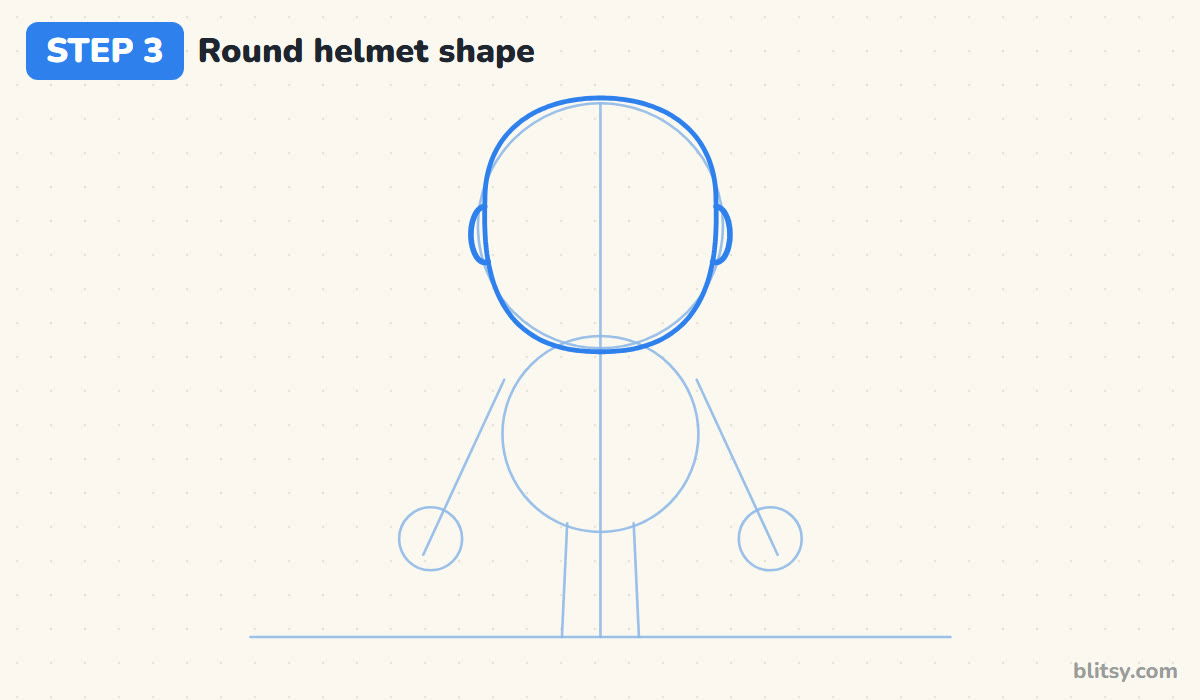
Go around the head circle with a smooth line, keeping the top domed and the sides almost straight. As you reach the bottom, curve the line inward so the chin is a little narrower than the forehead. Add an upright oval on each side, half hidden behind the helmet, for the round ear pieces.
💡 Tip: Let the helmet sit a touch outside the guide circle on top. A taller dome makes him look cuter.
Step 4: Draw the faceplate and the eye slits
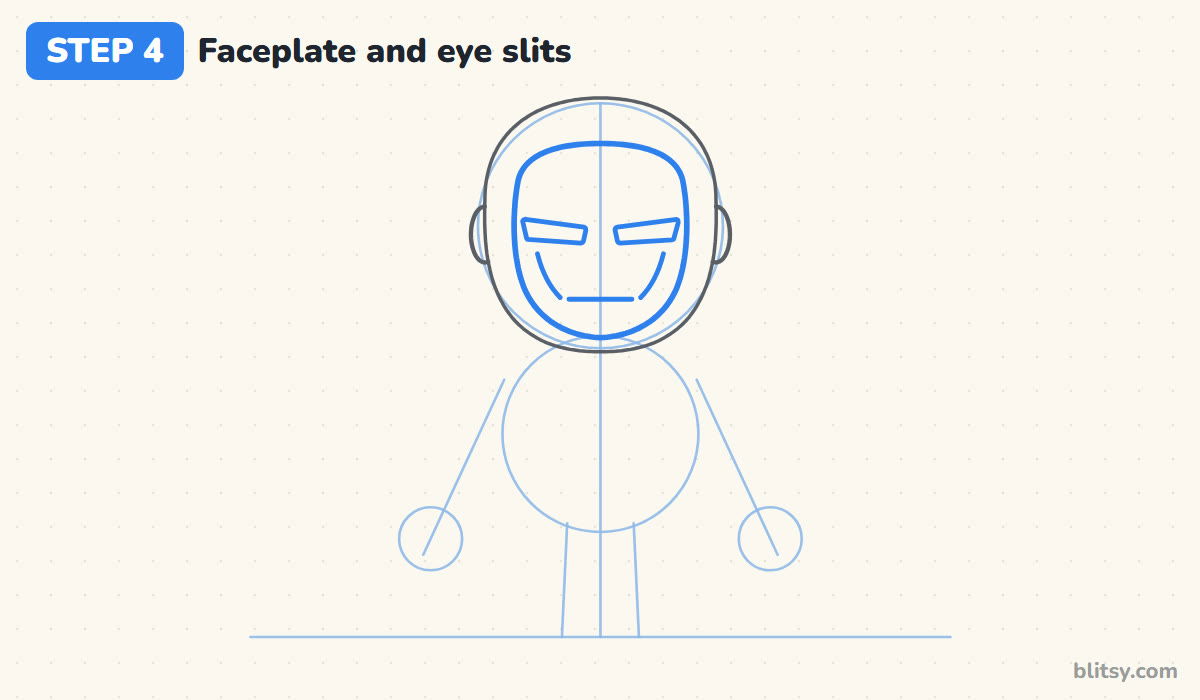
This is the step that makes him Iron Man. Inside the helmet, draw the faceplate as a rounded shape that leaves a red border all the way around it. Halfway down, add two long, narrow eye slits, slightly higher at the outer ends. Finish with a short flat mouth line and a gently curved line under each eye that runs down toward the mouth corners.
💡 Tip: Keep the eye slits thin and wide apart. Fat, close eyes make the mask look like a sleepy cat.
Step 5: Shape the chest armor and shoulder pads
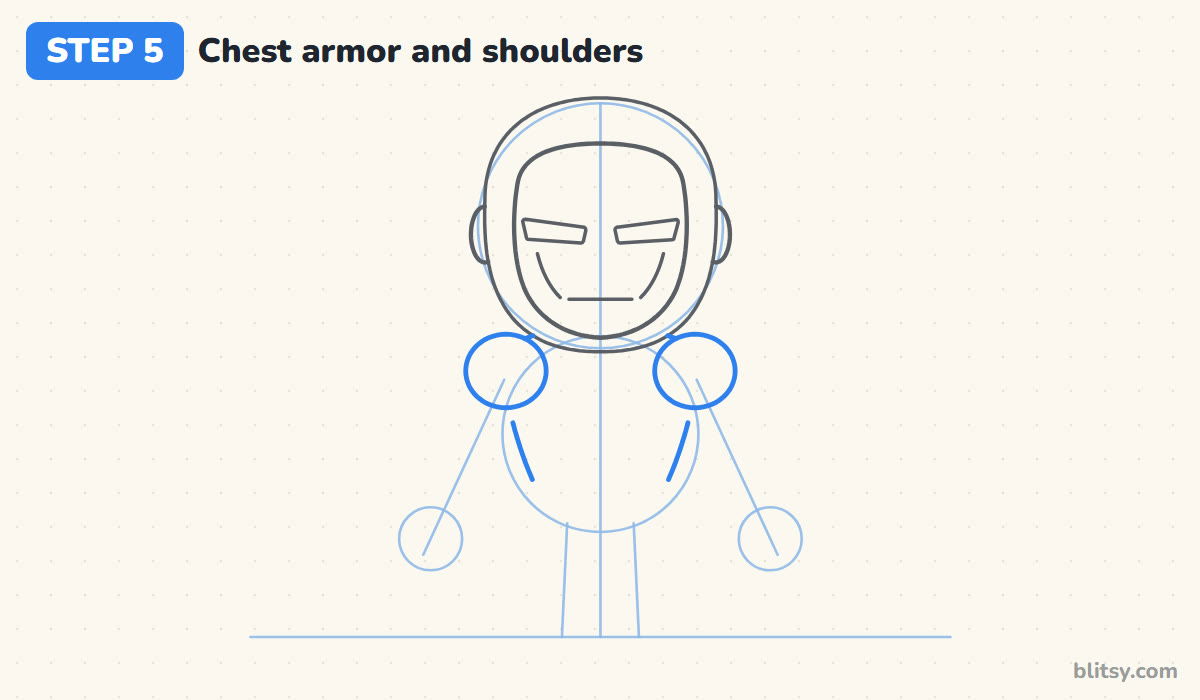
Under the chin, draw the sides of the chest sloping in toward a narrow waist, a bit like a shield turned upside down. Then place a big round pad over each shoulder, overlapping the chest and the top of the arm guide. I make the pads about a third as wide as the helmet; that's enough to look strong without hiding the body.
💡 Tip: Draw the shoulder pads after the chest so you can see exactly where they overlap.
Step 6: Draw the arms and open hands
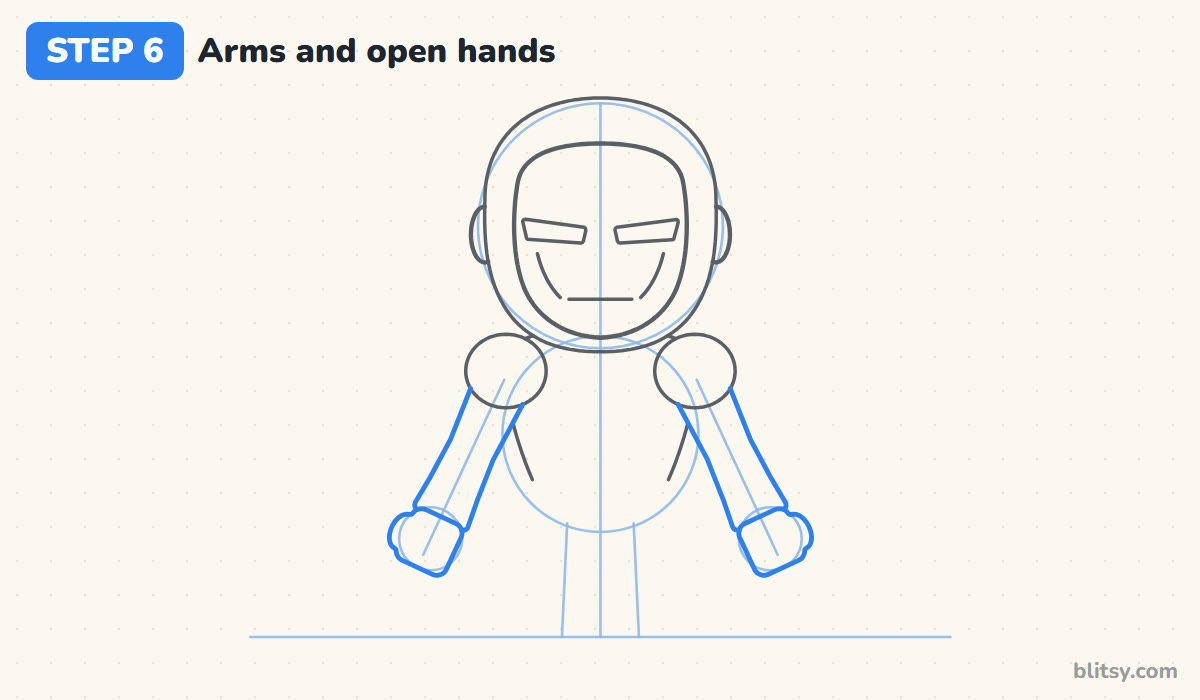
Following the slanted guides, draw each arm as a tube coming out from under the shoulder pad. Let it widen slightly at the wrist, where the gauntlet flares. At the end, draw an open hand facing you: a rounded square with the fingers pointing down and a small thumb bump on the outer side. The hand should touch the wrist with no gap.
💡 Tip: Think mitten, not five fingers. Simple hands stay neat at this small size.
Step 7: Add the hips, then the legs and boots
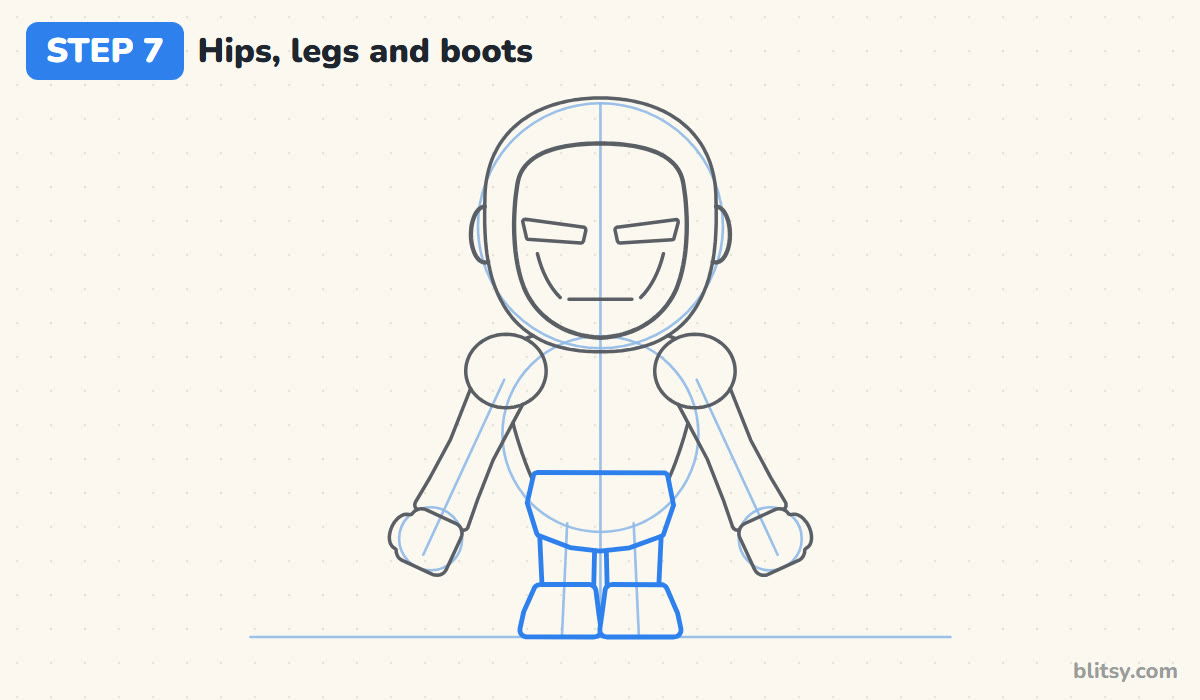
Across the waist, draw a band for the hips that narrows to a soft point between the legs. Under it, two short straight legs come down along your leg guides. Each one ends in a chunky boot that gets slightly wider at the sole and sits flat on the ground line. Short legs keep him balanced under that big helmet.

💡 Tip: Make both boots touch the ground line. Even a small lift makes him look like he's floating.
Step 8: Draw the arc reactor and palm lights
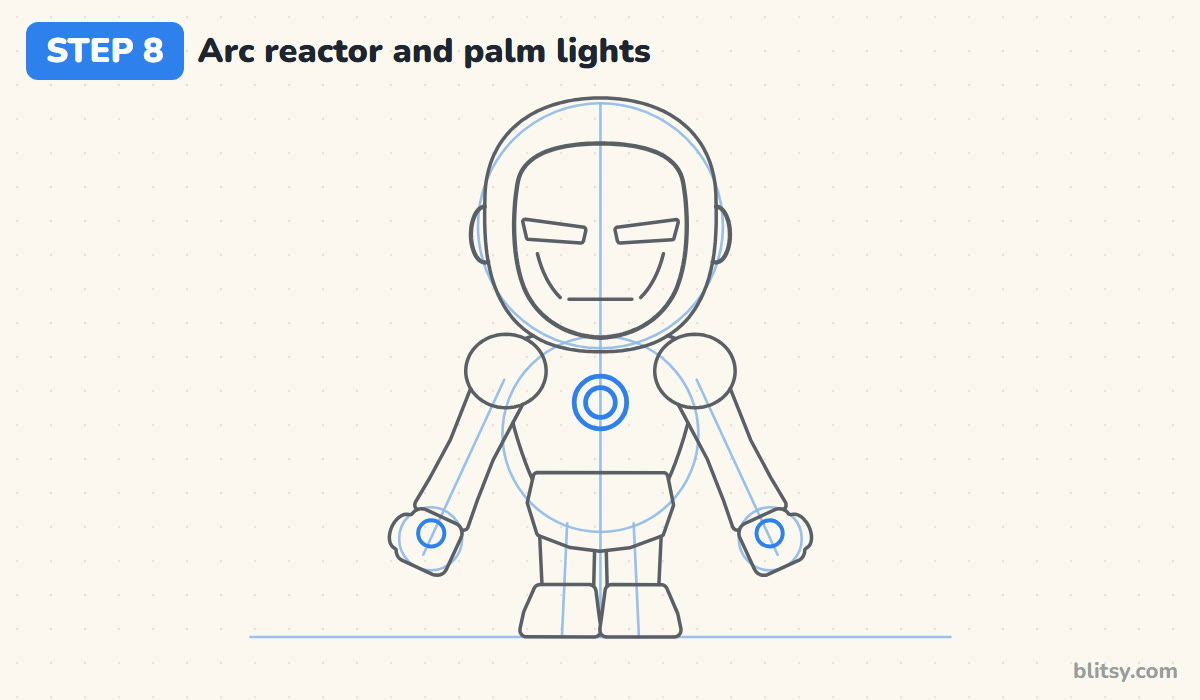
Right in the middle of the chest, draw a circle about the size of one eye slit is long, then a smaller circle inside it. That's the arc reactor, the light every kid looks for first. On each hand, add one small circle in the palm for the repulsor lights.
💡 Tip: Place the reactor a little above the middle of the chest. Too low and it starts to look like a belly button.
Step 9: Add the armor panel lines
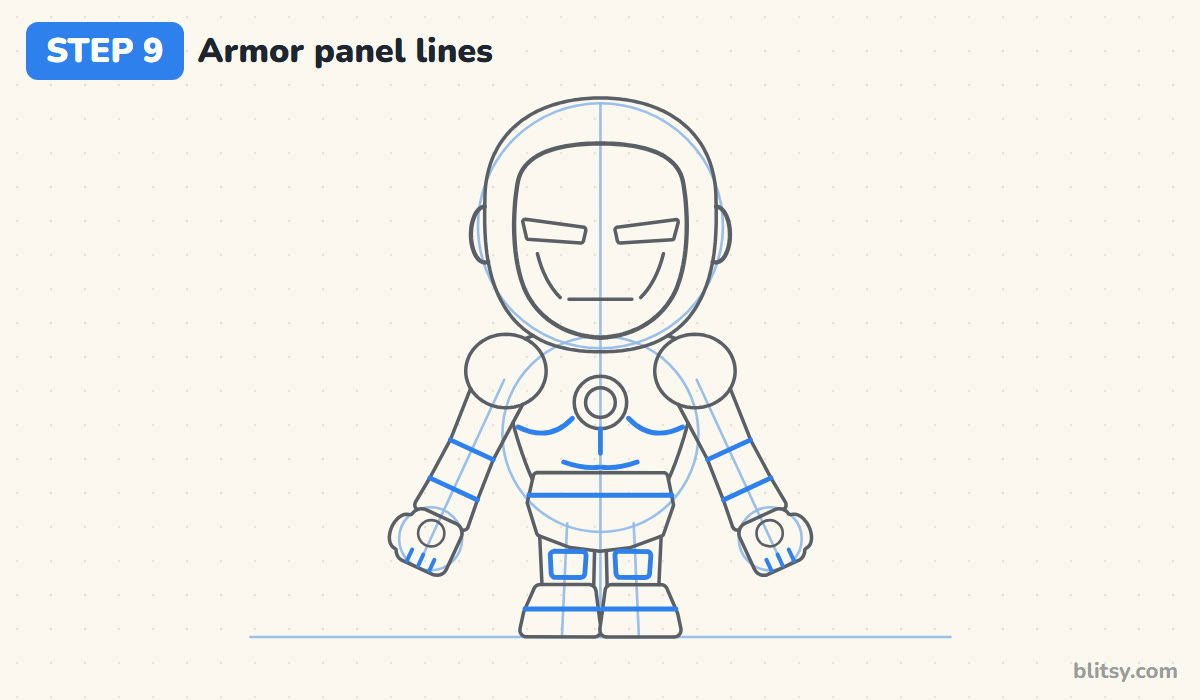
Now the suit gets its segments. Draw a curved line under each side of the chest with a short line down the center, then a small curve lower down for the stomach plate. On each arm, draw one line across at the elbow and another near the wrist. Add a belt line across the hips, a small rounded panel on each thigh, a line around each boot, and three short finger lines on each hand.
💡 Tip: Stop when each body part has one or two lines. More than that and the armor turns into a cluttered grid.
Step 10: Ink the outlines and erase the guides
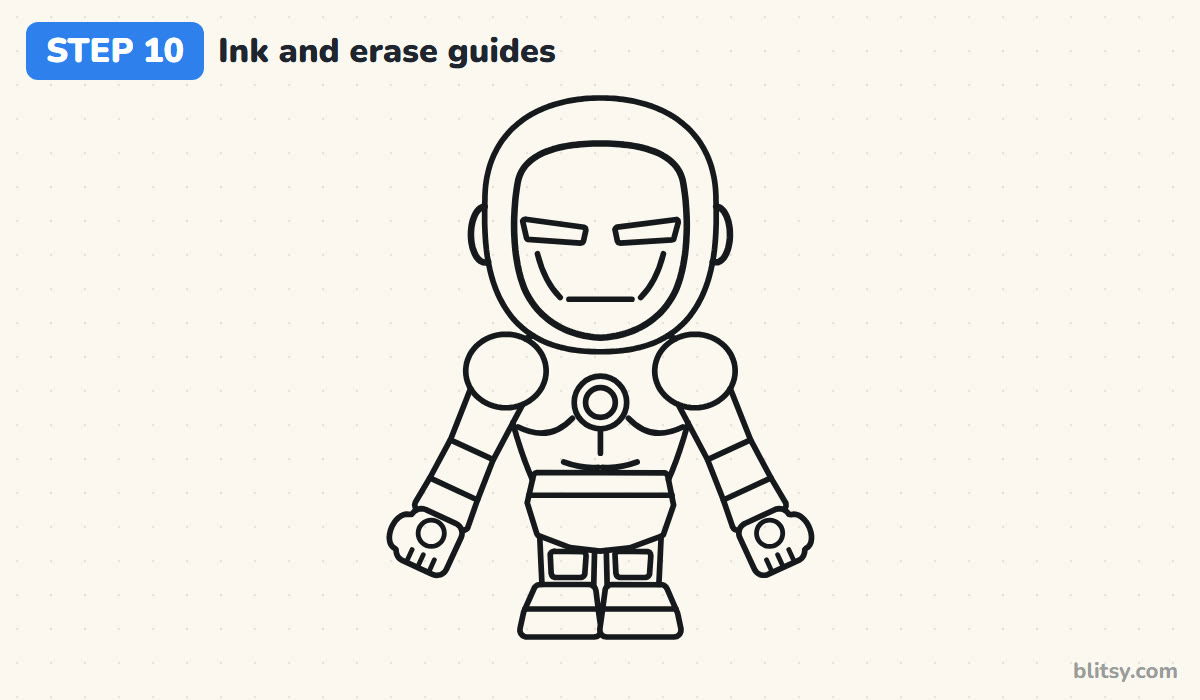
Go over every line you want to keep with the black pen. I ink the big outer shapes first and the small panel lines last, which keeps my hand steady for the fiddly bits. Leave the guide circles and lines alone. Once the ink is dry, erase all the pencil underneath.
💡 Tip: Ink the eye slits slowly with short strokes. Their sharp corners are what give the mask its look.
Step 11: Color the armor red and gold
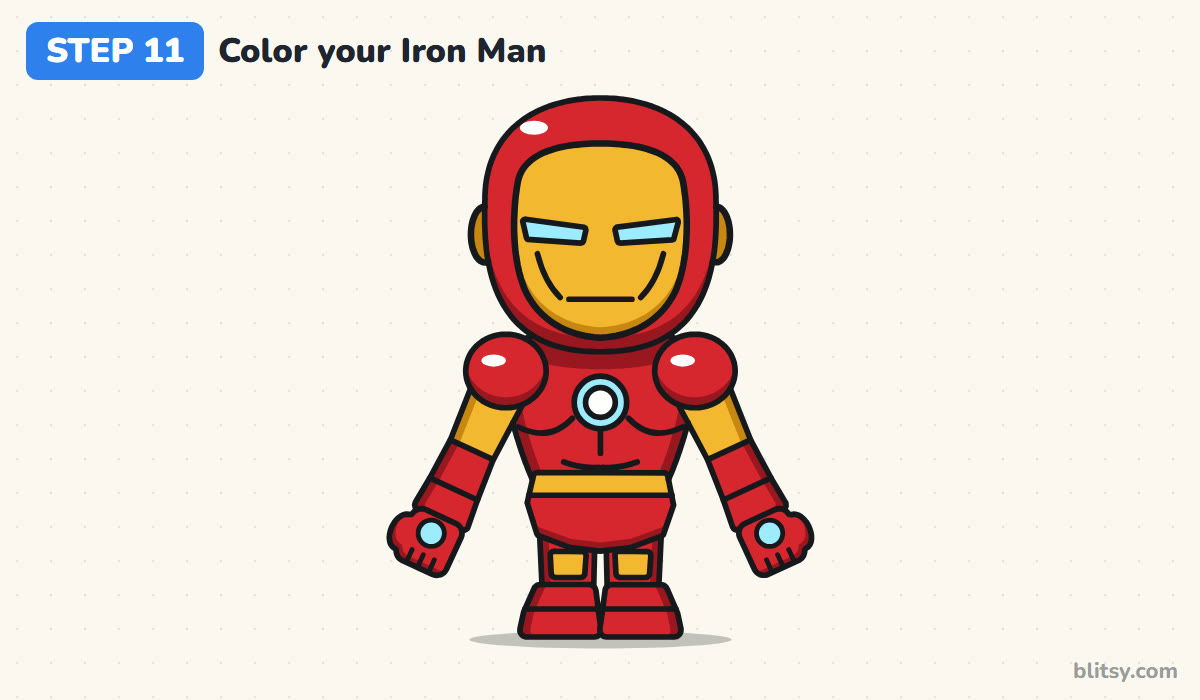
Color the helmet, chest, forearms, hands, hips, lower legs and boots red. The faceplate and upper arms go yellow, like the belt and thigh panels, with orange for the ear pieces. Use light blue for the eyes, palm circles and the reactor ring, and leave the reactor center white. Last, run dark red along the outer edges of the red parts and orange along the bottom of the gold ones.
💡 Tip: Leave a tiny white spot on the helmet and each shoulder pad. It makes the metal look polished.
Where Armored Hero Sketches Usually Slip
- A small helmet. With a normal-sized head he looks like a regular robot. Keep the helmet close to half the total height.
- A faceplate that fills the whole helmet. Without the red border around it, the face loses its shape. Leave a clear band of red on top and at the chin.
- Eye slits that tilt too steeply. Strong slants make him look angry. A gentle lift at the outer ends is enough.
- Hands floating off the wrists. A gap there breaks the arm. Overlap the hand slightly onto the gauntlet.
- Too many panel lines. One or two per part reads better on a chibi.
Fresh Suit Ideas for Your Mini Avenger
When the standing pose feels easy, try him flying: tilt the whole figure, raise one arm with the palm light facing forward, and draw short flame shapes under the boots. A silver and black stealth suit is another fun swap. Younger kids can skip the panel lines and still end up with a clear Iron Man, because the gold faceplate and the glowing chest do most of the work. If you'd like a teammate beside him, try the Hulk drawing tutorial or the Wonder Woman drawing tutorial. Both are chibi heroes drawn at the same size as this one.
Free Iron Man Coloring Page With an 11-Step PDF
For a quiet afternoon or a classroom table, print the free Iron Man coloring page. A small colored version at the top shows where each color goes, so kids can match it on their own. The step-by-step PDF guide holds all 11 steps with their tips, two to a page, and prints on Letter or A4.
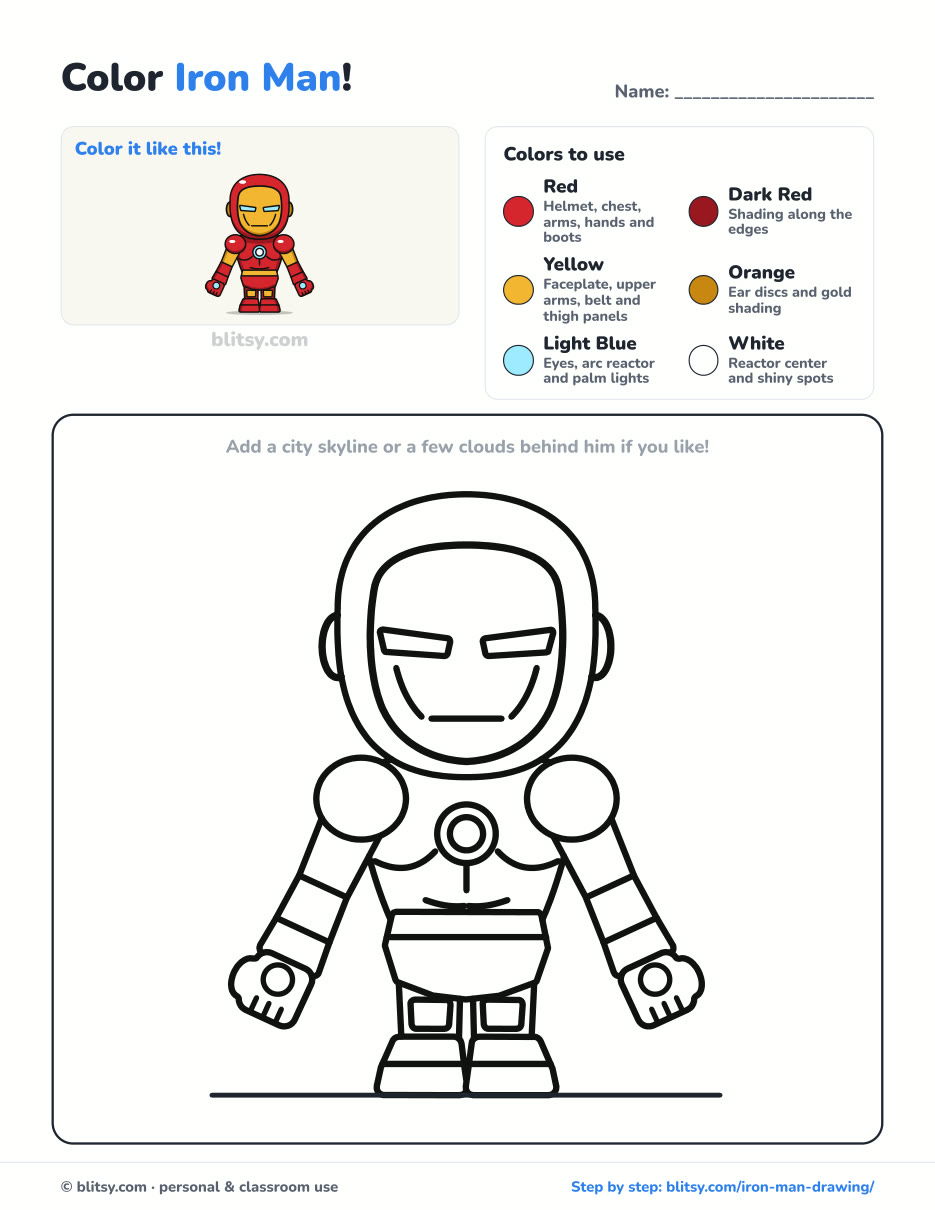
Black outlines with a colored example and the color names at the top. Ready to print and color.
⬇️ Download Coloring PageEvery step picture with its instructions and tips, to keep beside your paper while you draw.
⬇️ Download Drawing Guide📱 On a phone? Tap a download button, then open the file and choose Share → Save to Files or Print. On a computer, the PDF opens or saves straight to your Downloads folder.
Keep the Armor Build on Your Board
Iron Man Suited Up? Heroes and Characters to Draw Next
Here are more step-by-step tutorials, many of them chibi characters like this one.
- Care Bear Drawing: The Care Bear drawing tutorial draws a pink bear with a rainbow between two clouds on its tummy.
- Scarecrow Drawing: Patched clothes and a smile on a post: scarecrow drawing step by step.
- Ariana Grande Drawing: Learn how to draw Ariana Grande as a chibi with her swinging ponytail.
- Princess Drawing: A lavender gown and a little star wand finish the princess drawing tutorial.
- Chalk Art: Head outdoors with how to do chalk art, a hopscotch and rainbow set for the sidewalk.
- Family Drawing: Draw four people and a puppy in the easy family drawing tutorial.
- Sharingan Drawing: The Sharingan drawing step by step lesson draws a red iris with three tomoe inside a manga panel.
- Pikachu Drawing: Ears up and cheeks red, how to draw Pikachu step by step takes 11 steps.
- Springtrap Drawing: A chibi Springtrap with one floppy ear waits at the end of this Springtrap drawing tutorial.
- Kurama Drawing: The Kurama drawing tutorial shows the chibi fox grinning in front of nine orange tails.
- Cerberus Drawing: Give each head its own mood when you learn how to draw Cerberus, a cute three-headed pup.
- Master Chief Drawing: For another armored hero, the Master Chief drawing step by step guide has him with fists on hips and visor gleaming.
- Disney Drawing: The Disney character drawing tutorial draws Nemo the clownfish with his bubbles.
- Stitch Drawing: Big ears and a small grin: how to draw Stitch step by step is done in twelve short steps.
- Bart Simpson Drawing: Spiky hair, wide eyes and a smirk make up the Bart Simpson drawing tutorial.
Iron Man Drawing Questions Kids Often Ask
What is the easiest way to draw Iron Man?
Draw him as a chibi from the front. One big circle for the helmet and one small circle for the body set the size, and the gold faceplate with a glowing chest light makes him easy to recognize.
How do you draw Iron Man's face?
Draw a rounded faceplate inside the helmet, leaving a red edge all around. Add two thin eye slits, a short mouth line and a curved line under each eye.
What colors do you need for Iron Man?
Red and dark red cover most of the armor, yellow with orange makes the gold, and light blue plus white handles every glowing light.
How long does it take to draw Iron Man?
Most beginners need 35 to 45 minutes with coloring. The faceplate and the panel lines take the longest.
Grab that pencil, power up the arc reactor, and let your own little Iron Man take his first stand on the page. 🦾❤️
Related posts:
 How to Draw Wonder Woman Step by Step (Chibi for Kids)
 How to Draw the Hulk Step by Step (Easy Chibi for Kids)
 How to Draw Springtrap Step by Step (Cute Chibi for Kids)
 How to Draw Nezuko Step by Step (Cute Chibi for Beginners)
 How to Draw Kurama Step by Step (Easy Chibi Nine-Tails)
 How to Draw Mario Step by Step (Easy Chibi Version)
 How to Draw Cat Noir Step by Step (Easy Chibi Hero)
 How to Draw Master Chief Step by Step (Easy Chibi Armor)
 How to Draw Tinkerbell Step by Step (Easy Flying Chibi)
 How to Draw Tanjiro Step by Step (Easy Demon Slayer Chibi)
 How to Draw a Chibi Step by Step (Easy 2-Head Method)
 How to Draw Darth Vader Step by Step (Easy Chibi Version)

