
A hibiscus has one feature no other garden flower shares: a long column that pokes straight out of the middle, dotted with pollen and tipped with little red pads. Get that column right and people recognise the flower at a glance. This lesson walks you through how to draw a hibiscus step by step, from one light circle to a colored bloom with leaves and a bud. You don't need any drawing experience, only a pencil you can press softly.
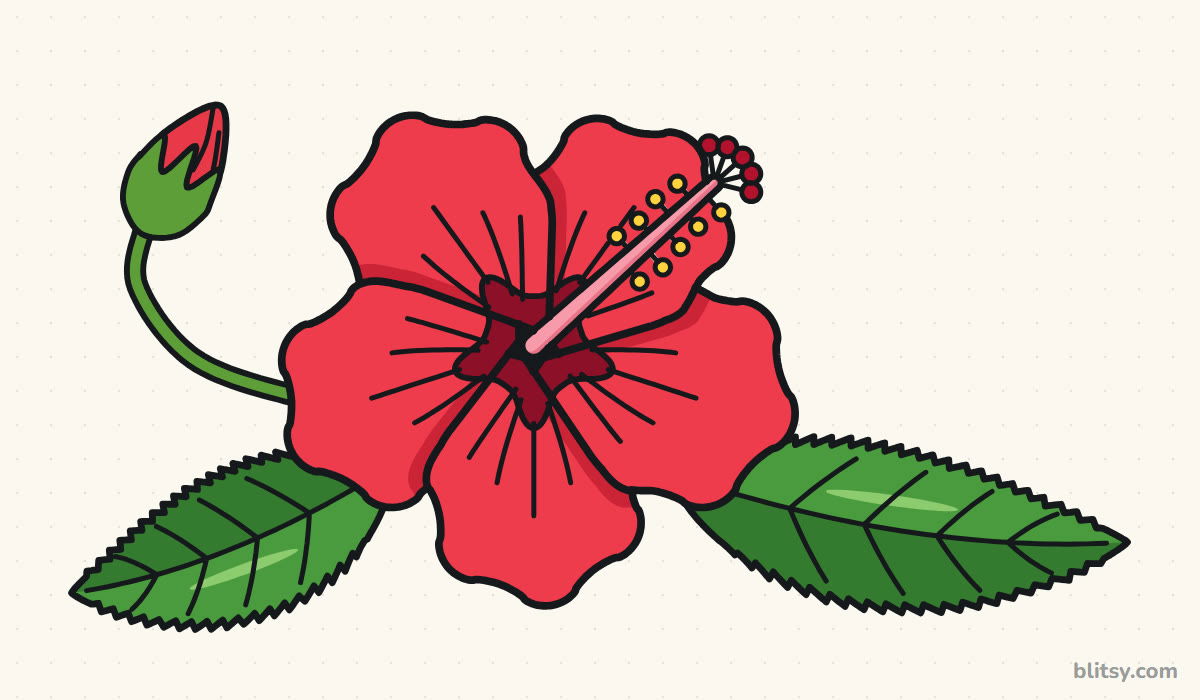
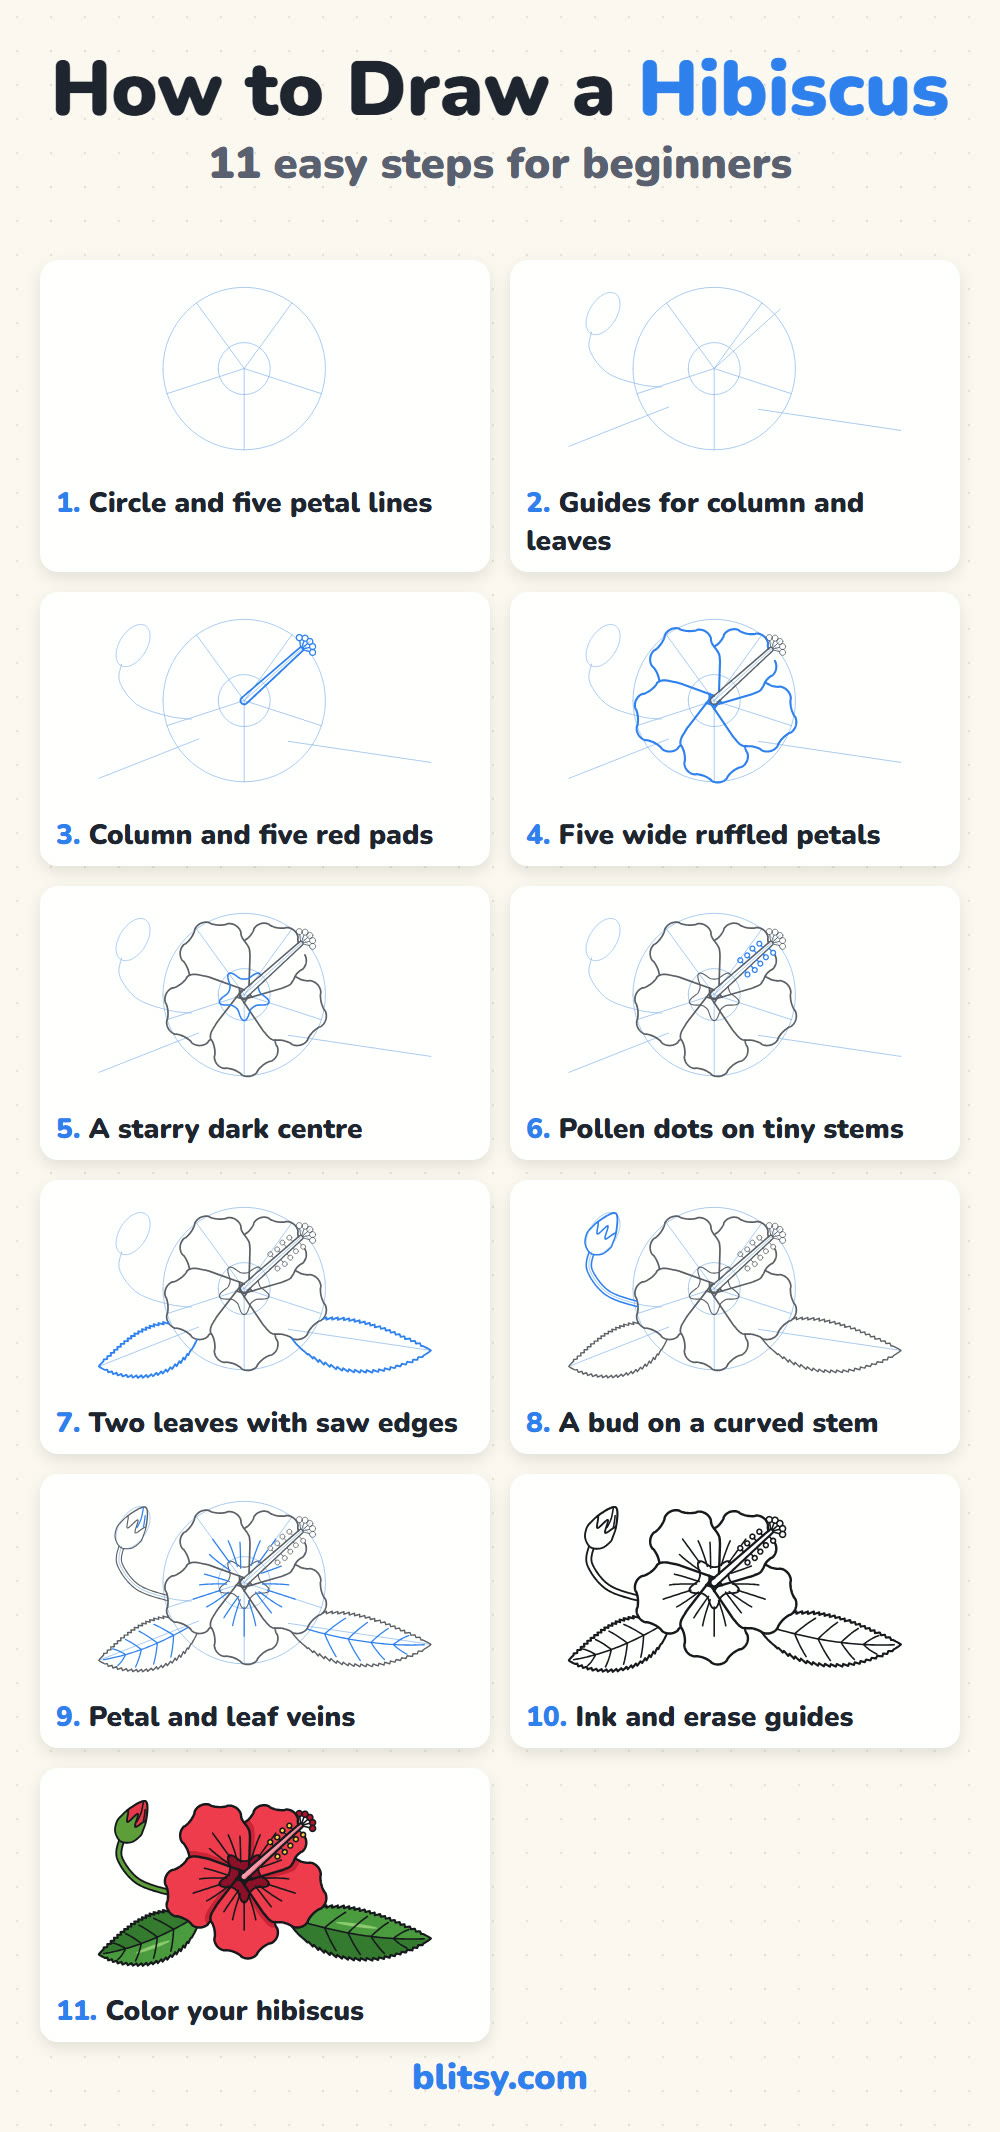
Copy whatever is bright blue in each picture; that's the new part. Gray lines are ones you've drawn already. The thin pale blue shapes are helper guides, so sketch them lightly, because step 10 erases them.
Quick overview
⏱️ Time: about 35 minutes with coloring
🎯 Level: easy to medium, good for kids from about 8
✏️ Steps: 11
🌺 You'll draw: a red hibiscus flower with its pollen column, two serrated leaves and a bud
Hibiscus Sketch Kit for a Tropical Bloom
- An HB pencil, kept sharp
- A soft eraser that won't smear
- A black fineliner or felt-tip pen
- Colored pencils: three reds from light to maroon, plus pink, yellow and two greens
- Plain paper turned sideways
Turning the paper sideways leaves room for the leaves to stretch out on both sides of the flower.
How to Draw a Hibiscus Step by Step
Step 1: Sketch a circle with five spokes
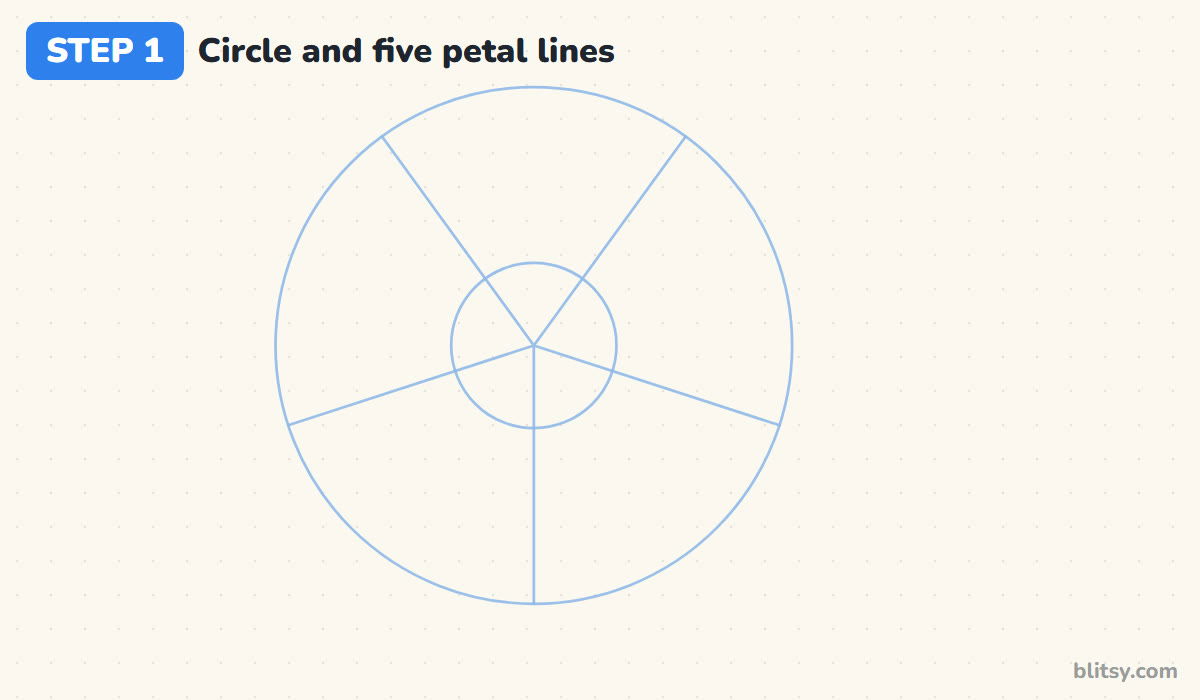
Draw a large circle a little left of the middle of your page, then a small circle in its centre. From the centre point, draw five straight lines to the edge, spaced like the points of a star. One line points straight down. Each spoke marks where a petal will go, so even gaps here mean even petals later.
💡 Tip: Draw the bottom spoke first, then place the other four by eye around the clock.
Step 2: Place guides for the column, leaves and the bud
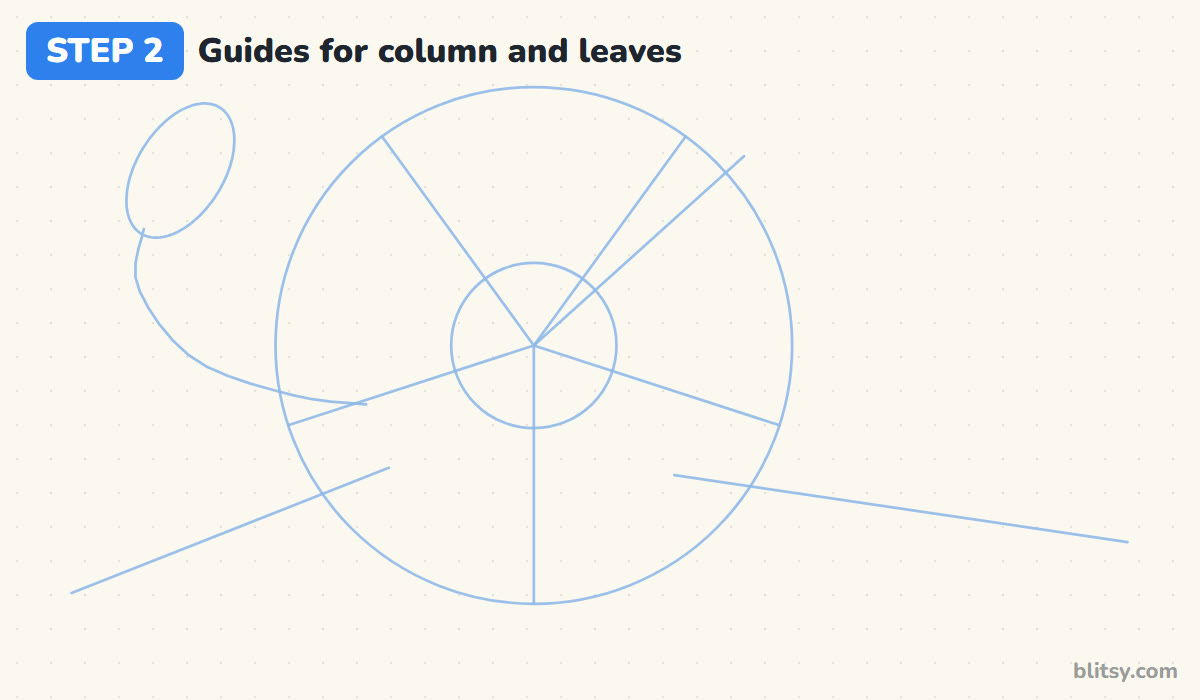
I like to place everything else before any real drawing starts. Draw a straight line from the centre up and to the right, past the circle edge. That's the column. Two long lines going left and right from the bottom of the circle become the leaves. In the top left corner, sketch a small tilted oval with a curved line hanging down from it for the bud.
💡 Tip: If the right leaf line runs off the page, shorten both leaf lines a little and keep them balanced.
Step 3: Draw the column and five red pads
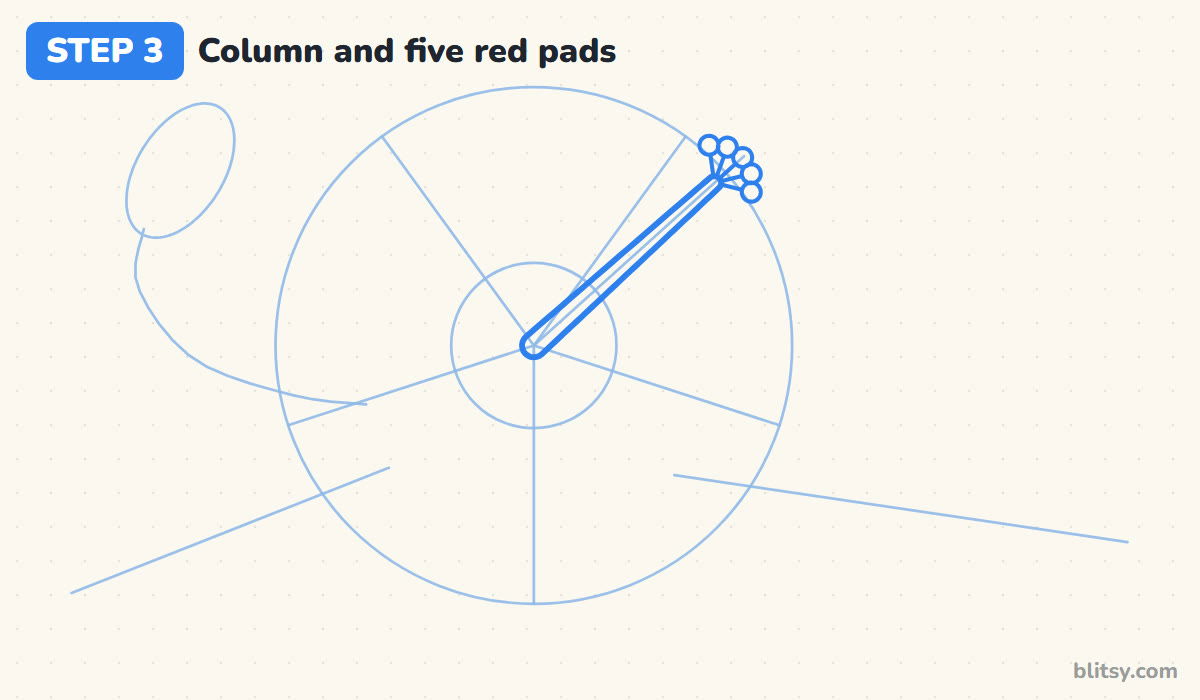
I draw the column before the petals, because it sits in front of them. Trace your column line on both sides to make a thin tube, a little wider at the centre than at the tip. At the tip, draw five short stalks fanning out with a small circle on each. Those circles are the stigma pads, and they're the part kids remember most.

💡 Tip: Keep the tube no wider than your little finger on the page; a fat column swallows the flower.
Step 4: Draw five wide ruffled petals
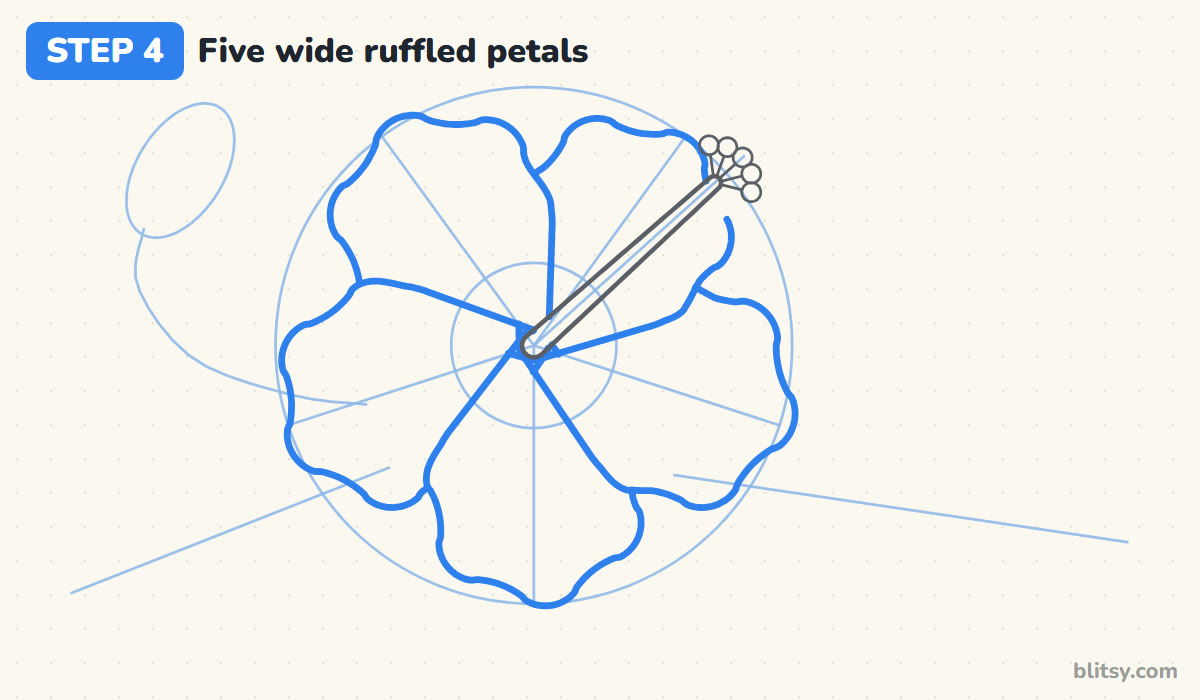
Around each spoke, draw a petal that starts narrow at the centre and opens into a wide, rounded end touching the big circle. Give the rim a few soft waves instead of a smooth curve. Each petal overlaps the next one on one side, like a pinwheel. Stop your line where it meets the column, since the column is in front.
💡 Tip: Go around in one direction and always tuck the new petal under the one before it.
Step 5: Shape the starry dark centre
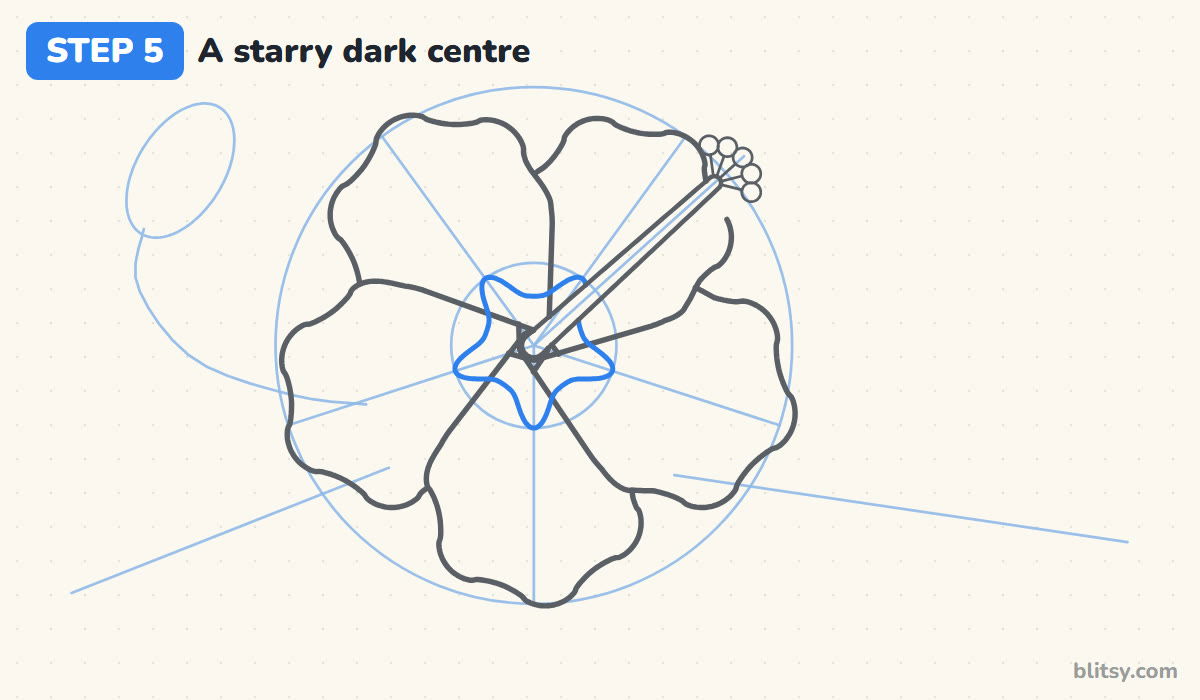
Around the base of the column, draw a small five-pointed shape with soft, rounded points. Line each point up with a spoke so it runs a short way into the middle of a petal. This is the hibiscus eye, the darkest spot of the flower. Keep it inside the small guide circle, or it starts to look like a second flower.
💡 Tip: Rounded points look like real petal markings, while sharp ones turn the centre into a star sticker.
Step 6: Add pollen dots on tiny stems
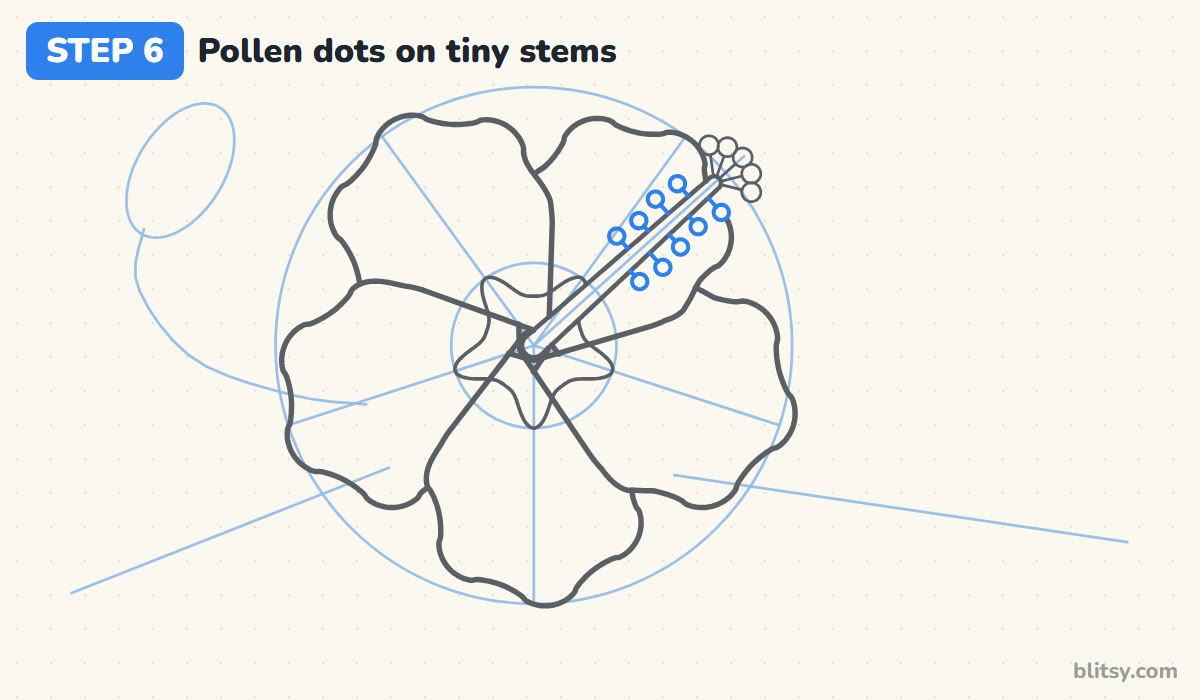
Along the top half of the column, draw little dots on both sides, each on a very short stem. Alternate them, one on the left, then one on the right, like leaves on a twig. About nine dots is plenty. On a real flower these are the pollen sacs, and they cluster near the tip, never down by the petals.
💡 Tip: Make every dot about the same size as a stigma pad so the column looks like one plant part.
Step 7: Draw two leaves with saw edges
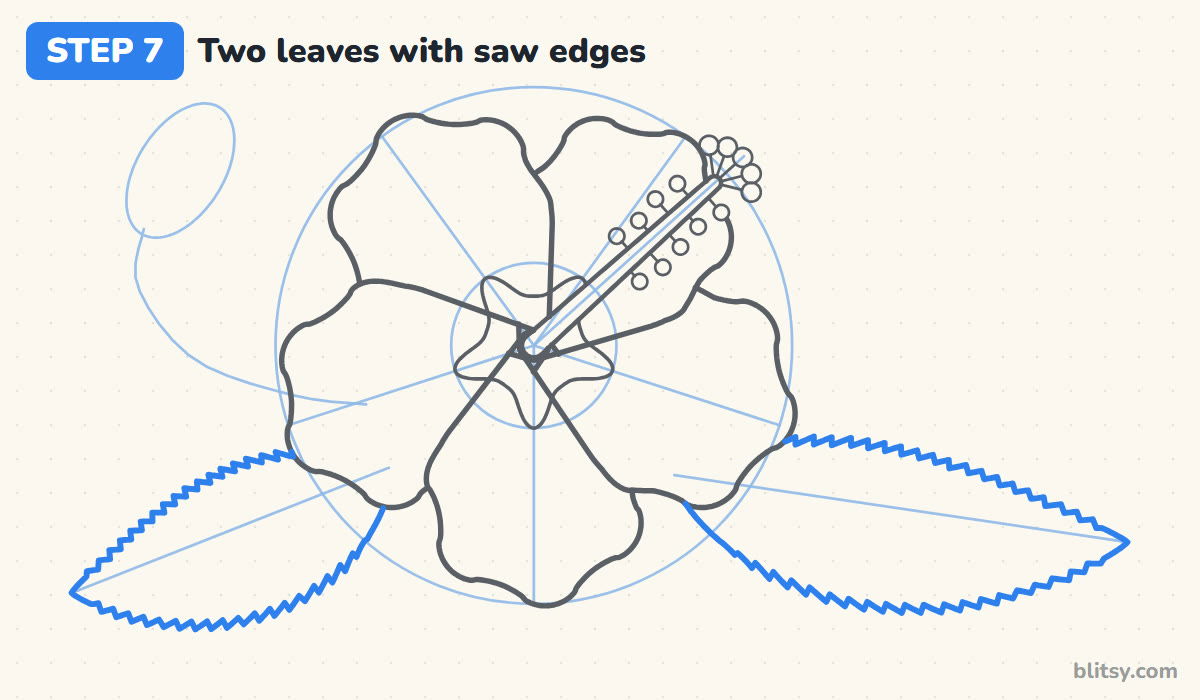
Along each leaf line, draw a long oval leaf that ends in a sharp point. Hibiscus leaves have small teeth along the edge, so replace a smooth line with tiny zigzags, smaller toward the tip. Start each leaf right where it disappears behind the petals. Nothing needs to be drawn where a petal covers it.



💡 Tip: Small, even teeth look natural; big ones make the leaf look like holly.
Step 8: Draw a bud on a curved stem
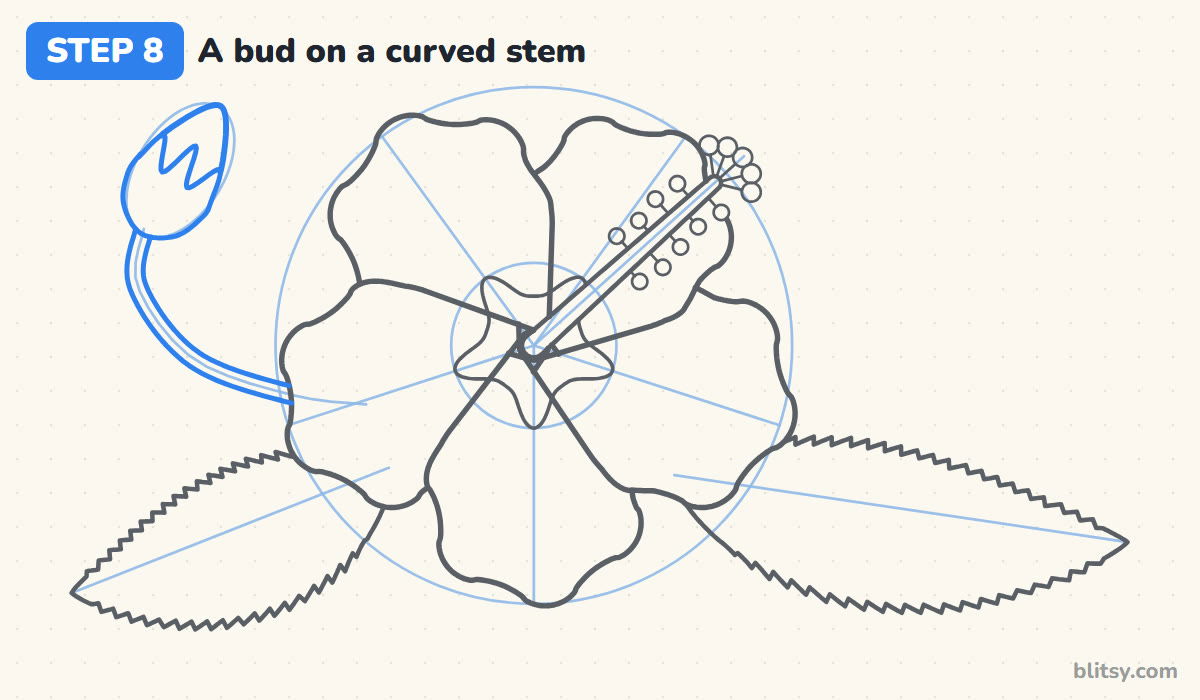
Inside the oval at the top left, draw a teardrop pointing up and to the right. Over its lower half, draw a green cup with three pointy tips, the sepals that hold the closed petals. Then trace the curved guide on both sides to make a thin stem that slips behind the flower. A bud gives the picture a second point of interest, but small kids can leave it out.
💡 Tip: I keep the bud smaller than one petal so the open flower stays the star.
Step 9: Add petal veins and leaf veins
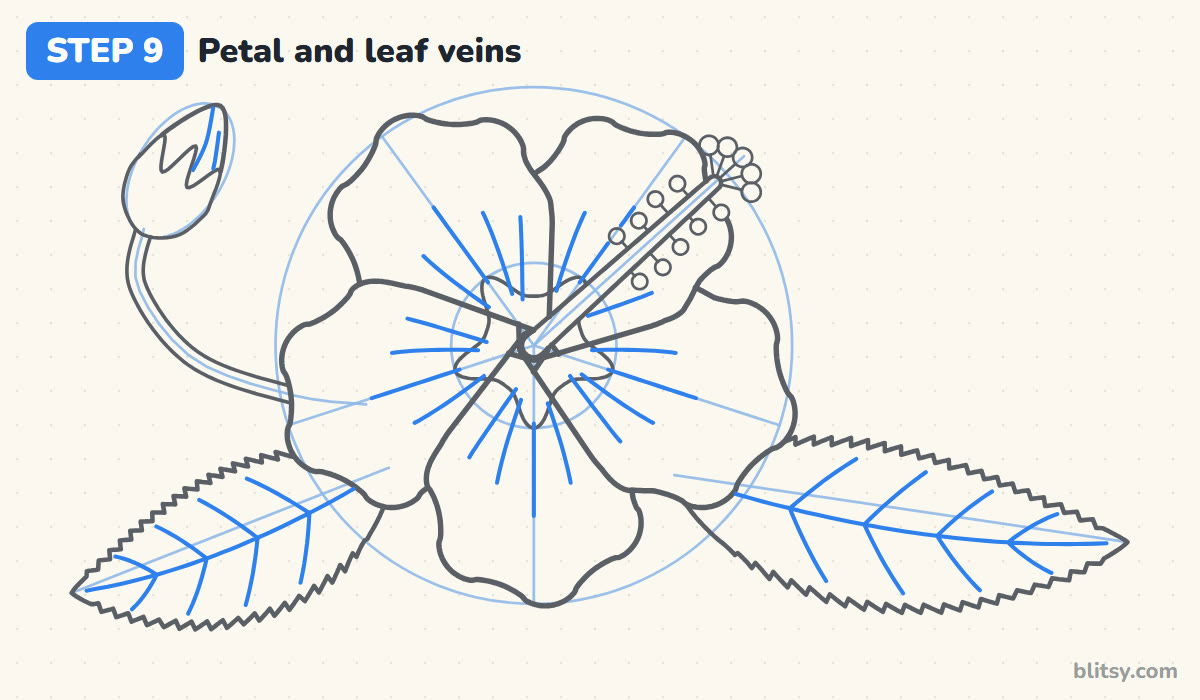
On every petal, draw five thin lines fanning out from the dark centre. The middle line is the longest, and the outer ones stay shorter. Down each leaf, draw a gentle centre line with slanted side veins pointing toward the tip. Add two curved lines on the bud to show the petals wrapped inside it.
💡 Tip: Lift your pencil at the end of each vein so the lines fade out instead of stopping with a dot.
Step 10: Ink the lines and erase the guides
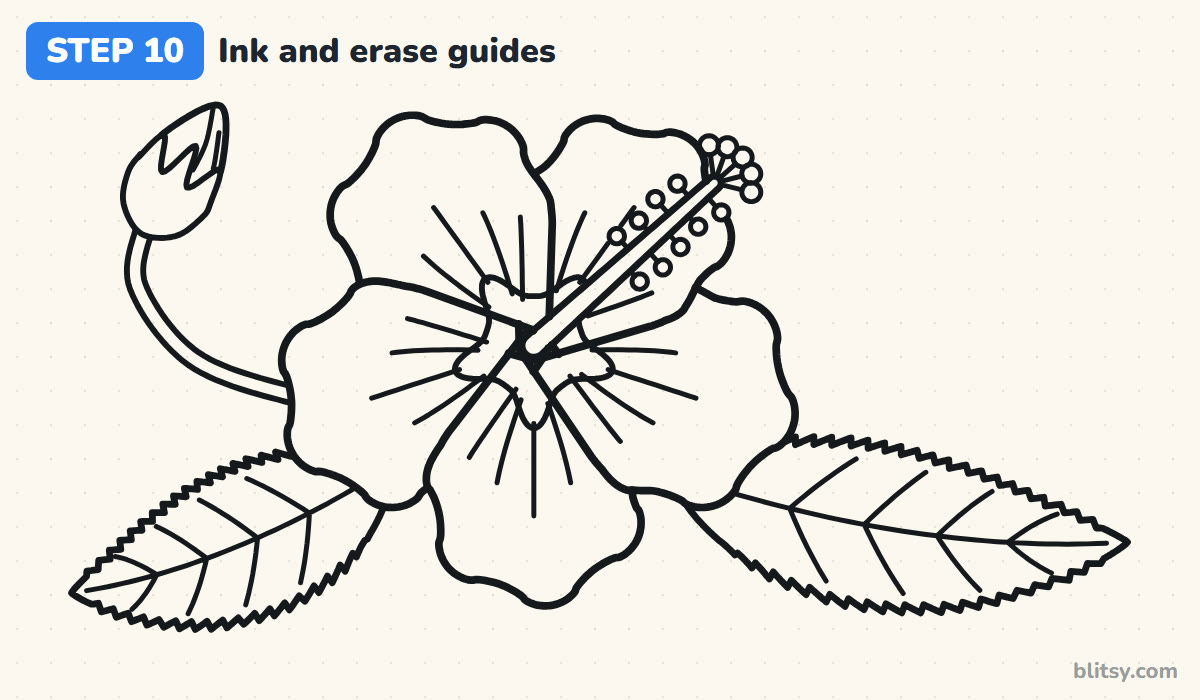
Trace over the keeper lines with your black pen. My order is column first, then petals, then the leaves, so my hand doesn't drag across fresh ink. I leave every circle and spoke alone. Wait a minute for the ink to dry before you erase the pencil.
💡 Tip: Ink the petal rims slowly; quick strokes flatten those little waves.
Step 11: Color your hibiscus
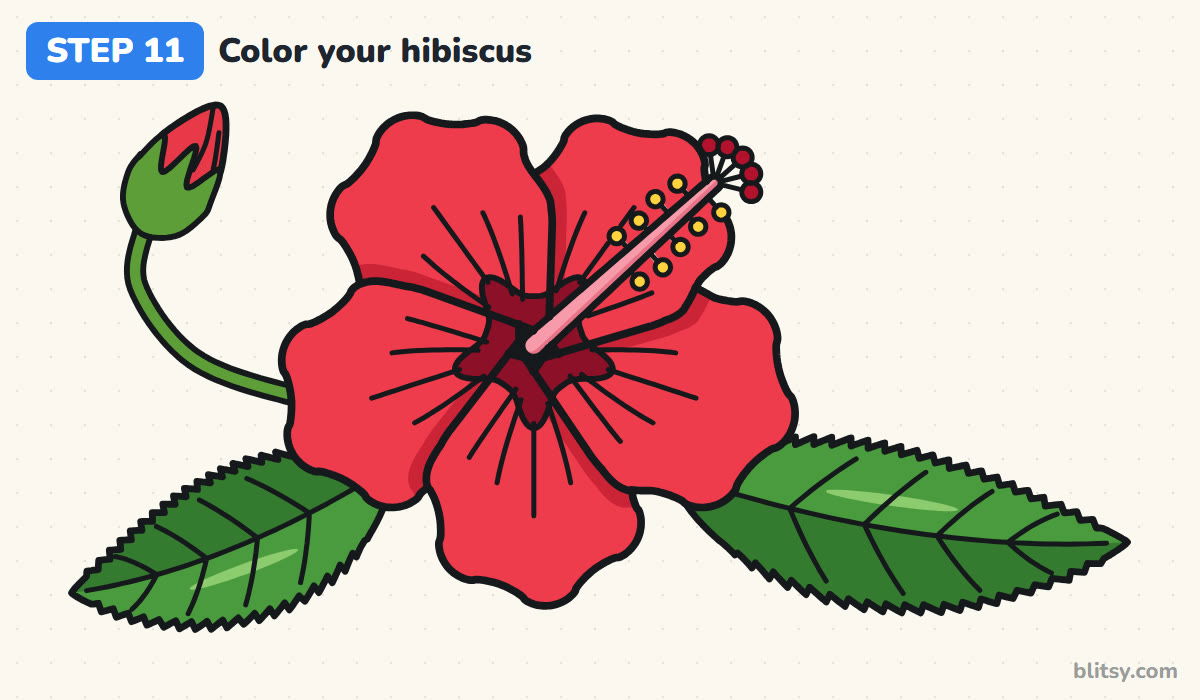
Fill the petals and the bud with red, then press harder with dark red beside each spot where one petal tucks under another. Color the centre maroon. Use pink for the column, yellow for the pollen dots and dark red for the pads. Color the leaves green with one half of each leaf in a darker green for a glossy look.




💡 Tip: Leave a thin pale streak on each leaf uncolored; it reads as light bouncing off a shiny surface.
Petal Problems That Hide the Hibiscus Shape
- Narrow petals with gaps between them. That reads as a daisy or a star. Make hibiscus petals wide enough to overlap.
- Leaving out the column. Without it, the flower could be a rose or a pansy. The column is what says hibiscus.
- Petals drawn over the column. Draw the column first and stop the petal lines at its edge.
- Smooth, round leaves. Add small saw teeth and a sharp tip so they match the plant.
- Coloring everything one flat red. A darker red at the overlaps and a maroon centre give the flower depth.
Hibiscus Colors and Scenes Beyond Classic Red
Real hibiscus also grow in yellow, coral or white, often with a red eye no matter what color the petals are. Try a yellow flower with a maroon centre, or draw three blooms at different angles on one branch. Tuck one behind the ear of a cartoon character for a beach look, or repeat small ones in a row for a tropical border on a card. If you want a simpler flower next, the tulip drawing tutorial is a good warm-up, and the garden drawing step by step lesson gives your hibiscus a place to grow.
Tropical Flower Coloring Page and Hibiscus Step PDF
Print the free hibiscus coloring page for a calm afternoon. A small colored example at the top shows which color goes where, with a key naming each one, and the large outline below is ready for crayons or pencils. The PDF drawing guide holds all 11 steps with their tips and prints on Letter or A4 paper.
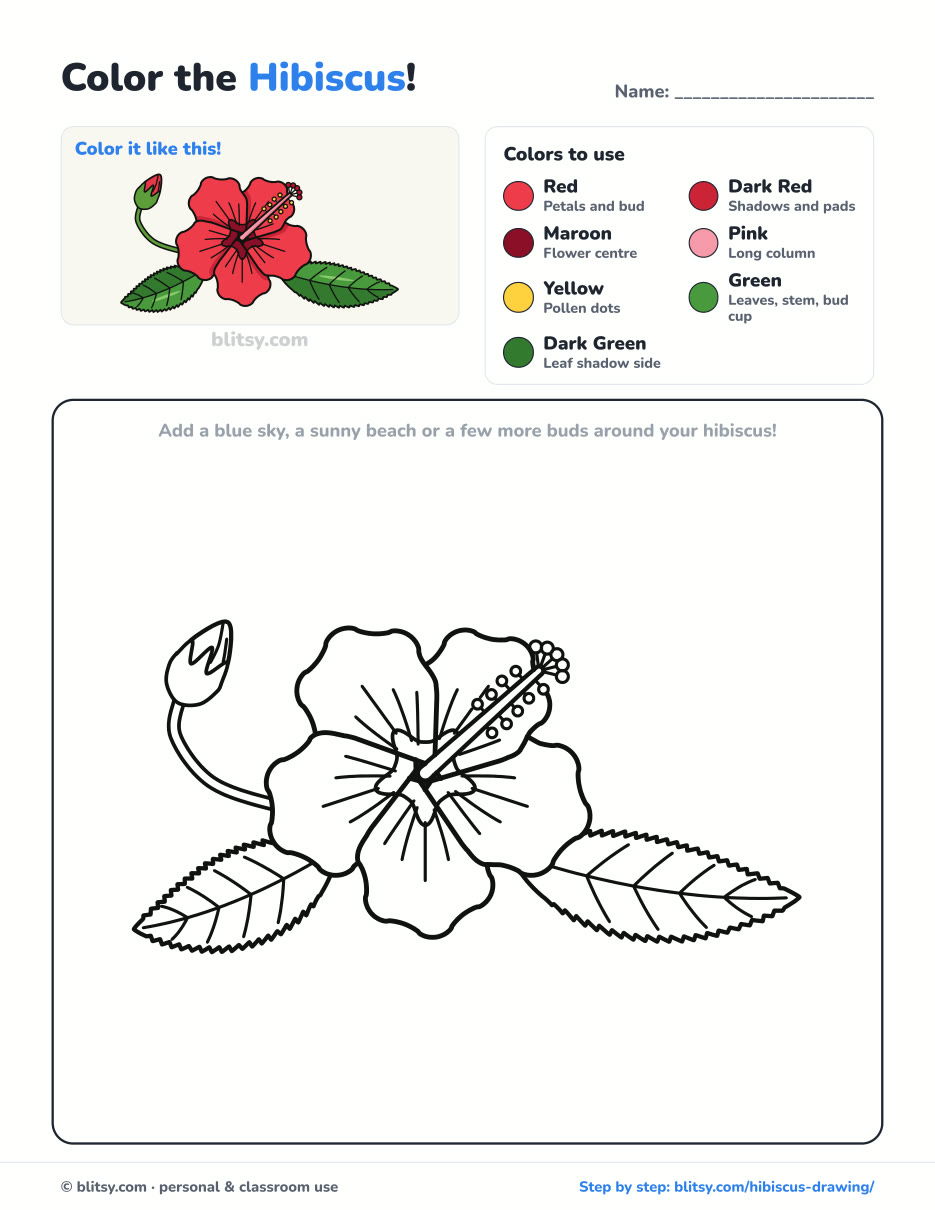
Black outlines with a colored example and the color names at the top. Ready to print and color.
⬇️ Download Coloring PageEvery step picture with its instructions and tips, to keep beside your paper while you draw.
⬇️ Download Drawing Guide📱 On a phone? Tap a download button, then open the file and choose Share → Save to Files or Print. On a computer, the PDF opens or saves straight to your Downloads folder.
Save the Hibiscus Steps to a Board
Beyond the Hibiscus: Flowers, Fruit and Plants
These step-by-step tutorials keep you in the garden and the kitchen, and each one breaks the drawing into small, numbered steps.
- Garden Drawing: Give your flower a home with the garden drawing tutorial, a sunny bed with a sunflower, a fence and a watering can.
- Dandelion Drawing: Learn how to draw a dandelion as a yellow bloom and as a seed head with seeds drifting away.
- Cell Drawing: Swap petals for organelles in this cell drawing step by step guide to a colorful animal cell.
- Tulip Drawing: A simpler flower to warm up on, the tulip drawing tutorial draws three tulips leaning in different directions.
- Oil Pastel Drawing: Bring the tropical mood to a sunset over water with the oil pastel drawing step by step lesson.
- Birthday Cake Drawing: The birthday cake drawing tutorial stacks two tiers of pink and cream frosting with three candles.
- Avocado Drawing: Two cut halves, one with a smiling pit, come from two circles in this how to draw an avocado guide.
- Jack O Lantern Drawing: Carve a grin into a five-rib pumpkin with the jack o lantern drawing step by step lesson.
- Pineapple Drawing: Another tropical subject: this pineapple drawing tutorial draws the leafy crown and a fresh slice.
- Fruit Drawing: Five fruits in a blue bowl make the still life in the fruit drawing step by step guide.
- Plant Drawing: Draw a potted monstera with five split leaves using the how to draw a plant tutorial.
- Pizza Drawing: The easy pizza drawing tutorial ends with a golden crust and one slice on its way to a plate.
- Mushroom Drawing: Build a storybook toadstool scene from two pale guide shapes with this mushroom drawing step by step lesson.
- Sunflower Drawing: A big sunflower, a younger bloom and a looping bee fill the page in the sunflower drawing tutorial.
- Pumpkin Drawing: Learn how to draw a pumpkin pile of three on golden hay, starting from light ovals.
Hibiscus Drawing Questions I Get Every Summer
What is the easiest way to draw a hibiscus?
Start with a circle and five spokes, draw one wide rounded petal on each spoke, then add a long line with dots sticking out of the middle. That line is what makes it a hibiscus.
How do you draw a hibiscus for kids?
Skip the bud, the veins and the ruffles. Five wide petals, a dark centre and the column with a few dots are enough for a clear, cheerful flower.
What colors do you need to draw a hibiscus?
Red and dark red for the petals with maroon in the centre. The column is pink with yellow pollen, and the leaves need two greens.
How long does it take to draw a hibiscus?
Around 35 minutes from the first circle to the last bit of color. The petals and the leaf teeth take the most time.
Once your red one is done, try the same five spokes again with yellow petals and see how different the flower feels. 🌺
Related posts:
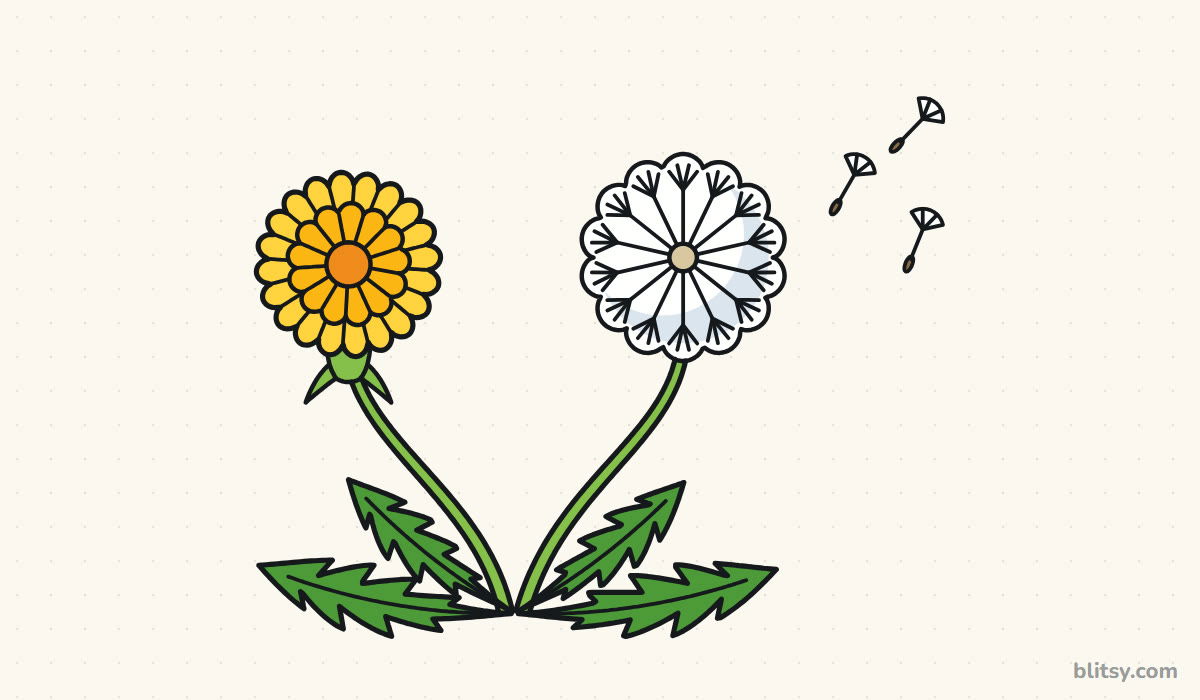 How to Draw a Dandelion Step by Step (Flower + Seed Head)
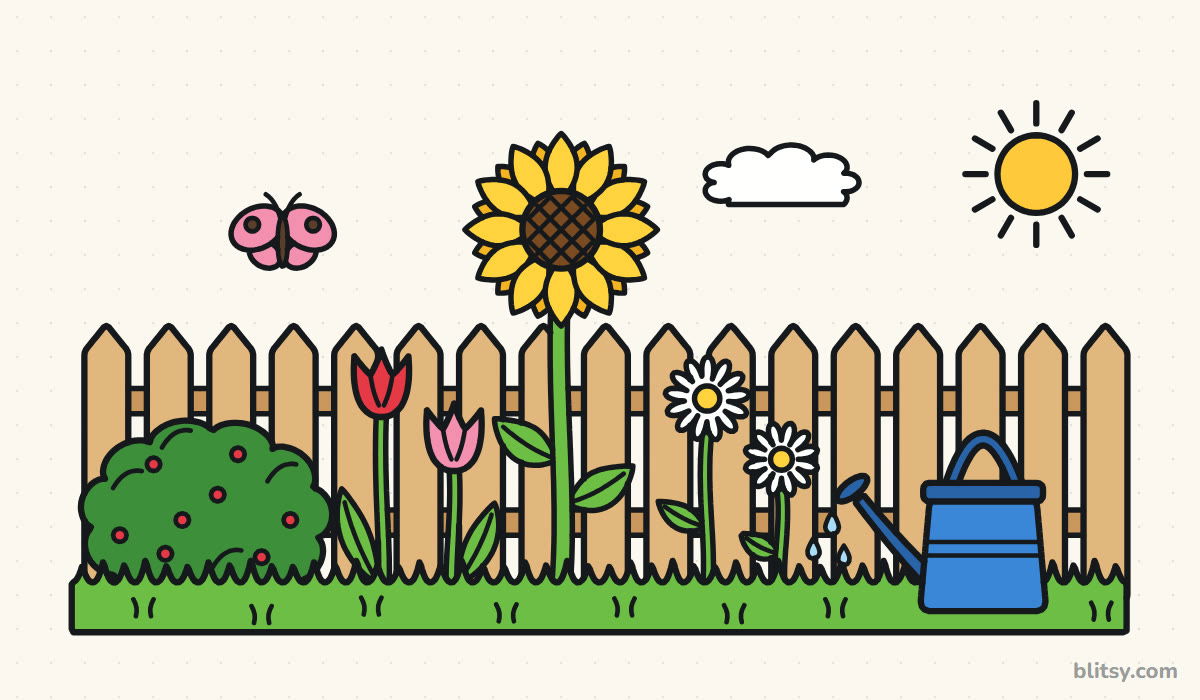 How to Draw a Garden Step by Step (Easy Flower Bed Scene)
 How to Draw a Flower Step by Step (Easy Potted Bouquet)
 How to Draw a Magnolia Flower Step by Step (Easy Guide)
 How to Draw a Whale Step by Step (Easy for Beginners)
 How to Draw Lungs Step by Step (Easy Science Diagram)
 How to Draw a Plant Step by Step (Easy Potted Monstera)
 How to Draw the Fortnite Llama Step by Step (Easy Fan Art)
 How to Draw a Hoodie Step by Step (Front and Back View)
 How to Draw a Parrot Step by Step (Easy Scarlet Macaw)
 How to Draw a Police Car Step by Step (Easy for Kids)
 How to Draw a Volcano Step by Step (Easy Erupting Volcano)

