
Babies are mostly head. That one fact does more for a baby drawing than any amount of detail, and it's the thing most people get wrong on their first try. Below I'll walk you through how to draw a baby step by step, from a single circle to a little one sitting in a onesie and waving a rattle. You only need to be able to draw circles and ovals, and I'll tell you where each one goes.
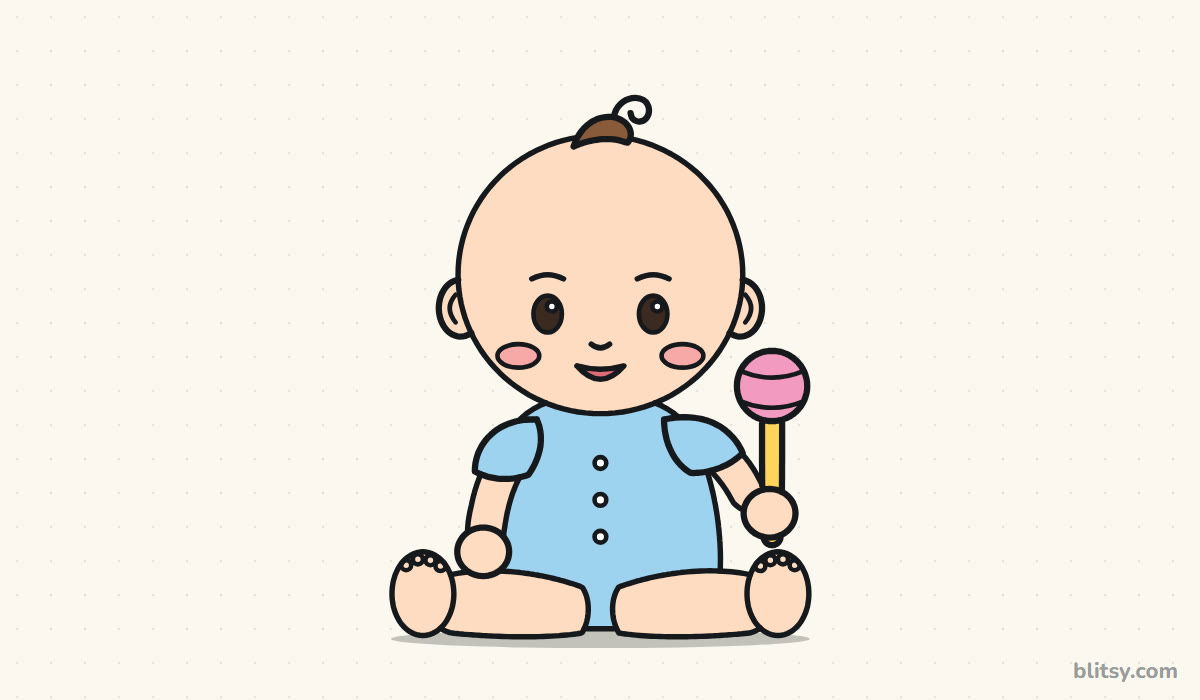
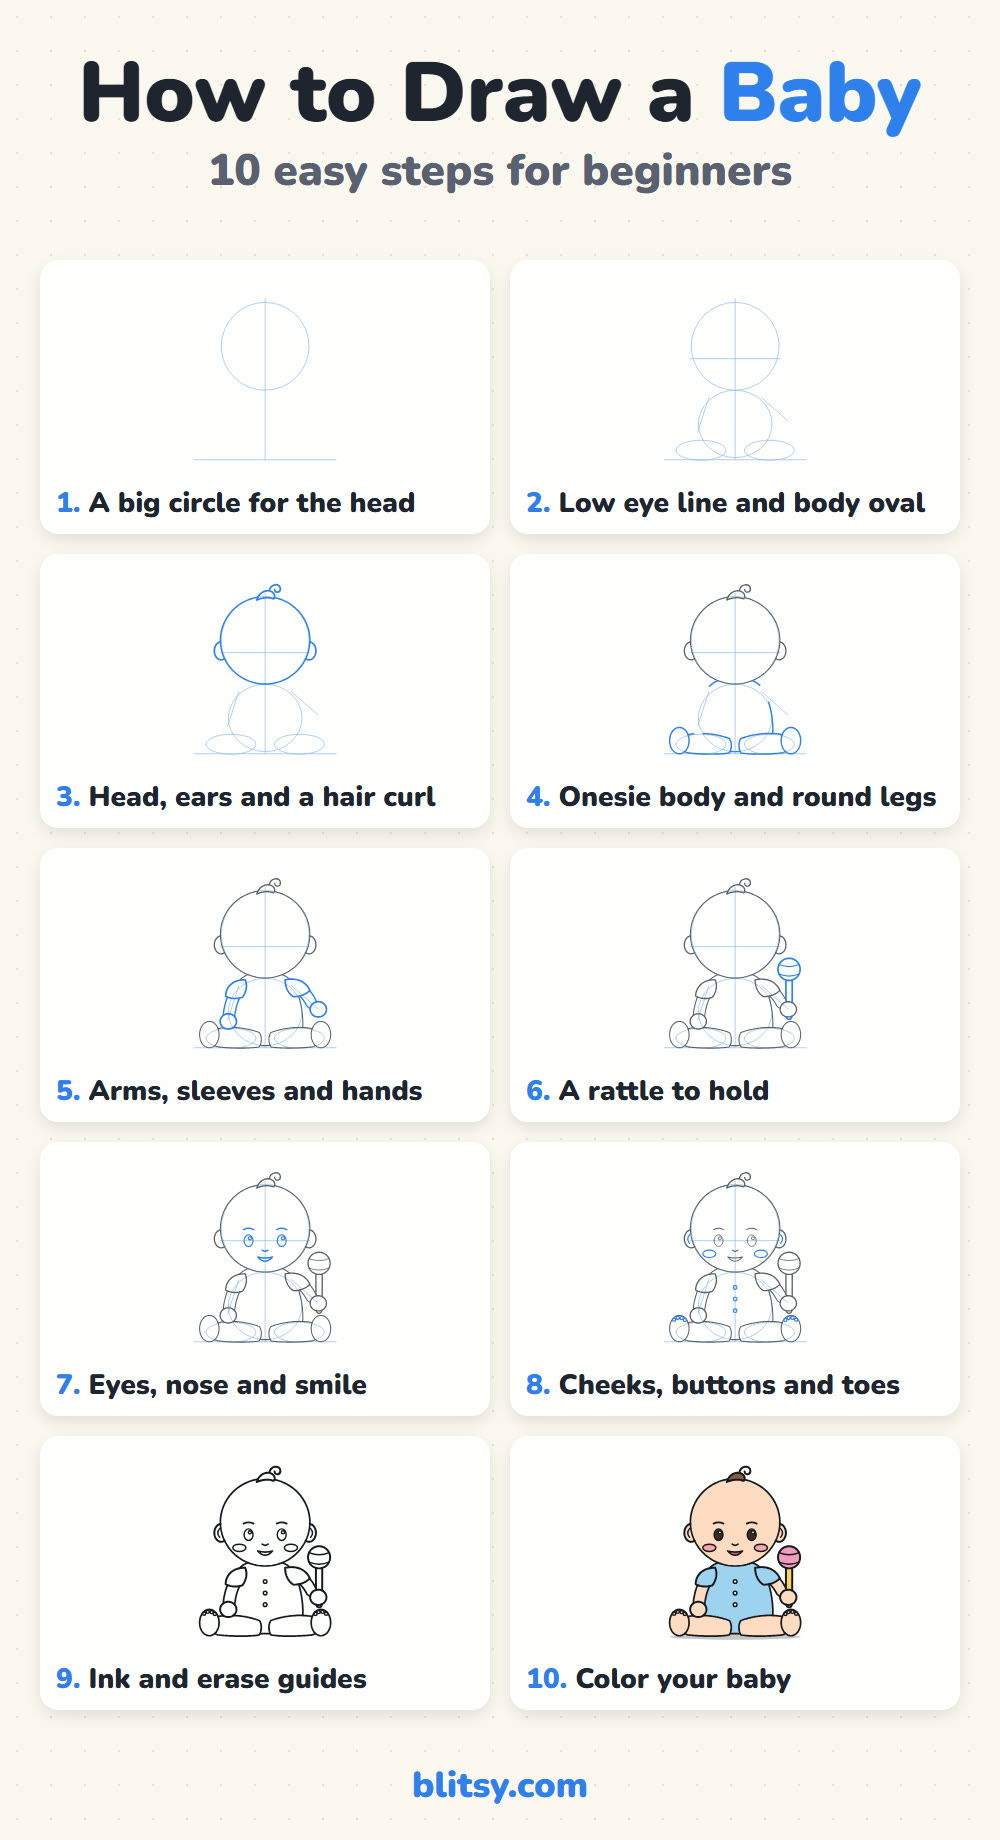
In every picture below, blue marks the lines you add in that step. Gray lines were drawn in earlier steps. Copy only the blue part, check it against the picture, then go on.
Quick overview
⏱️ Time: about 25 to 30 minutes with coloring
🎯 Level: easy, good for kids from about 6
✏️ Steps: 10
👶 You'll draw: a sitting baby in a onesie holding a rattle
Gather These Before the First Circle
- A pencil you can press lightly with (HB is fine)
- A clean eraser
- A black fineliner or thin marker
- Crayons or colored pencils, mainly peach and light blue
- Small amounts of pink and yellow for the rattle
- A sheet of plain paper held upright
If you don't have a peach pencil, a very light orange or tan pressed softly works just as well for the skin.
How to Draw a Baby Step by Step
Step 1: Draw a big head circle on a center line
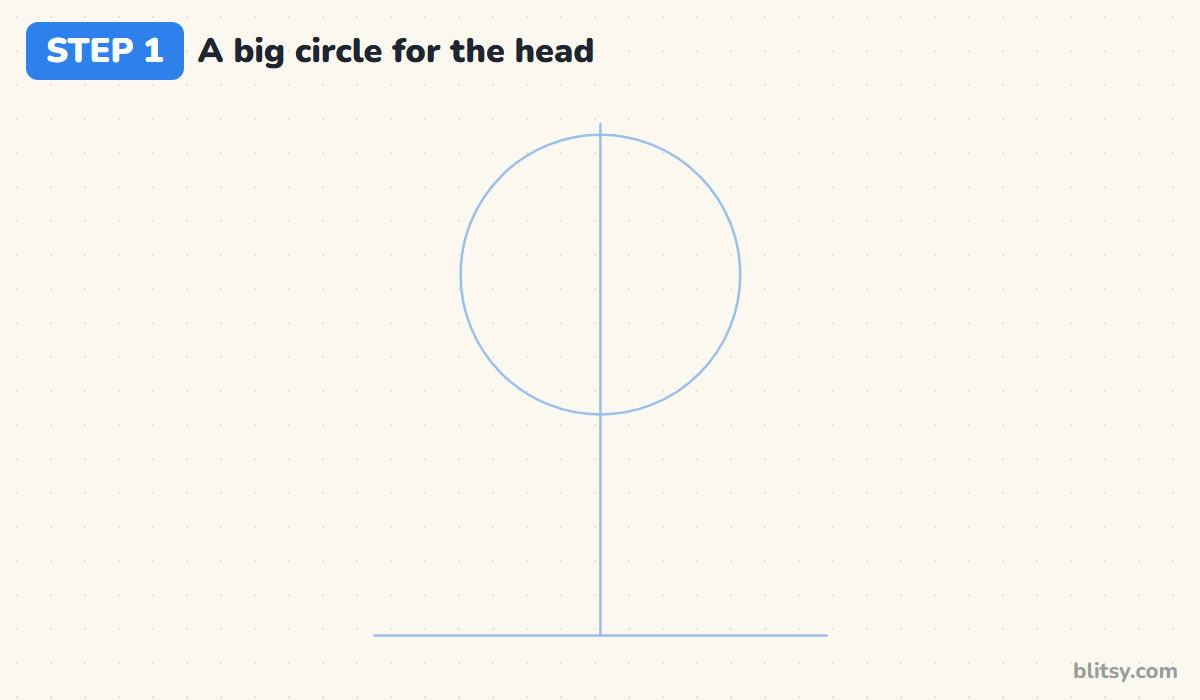
Start with a flat ground line near the bottom of the page and a straight line rising from its middle. Up near the top, draw a large circle on that center line. It should take up roughly the top half of the whole drawing. I always tell people to make it bigger than feels right, because a baby's head is huge compared to the rest of the body.
💡 Tip: Hold the pencil farther back from the tip. Your lines will come out lighter without you trying.
Step 2: Add a low eye line and the body guides
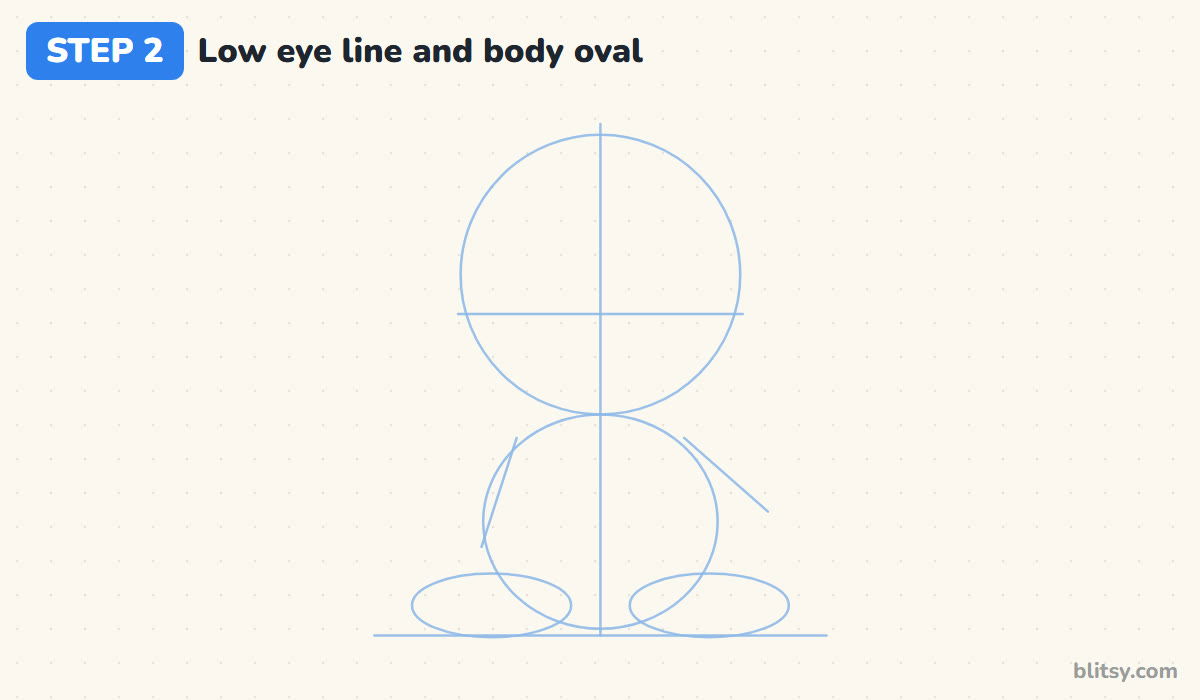
Cross the head with a line a little BELOW the middle of the circle. That's where the eyes go, and placing them low is what makes the face read as a baby instead of a child. Under the head, draw a body oval that is slightly narrower than the head and touches the ground. Add two flat ovals at the bottom for the legs and two slanted lines for the arms.
💡 Tip: Compare the two big shapes. If the body oval is wider than the head, shrink it.
Step 3: Trace the head and add ears with a curl of hair
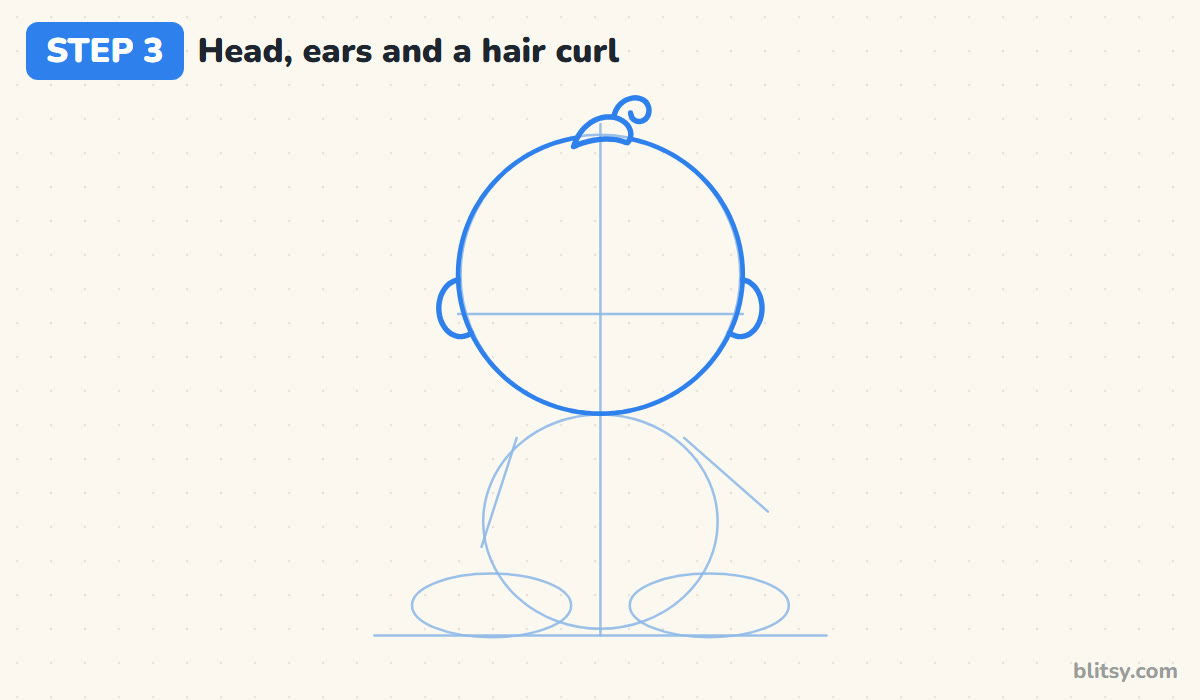
Go over the head circle with a firmer line. On each side, draw a small C shaped ear that sits on the eye line, half hidden behind the head. Then put a tiny tuft of hair on top: a short leaf shape lying on the head, with a little loop curling up out of it.




💡 Tip: Keep the ears small. Big ears pull the eye away from the face and make the head look narrow.
Step 4: Shape the onesie body and the round legs
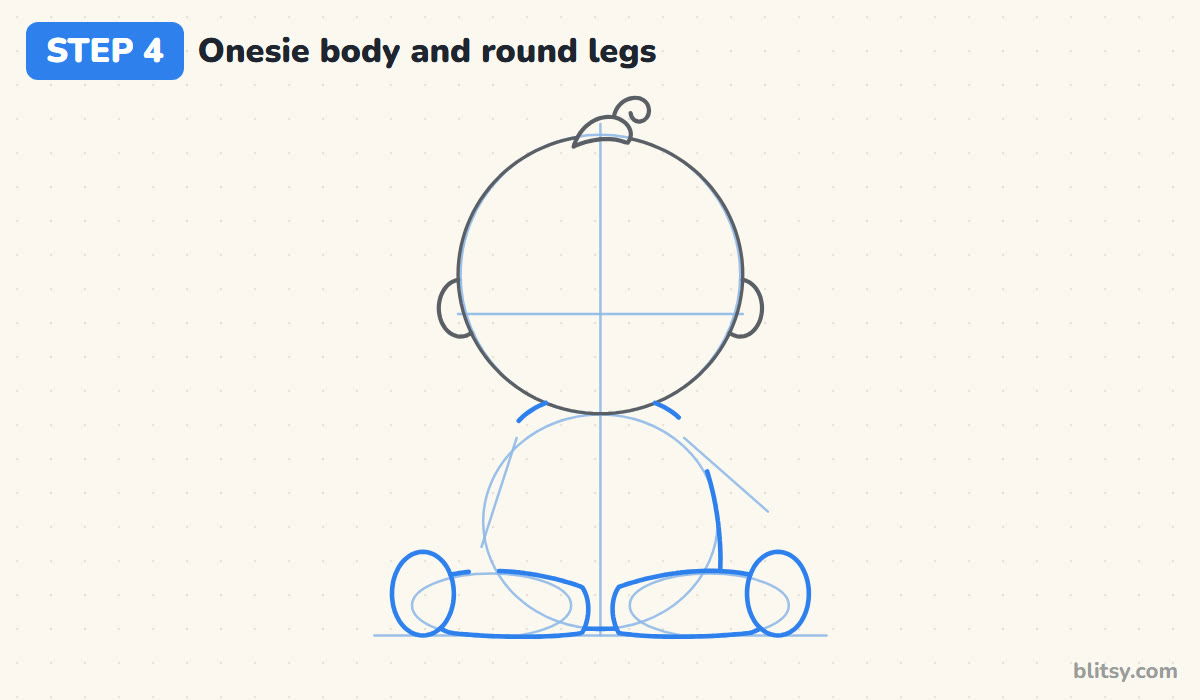
Follow the body oval to draw a soft pear shape, narrow at the neck and widest near the bottom. Now the legs: each one is a short, fat tube lying along the ground and pointing outward, so the baby looks like it's sitting with its legs apart. Finish each leg with a tall oval foot standing upright, as if we're looking at the soles. The legs cover the bottom of the body, so stop the body line where they begin.
💡 Tip: Let the bottom edge of each leg rest flat on the ground line. That's what makes the baby look seated and steady.
Step 5: Draw the arms with short sleeves
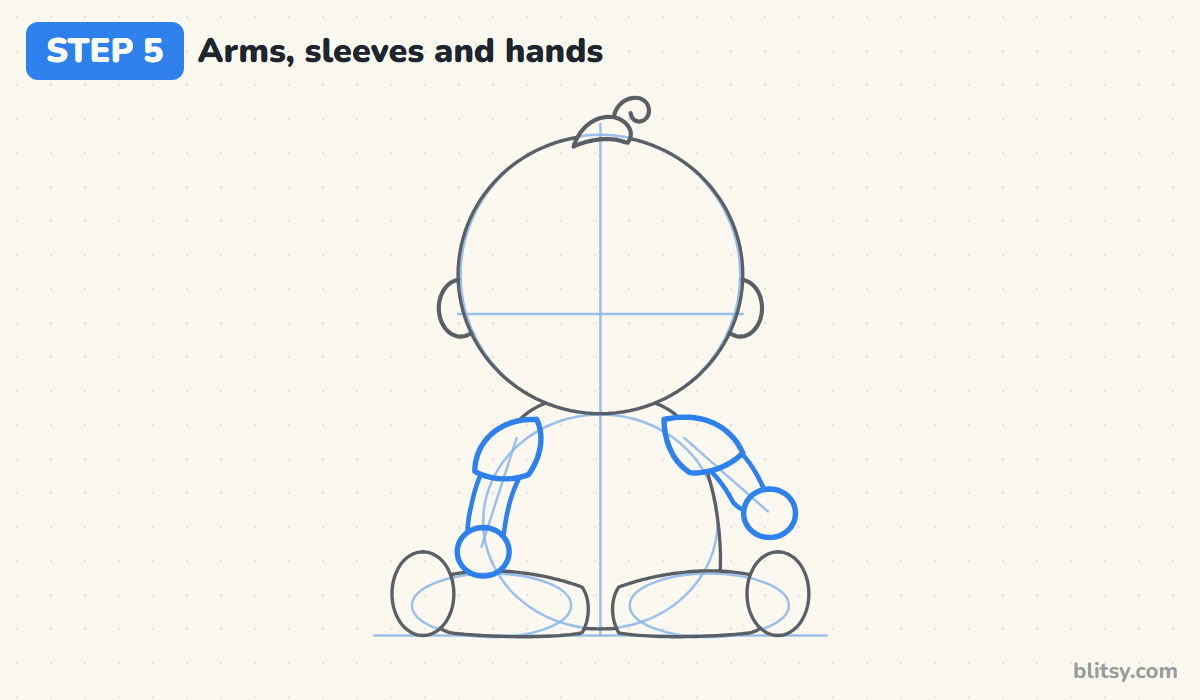
The left arm hangs down and the hand rests on top of the leg. The right arm bends out to the side, ready to hold something. Draw each arm as a soft, slightly bent tube following your guide lines. Cap the shoulders with puffy sleeve shapes, then finish each arm with a round hand about the size of the feet's width.
💡 Tip: Draw baby hands as simple circles. Fingers make them look older and are hard to get small enough.
Step 6: Give the baby a rattle
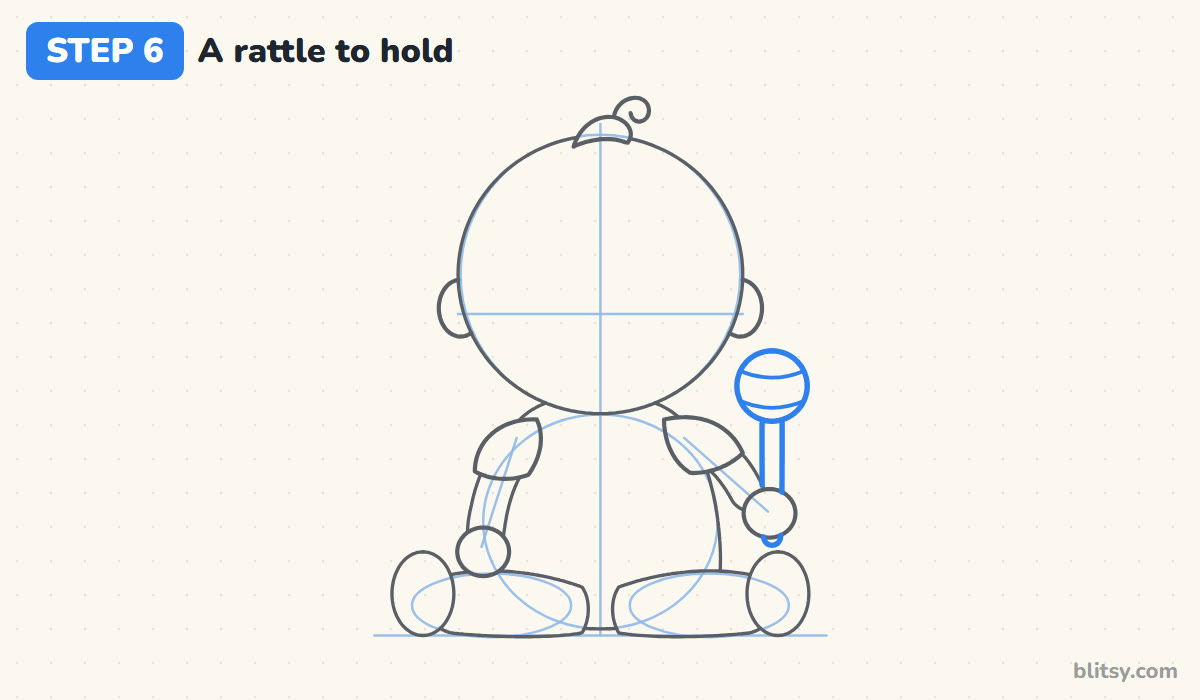
From the raised hand, draw a narrow handle going straight up, with a little rounded end peeking out under the fist. On top of the handle, add a ball about a quarter the width of the head. Two curved bands across the ball make it look round instead of flat. Leave a clear gap between the rattle and the cheek so the two shapes don't merge.
💡 Tip: Draw the ball first and the handle after. It's easier to line up a stick with a circle than the other way around.
Step 7: Place the face low on the head
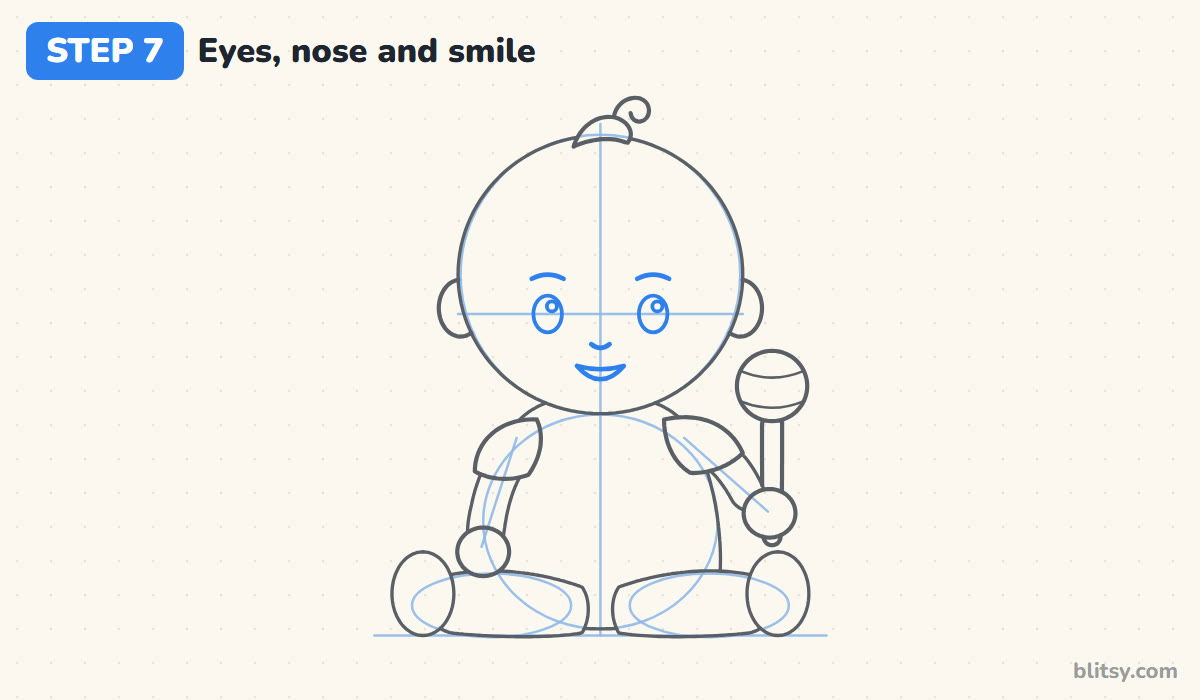
Sit two small oval eyes right on the low eye line, spaced wide, with about three eye widths between them. Inside each, draw a small circle near the top for the shine. A short curved eyebrow floats well above each eye. The nose is just a tiny smile shaped curve on the center line, and the mouth is a small half moon below it. Notice how much empty forehead is left above the eyes. That space is the secret to a baby face.


💡 Tip: Keep the eyes small and dark. Huge sparkly eyes start to look like a doll or an anime character.
Step 8: Finish the small details
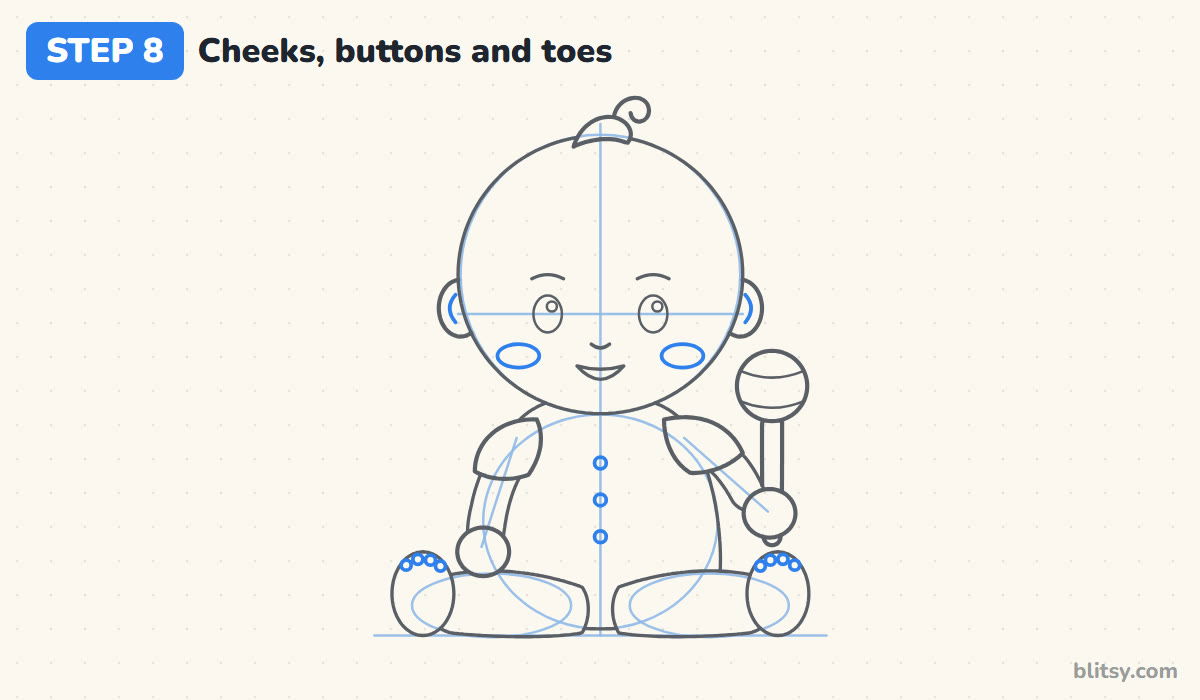
Two flat ovals on the lower cheeks, just outside the eyes, make the face warm and chubby. Draw a short curve inside each ear. On the front of the onesie, stack three small snap buttons down the center line. Finish with four tiny circles along the top of each foot for toes.
💡 Tip: Make the toes the smallest circles in the whole picture, and let them overlap a little.
Step 9: Ink the lines and erase the guides
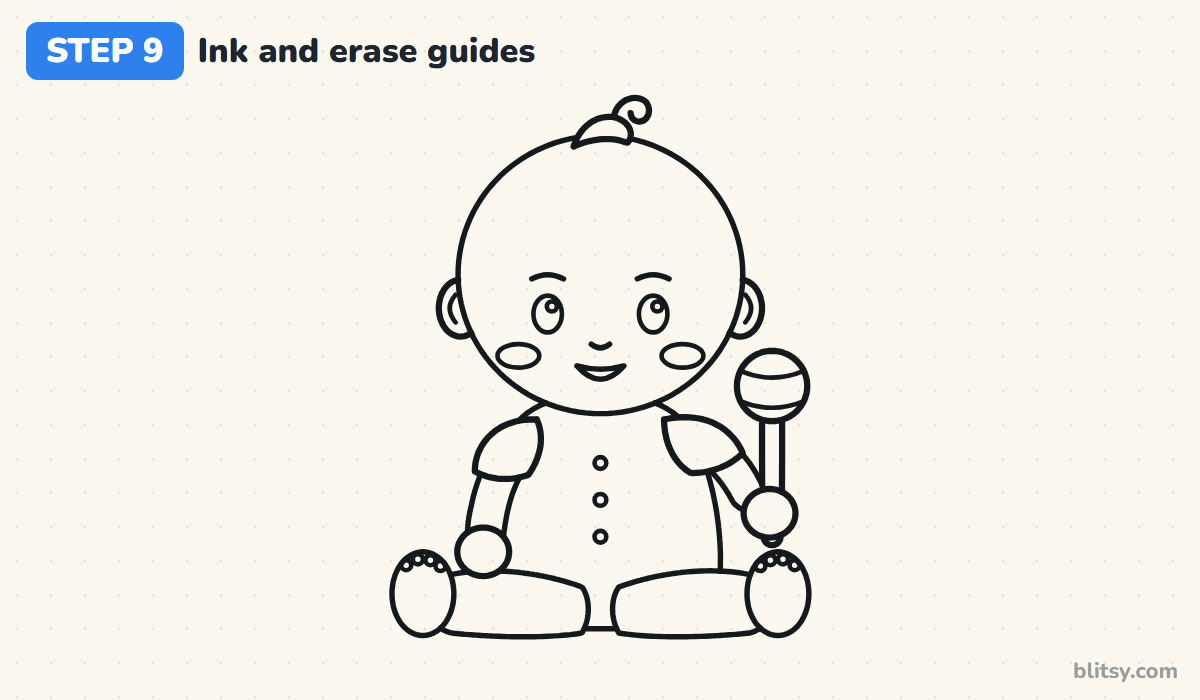
Trace every final line with the black pen. I like to ink the face first while my hand is fresh, then the body and legs. Leave out the guide circles, the eye line and the center line. Once the ink is completely dry, rub out all the pencil so the outline is clean.
💡 Tip: Turn the paper as you ink the round shapes. Curves are much smoother when your wrist doesn't have to twist.
Step 10: Color your baby
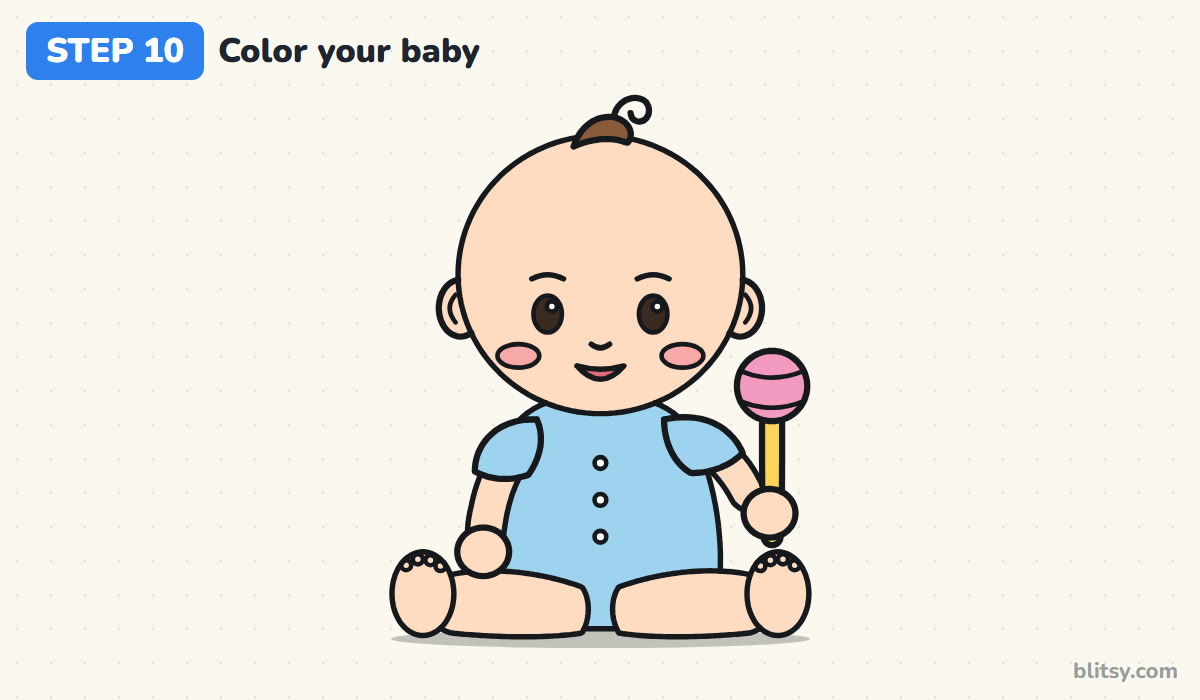
Use peach for the face, ears, arms, hands, legs and feet, pressing lightly so it stays soft. Color the onesie and sleeves light blue but keep the buttons white. The hair tuft is brown, the rattle ball pink and its handle yellow. Finish with rosy cheeks, a red mouth and dark brown eyes with the shine dots left white, plus a soft gray shadow under the baby.
💡 Tip: Color the skin first, before any darker color touches the page, so it stays clean and even.
Where Baby Drawings Start Looking Grown Up
- Eyes placed halfway up the head. That's where adult eyes go. Drop them below the middle and the face gets younger straight away.
- A head that's too small. A baby's head should be about as wide as the body. If yours looks like a toddler, make the head circle bigger.
- Long, thin arms and legs. Babies have short, chubby limbs. Shorten them and make them thicker than seems natural.
- Too many face details. Lips, nostrils and eyelashes add years. A small curve for the nose and a tiny mouth are enough.
- A stiff, upright body. Babies sit in a soft pear shape with a rounded tummy, not a straight box.
Dress Up Your Little One Differently
Once the basic baby works, small changes give you a whole nursery of characters. Swap the onesie color, add a bow or a bonnet, or trade the rattle for a bottle or a teddy bear. A pacifier can replace the smile if you want a sleepier look. Younger kids can leave out the sleeves and toes and still end up with a sweet drawing. When you want to put your baby into a bigger picture, the family drawing tutorial is a good next step, and the smile drawing tutorial helps with happy faces.
Free Baby Coloring Page and Printable Drawing Guide
The baby coloring page shows the colored baby at the top as an example, with a small key that tells you which color goes on which part, and a large outline underneath for coloring. The step-by-step PDF guide has all 10 steps with pictures and tips, so you can draw away from the screen. Both print on Letter or A4.
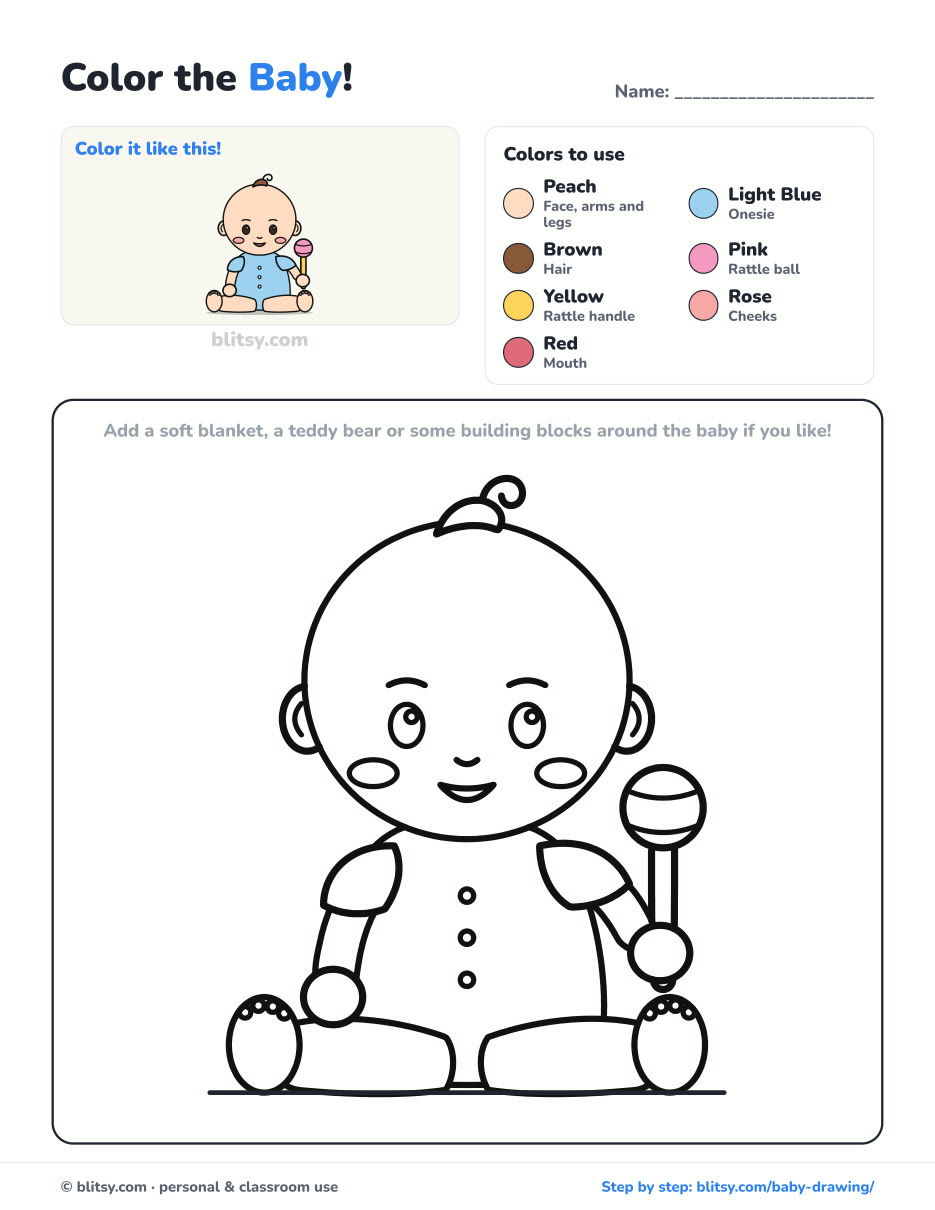
Black outlines with a colored example and the color names at the top. Ready to print and color.
⬇️ Download Coloring Page
Every step picture with its instructions and tips, to keep beside your paper while you draw.
⬇️ Download Drawing Guide📱 On a phone? Tap a download button, then open the file and choose Share → Save to Files or Print. On a computer, the PDF opens or saves straight to your Downloads folder.
Pin the Baby Lesson for Next Time
Baby Done? Practice People and Faces Next
These are full step-by-step tutorials, each one starting from simple guide shapes, so they work well as the next lesson after your baby.
- Human Heart Drawing: For a science project, the human heart drawing tutorial walks you through the muscle, the aorta and the blue vessels.
- Woman Drawing: Mark six head lengths first, then build a full figure in this how to draw a woman step by step lesson.
- Smile Drawing: One big grin and three smaller variations come from the same curves in the smile drawing tutorial.
- Chalk Art: Take your drawing outside with this chalk art step by step guide to a hopscotch grid and a rainbow.
- Side Profile Drawing: Measuring lines do most of the work in the side profile drawing tutorial, which starts from a plain circle.
- Hands Drawing: Hands scare a lot of beginners, and the how to draw hands lesson keeps it calm with one open palm.
- Ghost Drawing: A waving ghost, a baby ghost and a pumpkin all grow from one circle in this cute ghost drawing tutorial.
- Emoji Drawing: Three yellow smiley faces share the same circles in the emoji drawing step by step guide.
- Family Drawing: Put your baby in a group portrait with the family drawing tutorial, which uses one body recipe for everyone.
- Skeleton Drawing: The how to draw a skeleton lesson gives you a cheerful bone buddy rather than a spooky one.
- Braid Drawing: A single zig-zag becomes a chunky three-strand braid in the braid drawing tutorial.
- Fairy Drawing: Draw a fairy with pale blue wings sitting on a spotted red toadstool in this easy fairy drawing tutorial.
- Lungs Drawing: The lungs drawing step by step lesson ends with a clear diagram that is ready for labels.
- Skull Drawing: Learn the front view of a skull, with two little marigolds, in the skull drawing tutorial.
- Heart Drawing: Two circles and a V give you an even shape in this how to draw a heart step by step guide.
Things People Ask About Drawing Babies
What is the easiest way to draw a baby?
Start with one big circle for the head and a smaller oval for the body. Put the eyes below the middle of the head, then add short round legs and simple circle hands.
How do you make a baby drawing look cute?
Keep the head big, the eyes small and low, and the limbs short and chubby. Pink cheeks and a tiny curl of hair help a lot.
Can kids draw this baby?
Yes. It's built only from circles and ovals. Younger children can skip the toes and buttons, and an adult can help with the rattle.
How long does it take to draw a baby?
Around 25 minutes for the drawing and coloring together. The face takes the most care, while the body and legs go quickly.
Sharpen that pencil, start with the biggest circle you dare, and let your baby grab its rattle. 👶✏️
Related posts:
 How to Draw a Car Step by Step (Easy Drawing for Beginners)
 How to Draw a Whale Step by Step (Easy for Beginners)
 How to Draw a Rat Step by Step (Easy for Beginners)
 How to Draw an Arctic Fox Step by Step (Easy for Beginners)
 How to Draw a Rose Step by Step (Spiral Method for Beginners)
 How to Draw Olaf Step by Step (Easy for Beginners)
 How to Draw a Ladybug Step by Step (Easy for Beginners)
 How to Draw a Dog Step by Step (Easy Side View for Beginners)
 How to Draw a Leopard Step by Step (Easy for Beginners)
 How to Draw a Light Bulb Step by Step (Easy for Beginners)
 How to Draw a Crow Step by Step (Easy for Beginners)
 How to Draw an Eagle Step by Step (Easy for Beginners)

