
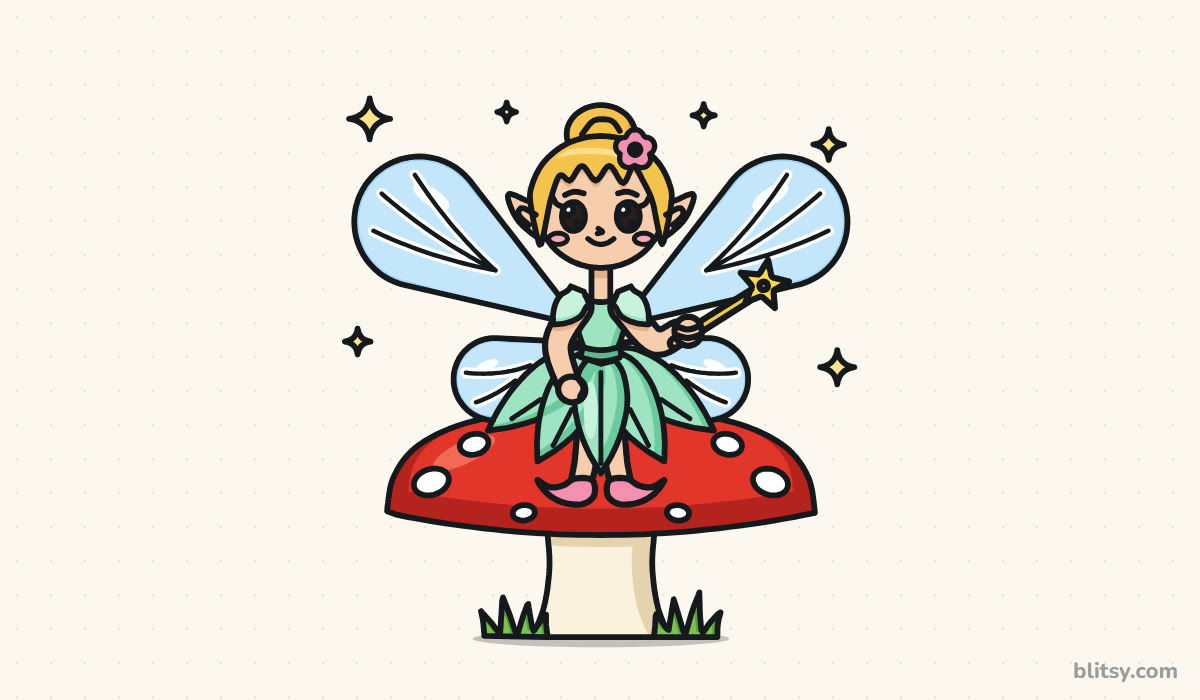
Old stories say fairies dance in rings of mushrooms at night, so this one has picked a big red toadstool for a seat. Here you'll learn how to draw a fairy step by step, starting with a few light circles and ending with a colored picture full of sparkles. She's my own original fairy, which means you're free to change her hair, her dress or her wings after your first try.
Blue marks what you draw in that step, and gray shows the lines already on your paper. The faint guide shapes stay until the inking step, when they get erased.
Quick overview
⏱️ Time: about 35 to 45 minutes, plus coloring
🎯 Level: beginner; the wings need a steady hand
✏️ Steps: 12
🧚 You'll draw: a smiling fairy with a flower in her bun, a petal dress, four wings and a star wand, sitting on a toadstool
A Small Kit for Fairy Sketching
- A pencil you can press lightly, such as an HB
- A soft eraser that won't smudge
- A black fineliner or felt-tip pen
- Colored pencils, crayons or markers
- Smooth paper, a little wider than it is tall would be nice
Any pencil and any paper will do for a first try, so don't wait for special supplies.
How to Draw a Fairy Step by Step
Step 1: Sketch the head, body and toadstool guides
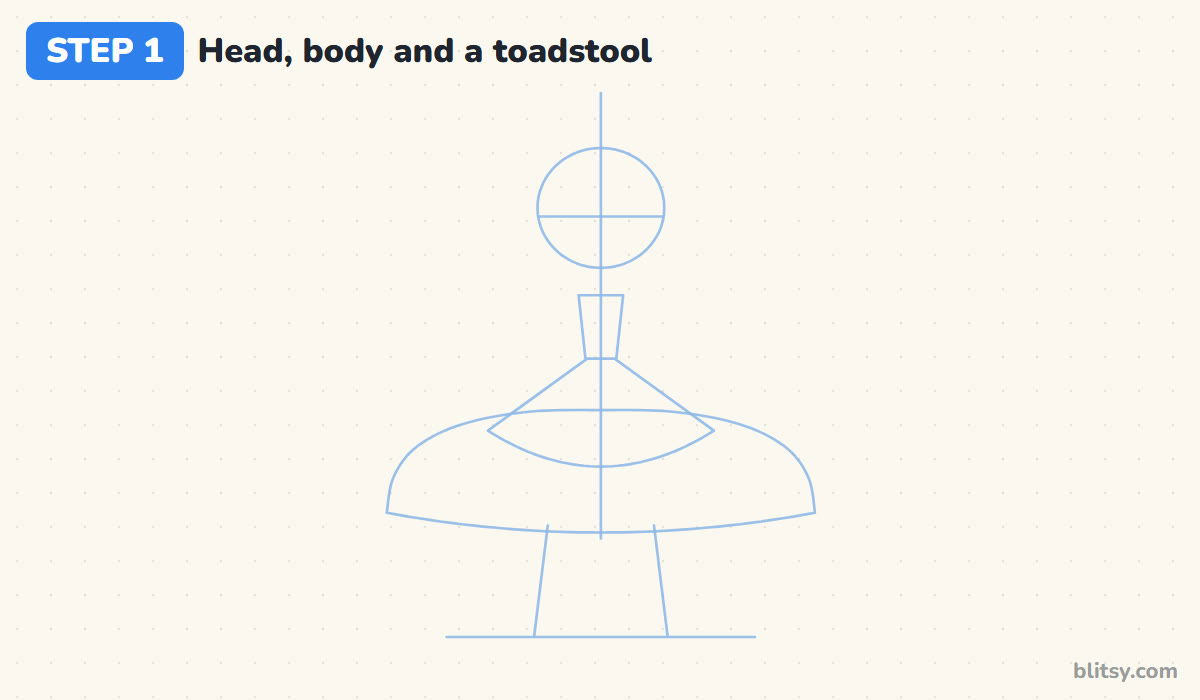
Start with a straight line down the middle of your page and a circle near the top for the head. Under it, draw a small box for her top and a wide fan shape for the skirt. Then add a big dome for the toadstool cap, two slanted stem lines and a ground line.
💡 Tip: Use the side of the pencil tip and barely touch the paper; these lines are temporary.
Step 2: Add the wing and arm guides
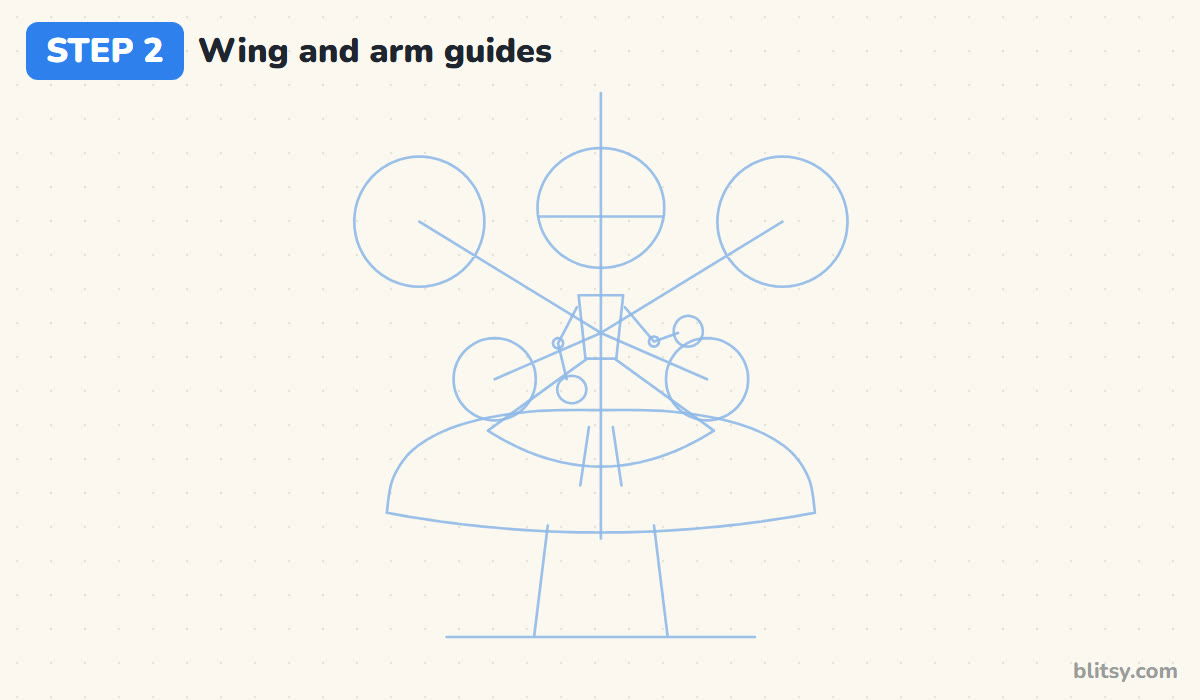
Wings are easier when you plan them as circles first. Draw two big circles beside the head and two smaller ones lower down, then connect each one to her back with a straight line. For the arms, I use stick lines with a dot at each elbow.
💡 Tip: Check that the left and right wing circles sit at the same height before you go on.
Step 3: Draw the face, pointy ears and neck
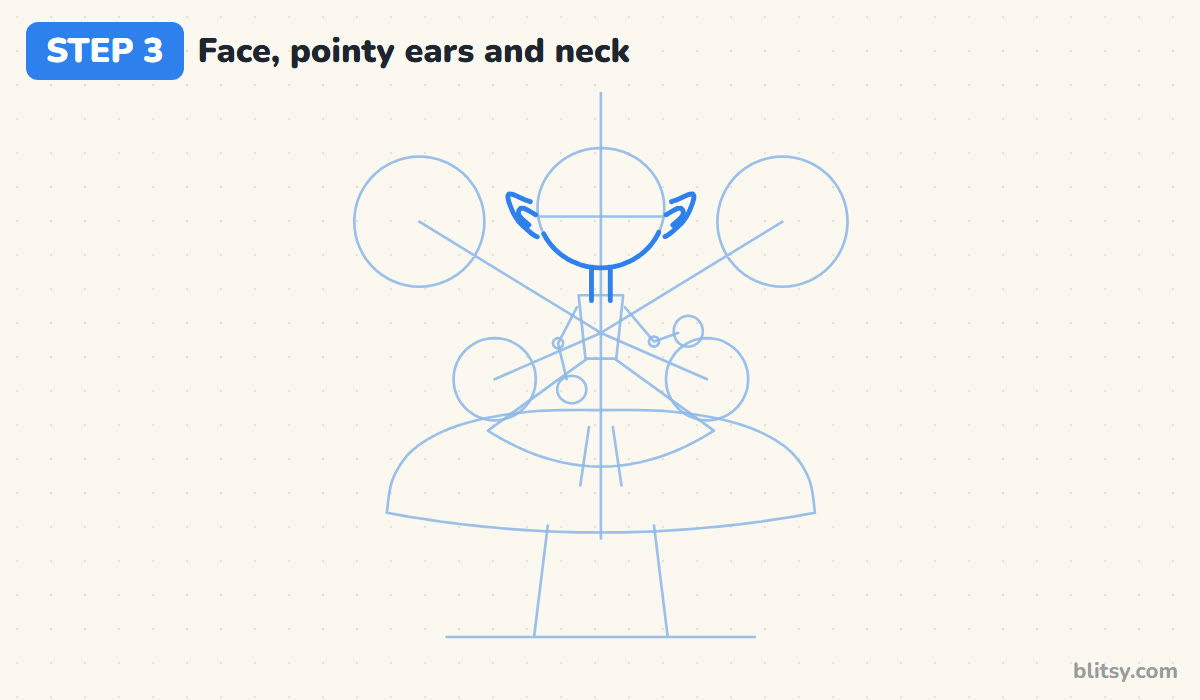
Trace around the bottom of the head circle for a round, soft chin. Add a small pointed ear on each side at eye level, like a leaf tipped upward, with a curved line inside. Finish with two short lines for a thin neck. Those little ears are what tells people she's a fairy and not just a girl with wings.




💡 Tip: Keep the ears small; big ones pull attention away from her face.
Step 4: Shape the hair, the bun and a flower
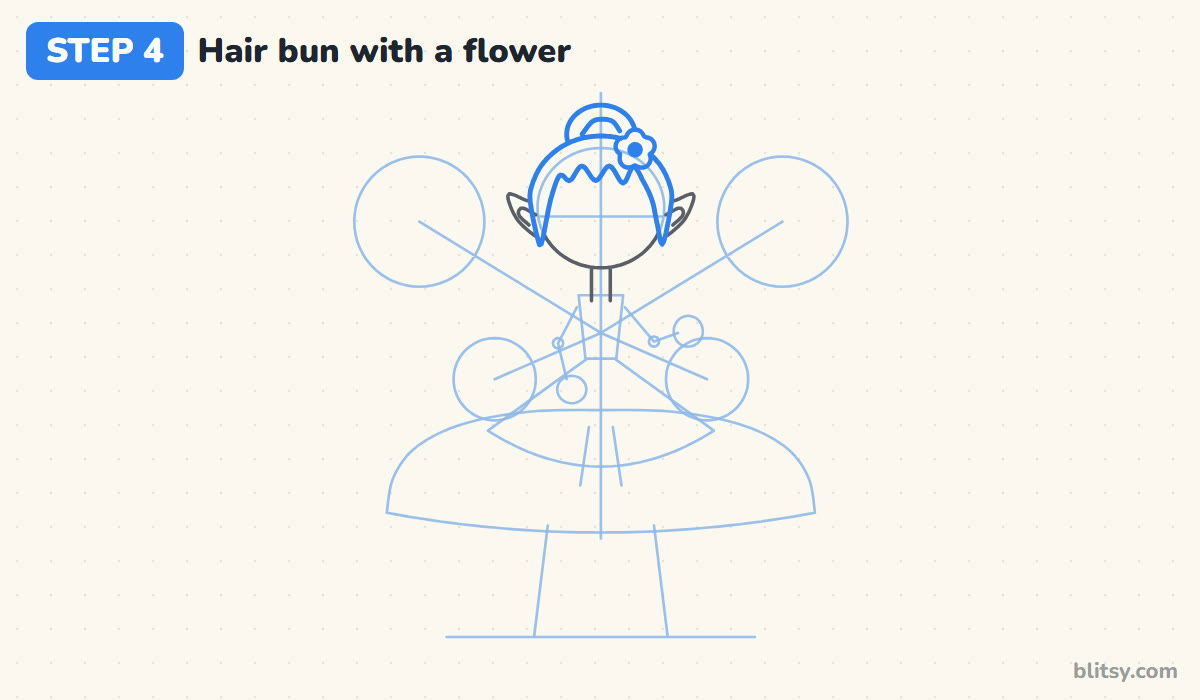
Draw the hair as a cap that sits just outside the head circle, with a wavy row of bangs across the forehead and short locks over the ears. On top, add a round bun with one curved line inside it. Tuck a small five-petal flower against the side of the bun so it overlaps the hair a little.
💡 Tip: Draw the flower center first, then put five equal round petals around it like a clock face.
Step 5: Draw the petal top, soft arms and a wand
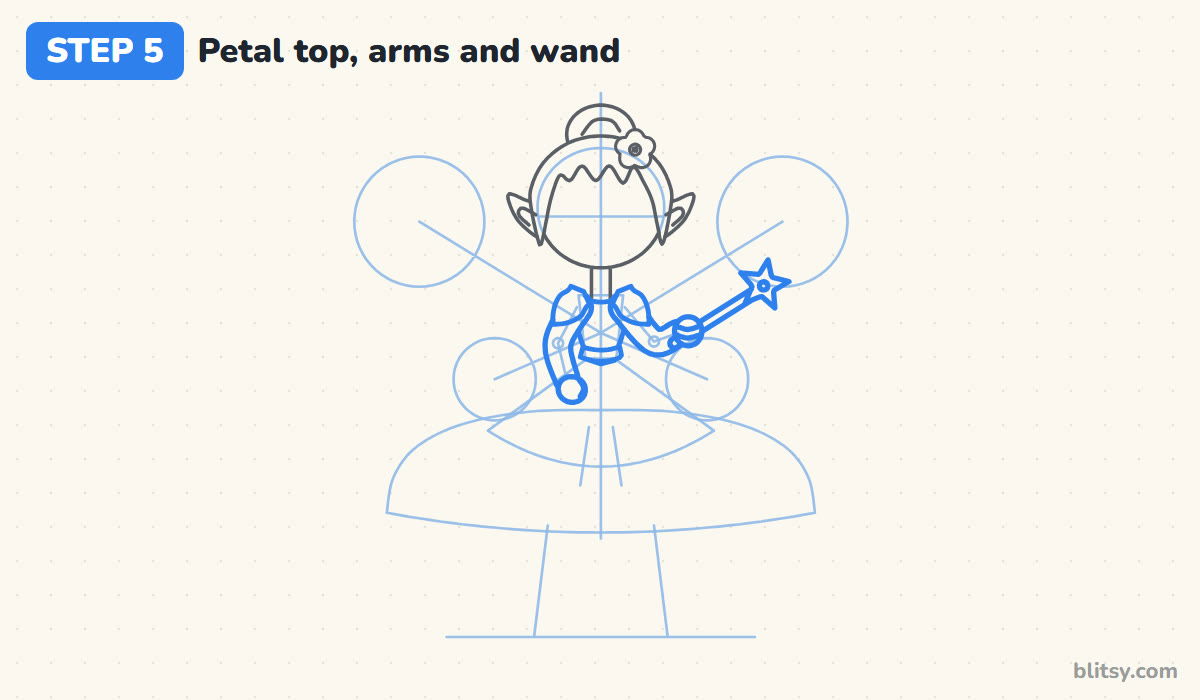
Her top has a gentle scoop neck, slightly curved sides and a thin band at the waist, with a pointed petal on each shoulder as a sleeve. Wrap two lines around each arm stick so the arms are soft and fairly thick. One mitten hand rests on her lap; the other holds a thin wand with a star.
💡 Tip: Draw the hand over the wand first, then the stick poking out on both sides of the fist.
Step 6: Draw the petal skirt and little slippers
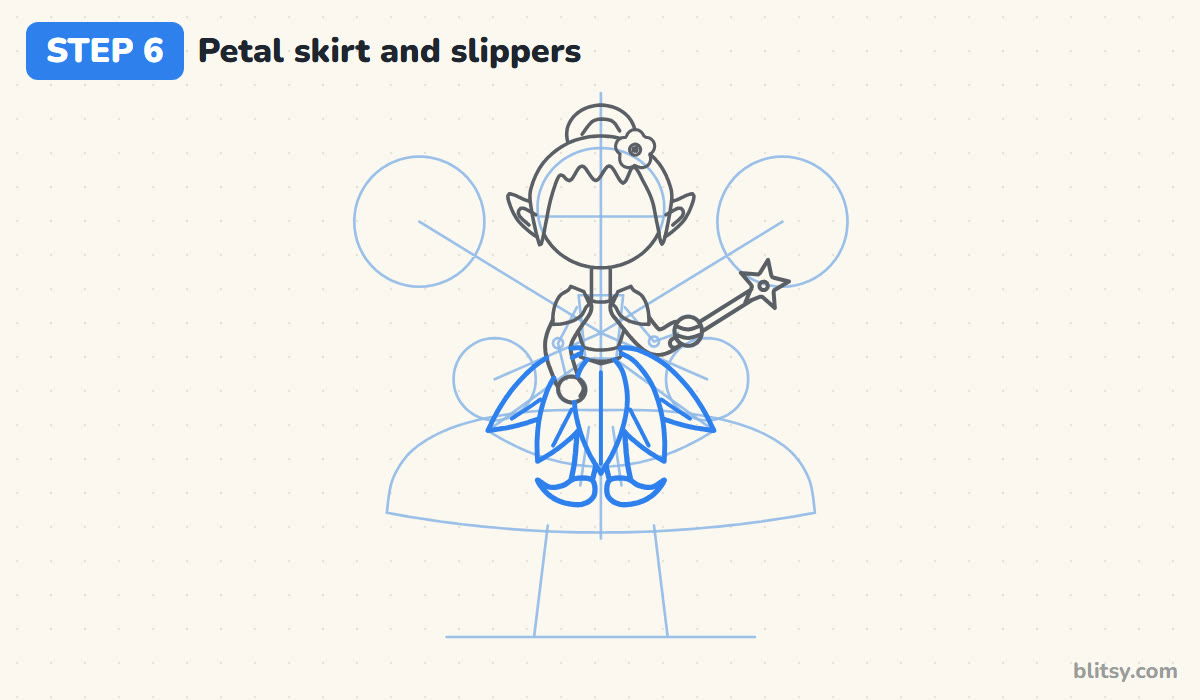
This is my favorite part of the lesson. Five pointed petals fan out from the waist band: one straight down the middle, two angled outward and two lying almost flat on the toadstool. Overlap them so the middle petal sits in front. Add a center line on each petal, then two short legs below the skirt and pink slippers with curled toes.
💡 Tip: Make every petal widest about a third of the way down, then taper it to a sharp point.
Step 7: Outline two pairs of wings
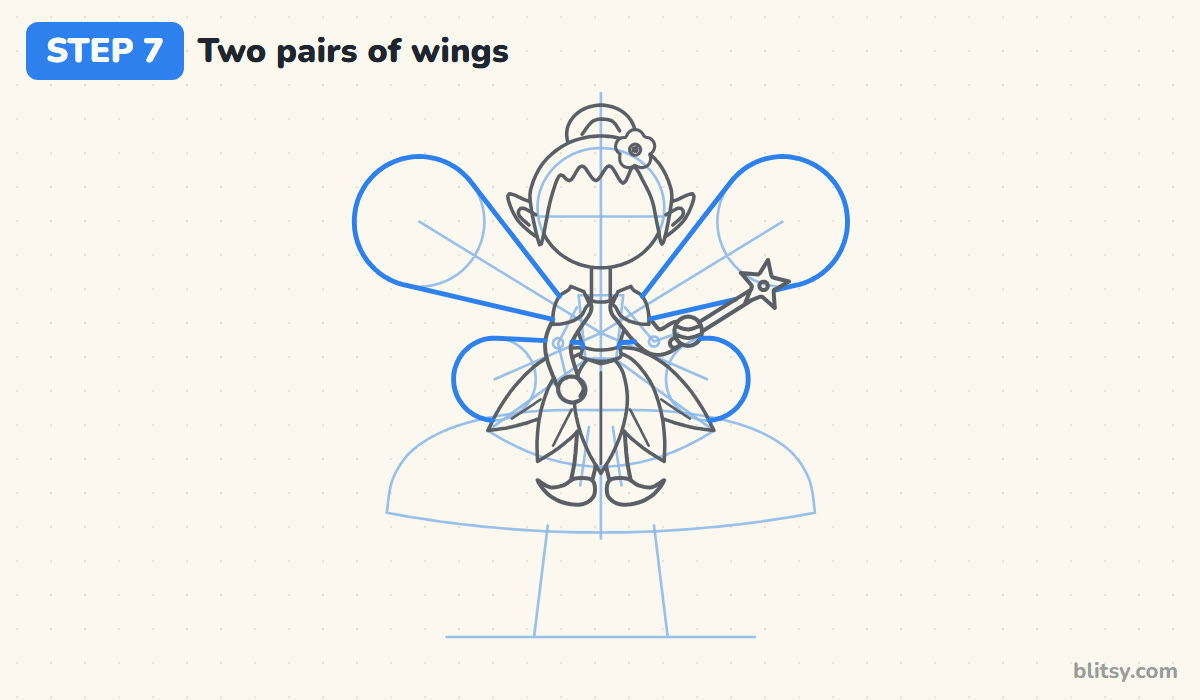
Go around each wing circle on the outside, then run its edges in toward her shoulders so every wing becomes a rounded teardrop. The lower pair is about half the size of the upper pair. Stop each line where it meets her arm, dress or hair, because the wings sit behind her.




💡 Tip: Draw the upper wing on one side, then copy it on the other side before you move on.
Step 8: Add wing veins and sparkles
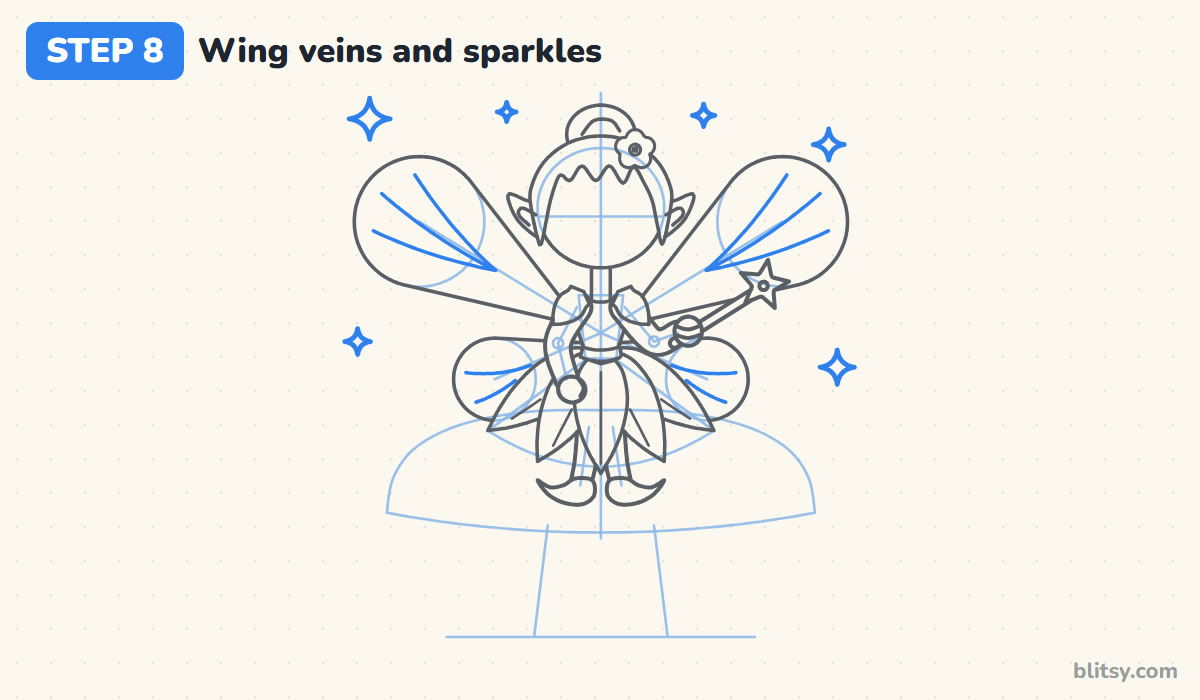
Inside each upper wing, draw three thin curved lines that fan out from the narrow end toward the round edge. The small wings get two. I keep these lines lighter and thinner than the outline, because heavy veins make the wings look like a leaf instead of something see-through. Then scatter a few four-point sparkles in the empty space around her.
💡 Tip: Stop the veins before they touch the wing edge; the gap keeps them delicate.
Step 9: Draw the toadstool cap and stem
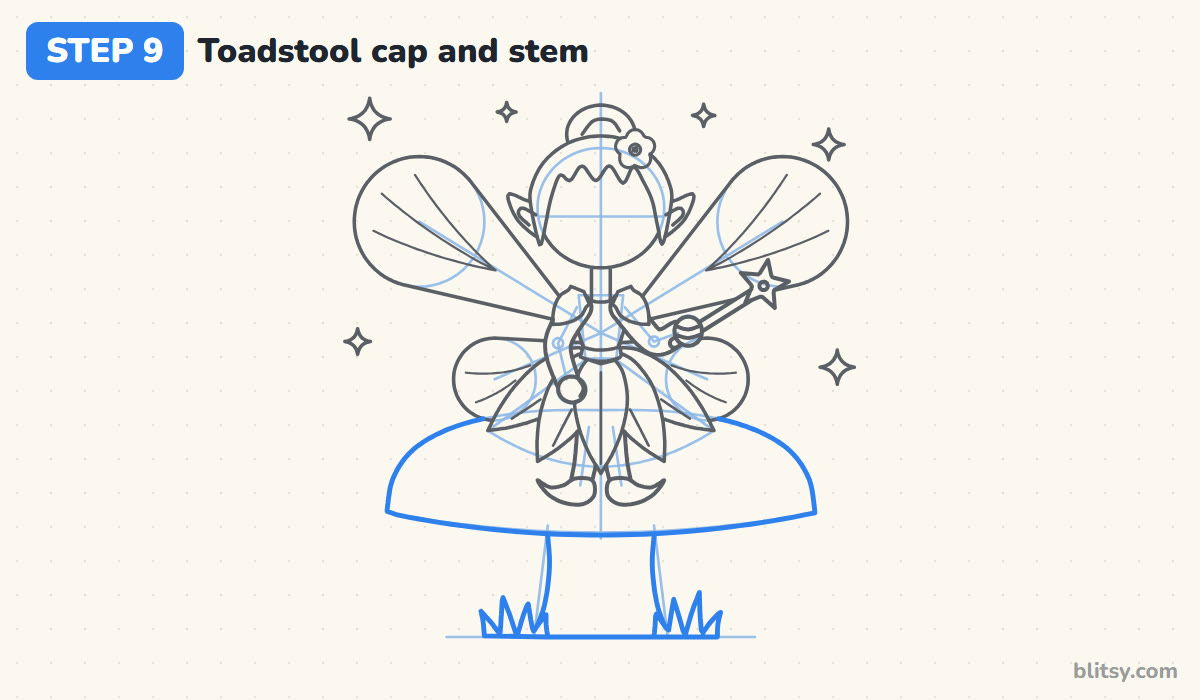
Follow the dome guide for the cap, but only where her skirt, legs and wings don't cover it. The bottom of the cap curves down a little in the middle. Under it, draw a stem that gets slightly wider toward the ground, and add two small tufts of pointed grass at its base so it looks planted.
💡 Tip: Make the cap much wider than the fairy; a tiny toadstool makes her look like a giant.
Step 10: Give her a sweet face and spot the cap
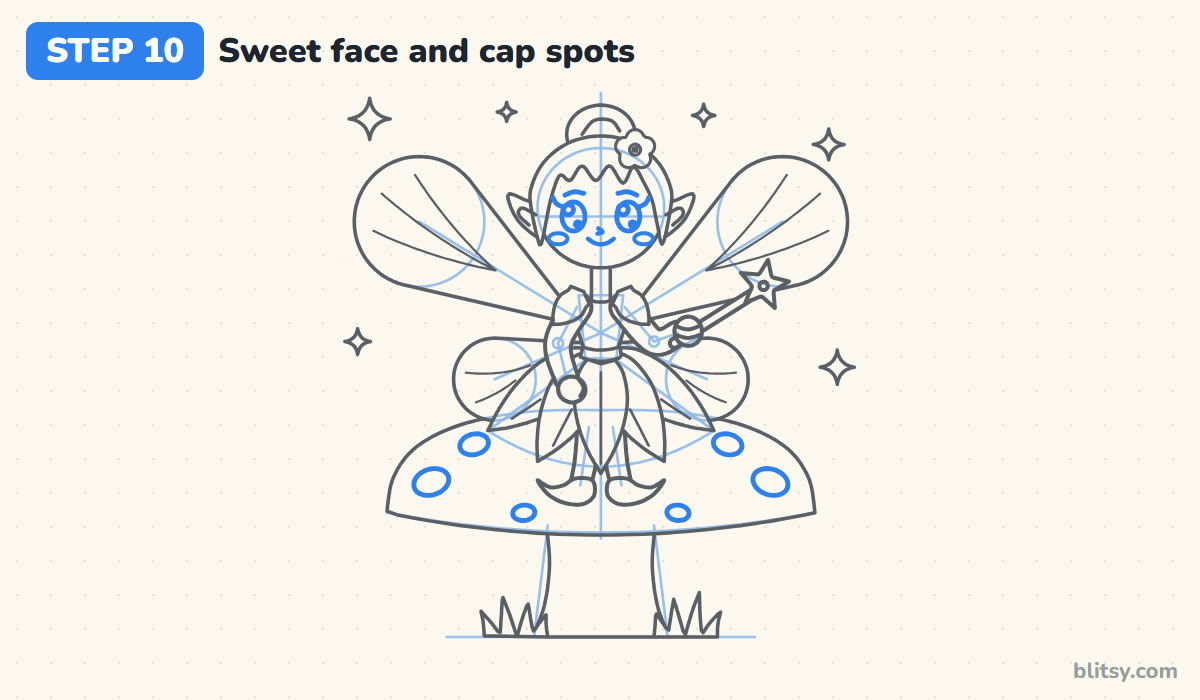
Now her face. Place two tall oval eyes on the eye line, leaving a small white circle in each for a shine. Add short brows, a lash flick at each outer corner, a tiny nose, a simple curved smile and oval cheeks. On the cap, draw white spots, flatter near the edges so they wrap around the dome.
💡 Tip: Keep the smile small and well above the chin; a wide mouth changes her whole mood.
Step 11: Ink the lines and erase the guides
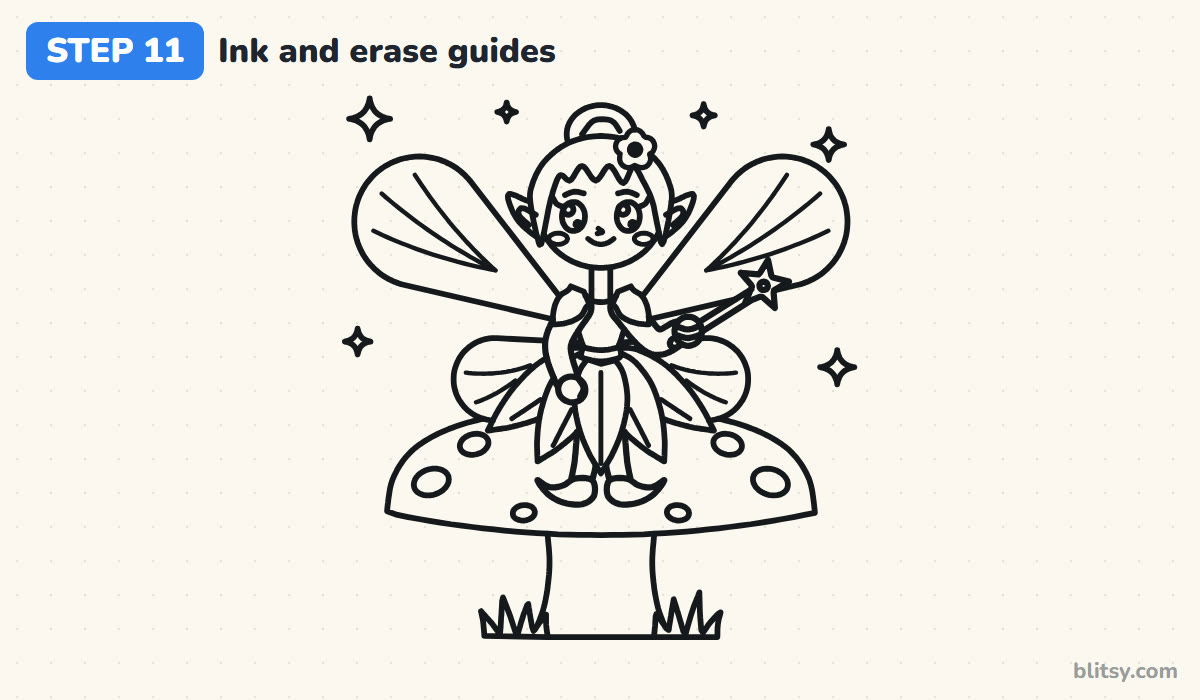
Go over every line you want to keep with the black pen, slowly, in short smooth strokes. The wings and petals have long curves, so turn the paper as you work. Leave out the circles, the stick lines and the center line. After the ink has dried for a minute, erase all the pencil underneath.




💡 Tip: Ink the face first, while your hand is fresh, since it's where a wobble shows most.
Step 12: Color your fairy
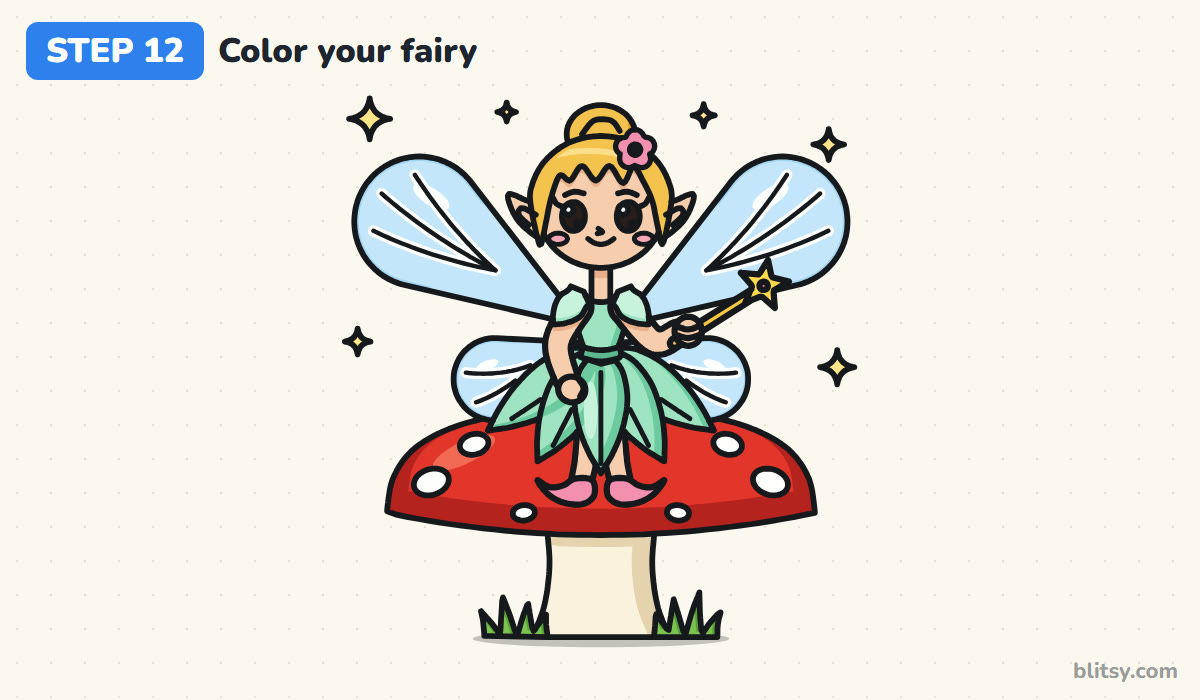
Color her hair and bun golden yellow and her skin peach, then make the petal dress mint green with a slightly darker green on one side of each petal. The wings get a very light blue; leave white streaks beside the veins and a white shine near each round end so they look like glass. Finish with a red cap, white spots, a cream stem, green grass and yellow sparkles.
💡 Tip: Press softly on the wings so the blue stays pale and airy.
Fairy Sketches Usually Slip Up Here
- Wings that don't match. One big wing and one small one look like an accident. Draw the guide circles first and compare their size and height before you outline.
- Wings drawn in front of the body. If wing lines cross her arms or dress, she looks tangled. Stop every wing line where it meets her, so the wings sit behind.
- Heavy black veins. Thick veins turn wings into leaves. Keep them thin, curved and short of the edge.
- Rounded skirt petals. Without points, the skirt reads as a blob. Taper every petal to a clear tip.
- A fairy floating above her seat. If there's a gap between the skirt and the cap, she doesn't look like she's sitting. Let the petals lie right on the toadstool.
New Seasons and Seats for Your Fairy
After the first one, try a new season: autumn leaves for the skirt and orange wings, or a snowflake on the wand for a winter fairy. She could also sit on a flower, a pinecone or a crescent moon. For a whole fairy garden, add a few toadstools from the mushroom drawing tutorial, and borrow wing patterns from the butterfly drawing tutorial.
Fairy Coloring Page and Printable Step Guide
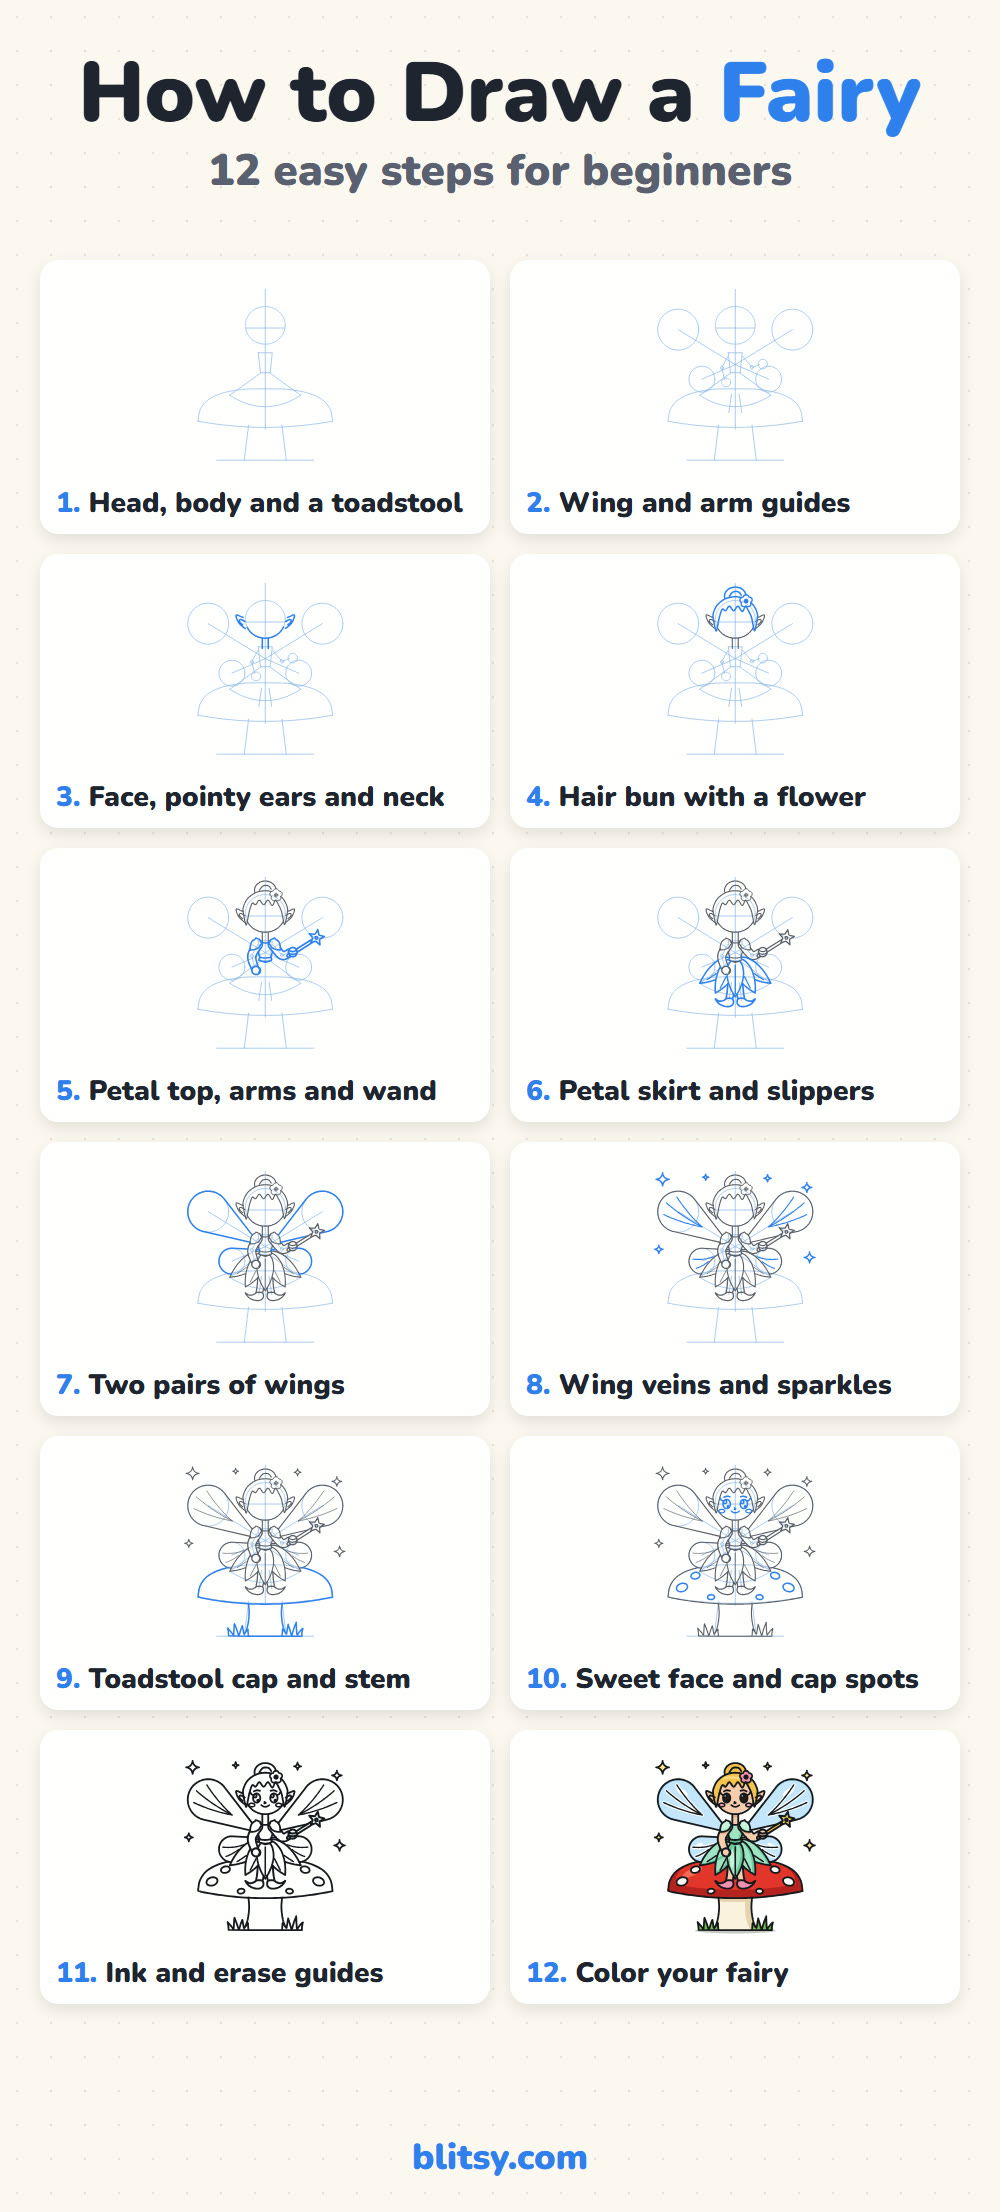
Prefer to color right away? The free fairy coloring page has the inked outline, a small colored example and a key that says which color goes where. The step-by-step guide PDF collects all 12 steps with their tips, and both print on Letter or A4 paper.
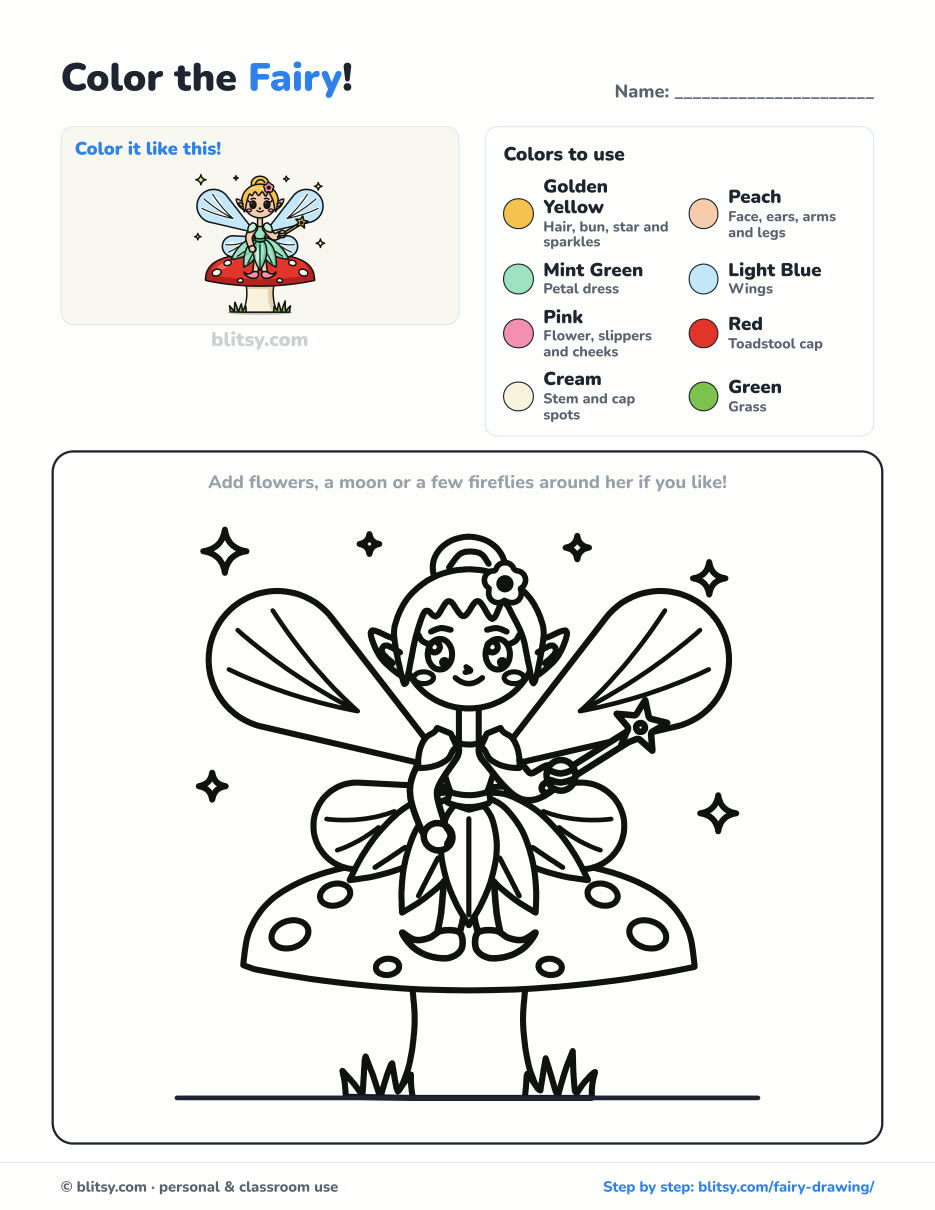
Black outlines with a colored example and the color names at the top. Ready to print and color.
⬇️ Download Coloring PageEvery step picture with its instructions and tips, to keep beside your paper while you draw.
⬇️ Download Drawing Guide📱 On a phone? Tap a download button, then open the file and choose Share → Save to Files or Print. On a computer, the PDF opens or saves straight to your Downloads folder.
Keep the Fairy Steps on Your Board
What Kids Want to Know About Drawing Fairies
What is the easiest way to draw a fairy?
Start with circles: one for the head and one for each wing. Join the wing circles to her back, add a simple dress, and the shape already reads as a fairy before any details go in.
How do you draw fairy wings that look see-through?
Keep the outline clean, the veins thin and the color very pale. A white shine near the round end of each wing and white streaks beside the veins make them look like glass.
Can young kids draw this fairy?
Yes, children around 6 and up can follow it. Smaller kids can skip the veins and the petal lines and just draw the four wing shapes and a simple skirt.
How long does it take to draw a fairy?
Plan on about 40 minutes for the drawing and 15 to 20 more for coloring. It's fine to stop after the wings and finish another day.
Give your fairy a name and a home, then leave the drawing somewhere a little magic might find it. 🧚✨
Related posts:
 How to Draw a Mushroom Step by Step (Easy Storybook Toadstool)
 How to Draw a Castle Step by Step (Easy Fairy-Tale Castle)
 How to Draw a Whale Step by Step (Easy for Beginners)
 How to Draw Lungs Step by Step (Easy Science Diagram)
 How to Draw a Pineapple Step by Step (Easy Crown and Slice)
 How to Draw Iron Man Step by Step (Easy Chibi for Kids)
 How to Draw a Dress Step by Step (Easy Party Dress)
 How to Draw a Chicken Step by Step (Easy for Beginners)
 How to Draw a UFO Step by Step (Cute Alien Saucer)
 How to Draw Flames Step by Step (Easy Campfire Drawing)
 How to Draw a Moon Step by Step (Sleepy Crescent + Phases)
 How to Draw a Sunflower Step by Step (Big and Bright)

