
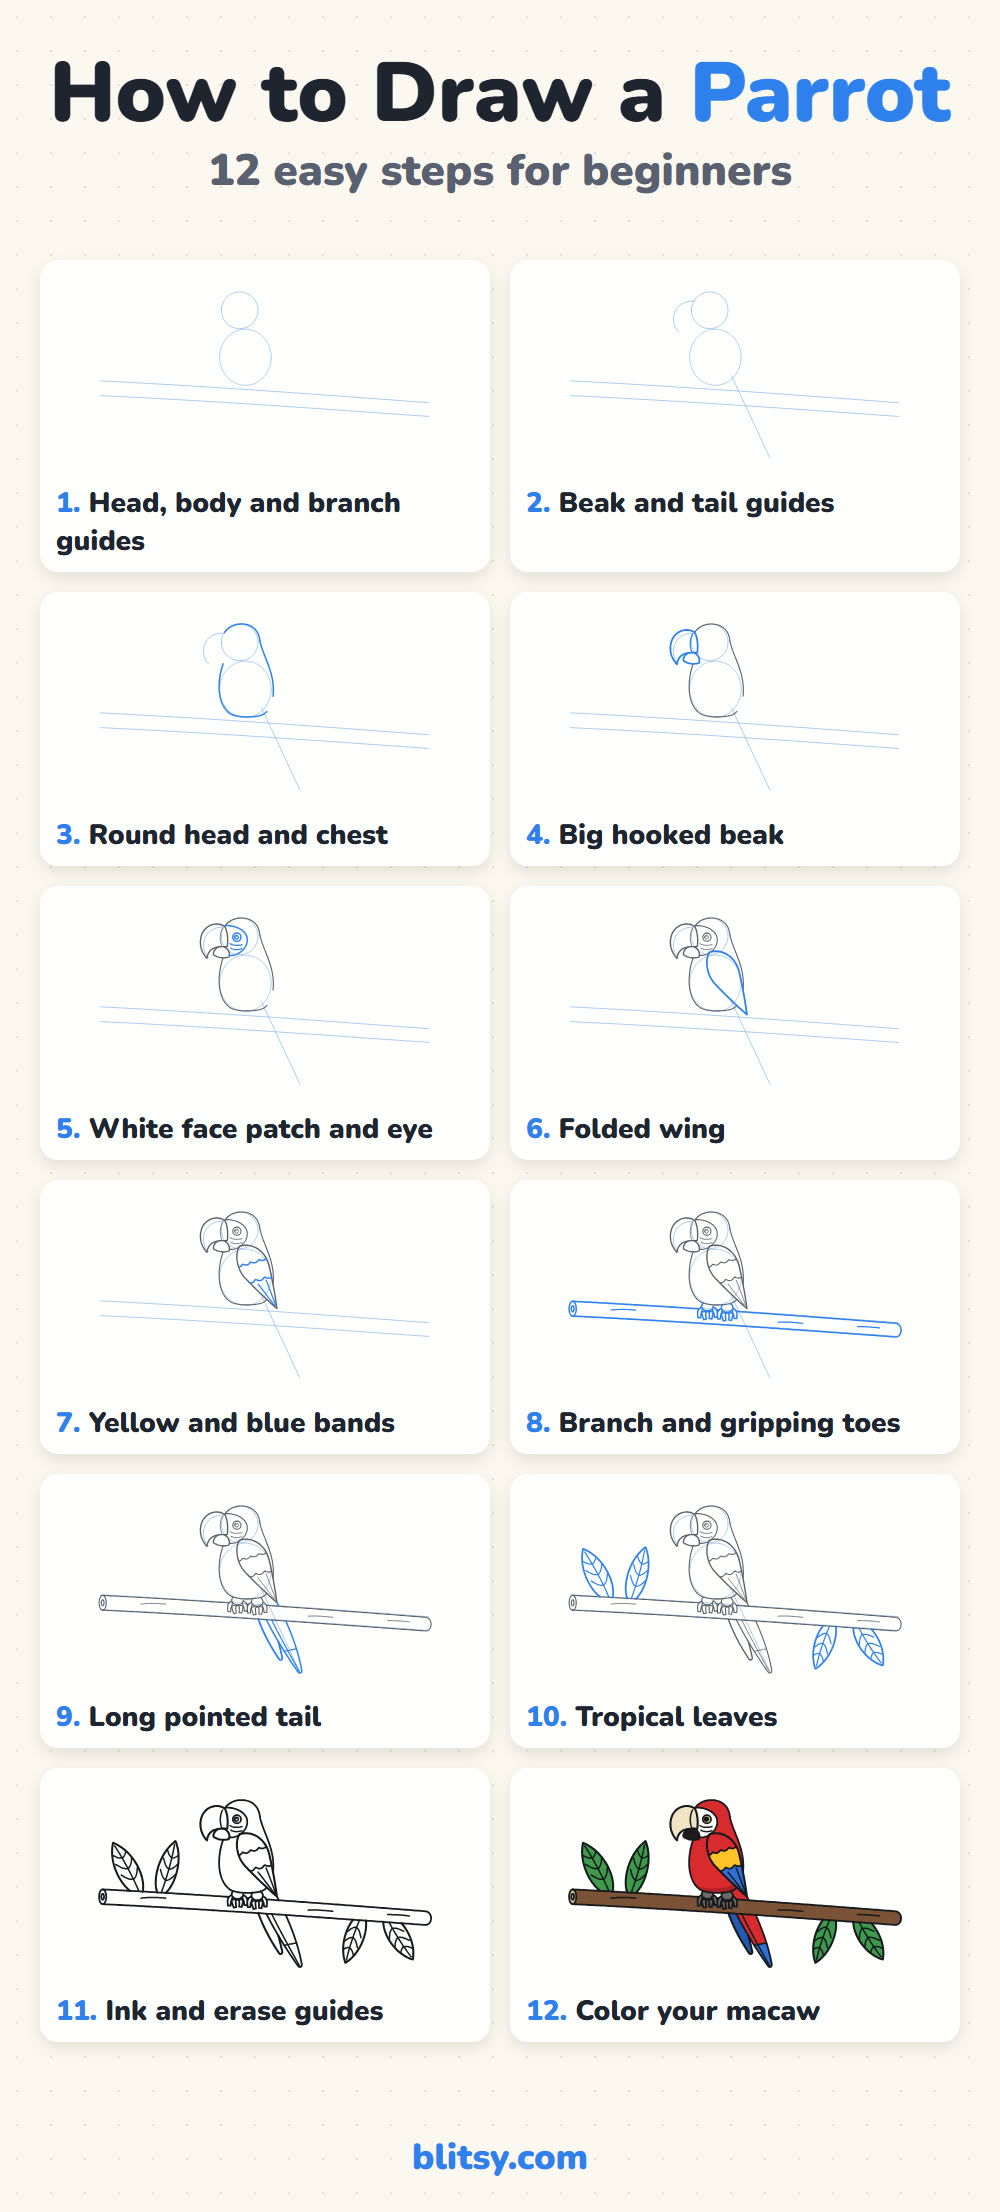
Few birds pack as much color into one body as a scarlet macaw. In this lesson I'll walk you through how to draw a parrot step by step, from two soft circles to a bright macaw gripping a branch between tropical leaves. The hooked beak scares most people off, yet it's really just a curved shape sitting on top of a smaller one.
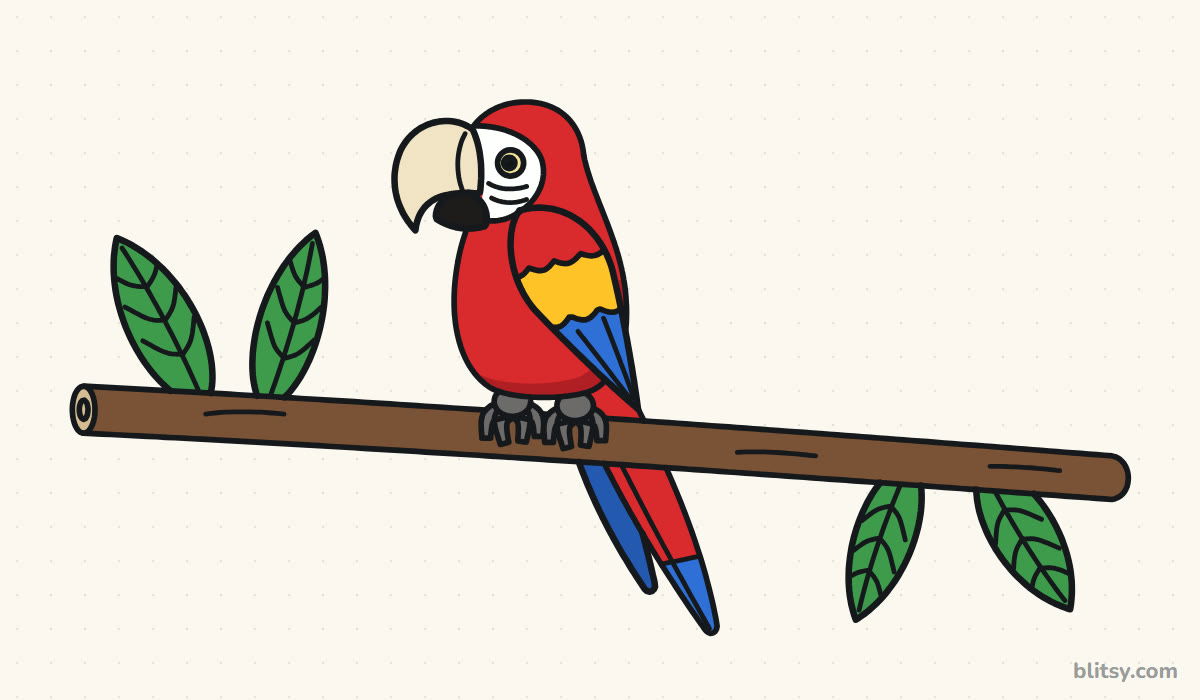
Each picture below adds only a little. The strong blue lines are what you draw in that step, the gray lines are work you already did, and the pale blue shapes are guides that disappear in step 11.
Quick overview
⏱️ Time: about 35 to 45 minutes
🎯 Level: easy, good for kids around 8 and up
✏️ Steps: 12
🦜 You'll draw: a scarlet macaw on a branch with tropical leaves
Pencils and Brights for a Jungle Bird
- An HB pencil for faint construction shapes
- A clean eraser, ideally a kneaded one
- A black fineliner or thin felt-tip pen
- Colored pencils or markers: red, yellow, blue, cream, black, gray, brown, green
- A sheet of paper turned sideways, so the branch fits
A strong red, a sunny yellow and a deep blue matter most here; the other colors can be whatever you already own.
How to Draw a Parrot Step by Step
Step 1: Sketch the head, body and branch guides
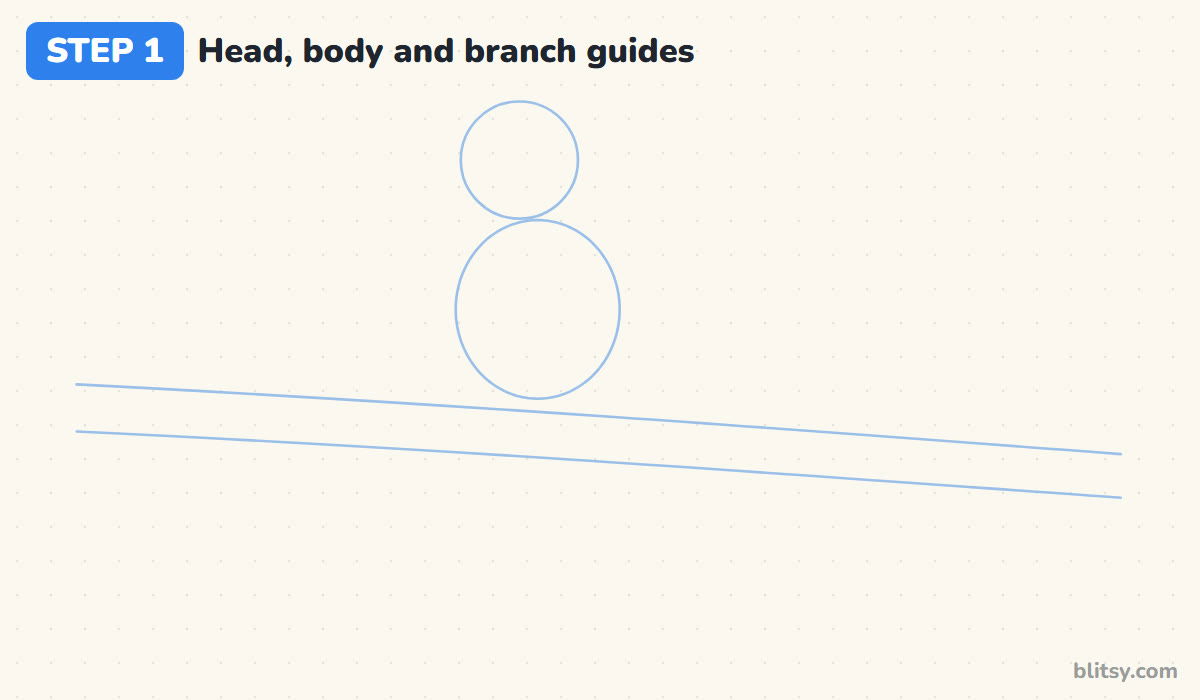
Draw a small circle a little above the middle of the page for the head. Right under it, touching it, draw a taller oval for the body. Then sketch two long lines that slope gently down to the right, a little below the oval. That's your branch.
💡 Tip: Keep the head circle roughly two thirds the width of the body oval, or the bird turns into a chick.
Step 2: Add the beak and tail guides
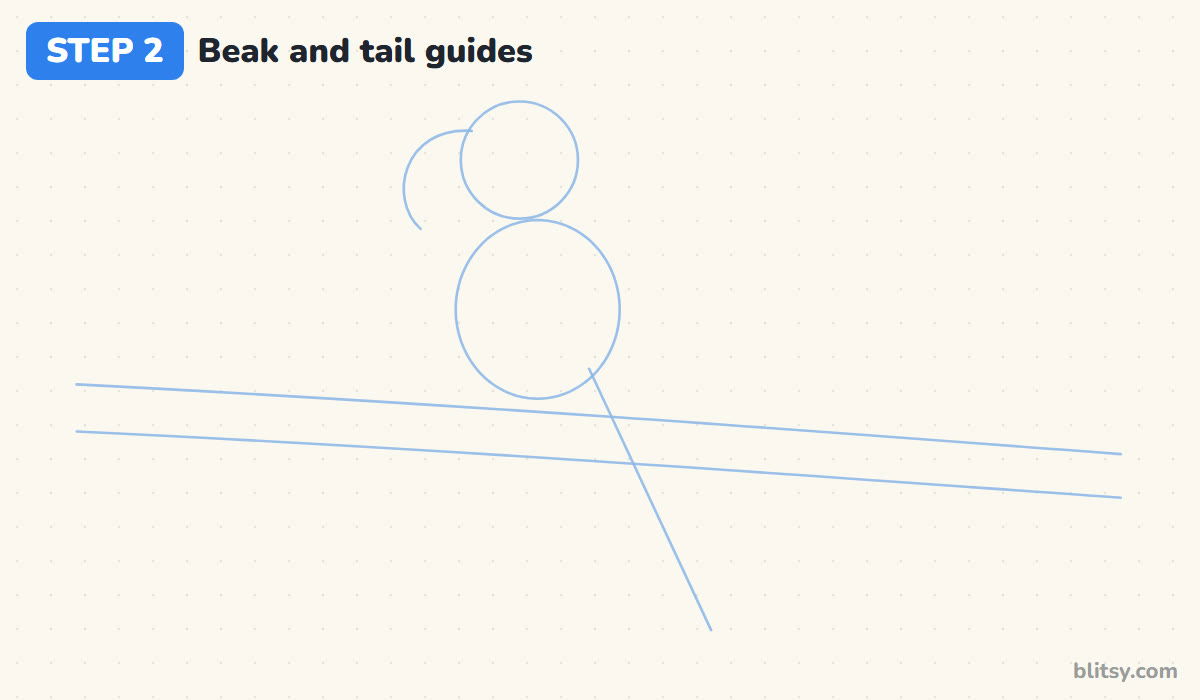
On the left of the head circle, draw one curved line that bulges out and hooks down, like a big comma. Then draw a long straight line from the bottom of the oval down and slightly right, almost to the bottom of the page. Macaw tails really are that long, so don't shorten it.
💡 Tip: Let the tail line lean away from the beak. The opposite slant keeps the bird balanced.
Step 3: Draw the round head and chest
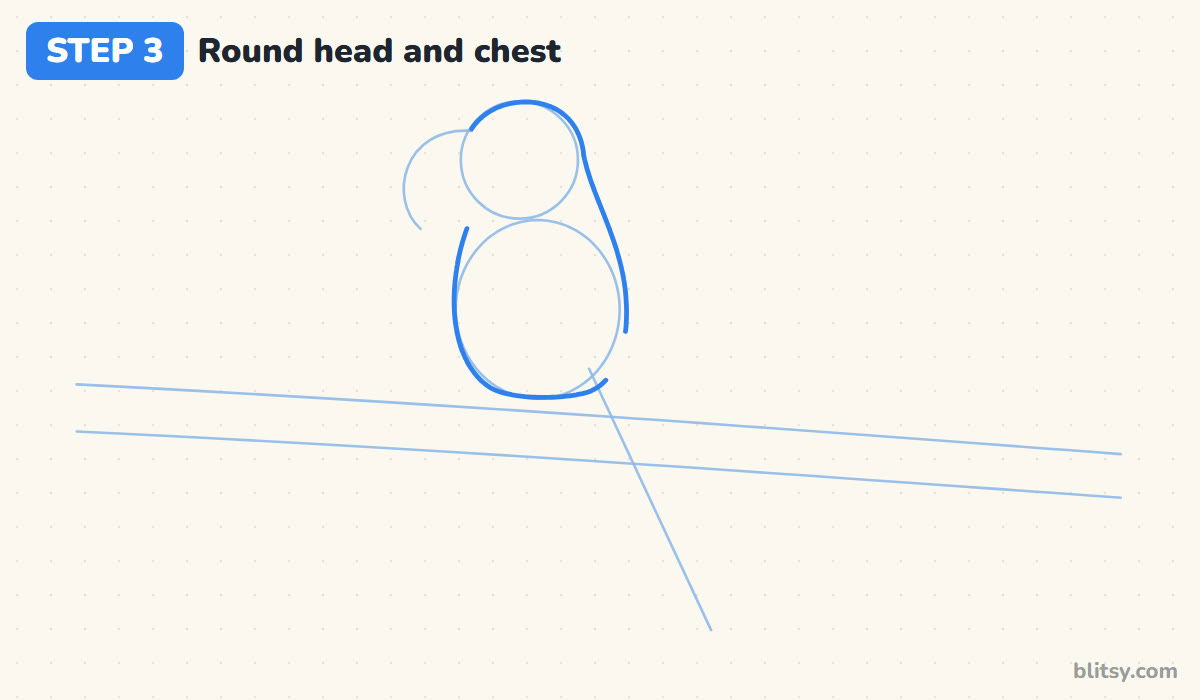
Go over the top of the head circle with a firm line, then let it run down the back in one long, gentle curve. Come back to the chin and draw the chest bulging forward and around to the belly. I let the back line slope outward a little, because a perched parrot sits upright but never stiff.




💡 Tip: Leave the left side of the head open. The beak will cover it in the next step.
Step 4: Draw the big hooked beak
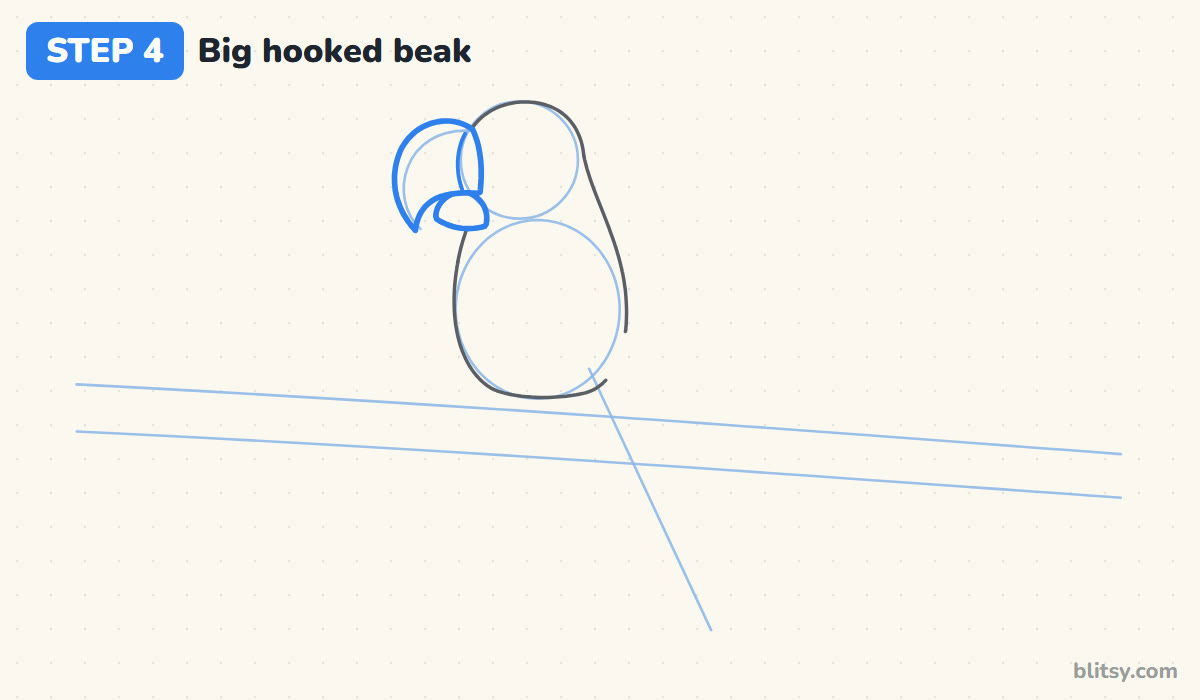
Start where the forehead meets the face and draw a high curve out to the left, then down to a sharp hook pointing toward the chest. From the hook, bring a short line back to the face. Underneath, add the smaller lower beak, tucked behind the hook. Most beginners draw it too small; a macaw's beak is nearly as tall as its head.
💡 Tip: Draw the hook tip last with one short flick so it ends in a real point.
Step 5: Draw the white face patch and eye
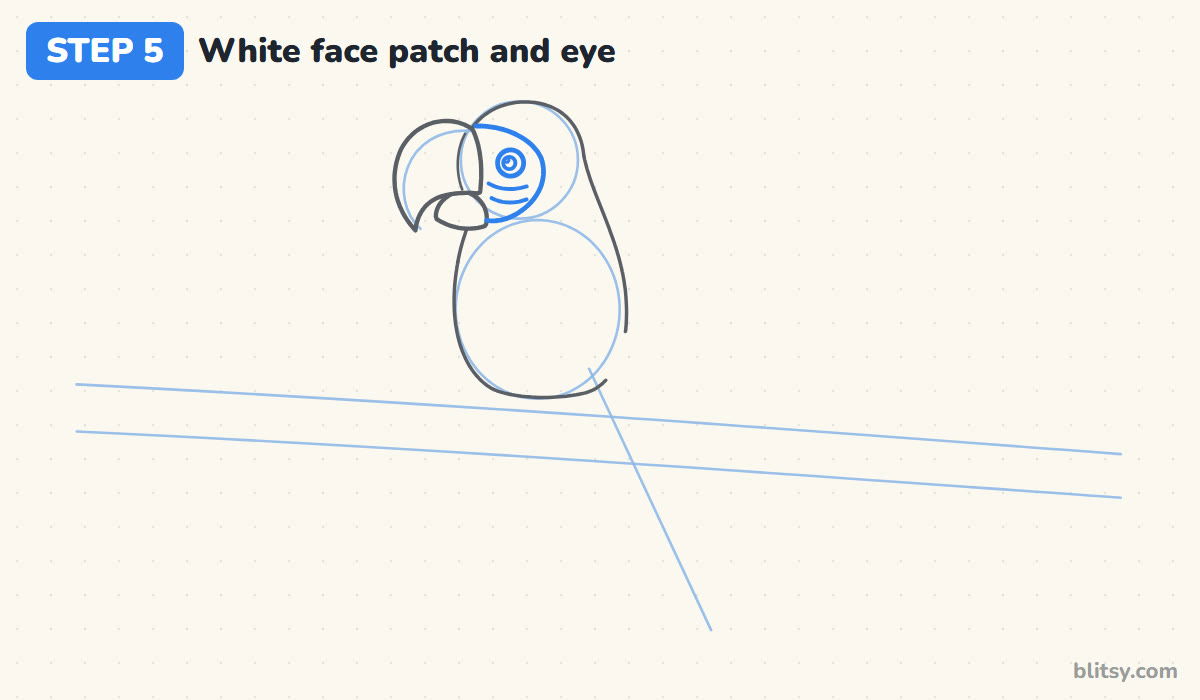
Behind the beak, draw a rounded line from the forehead back and down around the cheek. That bare white patch is a macaw trademark. Put the eye in the upper part of it as a circle with a smaller pupil and a tiny shine. Two short curved lines below the eye hint at the little feather rows on the skin.
💡 Tip: Place the eye closer to the beak than to the back of the head.
Step 6: Outline the folded wing
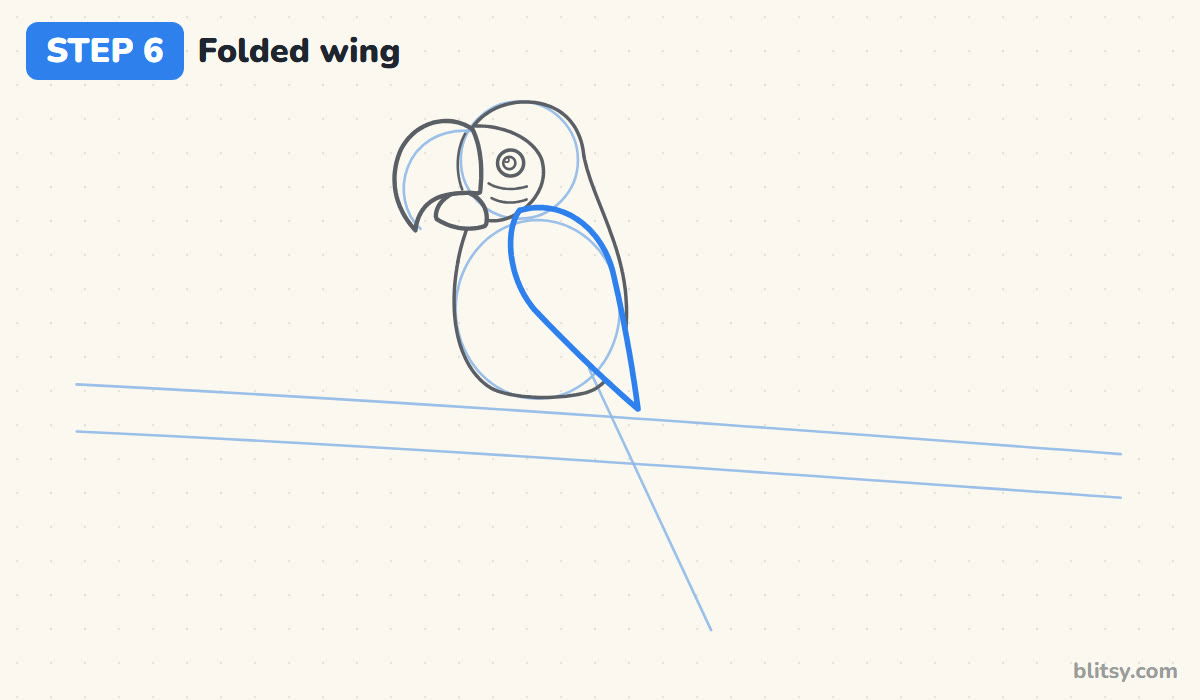
The wing is a long leaf shape lying over the back. Start it just behind the face patch, follow the back line down, and finish in a point that pokes out past the body. Bring the front edge back up in a smooth curve across the chest. Don't worry if it covers half the body; it should.
💡 Tip: Push the wing tip slightly outside the body line so the wing looks layered, not painted on.
Step 7: Add the yellow and blue bands
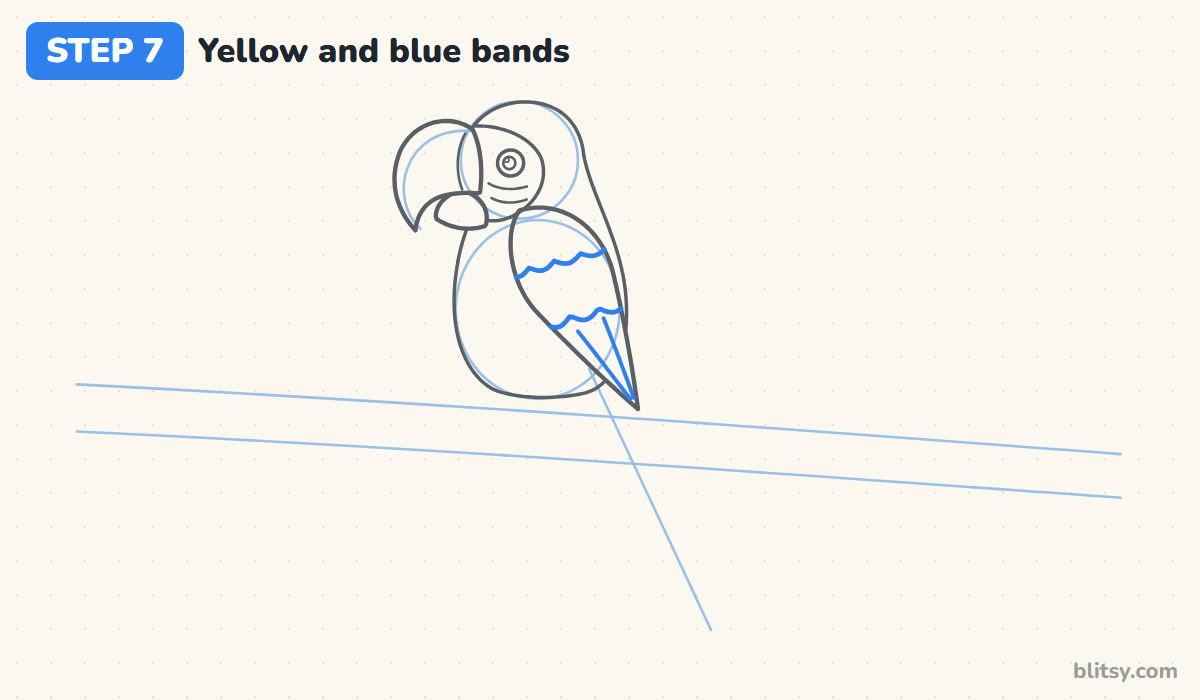
Across the wing, draw two wavy lines, one near the top third and one a bit lower. The bumps are feather tips. The section between them becomes the yellow band, and everything below the second line turns blue. Two long lines toward the tip separate the flight feathers.



💡 Tip: Make the bumps a little bigger on the lower line. The yellow feathers are longer than the red ones above them.
Step 8: Draw the branch and gripping toes
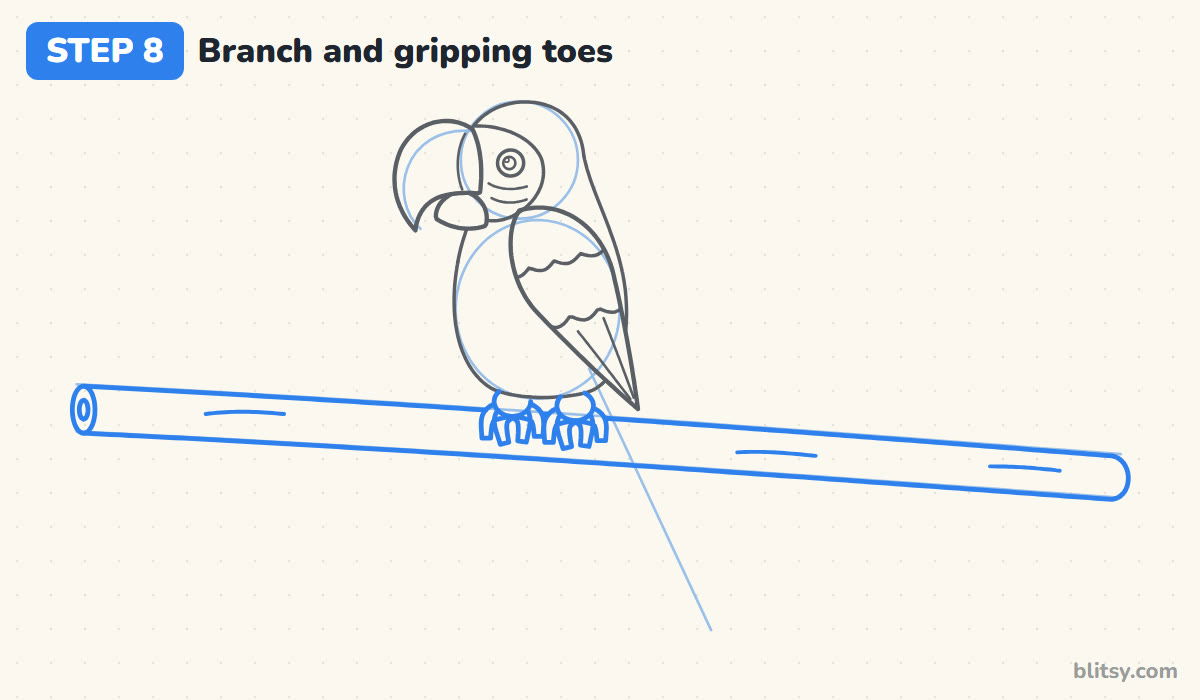
Trace over the branch guides with firm lines, add a small oval with a ring at the left end and a rounded right end. Under the belly, draw two rounded feet. Parrots have two toes pointing forward and two pointing back, so give each foot four thick toes curling over the front of the branch, two leaning left and two right.
💡 Tip: Draw the toes chunky. Thin toes make the feet look like spider legs.
Step 9: Draw the long pointed tail
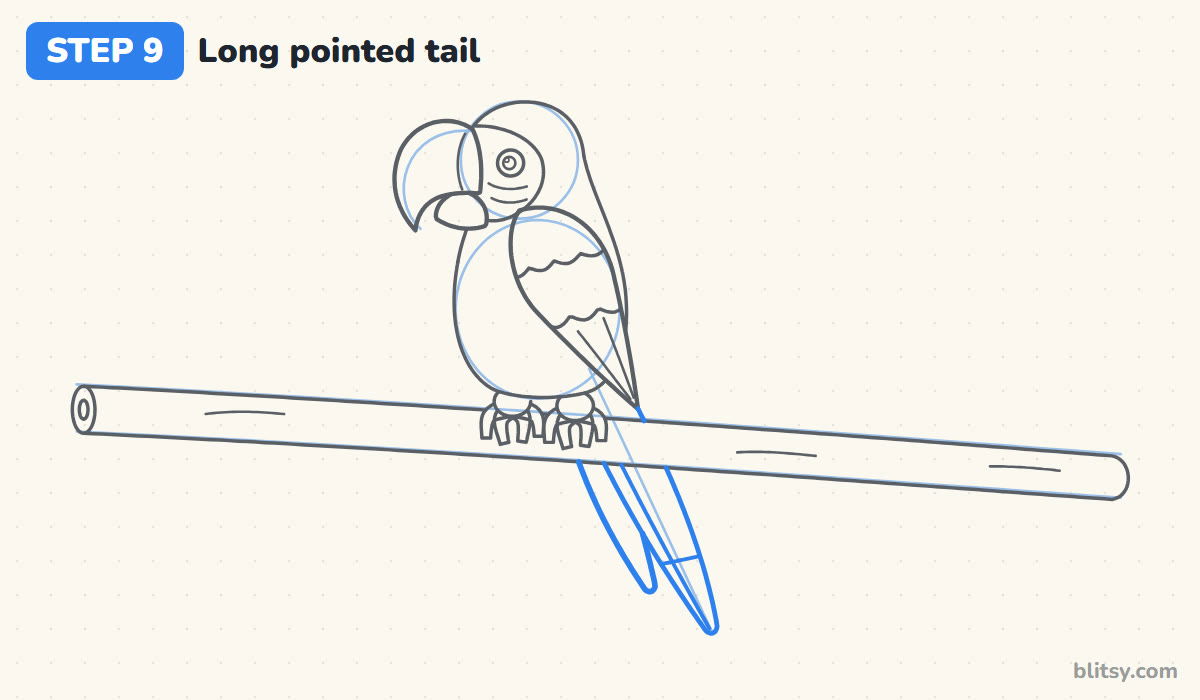
Follow the tail guide with two lines that start behind the body and meet in a sharp point near the bottom. Stop where the branch crosses and continue below it, since the tail hangs behind the wood. On the left, add a shorter outer feather peeking out, then a center line and a line across the lower part for the blue tip.
💡 Tip: Taper the tail slowly. If it narrows too early, it looks like a stick.
Step 10: Add the tropical leaves
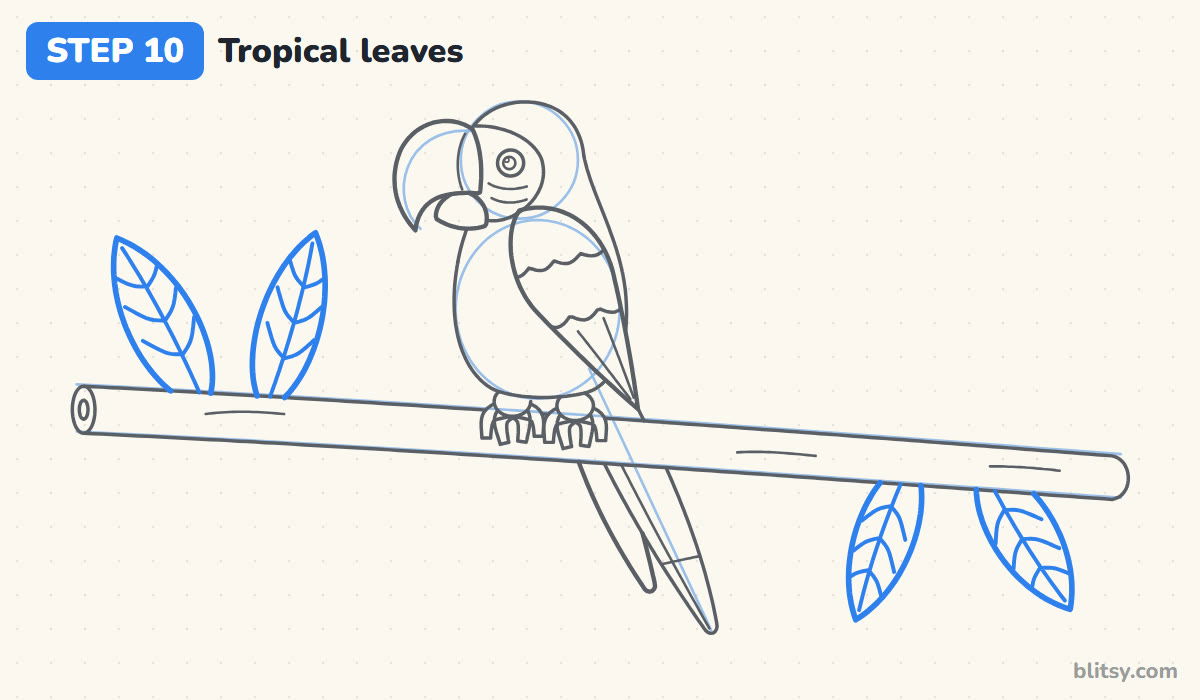
Two broad leaves stand up from the branch on the left, and two hang down on the right. Each one is a wide almond shape with a center vein and a few side veins curving toward the tip. Leaves in opposite corners frame the bird and fill the empty paper.
💡 Tip: Tilt each leaf a different way. Four leaves facing the same direction look like stickers.
Step 11: Ink the lines and erase the guides
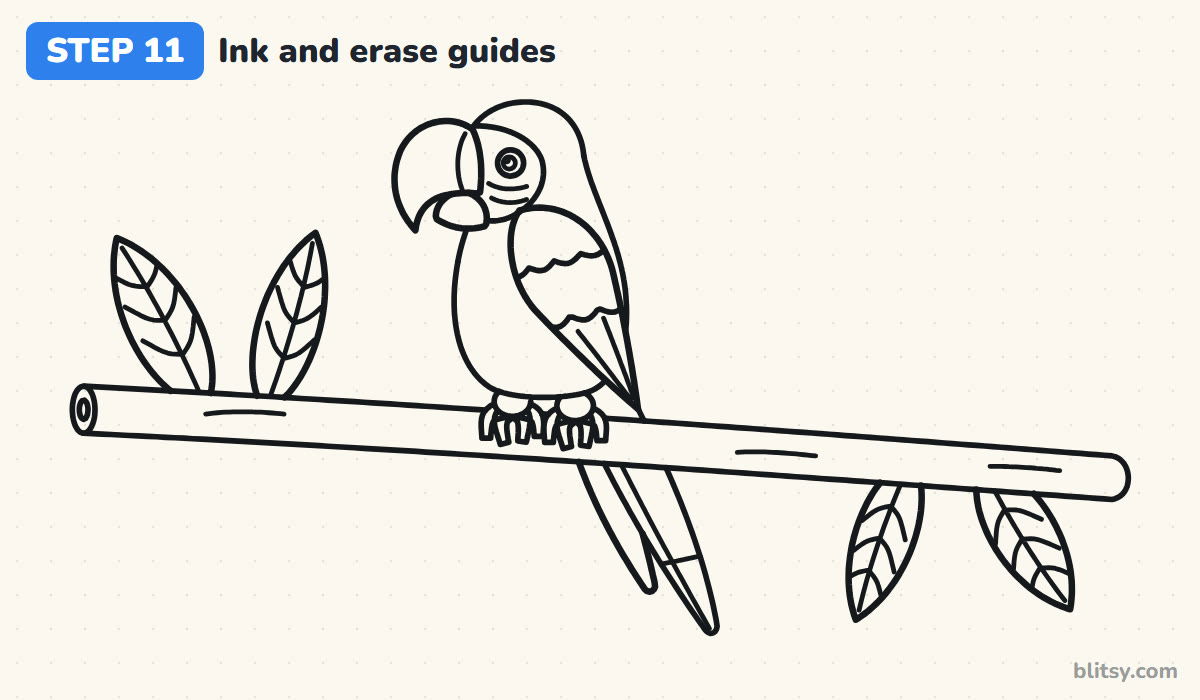
Go over every line you want to keep with the fineliner. I start with the beak and eye while my hand is fresh, then work outward to the branch and leaves. Skip the circles, the oval and the guide lines. After the ink dries, erase all of them.



💡 Tip: Turn the paper as you ink so you always pull the pen toward you on curves.
Step 12: Color your macaw
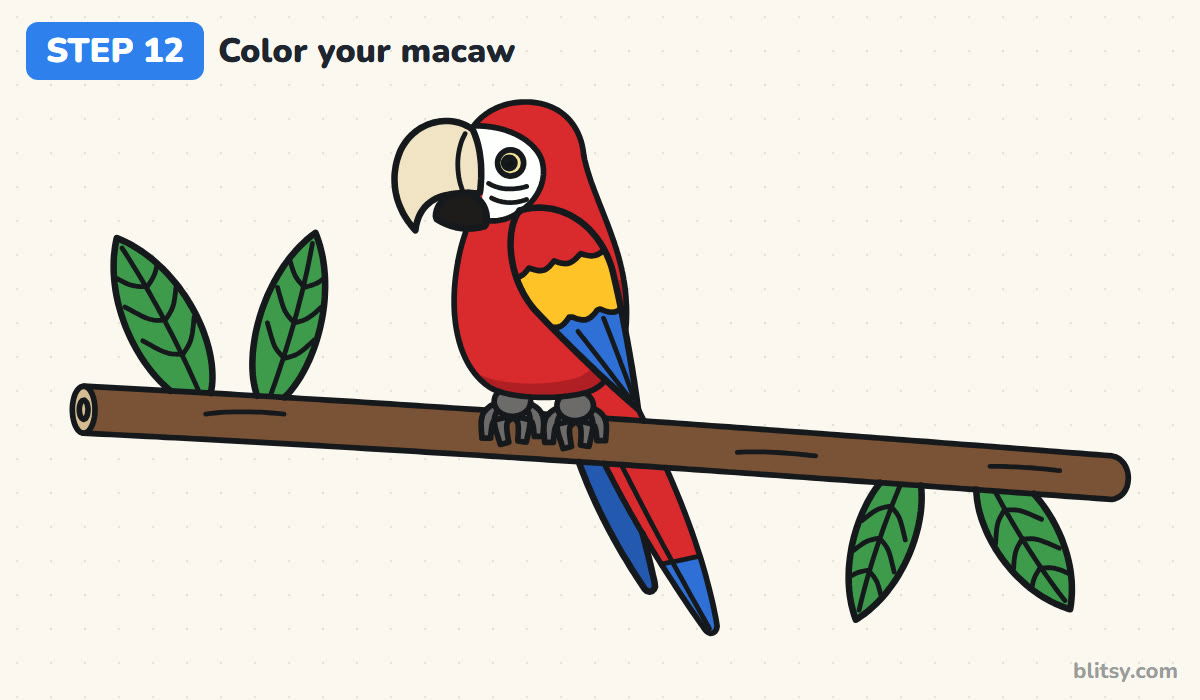
Fill the head, body, shoulder and tail with red, pressing a little harder along the belly for a shadow. Color the wing band yellow and the feathers below it blue, plus the tail tip and the outer tail feather. The upper beak is cream, the lower beak black, the feet gray. Leave the face patch white, then finish with a brown branch and green leaves.
💡 Tip: Color the yellow before the blue next to it, so no blue smudges into the lighter band.
Parrot Sketches That Turn Into Chickens (and How to Stop It)
- A short, straight beak. Without the hook it reads as a chicken or a duck. Curve the top over and down into a point.
- A tail the length of the body. A macaw's tail is longer than the rest of the bird. Let it reach close to the bottom of the page.
- Coloring the face patch red. The white bare skin around the eye is what makes it look like a macaw. Leave it white.
- Three toes forward like a songbird. Parrots grip with two toes in front and two behind, so show toes going both ways.
- Drawing the tail over the branch. The tail hangs behind the wood. Break its lines where the branch crosses.
Other Parrots You Can Try With These Shapes
Once the scarlet macaw feels easy, change only the colors. A blue-and-yellow macaw keeps the same body with a blue back and a golden chest, and a green parrot needs just one main color with a red or yellow forehead. You could draw two macaws sitting side by side, or leave out the leaves for a quicker version. To practice birds with a different shape, the peacock drawing step by step lesson is great for colorful tails, and the bird drawing tutorial covers a simpler round bluebird.
Free Macaw Coloring Page and a Printable Parrot Guide
Prefer paper? The free parrot coloring page has a small colored example and a color key at the top that names each color and its part, with a big outline below. The PDF drawing guide holds all 12 steps with tips and prints on Letter or A4.
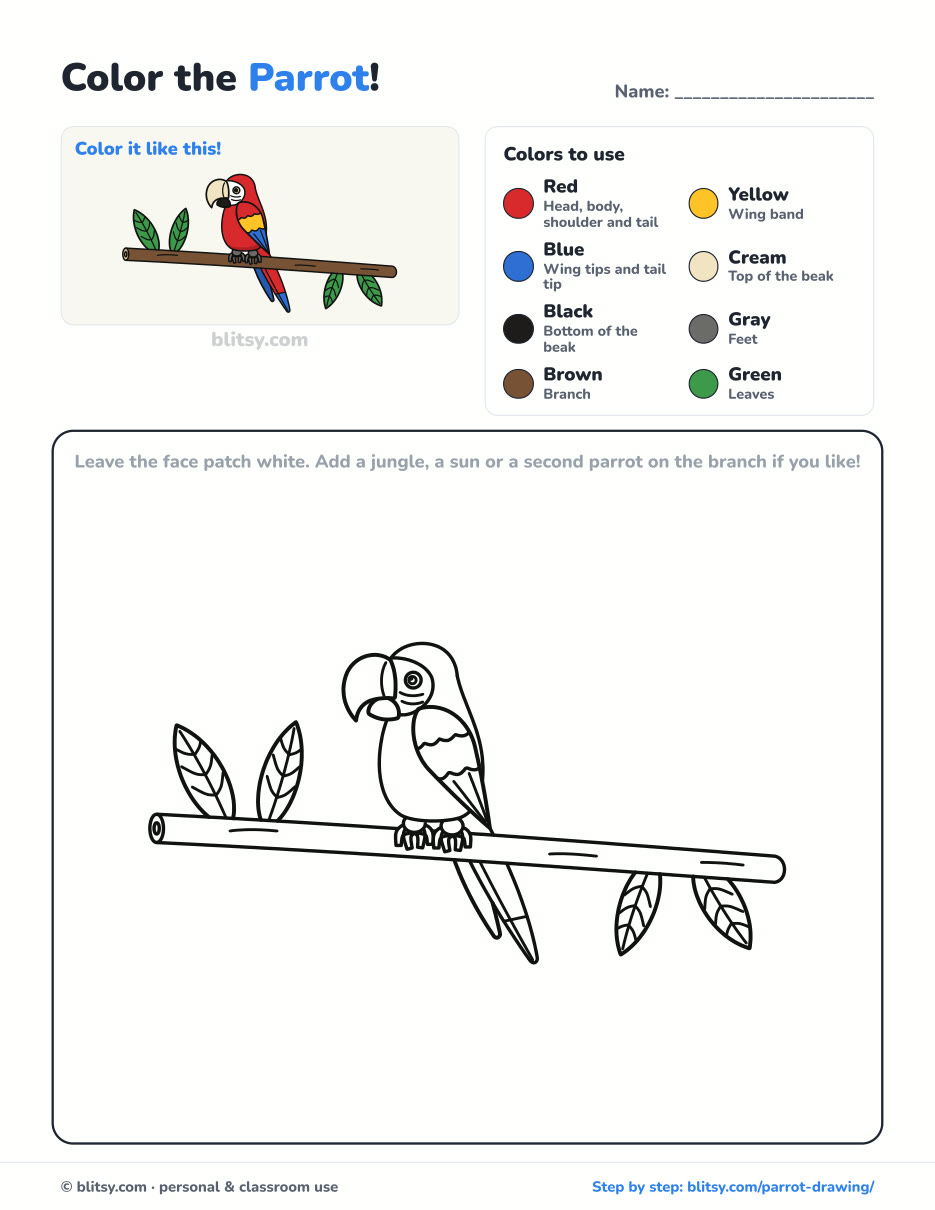
Black outlines with a colored example and the color names at the top. Ready to print and color.
⬇️ Download Coloring PageEvery step picture with its instructions and tips, to keep beside your paper while you draw.
⬇️ Download Drawing Guide📱 On a phone? Tap a download button, then open the file and choose Share → Save to Files or Print. On a computer, the PDF opens or saves straight to your Downloads folder.
Keep the Macaw Lesson on Your Pinterest Board
Parrot Perched? Draw These Animals Next
Here are more step-by-step tutorials, most of them animals, to follow your macaw.
- Leopard Drawing: A sitting leopard with amber eyes and a curled tail: the leopard drawing tutorial.
- Chalk Art: Swap paper for pavement in how to do chalk art step by step.
- Peppa Pig Drawing: One snout, a rosy cheek and a puddle to splash in: Peppa Pig drawing step by step.
- Alligator Drawing: The alligator drawing tutorial turns two ovals into a walking gator.
- Peacock Drawing: For another colorful tail, learn how to draw a peacock.
- Family Drawing: The family drawing tutorial puts four people, a puppy and a balloon on one page.
- Simba Drawing: Draw a curious lion cub in how to draw Simba step by step.
- Polar Bear Drawing: Paws up and snout forward on the ice: the polar bear drawing tutorial.
- Butterfly Drawing: Spread a pair of orange wings, every dot in place, with how to draw a butterfly step by step.
- Mouse Drawing: Draw a mouse with cheese in its paws in the mouse drawing step by step lesson.
- Cat Eye Drawing: The cat eye drawing tutorial draws a slit pupil and a round one from a circle and a cross.
- Snow Leopard Drawing: Rest a snow leopard on a mountain rock when you learn how to draw a snow leopard.
Parrot Drawing Questions Kids Often Ask
What is the easiest way to draw a parrot?
Start with a circle for the head and an oval for the body, then add a big hooked beak and a long pointed tail. Those two features alone make the bird read as a parrot.
What colors do I need for a scarlet macaw?
Red and yellow plus a deep blue do most of the work. You'll also want cream and black for the beak, gray for the feet, and white paper left showing on the face.
How long does it take to draw a parrot?
Around 35 to 45 minutes with coloring. The sketch alone takes about 15 minutes, and kids can split it into two sessions.
Why do parrots have two toes in front and two in back?
That foot shape is called zygodactyl. It lets parrots hold branches tightly and even pick up food with one foot, which is why showing toes going both ways makes your drawing look right.
Pick up your brightest red and give your macaw a branch of its own. I hope yours ends up as loud and cheerful as the real thing. 🦜🌿
Related posts:
 How to Draw a Whale Step by Step (Easy for Beginners)
 How to Draw Lungs Step by Step (Easy Science Diagram)
 How to Draw a Pineapple Step by Step (Easy Crown and Slice)
 How to Draw Iron Man Step by Step (Easy Chibi for Kids)
 How to Draw a Dress Step by Step (Easy Party Dress)
 How to Draw a Chicken Step by Step (Easy for Beginners)
 How to Draw a Police Car Step by Step (Easy for Kids)
 How to Draw a Volcano Step by Step (Easy Erupting Volcano)
 How to Draw a Crow Step by Step (Easy for Beginners)
 How to Draw a Tiger Step by Step (Easy Walking Pose)
 How to Draw a Heart Step by Step (Even, Symmetric Shape)
 How to Draw a Jellyfish Step by Step (Cute, Easy Guide)

