
Cowboy hats trip people up because of the brim. Draw it flat and you get a bowler with a ring around it; curl it too hard and it turns into a canoe. This lesson on how to draw a cowboy hat step by step starts with a plain flat oval and then lifts its two ends, so the curl comes out even on both sides. A coiled lasso and a sheriff-style star sit beside the hat to round out a little western still life.
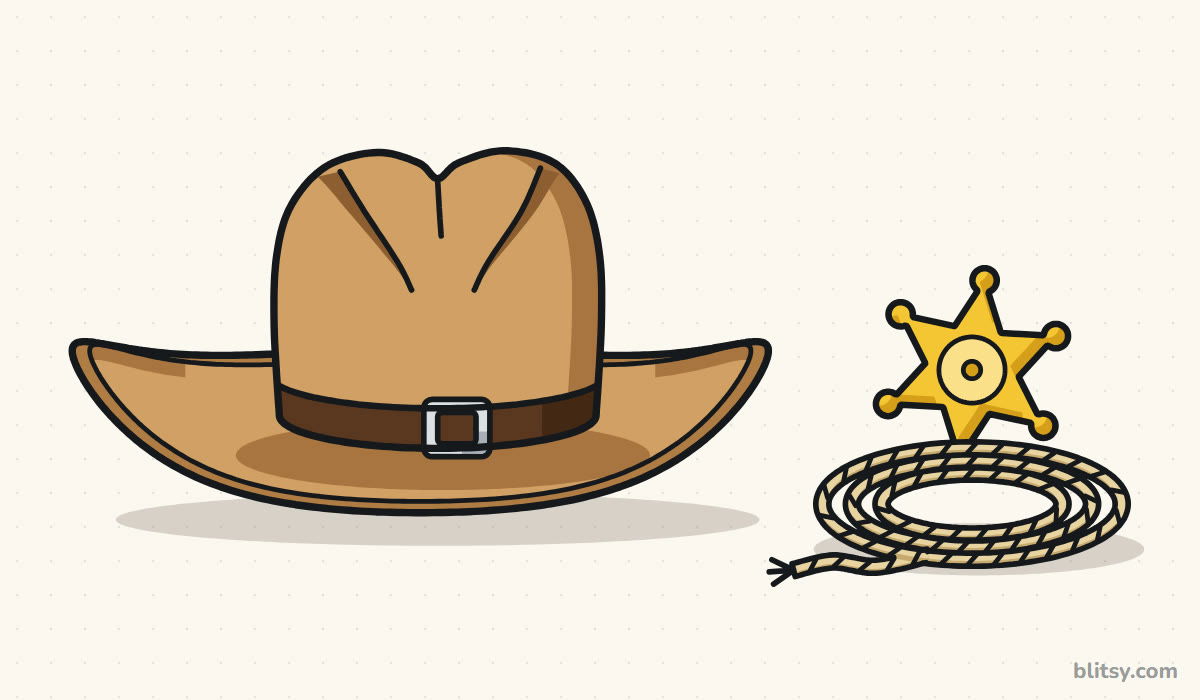
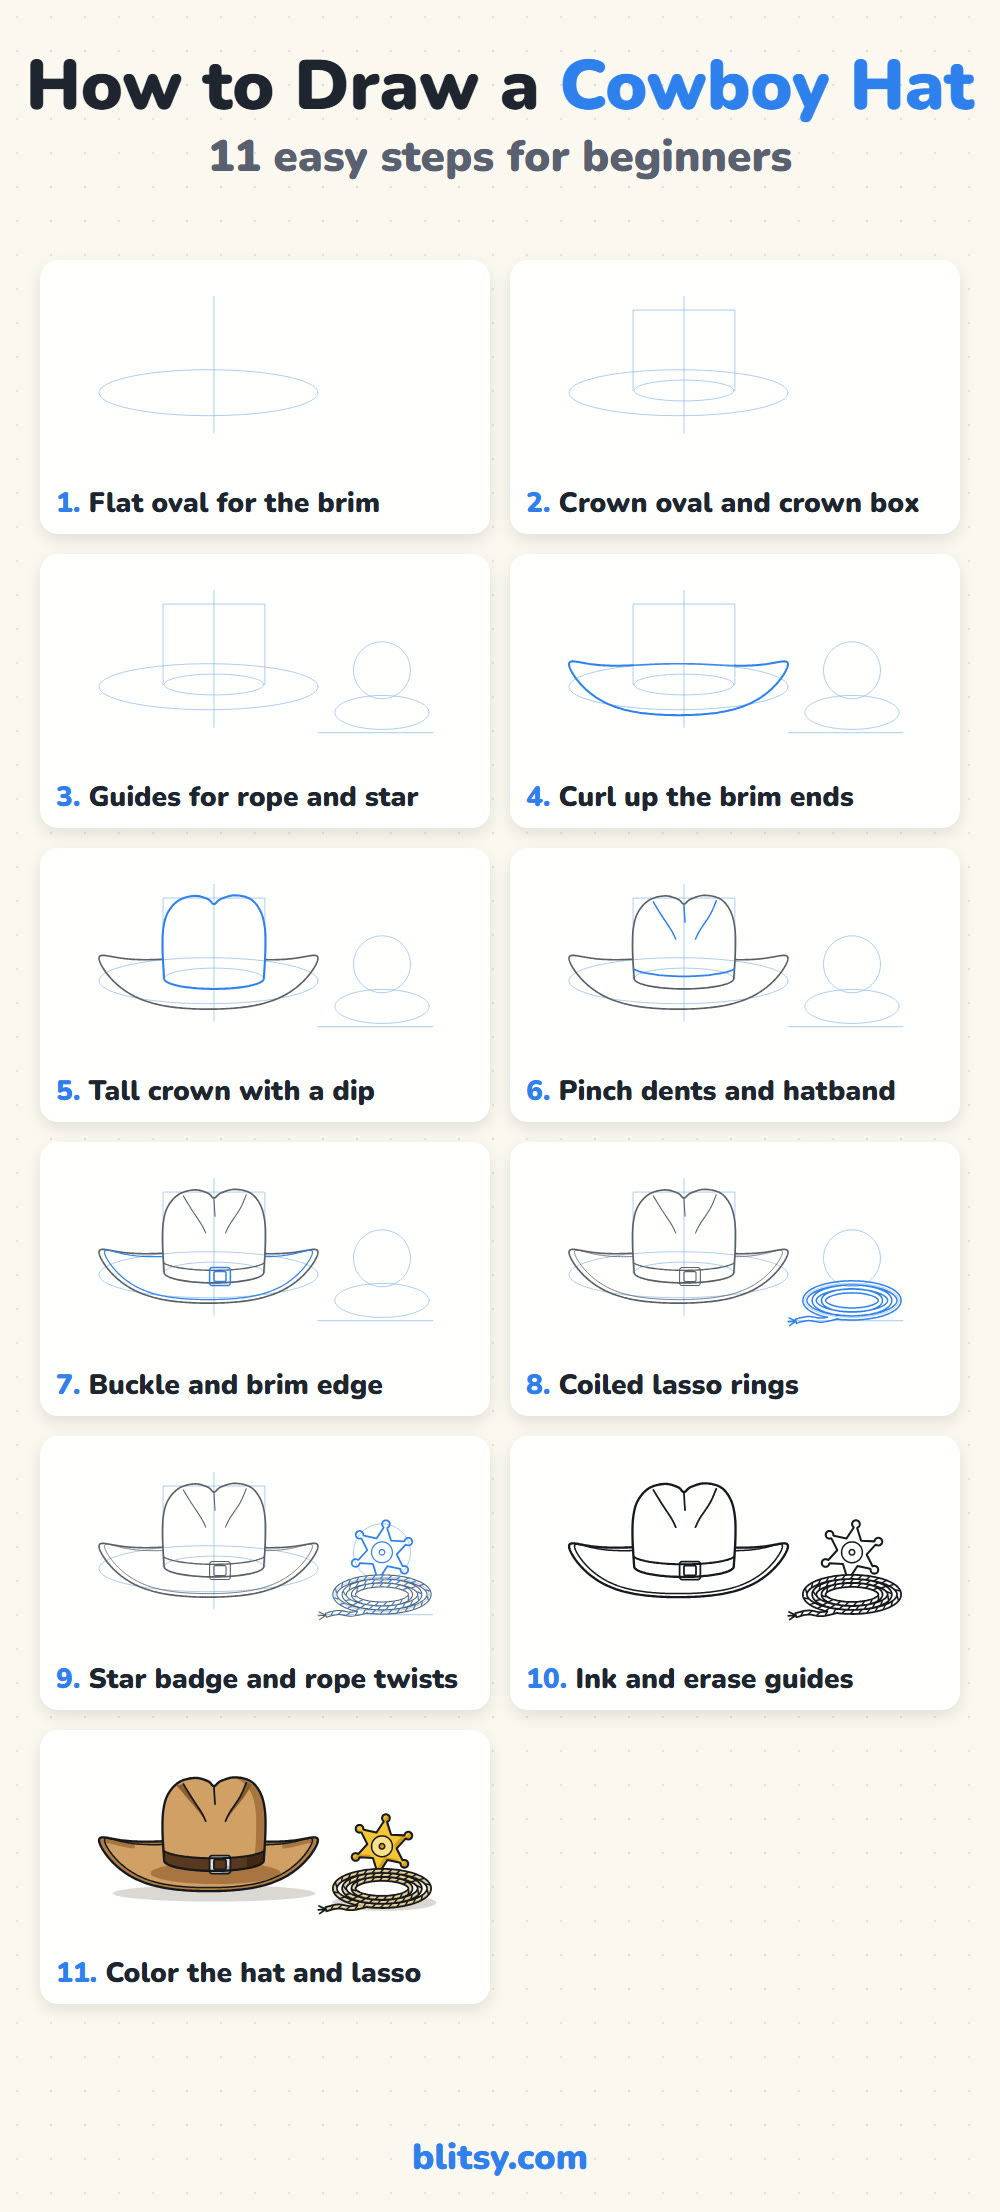
Think of each hat picture as a progress report: bright blue marks what you add in that step, and gray is the work you've already done. Pale blue ovals, boxes and lines are guides; draw them softly, because they get erased before you color.
Quick overview
⏱️ Time: roughly 30 to 40 minutes, about 15 for the hat on its own
🎯 Level: easy; the rope twists take patience, so younger kids can leave them plain
✏️ Steps: 11
🤠 You'll draw: a cowboy hat with a curled brim, a coiled lasso and a star badge
Supplies Waiting on the Ranch Table
- A pencil that sketches lightly (HB or 2B works well)
- A kneaded or soft white eraser
- A black fineliner or marker for inking
- Colored pencils or markers: tan, light brown, dark brown, beige, yellow and gray
- A sheet of paper turned sideways, since the hat is wide
No compass or ruler needed here; every oval in this drawing is meant to be done freehand.
How to Draw a Cowboy Hat Step by Step
Step 1: Sketch a flat oval for the brim
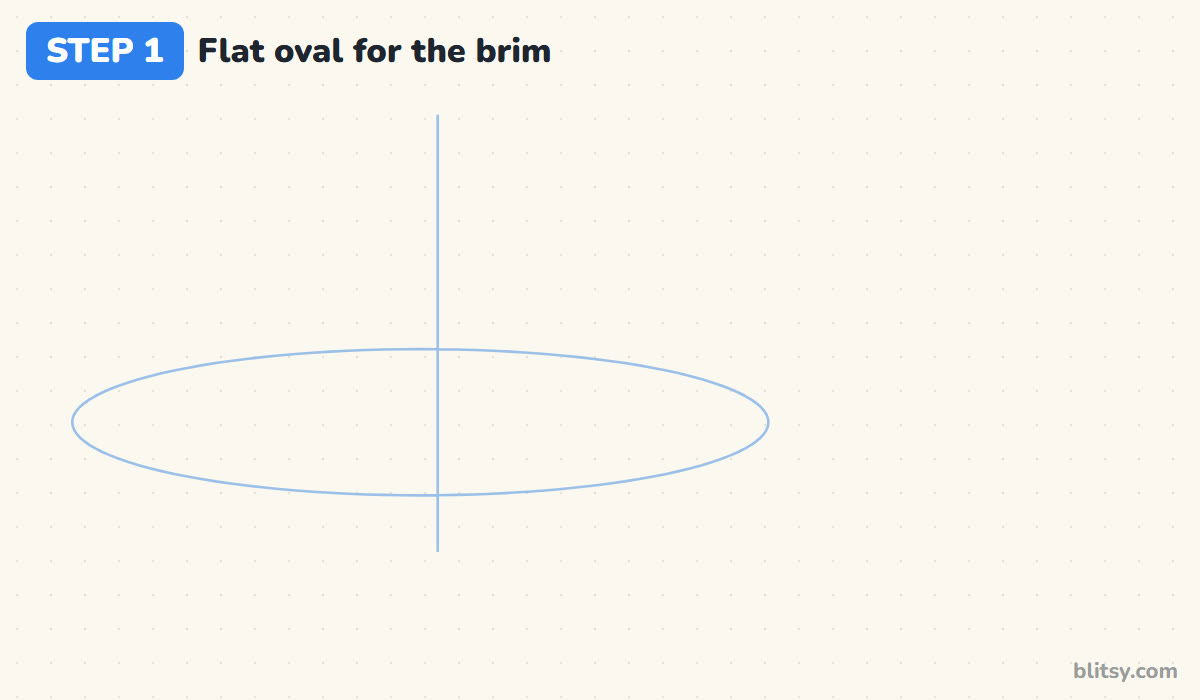
Draw a long, flat oval across the left two thirds of the page, about four times wider than it is tall. Then add a light vertical line through its middle. That oval is the brim before it curls, and the line keeps the crown centred.
💡 Tip: Swing your whole arm for the oval instead of just your wrist; the curve stays smoother.
Step 2: Add the crown oval and a crown box
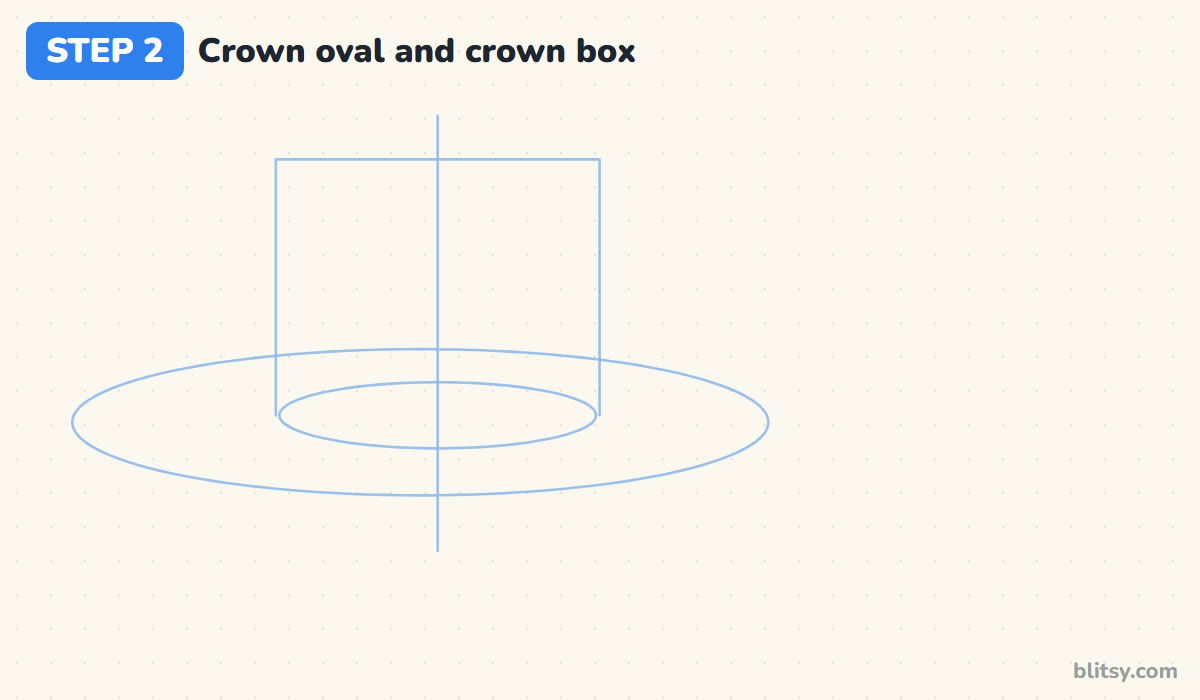
Inside the brim oval, a little above its centre, sketch a smaller oval about half as wide. This is where the crown sits on the brim. From its two ends, draw straight lines up and join them with a flat top to make a tall box. I make the box a bit taller than it is wide, since cowboy hats have high crowns.
💡 Tip: Keep the small oval slightly toward the back of the brim, so there's more brim in front of the hat than behind it.
Step 3: Place guides for the rope and the star
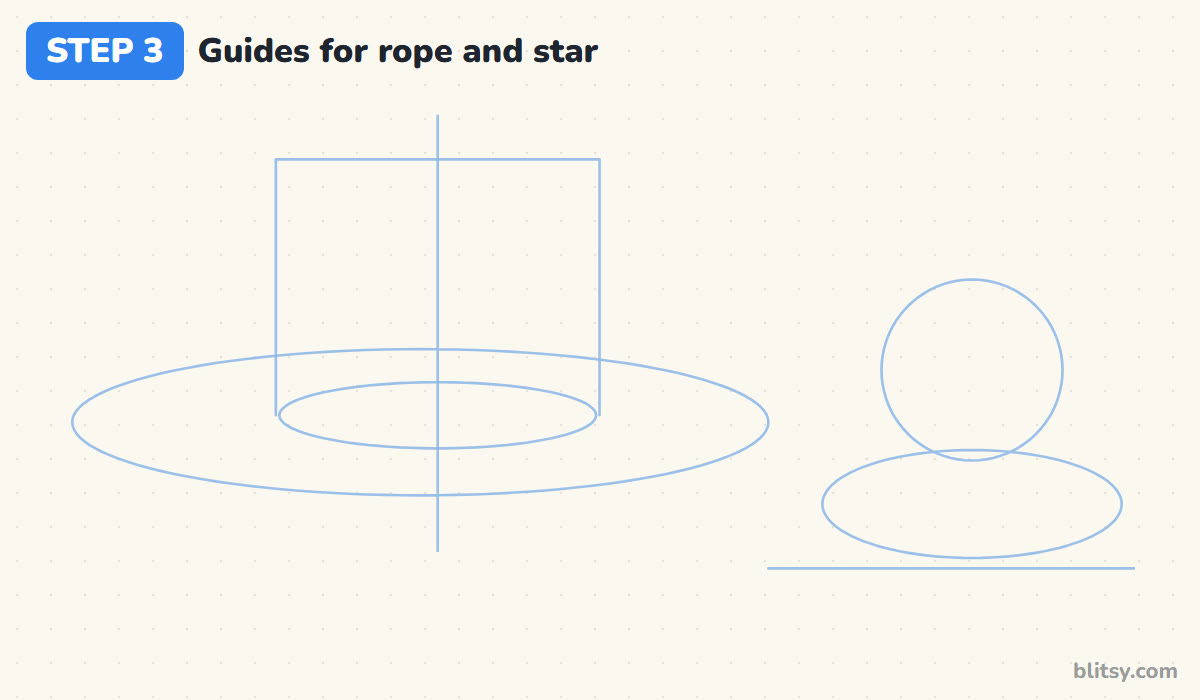
On the right side of the page, near the bottom, draw a wide oval for the coiled rope and a flat ground line under it. Above that oval, sketch a circle that dips into its back edge. The star badge will stand there, tucked behind the coil.


💡 Tip: Leave a clear gap between the brim and the rope oval so the two objects don't crowd each other.
Step 4: Curl up both ends of the brim
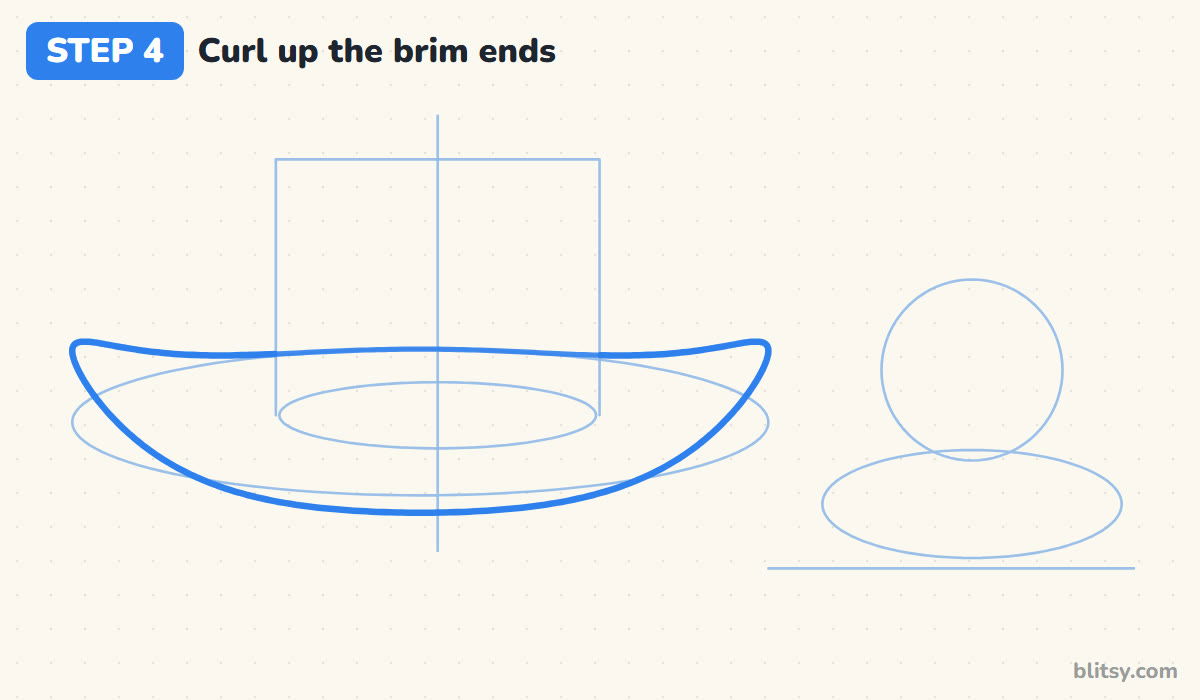
This is the step that makes it a cowboy hat. Follow the front of the flat oval, but let your line dip slightly lower in the middle. As you reach each end, lift the line well above the oval into a rounded tip, then come back along the top edge. Both tips should rise to the same height.
💡 Tip: Mark the height of both tips with a small dot first, then draw toward the dots.
Step 5: Shape the tall crown with a dip on top
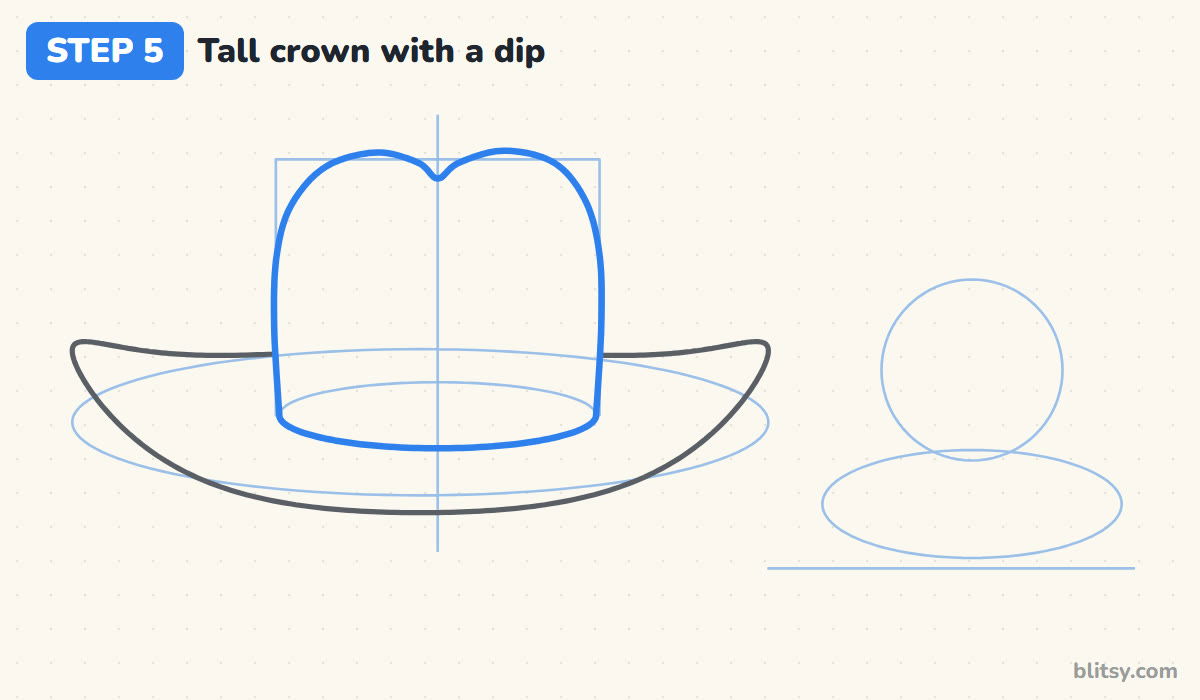
Trace up the sides of the crown box, keeping them almost straight. At the top, round off both corners into soft shoulders and pull the middle down into a small dip. Finish the crown with the front half of the little oval at the bottom. Where the crown covers the back of the brim, erase that bit of brim line.
💡 Tip: Make the dip small; a deep notch reads as a heart or a pair of ears.
Step 6: Pinch in the dents and add the hatband
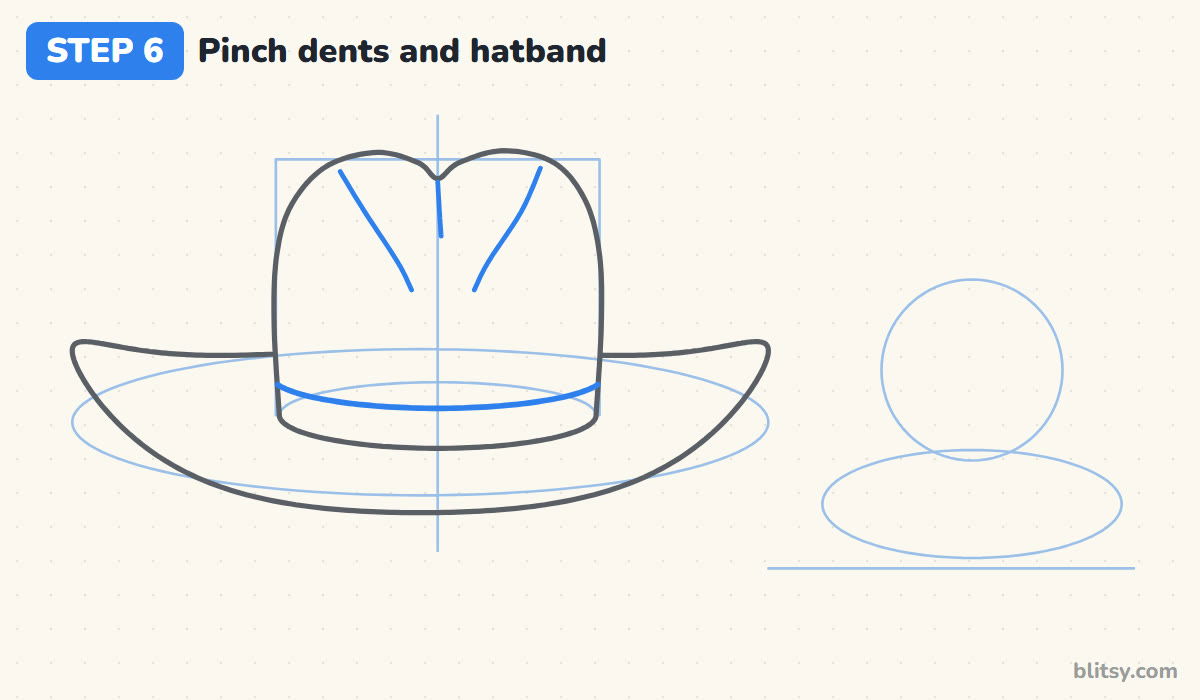
From near each top shoulder, draw a curved line that slants down toward the middle of the crown. Those are the side dents where fingers pinch the felt. Add a short straight line down from the dip for the centre crease. Then draw a curve parallel to the bottom of the crown, a finger's width above it, to form the band.
💡 Tip: Stop the dent lines halfway down the crown; if they reach the band, the hat looks crumpled.
Step 7: Draw the buckle and the brim edge
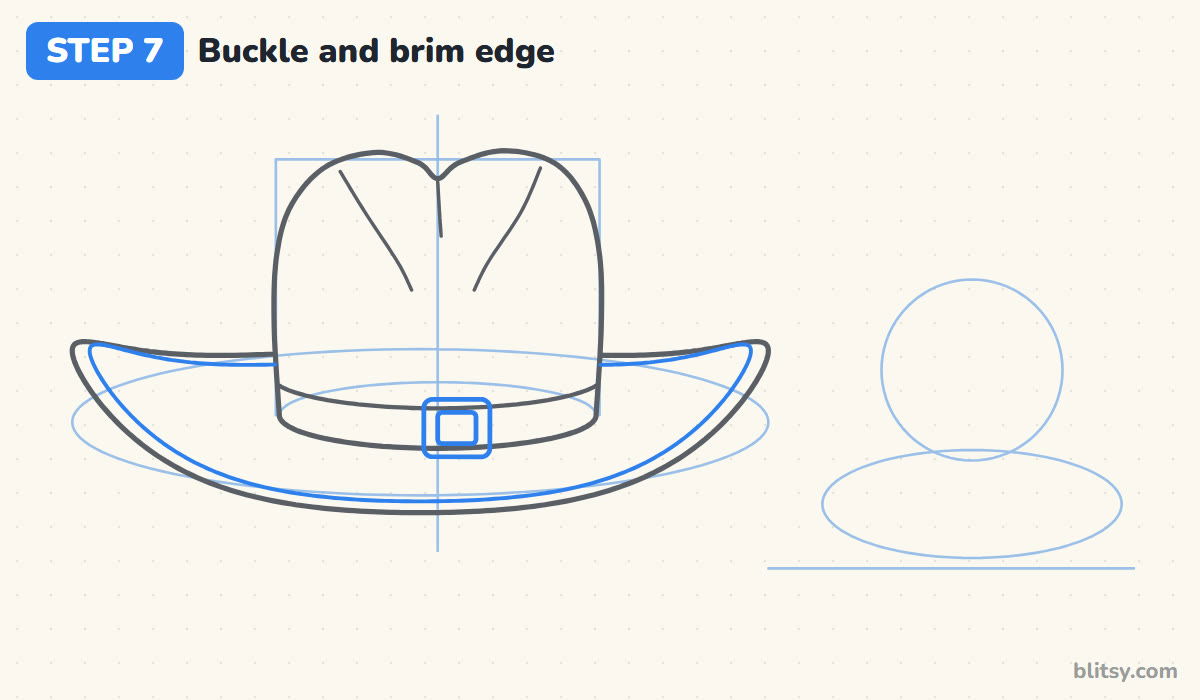
Just right of the centre line, draw a small rounded rectangle on the band with a smaller one inside it. That is the buckle. Next, run a second line all around the brim, just inside its edge. It shows the stitched binding and makes the brim look like thick felt instead of paper.



💡 Tip: Keep the binding line the same distance from the edge the whole way, even around the curled tips.
Step 8: Draw the coiled lasso rings
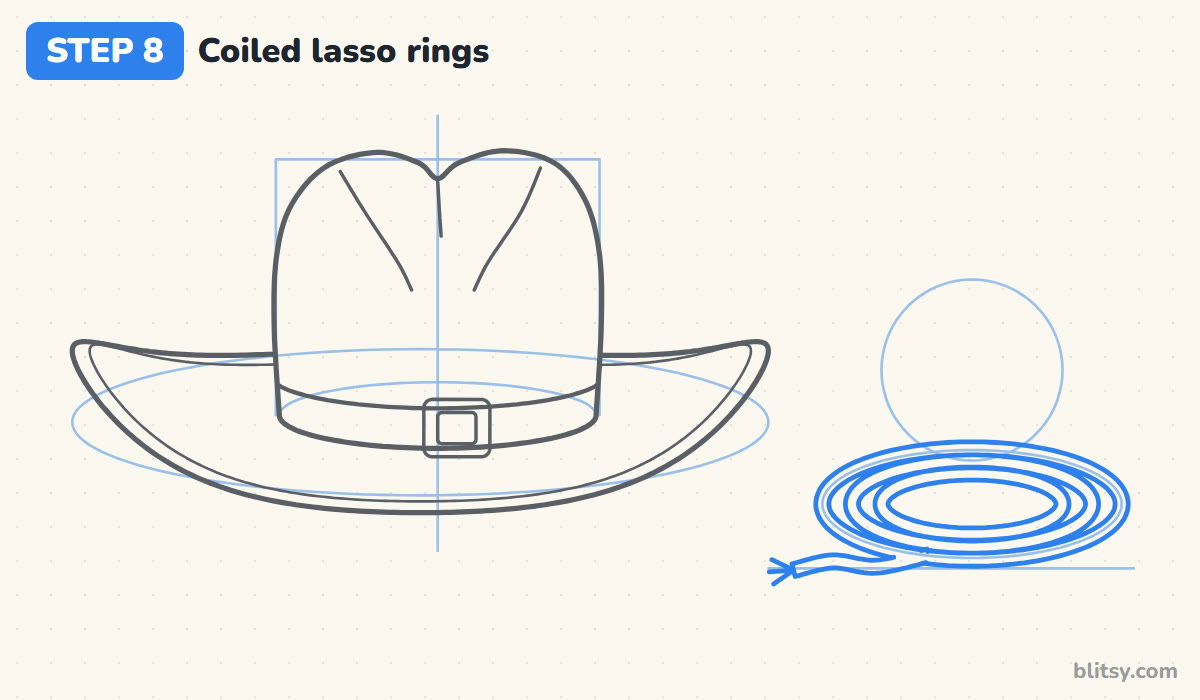
Inside the rope guide, draw three rings, each one smaller than the last, with a small gap between them. Each ring is a thin band with two lines, not one. From the front of the outer ring, pull a loose rope end toward the left and finish it with a few short frayed lines.
💡 Tip: Draw the outer ring first and use it to size the other two.
Step 9: Add the star badge and rope twists
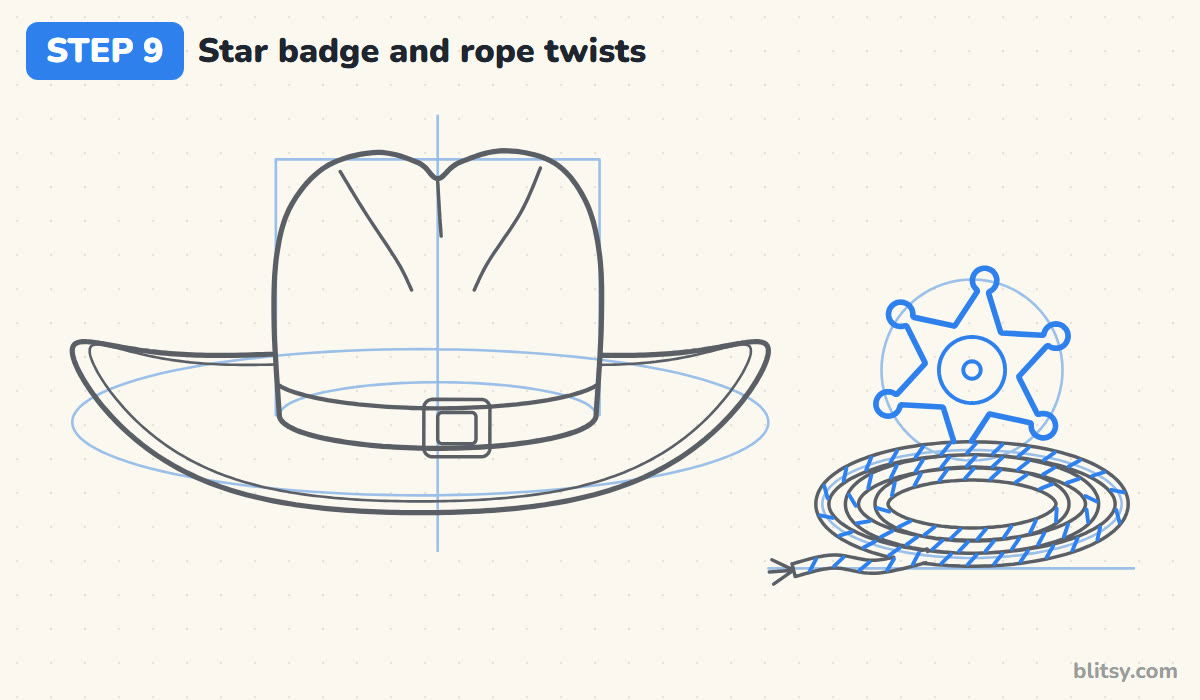
Inside the circle, draw a six-pointed star with a small ball on every tip. Its lower point disappears behind the rope, so stop the outline where it meets the coil. Put a circle and a dot in the centre. Then cover every rope band with short slanted marks, all leaning the same way, to show the twist.
💡 Tip: Draw the star as two triangles first, one pointing up and one pointing down, then trace around the outside.
Step 10: Ink the lines and erase the guides
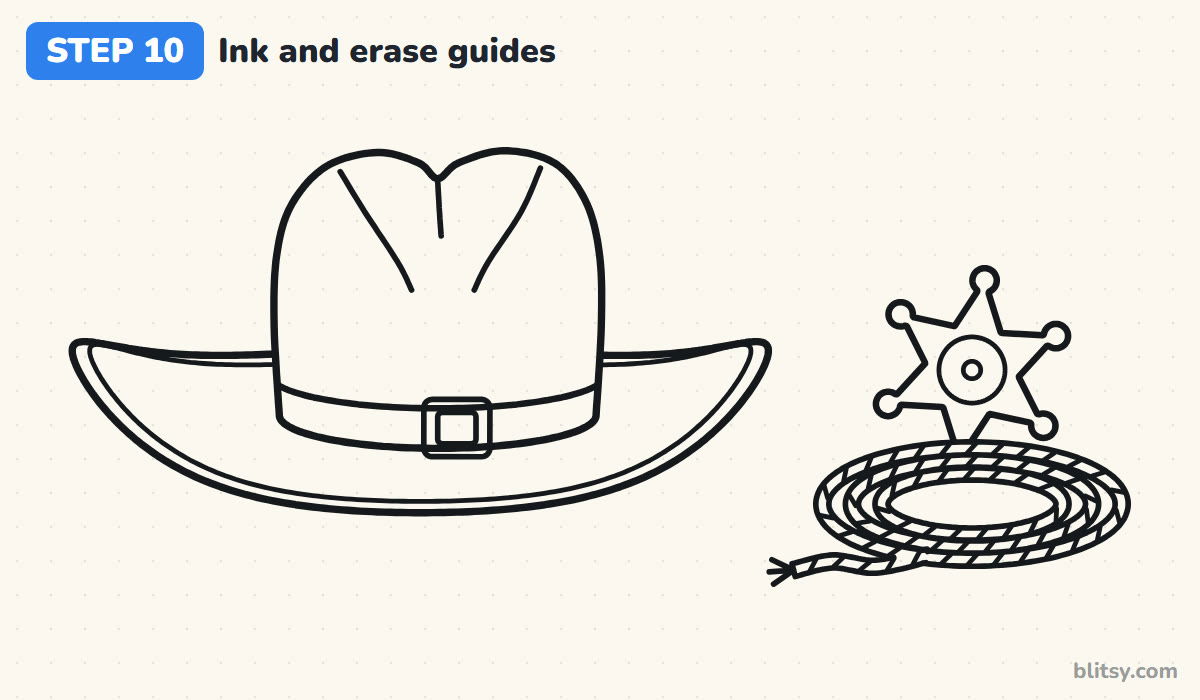
Go over every keeper line with the black pen. I start with the big brim curve while my hand is fresh, then do the crown, the buckle and the rope. Once the ink is dry, erase all the ovals, the box, the centre line and the ground line.
💡 Tip: Ink the rope twists last; they're tiny, and a smudge there is easy to hide.
Step 11: Color the hat, the rope and the badge
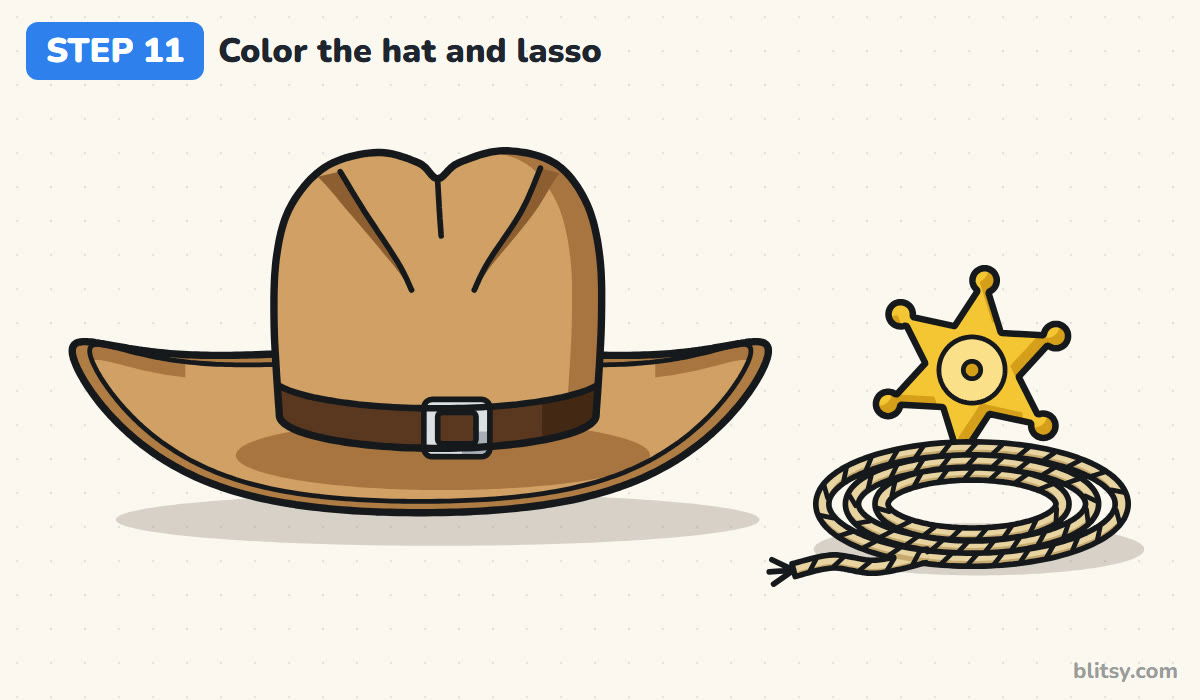
Fill the hat with tan, then use light brown on the right side of the crown, inside the dents, under the crown on the brim and inside the curled tips. The band is dark brown and the buckle silver gray. Color the rope beige with a darker beige along the bottom of each ring, and the star bright yellow with a deeper gold on one side.


💡 Tip: Shade the crown from the edge inward with light pressure, so the dark part fades into the tan.
Where Cowboy Hat Sketches Lose Their Shape
- A brim drawn as a flat ring. Without the lift at the ends it reads as a sun hat. Raise both tips above the guide oval.
- Tips that curl to different heights. One high tip and one low tip makes the hat look tilted. Dot both heights before you draw.
- A crown sitting in the middle of the brim. Push it slightly back so more brim shows in front, like a real hat seen from above.
- Brim lines showing through the crown. The crown is in front, so the back edge of the brim stops on each side of it.
- Rope drawn as a single line. A lasso has thickness. Give each ring two edges and the twists will have room.
Dress Up Your Hat With New Colors and Trims
Once the basic hat feels easy, I like to change the felt color: black with a silver band looks like a movie villain, and white with a turquoise band feels like a rodeo queen. You can also stick a feather in the band, swap the buckle for a round concho, or set the hat on a fence post instead of the ground. The hat needs a rider, so the cowboy drawing tutorial is a natural next page, and the horse drawing tutorial gives that cowboy something to ride.
Printable Cowboy Hat Coloring Page and Step Guide PDF
The cowboy hat coloring page has the hat, the rope and the star in thick outlines, with a small colored example and a color key at the top so kids can copy the shades. The step-by-step guide PDF has all 11 steps with their tips, and it prints on Letter or A4 paper.
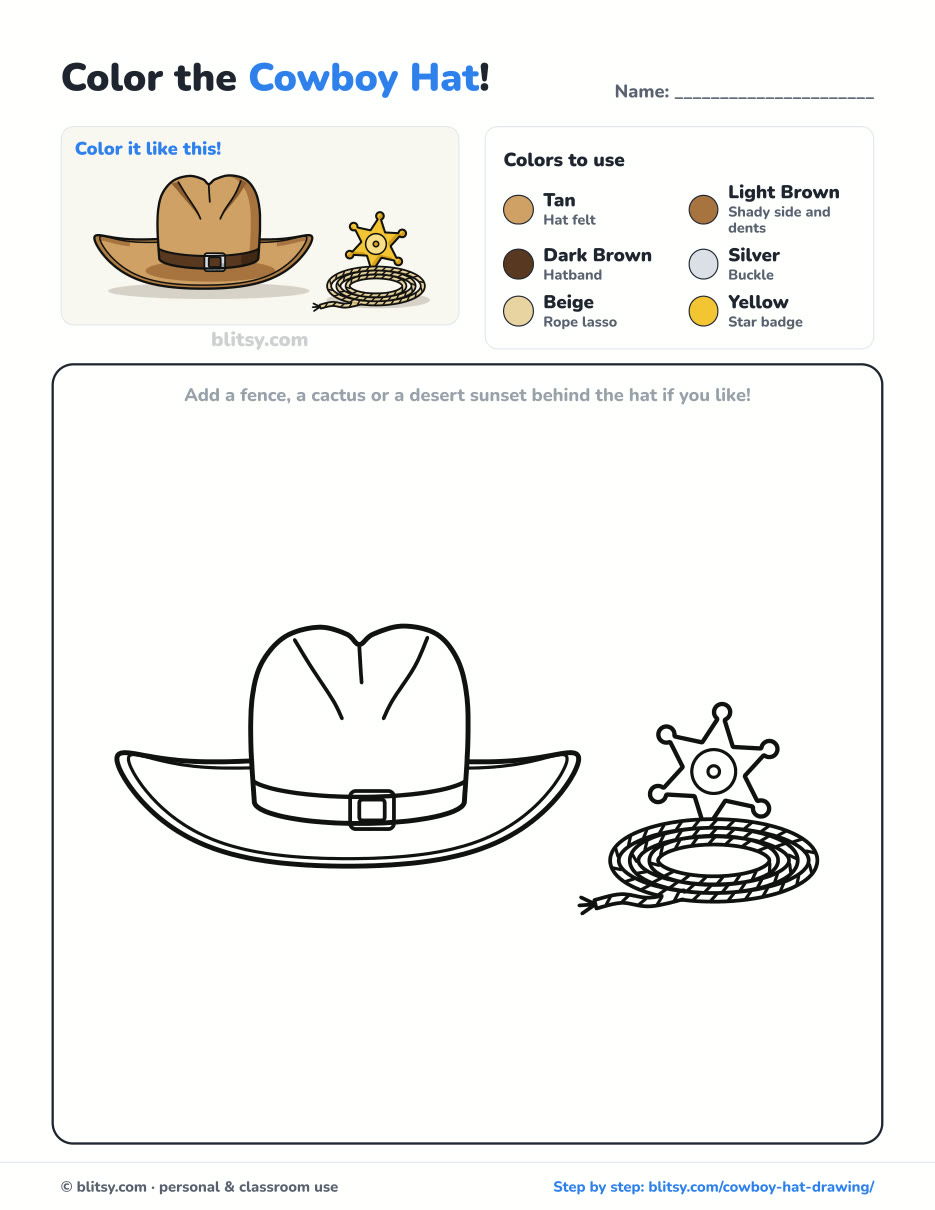
Black outlines with a colored example and the color names at the top. Ready to print and color.
⬇️ Download Coloring PageEvery step picture with its instructions and tips, to keep beside your paper while you draw.
⬇️ Download Drawing Guide📱 On a phone? Tap a download button, then open the file and choose Share → Save to Files or Print. On a computer, the PDF opens or saves straight to your Downloads folder.
The Whole Hat Lesson on One Pin
Cowboy Hat Drawing Questions Kids Ask
What is the easiest way to draw a cowboy hat?
Draw a flat oval for the brim, then a tall rounded box on top for the crown. Lift both ends of the brim into curls and put a small dip in the top of the crown.
How do you make the brim curl?
Draw the brim as a flat oval first. Then redraw it, letting the line rise above the oval at both ends and dip a little at the front.
Is a cowboy hat hard to draw for kids?
Not really. Kids around six or seven can manage the hat. The rope twists are fiddly, so small hands can leave the rope as plain rings.
What colors should a cowboy hat be?
Tan or light brown felt is the classic look, with a darker brown band. Black, white and gray hats are common too.
One flat oval, two lifted tips and a pinched crown: that's the whole trick, and your hat is eleven steps away. 🤠
Related posts:
 How to Draw a Cowboy Step by Step (Easy Cartoon Kid)
 How to Draw a Guitar Step by Step (Easy Acoustic Sketch)
 How to Draw Luffy Step by Step (Easy Straw Hat Guide)
 How to Draw a Whale Step by Step (Easy for Beginners)
 How to Draw Lungs Step by Step (Easy Science Diagram)
 How to Draw a Pineapple Step by Step (Easy Crown and Slice)
 How to Draw Iron Man Step by Step (Easy Chibi for Kids)
 How to Draw a Dress Step by Step (Easy Party Dress)
 How to Draw a Chicken Step by Step (Easy for Beginners)
 How to Draw a UFO Step by Step (Cute Alien Saucer)
 How to Draw Flames Step by Step (Easy Campfire Drawing)
 How to Draw a Crow Step by Step (Easy for Beginners)

