
Fans of a musician often want to draw that person, and the hardest part is usually knowing where the face starts. Here I'll show you how to draw Juice WRLD step by step as a simple, friendly tribute portrait: short twisted locks, a calm face, a hoodie with the hood down and a little 999 pendant on a chain. It's built on guide lines, so you don't need any portrait practice before you begin.
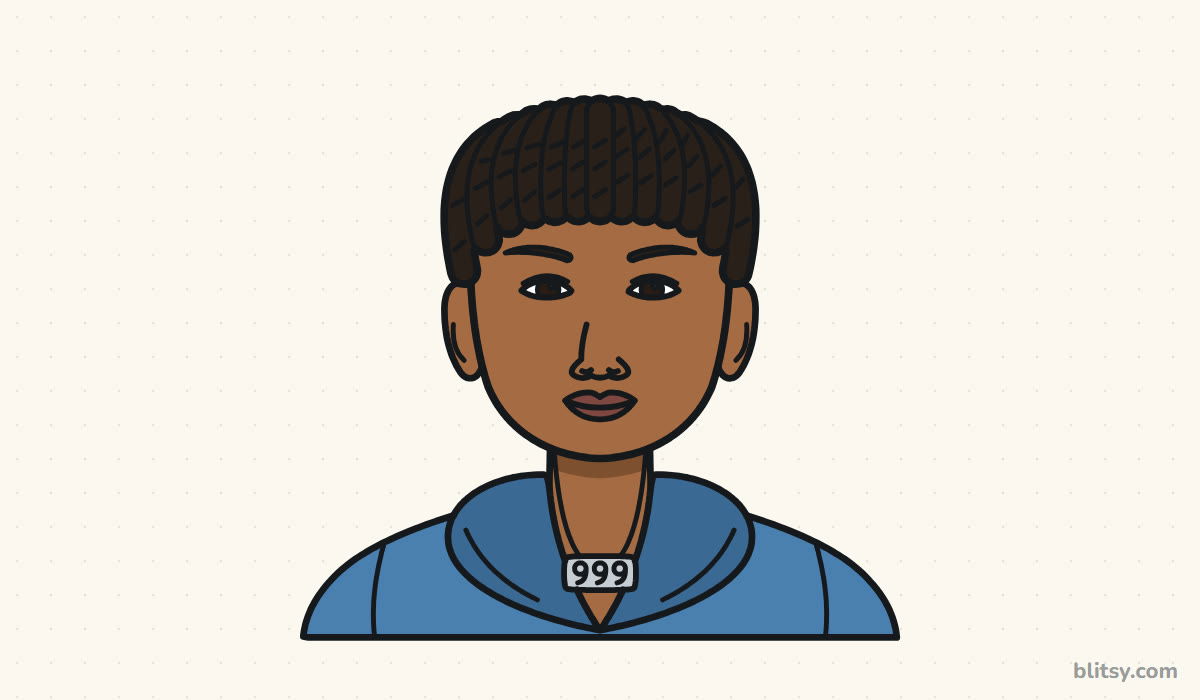
Blue marks the lines you add in a given step. Earlier work turns gray, and the faint guide lines disappear once the drawing is inked.
Quick overview
⏱️ Time: around 40 minutes, then 15 for coloring
🎯 Level: easy to medium, a good fit for ages 10 and up
✏️ Steps: 12
🎤 You'll draw: a head-and-shoulders tribute portrait of Juice WRLD in a hoodie with a 999 pendant
Simple Tools for Sketching Juice WRLD
- A regular HB pencil for the light guides
- An eraser, preferably a soft or kneaded one
- A black fineliner or a fine marker
- Colored pencils: medium brown, dark brown, black, two blues, gray or silver, and a rose brown
- Smooth drawing paper or printer paper
Nothing fancy is needed here; a gray pencil works fine for the pendant if you don't own a silver one.
How to Draw Juice WRLD Step by Step
Step 1: Sketch a head oval and a center line
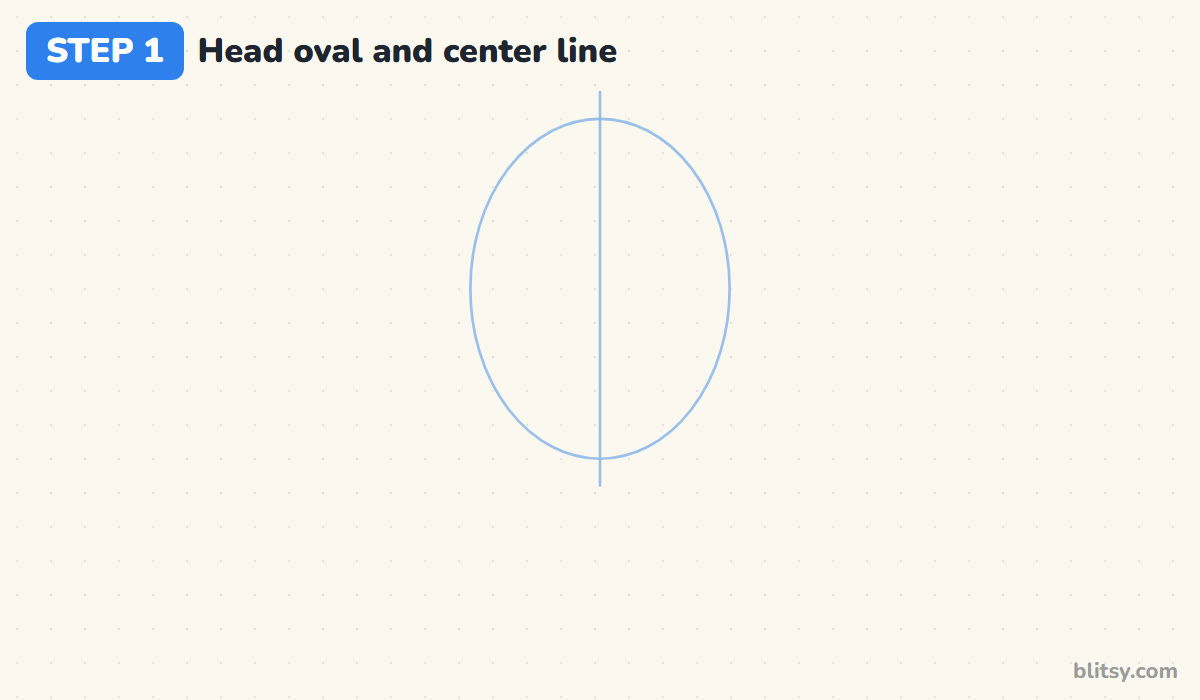
Draw an egg shape that's a little taller than it is wide, with the narrower end at the bottom for the chin. Keep the pressure very light. Run a straight vertical line through the middle so both halves of the face stay even later on.
💡 Tip: Rotate the paper so your hand curves naturally around the oval instead of fighting it.
Step 2: Add face lines and body guides
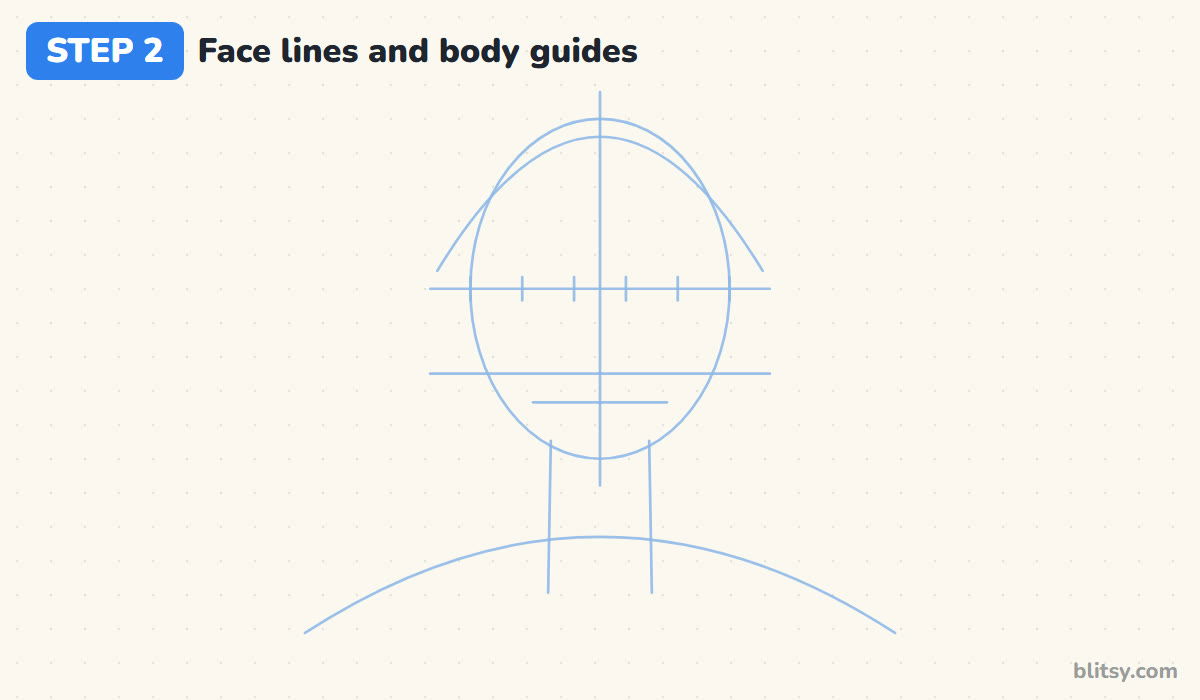
Place the eye line exactly halfway down the oval. Most people put it too high, which leaves a tiny forehead and a crowded face. The nose line goes halfway between the eye line and the chin, and a short mouth line sits a third of the way below that. Mark five equal spaces on the eye line, then add a dome over the head for the hair, two neck lines and a wide shoulder curve.
💡 Tip: That hair dome should rise clearly above the oval. Short twists still have height.
Step 3: Draw the face outline
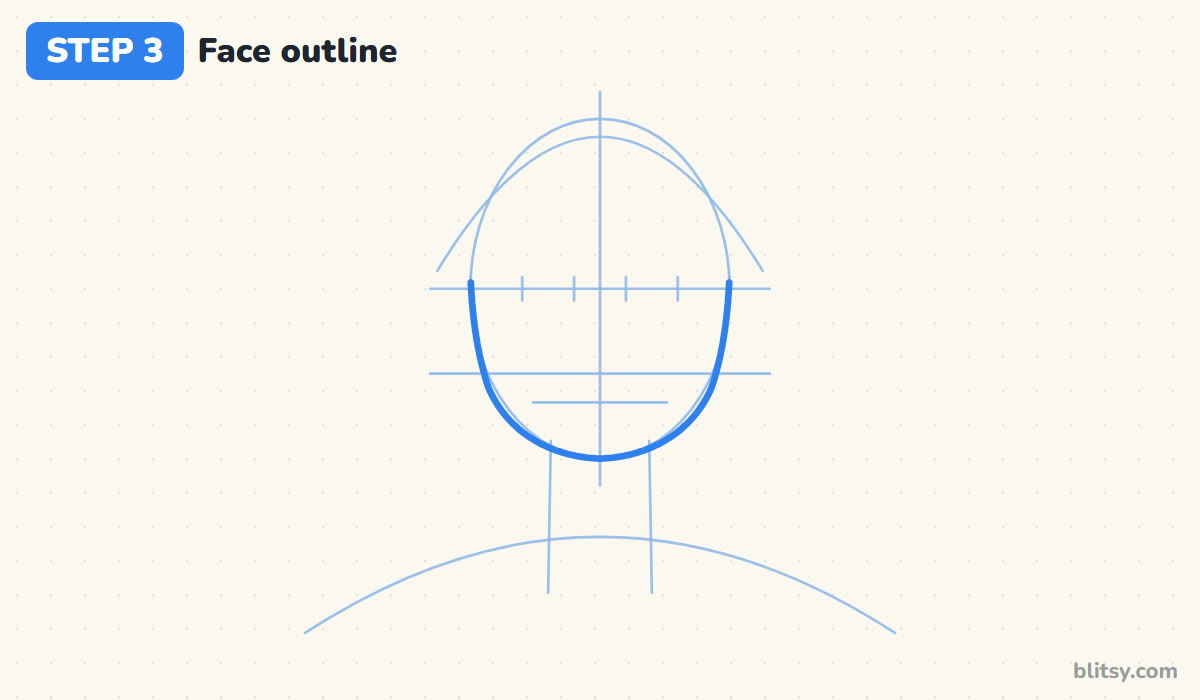
Starting at the eye line, trace the sides of the face down to a soft, rounded chin. I leave the top of the oval alone because the hair covers it. Keep the jaw gentle rather than square; a hard corner here makes the whole face look older and tense.




💡 Tip: Draw one side, then mirror it while watching the center line rather than your pencil tip.
Step 4: Add the ears and the neck
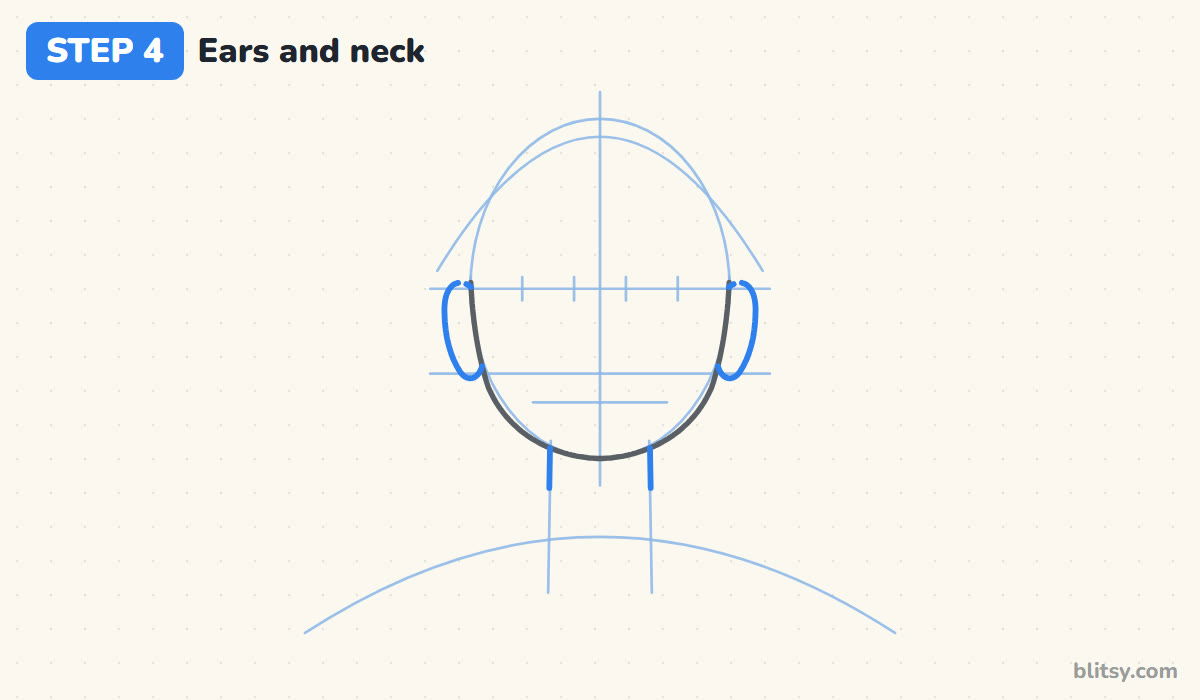
Each ear is a narrow C shape on the side of the head, starting at the eye line and ending at the nose line. Then go over the two neck guides from just under the jaw. The neck should be a bit narrower than the face, but not thin, or the head will look like it's balancing on a stick.
💡 Tip: Check the ear bottoms against the nose line. Uneven ears tilt the whole face.
Step 5: Outline the hair shape
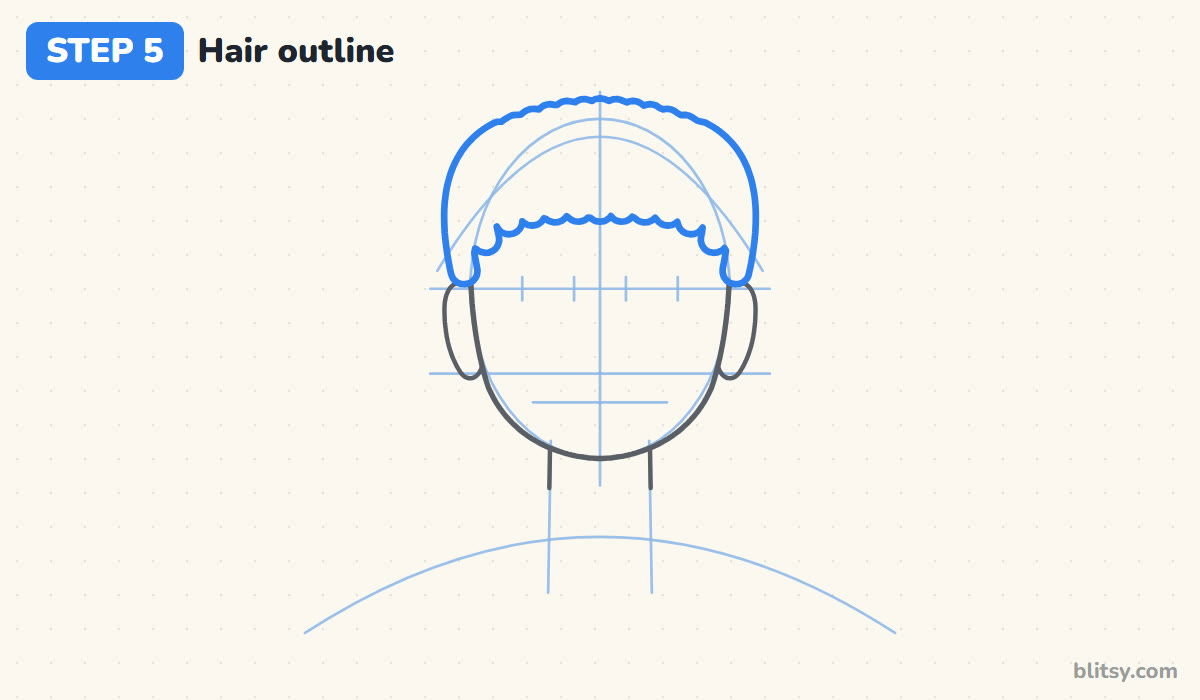
Follow the dome guide around the top of the head, keeping the outline slightly bumpy. Bring the sides down to the tops of the ears. Along the forehead, draw a row of small rounded scallops; each bump is the tip of one twist. The hairline should sit roughly a finger's width above where the brows will go.
💡 Tip: Bumps of slightly different sizes look more natural than a perfect row of scallops.
Step 6: Draw the short twisted locks
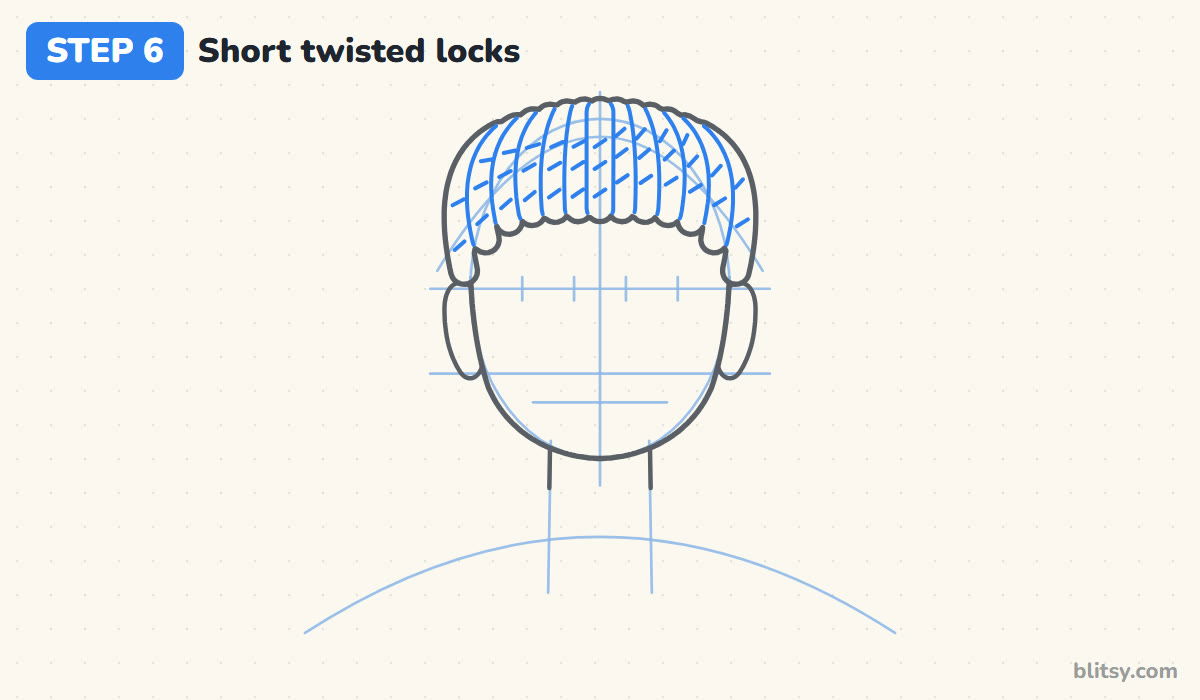
Juice WRLD was known for short twists or dreadlocks, so fill the hair shape with long, narrow locks. Each one starts near the top of the head and curves down to one of the scallops you drew. Side locks bend outward; middle ones hang almost straight. Then add a few small slanted marks along each lock so it reads as twisted, not smooth.
💡 Tip: Keep the slanted marks short. Long ones turn the hair into stripes.
Step 7: Shape the hoodie and the hood
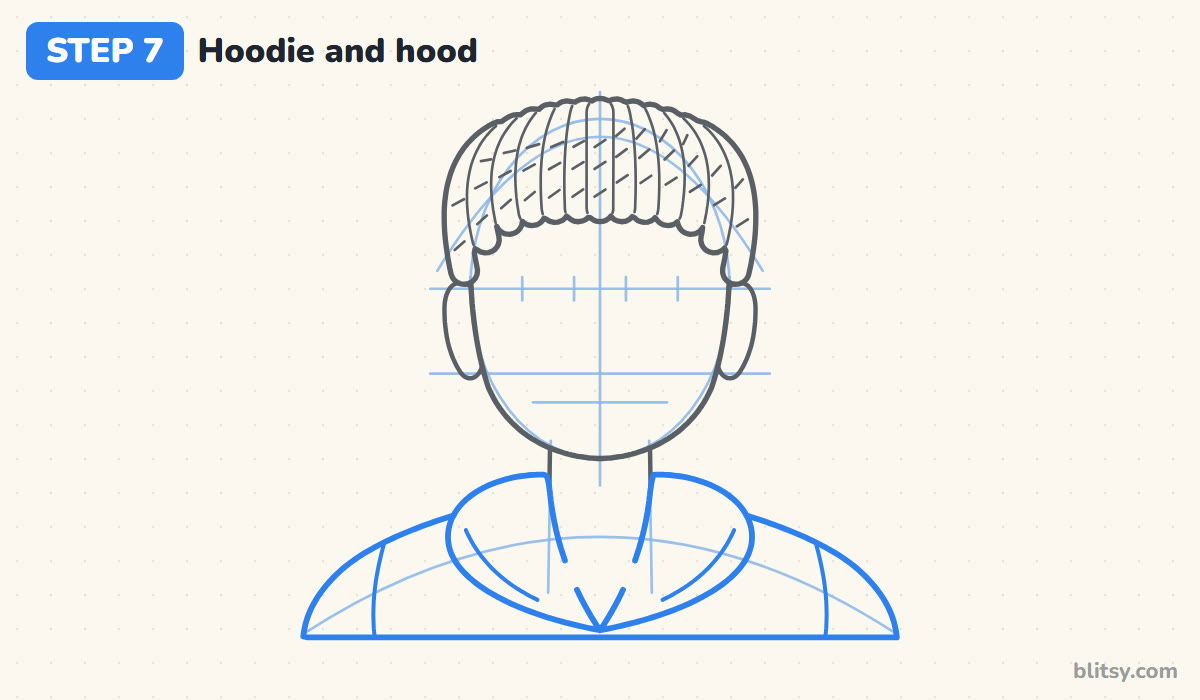
Draw sloping shoulders that run out from the neck and down past the shoulder guide, then cut the bottom off flat. The hood, pushed down, lies around the neck like a thick rounded collar, and both sides meet in a V low on the chest. Add a curved fold inside each side of the hood and one seam line on each shoulder.




💡 Tip: Make the hood band chunky. A thin one looks like a shirt collar instead of a hoodie.
Step 8: Add the chain and the 999 pendant
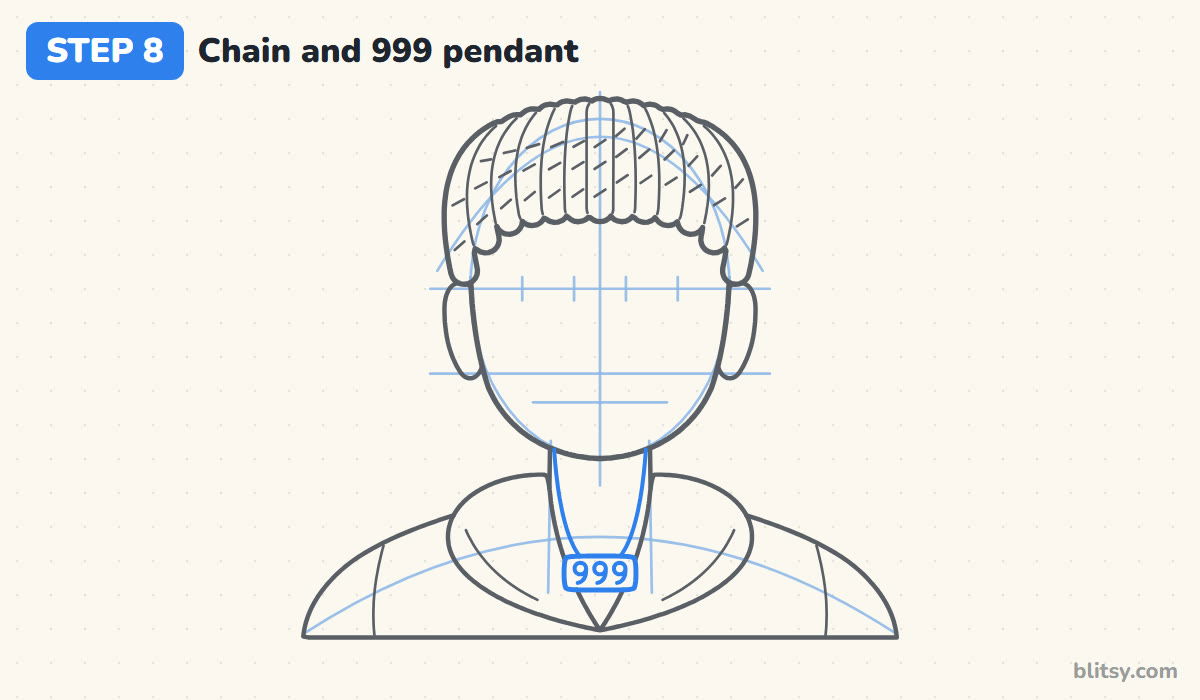
Two thin lines run from the sides of the neck down toward the V of the hood. Where they meet, draw a small rectangle with rounded corners. Inside it, write three 9s: a little circle with a short curved tail for each one. I keep the pendant small, about as wide as the mouth, so it doesn't steal attention from the face.
💡 Tip: Draw the middle 9 first, then one on each side. They space out much more evenly that way.
Step 9: Draw calm eyes and brows
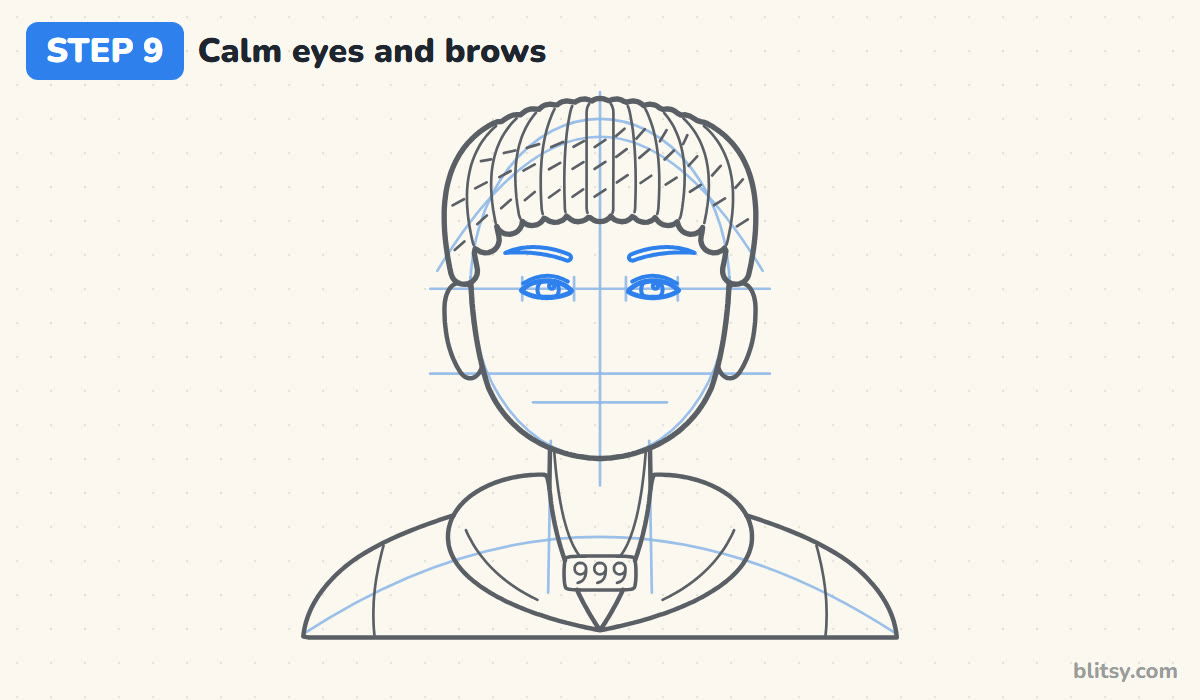
Use the second and fourth spaces on the eye line for two almond shapes. Tuck the round iris slightly under the upper lid and leave a tiny white highlight. A gentle lid curve above each eye gives a relaxed look. The brows are fairly straight and a bit thick, sitting just below the hairline.
💡 Tip: Put both highlights on the same side of the iris, or the eyes will seem to look in two directions.
Step 10: Add the nose, mouth and ear details
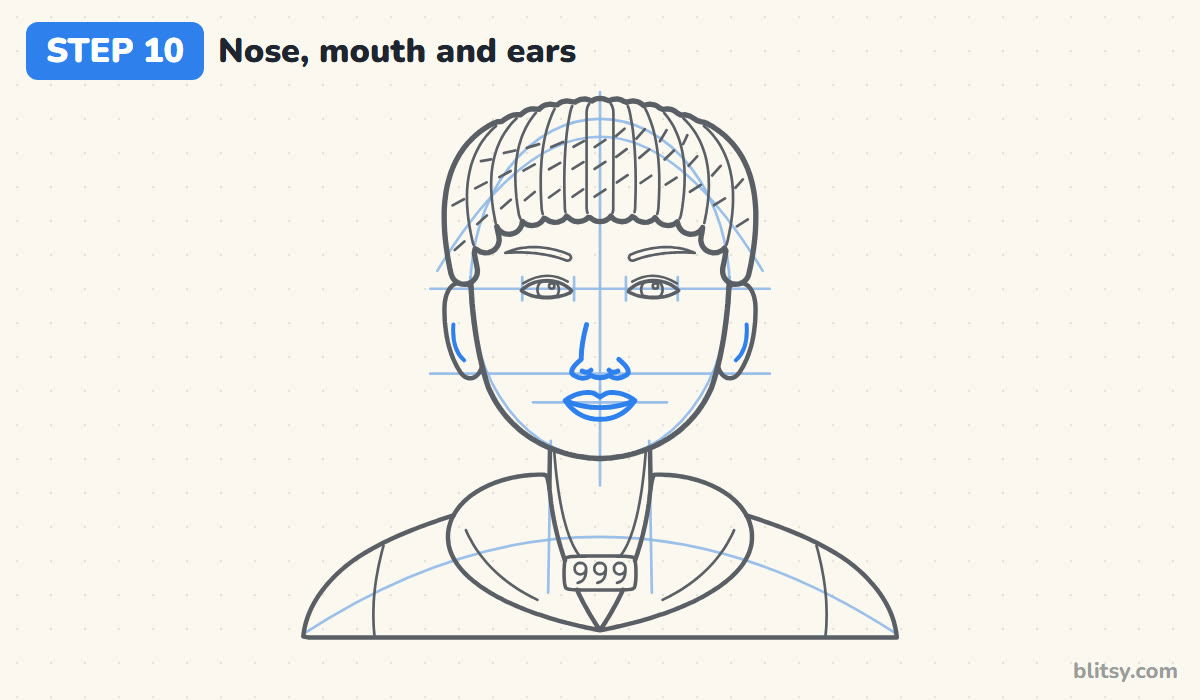
A short line from between the eyes hints at the bridge of the nose. On the nose line, draw a soft rounded base with two small nostrils. For the mouth, use a gently curved line between the lips, a thin upper lip and a slightly fuller lower one. Finish with a small inner curve in each ear.
💡 Tip: Keep the mouth no wider than the space between the centers of the eyes.
Step 11: Ink the drawing and erase the guides
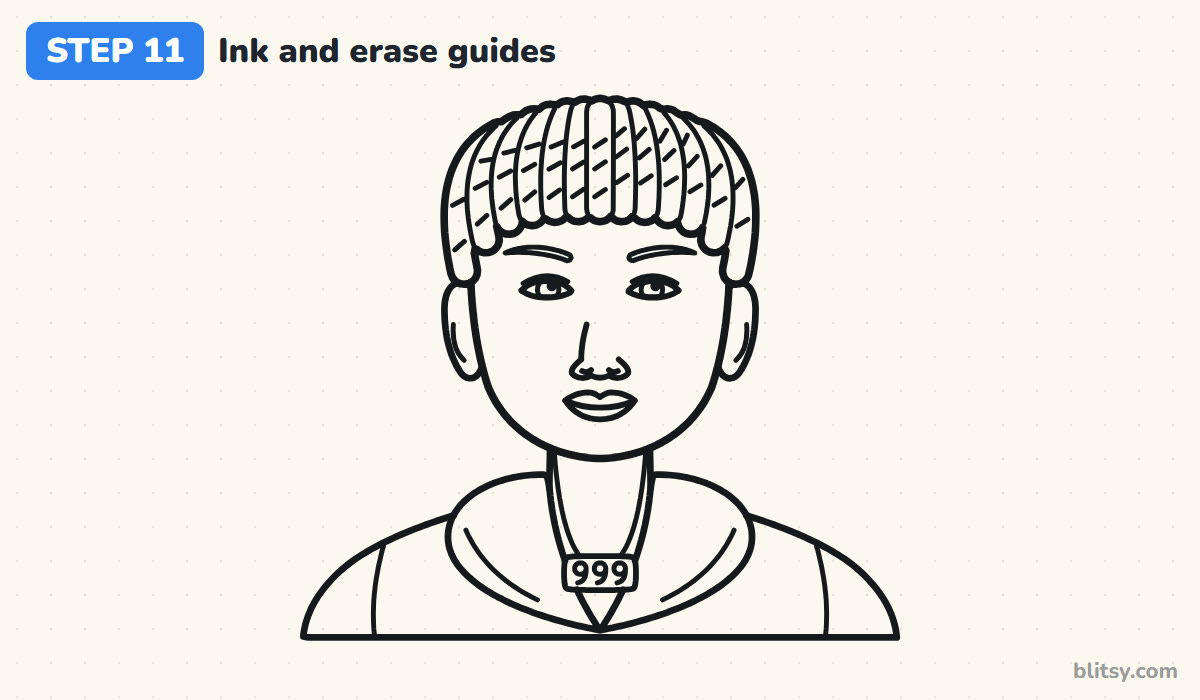
Trace every line you want to keep with a black fineliner. Slow down on the hair, since there are lots of short curves there and wobbly lines show. Let the ink dry for a minute before you erase the oval, the face lines, the hair dome and the shoulder curve.



💡 Tip: Ink the face before the hair, so your hand rests on blank paper while you do the fiddly parts.
Step 12: Color the portrait
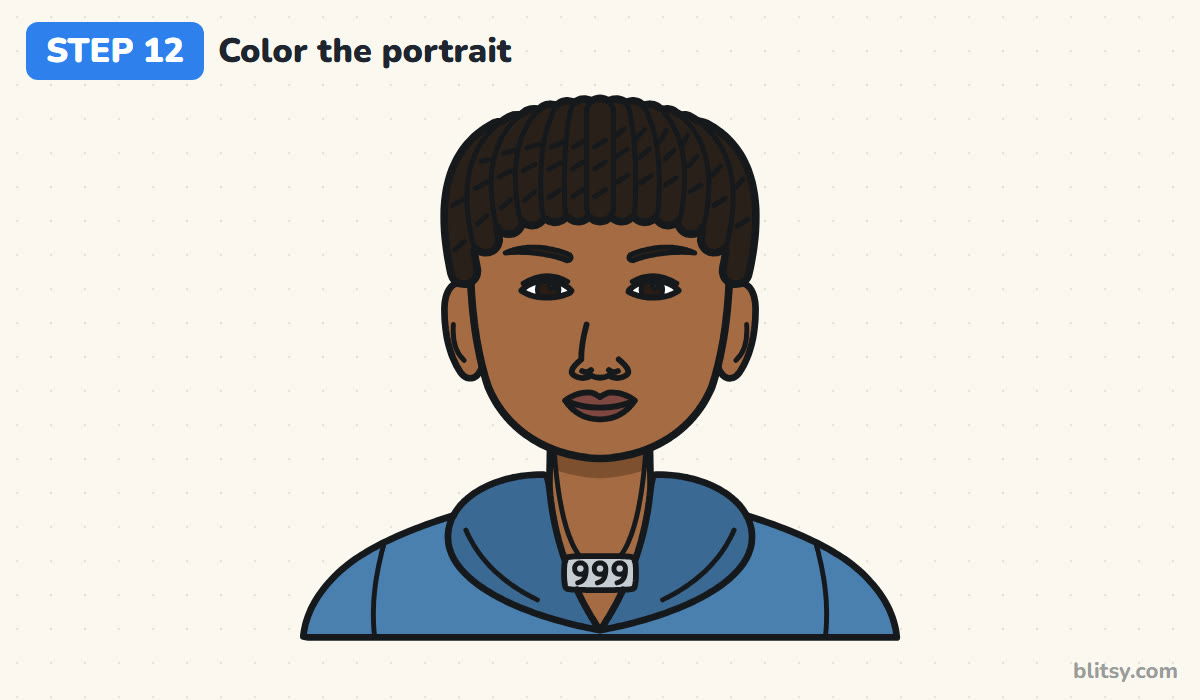
Use a warm medium brown for the face, ears and neck, and a darker brown under the chin. The hair and brows are black. I chose blue for the hoodie with a darker blue hood, but any color you like works. Shade the pendant gray or silver, and give the lips a soft rose brown.
💡 Tip: Color the skin in two light layers instead of one hard one, so the finish stays smooth.
Trouble Spots in a Juice WRLD Portrait
- Turning the face into a caricature. This is a respectful tribute, so keep the nose, lips and eyes normal sized and right on the guide lines.
- Hair drawn flat on the oval. The twists need some height above the head, or the forehead gets squashed.
- A huge pendant. Keep the 999 piece small; it's a detail, not the subject.
- Locks that all look the same. Let the side twists curve outward and vary the slanted marks a little.
- Dark skin color in one pass. Build it up lightly, so the shadow under the chin still shows.
Ideas for Your Own Juice WRLD Tribute
Juice WRLD was an American rapper and singer from the Chicago area, best known for songs like "Lucid Dreams". He often used the number 999, which he described as turning something negative into something positive, and fans still draw it on tributes today. He passed away in 2019 at just 21, and many people draw him to remember his music. My drawing is a simple cartoon tribute portrait for practice, not an exact likeness, so I kept his look general and friendly. You can change the hoodie color, add headphones around the neck, or write a favorite song title under the portrait. To get better at faces in general, try the male face drawing tutorial, and the boy drawing tutorial is good practice for simple figures in casual clothes.
Free Juice WRLD Coloring Page and a PDF Step Guide
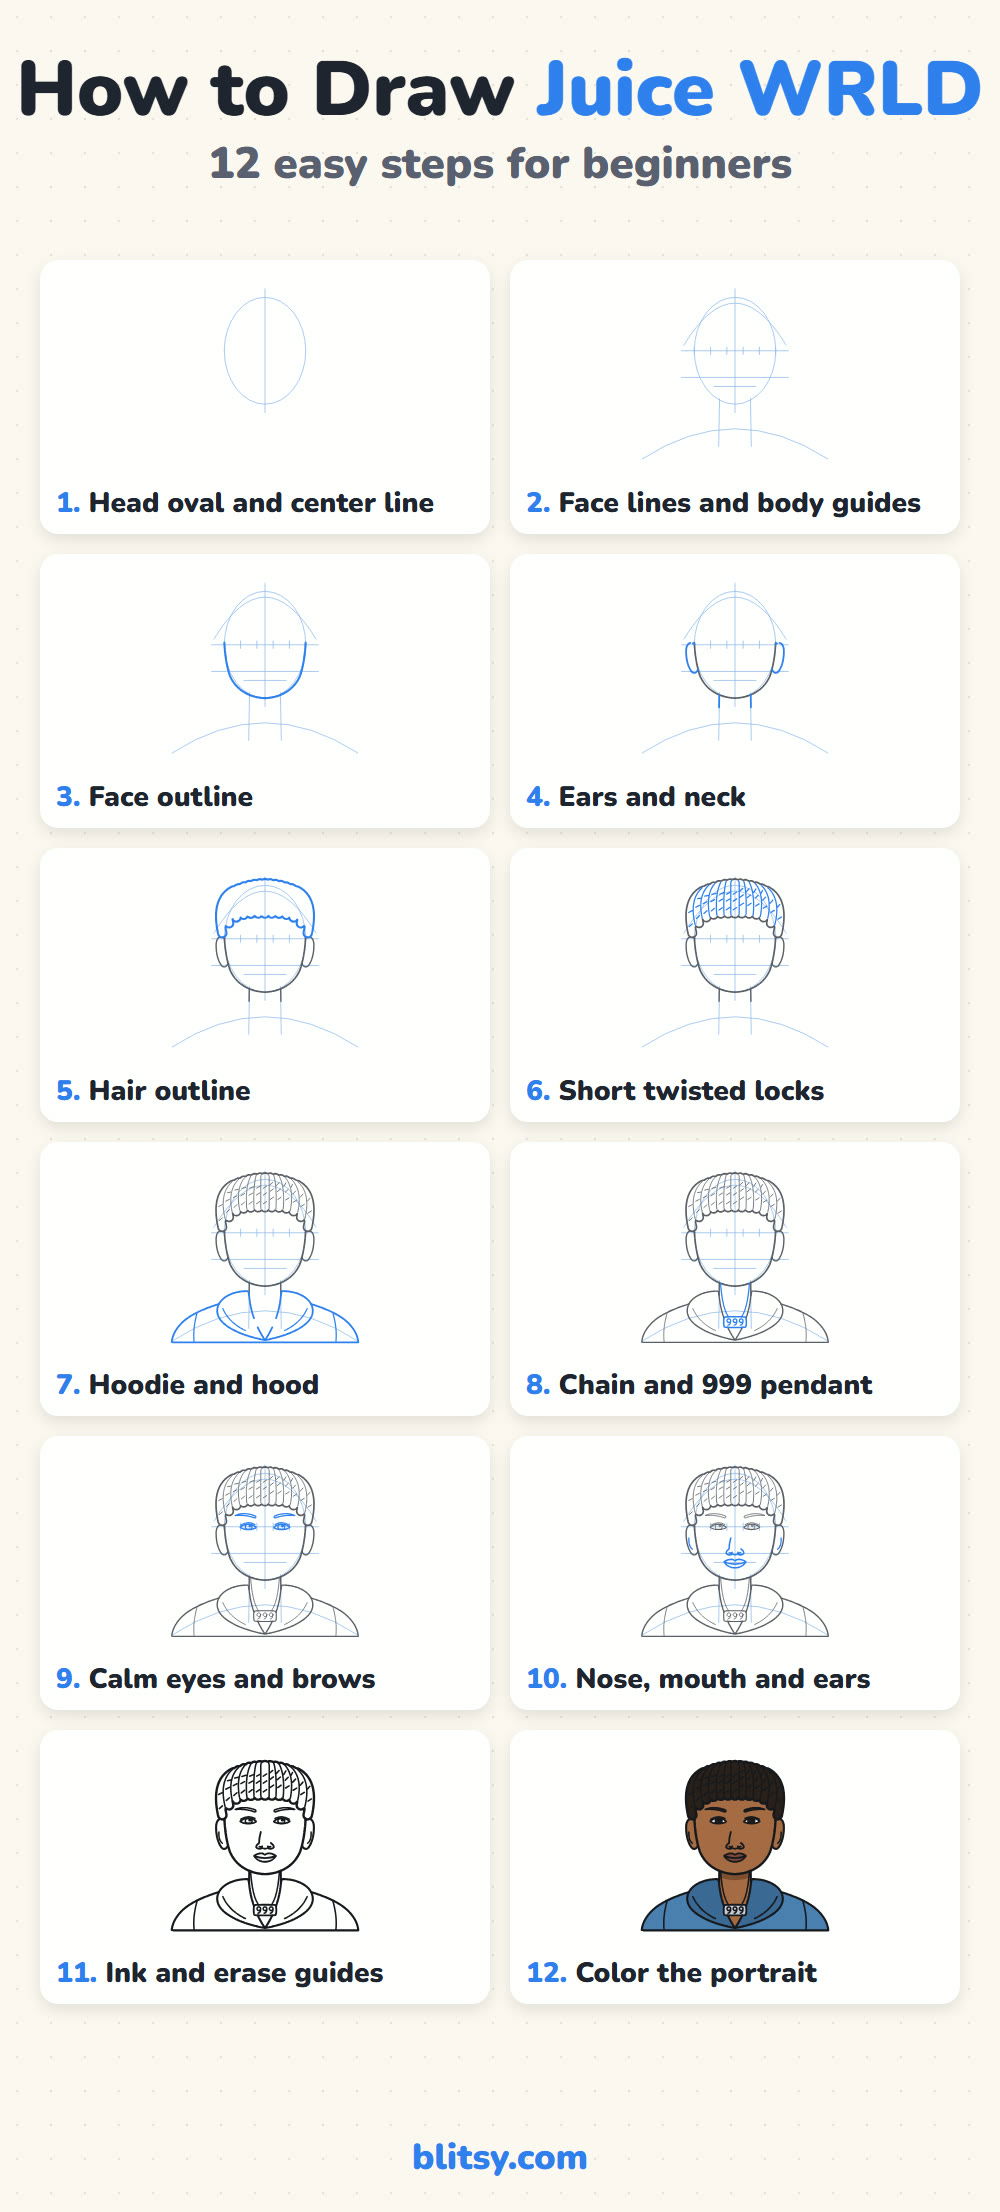
Prefer paper? Print the coloring page, which has the inked portrait, a small colored example and a key that names each color. The PDF guide holds all twelve steps on a few pages, so you can follow along away from a screen.
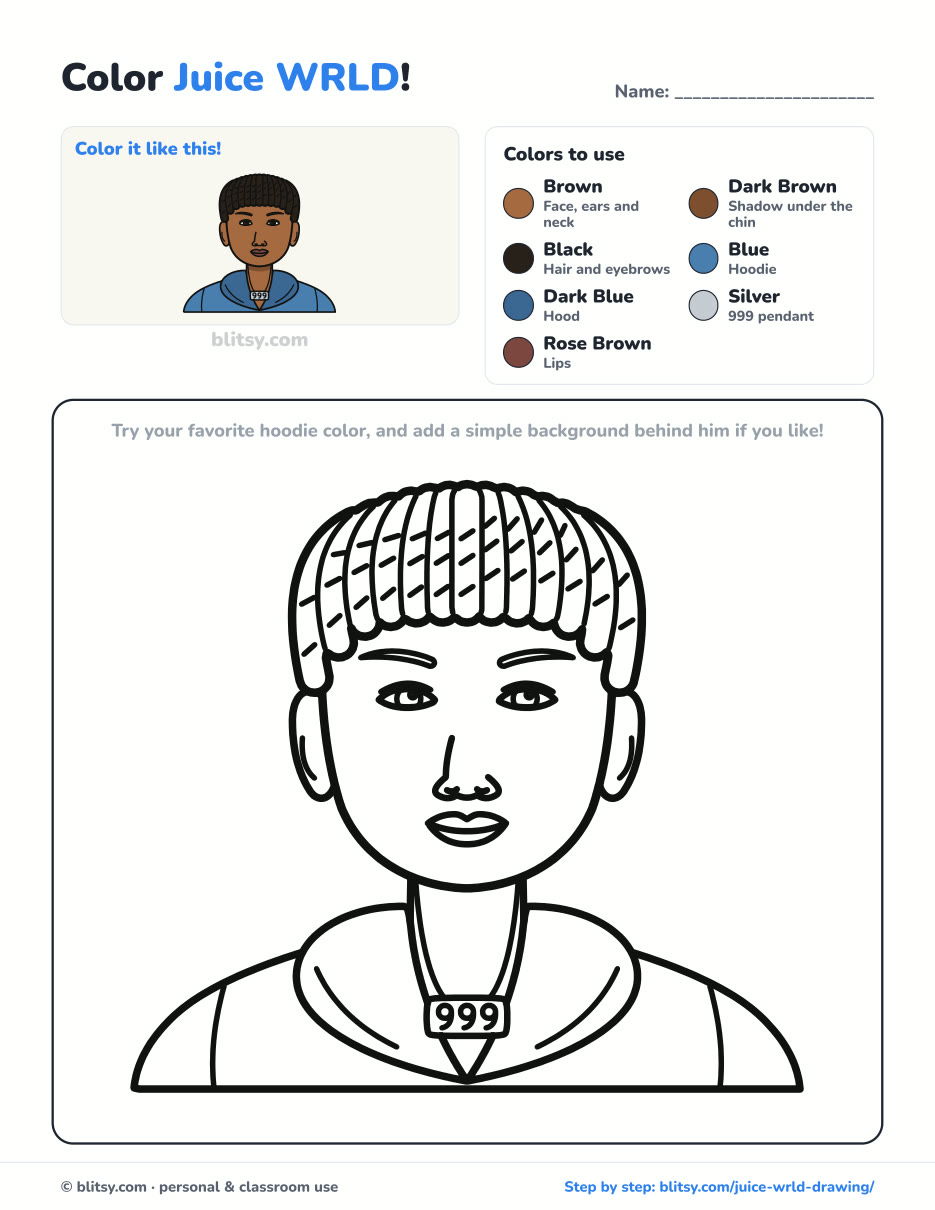
Black outlines with a colored example and the color names at the top. Ready to print and color.
⬇️ Download Coloring PageEvery step picture with its instructions and tips, to keep beside your paper while you draw.
⬇️ Download Drawing Guide📱 On a phone? Tap a download button, then open the file and choose Share → Save to Files or Print. On a computer, the PDF opens or saves straight to your Downloads folder.
A Juice WRLD Pinterest Pin With Every Step
Portrait Finished? Try These Character Tutorials
Every link opens a complete step-by-step tutorial, from anime eyes to cartoon favorites, with a picture for each stage.
- Sharingan Drawing: Draw a red iris with three tomoe and a sharp lash line inside a manga panel in the Sharingan drawing tutorial.
- Disney Drawing: Nemo and his bubbles take twelve small steps in this easy Disney character drawing tutorial.
- Stitch Drawing: Learn how to draw Stitch step by step, finishing with his big ears out and a small grin.
- Bart Simpson Drawing: Spiky hair, wide eyes and a smirk ready for trouble come together in the Bart Simpson drawing tutorial.
- Pikachu Drawing: Draw Pikachu with ears up, red cheeks and the tail flashing out to the side using the Pikachu drawing step by step lesson.
- Springtrap Drawing: Try a different kind of character with the Springtrap drawing tutorial, a chibi version with one floppy ear in twelve small steps.
- Iron Man Drawing: A chibi Iron Man with a glowing reactor and palms ready is the goal of the Iron Man drawing tutorial.
- Kurama Drawing: Chibi Kurama grins in front of nine orange tails in the Kurama drawing step by step guide.
- Anime Drawing: Spiky blue hair and green eyes with two shines grow from one circle in this anime boy face tutorial.
- Mickey Mouse Drawing: Finish Mickey with ears up and one glove in the air using how to draw Mickey Mouse.
Juice WRLD Drawing Questions, Answered
What is the easiest way to draw Juice WRLD?
Begin with a head oval and an eye line halfway down, then add the short twists and the hoodie. Those two parts carry most of the likeness, so the face itself can stay simple.
What does 999 mean on Juice WRLD drawings?
Juice WRLD used 999 as his symbol for turning negatives into positives. Fans often add it to tribute drawings, which is why it's on the pendant here.
How long does this Juice WRLD drawing take?
About 40 minutes for the pencil and ink work, plus around 15 minutes of coloring. The locks in step 6 take the longest, so give yourself time there.
Can kids follow this Juice WRLD tutorial?
Yes. Kids around 9 or 10 manage it well if they skip the slanted marks on the locks and the folds in the hood. The basic shapes still read clearly.
Grab a pencil, keep that first oval light, and take your time on the twists; a calm tribute comes from calm, unhurried lines. 🎧
Related posts:
 How to Draw Rosa Parks Step by Step (Easy Portrait)
 How to Draw Abraham Lincoln Step by Step (Easy Portrait)
 How to Draw a Family Step by Step (Easy Cartoon Portrait)
 How to Draw a Whale Step by Step (Easy for Beginners)
 How to Draw Lungs Step by Step (Easy Science Diagram)
 How to Draw a Pineapple Step by Step (Easy Crown and Slice)
 How to Draw Iron Man Step by Step (Easy Chibi for Kids)
 How to Draw a Hoodie Step by Step (Front and Back View)
 How to Draw a Parrot Step by Step (Easy Scarlet Macaw)
 How to Draw a Police Car Step by Step (Easy for Kids)
 How to Draw a Volcano Step by Step (Easy Erupting Volcano)
 How to Draw a Crow Step by Step (Easy for Beginners)

