
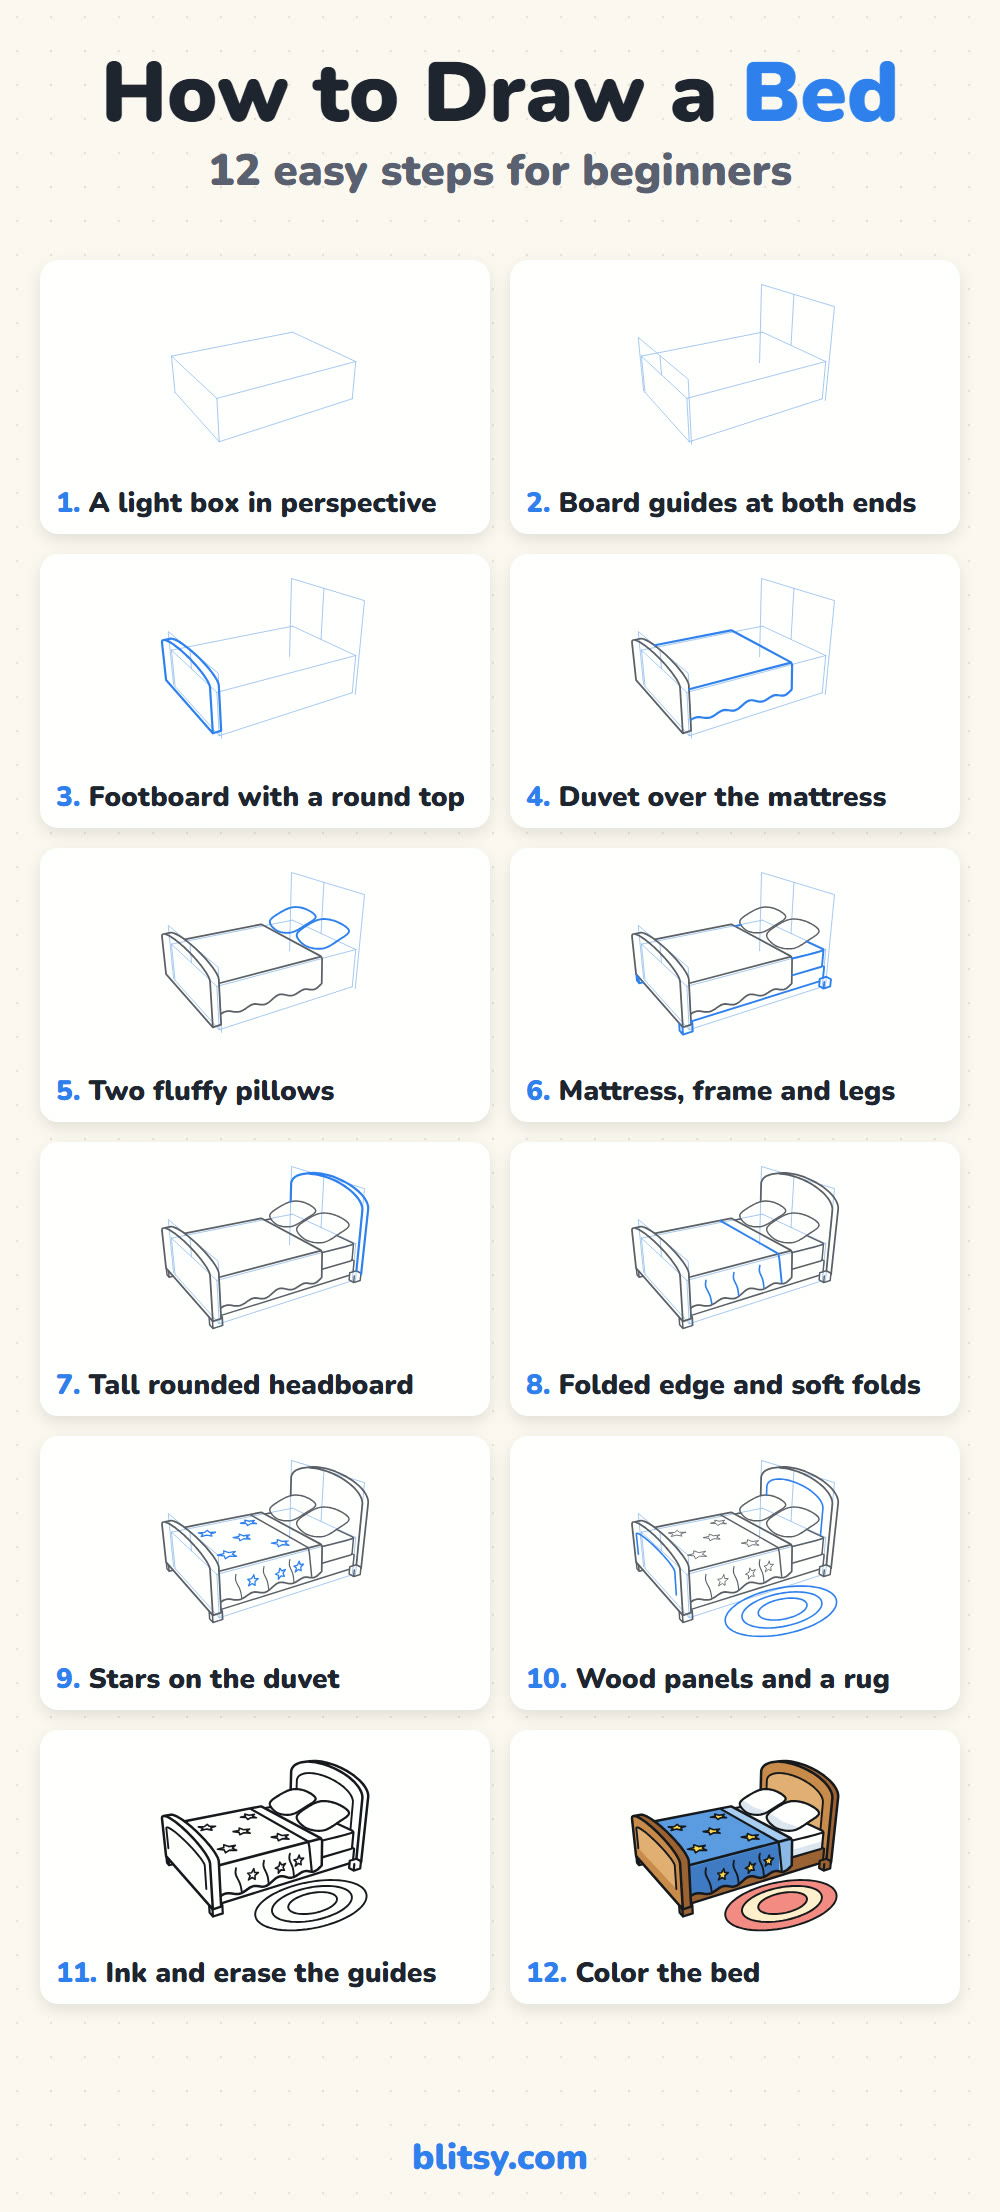
A bed looks tricky because it sits at an angle, but under all the pillows and blankets it's just a box. In this lesson you'll learn how to draw a bed step by step, starting with that box and turning it into a snug wooden bed with a starry duvet. I teach it front to back: the closest parts first, the headboard last. That way you never draw a line you later have to rub out.
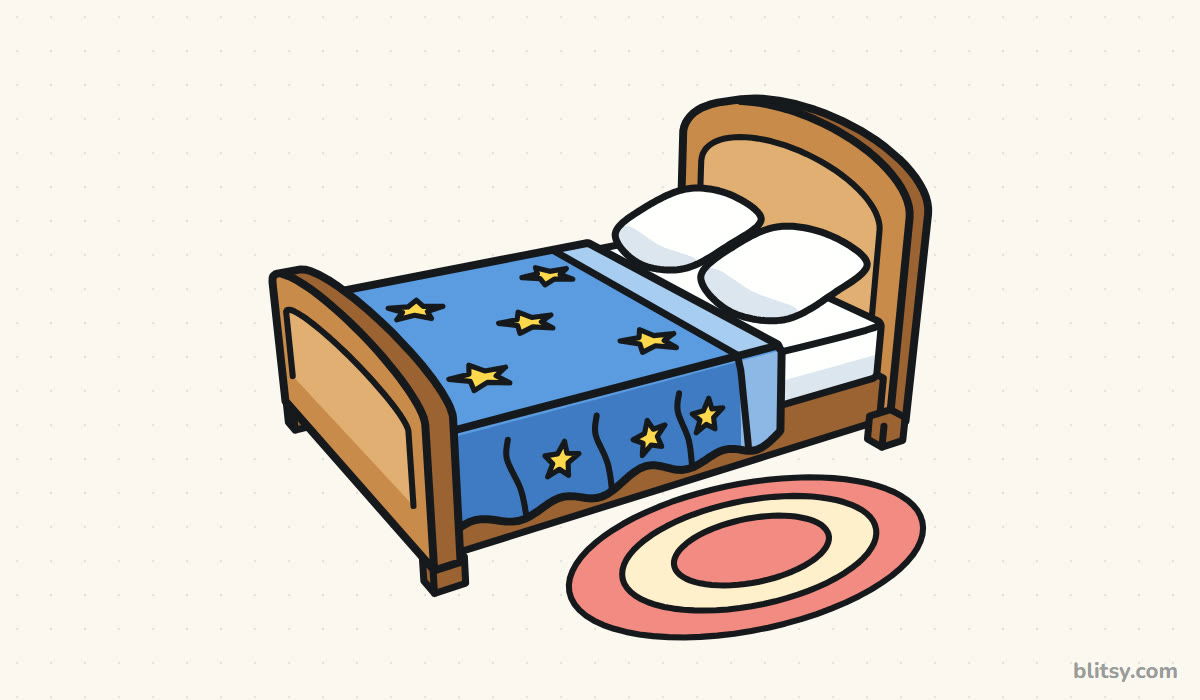
Blue marks whatever you add in that step. Gray lines are the ones already on your paper. The pale blue guides get erased near the end, so press lightly on them.
Quick overview
⏱️ Time: about 30 minutes, coloring included
🎯 Level: easy to medium, good for kids around 7 and up
✏️ Steps: 12
🛏️ You'll draw: a double bed in ¾ view with a headboard, footboard, pillows, a star duvet and a small rug
Bedtime Supplies for This Sketch
- A pencil you can press lightly (HB is fine)
- A clean eraser
- A black fineliner or felt-tip pen
- Colored pencils: light brown, brown, blue, light blue, yellow, light gray and coral pink
- Plain paper turned sideways
- A ruler, if you like straight box edges
Any blue works for the duvet, so use the shade you already have.
How to Draw a Bed Step by Step
Step 1: Sketch a light box in perspective
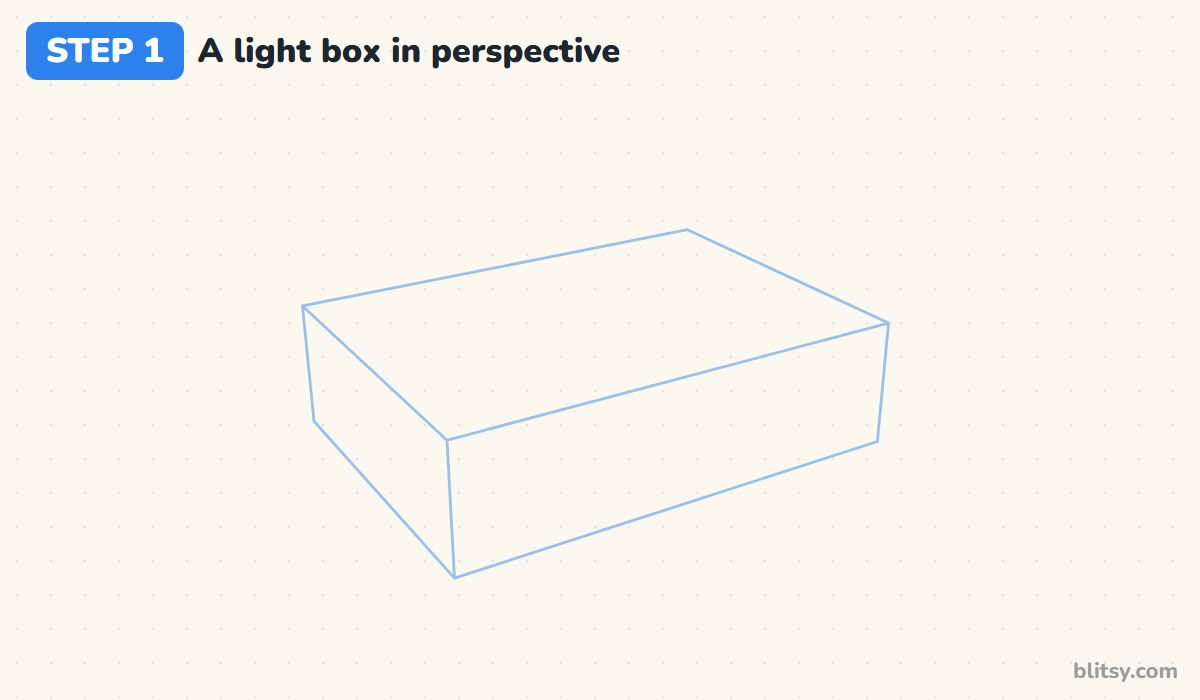
Start with a long, flat box drawn at an angle. Put the front corner low on the page, then let one long edge climb gently to the right and a short edge climb to the left. Add the top the same way. I keep the box about twice as long as it is wide, because a bed that's too square looks like a table.
💡 Tip: Edges that run the same way on a real bed should lean the same way on paper.
Step 2: Add guides for the headboard and footboard
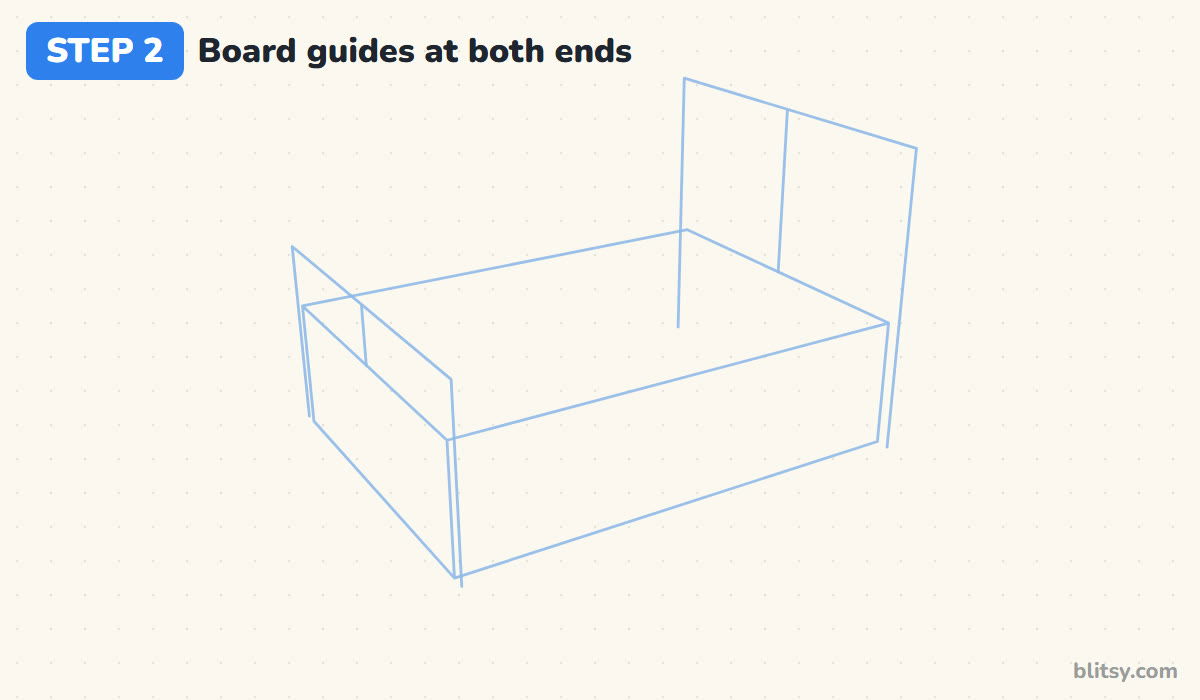
At the far right end of the box, draw a tall upright rectangle for the headboard. At the near left end, draw a shorter one for the footboard. Put a small upright line through the middle of each, so you can find the top of the curves later.
💡 Tip: Keep the upright edges straight up and down. If they tilt, the whole bed looks like it's sliding.
Step 3: Draw the footboard with a round top
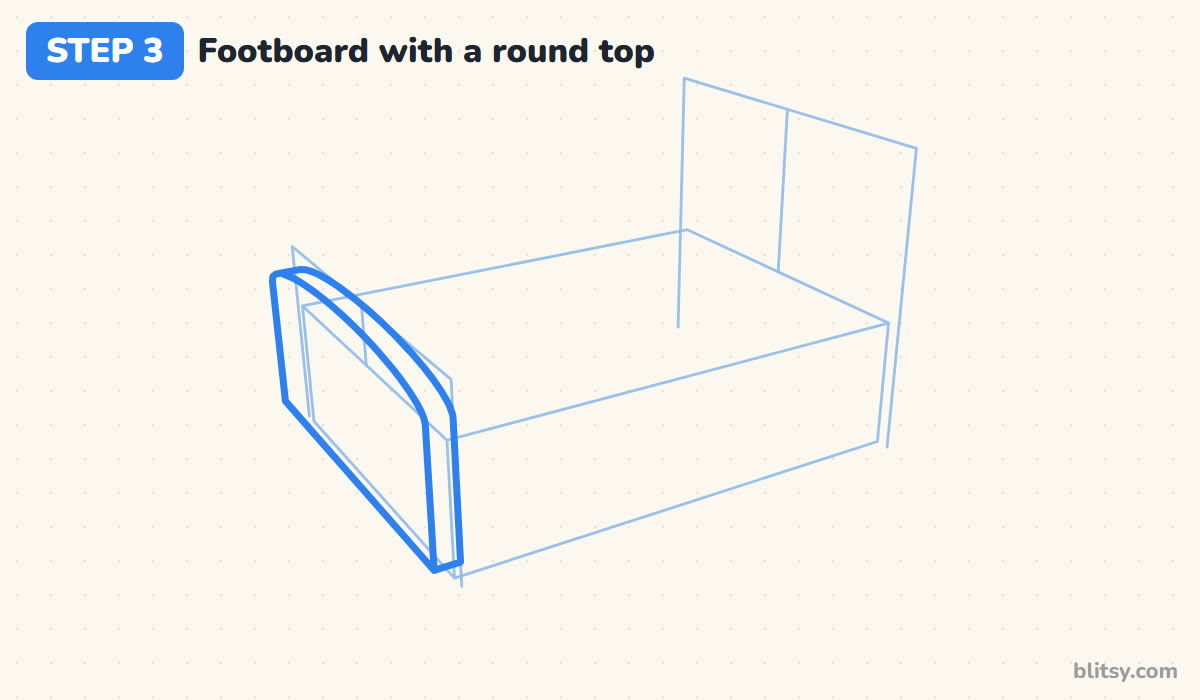
Inside the small front rectangle, draw two straight sides and join them with a gentle curve across the top, highest at the middle line. Then copy that shape a little to the right and join the two, so the board gets some thickness. Because the footboard is the closest part of the bed, I draw it first. Everything behind it simply tucks in.




💡 Tip: A thin board edge is enough. Make it too wide and the footboard turns into a wall.
Step 4: Lay the duvet over the mattress
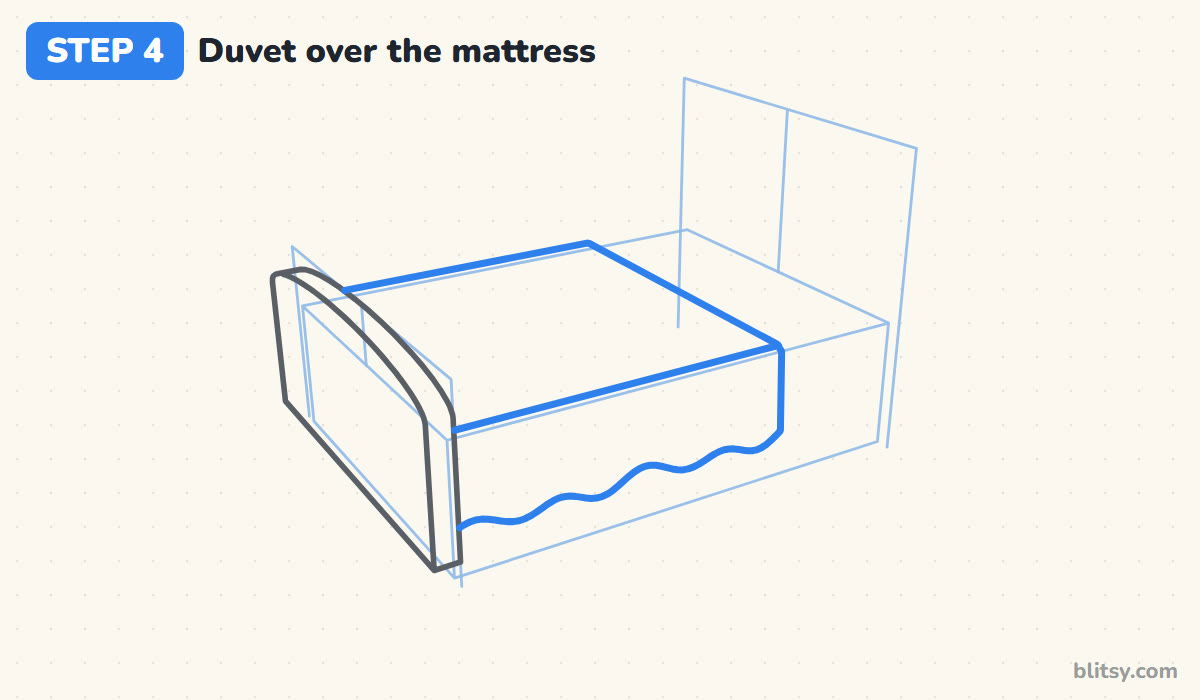
Trace the top of the box from the footboard to about three quarters of the way back. That flat shape is the duvet lying on the bed. From its front edge, let the cover hang down the side and finish it with a wavy hem. Most beginners draw the hem as a straight line, and the blanket ends up looking like cardboard.
💡 Tip: Make the waves uneven: two small bumps, then a bigger one. Fabric never folds in a perfect rhythm.
Step 5: Draw two fluffy pillows
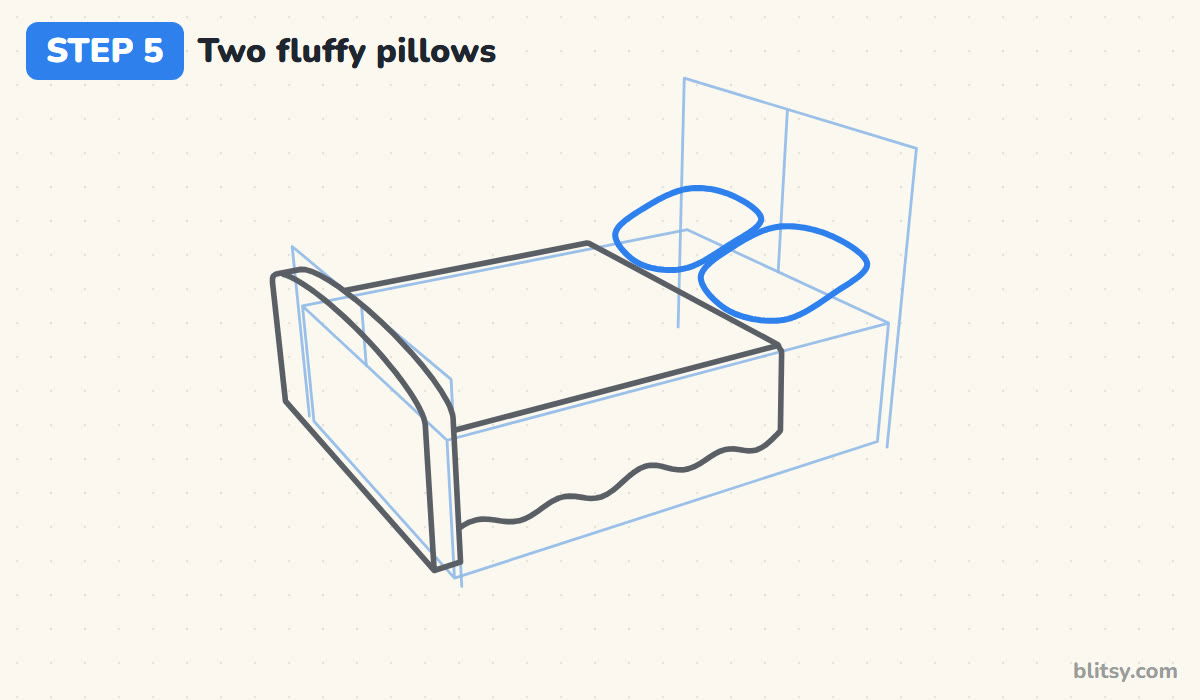
Near the head end, draw two soft rounded shapes side by side, leaning back toward where the headboard will be. Let the edges bulge out a little and keep the corners slightly pointed, like a real stuffed pillow. The closer pillow overlaps the one behind it. That small overlap does more for the 3D look than any shading.
💡 Tip: Draw the front pillow first, then tuck the back one behind it.
Step 6: Show the mattress, frame and legs
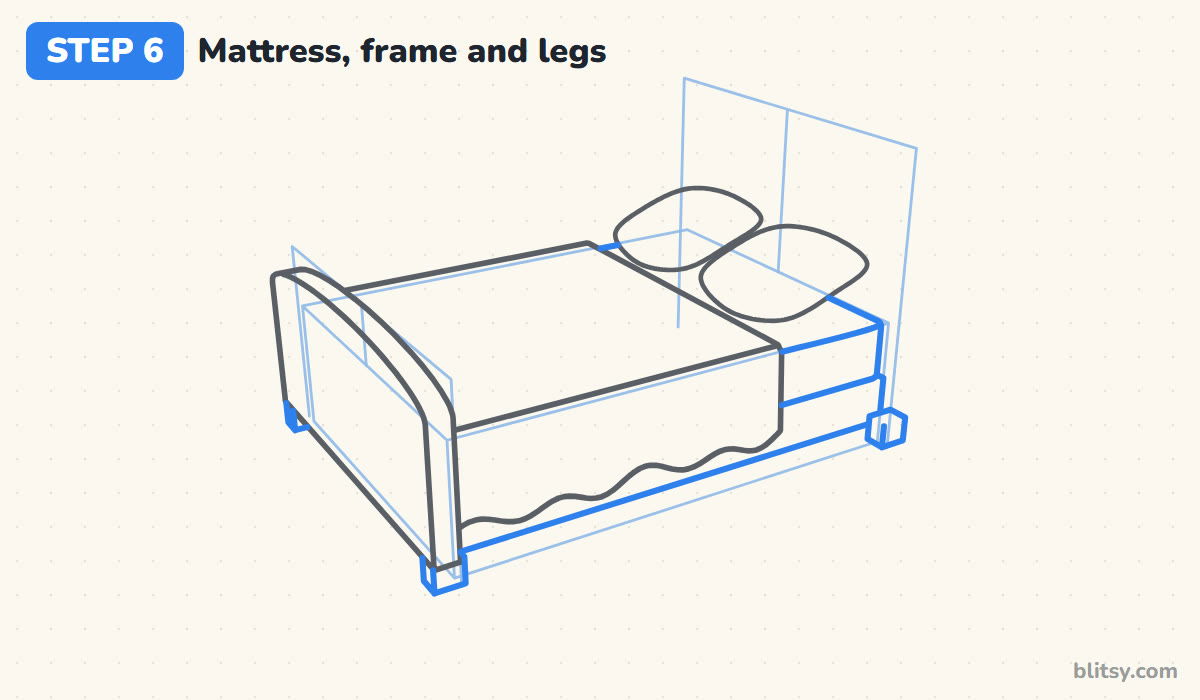
Between the duvet and the head end, a bit of white mattress shows. Draw its side as a band with soft corners, and add the wooden frame as a thinner band below the hem. Finish with short square legs under each end of the footboard and at the far right corner. The fourth leg hides behind the bed.
💡 Tip: Keep the legs short and chunky. Long thin legs make the bed look wobbly.
Step 7: Draw the tall rounded headboard
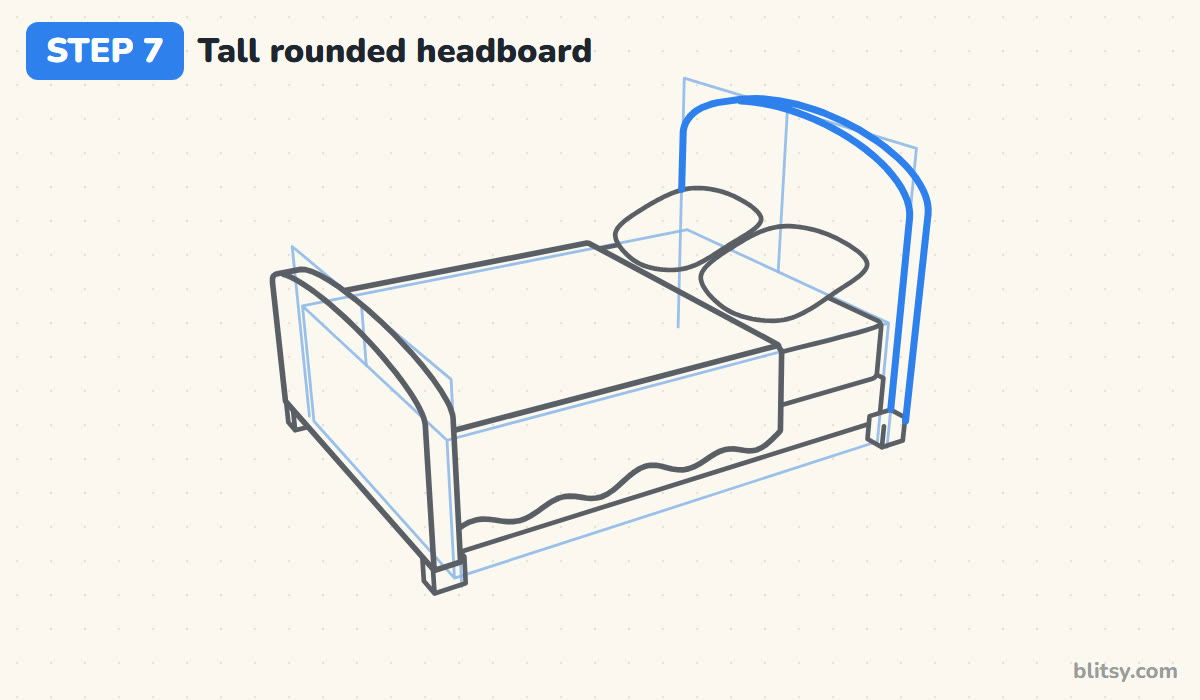
Now use the big rectangle at the back. Draw the two sides, then a wide curve over the top, peaking at the middle line. Repeat it slightly to the right for thickness, just like the footboard. Where the pillows sit in front, stop your line and pick it up again on the other side. Leaving those gaps is exactly what pushes the headboard behind the pillows.


💡 Tip: Make the headboard curve rise higher than the footboard curve. The difference tells the eye which end is which.
Step 8: Add the folded edge and soft folds
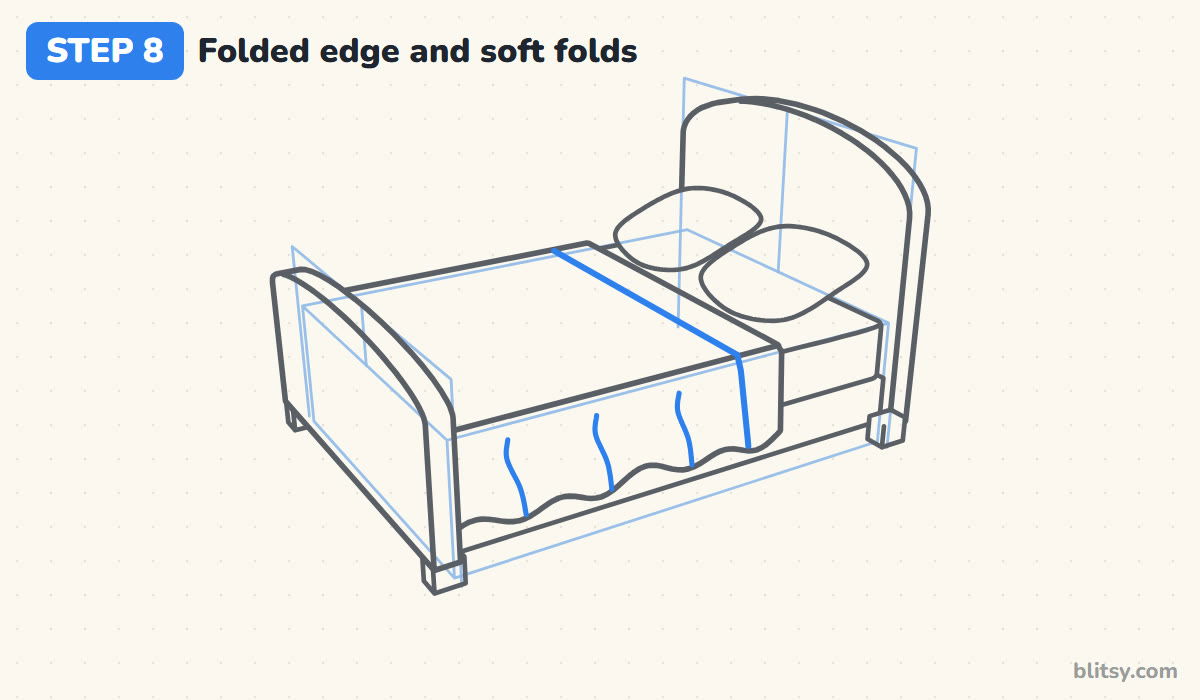
Draw a line across the duvet, a little in front of where it ends, and carry it down the side to the hem. That strip is the top edge folded back over. On the hanging part, sketch three slightly wiggly lines rising from the low points of the hem. They don't reach the top. Folds fade out as the fabric flattens over the mattress.
💡 Tip: Start each fold line where the hem dips down, never where it bumps up.
Step 9: Decorate the duvet with stars
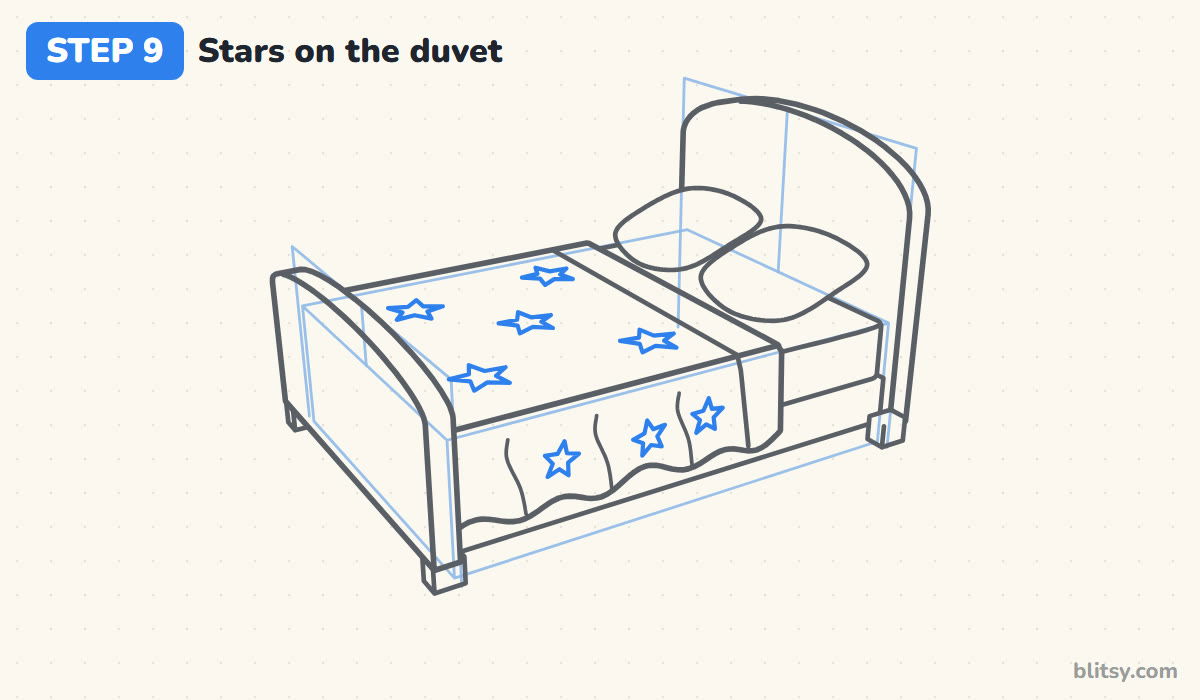
Scatter five-point stars over the top of the duvet and a few smaller ones on the side. Stars on the flat top should look a bit squashed, because that surface tips away from you. I space them unevenly so the pattern feels hand-made. Stripes work too if stars feel fiddly.
💡 Tip: Keep the stars clear of the fold lines and the folded edge, so the shapes stay readable.
Step 10: Draw the wood panels and a rug
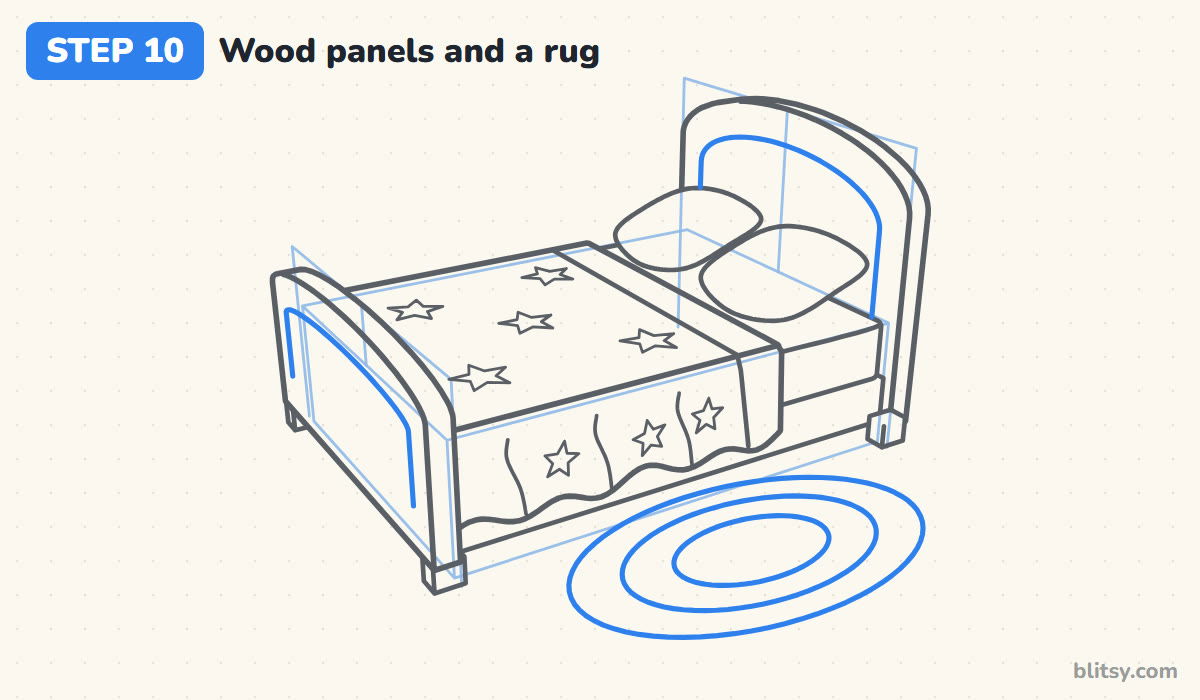
Inside the headboard and the footboard, draw a second curve that follows the outer shape with a small gap. It looks like a carved panel and makes the wood feel solid. On the floor beside the bed, add an oval rug with two smaller ovals inside it. Tuck its far edge under the frame, as if the rug slides beneath the bed.
💡 Tip: Draw the rug as a flat, wide oval. A round circle would stand up off the floor.
Step 11: Ink the lines and erase the guides
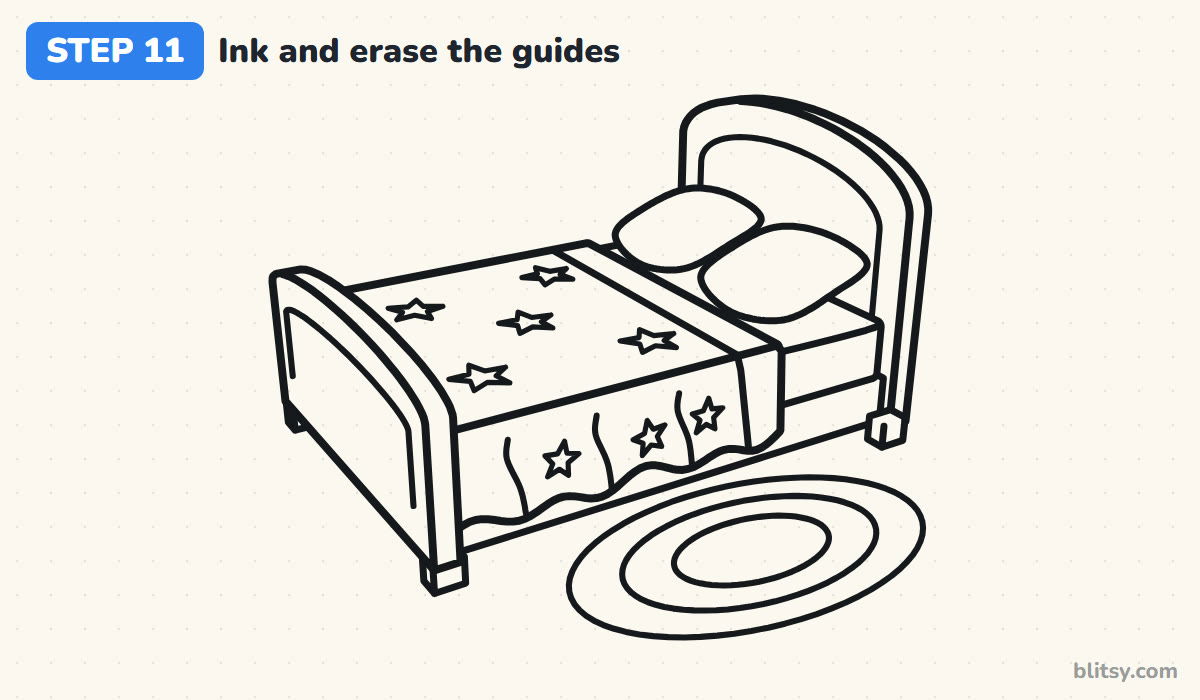
Go over the keeper lines with your black pen. Begin at the footboard and work toward the back, the same order you drew it. Let the ink dry for a minute, then erase the box and every pale guide line. Once the box is gone, the bed suddenly looks soft and cosy instead of boxy.

💡 Tip: Turn your paper so you can pull each long line toward you. It's much steadier than pushing.
Step 12: Color the bed
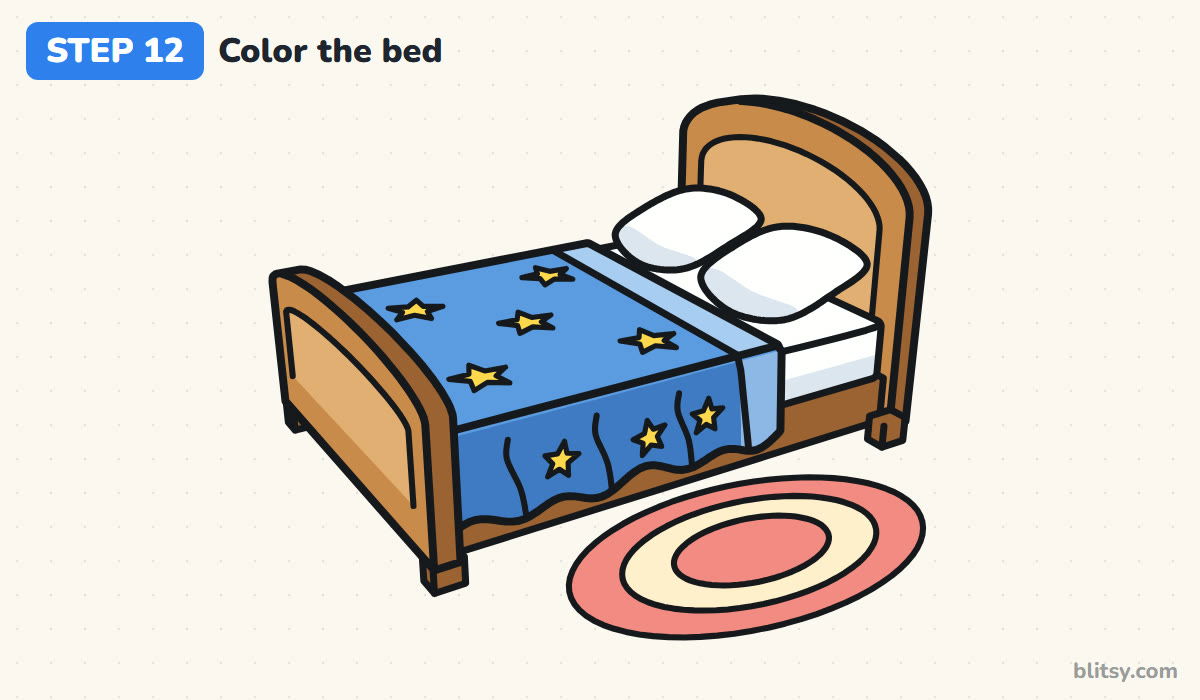
Use light brown for the board faces and darker brown for the board edges, frame and legs. Color the duvet blue, pressing harder on the side that hangs down so it looks shaded. The folded edge is light blue and the stars yellow. Pillows and sheet stay white with light gray along their lower edges. Coral pink finishes the rug.
💡 Tip: Leave a sliver of white on top of each pillow. It reads as light hitting the fluff.
Why a Bed Drawing Sometimes Looks Flat
- Drawing the bed straight from the front. A front view hides the mattress and pillows. Turn the box at an angle so you see two sides and the top.
- Edges that lean different ways. If the top and bottom edges of the box don't run the same direction, the bed twists. Line them up before you ink.
- Drawing lines behind the pillows. A headboard line running through a pillow makes it see-through. Stop the line and start again on the other side.
- A flat, straight blanket edge. A ruler-straight hem kills the cosy look. Give it gentle, uneven waves.
- Same height for both boards. When the headboard and footboard match, the bed has no clear head end. Keep the footboard clearly shorter.
Bed Ideas to Try After This One
Once the box trick clicks, change the bed to suit your room. Swap the stars for stripes, polka dots or tiny hearts, add a teddy bear on the pillow, or stack a second box on top for a bunk bed. A canopy bed just needs four tall posts and a curved cloth at the top. When your bed is ready, give it a home with the room drawing tutorial, or practice another box-in-perspective shape with how to draw a house step by step.
Free Bed Coloring Page and Printable Drawing Steps
Prefer paper? The bed coloring page has a colored example and a color key at the top, with a large bold outline underneath to fill in. The step-by-step guide PDF holds all 12 steps and tips, handy for a quiet bedtime activity. Both fit Letter and A4 paper.
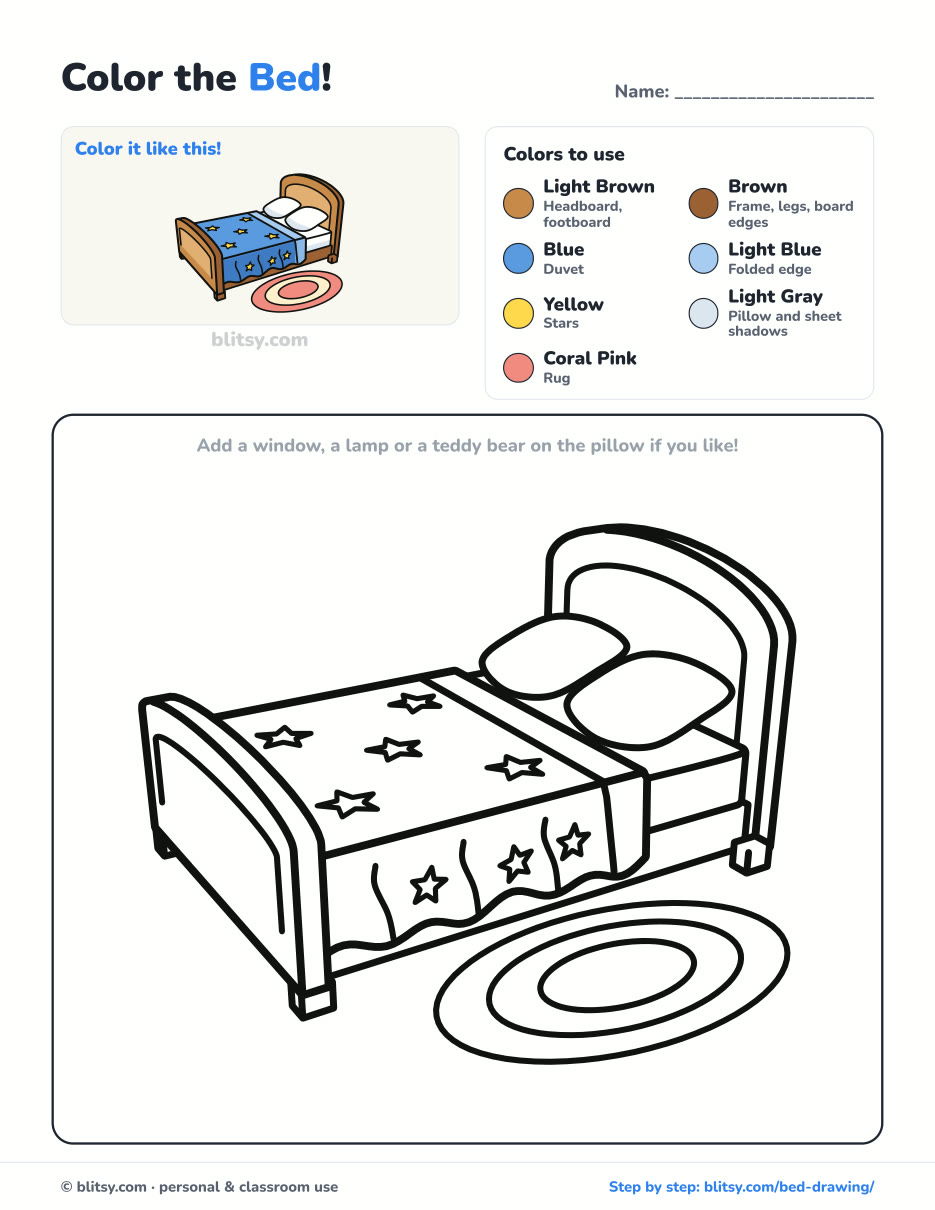
Black outlines with a colored example and the color names at the top. Ready to print and color.
⬇️ Download Coloring PageEvery step picture with its instructions and tips, to keep beside your paper while you draw.
⬇️ Download Drawing Guide📱 On a phone? Tap a download button, then open the file and choose Share → Save to Files or Print. On a computer, the PDF opens or saves straight to your Downloads folder.
Keep the Bed Steps on Pinterest
Bed Made Up? Try These Objects and Vehicles
Each of these is a step-by-step tutorial, from a fairy-tale castle to a cartoon tank.
- Castle Drawing: Learn how to draw a castle step by step with three towers, a portcullis and a moat.
- UFO Drawing: The UFO drawing tutorial draws a saucer with its beam on and an alien on board.
- Train Drawing: A steam engine with a red boiler and three puffs of steam: the train drawing tutorial.
- Tank Drawing: Draw an olive cartoon tank with five road wheels when you learn how to draw a tank.
- Realistic Drawing: The realistic drawing tutorial teaches shading on a shiny apple.
- Monster Truck Drawing: Roll a flame-painted truck over a dirt mound in the monster truck drawing tutorial.
- Rocket Drawing: The rocket drawing step by step lesson launches past a ringed planet and a sprinkle of stars.
- Diamond Drawing: Straight lines make a faceted gem in the diamond drawing tutorial.
- Baseball Bat Drawing: Learn how to draw a baseball bat with a glove and a ball beside it.
- Rocks Drawing: Shade a chunky boulder in rocks drawing step by step.
Bed Drawing Questions From Young Artists
What is the easiest way to draw a bed?
Draw a long box at an angle first. Add a tall board at one end and a short one at the other, then lay a blanket and pillows on top. The box keeps everything in proportion.
How do you draw a bed in 3D?
Show two sides and the top, and make edges that are parallel in real life run the same direction on paper. Overlaps, like pillows in front of the headboard, add depth too.
How long does it take to draw a bed?
Around 30 minutes with coloring. Skip the stars and the rug and it's closer to 15.
Is this bed drawing good for kids?
Yes, for kids from about 7. Younger children can skip the folds and the wood panels and color the duvet in one plain shade.
Sign your drawing on the rug, then try it again with your own bedspread pattern. 🛏️
Related posts:
 How to Draw a Garden Step by Step (Easy Flower Bed Scene)
 How to Draw a Car Step by Step (Easy Drawing for Beginners)
 How to Draw Godzilla Step by Step (Easy Kaiju for Beginners)
 How to Draw a Whale Step by Step (Easy for Beginners)
 How to Draw a Rat Step by Step (Easy for Beginners)
 How to Draw an Arctic Fox Step by Step (Easy for Beginners)
 How to Draw a Shark Step by Step (Easy for Beginners)
 How to Draw a Dog Step by Step (Easy Side View for Beginners)
 How to Draw a Chicken Step by Step (Easy for Beginners)
 How to Draw a Fish Step by Step (Easy Goldfish for Beginners)
 How to Draw a Crow Step by Step (Easy for Beginners)
 How to Draw an Eagle Step by Step (Easy for Beginners)

