
Flat houses are where everyone starts: a square, a triangle on top, a door in the middle. This lesson goes one small step further and shows you how to draw a house step by step so it looks solid, with a front wall facing you and a side wall that slides away into the distance. The trick is a single box drawn in perspective, and I'll walk you through it slowly. Then come the fun parts, like chimney smoke and curtains.
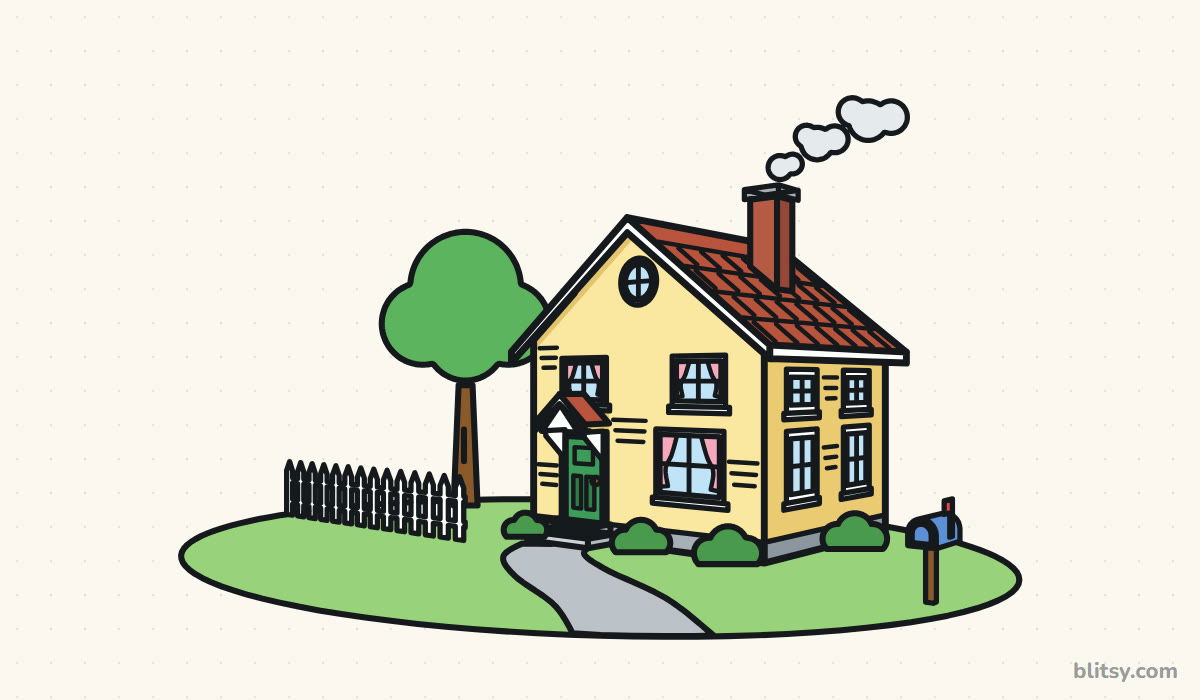
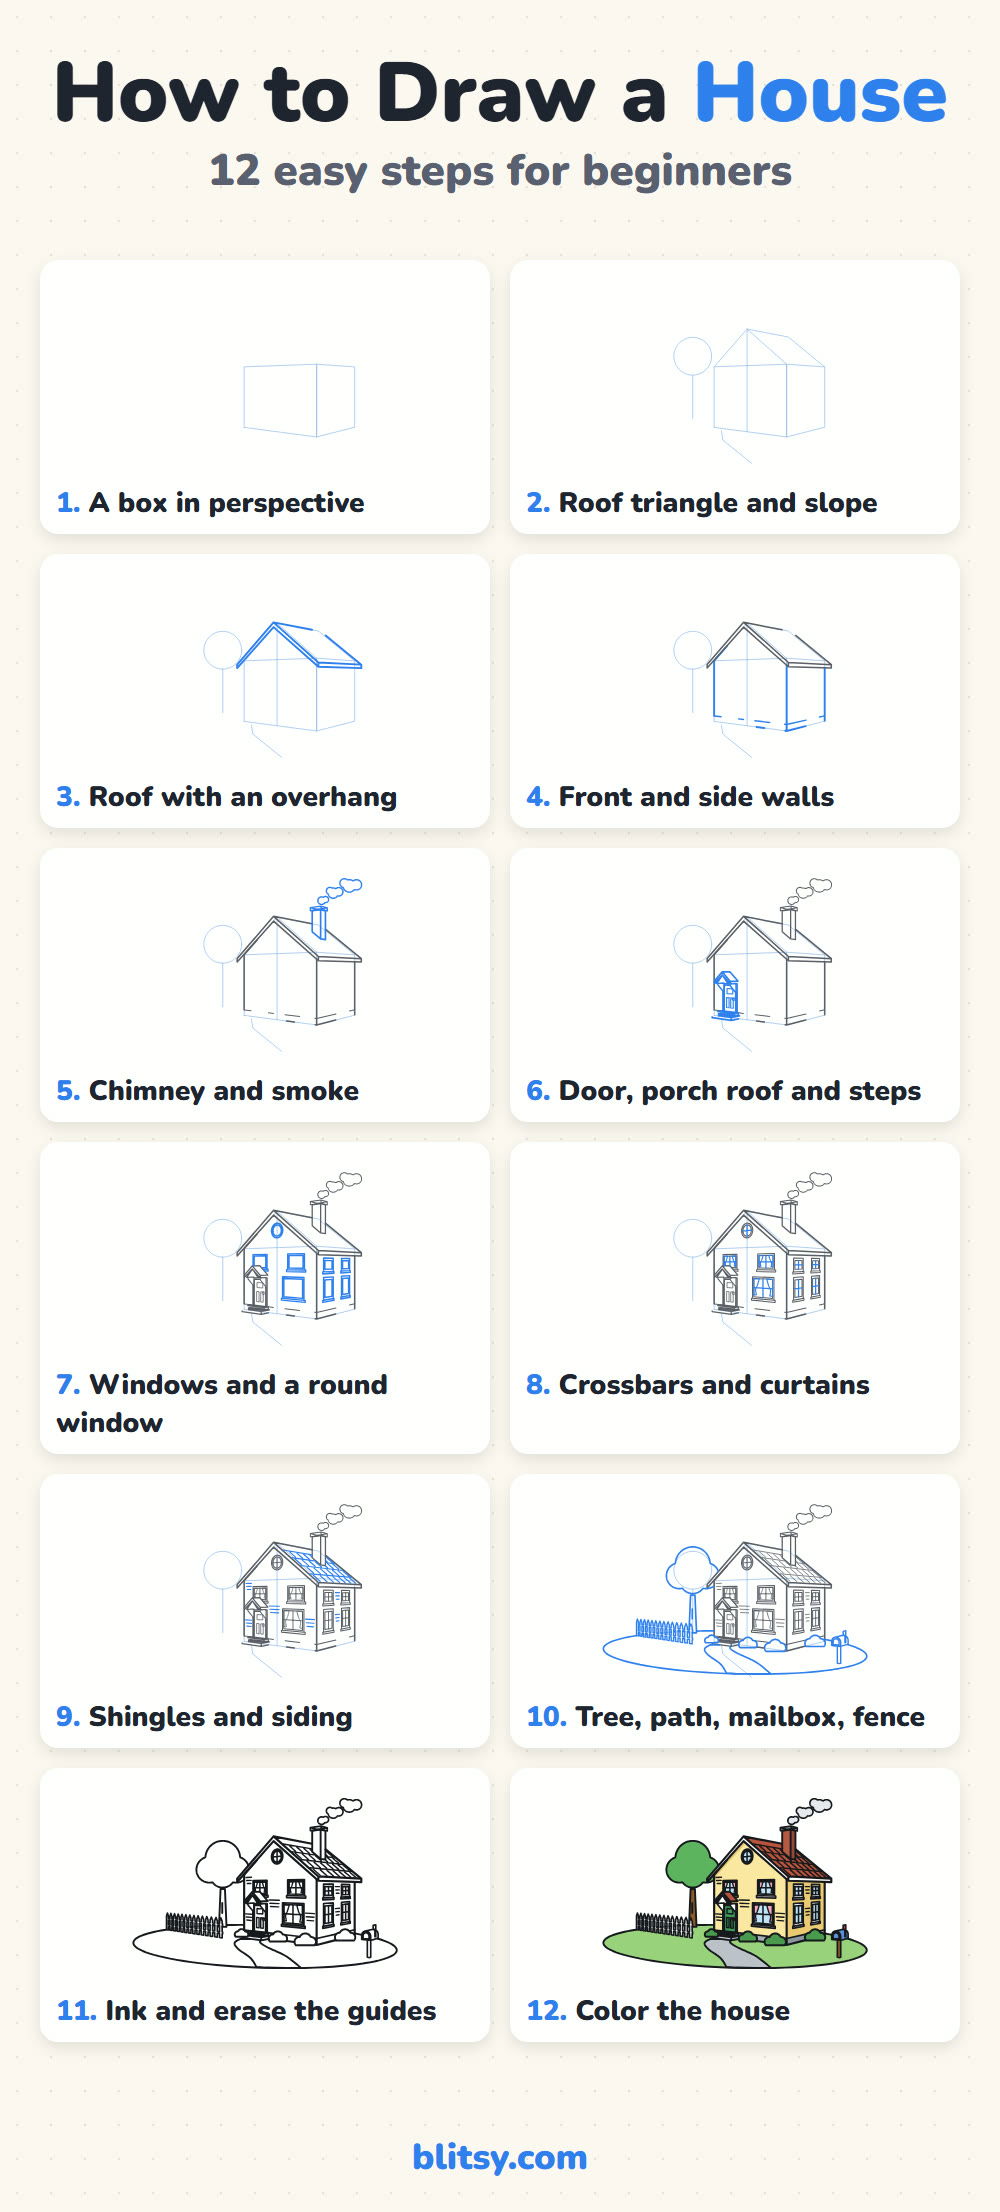
Every picture below adds only one stage. The fresh lines show up blue, and anything from an earlier stage turns gray, so you can see at a glance what to add next.
Quick overview
⏱️ Time: 45 to 60 minutes with coloring
🎯 Level: easy to medium, good for ages 8 and up
✏️ Steps: 12
🏠 You'll draw: a two-story house with a porch, a chimney and a front yard
Supplies for a Cozy House Sketch
- A light pencil (HB or 2H)
- A clean eraser
- A ruler for the long wall and roof edges
- A black fineliner or felt-tip pen
- Colored pencils or markers: light yellow, red, green, light blue, pink, gray, brown
- A sheet of paper turned the long way
No ruler? A book edge works fine for the long straight lines.
How to Draw a House Step by Step
Step 1: Sketch a box in perspective
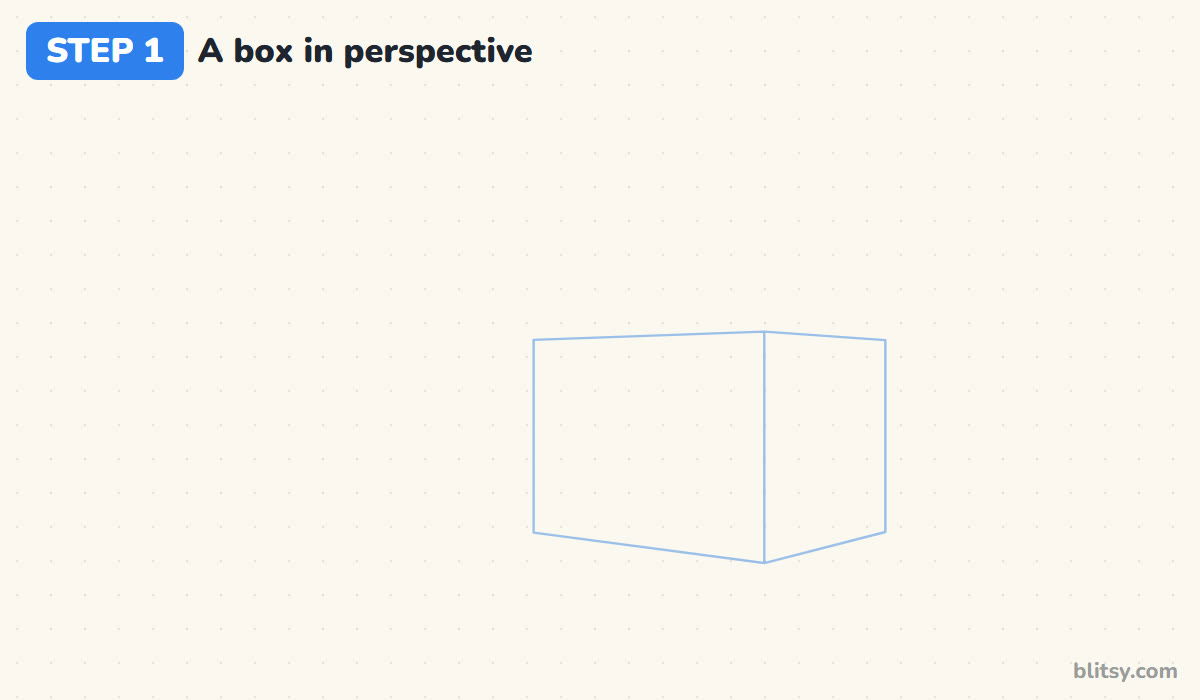
Lightly draw a rectangle a little left of center. That's the front wall. On its right, add a narrower shape whose top and bottom edges tilt toward each other as they go away from you. I tell beginners to tilt the lower edge up and the upper edge down, just a little. That tiny slant is what makes the house look three-dimensional.
💡 Tip: Keep every vertical line truly vertical; only the top and bottom edges slant.
Step 2: Add the roof triangle and slope
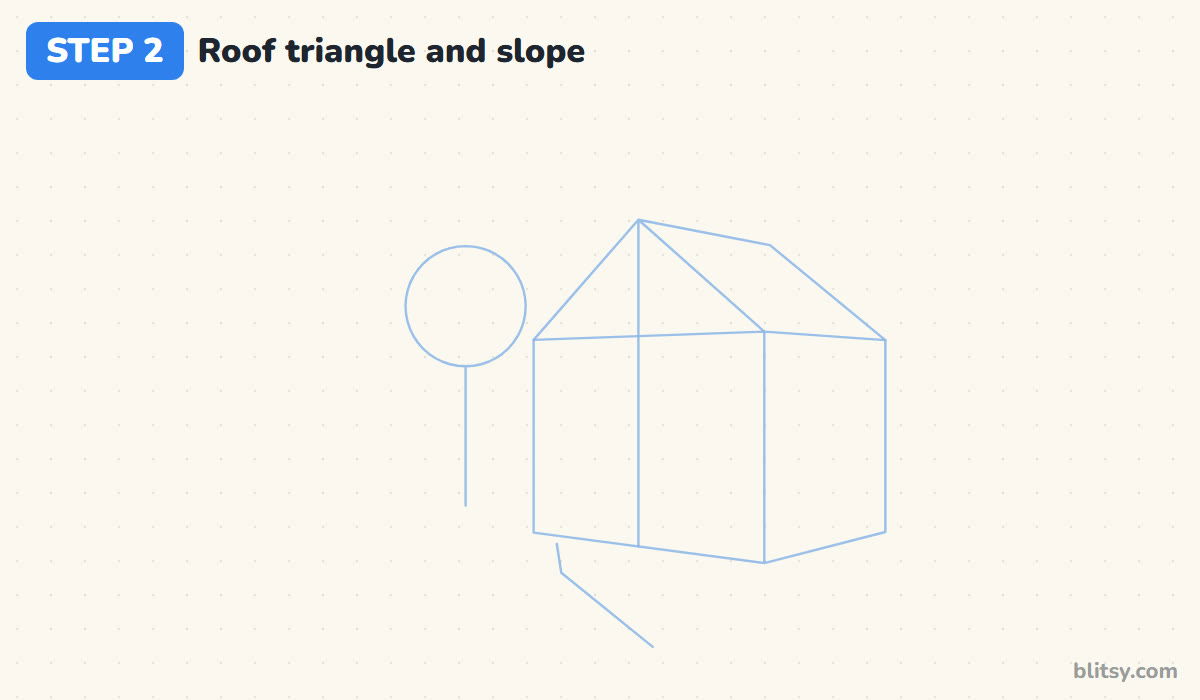
Draw a faint line straight up from the middle of the front wall and mark the roof peak on it, about half the wall's height above the top. Connect the peak to both top corners for the gable triangle. From the peak, draw the ridge going back, parallel to the side wall's top edge. Sketch a circle on a stick for the tree and a curvy line for the path.
💡 Tip: The ridge line should lean the same way as the side wall's top edge.
Step 3: Draw the roof with an overhang
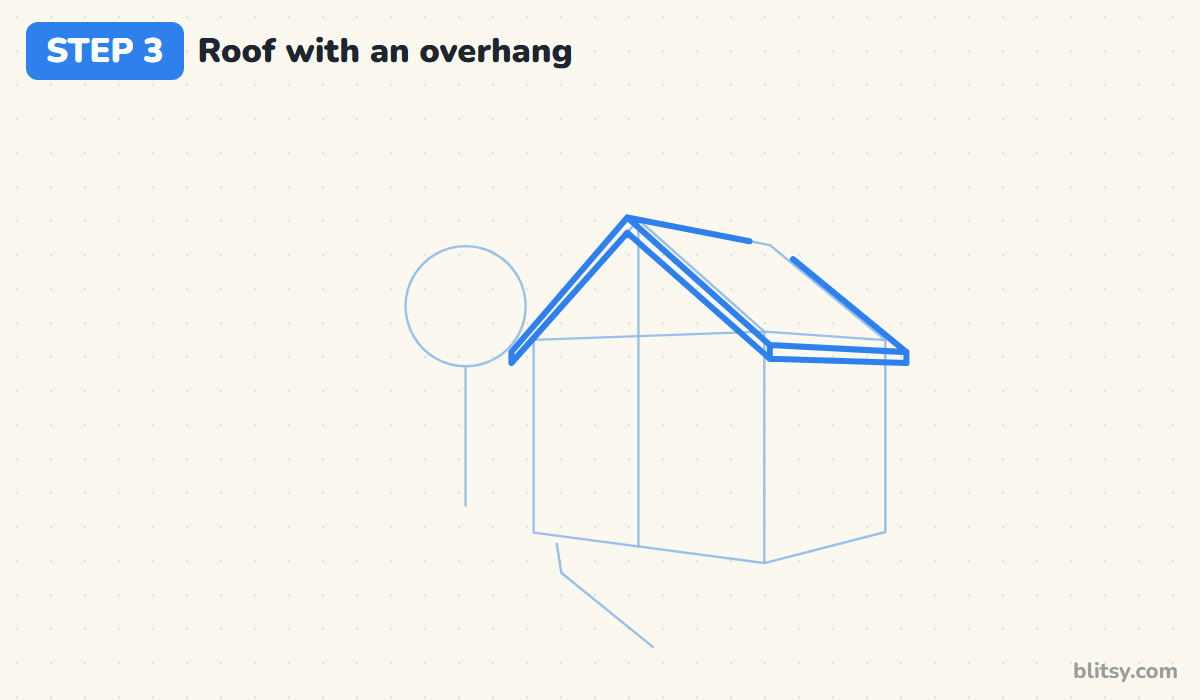
Press a bit harder now. Go over the two sides of the gable, letting them stick out past the walls; that overhang makes a roof look real instead of pasted on. Draw a second line inside each slope for a white trim board, then outline the long roof side with a thin board along its lower edge. Leave a small gap near the top right for the chimney.




💡 Tip: Draw each long roof line in one slow stroke instead of several short ones.
Step 4: Outline the front and side walls
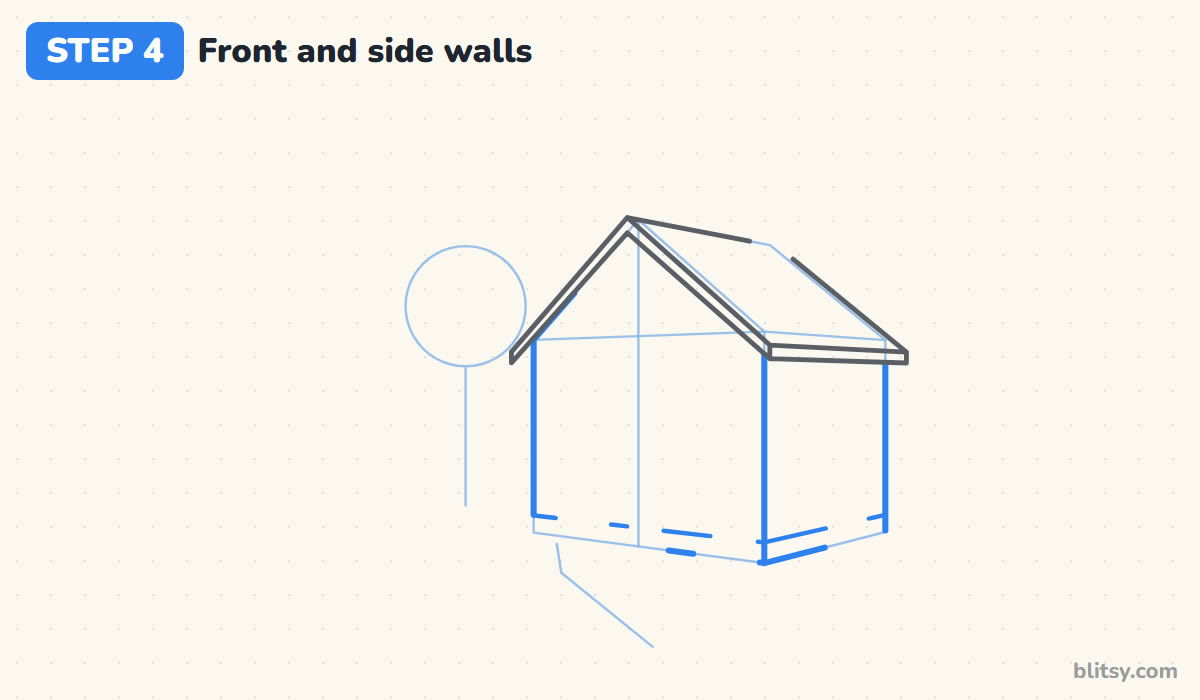
Trace the walls under the roof, using your guide box, and draw a second line just above the ground for a stone foundation. You can leave short gaps along the base where bushes will go. I like doing that because it saves erasing. If the side wall looks too wide, nudge its far edge closer; a narrow side wall reads as distance.
💡 Tip: Lift your pencil where a bush will cover the wall instead of erasing later.
Step 5: Build the chimney and smoke
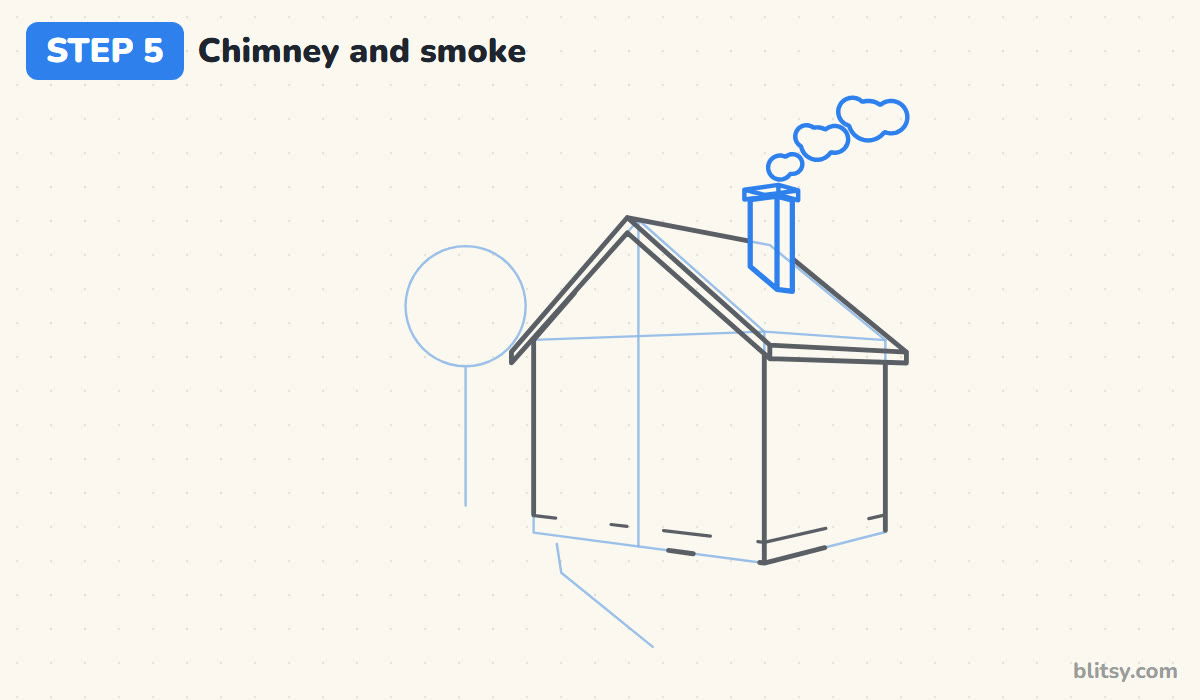
Near the top of the long roof side, draw a tall narrow box for the chimney. Its base follows the roof slope, so the left side ends higher than the right. Add a slightly wider cap on top. For the smoke, draw three bumpy puffs drifting up and to the right. Small kids love this part, and it's very forgiving.
💡 Tip: Make the smoke puffs grow bigger as they float away from the chimney.
Step 6: Draw the door, porch roof and steps
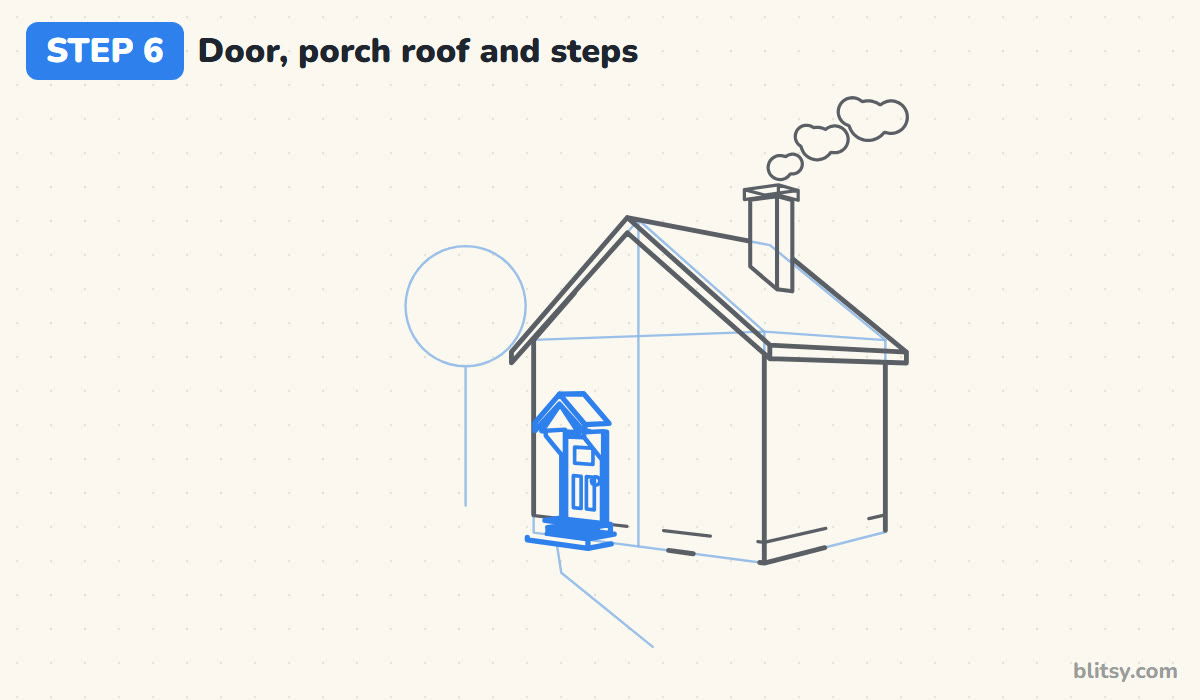
On the left side of the front wall, draw a tall door with a frame around it, a small window near the top, two panels and a round knob. Above it, add a tiny copy of the main roof held up by two small brackets. Under the door, stack two flat steps, the lower one wider.
💡 Tip: The porch roof should be only a bit wider than the door frame.
Step 7: Add windows and a round window
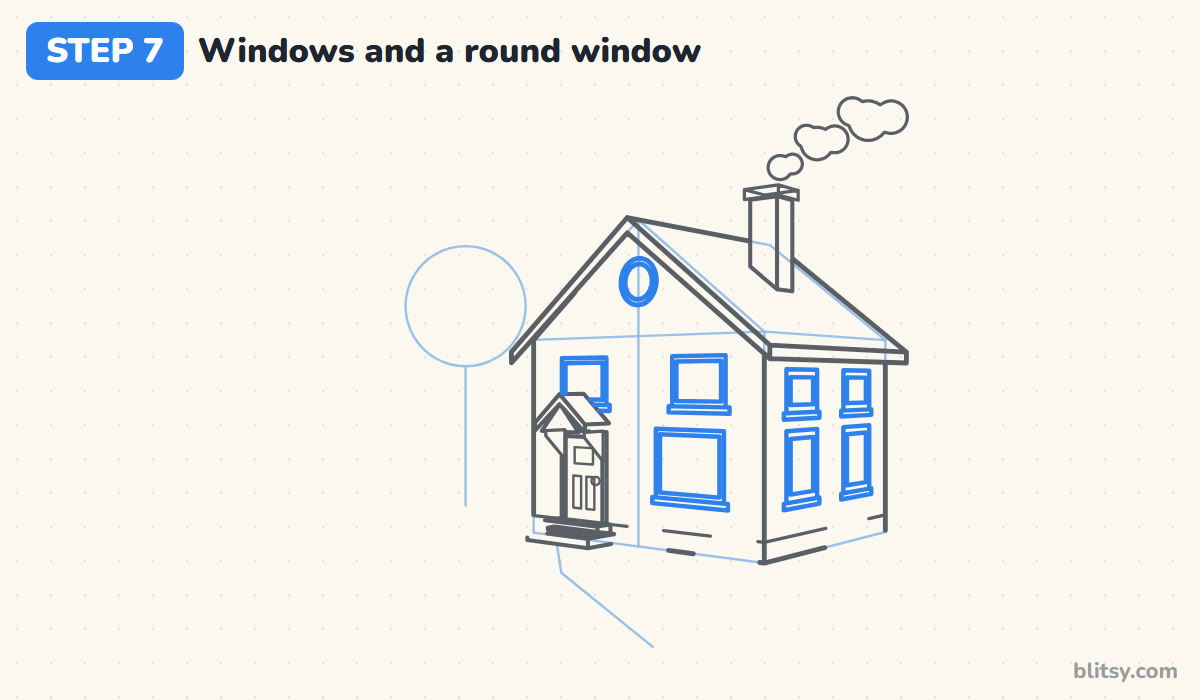
Start with the front: one big window beside the door and two smaller ones upstairs, each with a frame and a ledge. On the side wall the windows look skinnier, because that wall turns away from you, so draw them as narrow rectangles. Finish with a round window centered under the peak.




💡 Tip: Line up the tops of the upstairs windows with your ruler before drawing their sides.
Step 8: Draw the crossbars and curtains
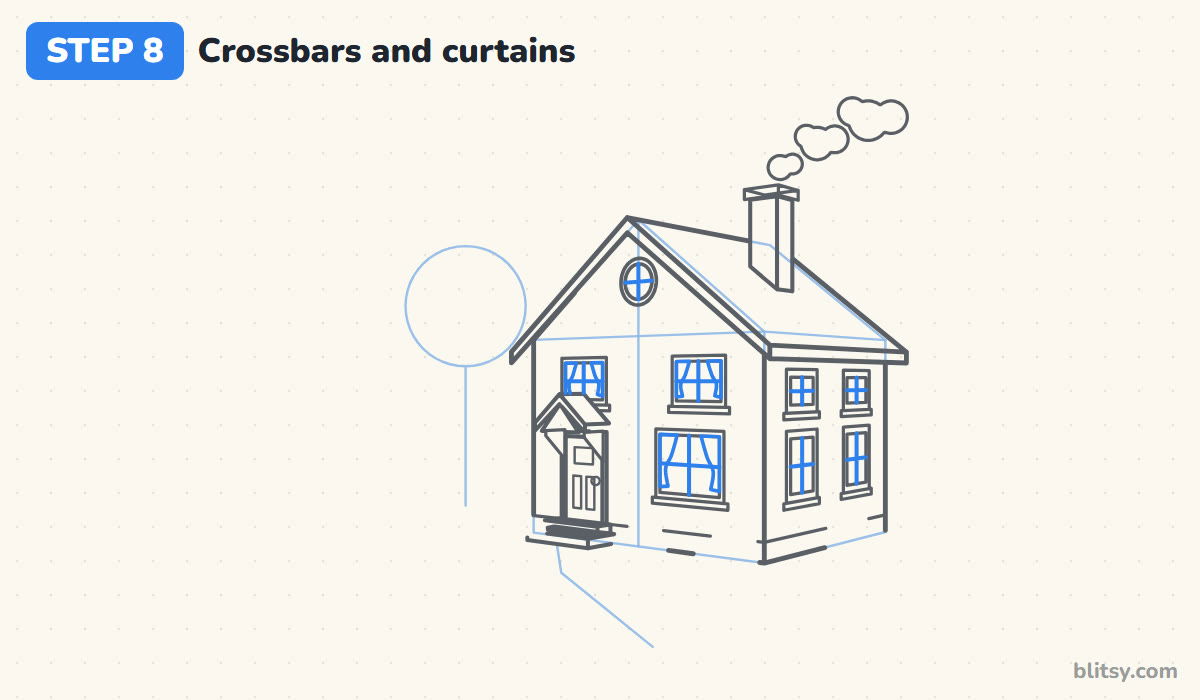
Put a plus sign in every window, splitting it into four panes. In the front windows, draw a curved curtain hanging from each top corner and tucked in at the side. The side windows are too narrow for curtains, so they only get crossbars. This is the step that makes the house feel lived in.
💡 Tip: Curve the inner curtain edge like a backward C to make the fabric look soft.
Step 9: Add shingles and siding
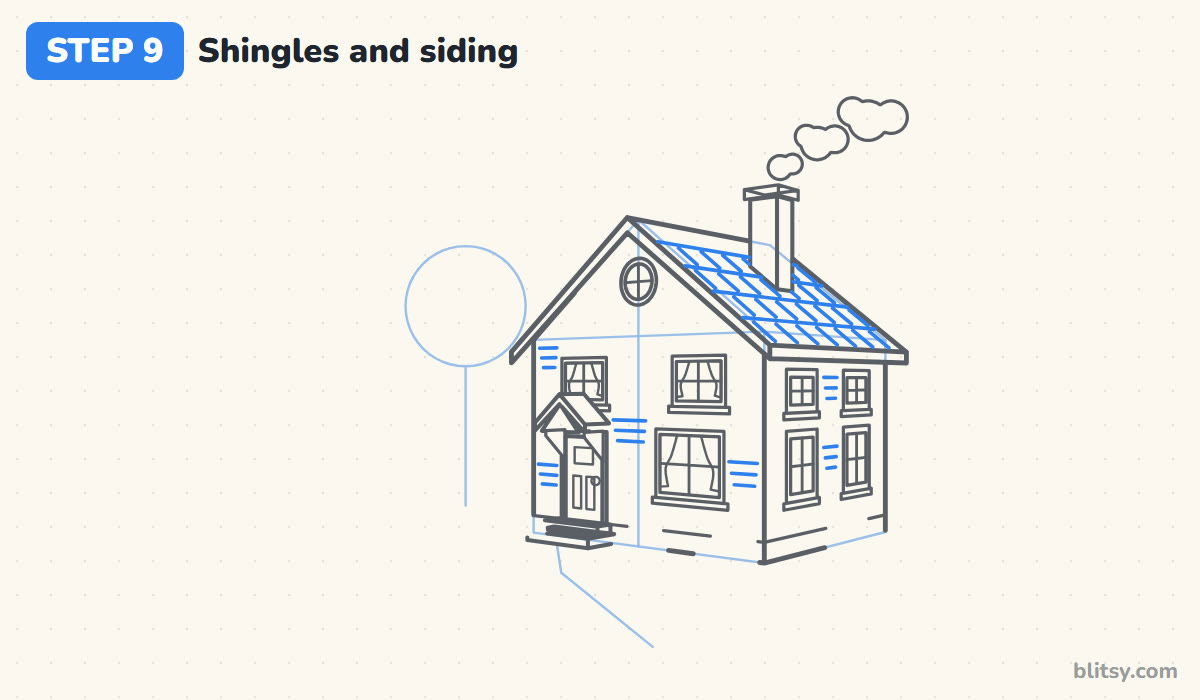
On the long roof side, draw four lines running the same way as the ridge. Between each pair, add short strokes, shifting them over on every row so they look like overlapping shingles. On the walls, add a few small groups of three lines to suggest wooden siding. A few hints are enough.
💡 Tip: Stagger the shingle strokes like bricks so no two rows line up.
Step 10: Grow the yard around the house
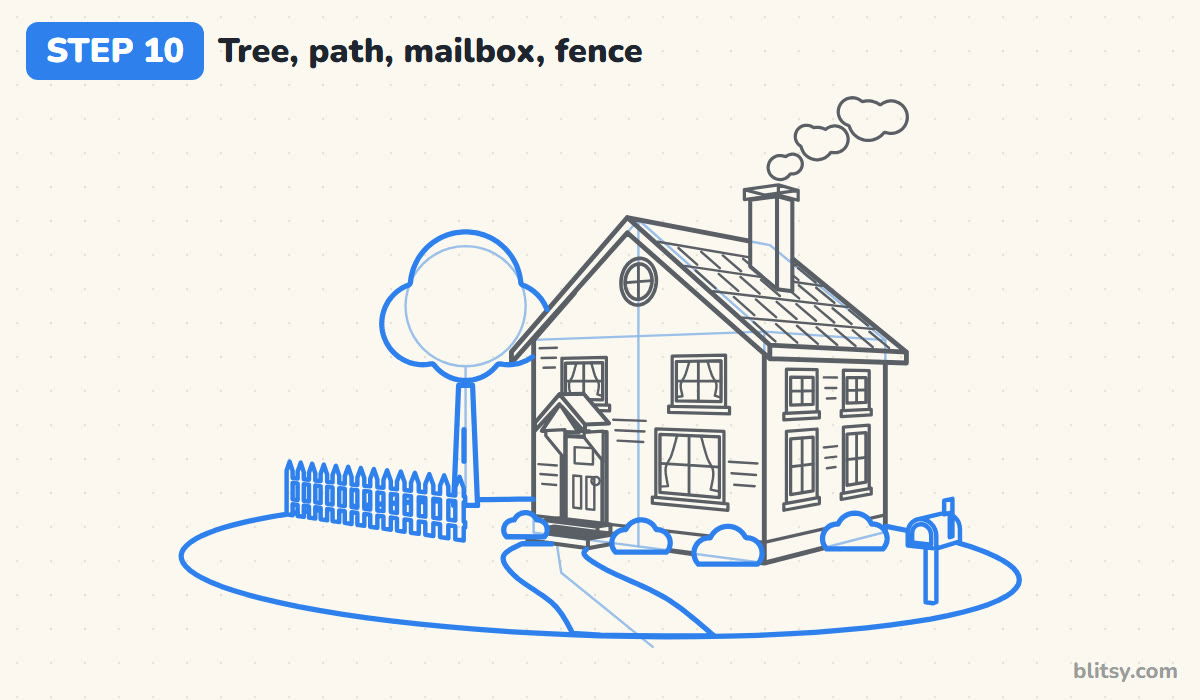
Over the tree guide, draw a bumpy crown and a trunk that widens at its base. Add the curving path from the steps toward you, wider at the front, then a big oval lawn, a few round bushes along the walls and a mailbox on a post at the right. On the left, draw a picket fence with two rails.
💡 Tip: Draw the path wider near the bottom of the page, since that part is closer to you.
Step 11: Ink the lines and erase the guides
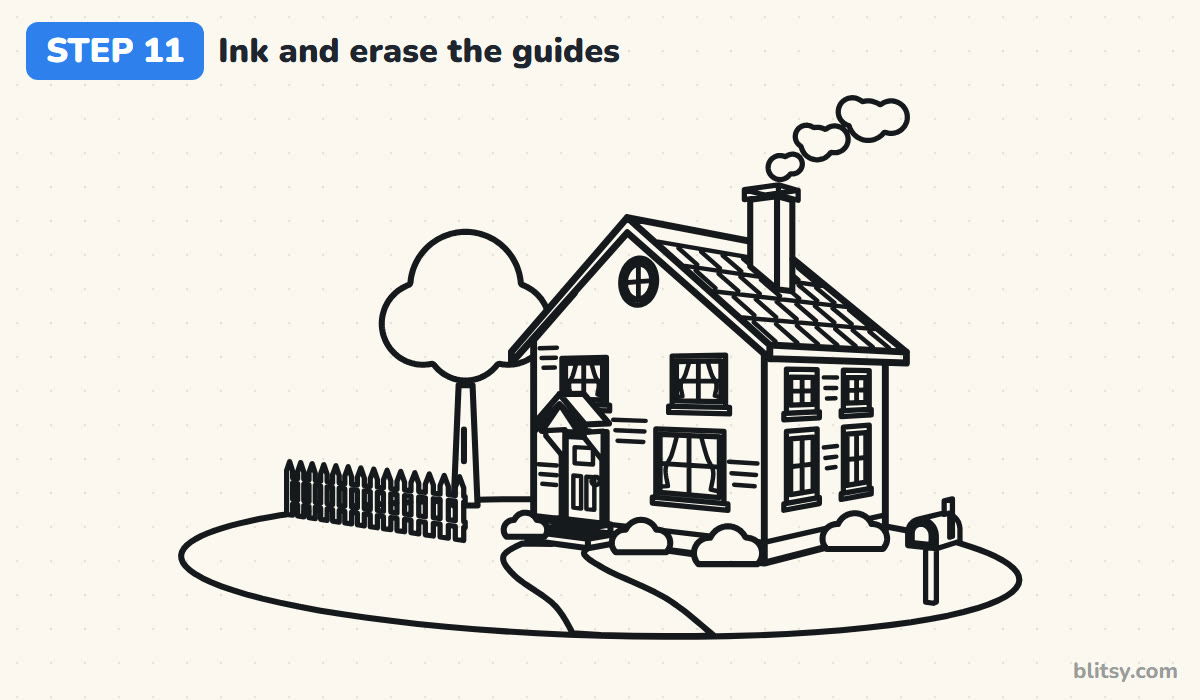
Trace every line you want to keep with your black pen, working from top to bottom so your hand never drags through wet ink. Give it a minute to dry, then erase the guide box, the roof triangle and the tree circle. If a guide is hard to see, you pressed lightly enough.




💡 Tip: Test your pen on scrap paper first to check it doesn't smear.
Step 12: Color your cozy house
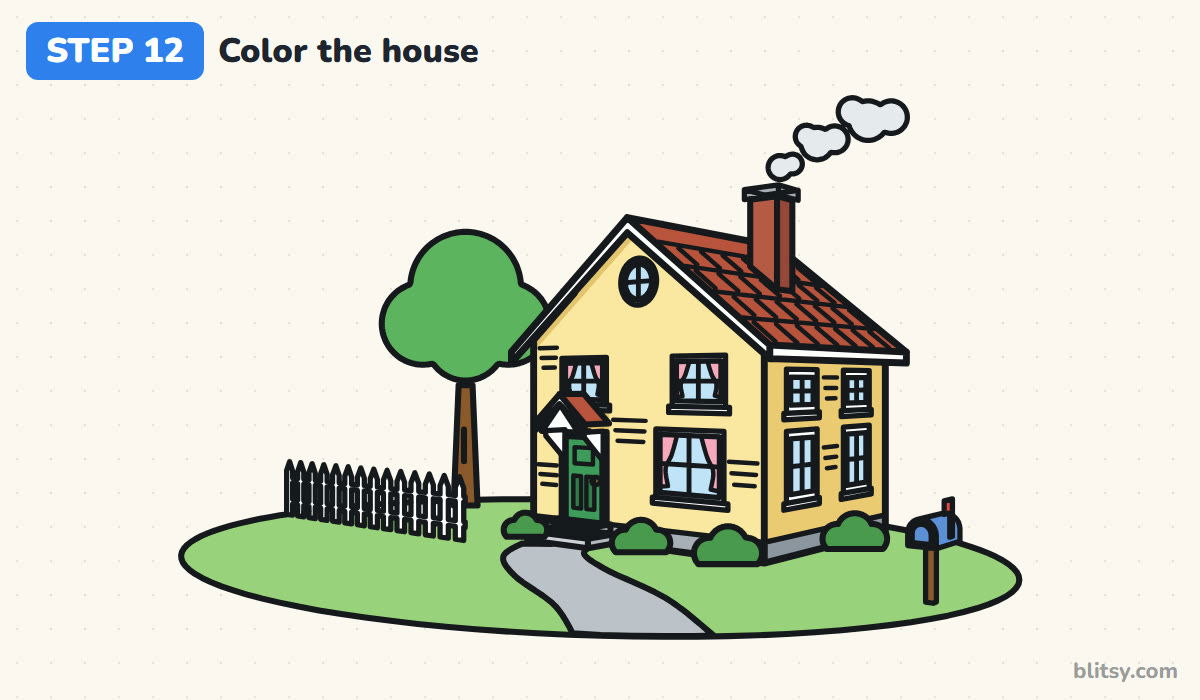
Color the front wall pale yellow and the side wall a slightly deeper yellow; that one change makes the house look solid. Make the roof and chimney red, the door and bushes green, the glass light blue and the curtains pink. Leave the trim and fence white, then add gray for the path and smoke, brown for the trunk and a green lawn.
💡 Tip: Shade the side wall slightly darker than the front to make it look turned away.
Why a House Drawing Can Look Flat or Crooked
- Leaning walls. If the corners tilt, the house looks like it's falling over. Keep every up-and-down line straight, and check them against the edge of your paper.
- A side wall as wide as the front. The house turns into a long barn. Keep the side wall narrower, since it's turning away from you.
- Side edges that don't slant. Level edges on the side wall kill the 3D look. Tilt them gently toward each other.
- A roof with no overhang. The roof looks like a hat that's too small. Let both slopes reach a little past the walls.
- Windows at random heights. The house looks messy. Line up the upstairs windows along one straight guide.
Ideas to Make the House Your Own Home
Once the basic house works, make it yours. Paint the walls light blue and the door red, swap the curtains for flower boxes, or add a third floor with one more row of windows. A swing on the tree or a cat on the steps fits nicely too. If you want more practice on the front door, the door drawing tutorial takes you through a cozy cottage door, and the same box-and-roof method also works for the towers in the castle drawing tutorial.
Free House Coloring Page and Printable PDF Steps
Want to color without drawing first? The house coloring page has the full outline in thick lines, plus a small colored example and a color key at the top, so kids can match the yellow walls and red roof. The step-by-step PDF guide holds all 12 steps and tips. Both print on Letter or A4 paper.
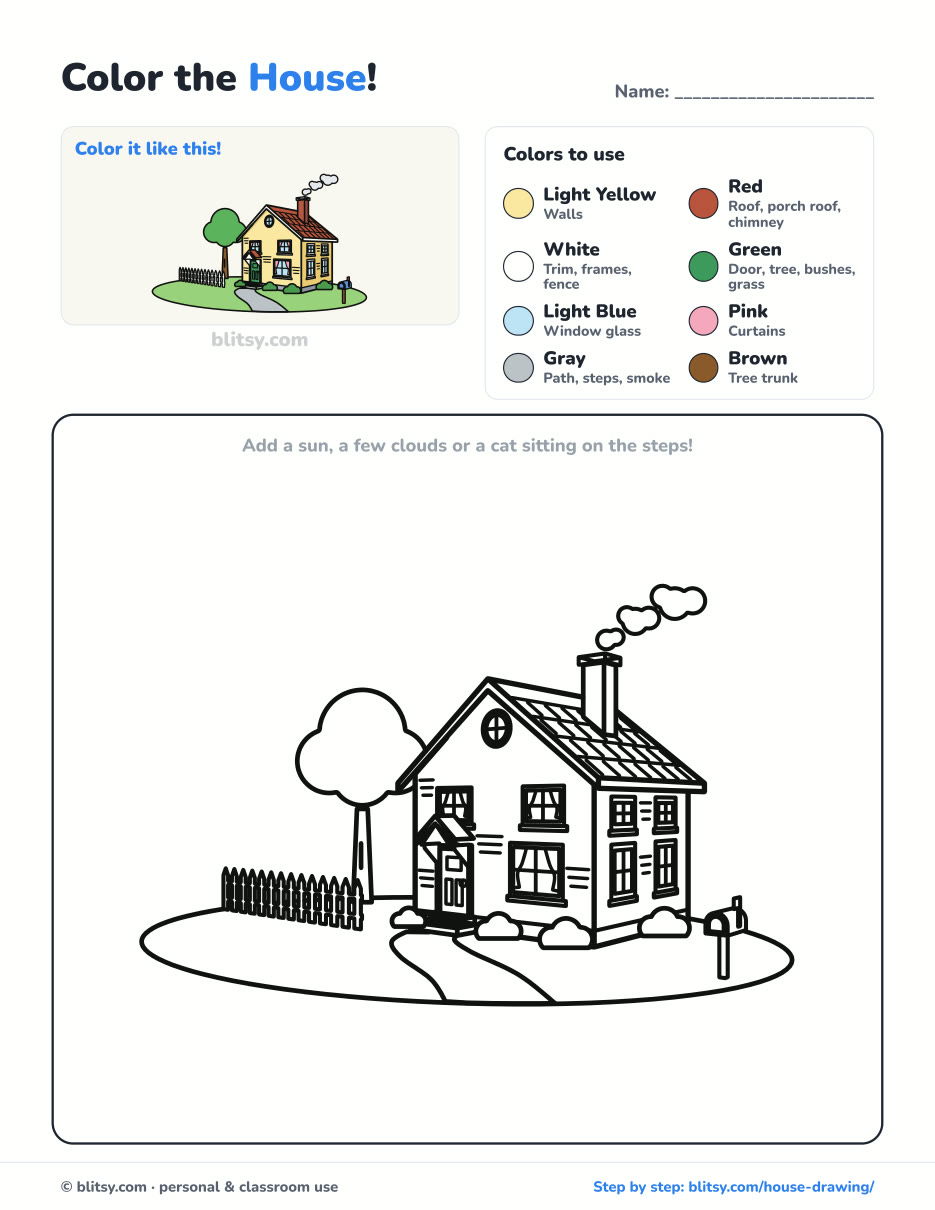
Black outlines with a colored example and the color names at the top. Ready to print and color.
⬇️ Download Coloring PageEvery step picture with its instructions and tips, to keep beside your paper while you draw.
⬇️ Download Drawing Guide📱 On a phone? Tap a download button, then open the file and choose Share → Save to Files or Print. On a computer, the PDF opens or saves straight to your Downloads folder.
Keep the House Steps Handy on Pinterest
House Drawing Questions Beginners Often Ask
What is the easiest way to draw a house in 3D?
Start with a box: a rectangle for the front and a narrower slanted shape for the side. Put a triangle on the front and a sloped roof on the side, and the house already looks solid.
How do you draw a house for kids?
Keep it simple: walls, roof, a door, two windows and the chimney smoke. Younger kids can draw the front wall only and skip the side wall and the shingles.
How long does it take to draw a house?
Around 45 minutes for the drawing and coloring. The windows and the fence take the longest.
Do I need a ruler to draw a house?
It helps with the long roof and wall edges, but it isn't required. Slow, steady strokes look fine.
Pick your own colors for the door and curtains, and you'll have a little house that feels like home. 🏠
Related posts:
 Halloween Drawing Step by Step (Cute Haunted House for Kids)
 How to Draw a Whale Step by Step (Easy for Beginners)
 How to Draw Lungs Step by Step (Easy Science Diagram)
 How to Draw a Pineapple Step by Step (Easy Crown and Slice)
 How to Draw Iron Man Step by Step (Easy Chibi for Kids)
 How to Draw a Dress Step by Step (Easy Party Dress)
 How to Draw a Chicken Step by Step (Easy for Beginners)
 How to Draw a UFO Step by Step (Cute Alien Saucer)
 How to Draw Flames Step by Step (Easy Campfire Drawing)
 How to Draw a Moon Step by Step (Sleepy Crescent + Phases)
 How to Draw a Tiger Step by Step (Easy Walking Pose)
 How to Draw a Heart Step by Step (Even, Symmetric Shape)

