
Spiders scare plenty of people, but a cartoon spider with big round eyes and a little smile is hard to be afraid of. In this lesson I'll show you how to draw a spider step by step, starting with a simple web made of straight spokes and curved rings, then a purple spider hanging from a silk thread right beside it. The tricky parts are spacing the web lines and fitting eight legs on evenly, and we handle both slowly. You only need a pencil and some patience.
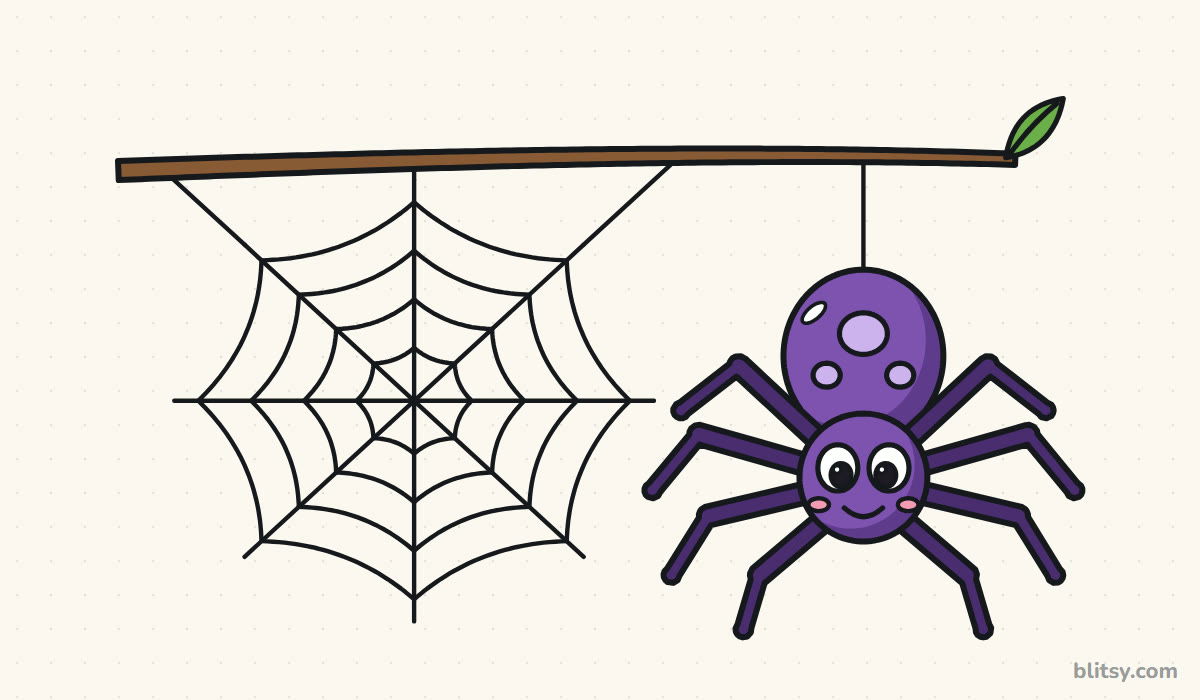
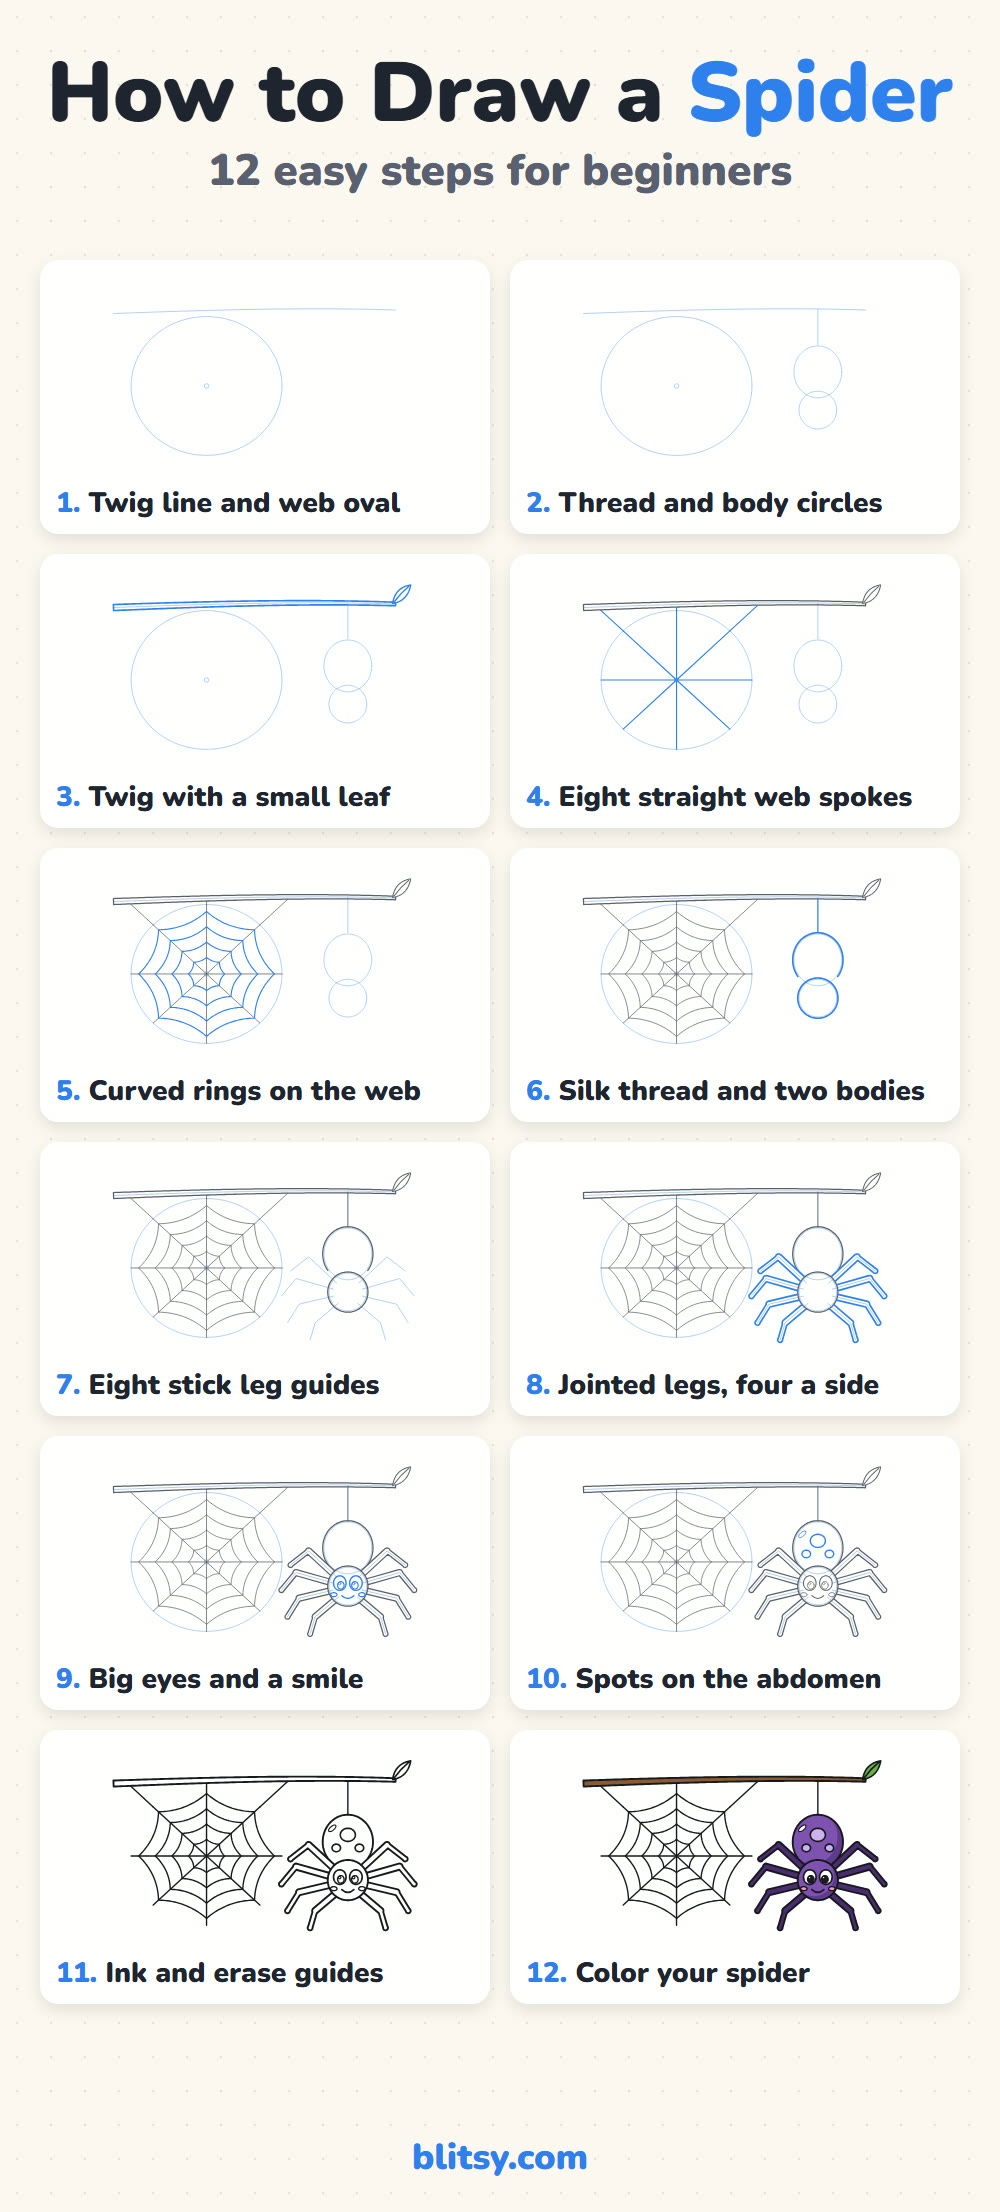
Blue lines are the ones you add in that step. The gray ones came earlier, so you can see exactly where each new part joins.
Quick overview
⏱️ Time: roughly 30 minutes including color
🎯 Level: easy, fine for kids around 6 and older
✏️ Steps: 12
🕷️ You'll draw: a friendly hanging spider next to its web
Gear for Your Spider and Web Sketch
- A regular pencil for light sketching
- A soft eraser
- A black fineliner or thin marker
- Purple, dark purple and lavender colored pencils or markers
- A little pink, brown and green, plus a gray pencil for the web
- A sheet of paper turned sideways
A ruler helps with the long web spokes, though a steady freehand line looks friendlier and is completely fine.
How to Draw a Spider Step by Step
Step 1: Sketch a twig line and a web oval
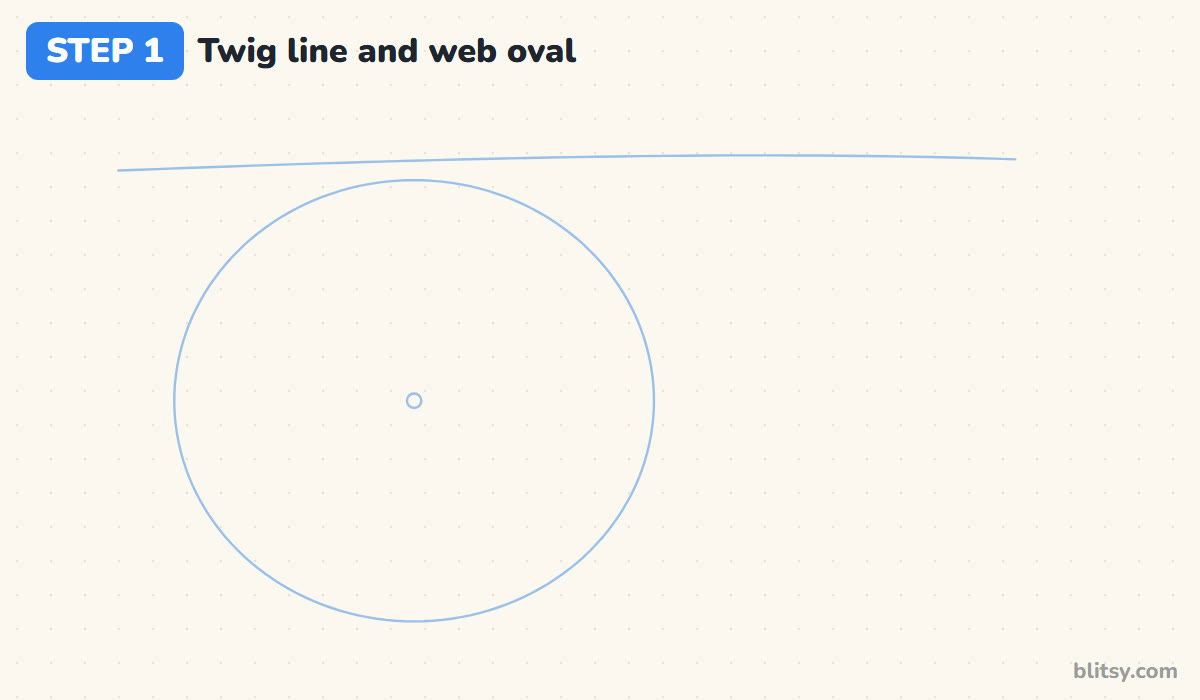
Draw a long, gently curved line across the top of your paper. That's the twig everything hangs from. Below it, on the left half, sketch a big oval that almost touches the twig, and mark a small dot in its middle. The oval shows how big the web will be, and the dot is where every spoke meets.
💡 Tip: Keep the dot in the true middle of the oval, or the web will look lopsided later.
Step 2: Add the thread and two body circles
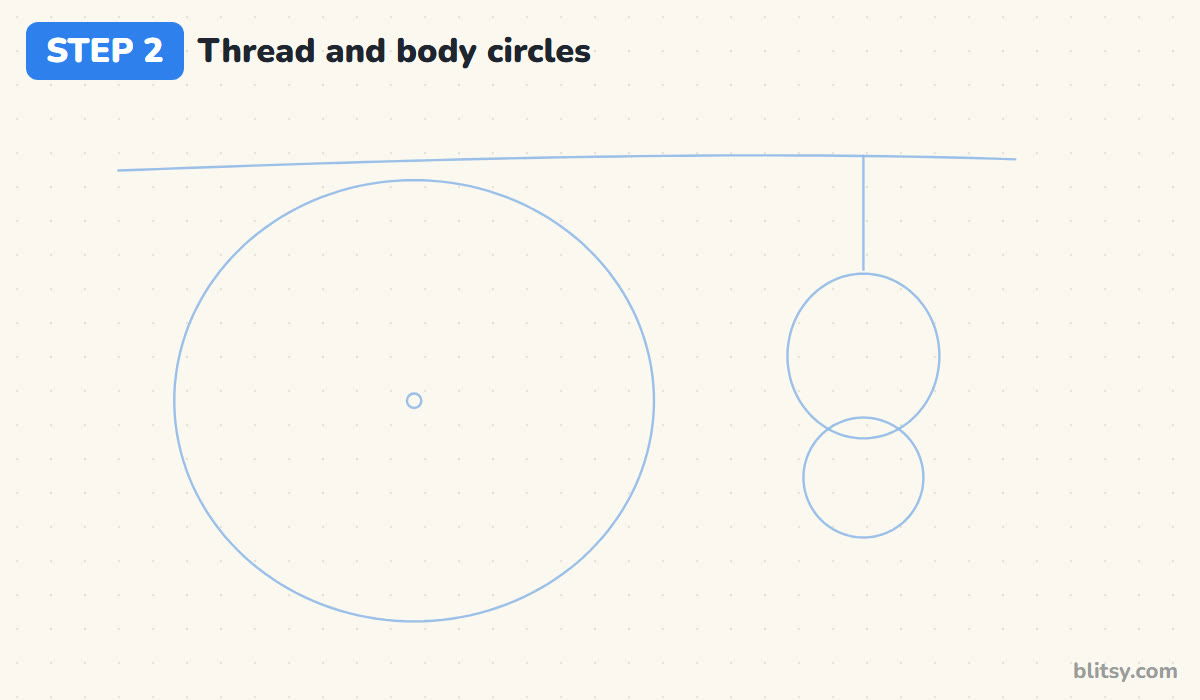
On the right side, drop a short straight line down from the twig. At its bottom, draw a slightly tall circle for the abdomen, which is the spider's back body part. Right underneath, overlapping it a little, add a smaller circle for the front body part, where the face goes. Real spiders have exactly two body parts, so two circles is all you need.
💡 Tip: Make the lower circle about three quarters the size of the upper one.
Step 3: Outline the twig and a small leaf
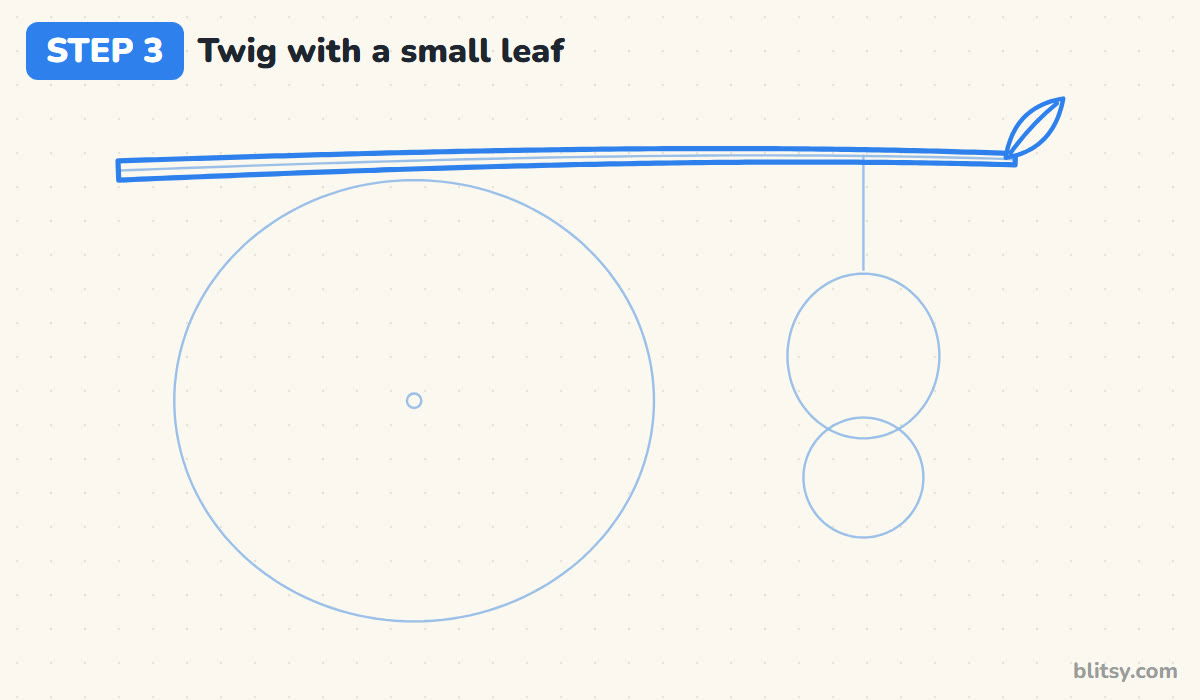
Trace the twig guide with two lines, a little thicker on the left and thinner toward the right tip, the way a real branch tapers. At the right end, add a pointed leaf that tilts up, with one curved line down its middle for the vein. The leaf is optional, but it tells the eye where the twig ends.



💡 Tip: Draw the leaf's two edges as matching curves, like a pair of parentheses.
Step 4: Draw eight straight web spokes
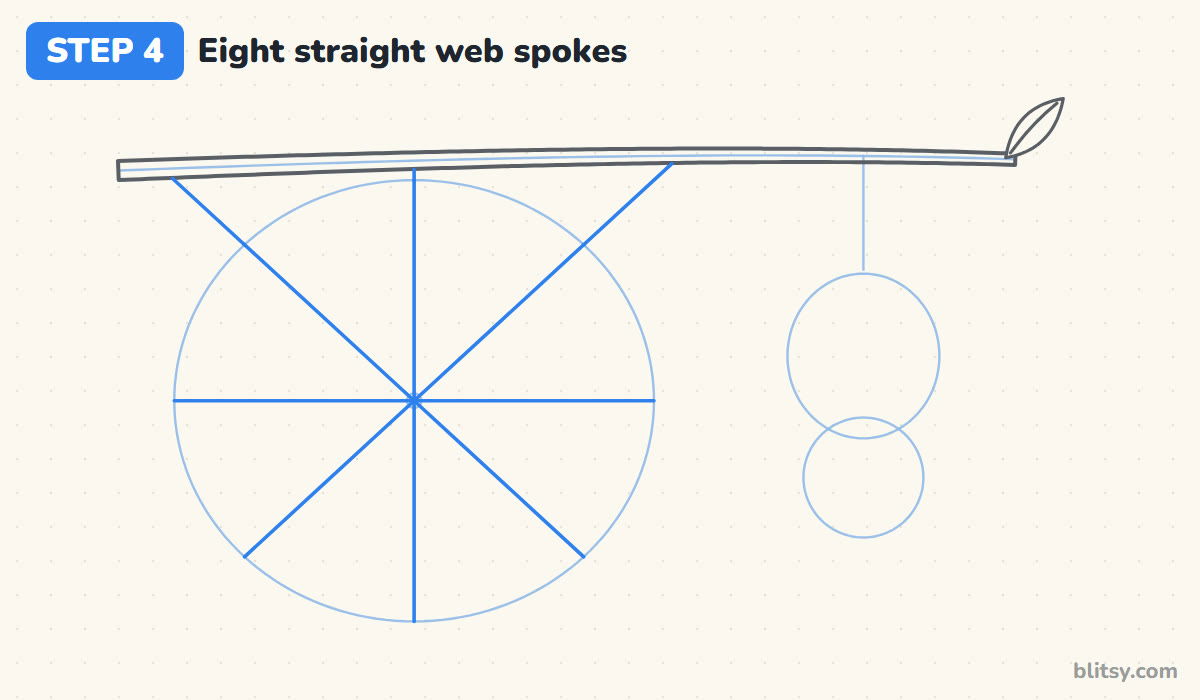
This is where the web comes together. Draw a plus sign through the centre dot, then an X through the same dot so it splits each gap in half. Now you have eight spokes, like a pizza cut into eight slices. Let the top spoke and the two upper diagonals run on to the twig. Those anchor threads hold the web up.
💡 Tip: Turn the page as you go so every spoke is drawn in the same comfortable direction.
Step 5: Connect the spokes with curved rings
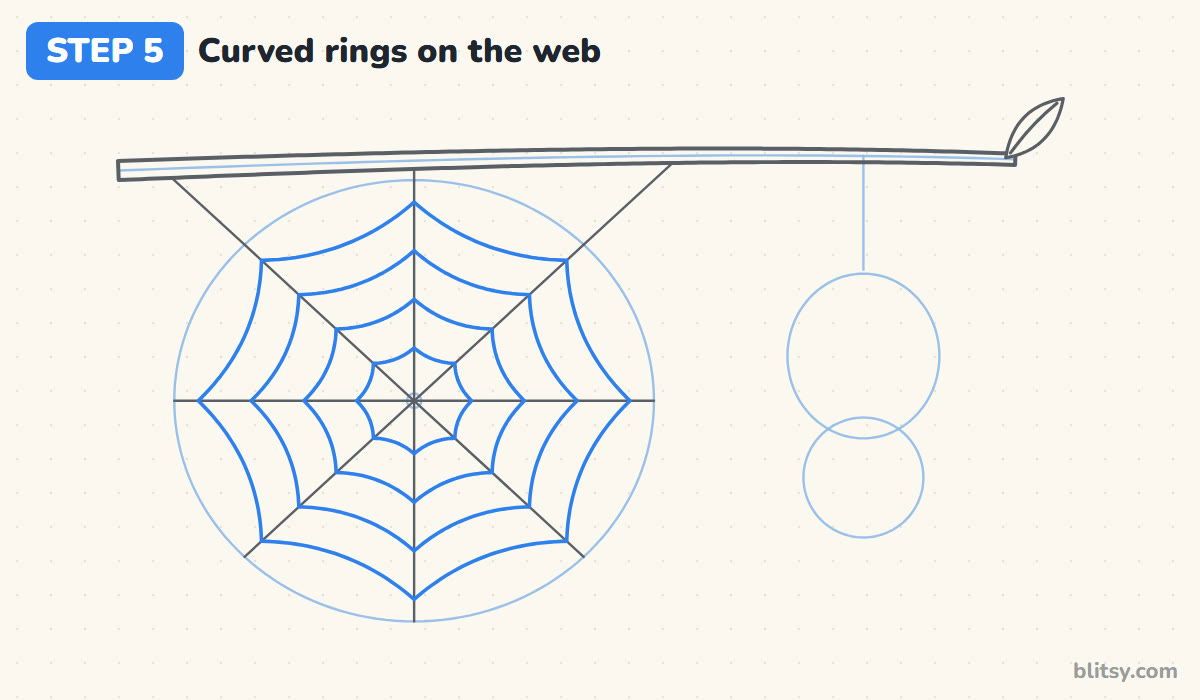
Start near the centre. Hop from one spoke to the next with a short curve that dips slightly toward the middle, and keep going until the ring closes. Make four rings, each farther out, with similar gaps. I draw the inner rings first, because small ones are where spacing goes wrong.
💡 Tip: Curve each ring segment inward, not outward. That little sag is what makes it read as silk.
Step 6: Outline the thread and both body parts
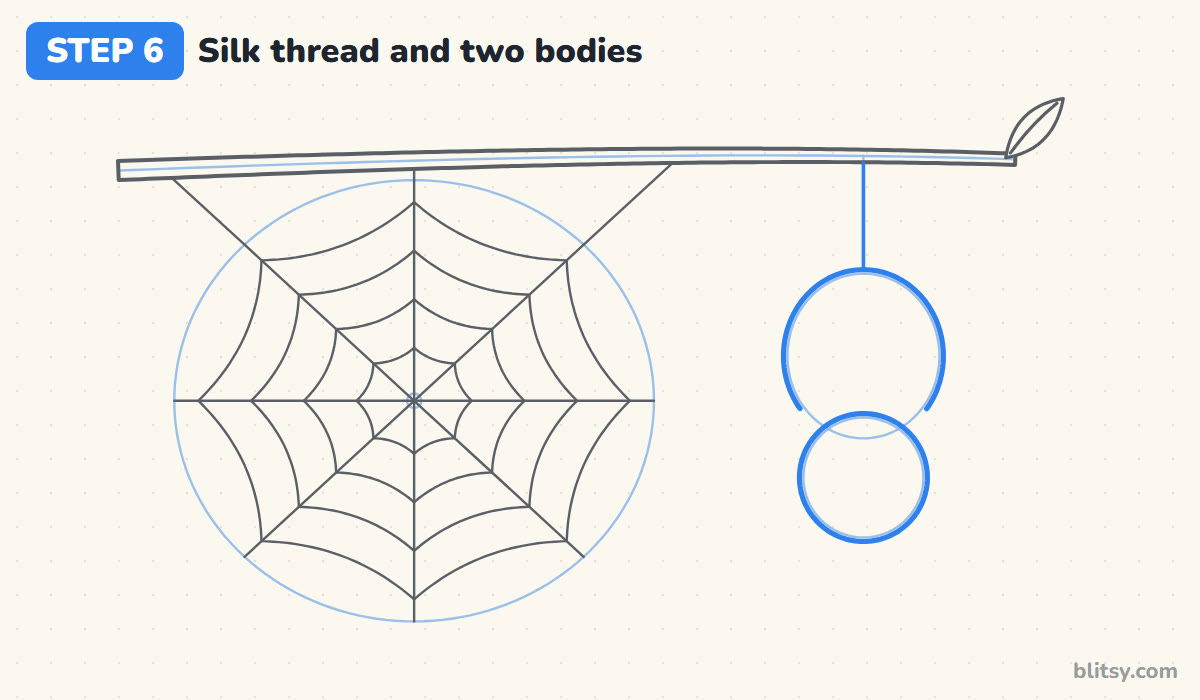
Go over the thread line with a firm, single stroke. Next, trace the abdomen circle, and stop the line where it disappears behind the head, since the smaller circle sits in front. Then trace the whole head circle. You should now see a snowman shape hanging upside down from the twig.
💡 Tip: Leave the overlap clean. Don't draw the hidden part of the big circle.
Step 7: Place eight stick leg guides
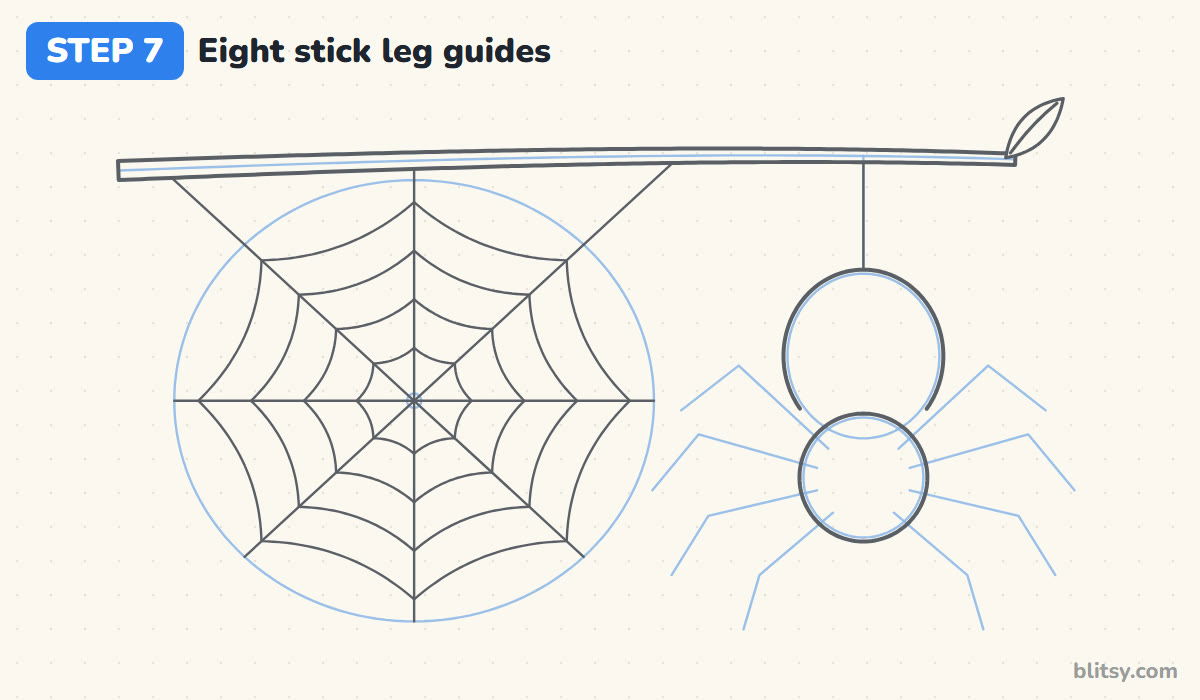
Here's how I keep eight legs even. Every leg starts on the head part, never on the abdomen. Draw four sticks on the right, spread from the top of the head to the bottom, and bend each at a knee so it rises and then drops. Mirror the same four on the left. Four plus four makes eight.

💡 Tip: Put the knees of all four legs on one side in a gentle arc so they fan out neatly.
Step 8: Turn the sticks into jointed legs
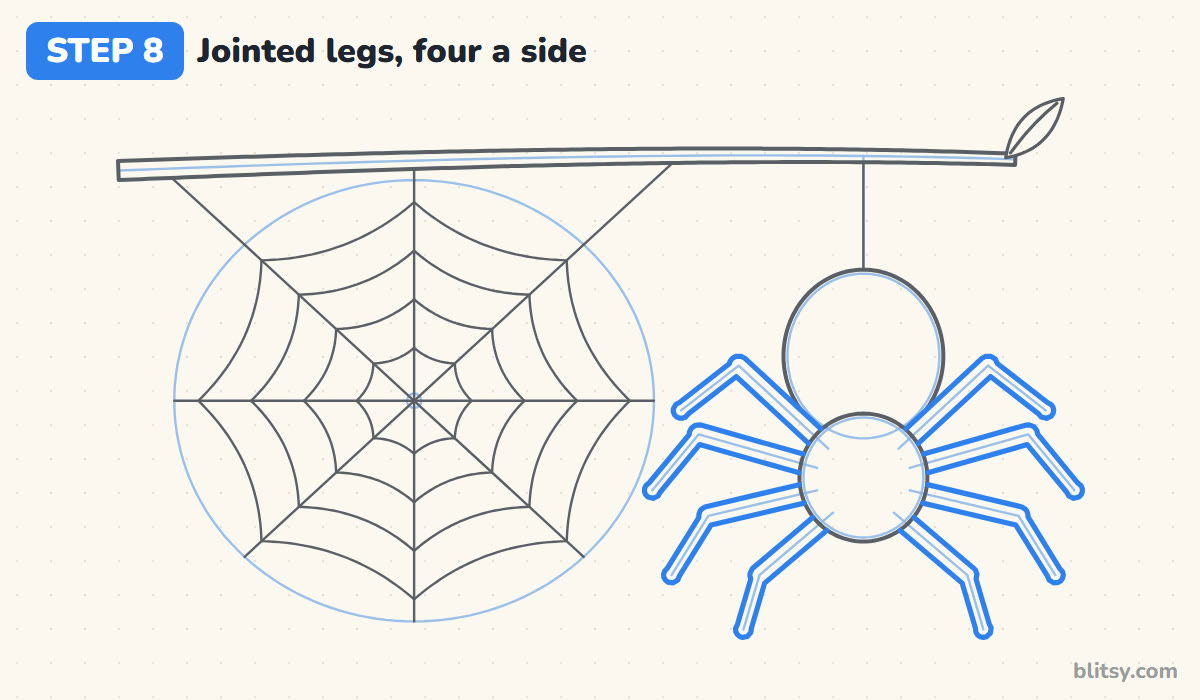
Draw a narrow tube around each stick, following the bend at the knee, and finish every leg with a small rounded foot. Start each tube at the edge of the head and leave out any line inside it. Where a top leg crosses the abdomen, stop the abdomen line at the leg.
💡 Tip: Keep all eight legs about the same thickness so none of them looks like an extra arm.
Step 9: Give it big eyes and a smile
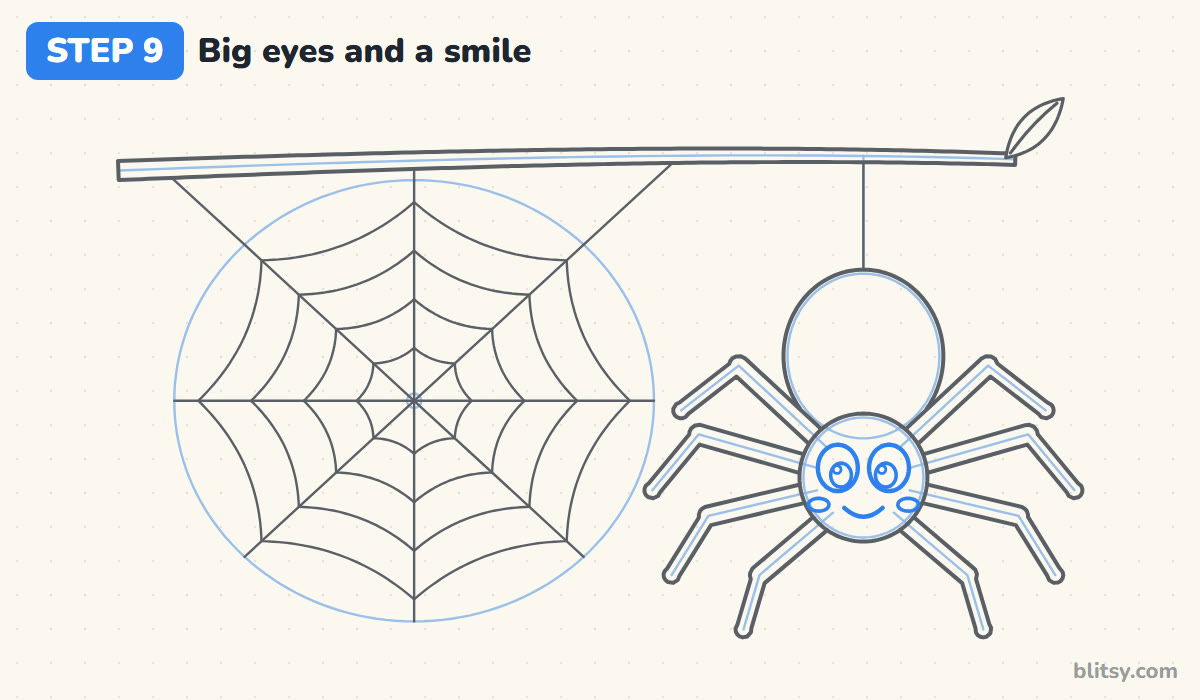
Draw two large ovals side by side in the upper half of the head. Inside each, add a round pupil toward the bottom and a tiny shine circle. A short curved smile and a small oval on each cheek finish the face. Most real spiders have eight small eyes, but two big ones look much kinder.
💡 Tip: Put both shine dots on the same side of the pupils so the eyes look straight at you.
Step 10: Add spots to the abdomen
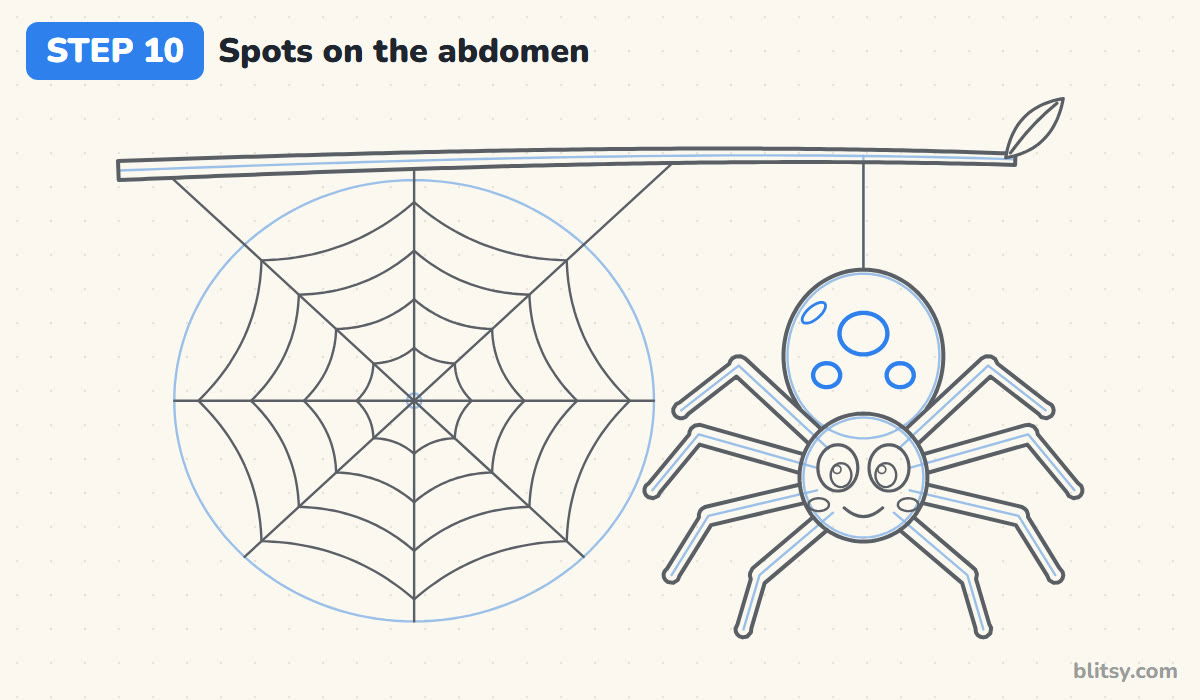
Draw one larger oval spot near the middle of the abdomen and two smaller ones below it, one on each side, like a little triangle. Then add a thin tilted oval near the upper left edge as a shine mark. The spots give the body a simple pattern without turning it into a busy one, and kids can swap them for stripes.
💡 Tip: Space the two small spots evenly from the centre line so the pattern feels balanced.
Step 11: Ink everything and erase the guides
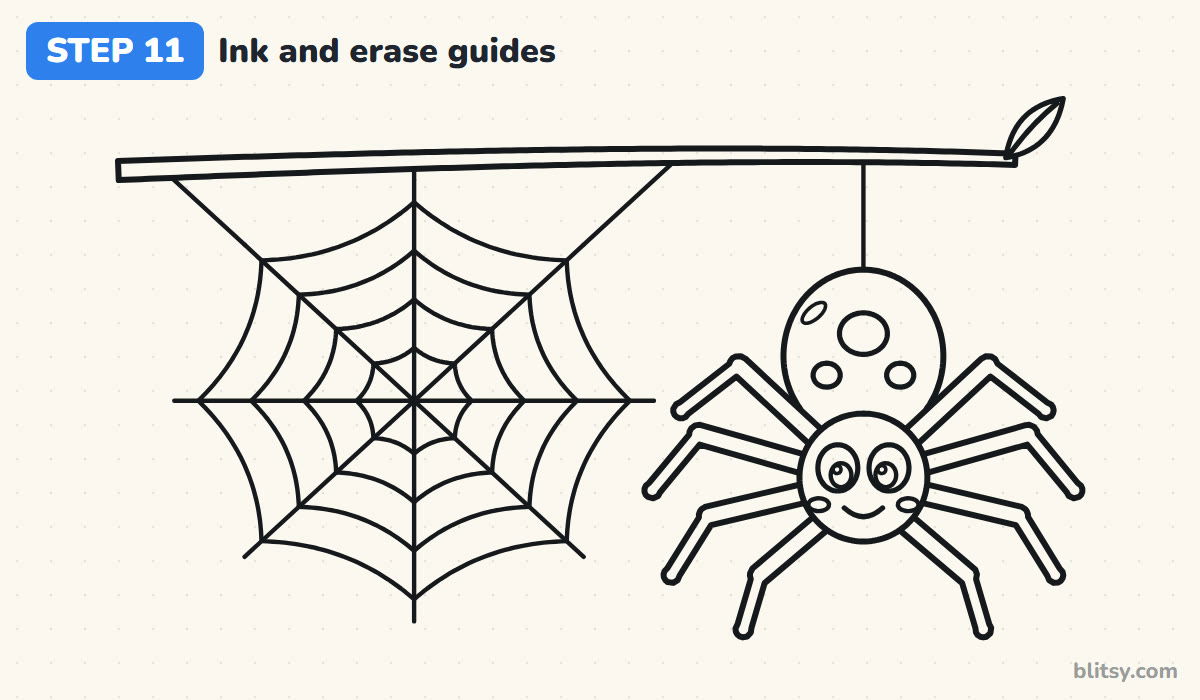
Trace every final line with your fineliner: twig, leaf, spokes, rings, thread, body and legs. Ink the long web lines in one smooth pull rather than many short strokes. Once the ink is dry, erase the oval, the stick legs and the guide circles. The web should stand on its own now.
💡 Tip: Ink from the centre of the web outward. Your hand won't drag through wet lines.
Step 12: Color your spider
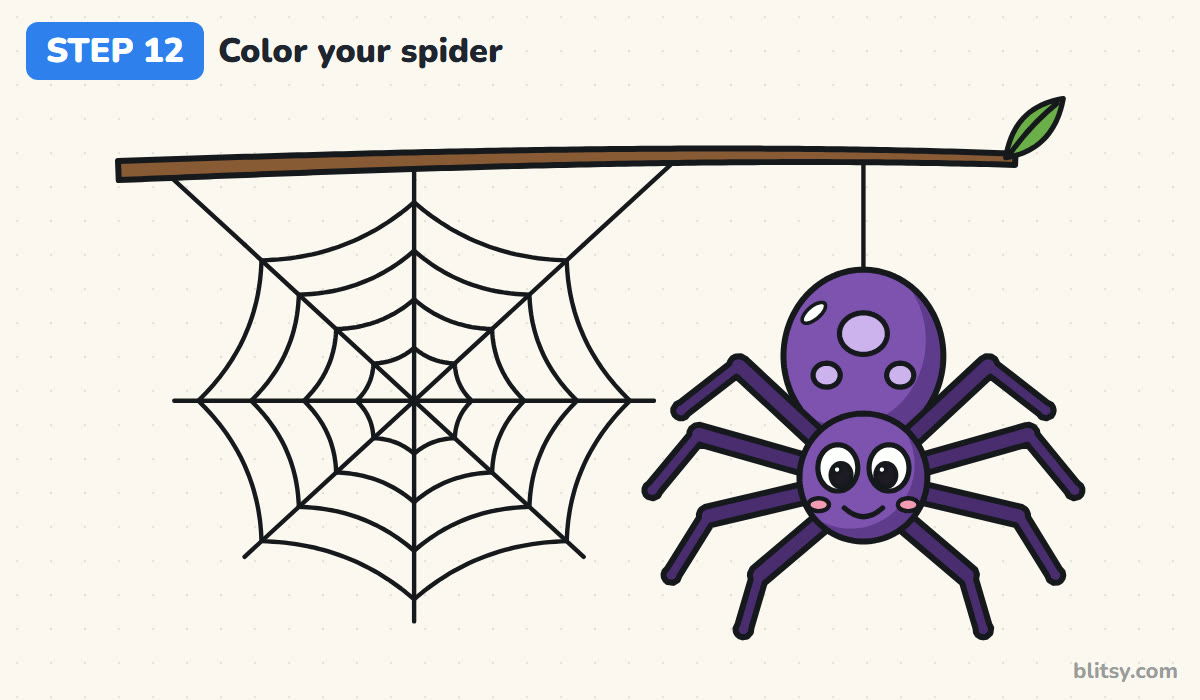
Color the twig brown and the leaf green. Use purple for the abdomen and head, with darker purple along their lower right edges for shading. The legs are dark purple, the spots lavender and the cheeks pink. Leave the eyes and shines white, then go over the web lightly in gray.
💡 Tip: Color in small circles on the body. It hides the strokes and looks smoother.
Spider Drawing Slips and How to Fix Them
- Six legs instead of eight. That's an insect. Count four on each side before you ink anything.
- Legs growing out of the abdomen. A spider's legs all attach to the front body part. Move them up onto the head circle.
- Web spokes that don't meet in one point. Redraw them through the centre dot, plus sign first, then the X.
- Rings that bulge outward. Silk sags between spokes. Pull each ring segment slightly toward the middle.
- Straight, stiff legs. Without a knee the spider looks flat. Bend every leg once, up and then down.
Fresh Spins on Your Spider Drawing
Once this one feels easy, try a black spider with white spots for a Halloween look, or give your purple spider a tiny hat. Dew drops along the rings or a little fly in one corner add a story. For younger kids, skip the leaf and draw only two rings in the web. For spooky season, the Halloween haunted house tutorial pairs well with this web, and if bugs are your thing, try how to draw an ant next.
Spider Coloring Page and Printable Steps
Grab the free spider coloring page: a colored spider at the top to copy, a key with each color and the part it belongs to, and a big outline with plenty of room for dew drops or a fly. The step-by-step PDF guide has all 12 steps with pictures and tips, and both print on Letter or A4 paper.
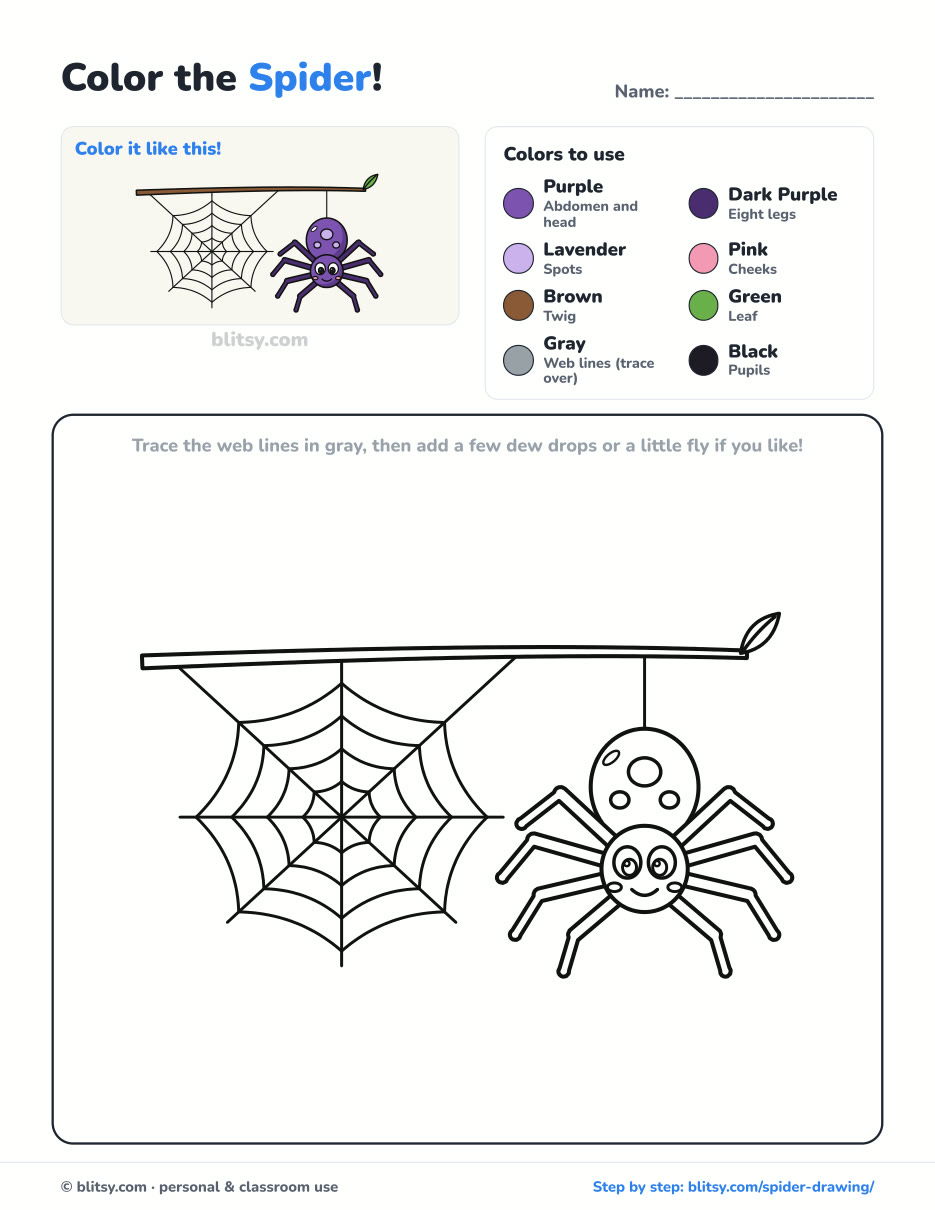
Black outlines with a colored example and the color names at the top. Ready to print and color.
⬇️ Download Coloring PageEvery step picture with its instructions and tips, to keep beside your paper while you draw.
⬇️ Download Drawing Guide📱 On a phone? Tap a download button, then open the file and choose Share → Save to Files or Print. On a computer, the PDF opens or saves straight to your Downloads folder.
Keep the Whole Spider Lesson on One Pin
Spider Finished? Draw These Critters Next
Each link below is a full step-by-step tutorial, with one picture for every step, so you can move straight on to another animal.
- Chicken Drawing: A hen and her chick stand on a patch of grass in this how to draw a chicken step by step lesson.
- Bear Drawing: Draw a walking brown bear, head low and one paw forward, with the bear drawing tutorial.
- Dog Drawing: Three circles grow into a beagle-style dog with its tail up in this easy dog drawing tutorial.
- Dove Drawing: Wings raised and an olive branch in its beak: that's where the dove drawing step by step lesson ends.
- Peacock Drawing: Fan out a proud tail in 11 calm steps with the peacock drawing tutorial.
- Mouse Drawing: Learn how to draw a mouse sitting up with a piece of cheese in its paws.
- French Bulldog Drawing: A square-headed Frenchie in a bow tie is the goal of this French bulldog drawing tutorial.
- Fish Drawing: Draw a goldfish with neat scales and seaweed beside it in the fish drawing step by step guide.
- Lion Drawing: A big mane and kind eyes come together in this how to draw a lion tutorial.
- Ladybug Drawing: Another small bug to try: the ladybug drawing tutorial puts one red ladybug on a leaf and a second in flight.
Spider Drawing Questions I Hear Often
What is the easiest way to draw a spider?
Draw two circles, a bigger one for the abdomen and a smaller one for the head part, then add four bent legs on each side of the smaller circle. Big eyes and a smile make it friendly.
How many legs does a spider have?
Eight. Spiders are arachnids, not insects, so they have eight legs and two body parts. Insects like ants have six legs and three body parts.
How do you draw a spider web easily?
Draw a plus sign and an X through one centre point to make eight spokes, then connect the spokes with curved rings that dip slightly toward the middle.
Is this spider drawing good for kids?
Yes. Kids from about six can follow it. Younger ones can skip the leaf and the leg shading, and use fewer web rings.
Hang your spider from its thread, give it a name, and see how many friends it can catch on the web. 🕷️✏️
Related posts:
 How to Draw a Car Step by Step (Easy Drawing for Beginners)
 How to Draw Godzilla Step by Step (Easy Kaiju for Beginners)
 How to Draw a Whale Step by Step (Easy for Beginners)
 How to Draw a Rat Step by Step (Easy for Beginners)
 How to Draw an Arctic Fox Step by Step (Easy for Beginners)
 How to Draw a Ladybug Step by Step (Easy for Beginners)
 How to Draw a Dog Step by Step (Easy Side View for Beginners)
 How to Draw a Butterfly Step by Step (Easy for Beginners)
 How to Draw a Leopard Step by Step (Easy for Beginners)
 How to Draw a Light Bulb Step by Step (Easy for Beginners)
 How to Draw a Crow Step by Step (Easy for Beginners)
 How to Draw an Eagle Step by Step (Easy for Beginners)

