
Every good dolphin drawing hangs on one curve. Get that arch right and the animal already looks like it's flying out of the sea, even before the fins go on. This lesson shows you how to draw a dolphin step by step, starting with a light curved line and a circle and ending with a smiling bottlenose leaping over a splash. I like it for beginners because there are no legs, no fur and only one eye to place.
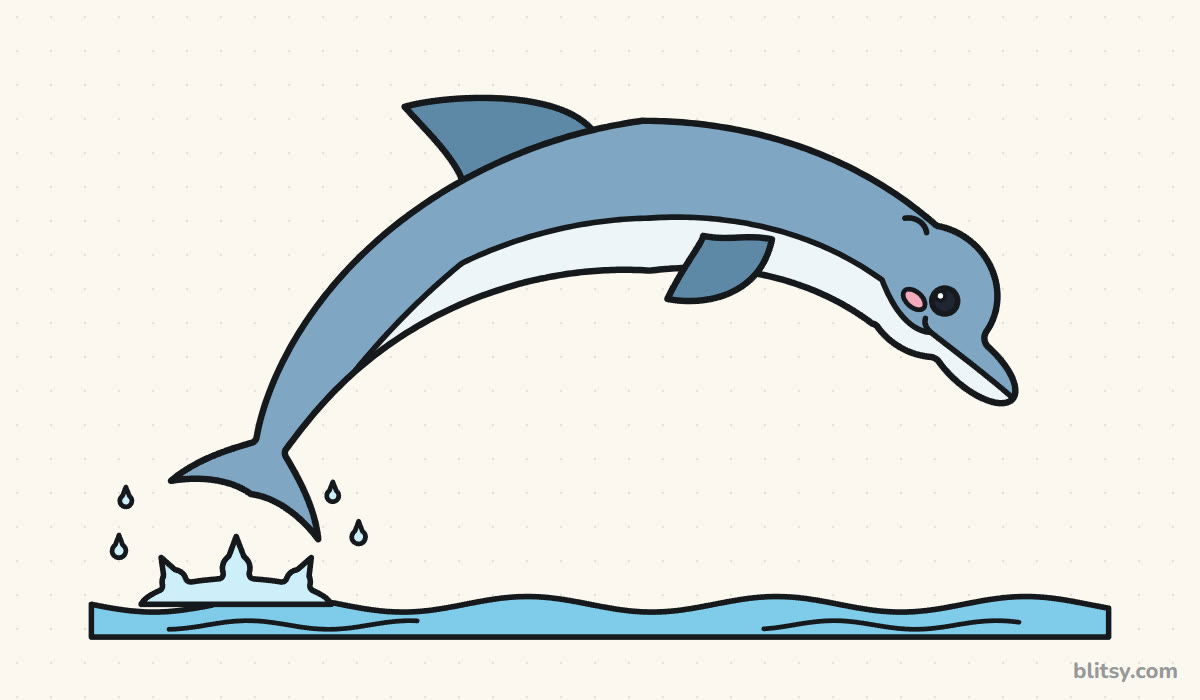
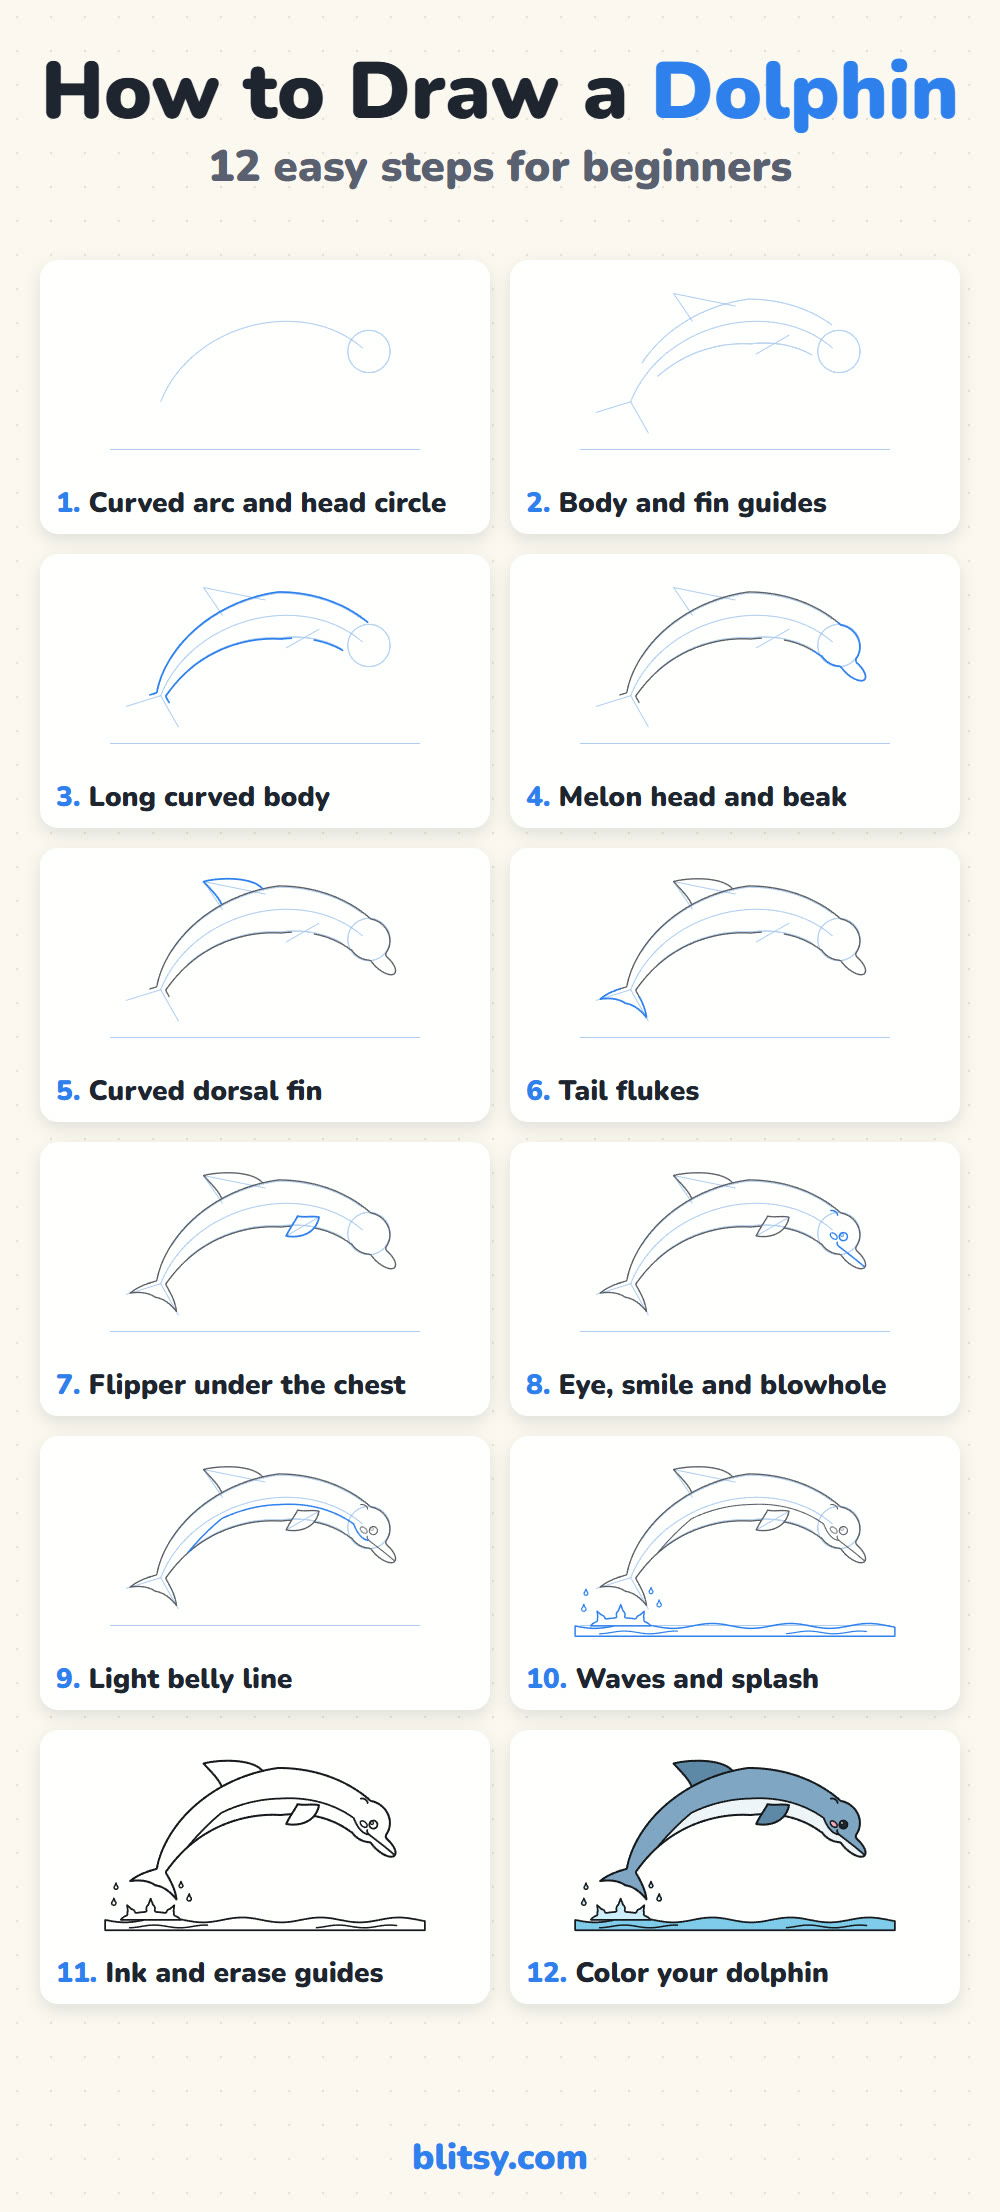
Watch the colors in the pictures: fresh lines for that step are blue, older ones gray. Copy the blue, compare, keep going.
Quick overview
⏱️ Time: about 30 minutes, coloring included
🎯 Level: easy, fine for kids around 6 and up
✏️ Steps: 12
🐬 You'll draw: a smiling bottlenose dolphin leaping over a splash
Supplies for a Leaping Dolphin
- A pencil you can press lightly (HB works well)
- A soft eraser that won't smear
- A black marker or fineliner for the final outline
- Colored pencils or crayons in blue gray, a darker blue gray, white, pink, black and two blues
- A sheet of plain paper, turned sideways
Sideways paper matters here, because the arc is much wider than it is tall.
How to Draw a Dolphin Step by Step
Step 1: Sketch the arc, a head circle and the water line
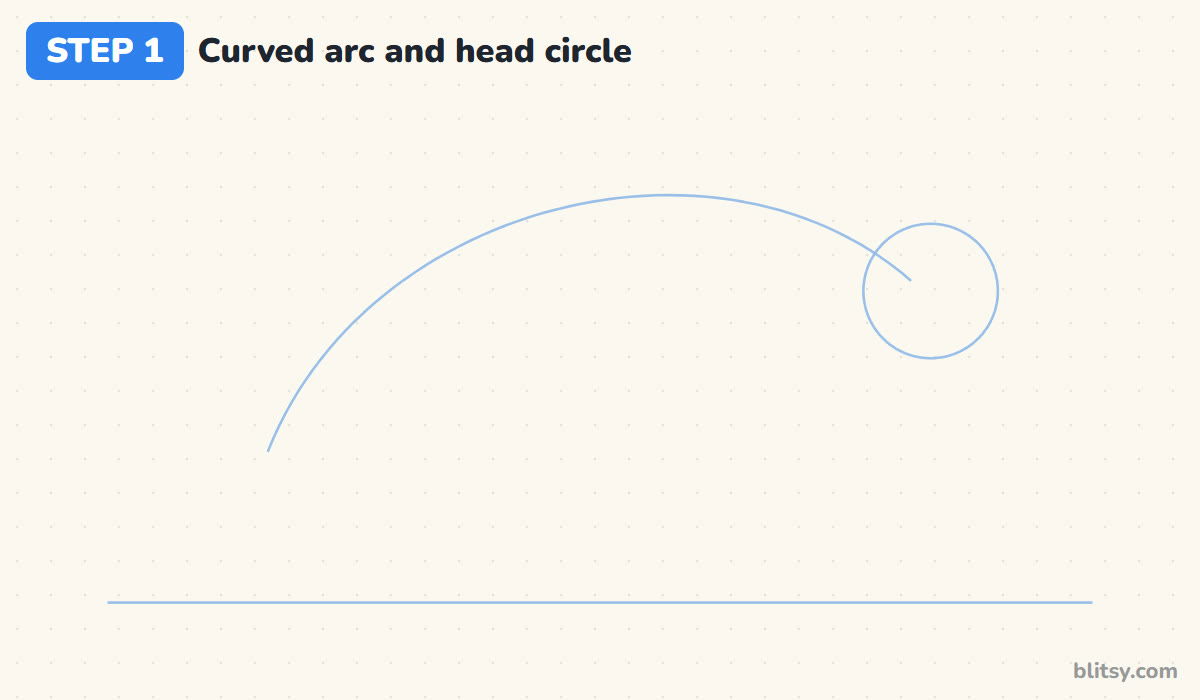
Draw a straight line low on the page for the water. Above it, sketch one long curve like a rainbow that starts near the left of the water line, rises to its highest point a little left of center, and comes down on the right. Where the curve ends, draw a circle about as wide as your thumb is long. That circle is the head.
💡 Tip: Keep the curve smooth and in one stroke if you can. A wobbly arc makes a wobbly dolphin.
Step 2: Add body guides and fin lines
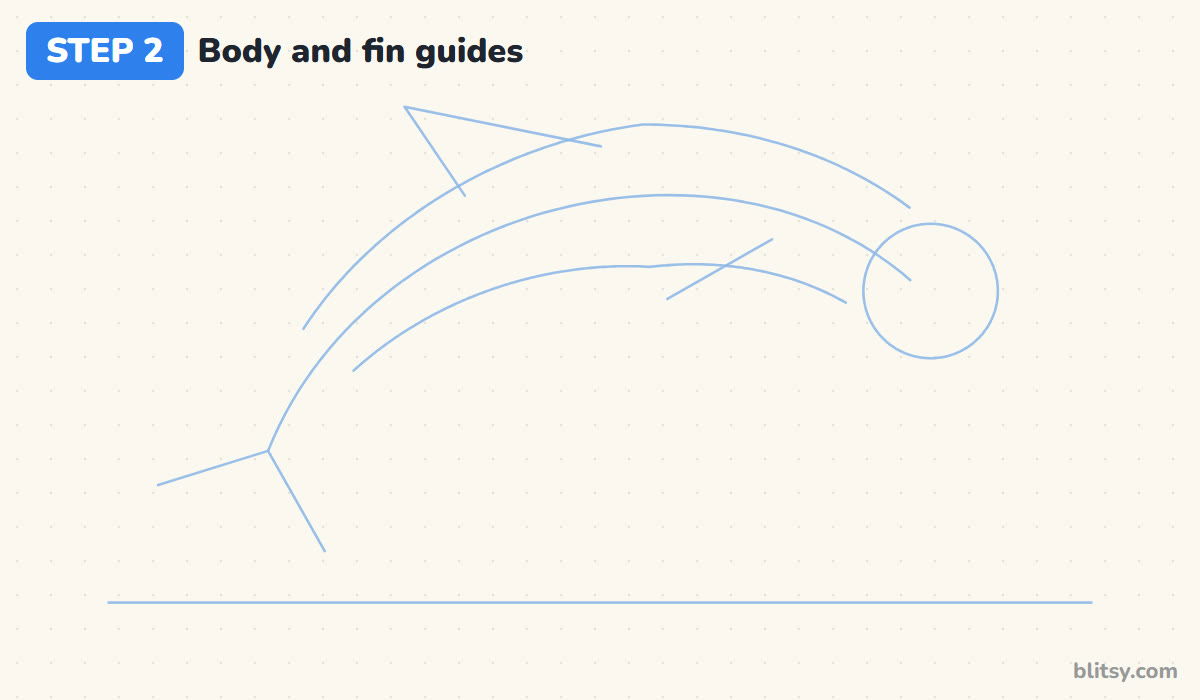
Draw two more curves along the arc, one above it and one below, so you get a long band that is thickest in the middle and narrows to the left. Near the middle of the top, sketch a small triangle for the dorsal fin. At the left end draw a V for the tail, and under the chest one short slanted line for the flipper.
💡 Tip: The band should be about as thick as the head circle at its widest point and very thin at the tail.
Step 3: Draw the long curved body
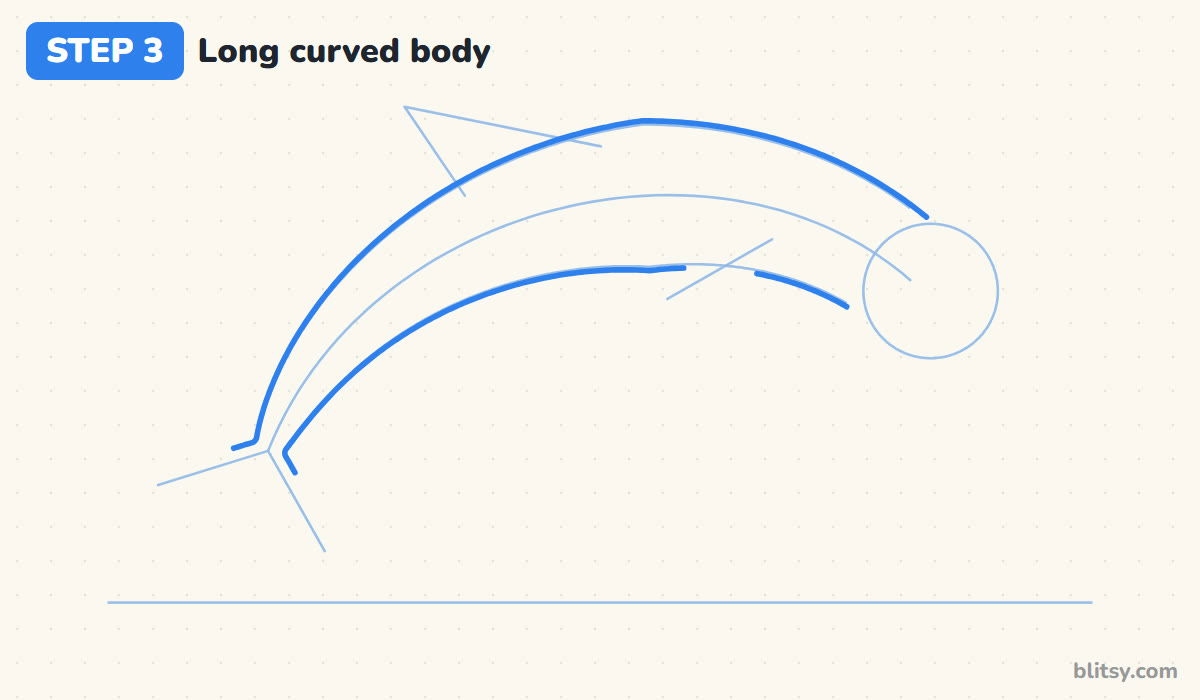
Now go over the top and bottom of the band with firmer lines. The back line runs from the tail all the way to the head circle. The belly line is shorter, and I leave a small gap where the flipper will sit. At the tail end, let both lines pinch in until they almost meet.
💡 Tip: Stop the lines at the head circle. The head gets its own shape next.




Step 4: Shape the melon head and the short beak
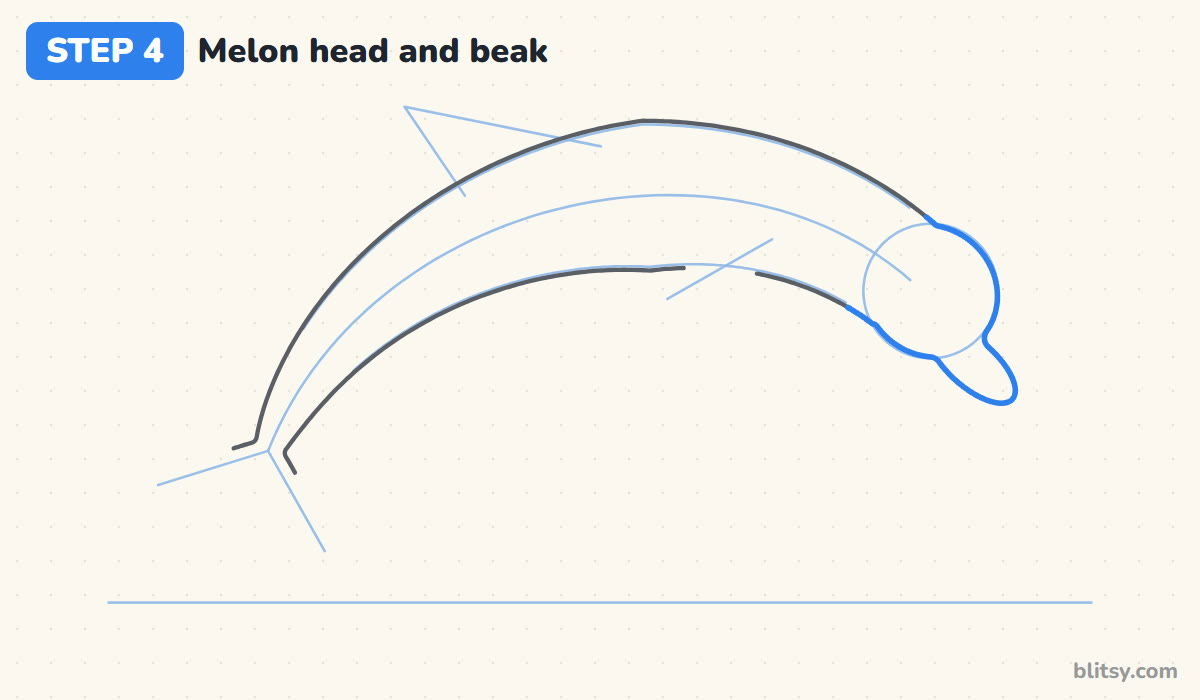
A bottlenose has a round, bulging forehead called the melon. Trace the front of the head circle to make it, then add a short, rounded beak at the lower front, a bit like a thumb. I always connect the bottom of the beak back to the belly line with one smooth curve under the chin.
💡 Tip: Keep the beak short. A long thin beak turns your bottlenose into a different kind of dolphin, or even a swordfish.
Step 5: Draw the curved dorsal fin
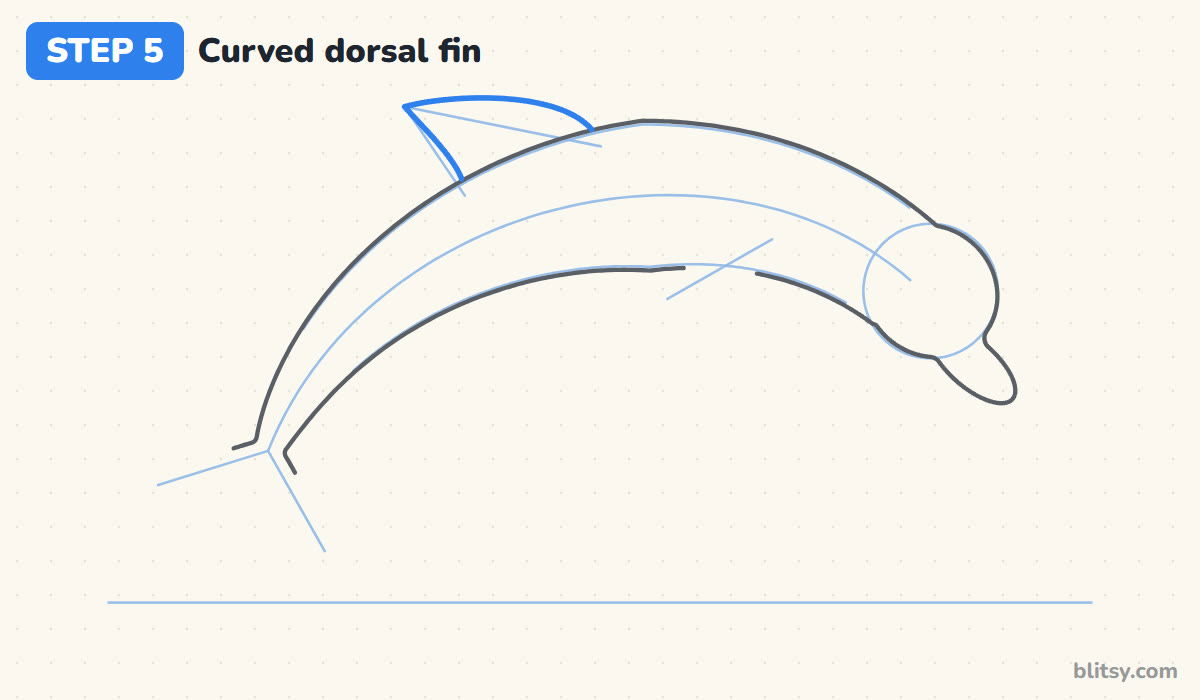
Use the triangle guide on the back. The front edge of the fin bulges out in a gentle curve, the tip points back toward the tail, and the back edge curves inward like a hook. Its bottom tucks behind the body line, so you don't draw a line across the base.
💡 Tip: If the fin stands straight up, it looks stiff. Leaning it toward the tail adds speed.
Step 6: Add the tail flukes
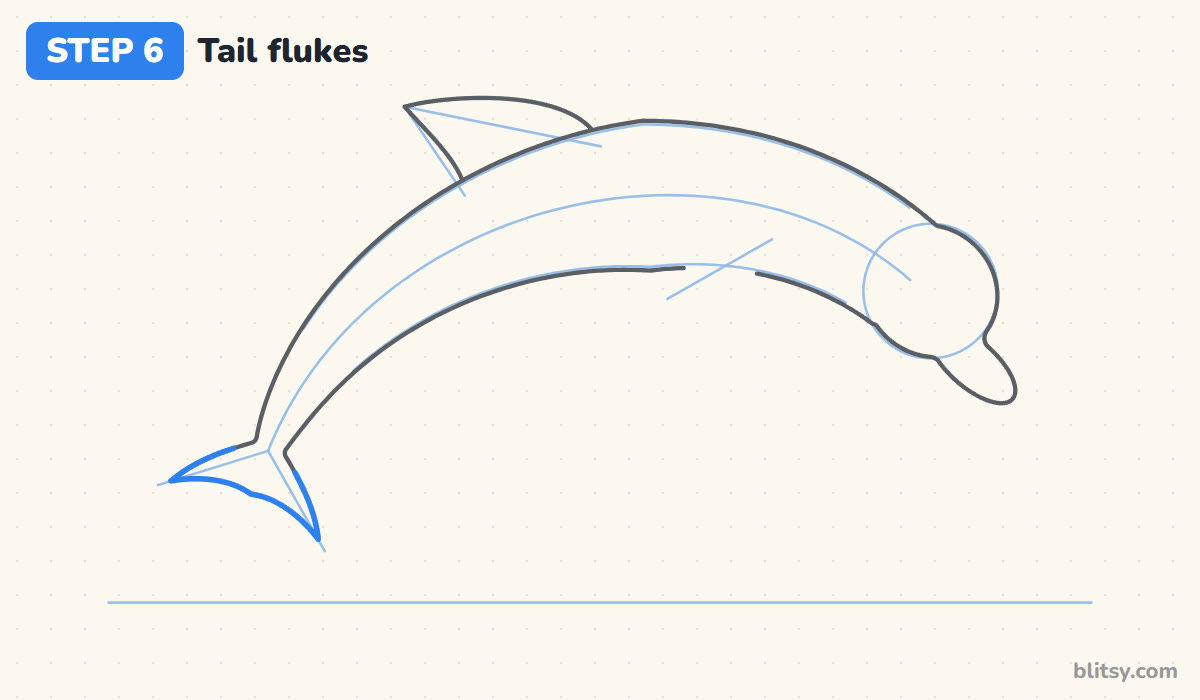
At the narrow end of the body, draw two pointed lobes that spread out along your V guide. Each has a curved front edge and a slightly scooped back edge, and they meet in a little notch. My test: together they should look like a wide, soft letter V.
💡 Tip: Make both lobes the same size. Uneven flukes are the first thing people notice.
Step 7: Draw the flipper under the chest
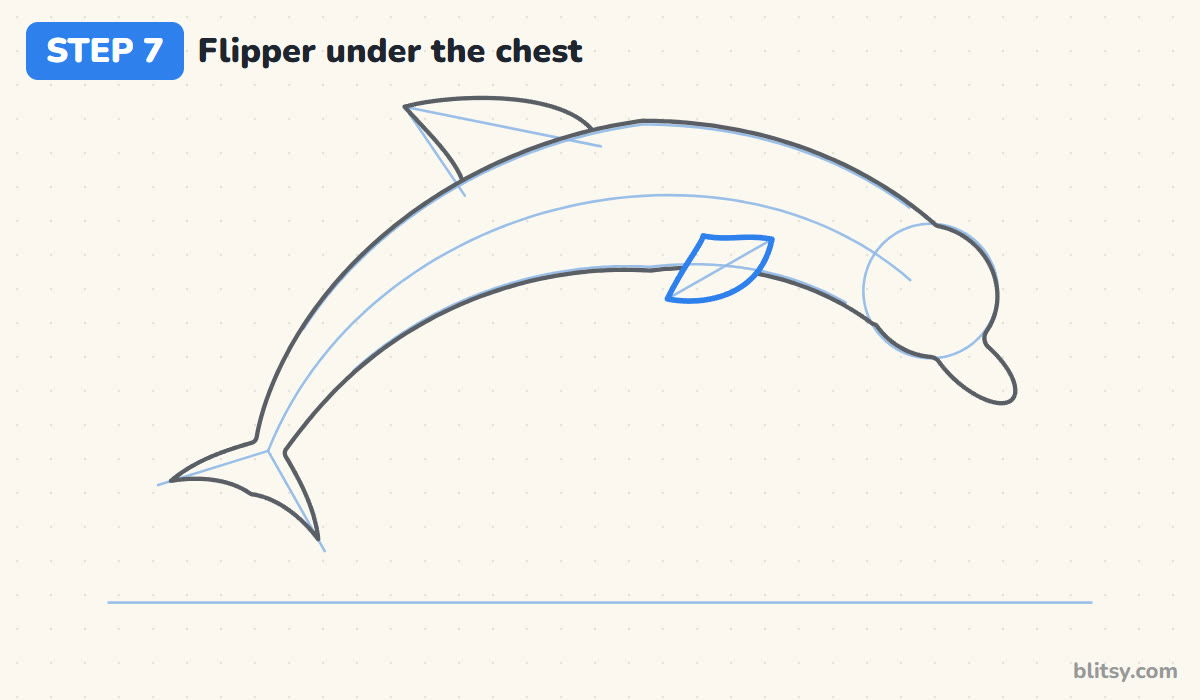
In the gap you left in the belly line, draw one flipper. It starts wide where it joins the body and tapers to a rounded point that sweeps back toward the tail, like a small leaf on its side. The other flipper is hidden on the far side.
💡 Tip: Point the flipper backward, never forward. Forward flippers make the dolphin look like it's braking.


Step 8: Give it an eye, a smile and a blowhole
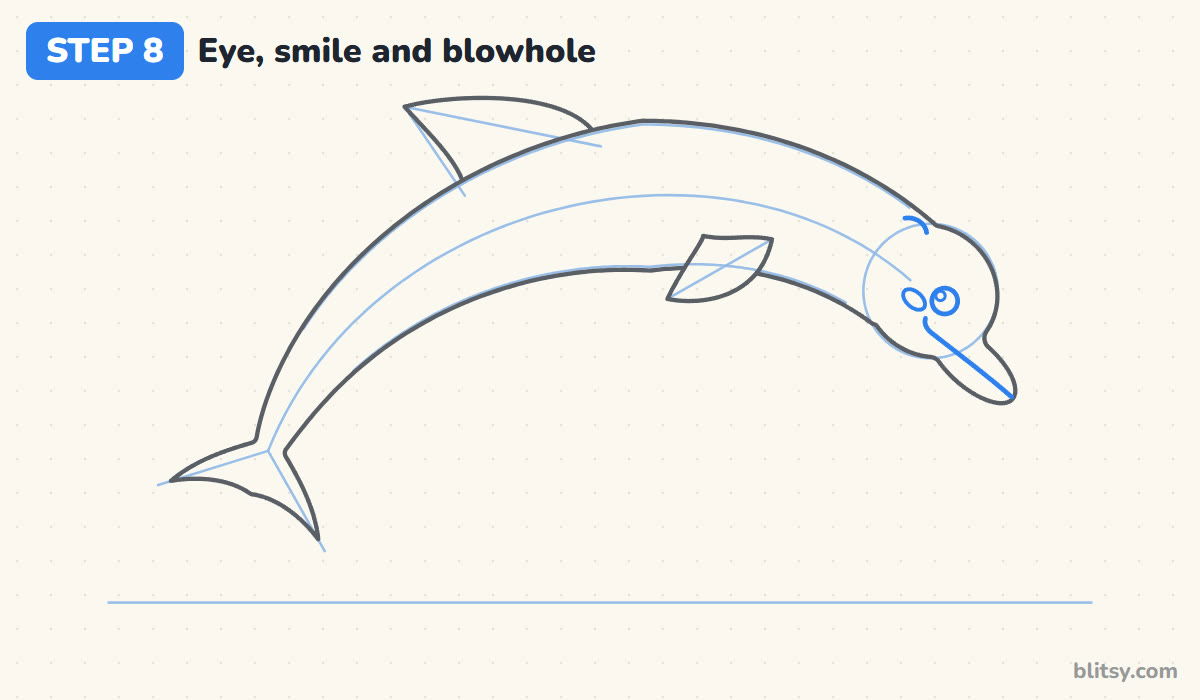
Place a round eye just above where the beak meets the head, with a small shine circle in its upper corner. Draw a line along the middle of the beak for the mouth, ending with a tiny upward curl near the eye. That curl is the smile. Add a small oval cheek behind it, and on top of the head, behind the melon, a short curved line for the blowhole.
💡 Tip: Keep the eye small. Dolphins have little eyes, and a big one quickly makes it look like a cartoon fish.
Step 9: Draw the light belly line
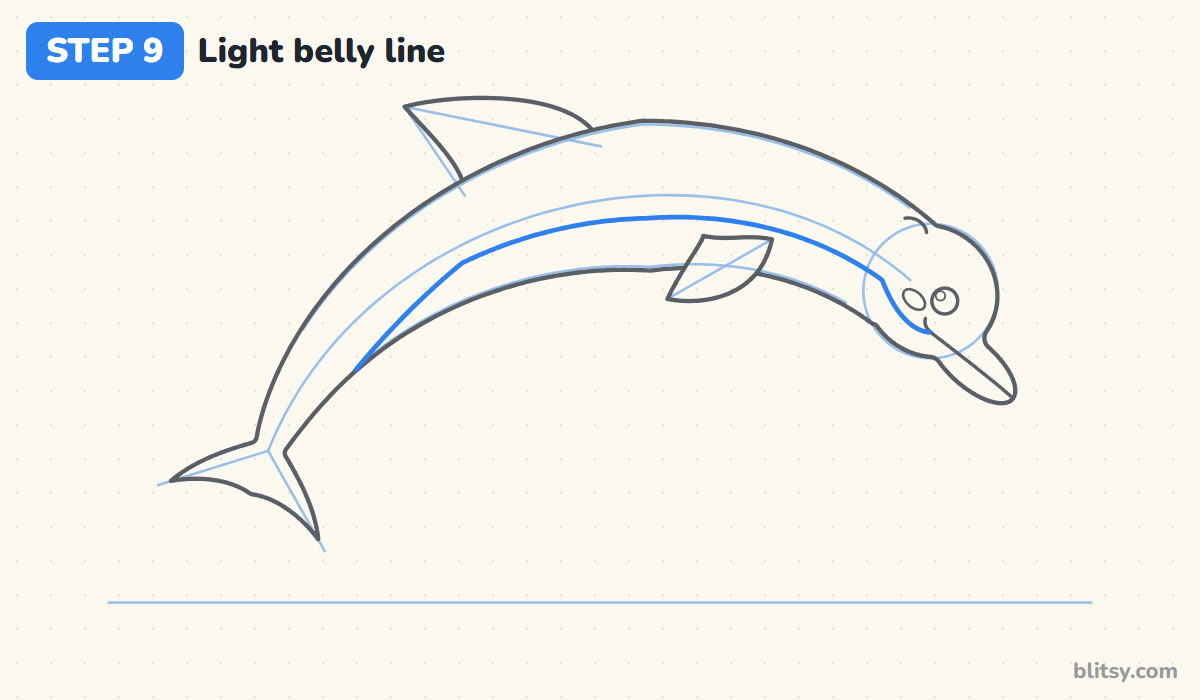
Start near the tail, right at the bottom edge, and draw a soft curve forward through the lower part of the body, a little below the middle. It runs under the flipper and up to the corner of the mouth. Everything below this line will be colored light later, and that two-tone look is what makes it read as a bottlenose.
💡 Tip: Let the line drift down to the edge near the tail instead of stopping in the middle of the body.
Step 10: Add waves and a splash
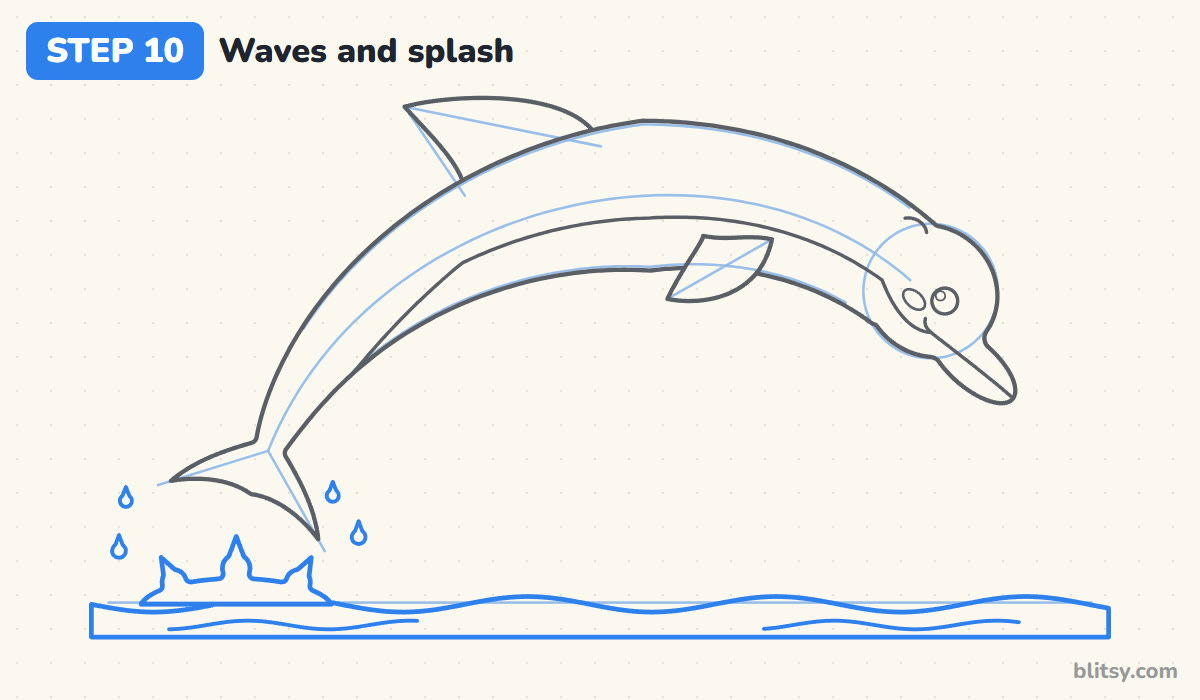
Turn the water guide into a wavy line, then draw a second line under it for a strip of sea, plus two short wave lines inside. Below the tail, I draw a low mound of splash with three rounded points rising from it, and a few small drops around the flukes.
💡 Tip: Put the splash under the tail, not under the head. It shows exactly where the dolphin left the water.
Step 11: Ink the outline and erase the guides
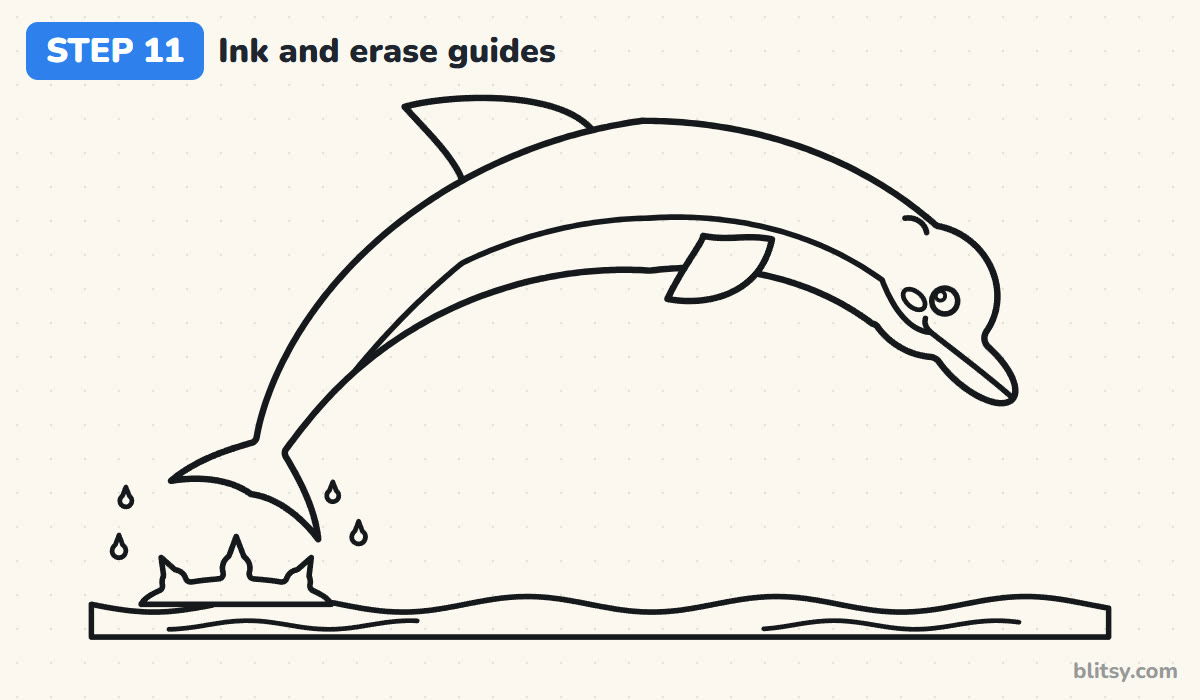
Trace all of the keeper lines with your black marker. I do the head and face first, while my hand is steady, then the long body curves in slow, even strokes. Wait a minute for the ink to dry, then erase the arc, the band guides and the fin lines.
💡 Tip: On the long body curves, move your whole arm instead of just your wrist. The line comes out smoother.


Step 12: Color your dolphin
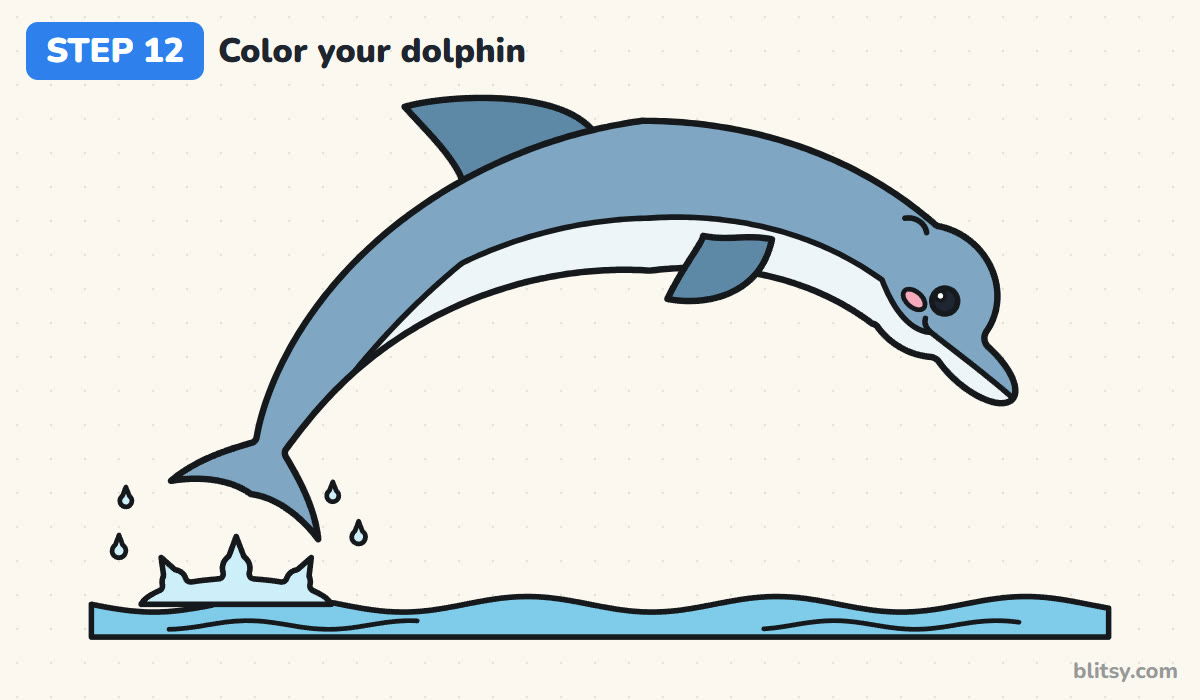
Color the back, head and tail flukes blue gray. The dorsal fin and flipper get a slightly darker blue gray so they stand out. Leave the belly and lower beak white or color them very lightly. Add a pink cheek, a black eye with its white shine, sky blue water and pale blue for the splash and drops.
💡 Tip: Press harder along the top of the back and lighter toward the belly line for a soft rounded look.
Where a Dolphin Starts Looking Like a Fish
- A flat, straight body. Without the arc there is no jump. Bend the guide curve more than feels natural.
- A tail fin that stands up and down. Fish have upright tails. Dolphin flukes spread out sideways, so draw them as a wide V.
- No melon on the forehead. A head that slopes straight into the beak looks like a shark. Give the forehead a clear round bump.
- A giant eye. Keep it small and close to the corner of the mouth.
- Skipping the belly line. One flat color all over hides the shape. The light belly shows which way the body bends.
Ideas for Your Next Dolphin Scene
Once the arc feels easy, I like to draw two dolphins jumping side by side, one a little smaller and behind the other. You can also flip the curve so it dives back down. Younger kids can skip the belly line and the cheek and it still looks like a happy dolphin. For another big ocean animal built from one long shape, try this whale drawing step by step lesson. If you want ready-made pages to color afterwards, there are plenty in these free dolphin coloring pages, and the shark drawing tutorial is a fun way to compare two sea animals that look alike but aren't.
Free Dolphin Coloring Page and Printable Steps
The free dolphin coloring page has a colored example at the top and a key that matches every color to its part, with a big outline below to fill in. The step-by-step PDF guide holds all 12 steps with their pictures and tips, so you can draw without a screen. Both print on Letter or A4 paper.
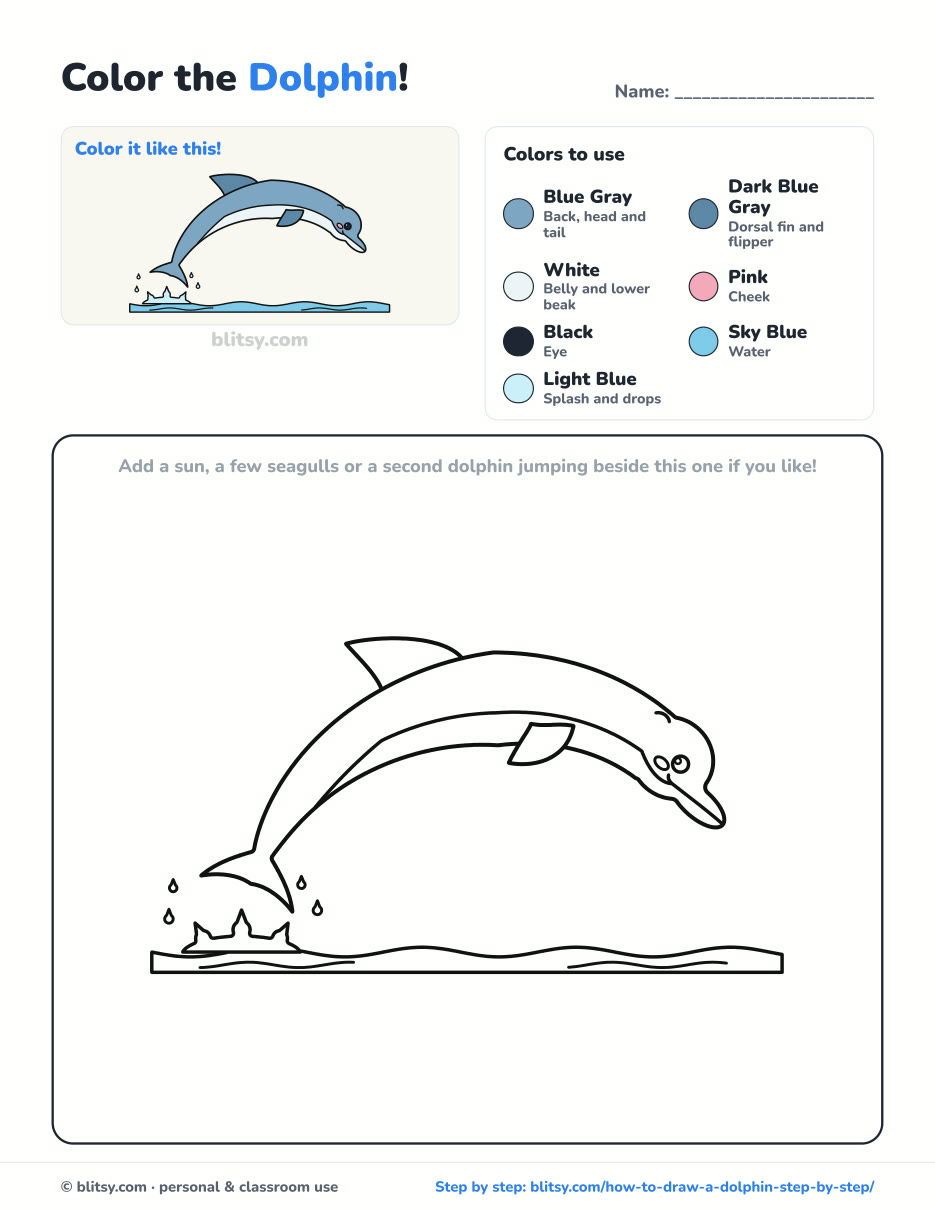
Black outlines with a colored example and the color names at the top. Ready to print and color.
⬇️ Download Coloring PageEvery step picture with its instructions and tips, to keep beside your paper while you draw.
⬇️ Download Drawing Guide📱 On a phone? Tap a download button, then open the file and choose Share → Save to Files or Print. On a computer, the PDF opens or saves straight to your Downloads folder.
Keep the Dolphin Steps on Pinterest
More Ocean Animals to Draw Next
Each one is a full step-by-step tutorial with a picture for every stage.
- Whale Drawing: A smiling blue whale grows from one long oval, with a curving tail and a splashy spout, in this how to draw a whale step by step lesson.
- Shark Drawing: A friendly great white with a tall dorsal fin and a crescent tail starts as one oval in this shark drawing tutorial.
- Turtle Drawing: Draw a smiling sea turtle with a hexagon shell and spotted flippers in this sea turtle drawing step by step guide.
- Octopus Drawing: A coral octopus with eight curling arms comes together one line at a time in this octopus drawing tutorial.
- Wave Drawing: Practice the water itself with a big rolling ocean wave and its foamy crest in this how to draw a wave lesson.
Dolphin Drawing Questions from Beginners
What is the easiest way to draw a dolphin?
Start with one curved line like a rainbow and a circle at the end for the head. Build a thick band around the curve, add a short beak, then a fin on the back and a tail at the thin end.
How do you draw a dolphin for kids?
Keep it to the arc, the head with a beak, one fin, one flipper and a V tail. Kids can leave out the belly line and the splash drops, then color it blue and gray.
How long does it take to draw a dolphin?
About 30 minutes with coloring. In my experience the long body curves take the most care, while the face goes quickly.
What colors is a bottlenose dolphin?
Mostly blue gray on top, a bit darker on the fins, with a pale gray or white belly. A black eye and a blue sea around it finish the picture.
Your sea is waiting on a blank sheet, so start with that big curve and let your dolphin jump. 🐬✏️
Related posts:
 How to Draw a Car Step by Step (Easy Drawing for Beginners)
 How to Draw a Whale Step by Step (Easy for Beginners)
 How to Draw an Arctic Fox Step by Step (Easy for Beginners)
 How to Draw a Shark Step by Step (Easy for Beginners)
 How to Draw a Chicken Step by Step (Easy for Beginners)
 How to Draw a Fish Step by Step (Easy Goldfish for Beginners)
 How to Draw a Snowman Step by Step (Easy for Beginners)
 How to Draw Hands Step by Step (Easy Palm View for Beginners)
 How to Draw an Airplane Step by Step (Easy Jet for Beginners)
 How to Draw a Mouse Step by Step (Easy for Beginners)
 How to Draw the Joker Step by Step (Easy Chibi for Beginners)
 How to Draw a T-Rex Step by Step (Easy for Beginners)

