
Kuromi looks tricky at first, with all that black, but under the hood she's mostly two ovals and a pair of long, curved ears. In this lesson I'll show you how to draw Kuromi step by step, from light guide shapes to a finished, colored character with her skull emblem, pink bow and pointy tail. This is my own simple fan-art version for practice, not official Sanrio artwork, so treat it as a starting point rather than a copy.
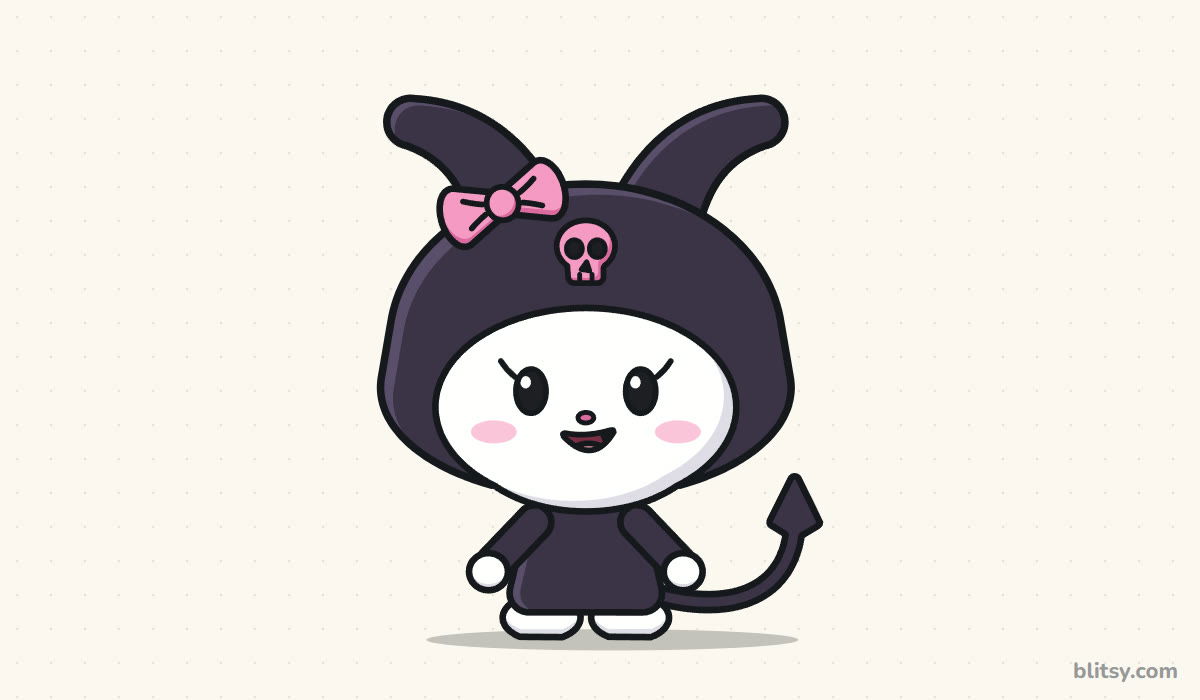
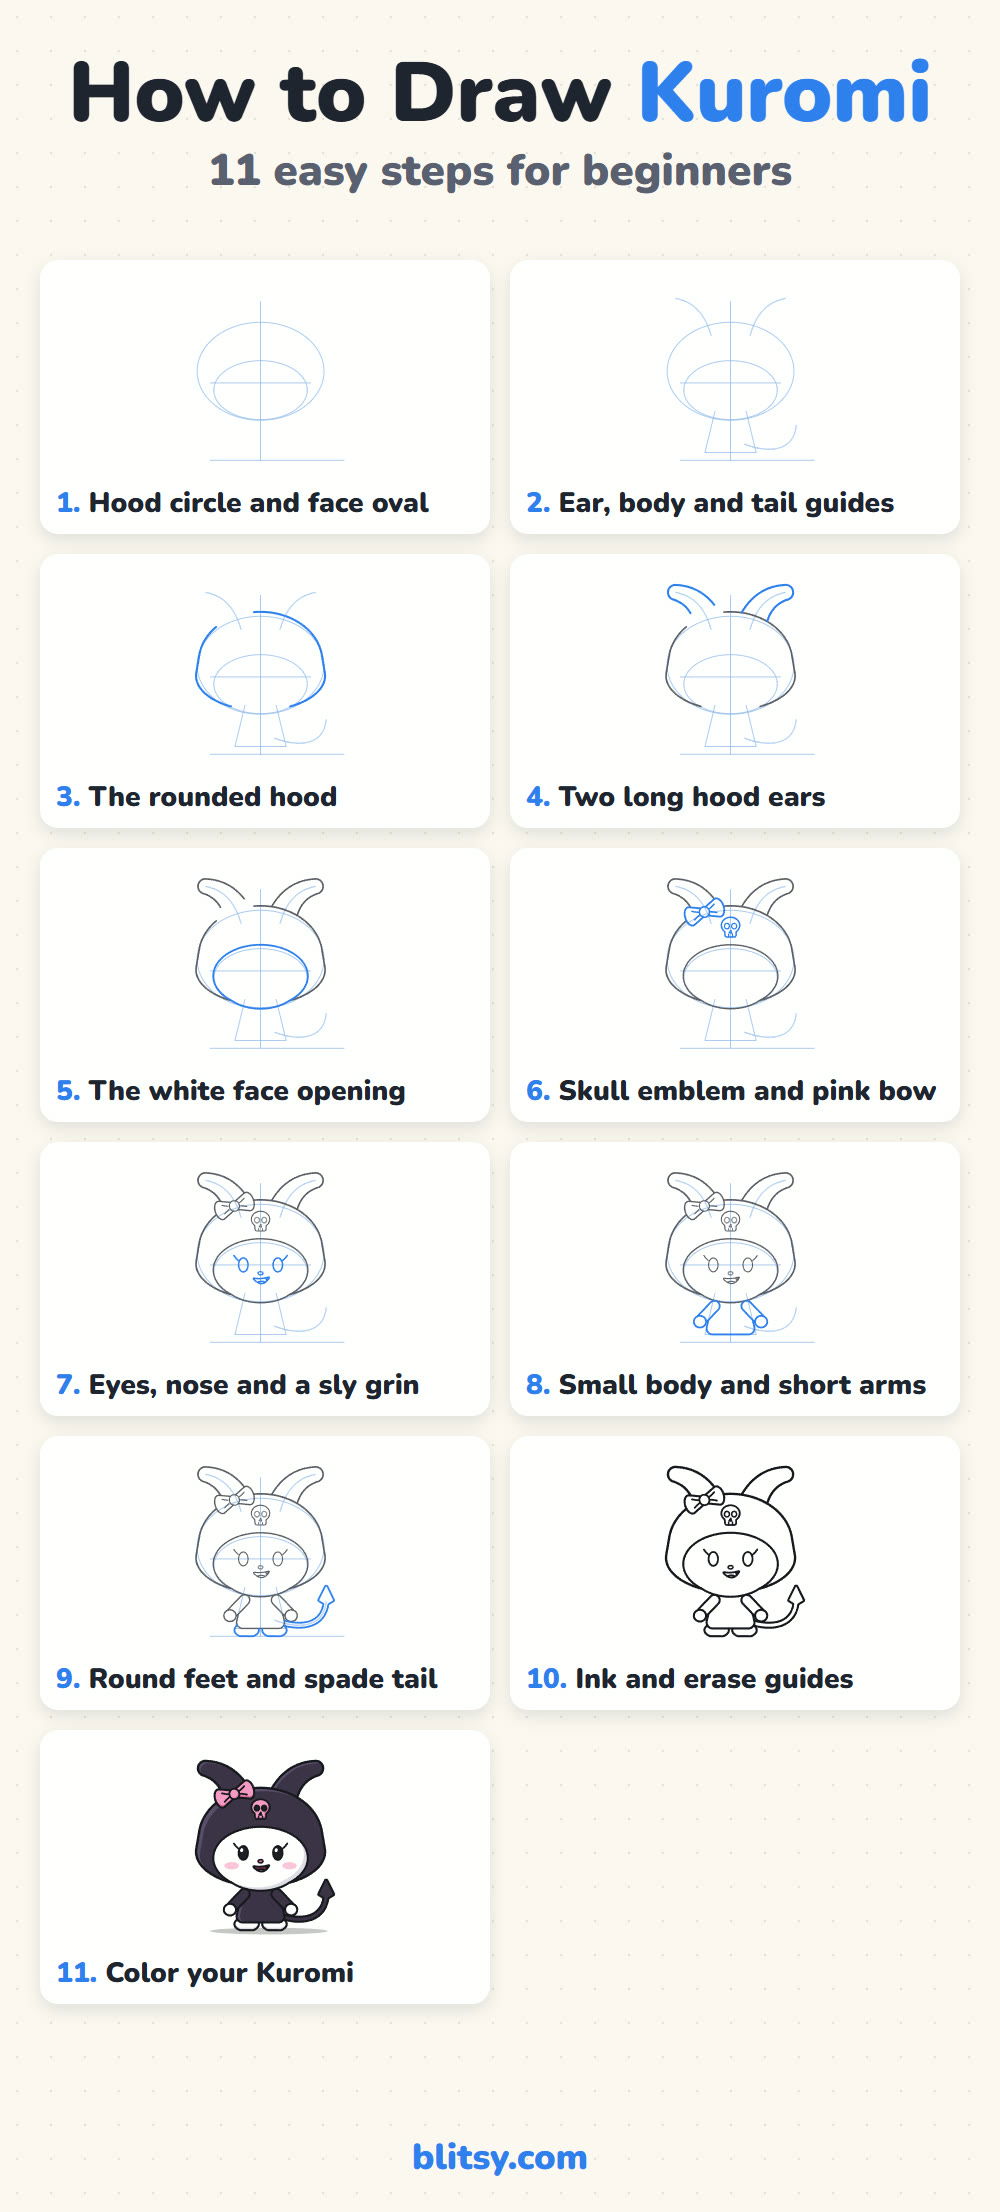
Kuromi's newest lines show up in blue in every picture. Gray means you drew it already, and the pale blue shapes are soft guides you'll erase after inking.
Quick overview
⏱️ Time: about 30 minutes to draw, 15 more to color
🎯 Level: easy to medium, fine for kids from around 6 and for teen or adult beginners
✏️ Steps: 11
💀 You'll draw: Kuromi standing, with her hood, skull, bow, short arms and a spade tail
Gear for a Hooded Kuromi Sketch
- A light pencil such as an HB, so the guide ovals erase cleanly
- A kneaded or soft white eraser
- A black fineliner or felt-tip pen for the final outline
- Coloring tools: a dark purple or black, pink, light pink and a light gray
- Smooth paper, held upright
If your black marker is very heavy, try a dark purple instead; it keeps the hood from swallowing your outline.
How to Draw Kuromi Step by Step
Step 1: Draw the hood circle and face oval
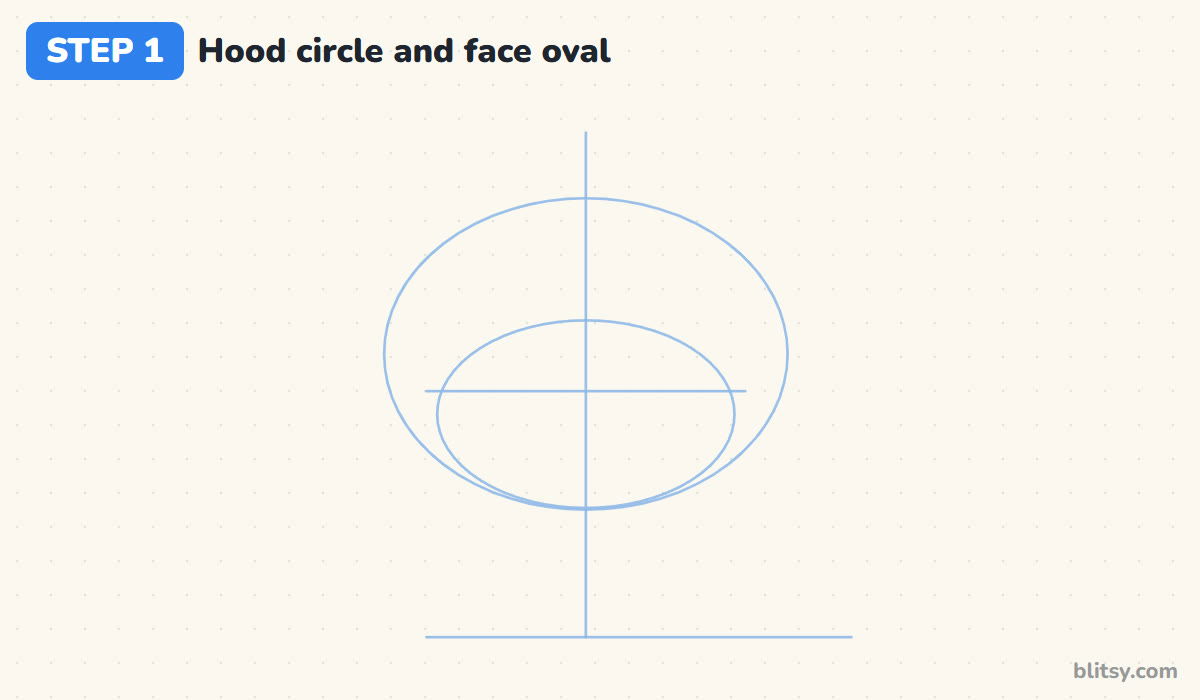
Start with a large oval in the upper half of the page, a bit wider than tall. That's the hood. Inside it, low down, sketch a flatter oval for the face so its bottom almost touches the bottom of the hood. Add a vertical center line that runs all the way to the ground, a short ground line, and a cross line through the face oval just above its middle for the eyes.
💡 Tip: Press so lightly that you can barely see the lines. Every shape in this step gets erased later.
Step 2: Sketch the ear, body and tail guides
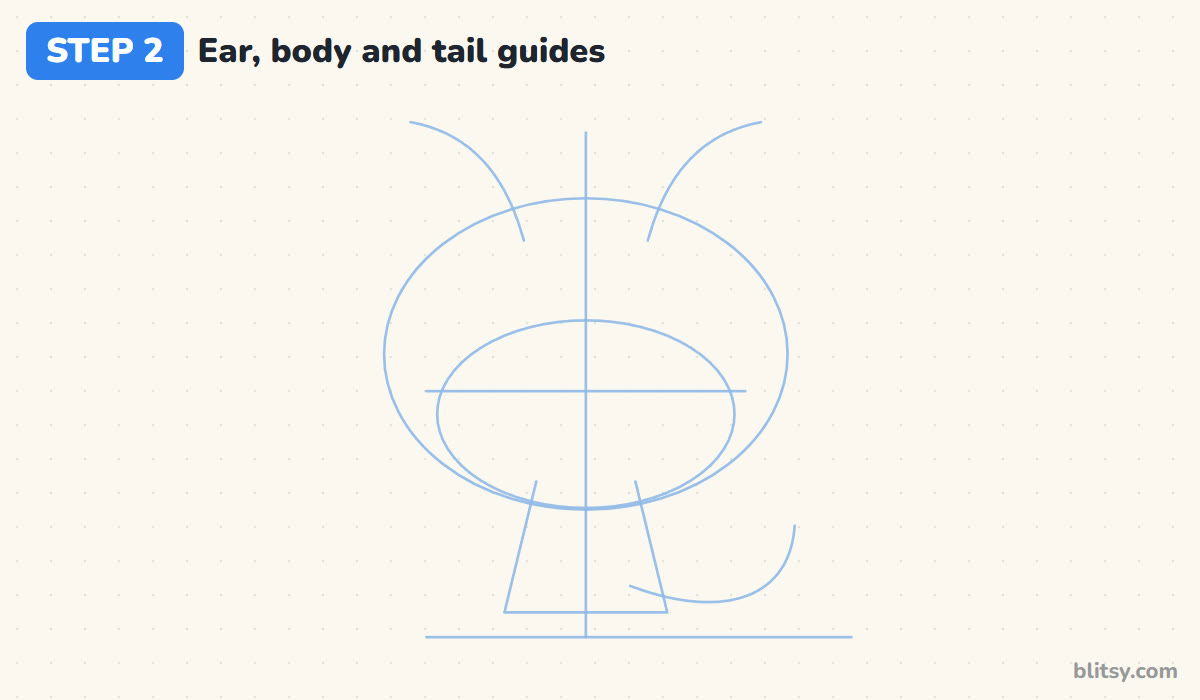
From the top of the hood, pull two curved lines up and outward like a pair of antlers bending away from each other. These are the centers of her ears. Under the head, draw a small trapezoid for the body, sitting on the ground line. Finally, swing a curve out from the lower right of the body and up, where the tail will go.
💡 Tip: Keep the body short. It should be less than half the height of the hood, or she starts to look like a grown-up figure.
Step 3: Outline the rounded hood
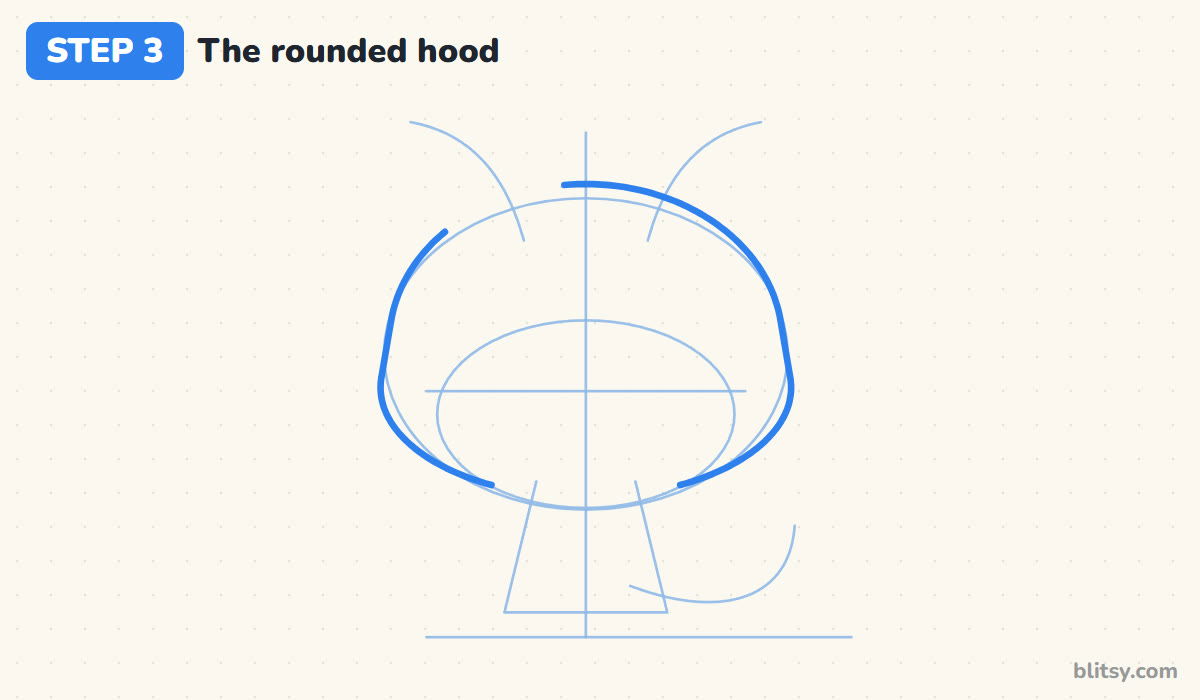
Go over the hood guide with a firmer line. Let the sides bulge out a little at cheek level and come back in toward the chin, almost like a rounded helmet. Leave small gaps near the top where the ears join, and another on the upper left where the bow will sit later.
💡 Tip: Draw one side, then the other, each starting at the top. Two short curves are easier to match than one big loop.



Step 4: Add the two long hood ears
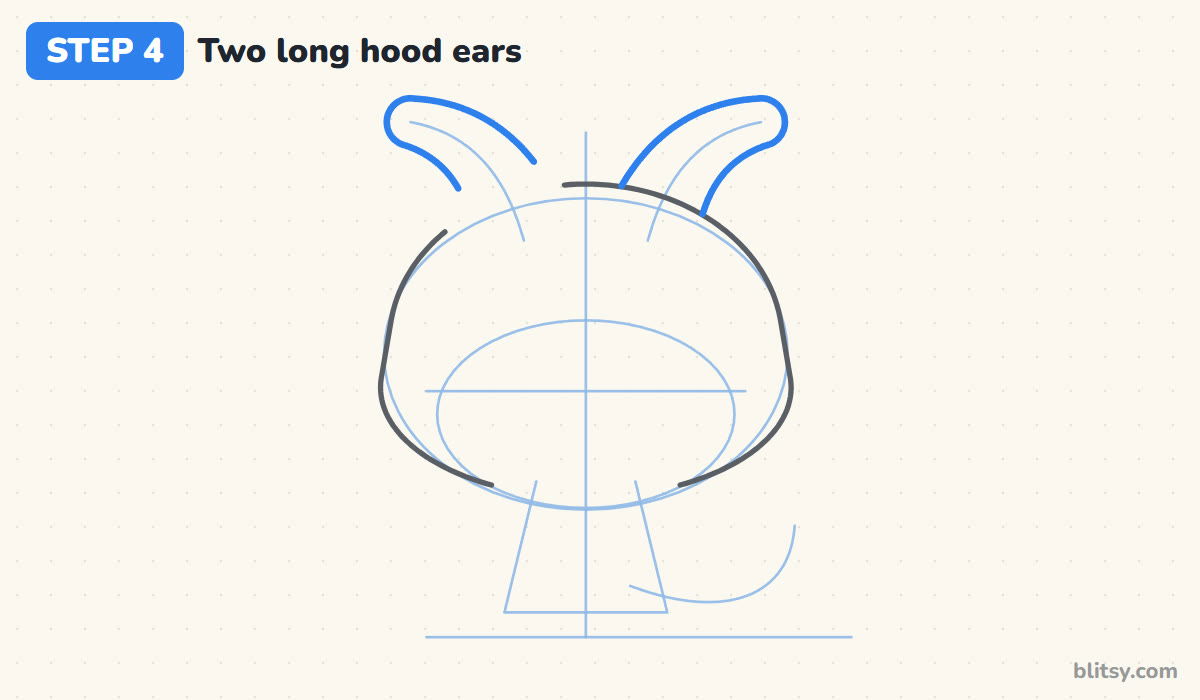
Draw each ear as a long, curved shape that follows its guide line. It's wide where it leaves the hood and slowly narrows toward a rounded tip that bends outward. I like the tips to tilt a touch downward, because it gives her that playful, floppy jester feel.
💡 Tip: Turn the paper as you go. Curved shapes come out smoother when your hand pulls the line toward you.
Step 5: Draw the white face opening
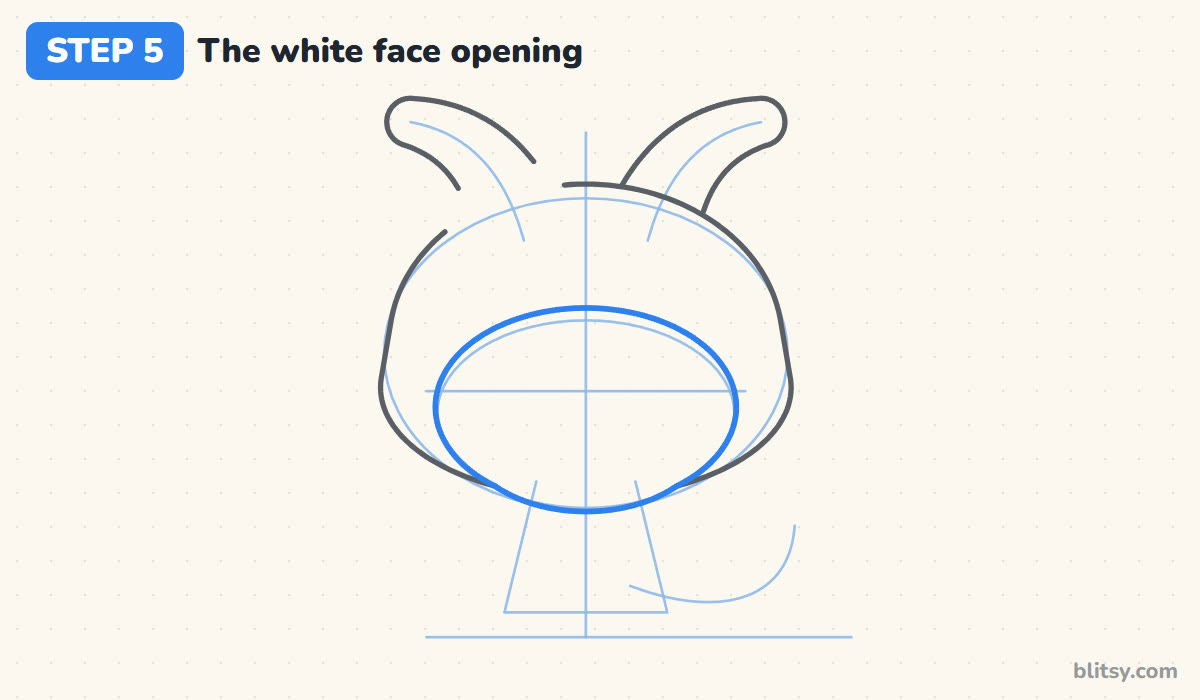
Trace the face oval with a confident line, letting the chin dip just below the edge of the hood. The top of the face is fairly flat and the cheeks are round. This opening is the white area that makes Kuromi readable, so keep it big; a small face gets lost in all that dark hood.
💡 Tip: If the oval tilts, check it against your center line. Both halves should reach the same distance from it.
Step 6: Add the skull emblem and the pink bow
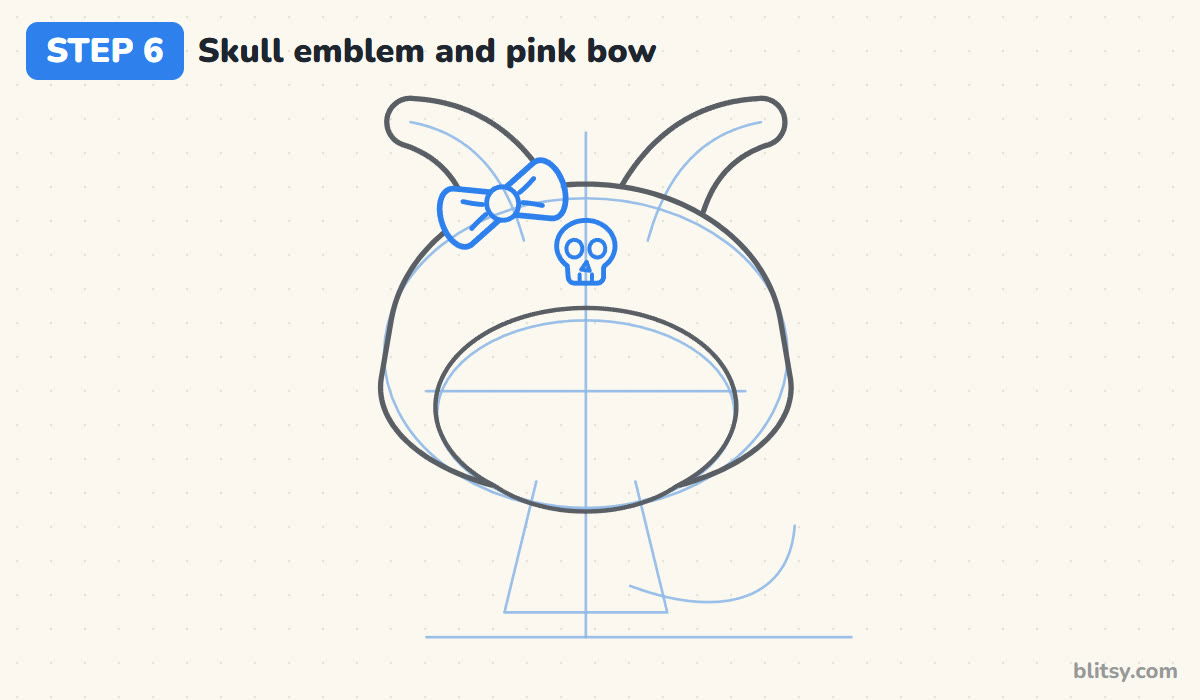
On the hood's forehead, centered above the face, draw a small skull: a circle with a little rounded box under it for the jaw. Give it two round eye holes, a tiny triangle nose and two short teeth lines. Then, at the base of the ear on your left, draw a bow with a round knot and two loops that widen away from it, plus a couple of crease lines in each loop.
💡 Tip: Make the skull about as wide as one eye is tall. Bigger than that and it starts to compete with her face.
Step 7: Draw the eyes and a cheeky grin
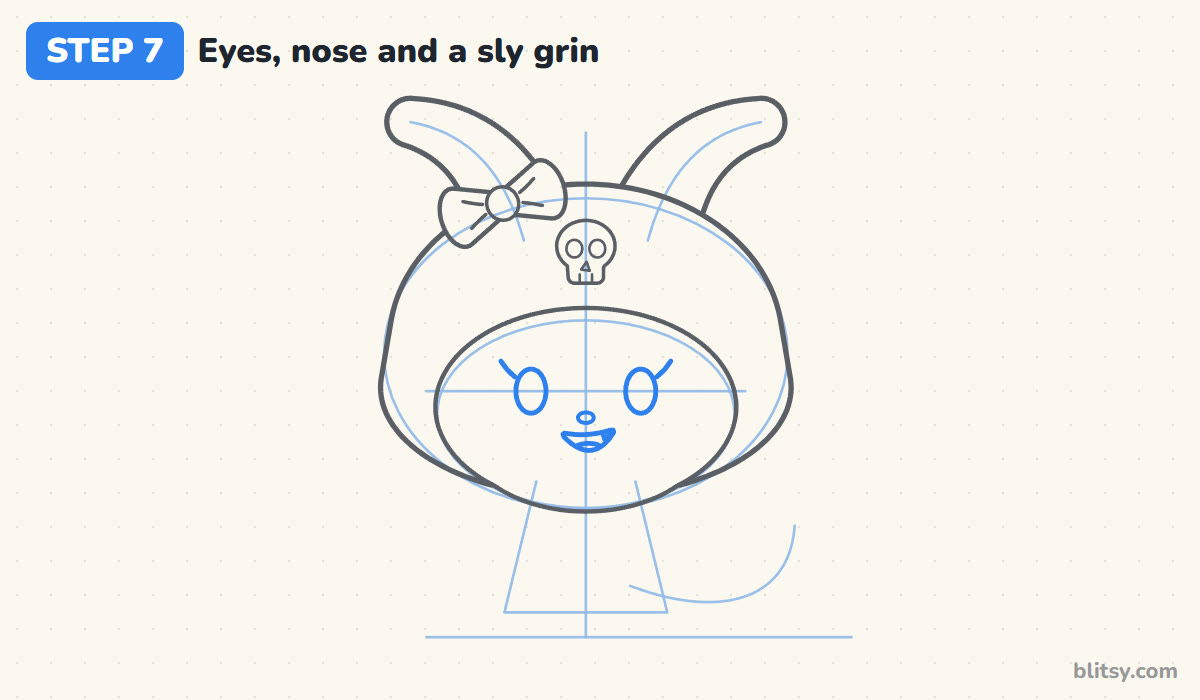
On the eye line, draw two upright ovals, set wide apart. Add one small lash flicking up from the outer top corner of each eye. Halfway between the eyes and a bit lower, place a tiny oval nose. Under it, draw a small open smile that's slightly wider on the right, with one little triangle fang hanging from the top edge and a curved line for the tongue.
💡 Tip: The one-sided fang is what turns a sweet smile into a mischievous one, so keep it small and on one side only.


Step 8: Draw the small body and short arms
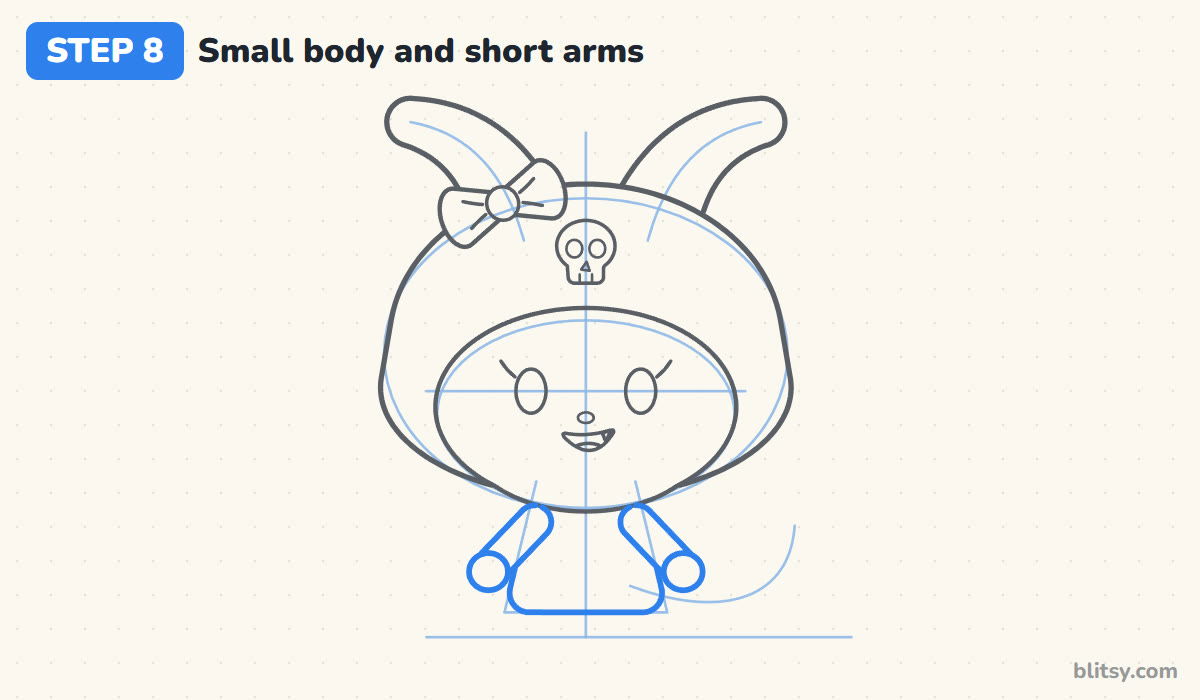
Outline the body over its guide with soft, rounded corners. Then add two short, thick arms angled down and out, each ending in a round mitten hand. The arms overlap the sides of the body, so stop the body line where an arm crosses it.
💡 Tip: Give the arms real width, about as thick as the nose to mouth distance on the face. Thin stick arms look wrong on such a round character.
Step 9: Add round feet and a spade tail
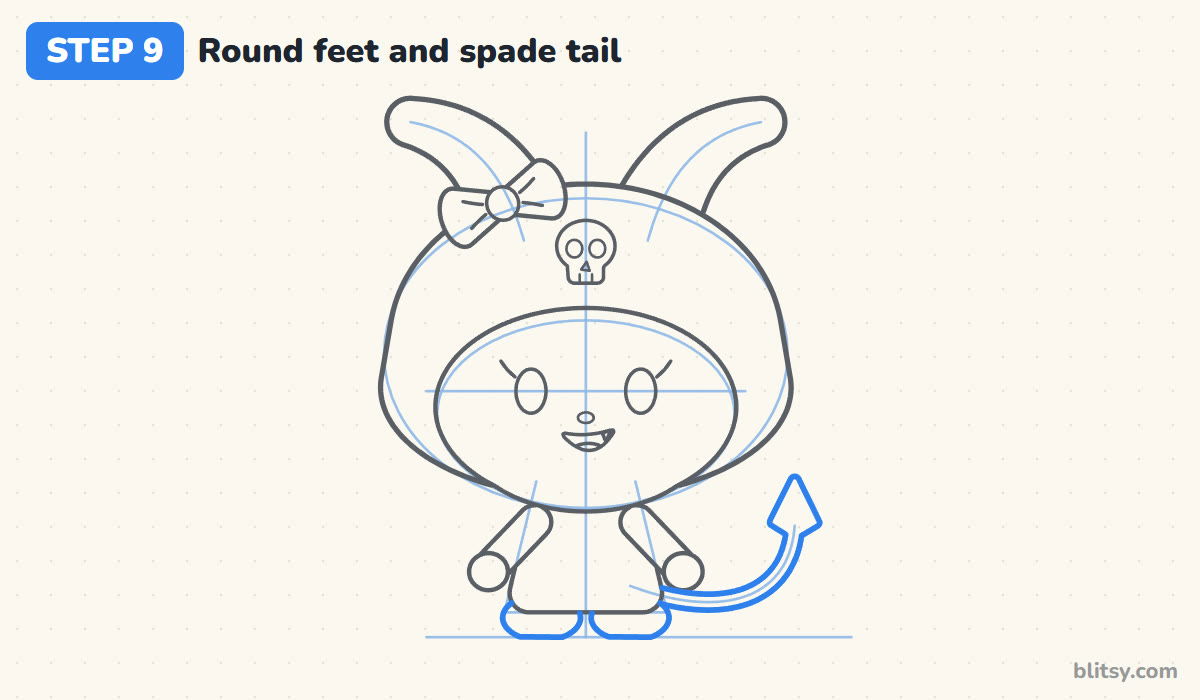
Under the body, draw two flat-bottomed ovals for the feet, resting on the ground line. Then trace the tail guide with two close parallel lines and finish it with a pointed spade shape at the tip, like the tip of an arrow.
💡 Tip: Draw the spade first and then connect the tail to it. It's easier to aim a line at a shape that's already there.
Step 10: Ink the lines and erase the guides
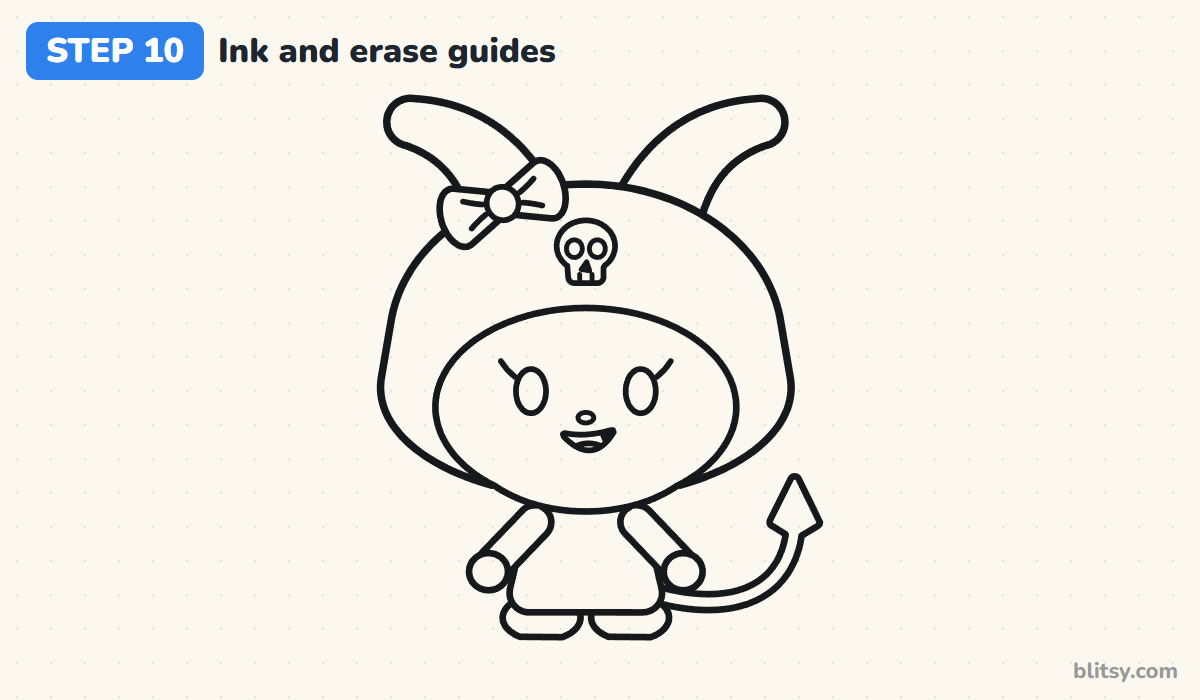
Trace all the keeper lines with your fineliner. I slow down most around the lashes and the fang, since those tiny lines carry her whole expression. Wait until the ink is fully dry before erasing every guide oval, the center line and the trapezoid.
💡 Tip: Rest the side of your hand on a scrap of paper while you ink, so you don't smear the lines you just drew.
Step 11: Color your Kuromi
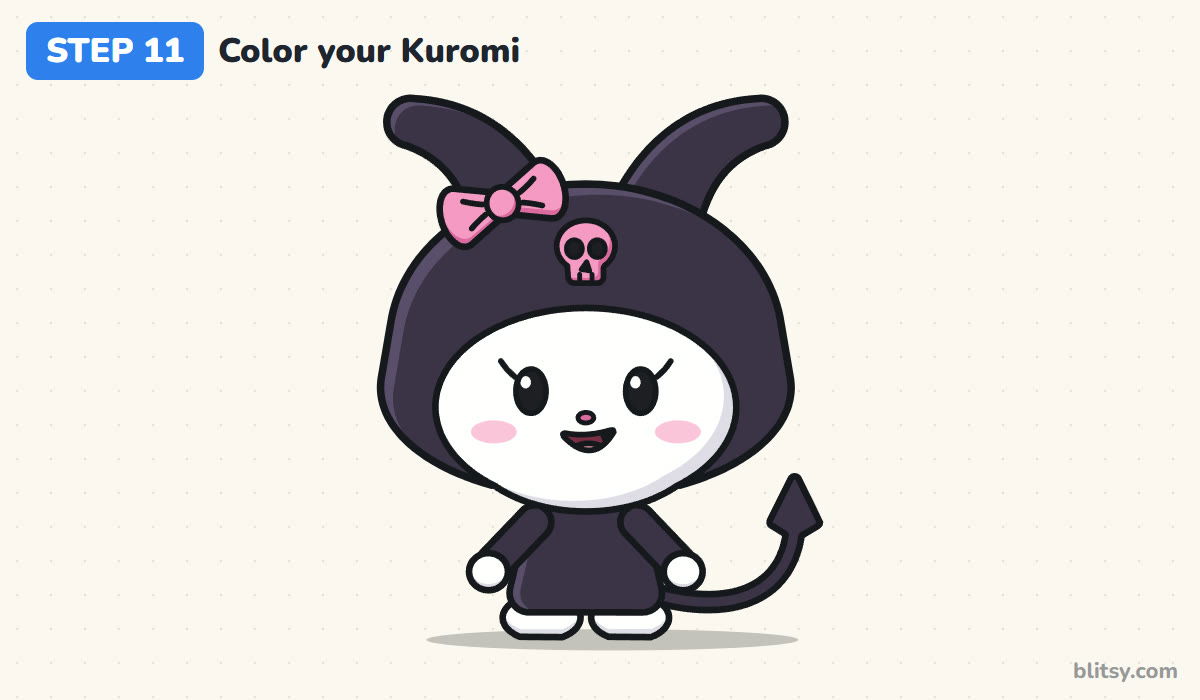
Color all the hood and body parts a very dark purple or soft black, leaving a slightly lighter strip along the left edges as a highlight. The skull and bow are pink, with darker pink in the shadows. Keep the white parts white with a little light gray at the edges, add light pink cheeks and tongue, and fill the eyes black, leaving a white dot of shine in each.
💡 Tip: Color the dark parts last if you use markers. Black ink can bleed into the white face if you work over it too soon.


Why Kuromi Sketches Often Look Off
- The face is too small. A tiny white face inside a big black hood looks like a hole. Make the face oval wide, reaching close to the hood's sides.
- Straight, stiff ears. Upright ears read as a rabbit or a devil. Curve them outward and round the tips.
- A fang on both sides. Two fangs make her look like a vampire. One small fang keeps the grin cheeky.
- Coloring over the lines with pure black. Black on black hides the outline. Use dark purple, or leave a thin lighter rim along each edge.
- Forgetting the skull. Without the emblem she can pass for any hooded bunny, so add it even when you simplify everything else.
Giving Your Kuromi a New Mood
Once the hood and ears feel easy, try changing her mood. Swap the grin for a pout, raise one eyebrow, or close one eye in a wink. I also like giving her a little bat-wing cape for Halloween. Kuromi comes from the same Sanrio world as a famous white kitty, and the two make a fun pair on one page, so try the Hello Kitty drawing tutorial next. If the long ears were your favorite part, the bunny drawing step by step lesson uses similar curves, and the skull drawing tutorial shows a bigger version of her emblem.
Free Kuromi Coloring Page and Printable Steps
Prefer to skip straight to coloring? Print the free Kuromi coloring page. A small colored sample at the top shows which color goes where, and the large outline below has thick lines that are easy to stay inside. The step-by-step guide PDF carries all 11 steps with their tips, two steps per page, and fits Letter or A4.
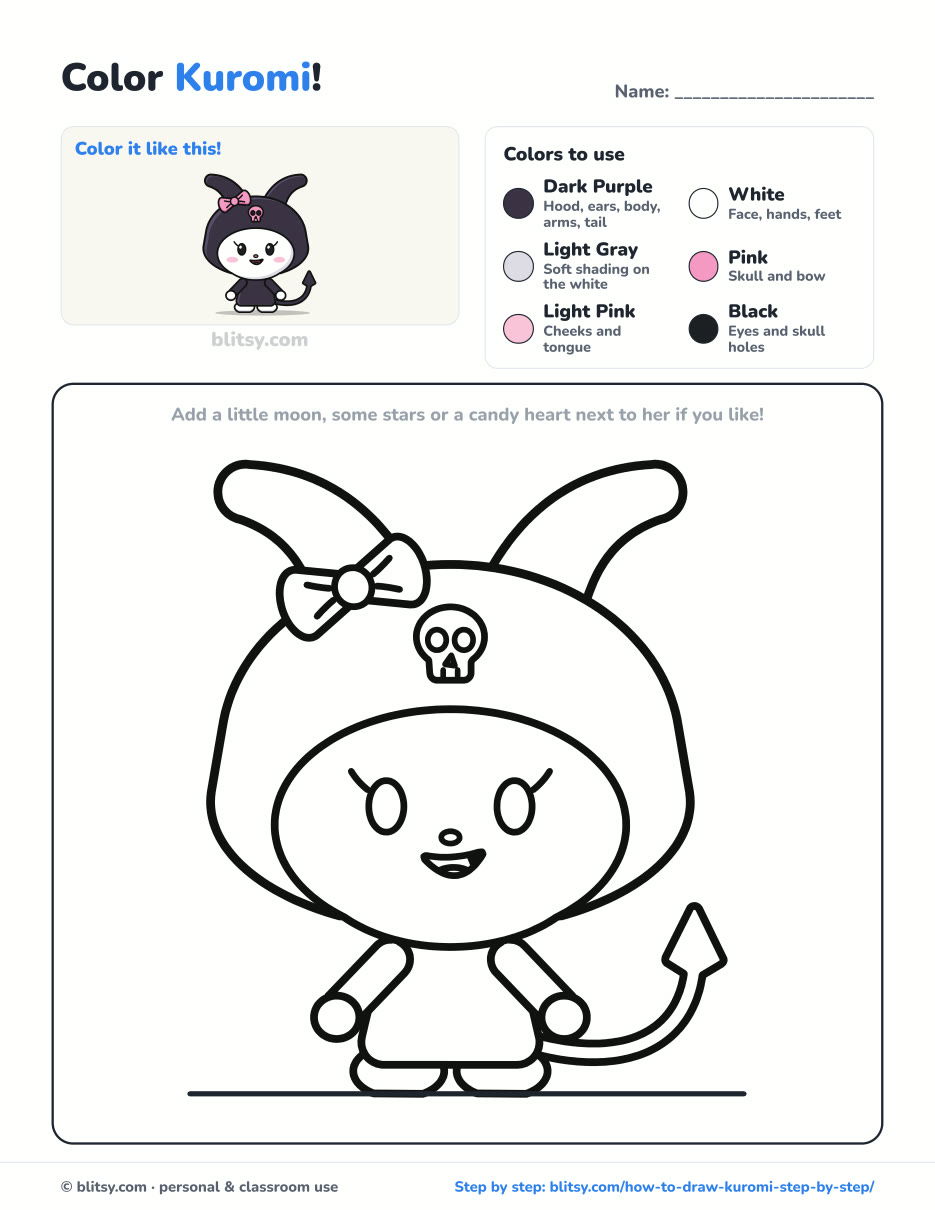
Black outlines with a colored example and the color names at the top. Ready to print and color.
⬇️ Download Coloring PageEvery step picture with its instructions and tips, to keep beside your paper while you draw.
⬇️ Download Drawing Guide📱 On a phone? Tap a download button, then open the file and choose Share → Save to Files or Print. On a computer, the PDF opens or saves straight to your Downloads folder.
Keep Kuromi's Eleven Steps on Pinterest
More Cute Characters to Draw After Kuromi
Each tutorial below has a picture for every step, in the same easy style.
- Hello Kitty Drawing: Draw Kuromi's famous Sanrio neighbor in blue overalls with a red bow on one ear in the how to draw Hello Kitty step by step lesson.
- Chibi Drawing: A tiny character in a mint cat-ear hoodie, holding a boba cup, comes together with this chibi drawing tutorial.
- Stitch Drawing: Big ears and a small grin are the stars of the Stitch drawing step by step guide.
- Care Bear Drawing: Draw a cuddly pink bear with a rainbow on its tummy in the Care Bear drawing tutorial.
- Ghost Drawing: A waving ghost, a baby ghost and a pumpkin all start from one circle in the how to draw a ghost lesson.
Kuromi Drawing Questions Kids Ask
Is Kuromi hard to draw for beginners?
Not really. The hood and face are two ovals, and the ears are two curves. The fiddly parts are the skull and the fang, and younger kids can draw those bigger and simpler.
What color is Kuromi?
Her hood and body are black or very dark purple, her face is white, and her skull emblem and bow are pink.
What is the symbol on Kuromi's hood?
It's a small pink skull on the front of her jester-style hood. It's her signature detail, so it's worth including even in a quick sketch.
How long does it take to draw Kuromi?
Plan on about 30 minutes for pencil and ink, plus around 15 to color.
Grab a dark marker and a pink one, and let your Kuromi show off that fang. 💀
Related posts:
 How to Draw a Care Bear Step by Step (Cute Fan Art for Kids)
 How to Draw Bluey Step by Step (Easy Fan Art for Kids)
 How to Draw the Fortnite Llama Step by Step (Easy Fan Art)
 How to Draw Ariana Grande Step by Step (Cute Chibi Fan Art)
 How to Draw Gojo Step by Step (Easy Chibi Fan Art)
 How to Do Chalk Art Step by Step (Hopscotch and Rainbow)
 How to Draw Wonder Woman Step by Step (Chibi for Kids)
 How to Draw Iron Man Step by Step (Easy Chibi for Kids)
 How to Draw a Police Car Step by Step (Easy for Kids)
 How to Draw a Valentine Step by Step (Easy Card Set for Kids)
 How to Draw a Bat Step by Step (Cute Cartoon Bat for Kids)
 How to Draw a Ninja Step by Step (Easy Chibi Ninja for Kids)

