
Batman is mostly dark shapes, and that turns out to be good news for beginners: a round head with two ears, a cape that spreads like a tent, and you're halfway there. The details that make him Batman are tiny, mainly the white eye slits and the little smile under the mask. In this lesson I'll show you how to draw Batman step by step as a chibi hero standing tall with his hands on his hips. It's my own simple fan-art version for practice, not an official DC drawing.
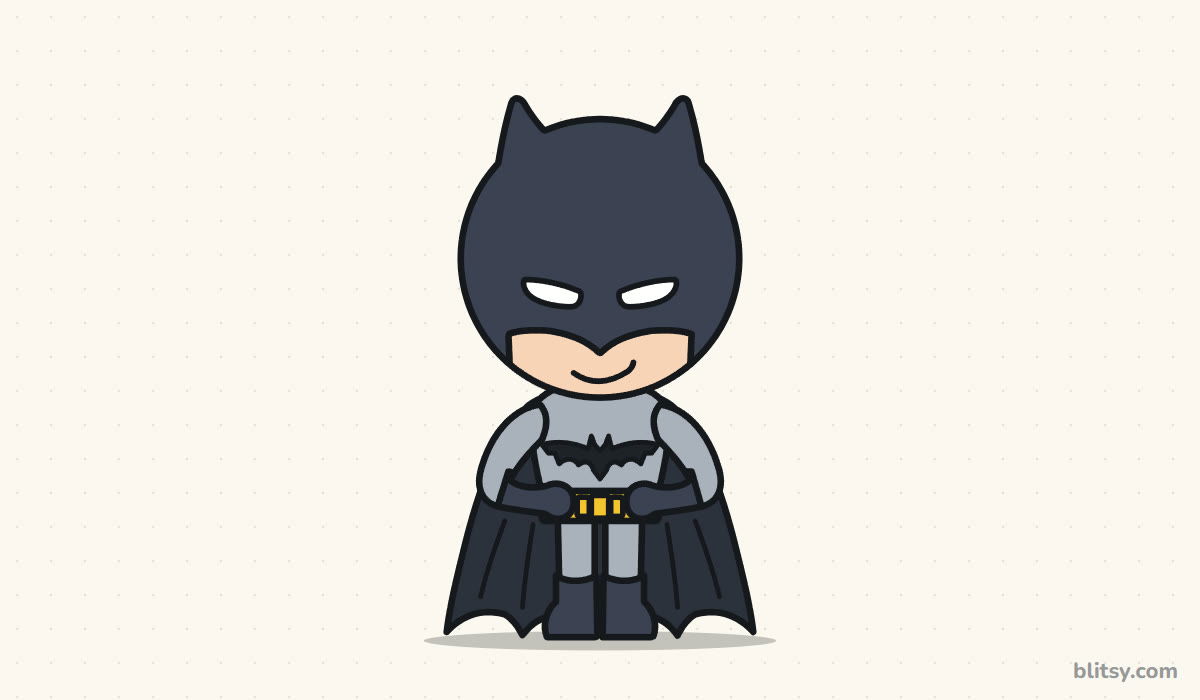
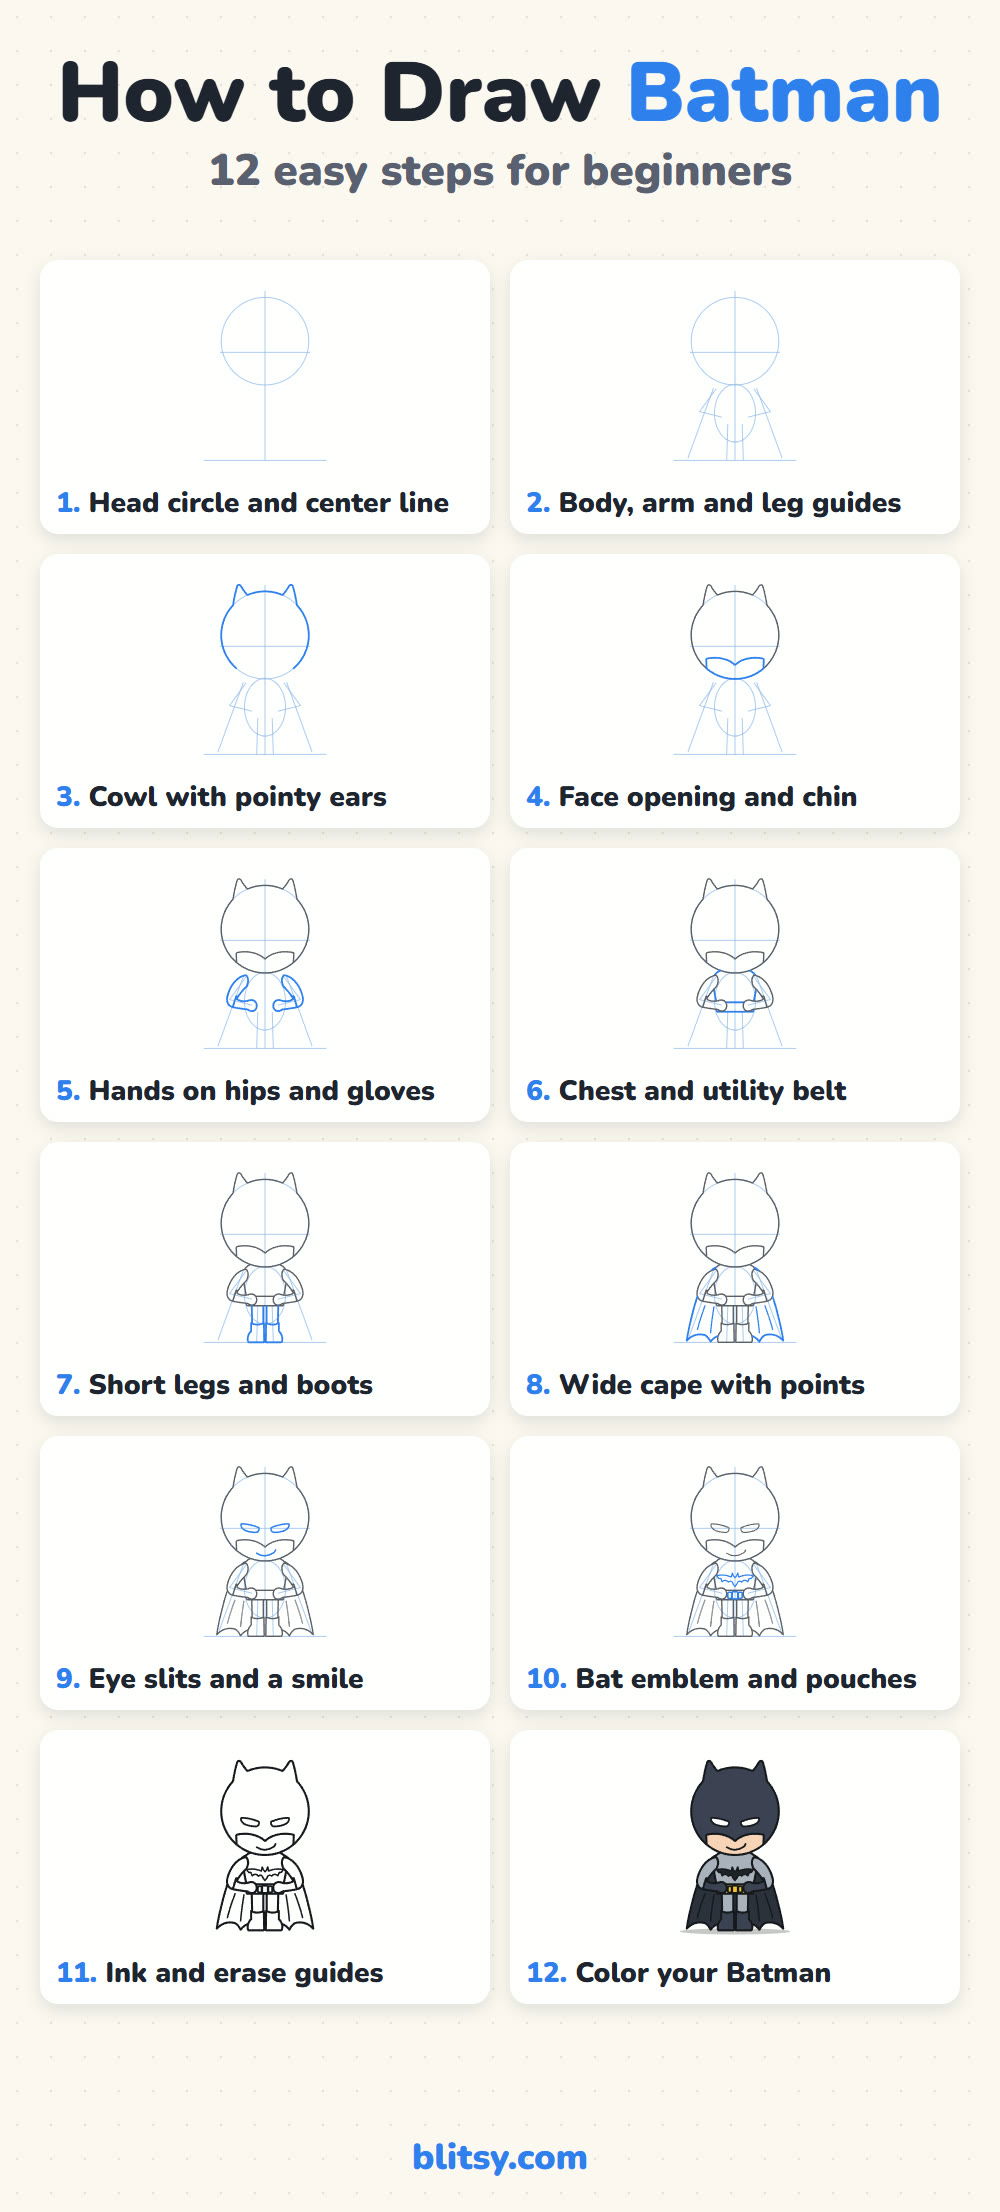
Blue lines are this step's job; gray lines were drawn earlier. The pale guides from the first two steps stay light until you erase them near the end.
Quick overview
⏱️ Time: about 30 to 40 minutes including color
🎯 Level: easy, good for kids around 6 and up
✏️ Steps: 12
🦇 You'll draw: a chibi Batman with his hands on his hips and his cape spread behind him
Supplies for a Gotham-Ready Sketch
- A light pencil, such as HB
- A soft eraser
- A black marker or fineliner for the final lines
- Colored pencils or markers in dark gray, light gray, yellow and peach
- A white gel pen if your paper isn't bright white (for the eyes)
- Plain drawing paper
With so much dark color, markers cover faster than pencils, but pencils let you keep the cape and cowl slightly different shades.
How to Draw Batman Step by Step
Step 1: Draw a big head circle and a center line
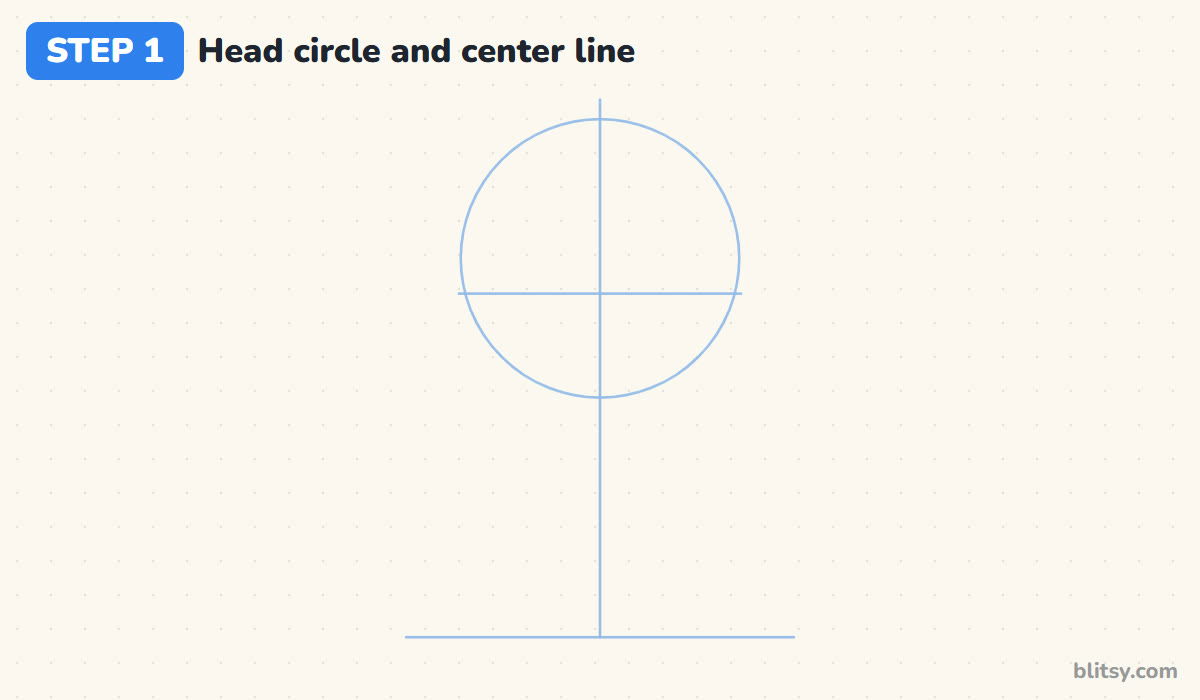
Start with a ground line near the bottom of the page and a straight line up the middle. Draw a large circle on the upper half of that line, then a short line across the circle a little below its middle. That crossing line is where the eyes will sit. Make the circle big; in a chibi drawing the head is roughly half of the whole figure.
💡 Tip: Trace the circle in the air two or three times before your pencil touches the paper. Your hand learns the size first.
Step 2: Add guides for the body, limbs and cape
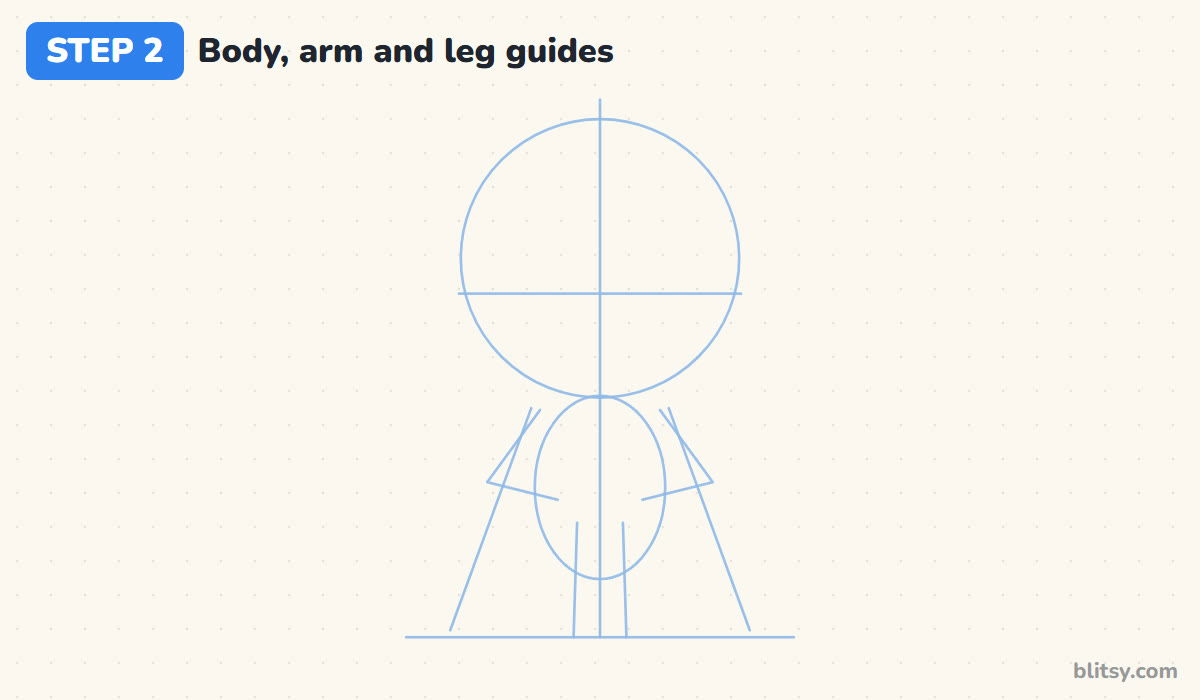
Under the circle, draw a small upright oval for the body. Two bent lines on each side mark the arms, going out to an elbow and back in to the hips. Add two short leg lines down to the ground, then two long slanted lines from the shoulders to the ground for the edges of the cape.
💡 Tip: Let the cape lines reach a bit wider than the head. A narrow cape makes him look like he's wearing a scarf.
Step 3: Turn the circle into a cowl with pointy ears
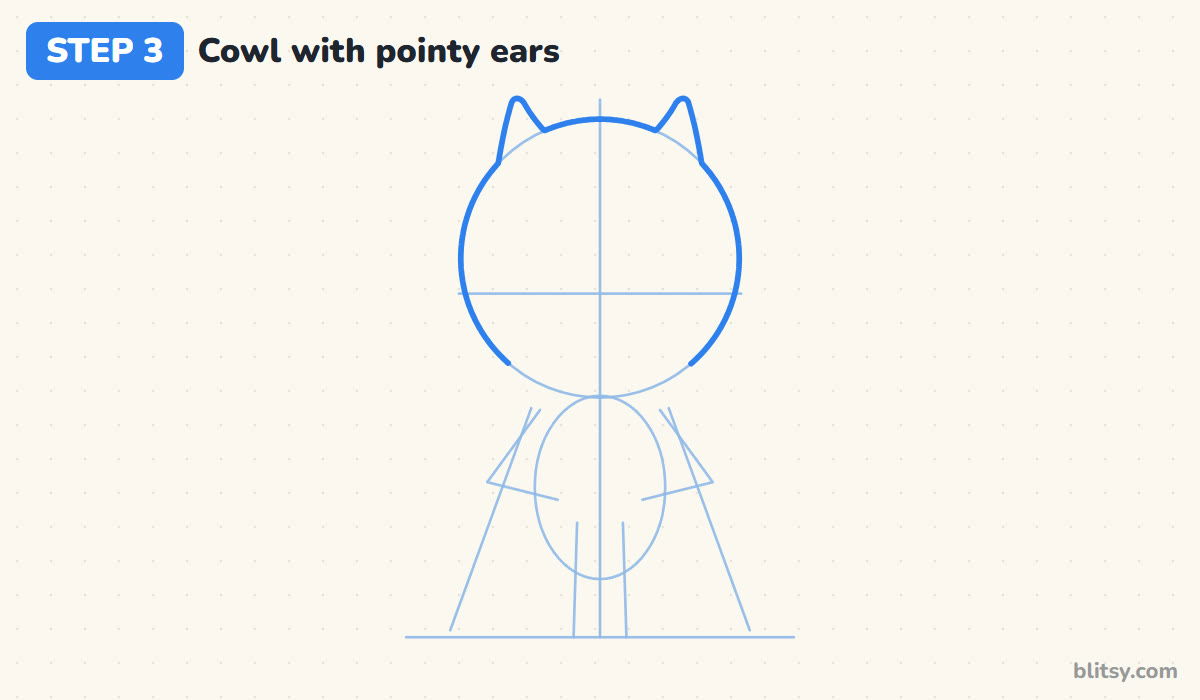
Go over the head circle with a firmer line. On top, draw two ears that lean slightly outward, each one a narrow triangle with a rounded tip. Place them about halfway between the center line and the edge of the head, so there's a smooth dome of cowl between them.
💡 Tip: Keep both ears the same height. I check by laying my pencil flat across the two tips.


Step 4: Draw the face opening and chin
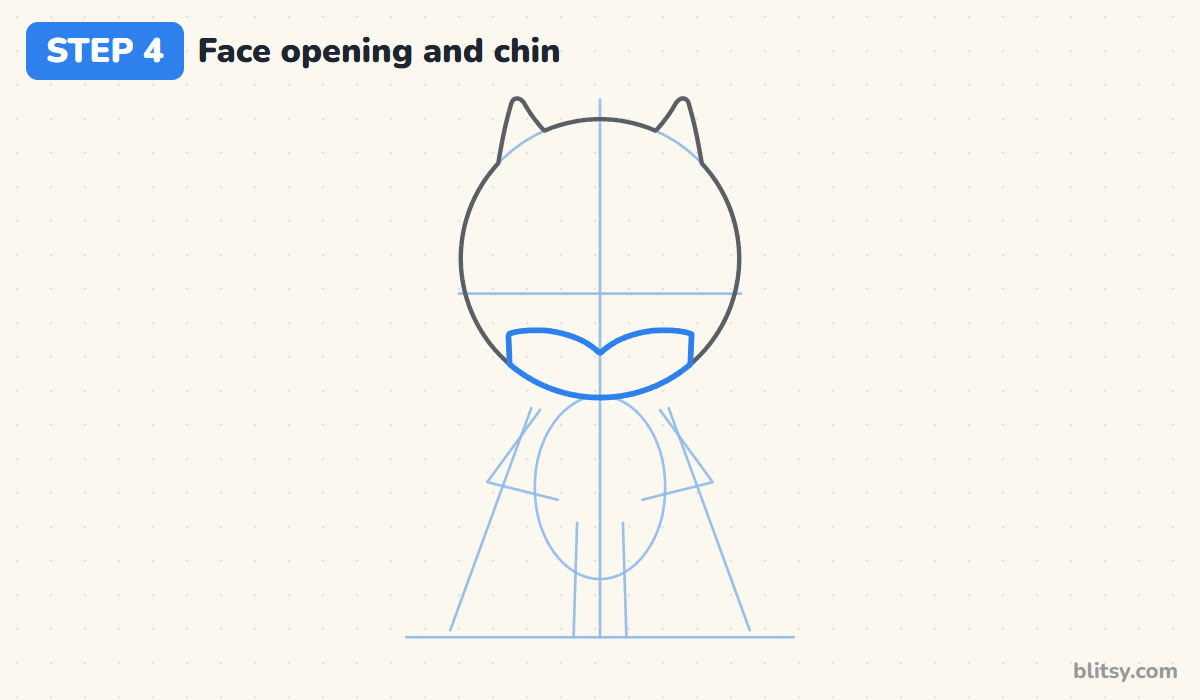
Below the eye line, draw the edge of the mask. It runs fairly flat across each cheek and dips into a soft point in the middle, which is the bottom of the cowl's nose. From the outer ends, follow the head circle down so the bottom of the circle becomes his chin.
💡 Tip: Keep the opening in the lower third of the head. If it climbs too high, he looks like he's wearing a short helmet.
Step 5: Draw the arms with fists on his hips
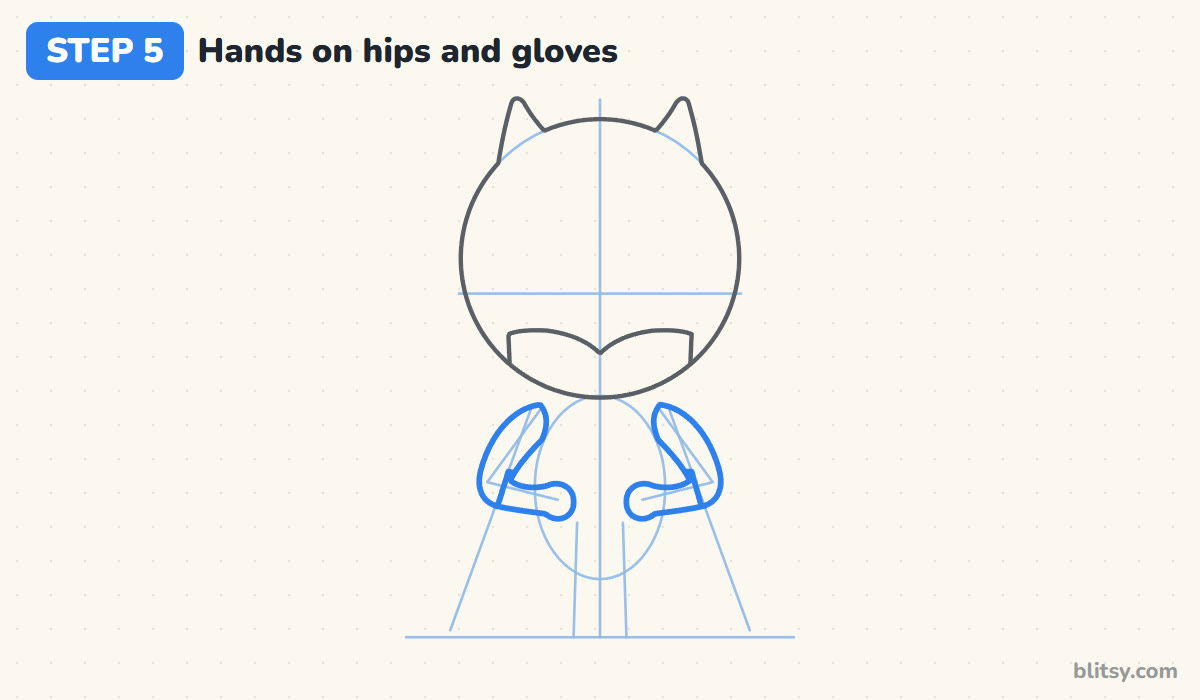
Draw each arm as a soft tube: out and down from the shoulder to a rounded elbow, then back in toward the middle, ending in a round mitten fist at hip level. Add a short line across each forearm, just past the elbow. Everything from that line to the fist is his glove.
💡 Tip: Give the arms real width. Thin arms under that big head make him look wobbly instead of confident.
Step 6: Add the chest and the utility belt
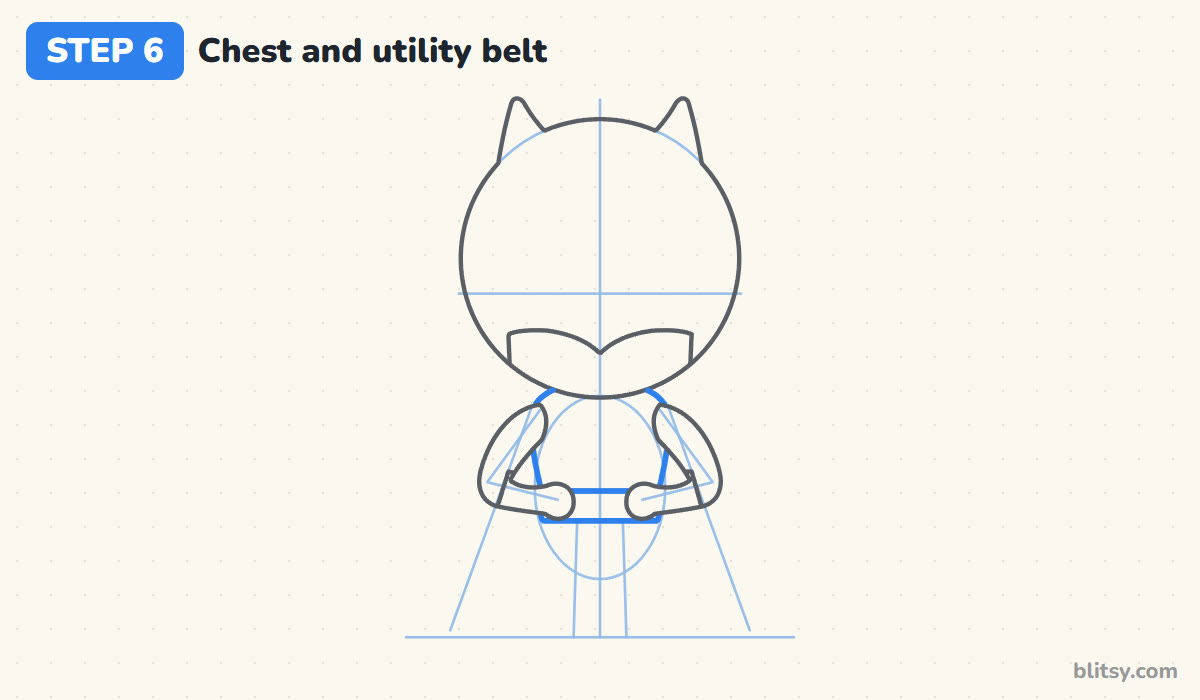
Now connect the shoulders down to the hips with two gentle curves for the chest, tucked in between the arms. Across the bottom, draw a band for the belt that runs from one fist to the other. The chest stays narrower than the head; that's what keeps him small and cute.
💡 Tip: Draw the belt slightly curved, smiling downward. A ruler-straight belt makes the body look flat.
Step 7: Draw short legs and boots
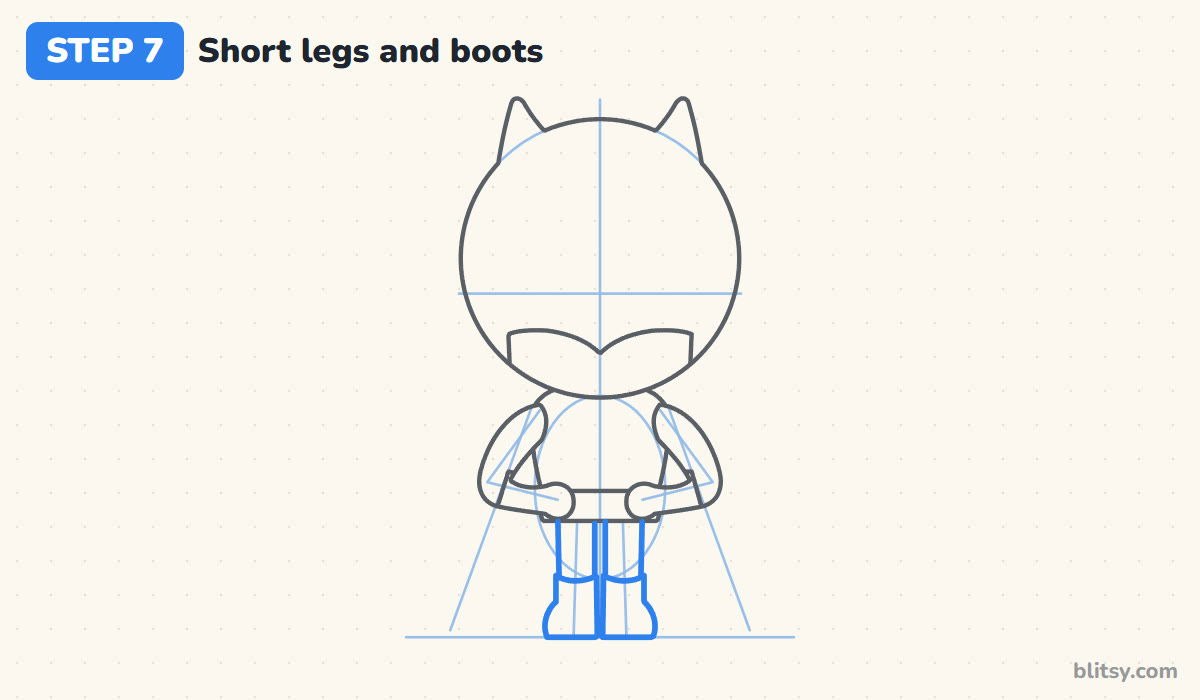
Under the belt, draw two short legs with a thin gap between them. Near the ground, each leg turns into a boot that's a little wider, with a gently curved top and a rounded toe pointing outward. Both soles sit flat on the ground line.
💡 Tip: Point the toes slightly out to the sides. It plants him firmly, like a hero who isn't going anywhere.

Step 8: Draw the wide cape with points at the bottom
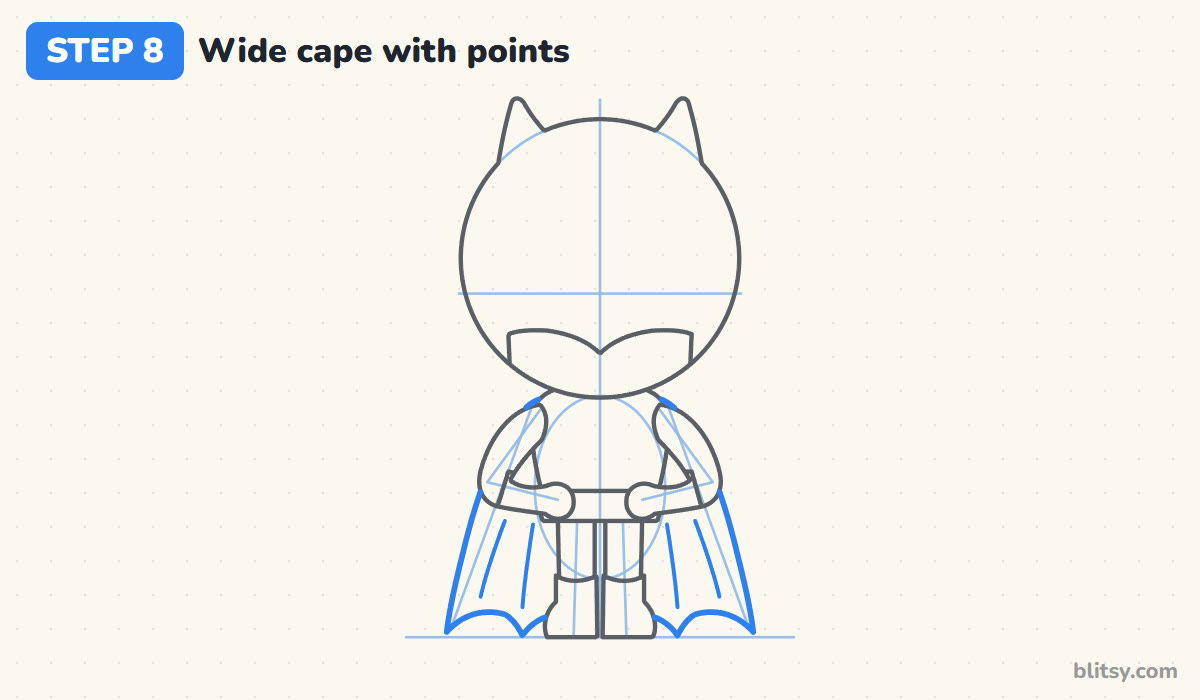
Follow your cape guides from the shoulders out and down to the ground. Along the bottom edge, draw a row of shallow scoops so the hem ends in points, like the edge of a bat wing. Then add two or three long, slightly curved fold lines inside each side of the cape.
💡 Tip: Make the scoops shallow and even. Deep, sharp zigzags look like torn cloth.
Step 9: Add the eye slits and a confident smile
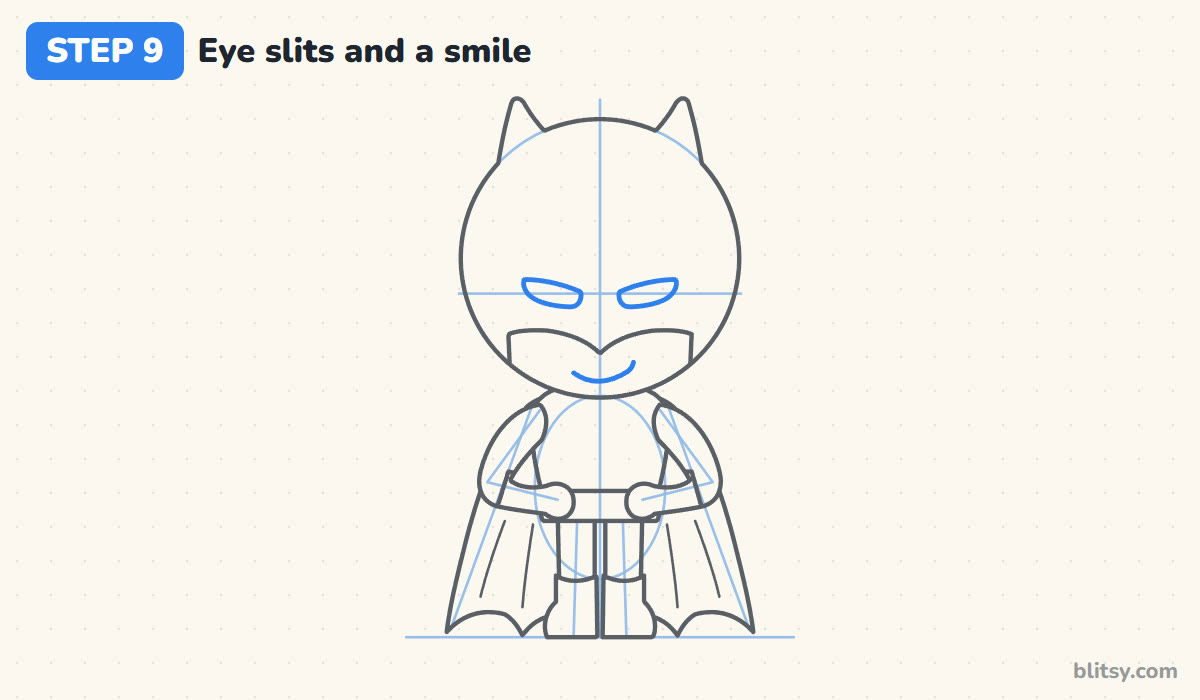
On the eye line, draw two narrow eye shapes, slightly wider at the outer corner and tipping down a little toward the nose. Leave a nose-width gap between them. In the face opening, draw a small curved smile that turns up a bit more on one side.
💡 Tip: Keep the eyes slim and the smile small. That mix reads as calm and sure of himself, not grumpy.
Step 10: Draw the bat emblem and belt pouches
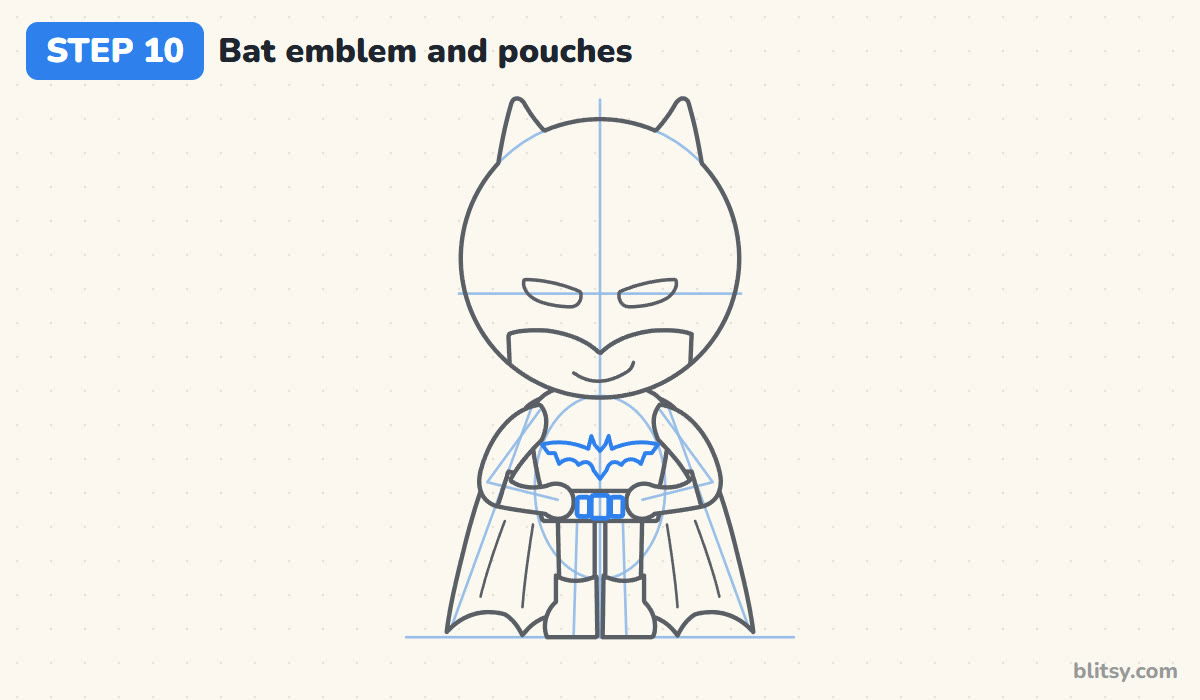
In the middle of the chest, draw a simple bat: a small head with two tiny ears, a wing stretching out on each side and three little scoops along the bottom of each wing. On the belt, draw a small buckle in the center with a pouch on each side of it.
💡 Tip: Draw one wing, then mirror it. I sketch a tiny cross first to mark the center of the bat.
Step 11: Ink the lines and erase the guides
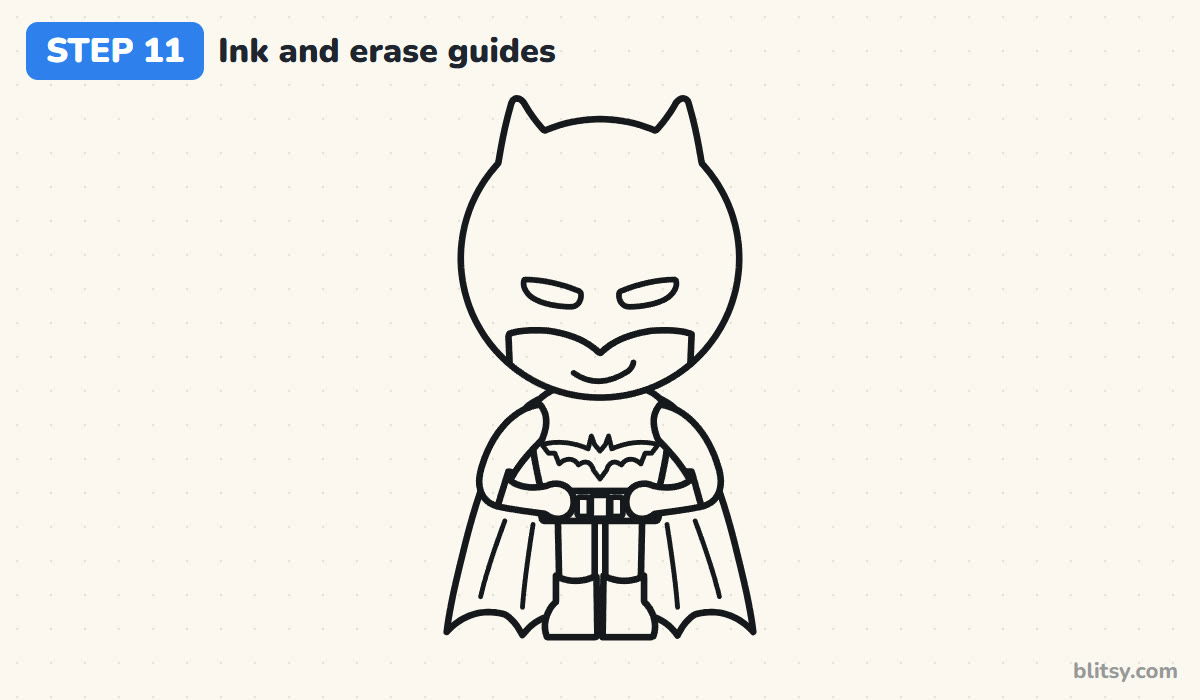
Trace every line you want to keep with a black marker. I go over the big outer shapes first, the cowl and cape, then the smaller parts like the belt and the bat. When the ink is dry, erase all the pencil guides.
💡 Tip: Wait a full minute before erasing. Marker that looks dry can still smear across the white eyes.


Step 12: Color your Batman
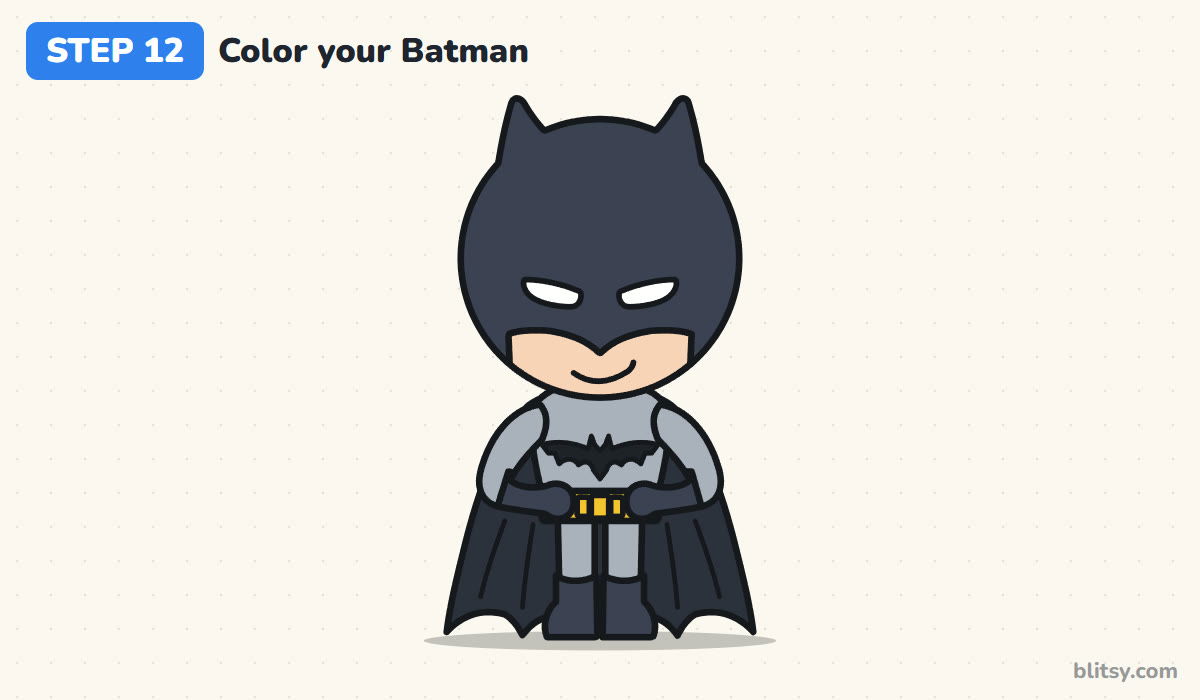
Color the cowl dark gray, along with the gloves and boots, and make the cape a shade darker if you have one. Everything else on the suit is light gray. Fill the belt and pouches with yellow, the chin with peach, and make the bat on his chest black. Leave the eyes white.
💡 Tip: Color the eyes last, or not at all. White eye slits on a dark cowl are what make him instantly recognizable.
Places Where Batman Drawings Slip Up
- Ears that are too tall or too far apart. They start looking like horns. Keep them short and set them near the top of the dome.
- A face opening that sits too high. The mask should cover the eyes and nose; only the mouth and chin show.
- Coloring over the eye slits. Dark eyes disappear into the cowl. Leave them white so his face still reads.
- A cape that hangs straight down. Let it flare out wider than his body, or he looks like he's wrapped in a towel.
- Everything in the same black. A light gray suit against a dark cape keeps the shapes from melting together.
Giving Your Dark Knight a Twist
Once the standing pose feels easy, try the cape blowing to one side or Batman giving a little wave with one glove. A classic look with a blue-gray cape and a yellow oval behind the bat is fun to color too. Younger kids can leave out the cape folds and belt pouches; the ears and eye slits carry the whole character. He also needs a teammate, and the Wonder Woman drawing tutorial uses the same chibi proportions, so the two look great side by side. For his famous rival, try the Joker drawing tutorial, or add a red and gold friend from the Iron Man drawing step by step lesson.
Free Batman Coloring Page and Printable Steps
Want to color him again or hand him out at a party? Print the free Batman coloring page, which has a small colored example at the top as a guide. The step-by-step PDF guide holds all 12 steps with tips, two per page, on Letter or A4 paper.
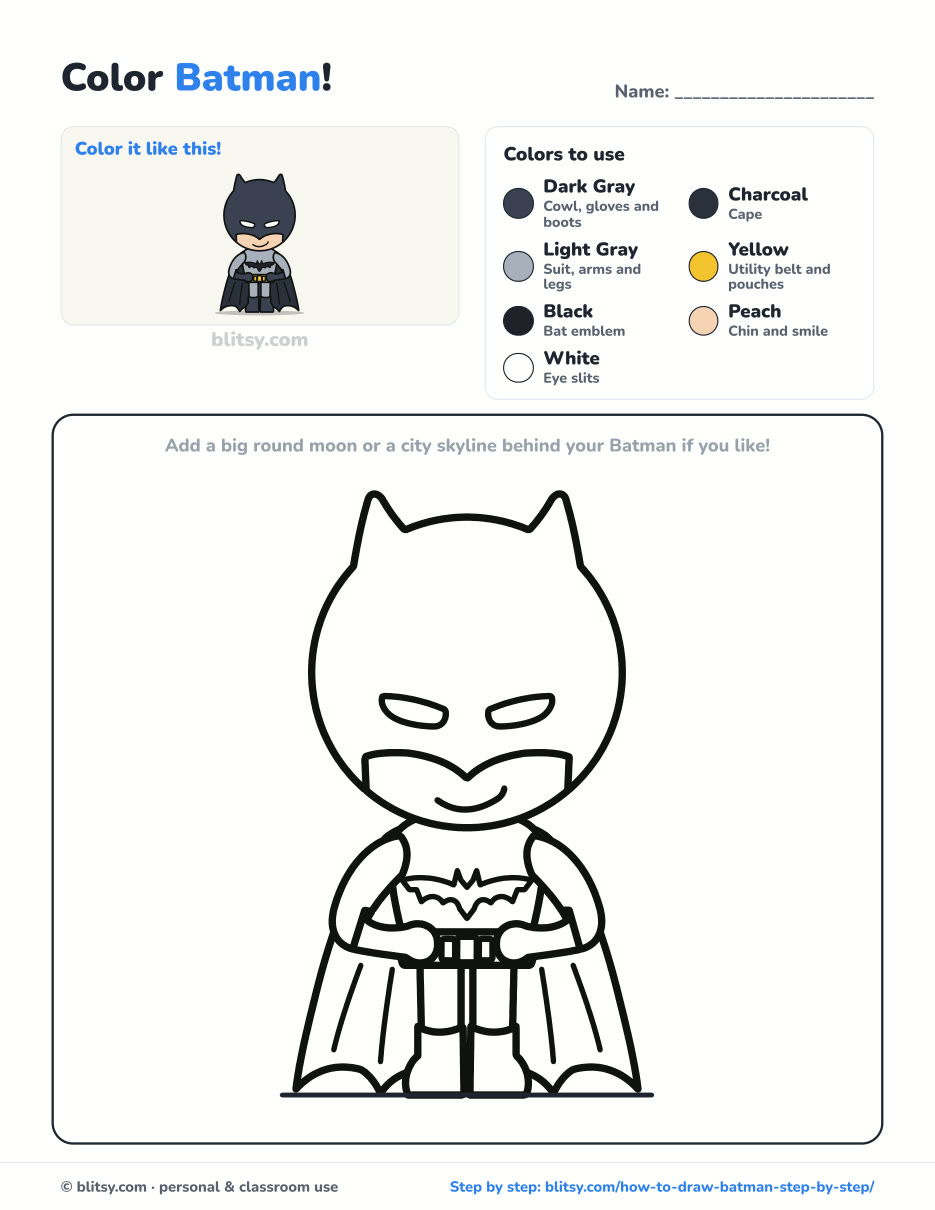
Black outlines with a colored example and the color names at the top. Ready to print and color.
⬇️ Download Coloring PageEvery step picture with its instructions and tips, to keep beside your paper while you draw.
⬇️ Download Drawing Guide📱 On a phone? Tap a download button, then open the file and choose Share → Save to Files or Print. On a computer, the PDF opens or saves straight to your Downloads folder.
Keep Batman's Steps on Your Pinterest Board
More Heroes and Villains to Draw Next
Each of these is a full step-by-step tutorial with a picture for every stage, and most use the same big-head chibi style.
- Wonder Woman Drawing: Hands on hips with a golden lasso at her side, she's a perfect partner for Batman in this Wonder Woman drawing tutorial.
- Joker Drawing: Turn the famous villain into a friendly chibi with a playing card in this how to draw the Joker tutorial.
- Iron Man Drawing: Draw a red and gold hero with a glowing chest light in this Iron Man drawing step by step lesson.
- Hulk Drawing: A small, grinning green giant flexes both arms in this Hulk drawing tutorial.
- Chibi Drawing: Learn the big-head, small-body style behind all these heroes with this chibi drawing tutorial.
Kids' Questions About Drawing Batman
What is the easiest way to draw Batman?
Draw him as a chibi from the front. A big round cowl with two pointy ears, white eye slits and a wide cape is enough for anyone to recognize him.
How do you draw Batman's mask?
Start with a circle, add two short pointed ears on top, then draw the bottom edge of the mask below the eyes with a small point in the middle. The chin and mouth show underneath.
How do you draw Batman's cape?
Draw two lines flaring out from his shoulders to the ground, then finish the bottom with a row of shallow scoops so the hem ends in points like a bat wing.
What colors do you need to color Batman?
Dark gray or black covers the cowl and cape plus the gloves and boots. Use light gray for the suit, yellow for the belt, peach for the chin, and black for the bat on his chest.
Hang your little Batman somewhere he can keep watch over your desk. 🦇
Related posts:
 How to Draw Wonder Woman Step by Step (Chibi for Kids)
 How to Draw the Hulk Step by Step (Easy Chibi for Kids)
 How to Draw Iron Man Step by Step (Easy Chibi for Kids)
 How to Draw Springtrap Step by Step (Cute Chibi for Kids)
 How to Draw Spider-Man Step by Step (Easy Chibi for Kids)
 How to Draw a Ninja Step by Step (Easy Chibi Ninja for Kids)
 How to Draw Cat Noir Step by Step (Easy Chibi Hero)
 How to Draw Goku Step by Step (Easy Chibi Version)
 How to Draw Freddy Krueger Step by Step (Cute Chibi Version)
 How to Draw Ariana Grande Step by Step (Cute Chibi Fan Art)
 How to Draw the Joker Step by Step (Easy Chibi for Beginners)
 How to Draw Toothless Step by Step (Easy Chibi Dragon)

