
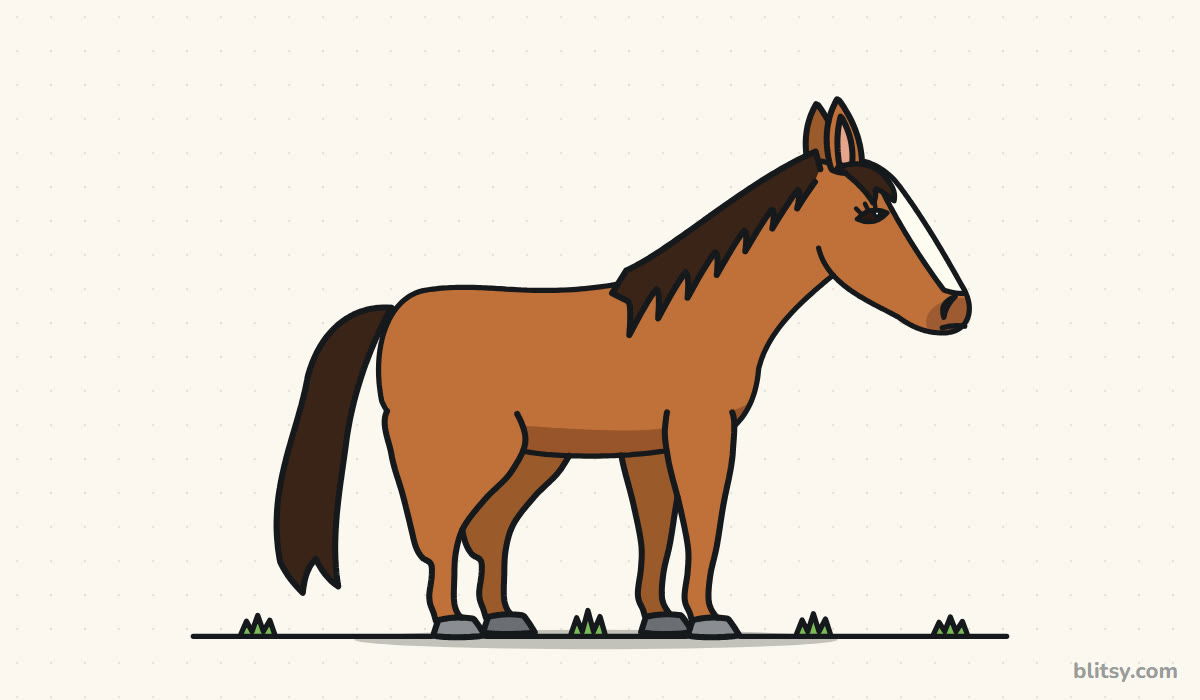
Horses have a reputation for being the hardest animal to draw, and the legs are usually the reason. Four long, thin legs with bends in odd places make anyone nervous. This lesson shows you how to draw a horse step by step from three circles and stick legs, so every knee and hock lands in the right spot before you commit to an outline. You'll finish with a friendly chestnut horse with a dark mane and a white blaze.
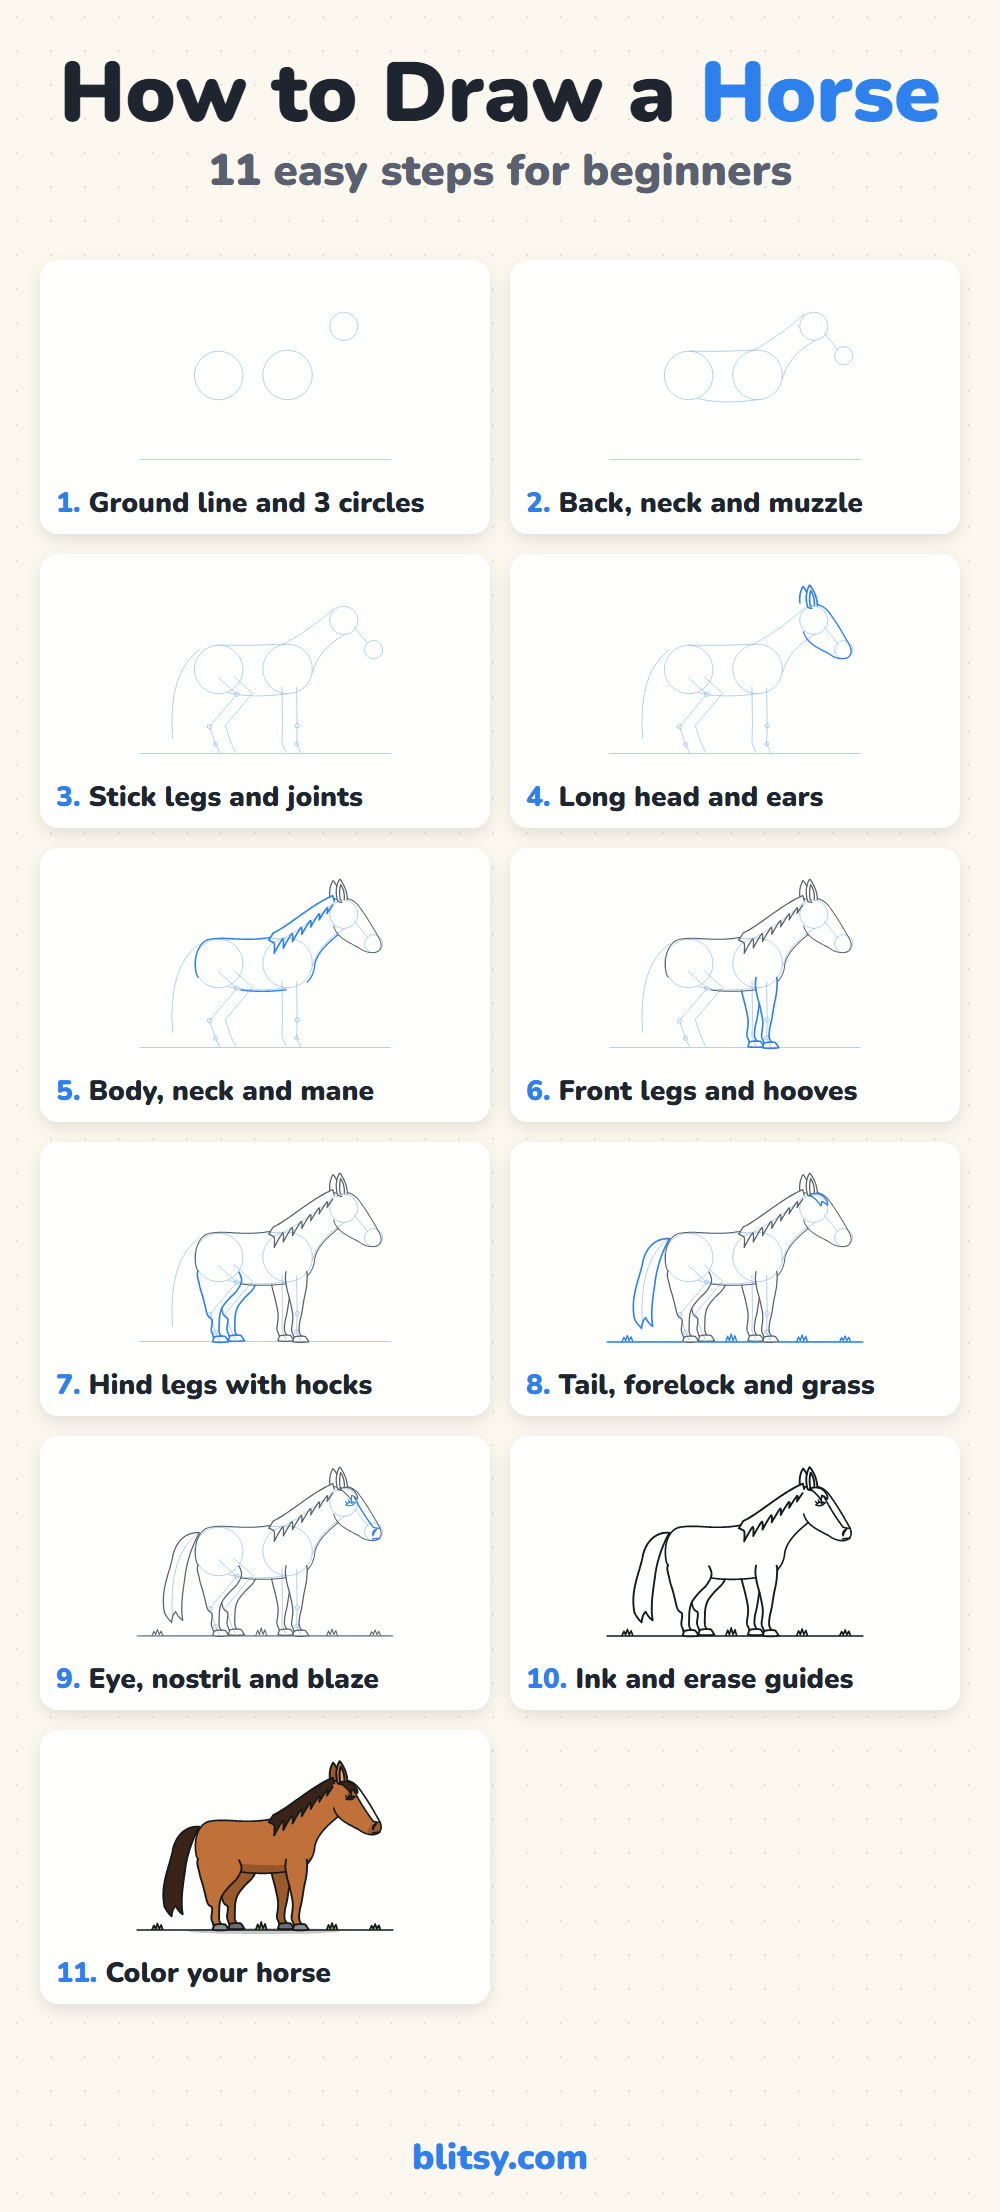
Read each step picture by color. Blue was added in that step, gray was there already, and the pale circles and sticks are guides you'll rub out before coloring.
Quick overview
⏱️ Time: about 45 minutes with coloring
🎯 Level: medium, best for kids around 8 and up and for adults
✏️ Steps: 11
🐴 You'll draw: a chestnut horse in side view with a flowing mane and tail
Supplies for a Sketch of a Standing Horse
- A regular pencil for soft guide lines
- An eraser that doesn't smear
- A black fineliner or thin marker
- Colored pencils or crayons: orange brown, dark brown, black or a very dark brown, gray, pink, green
- Plain paper laid sideways, so the horse has room from tail to nose
Nothing special is needed here; a sharp pencil and a good eraser do most of the work.
How to Draw a Horse Step by Step
Step 1: Draw a ground line and three circles
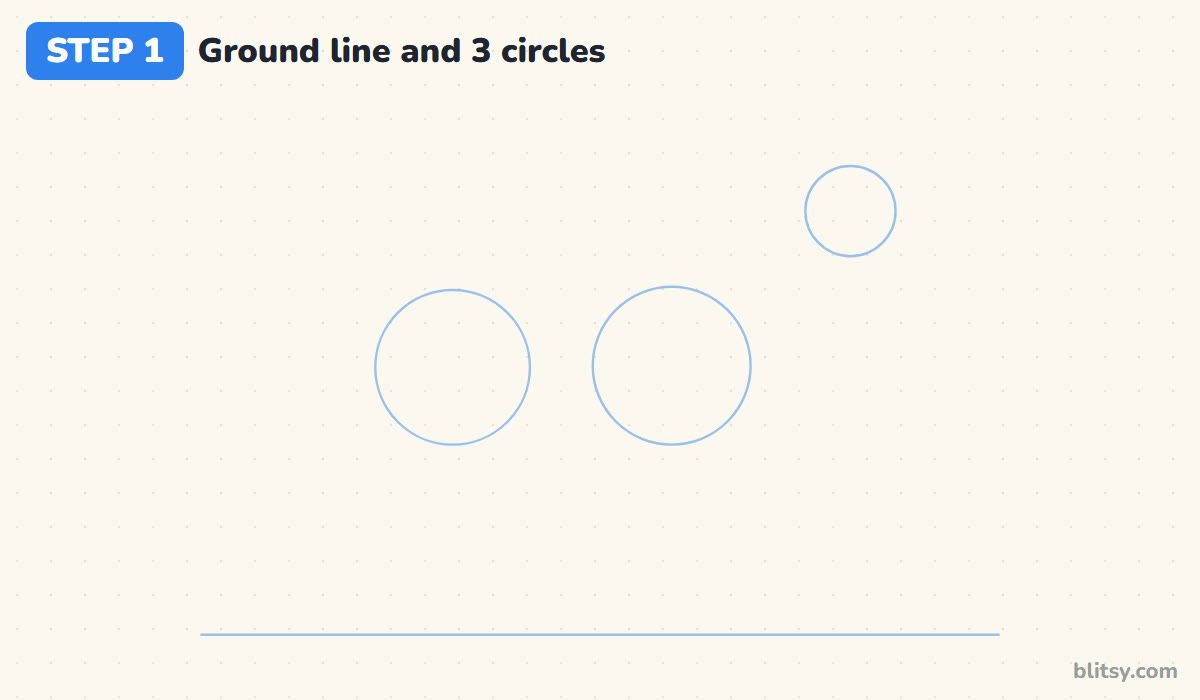
Start with a long ground line near the bottom of the page. Above it, draw two circles of about the same size side by side: the hips on the left and the chest on the right, with only a small gap between them. Then place a much smaller circle high up and to the right for the head. I keep the body circles close because a horse is roughly as tall at the shoulder as it is long.
💡 Tip: Press so lightly that the circles almost disappear. You'll be erasing them later.
Step 2: Connect the back, the neck and the muzzle
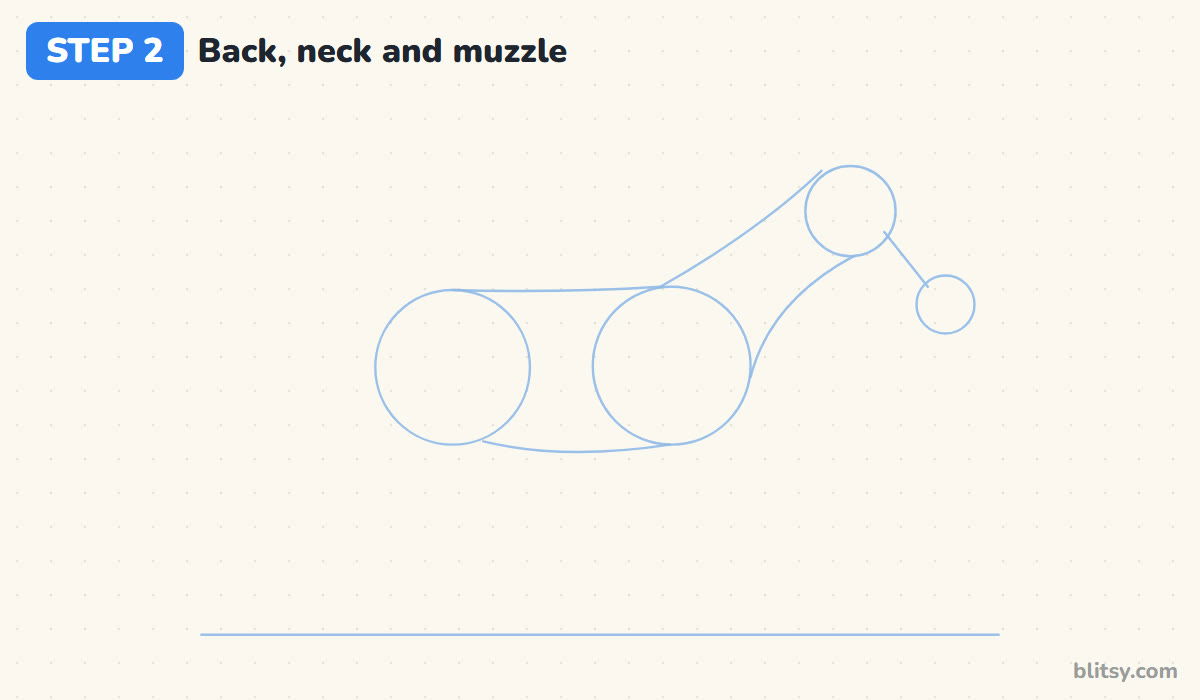
Link the tops of the body circles with a gently dipping back line and the bottoms with a belly line. Two curved lines from the chest circle up to the head circle make the neck, which should be long and thick. Add a small muzzle circle down and to the right of the head and join the two with a short line. That slanted line sets the angle of the face.
💡 Tip: Let the top neck line curve upward like a rainbow. A straight neck looks stiff.
Step 3: Add stick legs with joint dots
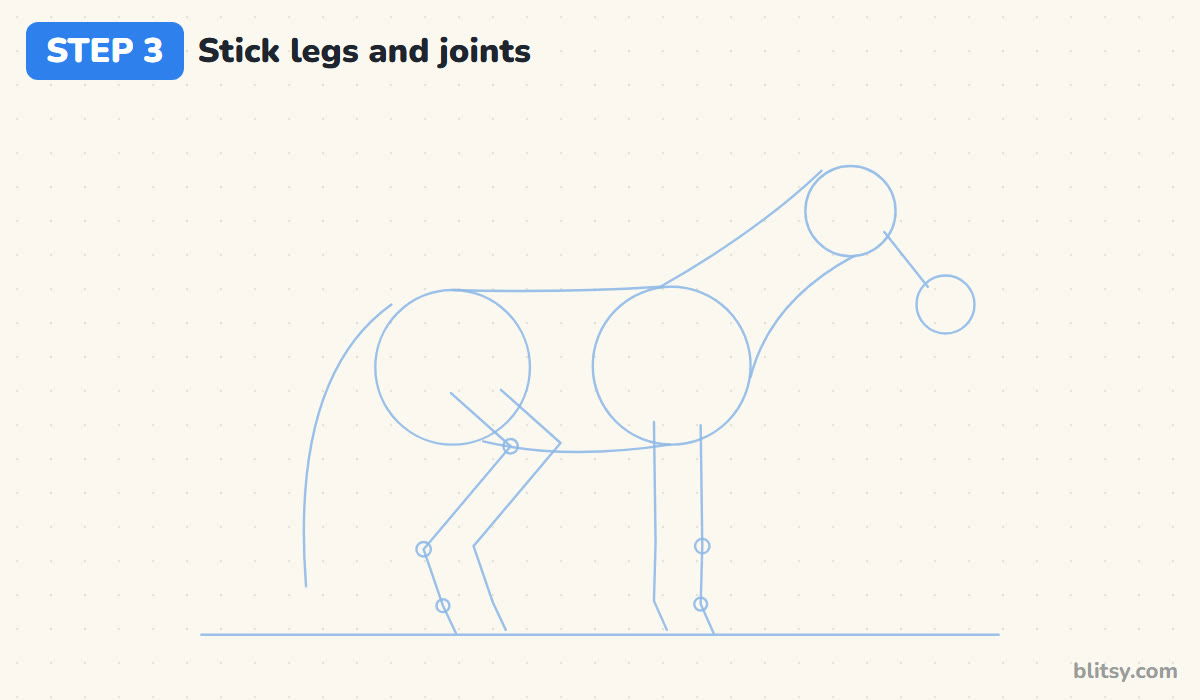
This is the step I spend the most time on when I teach horses. The front legs drop almost straight down from the chest, with a dot for the knee about halfway and another just above the hoof for the fetlock. The hind legs go forward to the stifle, slant back to the hock, which sits a little higher than the front knee, then drop to the ground. Add a long curve behind the hips for the tail.

💡 Tip: The front knee bends forward and the hock points back. Check both before moving on.
Step 4: Shape the long head and two ears
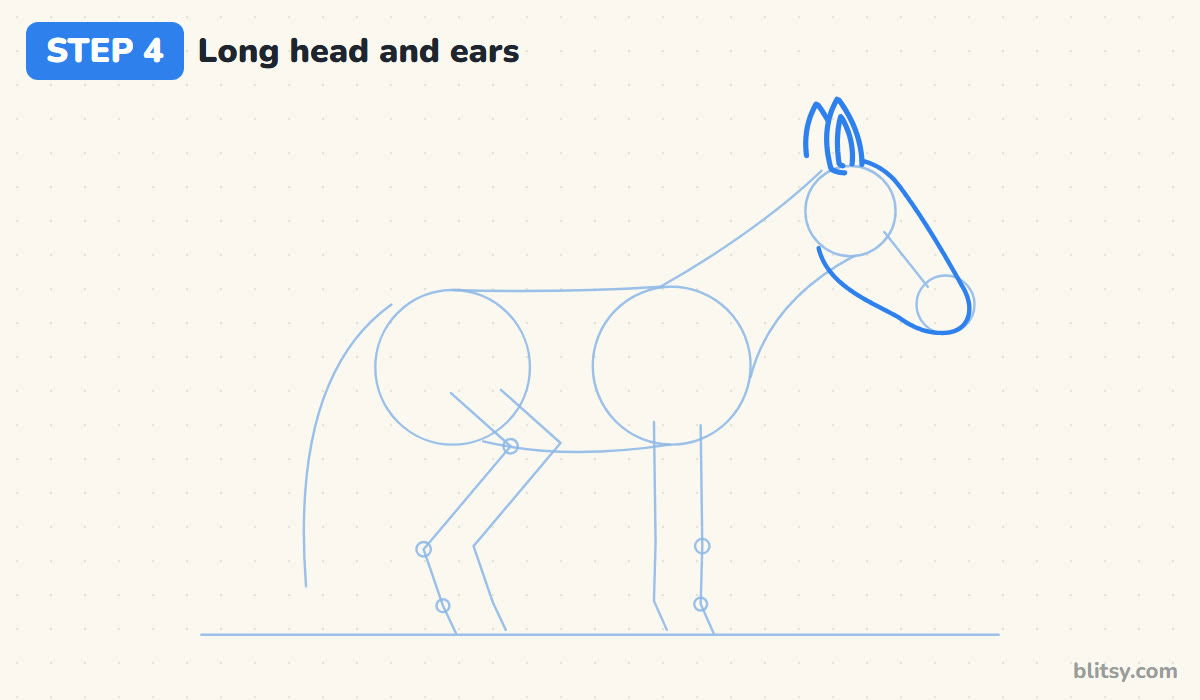
Wrap one line around the head circle and the muzzle circle. The front of the face slopes down in a long, fairly straight line, while the bottom curves around a big round cheek. On top, draw two pointed ears standing up, one peeking out behind the other. I keep the ears fairly small, since oversized ears turn a horse into a donkey.
💡 Tip: Make the head about as long as the neck. Short heads look like a pony toy.
Step 5: Outline the body, neck and mane
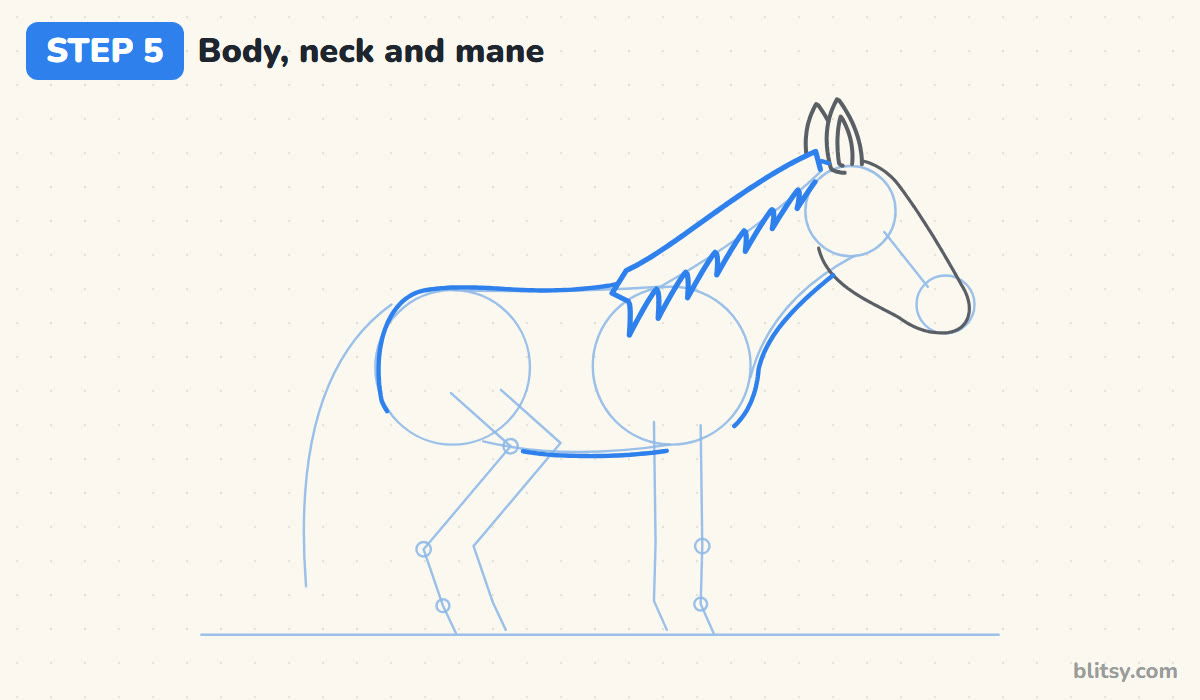
Trace around the hip circle for the rump, along the back and up the front of the chest. Run the throat line from under the cheek down to the chest. Instead of a plain top line on the neck, I draw the mane right away: a strip sitting just above the crest, with pointed locks hanging down onto the neck. Leave short gaps at the bottom where the legs will join.
💡 Tip: Make the locks different lengths. Hair that's perfectly even looks like a comb.
Step 6: Draw the front legs and hooves
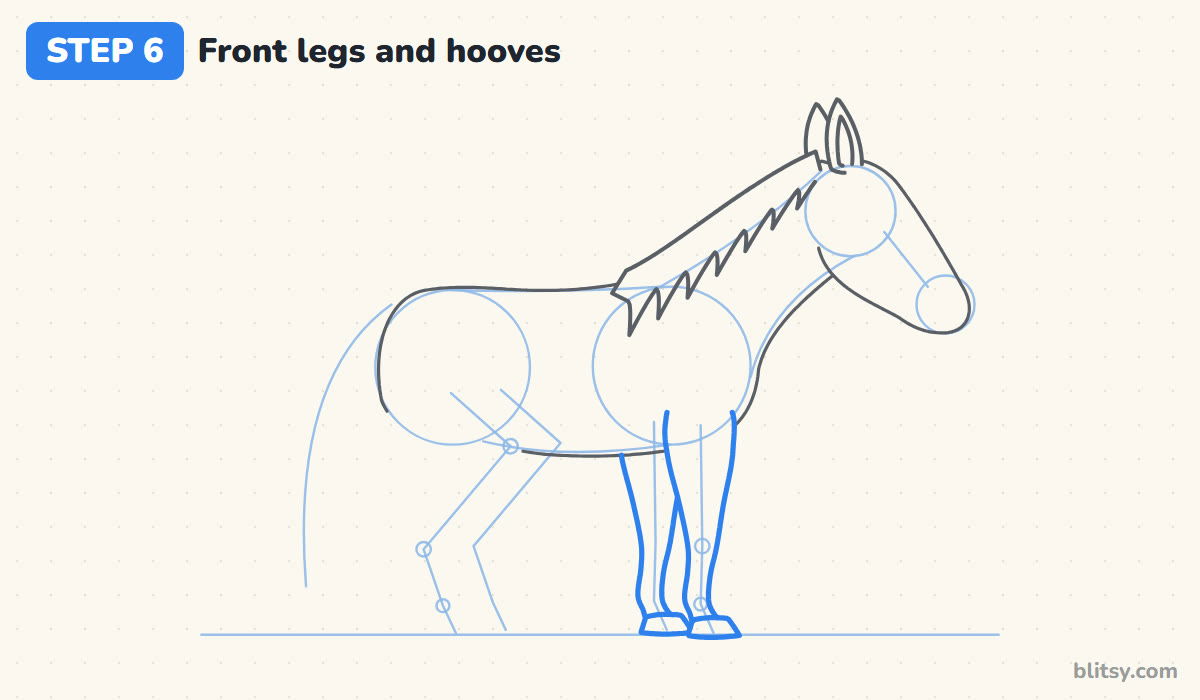
Build the near front leg around its stick. It starts wide at the elbow, narrows toward the knee, stays slim and straight down the cannon, then bulges slightly at the fetlock. A short pastern slants forward into a hoof shaped like a small trapezoid. The far front leg sits a little behind it, so you only draw the edges that show.
💡 Tip: Keep the lower leg thin. Horse legs are much slimmer than beginners expect.
Step 7: Add the hind legs with pointed hocks
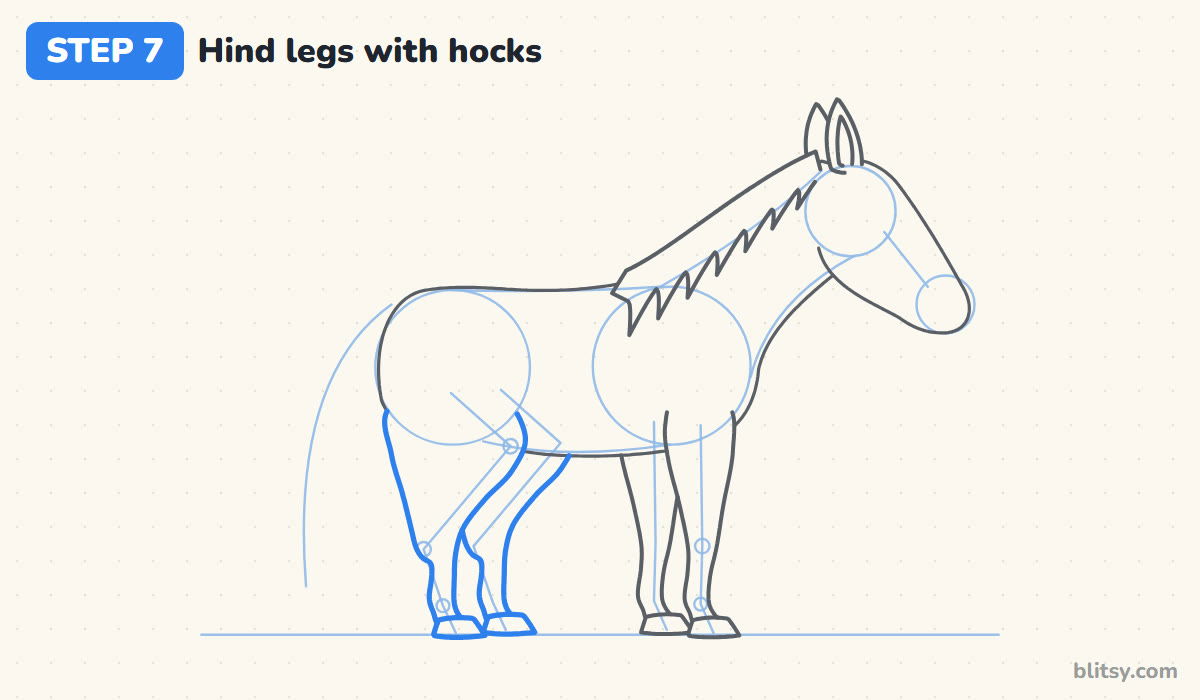
Most horse drawings go wrong right here, so slow down. Draw a big rounded thigh from the hip, then let the front edge slant backward from the stifle toward the hock. The back edge forms the hock as a clear point sticking out behind the leg. Below it, the cannon drops straight down to the fetlock and hoof. The far hind leg sits slightly ahead and is partly hidden.



💡 Tip: If the hind leg looks like a dog's, lower the hock and lengthen the cannon below it.
Step 8: Draw the tail, forelock and grass
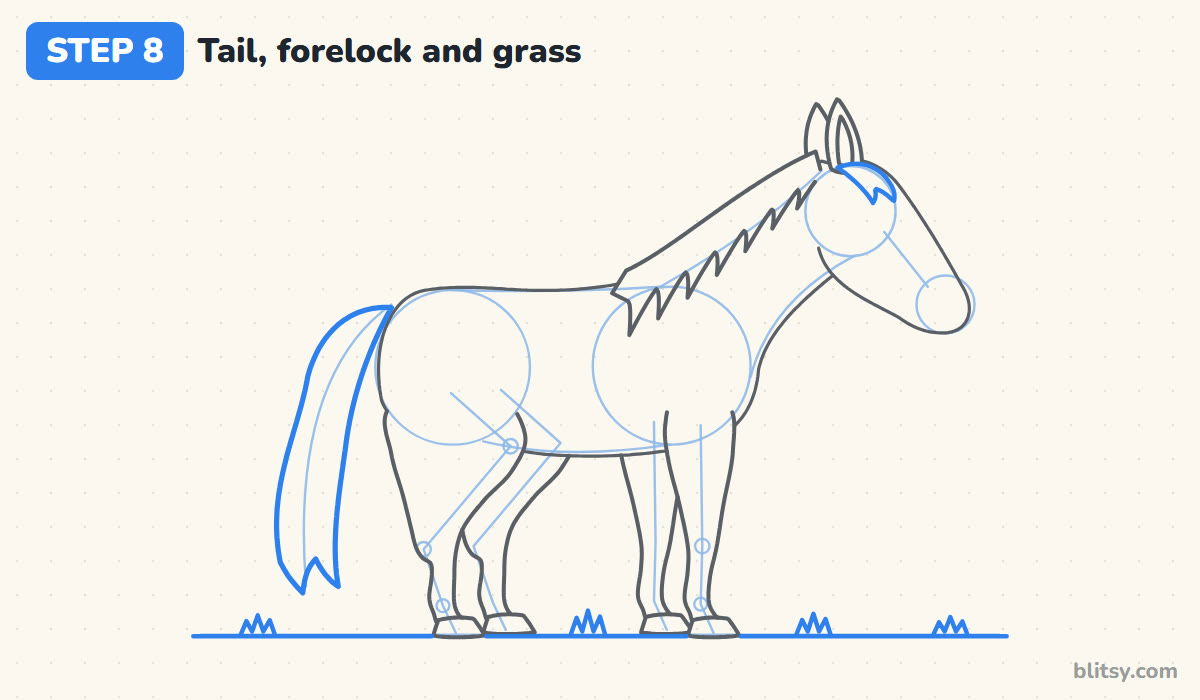
Follow the tail guide with a long flowing shape that starts narrow at the top of the rump and widens as it falls, ending in two pointed tips. Between the ears, add a small forelock falling forward onto the forehead. Then turn the ground line into grass with a few little tufts between the hooves.
💡 Tip: Draw the tail in one sweeping motion from your elbow, not your wrist.
Step 9: Give it a kind eye, a nostril and a blaze
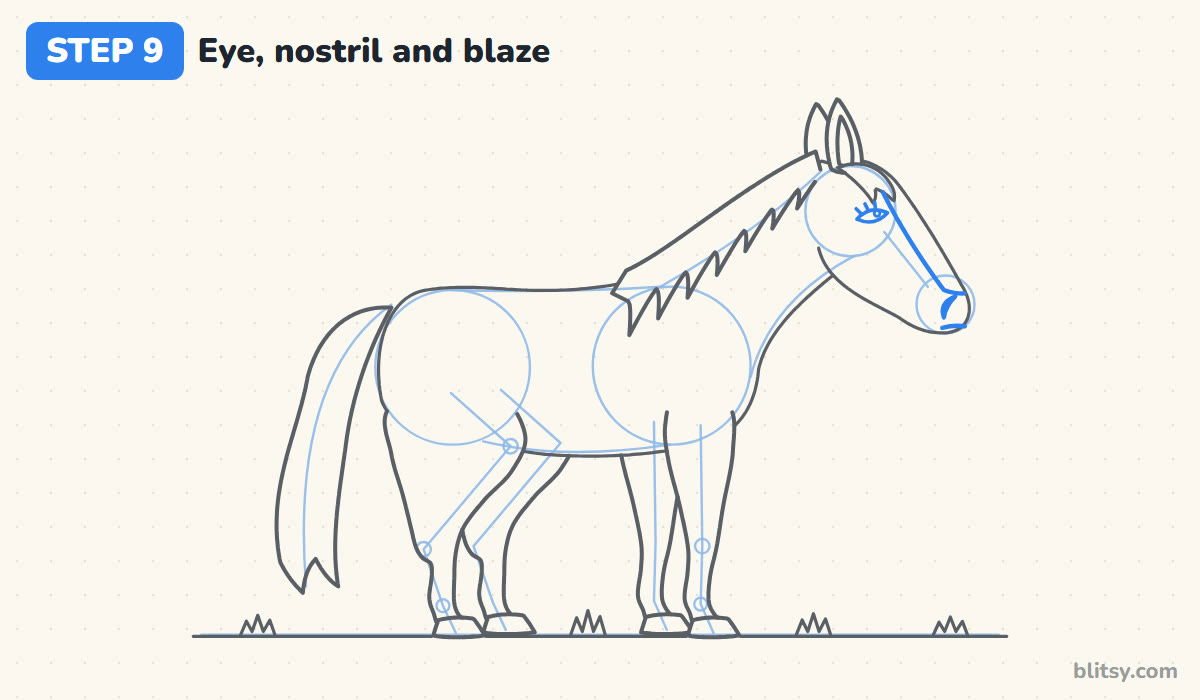
Place an almond-shaped eye just below the forelock, closer to the back of the head than the nose, and add a few short lashes and a shine dot. A small crescent near the end of the muzzle makes the nostril, with a short mouth line below. Then mark the blaze, a white stripe running down the front of the face to the nose.
💡 Tip: Leave a tiny white dot in the eye. It makes the horse look gentle and alive.
Step 10: Ink the lines and erase the guides
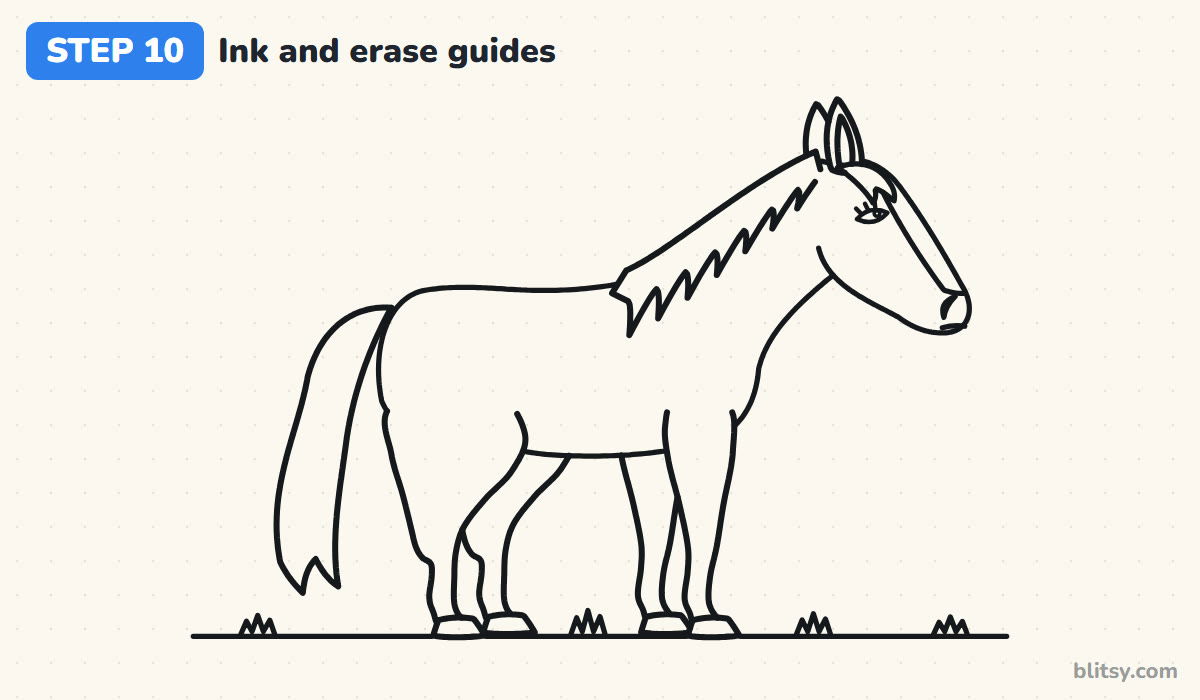
Go over every keeper line with your black pen, starting at the head and working toward the tail. Leave out the circles, the sticks and the joint dots. I wait a full minute for the ink to dry before erasing, because a smear across the horse's side is hard to hide.
💡 Tip: Turn the paper as you ink the legs, so you're always pulling the pen toward you.
Step 11: Color your horse
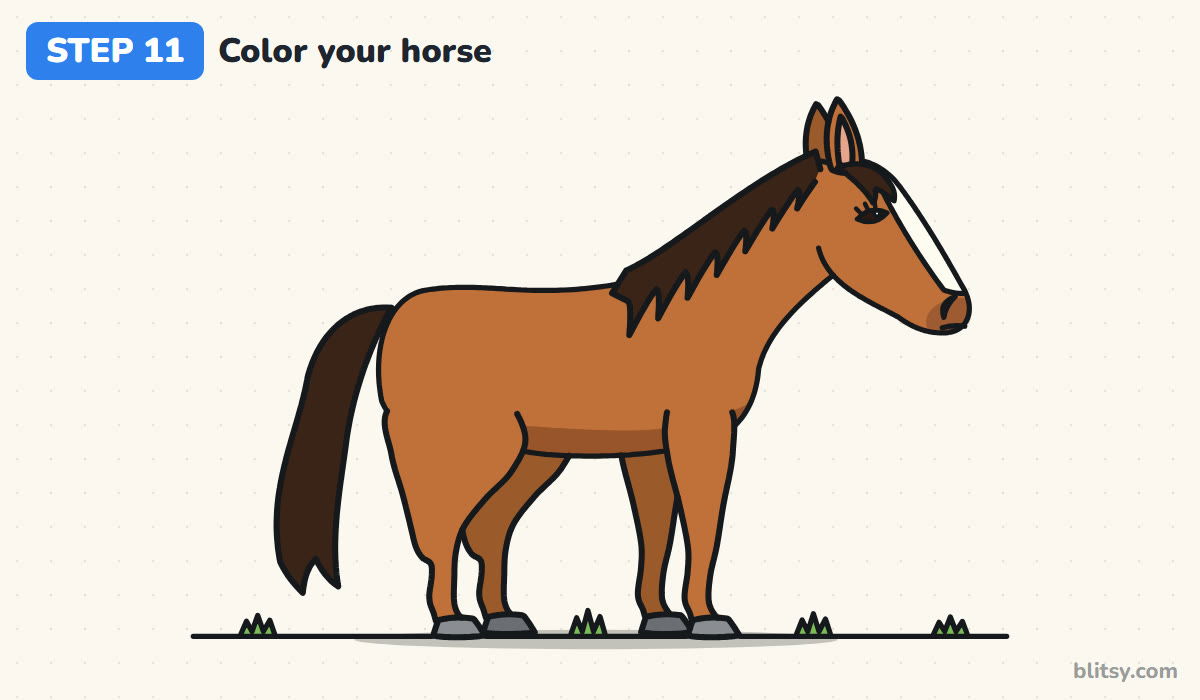
Fill the head, the body and the near legs with a warm orange brown. Go over the belly and the area under the jaw with a darker brown for shadow, and use that darker shade on the two far legs too, which pushes them back. The mane and tail get a very dark brown or black, and so does the forelock. Keep the blaze white, make the hooves gray and add pink inside the ear.


💡 Tip: Color the dark mane last, after the brown, so it doesn't smudge into the coat.
Fixing a Horse That Looks Like a Dog
- Legs that are too short. A horse's belly sits about halfway between its back and the ground. If yours sits lower, lengthen the legs.
- Hind legs bent the wrong way. The hock always points backward. If it points forward, the horse looks like it's sitting down.
- Chunky lower legs. Below the knee and the hock, horse legs are slim. Save the width for the forearm and thigh.
- A short, round head. Stretch the face with the muzzle circle so the nose sits well below and in front of the eye.
- A thin, straight neck. Make the neck wide where it meets the chest and curve the top line up like an arch.
New Coats and Poses for Your Horse
Once the three circles feel easy, my favorite next move is changing the coat. A gray horse with dapples, a black horse with four white socks or a spotted pinto all use the same outline. You can also lift one front leg to make your horse paw the ground. Add a horn and a pastel mane and you have something close to the unicorn drawing tutorial, or put a rider on top with help from how to draw a cowboy step by step.
Free Horse Coloring Page and Printable Guide
Print the horse coloring page for a colored horse to copy from, a key matching each color to its part, and a large outline with room for a fence or a barn. The step-by-step PDF guide holds all 11 steps with pictures and tips. Both print on Letter or A4.
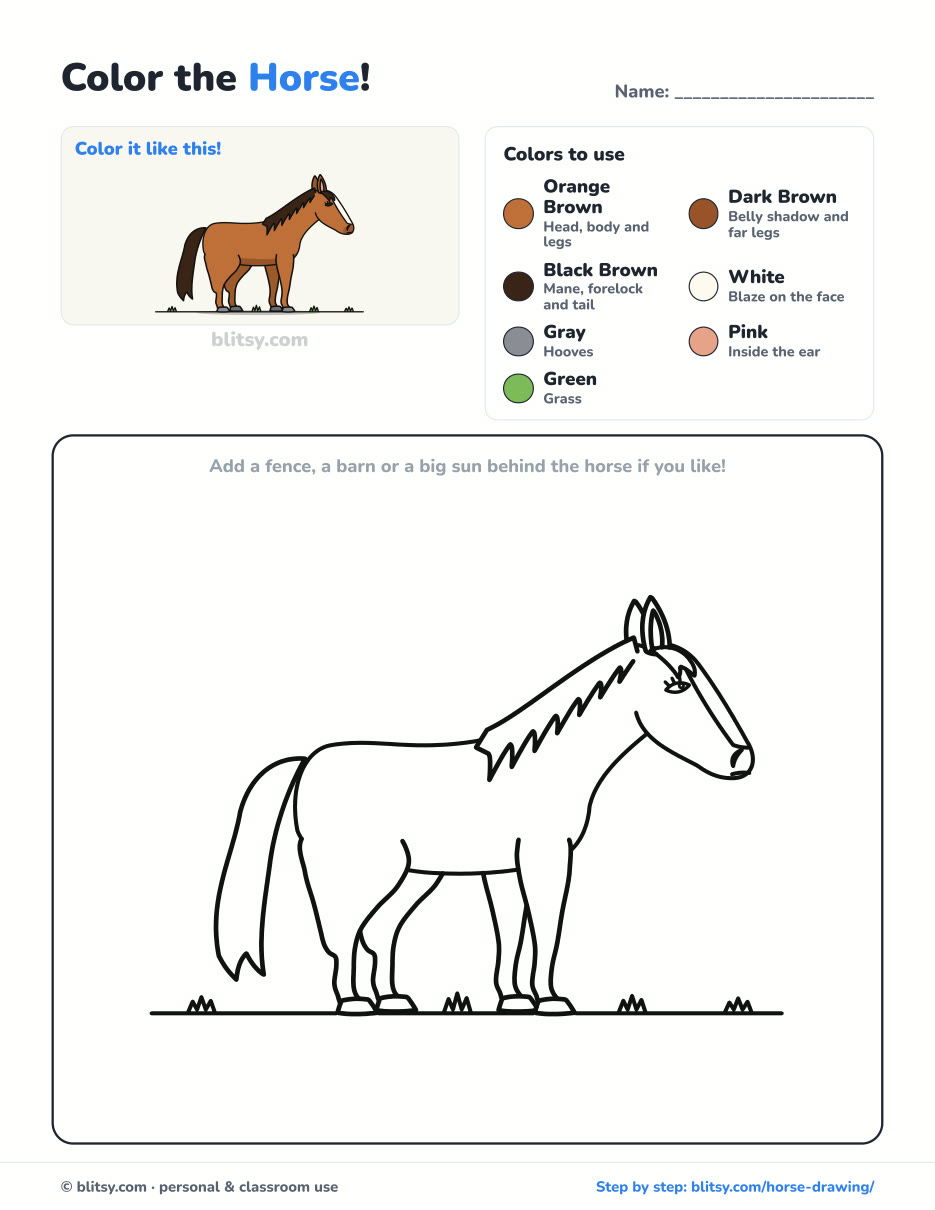
Black outlines with a colored example and the color names at the top. Ready to print and color.
⬇️ Download Coloring PageEvery step picture with its instructions and tips, to keep beside your paper while you draw.
⬇️ Download Drawing Guide📱 On a phone? Tap a download button, then open the file and choose Share → Save to Files or Print. On a computer, the PDF opens or saves straight to your Downloads folder.
Pin the Horse Lesson for Later
Horse Drawing Questions People Often Ask
What is the easiest way to draw a horse?
Begin with three circles for the hips, the chest and the head, join them with a back line and a neck, then add stick legs with joint dots. Outlining around guides is far easier than starting with the outline.
Why do horse back legs bend backward?
The joint that points back is the hock, which works like an ankle, so it isn't really a backward knee. The real knee of the hind leg is the stifle, high up near the belly, and it points forward.
How long does it take to draw a horse?
Around 45 minutes with coloring. The hind legs take the longest.
Can kids draw a horse with these steps?
Yes, children from about 8 can follow along. Younger kids can stop after the circles, the neck and stick legs and still have a horse to color.
Set out those three circles, take your time on the hocks and see what color your own horse turns out. 🐴✏️
Related posts:
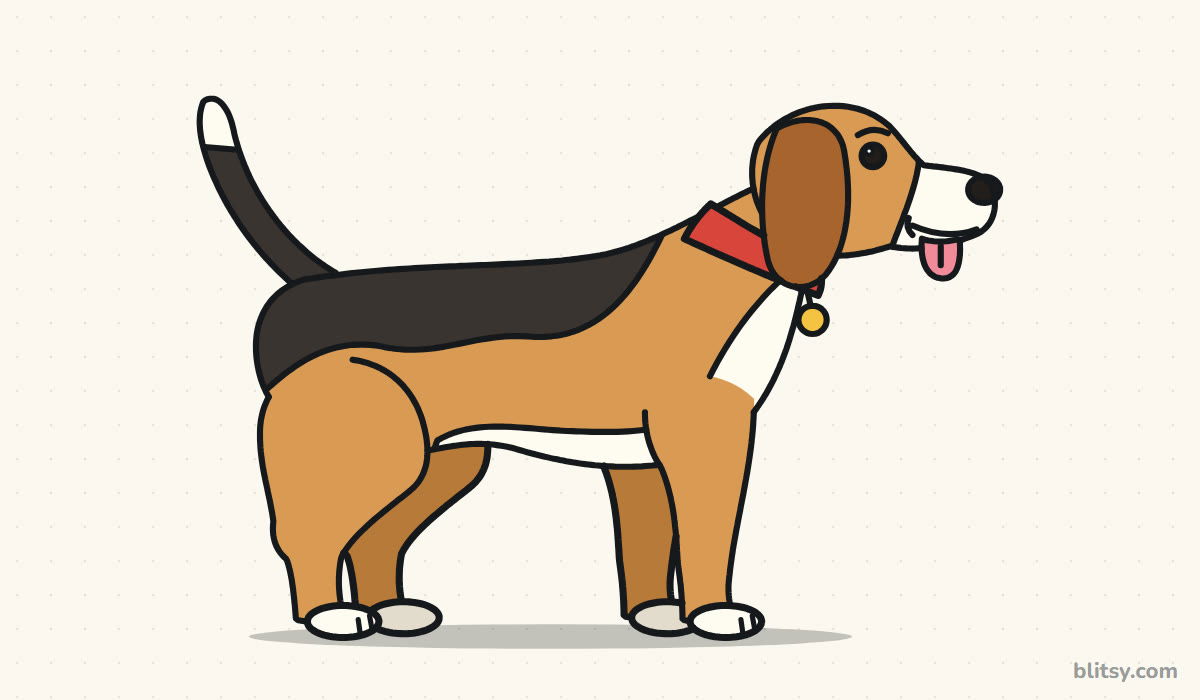 How to Draw a Dog Step by Step (Easy Side View for Beginners)
 How to Draw an Alligator Step by Step (Easy Side View)
 How to Draw a Nose Step by Step (Front and Side View)
 How to Draw a Brain Step by Step (Easy Side View)
 How to Draw a Dragon Head Step by Step (Easy Side View)
 How to Draw a Hoodie Step by Step (Front and Back View)
 How to Draw a School Step by Step (Easy Front View)
 How to Draw Hands Step by Step (Easy Palm View for Beginners)
 How to Draw a Skull Step by Step (Easy Front View)
 How to Draw a Side Profile Step by Step (Easy Head Guide)
 How to Draw a Whale Step by Step (Easy for Beginners)
 How to Draw Lungs Step by Step (Easy Science Diagram)

