
The trick with a talking car is to put the eyes where a driver would sit. Once two big eyes look out of the windshield and a grin stretches across the front bumper, any red race car turns into a character. In this lesson I'll show you how to draw Lightning McQueen step by step, starting from two wheel circles and a long box. It's my own simple fan-art version for practice, not official Disney Pixar artwork, so you can change anything you like.
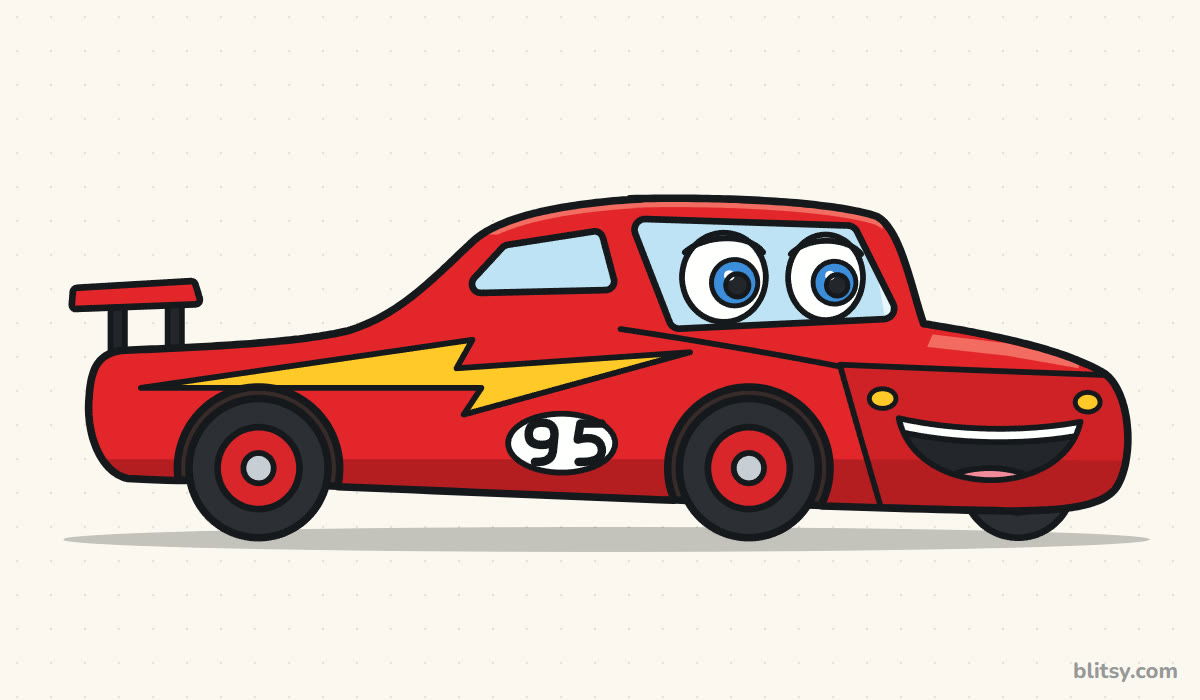
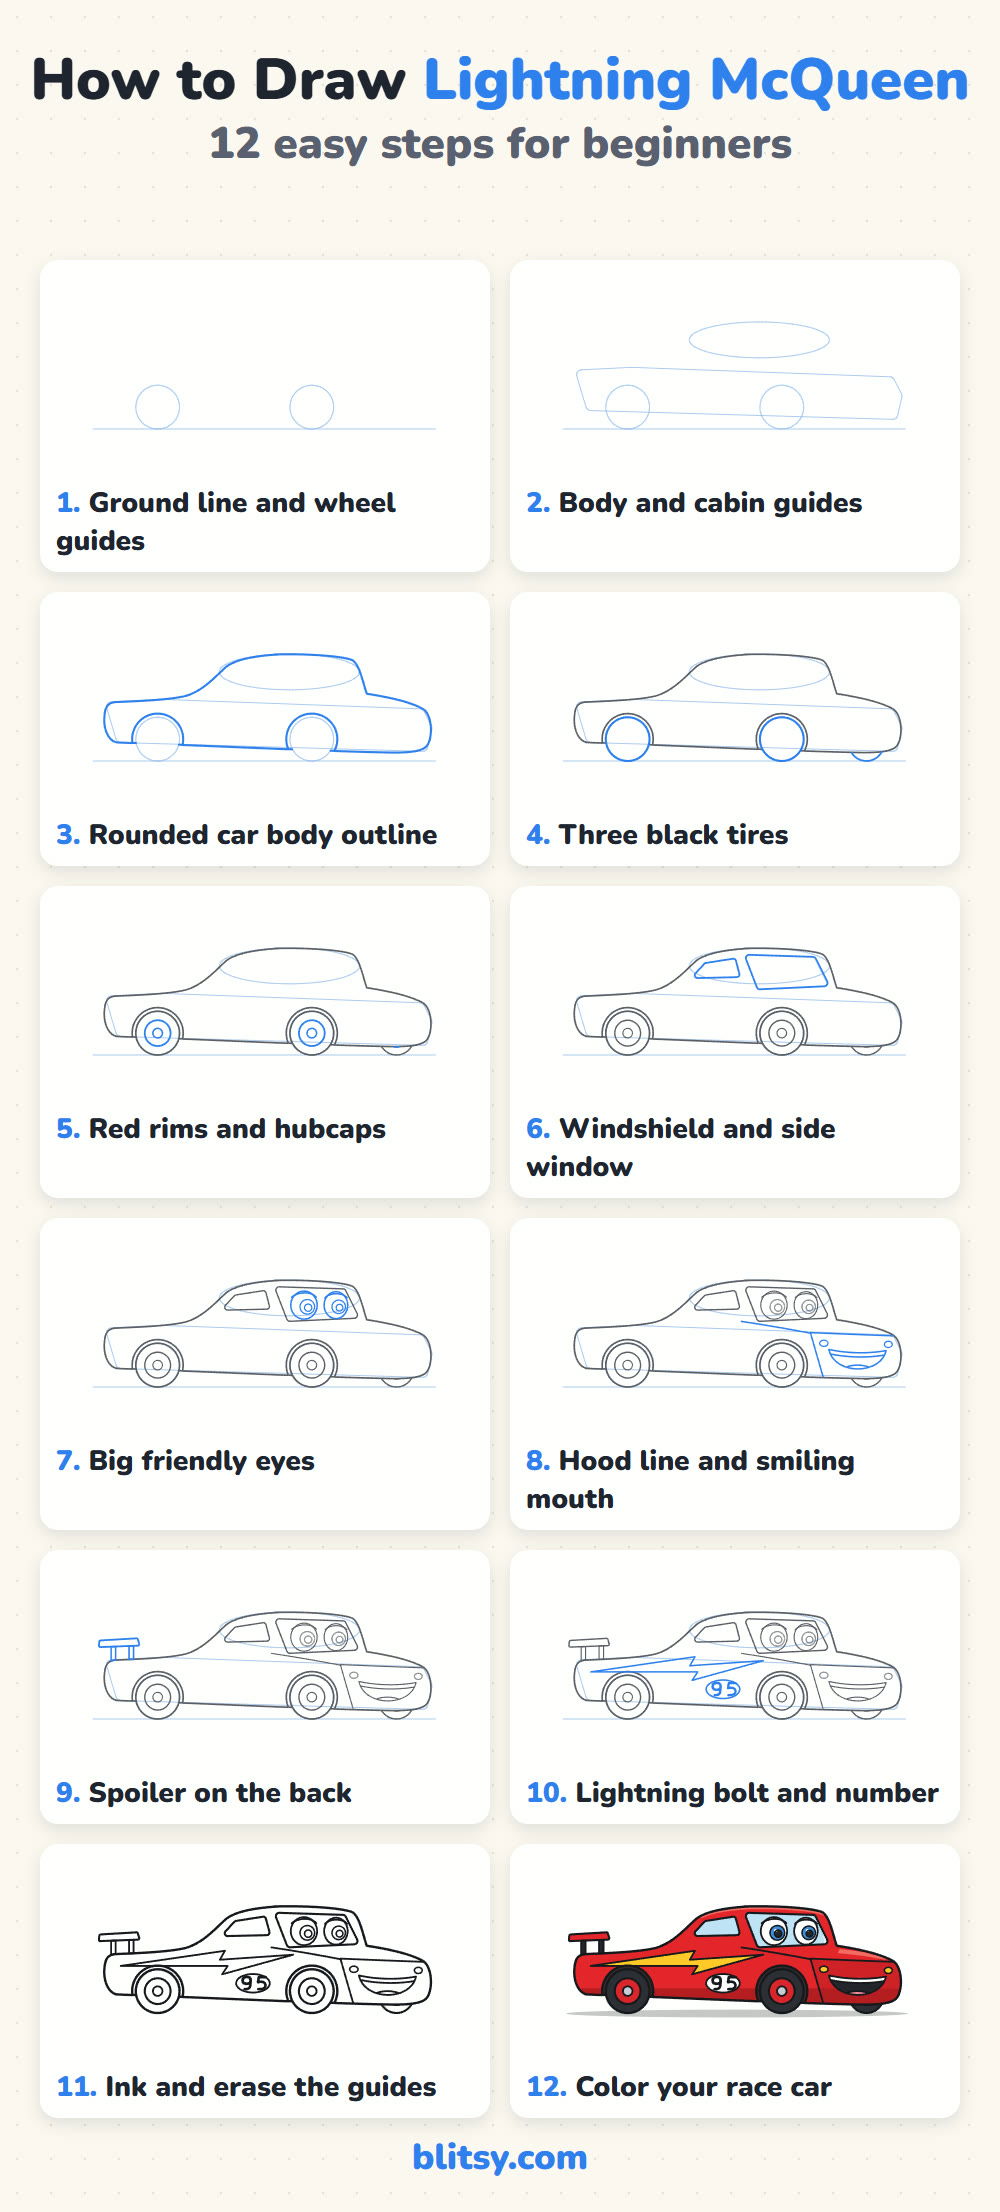
Think of the pictures as a race in laps: the blue lines are this lap, the gray ones are laps you've already finished. Copy just the blue, then check your car.
Quick overview
⏱️ Time: about 30 to 40 minutes, coloring included
🎯 Level: easy, fine for kids around 6 and older
✏️ Steps: 12
🏎️ You'll draw: a smiling red race car seen from the front corner
Gear for a Speedy Race Car Sketch
- A regular pencil you can press lightly
- An eraser that doesn't smudge
- A black marker or fineliner for the final outline
- Crayons or colored pencils in red, dark red, yellow, light blue, blue, pink and black
- Plain white paper, turned sideways
A long car needs a wide page, so landscape paper keeps the spoiler and the nose from running off the edges.
How to Draw Lightning McQueen Step by Step
Step 1: Draw the ground line and two wheel circles
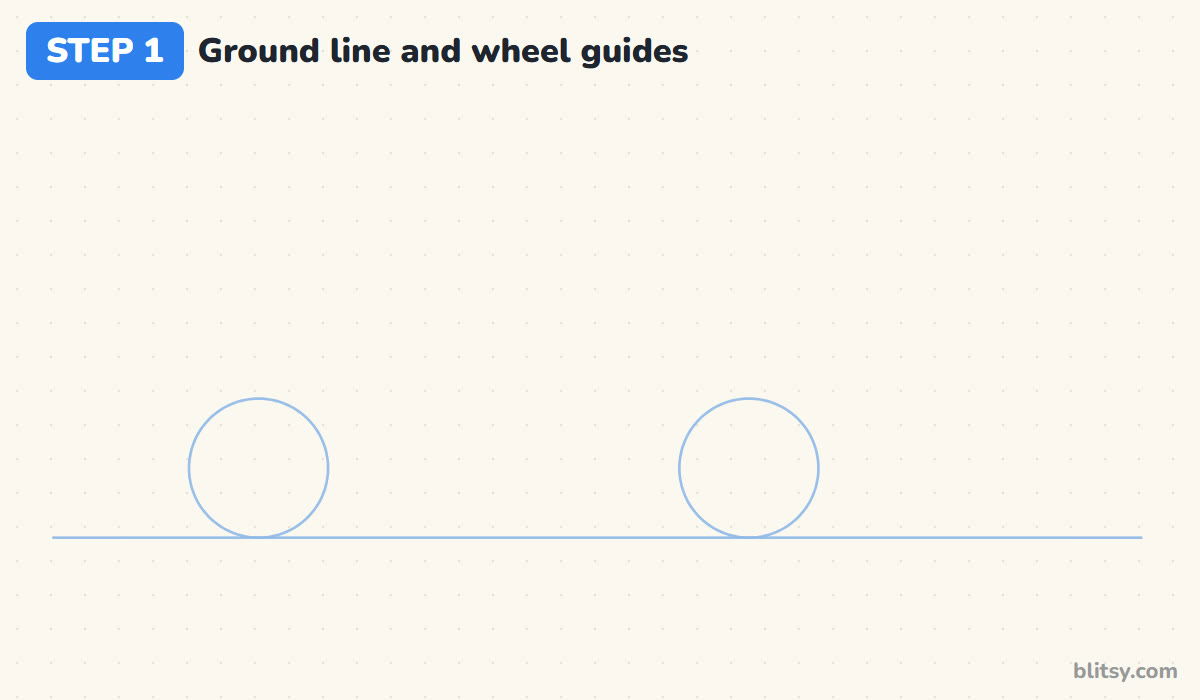
Draw a long, light line across the lower part of your page. Sit two circles of the same size on it, one about a third of the way in from the left and one about two thirds in. Leave a wide gap between them, because the door and the number will go there later.
💡 Tip: Trace around a coin or a bottle cap if your circles keep coming out lumpy.
Step 2: Sketch a long body box and a cabin oval
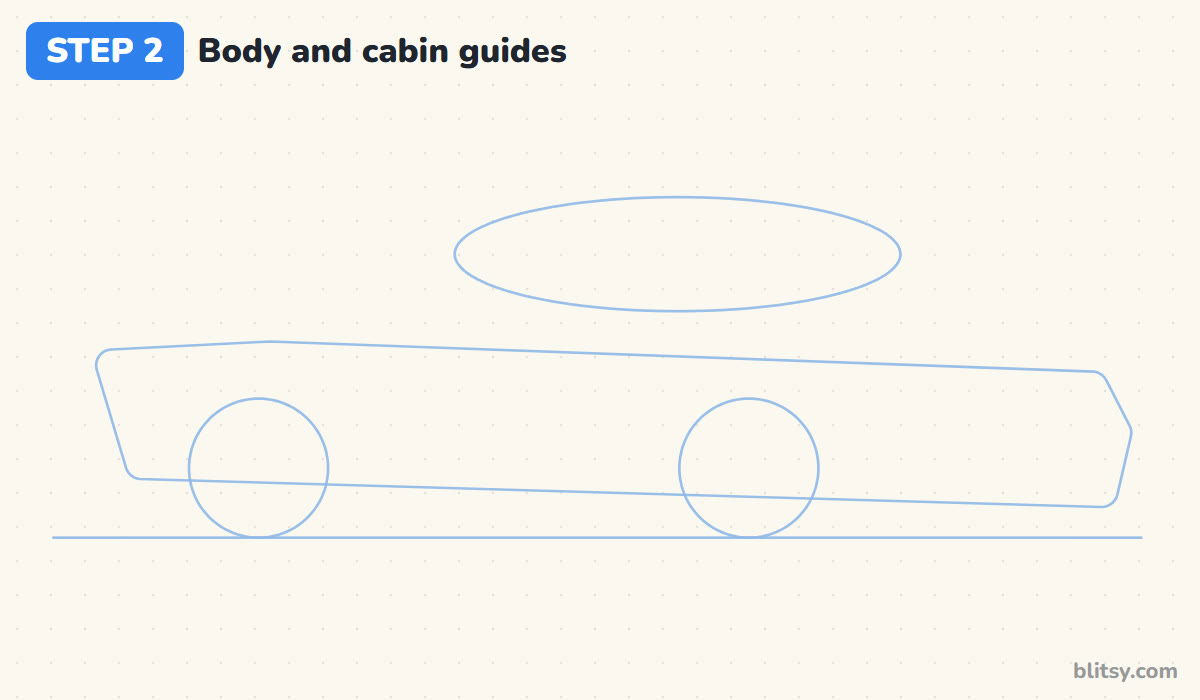
Around the wheels, sketch a long, low box that runs a little past each circle. Make the right end slightly taller and rounded, since that's the nose. Then float a flat oval above the right half of the box. That oval marks where the roof and the windshield will sit.
💡 Tip: Keep the oval over the front wheel, not in the middle. A race car's cabin sits forward.
Step 3: Outline the rounded car body
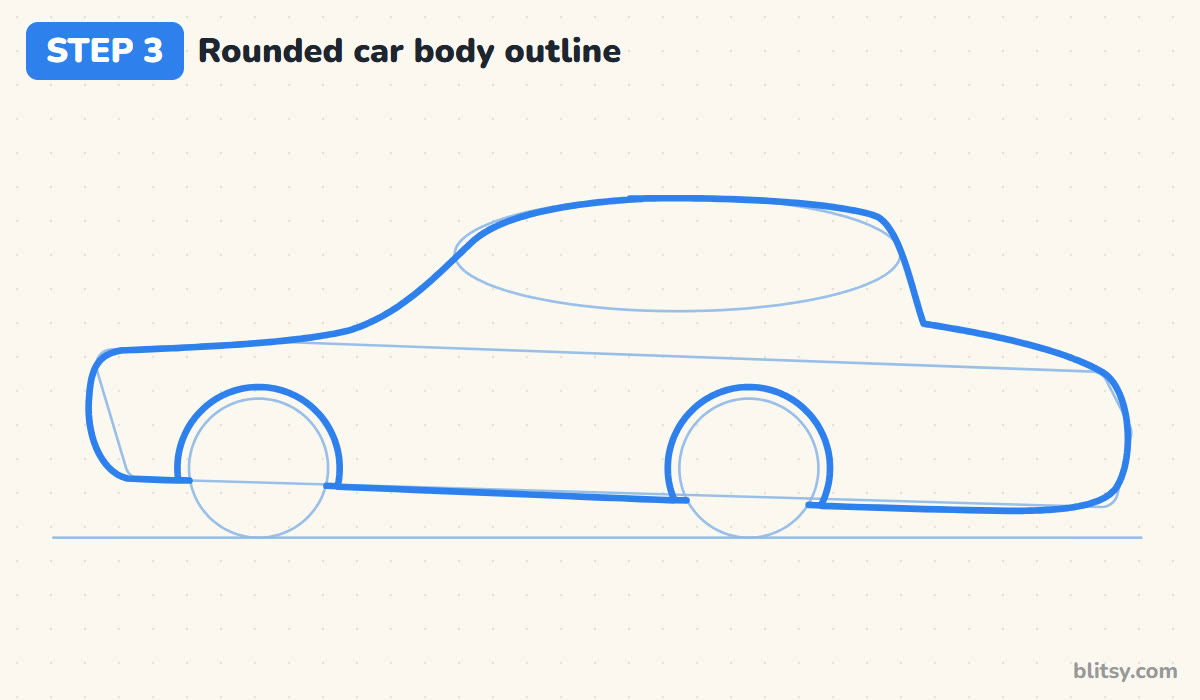
Now go over the guides with one smooth outline. Start at the back with a rounded end, run a long flat deck forward, then climb up over the cabin oval in a gentle hump for the roof. From the front of the roof, slope down to a long hood and finish with a big rounded nose. Above each wheel, scoop the line up into an arch so the tires have room.
💡 Tip: Draw the roof as one slow curve. Short scratchy strokes make it look bumpy.




Step 4: Add three chunky black tires
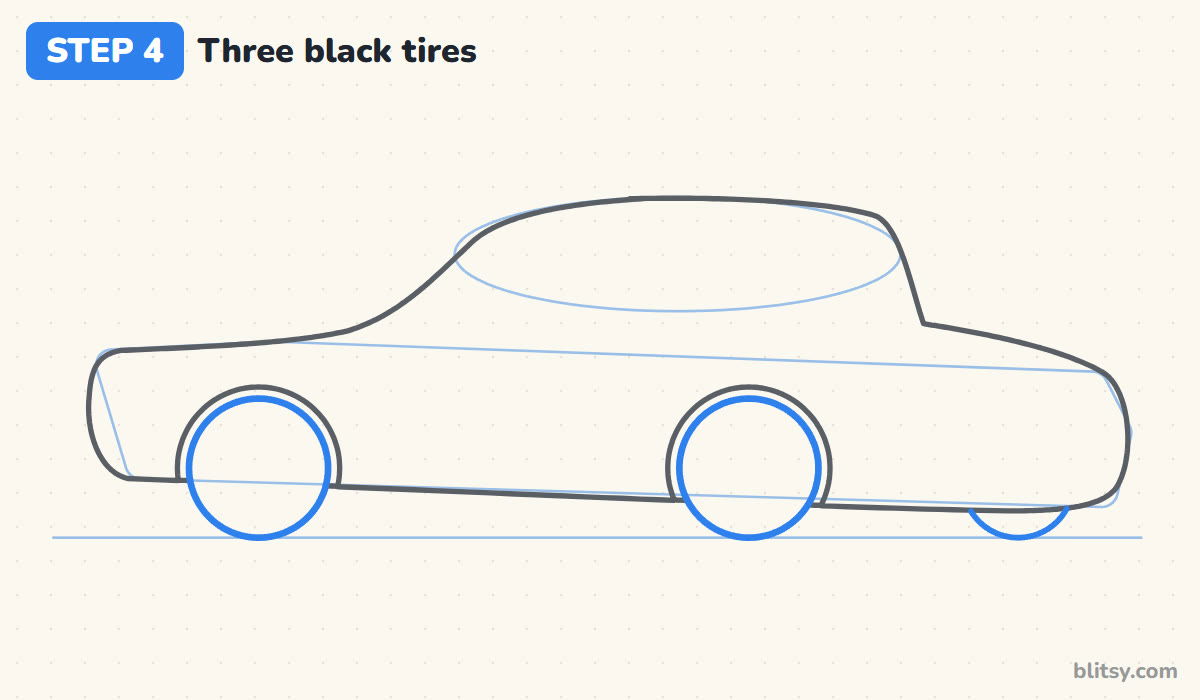
Trace firmly over the two wheel circles so they sit just inside their arches. Under the nose, draw only the bottom part of a third tire peeking out. That's the wheel on the far side of the car, and showing a slice of it is what makes the car look turned toward you instead of flat.
💡 Tip: Stop the far tire where it meets the body. If you draw the whole circle, the car looks see-through.
Step 5: Put red rims and hubcaps in the wheels
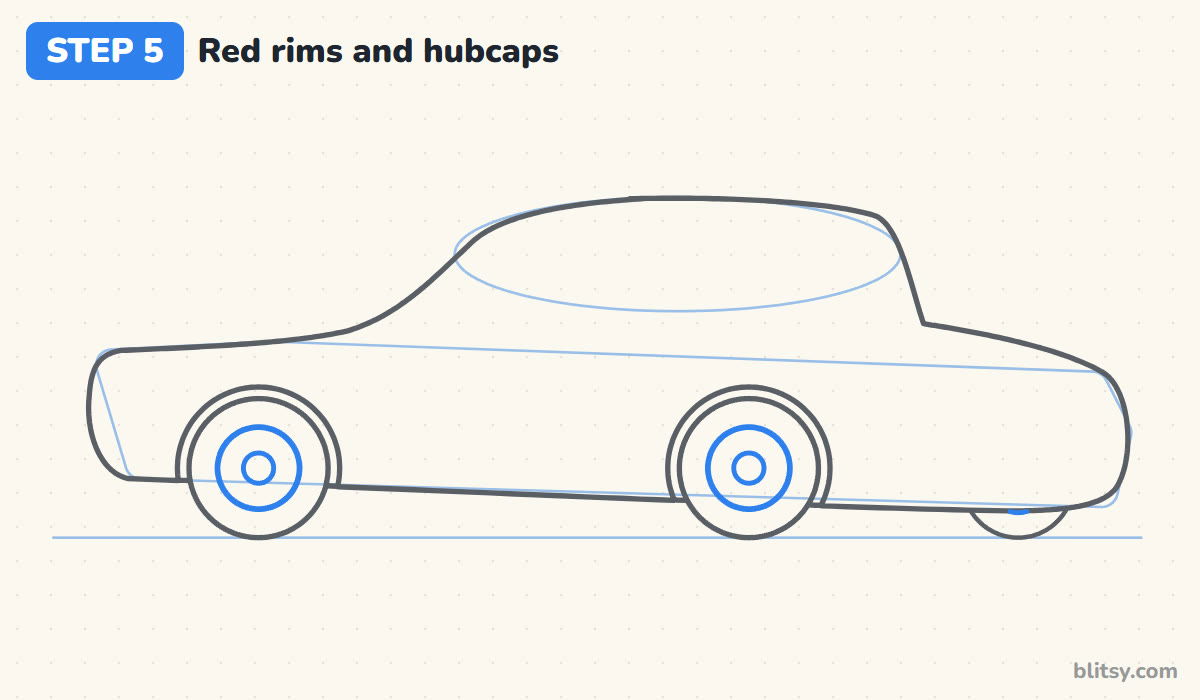
Inside each near tire, draw a circle about half as wide for the rim, then a small one in the center for the hubcap. Add a matching rim slice inside the far tire. Keeping the rims centered matters more than it seems. An off-center rim makes the wheel look wobbly.
💡 Tip: Mark the center of each wheel with a tiny dot first, then draw the rims around it.
Step 6: Draw the windshield and a side window
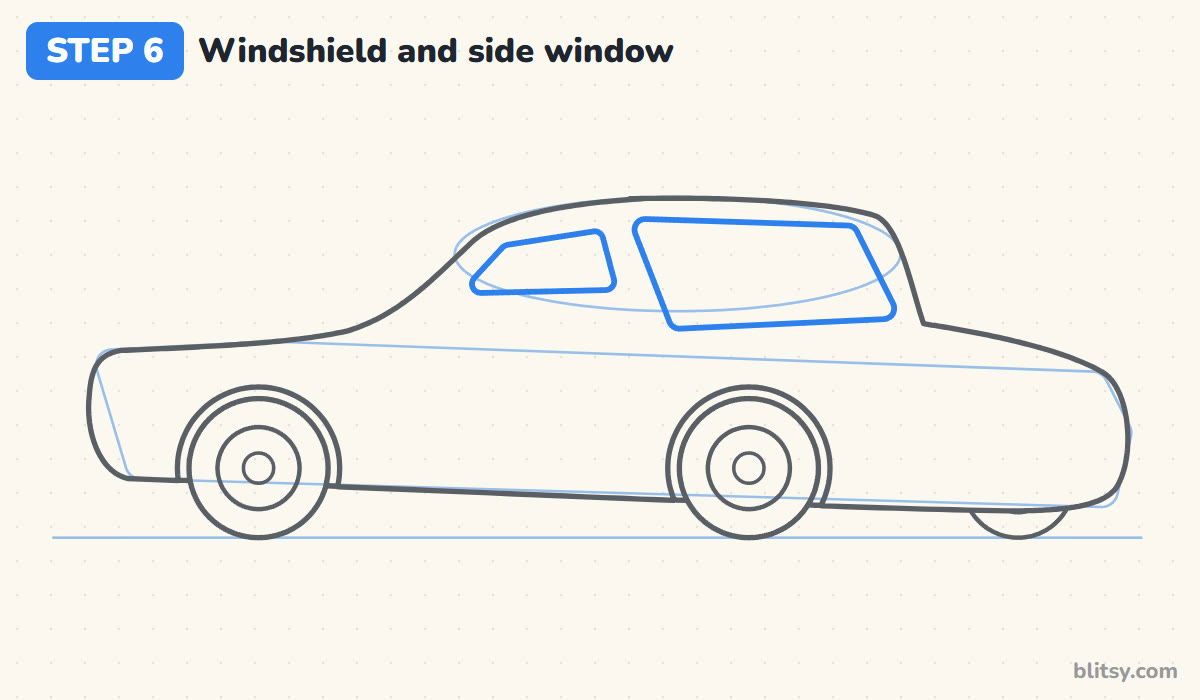
The windshield is a wide, tilted box with soft corners inside the front of the roof. Lean its sides to the right a little so it faces you. Behind it, draw a smaller slanted side window. I leave a strip of body between the two windows, because that little post keeps them from melting into one big shape.
💡 Tip: Make the windshield clearly bigger than the side window. It has to hold both eyes.
Step 7: Give him big friendly eyes
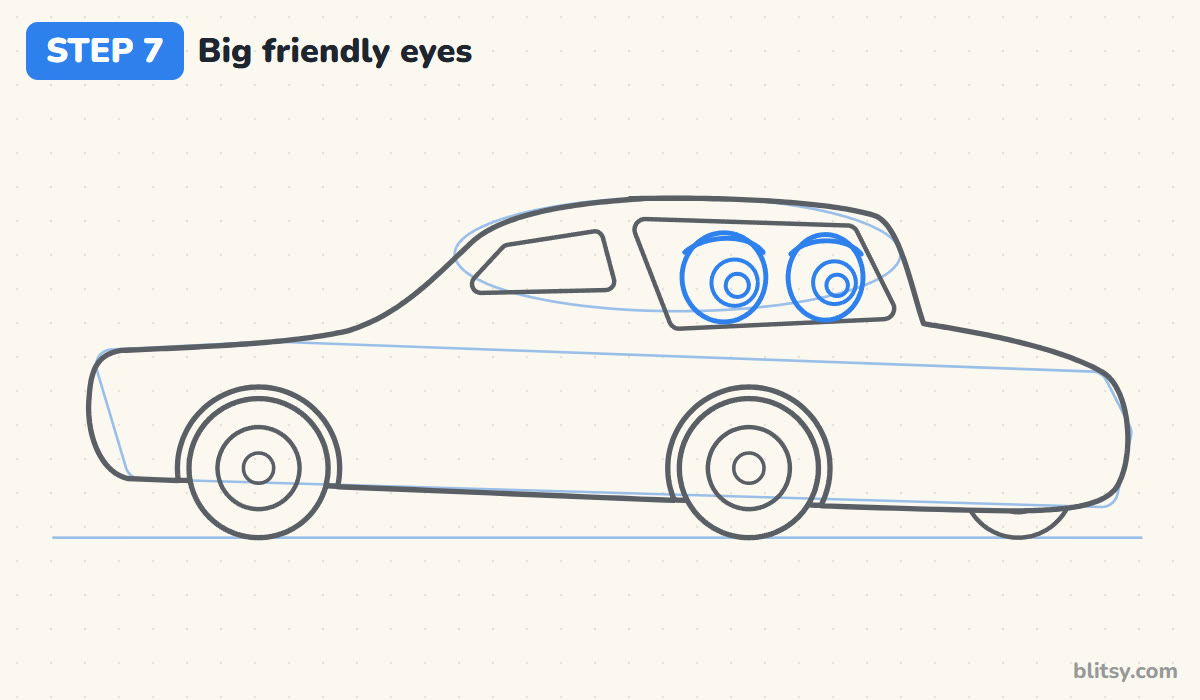
Fill most of the windshield with two tall ovals, side by side and almost touching. In each one draw a round blue iris shifted toward the front of the car, a black pupil inside it and a small shine circle near the top. Finish with a soft curved lid line over each eye. Those lids are where most of his expression comes from.
💡 Tip: Make the far eye a touch smaller than the near one. It quietly adds depth.



Step 8: Add the hood line and a smiling mouth
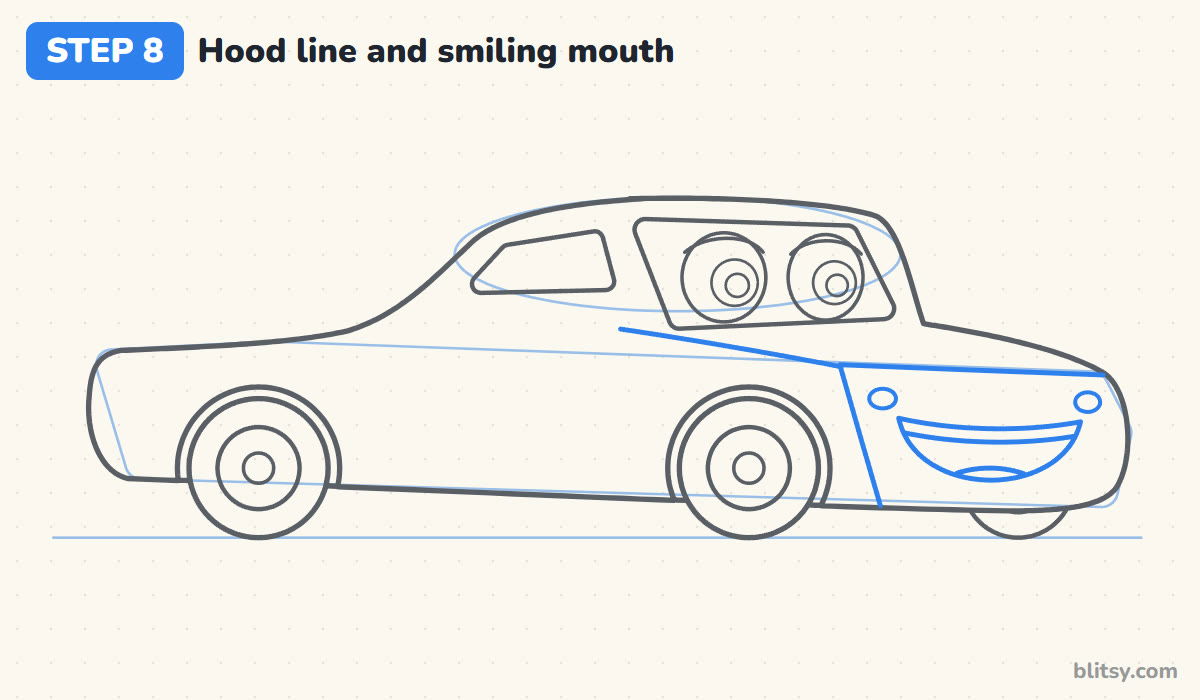
Draw a line from under the windshield down to the front, then a second line that drops from there to the bottom of the car. That box on the right is the front bumper. Across it, draw a wide grin: a gentle top curve and a deep round bottom curve. Add a thin band of teeth under the top lip, a tongue at the bottom and two little oval headlight stickers above the mouth corners.
💡 Tip: Let the smile reach close to both sides of the bumper. A small mouth looks shy, not cheerful.
Step 9: Draw the spoiler on the back
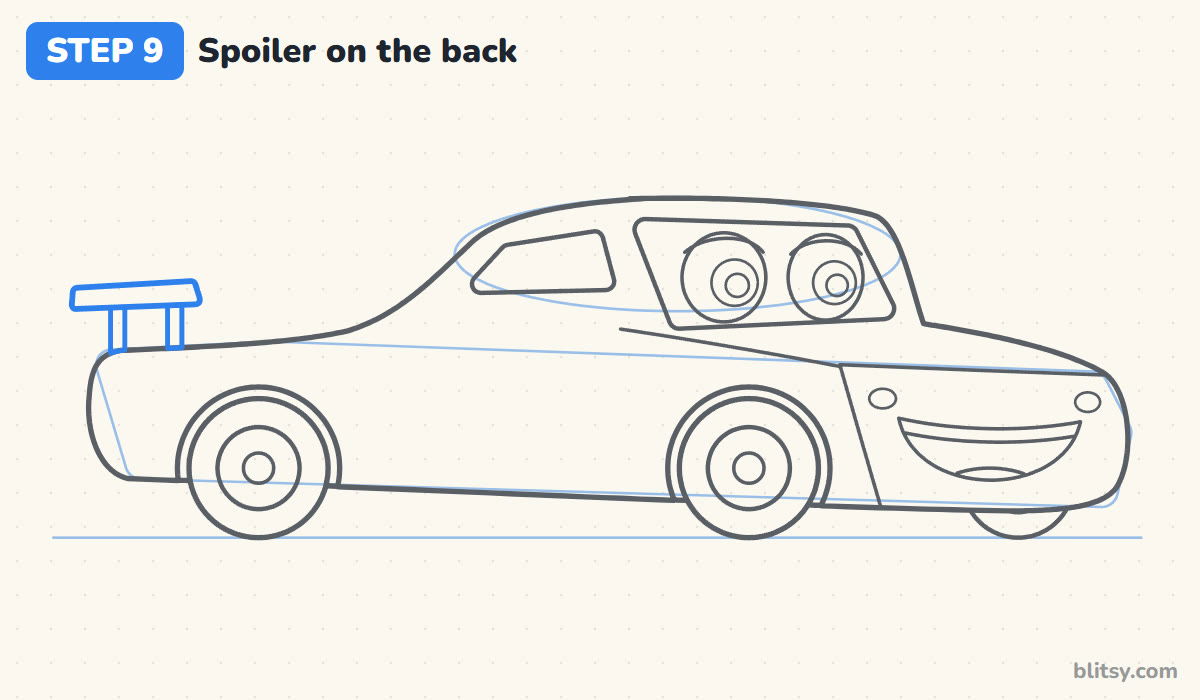
Above the rear deck, draw a flat, slightly tilted bar that sticks out past the back of the car. Hold it up with two short posts that disappear into the body. It's one of the quickest ways to say race car rather than family sedan.
💡 Tip: Keep the posts short. A tall spoiler looks like a handle.
Step 10: Add the lightning bolt and the number 95
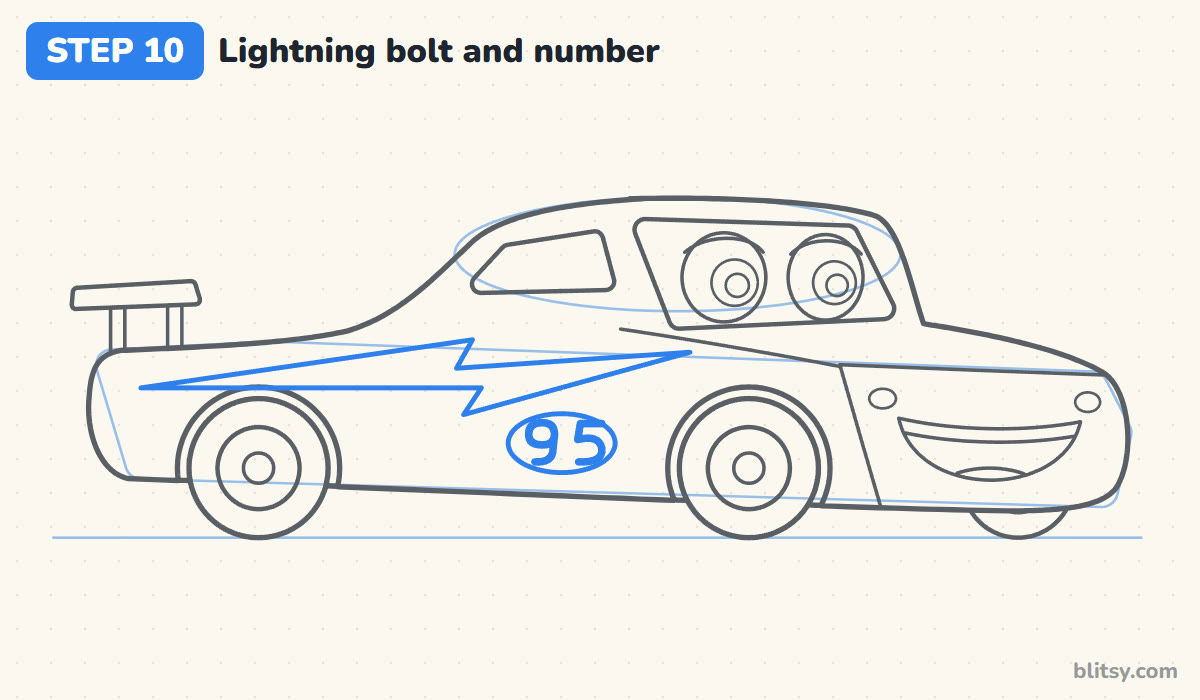
Along the side, draw a long zigzag bolt that starts as a sharp point near the back and ends in another point just before the front wheel. Give it one big jag in the middle. Below the bolt, on the door, draw a flat oval and write a bold 95 inside.
💡 Tip: Draw the bolt's top edge first, then the bottom edge. Its thickness stays even that way.
Step 11: Ink the car and erase the guides
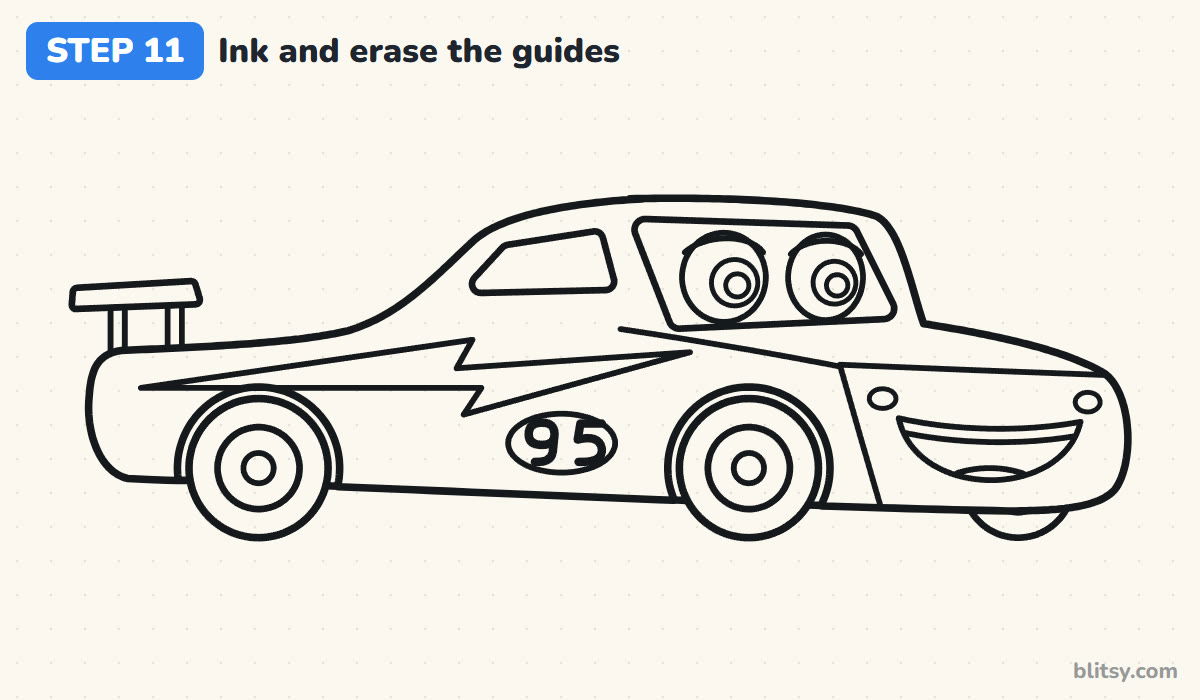
Trace every keeper line with your black marker. I go around the outer body first, then the wheels, and leave the eyes and mouth for last, when my hand is steady. Wait for the ink to dry, then erase every guide.
💡 Tip: Turn the page so you always pull the marker toward you on long curves.


Step 12: Color your race car

Red covers the whole body and the spoiler. A darker red along the bottom edge and a lighter streak on the roof make him look shiny and round. Color the windows light blue, the bolt and headlights yellow, and the eyes blue with black pupils. The tires and mouth are black, the tongue pink, and the rims red to match the body. Leave the eye whites and teeth white.
💡 Tip: Color the red with long strokes going front to back, the way the car moves.
Why a Cartoon Race Car Can Look Off
- Eyes on the headlights. It's a common habit to put the eyes at the front. This character looks through the windshield, so the eyes belong up there.
- A boxy family car. A tall roof and a short hood look like a minivan. Keep the roof low and the hood long.
- Wheels of different sizes. One big and one small wheel make the car tip. Trace the same coin for both.
- A bolt that crosses the wheels. Keep the decal in the band between the windows and the wheel arches so it reads clearly.
- A flat, side-on look. Without the far tire and the bumper box, the car looks pasted on. Those two small details give the ¾ view.
Giving Your Red Racer a New Look
Once the car is done, add speed lines behind the spoiler and a checkered flag on a pole to make him look like he's crossing the finish line. You can tilt the lids lower for a sly grin or raise them for a surprised face. Little ones can skip the small details. If you'd like a real open-wheel racer next, my how to draw a race car step by step lesson uses the same wheel-first start. For an everyday ride, try the car drawing tutorial, and the monster truck drawing lesson is great for kids who love giant tires.
Free Lightning McQueen Coloring Page and Step Guide
Print the free Lightning McQueen coloring page with a colored example on top, a simple color key and a large outline to fill in. The step-by-step PDF guide holds all 12 steps with pictures and tips, which works well for a classroom. Both print on Letter and A4 paper.
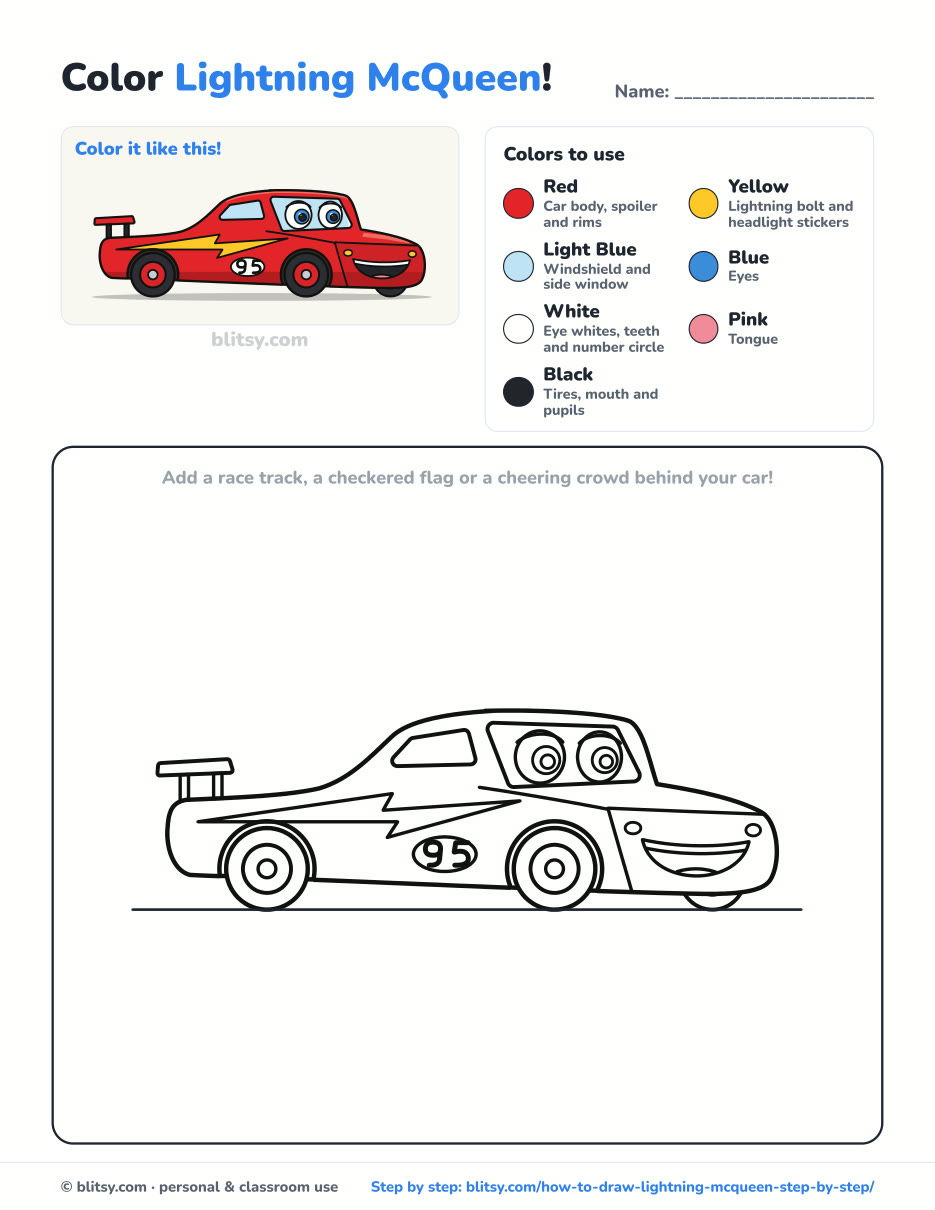
Black outlines with a colored example and the color names at the top. Ready to print and color.
⬇️ Download Coloring PageEvery step picture with its instructions and tips, to keep beside your paper while you draw.
⬇️ Download Drawing Guide📱 On a phone? Tap a download button, then open the file and choose Share → Save to Files or Print. On a computer, the PDF opens or saves straight to your Downloads folder.
Pin the Race Car Steps for Later
More Cars and Trucks to Draw Next
Each one is a full step-by-step lesson with a picture for every stage, and most start with the same two wheel circles.
- Race Car Drawing: Draw a low open-wheel racer with a helmet, wings and big tires in this how to draw a race car step by step lesson.
- Car Drawing: Learn the basic side-view car shape in the how to draw a car step by step tutorial.
- Police Car Drawing: Add lights and a shiny badge with this police car drawing tutorial.
- Monster Truck Drawing: Giant tires and a tall body wait in the how to draw a monster truck step by step guide.
- Fire Truck Drawing: Draw a red truck with a ladder in this fire truck drawing lesson.
Lightning McQueen Drawing Questions from Kids
What is the easiest way to draw Lightning McQueen?
Start with two wheel circles on a ground line and a long box around them. Shape the body over that, then add the windshield eyes, the bumper smile, the spoiler and the lightning bolt.
Is this Lightning McQueen drawing easy enough for kids?
Yes. Most kids from about six can follow it, because the car is built from simple round shapes. Younger artists can leave out the teeth.
What colors do I need to color Lightning McQueen?
Red for the body, yellow for the bolt and headlights, light blue for the windows and blue for the eyes. Black covers the tires and mouth.
What number is on Lightning McQueen?
He races with the number 95, so this drawing puts a bold 95 inside an oval on the door, just under the lightning bolt.
Grab your red crayon and send your racer zooming across the page. 🏁
Related posts:
 How to Draw a Tooth Step by Step (Cute and Easy for Kids)
 How to Draw Wonder Woman Step by Step (Chibi for Kids)
 How to Draw Iron Man Step by Step (Easy Chibi for Kids)
 How to Draw a Police Car Step by Step (Easy for Kids)
 How to Draw a Care Bear Step by Step (Cute Fan Art for Kids)
 How to Draw Hello Kitty Step by Step (Easy for Kids)
 How to Draw a Valentine Step by Step (Easy Card Set for Kids)
 How to Draw a Bat Step by Step (Cute Cartoon Bat for Kids)
 How to Draw a Rainbow Step by Step (Easy for Kids and Beginners)
 How to Draw a Yeti Step by Step (Easy and Cute for Kids)
 How to Draw a Ninja Step by Step (Easy Chibi Ninja for Kids)
 How to Draw Batman Step by Step (Easy Chibi for Kids)

