
Two long ears and a pair of heavy eyelids. Get those right and almost anyone will recognize this little green Jedi master, even before you color him. In this lesson I'll show you how to draw Yoda step by step, starting with an oval and a few straight lines. This is my own simple chibi fan-art version for practice, not official Star Wars art, so the shapes are kept round and friendly for beginners and kids.
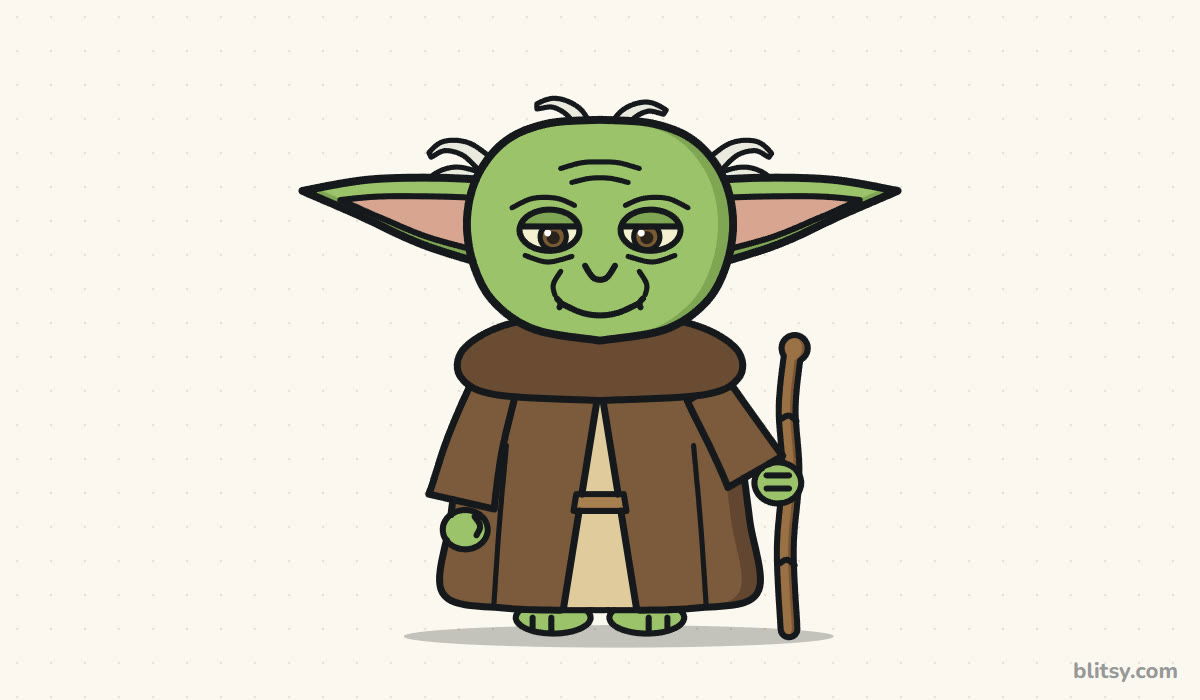
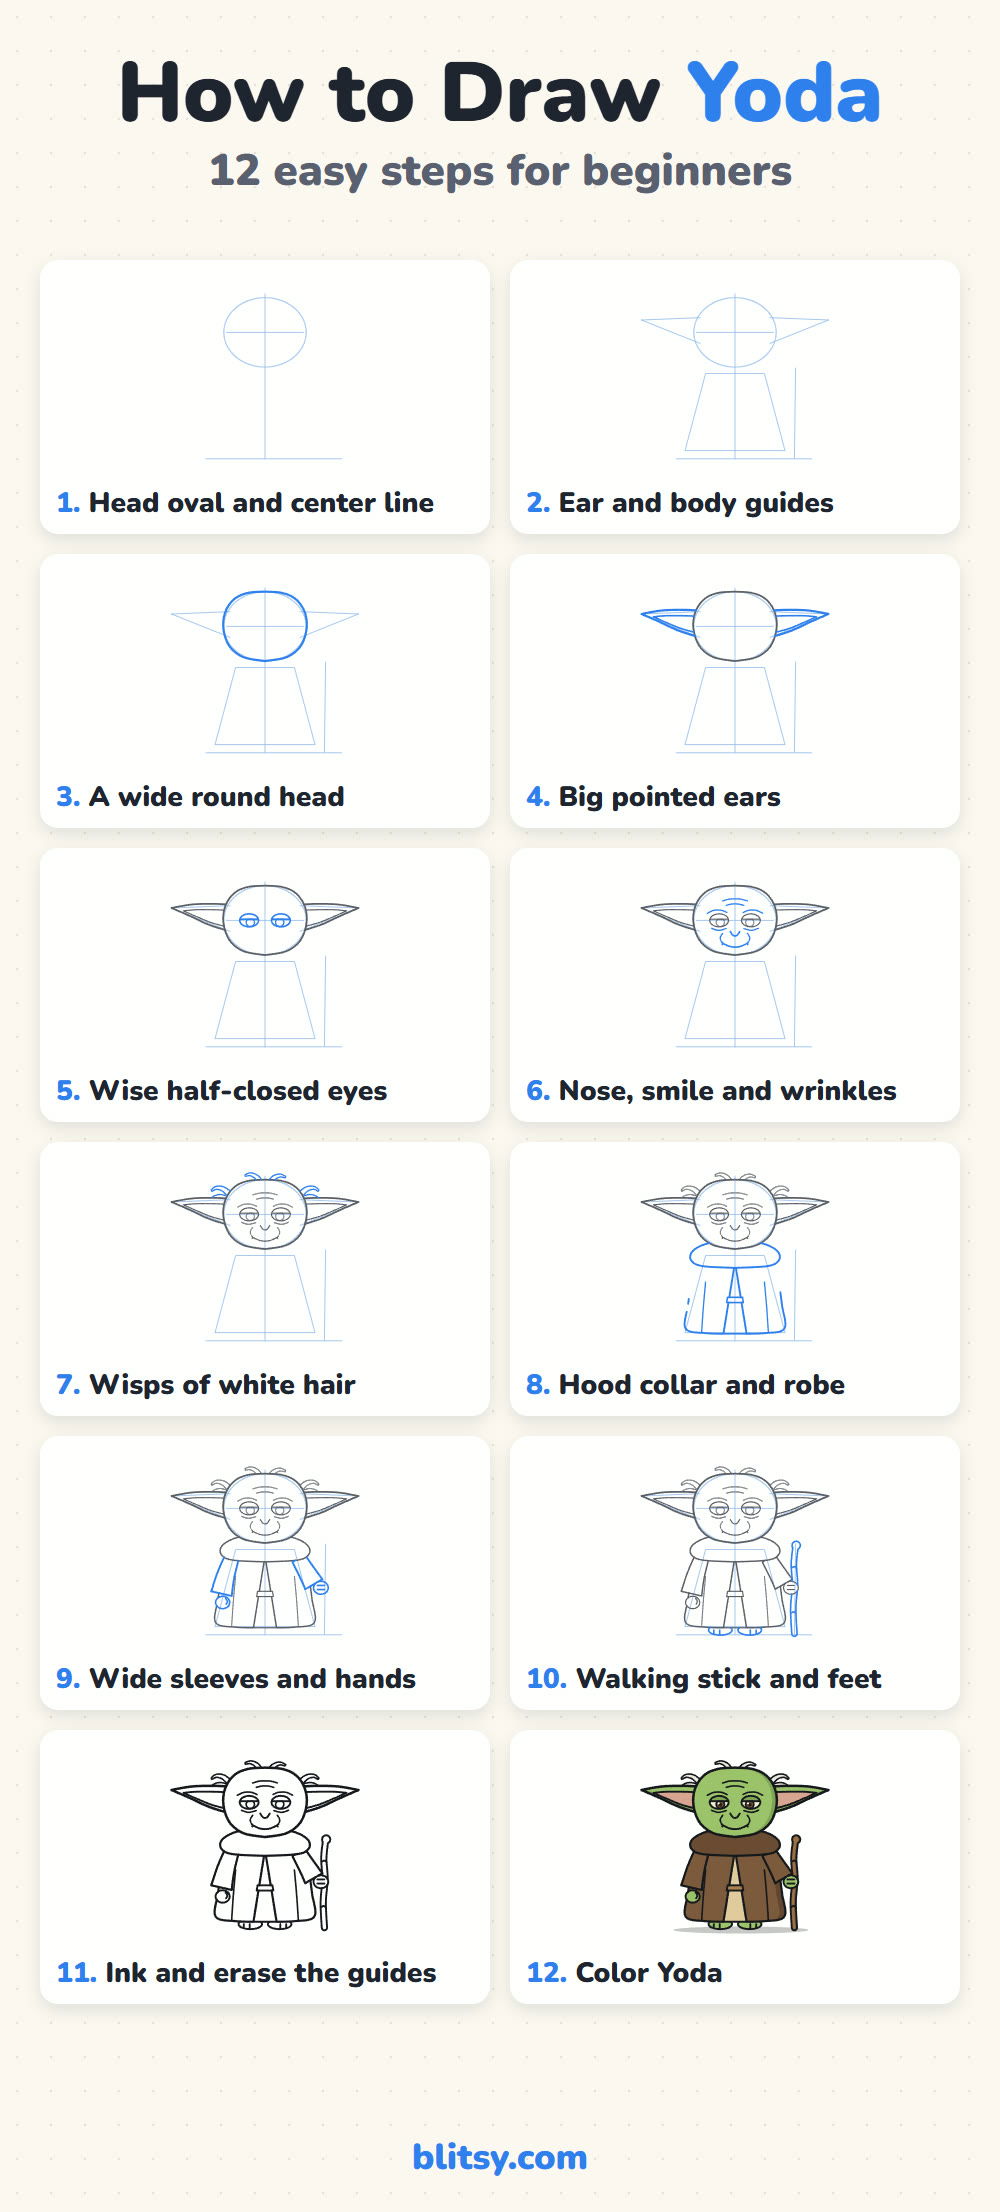
Read the step images by color. The lines drawn in blue are the ones to copy in that step, while the gray lines are what you already have on your paper.
Quick overview
⏱️ Time: about 30 minutes, coloring included
🎯 Level: easy, good for kids around 6 and up
✏️ Steps: 12
🟢 You'll draw: a standing chibi Yoda in a brown robe with a walking stick
Supplies for a Small Jedi Master
- A pencil for soft first lines
- A clean eraser
- A black marker or fineliner for the final outline
- Crayons or colored pencils: mostly light green and brown, plus beige with a touch of pink
- Plain paper turned sideways
Turn the paper sideways, because those ears make Yoda wider than he is tall.
How to Draw Yoda Step by Step
Step 1: Draw a head oval and a center line
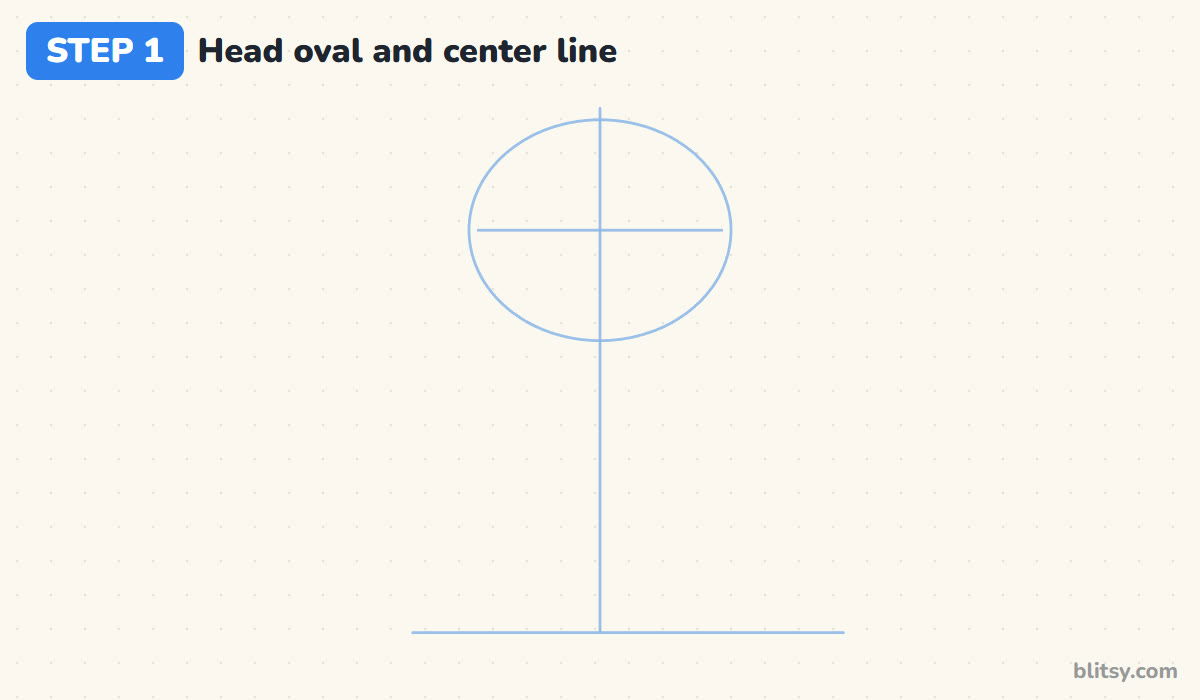
Draw a ground line near the bottom of the page. Then draw a straight line up the middle, and near the top an oval that's a bit wider than it is tall. Add a short line across the oval just below its middle; the eyes will sit on it.
💡 Tip: Keep the head big. In a chibi drawing the head is almost as tall as the whole body below it.
Step 2: Sketch guides for the ears and body
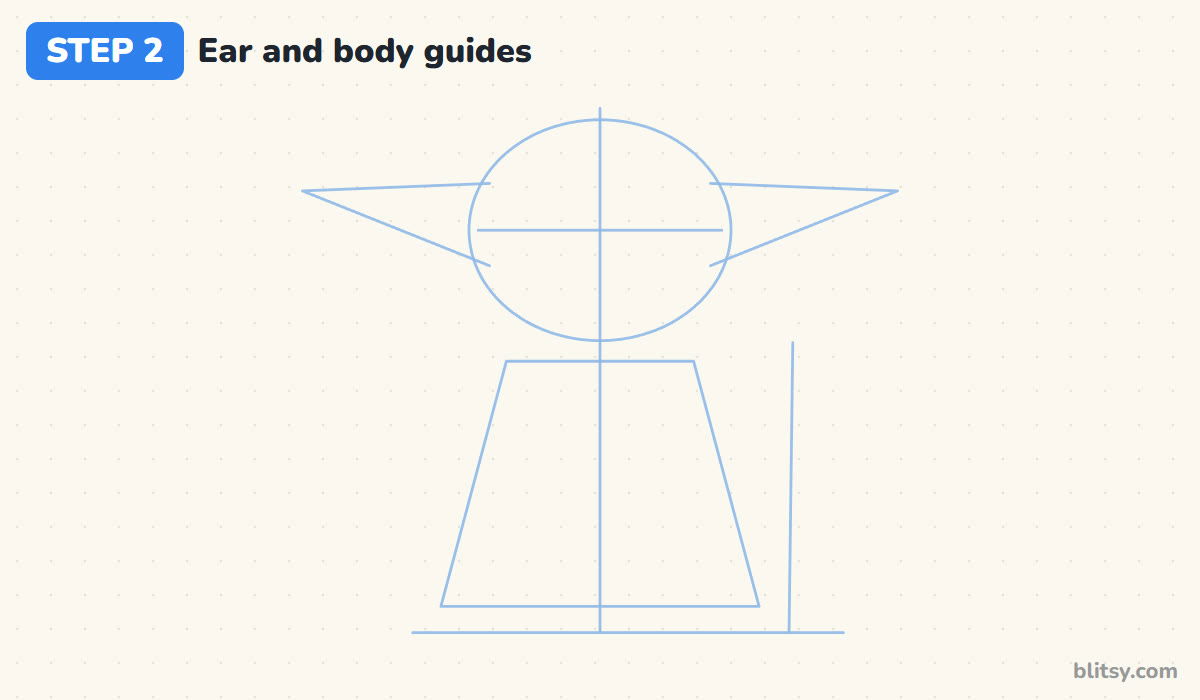
From each side of the head, draw a long flat triangle that points outward, a little lower at the tip. Under the head, sketch a trapezoid that gets wider toward the ground. That's the robe. A straight line on the right marks where the stick will stand.
💡 Tip: Make each ear triangle longer than the head is wide. Short ears turn him into a goblin.
Step 3: Shape a wide, round head
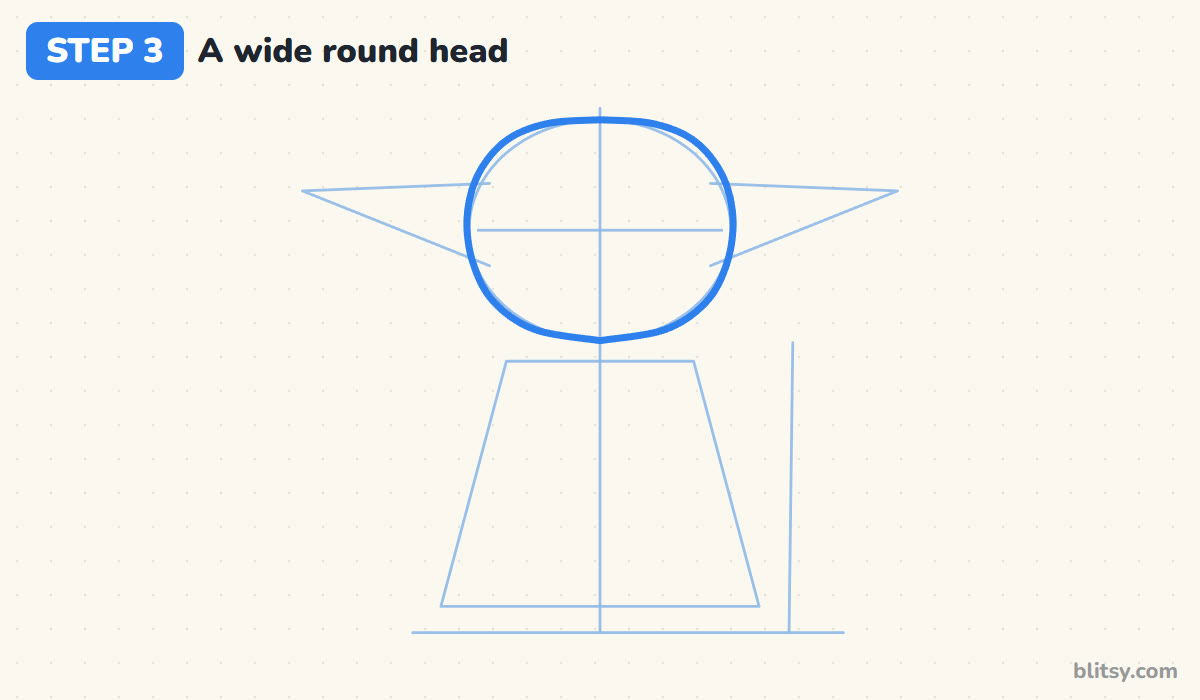
Go over the oval with a firmer line. I flatten the top a little and let the cheeks bulge out before the line rounds down to a soft chin. That squashed, wide shape is what makes him look old and wise rather than like a baby.
💡 Tip: Draw the chin with a gentle point, not a sharp one. A pointy chin makes the face look mean.



Step 4: Draw big pointed ears
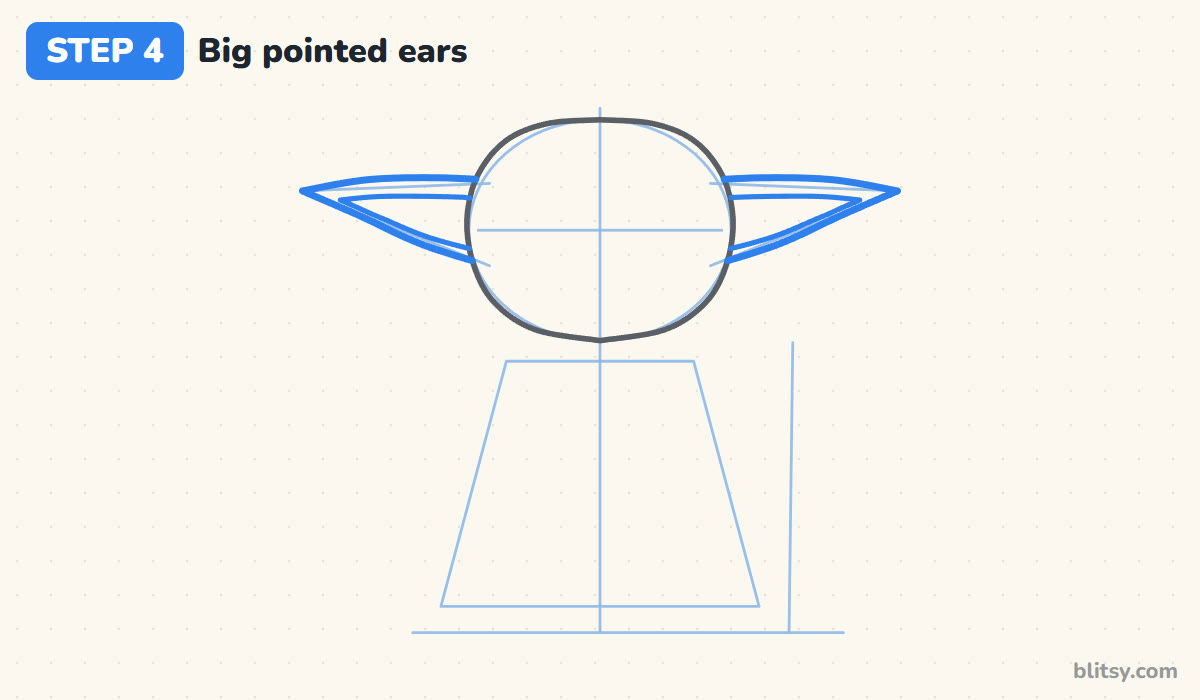
Follow your triangle guides. The top edge runs almost straight out to the tip, and the bottom edge curves back to the side of the head. Then draw a smaller copy inside each ear for the inner ear. Stop the lines where they meet the head, so the ears tuck behind it.
💡 Tip: Check both tips are at the same height before you move on. Uneven ears are the first thing people notice.
Step 5: Add wise, half-closed eyes
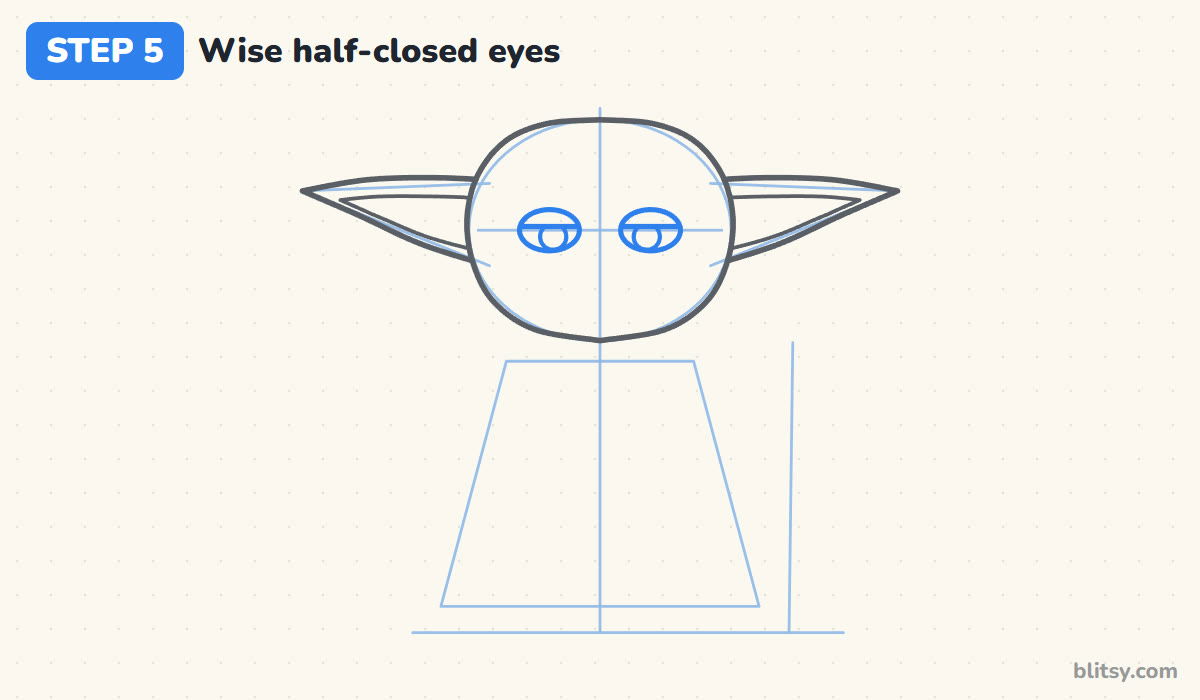
Draw two wide ovals on the cross line, with a gap between them about as wide as one eye. Draw a straight line across each oval just above its middle. That's the heavy eyelid. Below it, draw a round iris that touches the lid line, then a smaller pupil.
💡 Tip: The lid line is the whole trick here. Without it, Yoda looks surprised instead of calm.
Step 6: Draw the nose, smile and wrinkles
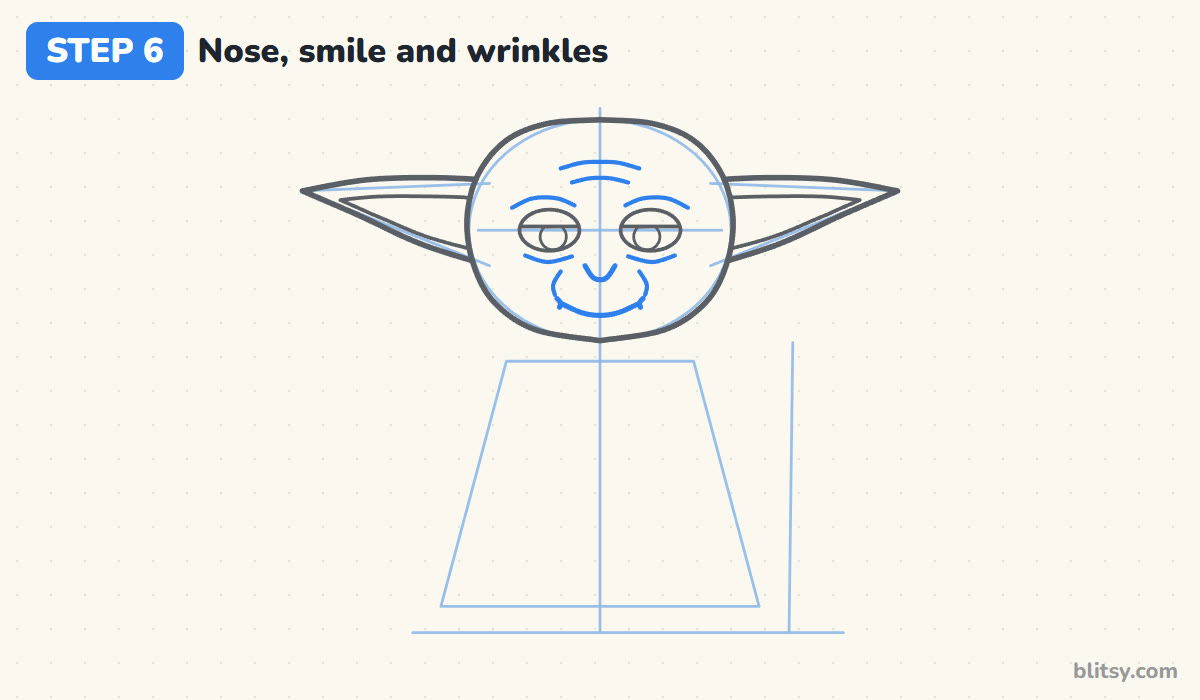
A small U shape between the eyes, a little lower, is the nose. Under it draw a wide, gentle smile with tiny curved corners. For age, add soft arches above the eyes and two short lines on the forehead. Small bags under the eyes come next, then one cheek line beside each end of the smile.
💡 Tip: Keep wrinkle lines short and light. Five or six are plenty; more and the face gets busy.
Step 7: Add wisps of white hair
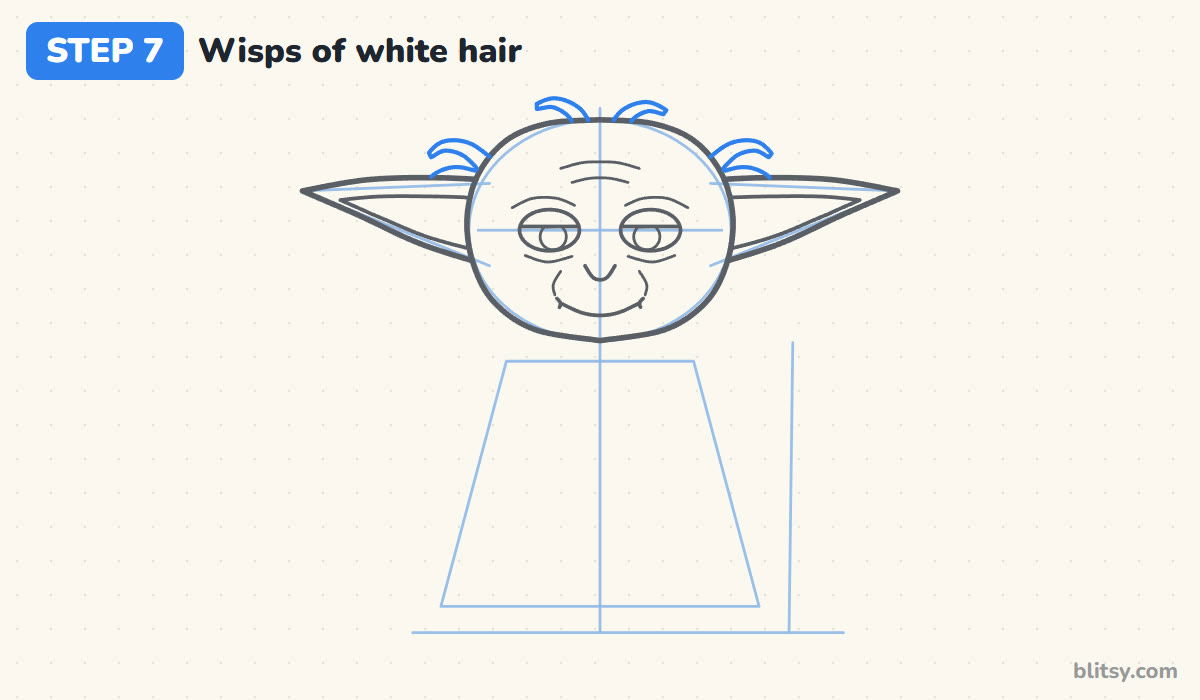
Yoda only has a few thin strands, so draw two curved wisps on top of the head and two small tufts above each ear. Each wisp is a skinny leaf shape that starts at the head and curls outward.
💡 Tip: Draw the wisps leaning away from the middle. If they all stand straight up, they look like antennas.
Step 8: Draw the hood collar and robe
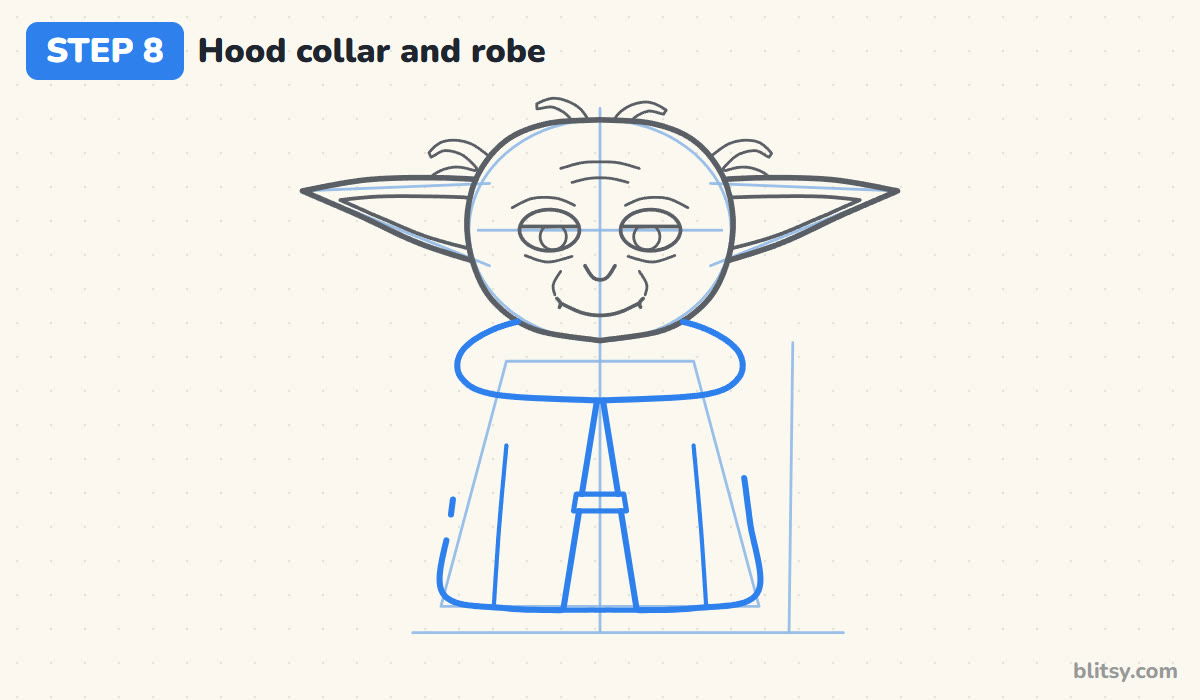
Right under the chin, draw a wide, puffy roll for the hood that rests on his shoulders. Below it, the cloak runs down to the ground and flares out a little at the hem. Leave a narrow triangle open in the middle to show the robe underneath, and draw a small belt across it. Two long lines on the cloak make folds.
💡 Tip: Make the hood roll a bit wider than the head. It gives the small body some weight and keeps him from looking top-heavy.
Step 9: Add wide sleeves and mitten hands
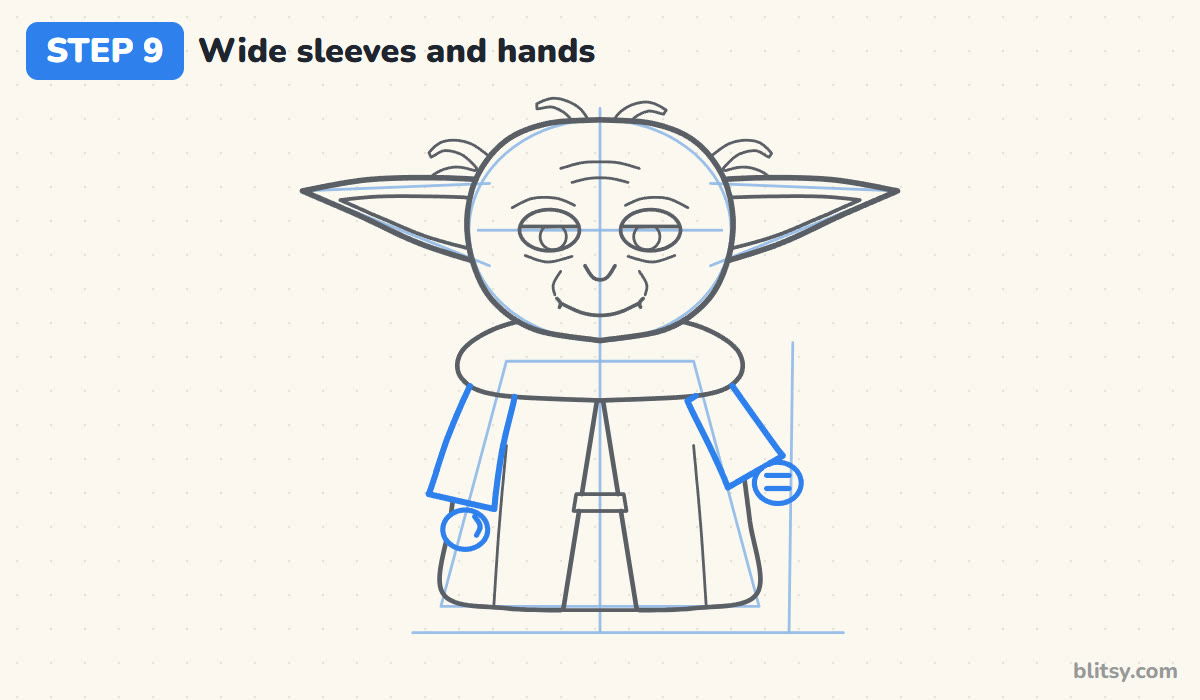
The left sleeve hangs down beside the body and opens out wide at the cuff. The right sleeve angles out toward the stick guide. Put a round mitten hand at the end of each one, with a tiny thumb curve on the hanging hand and two grip lines on the other.
💡 Tip: Make the cuffs wider than the arms. Loose sleeves are what make it read as a Jedi robe.
Step 10: Draw the walking stick and feet
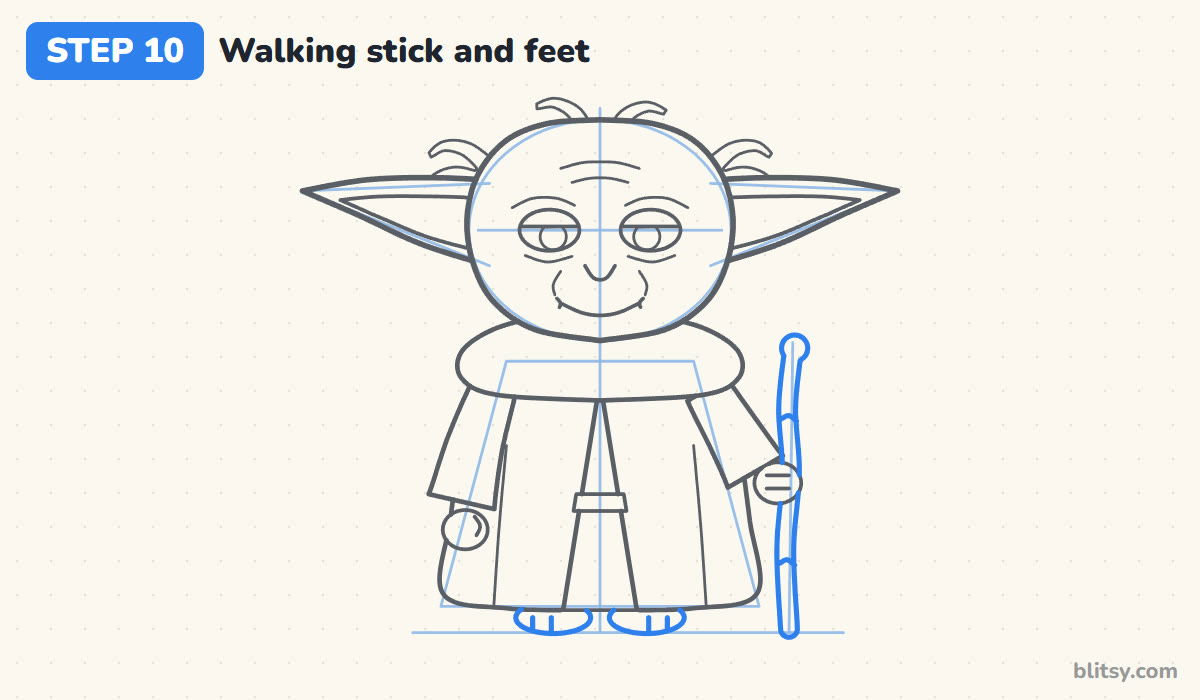
Follow the stick guide with two lines that wobble a little, so it looks like a twig. Give it a round knob at the top and two small knots along the way, and stop the lines where the hand covers them. At the bottom of the robe, two small oval feet peek out with short toe lines.
💡 Tip: A slightly crooked stick looks natural. A perfectly straight one looks like a broom handle.
Step 11: Ink Yoda and erase the guides
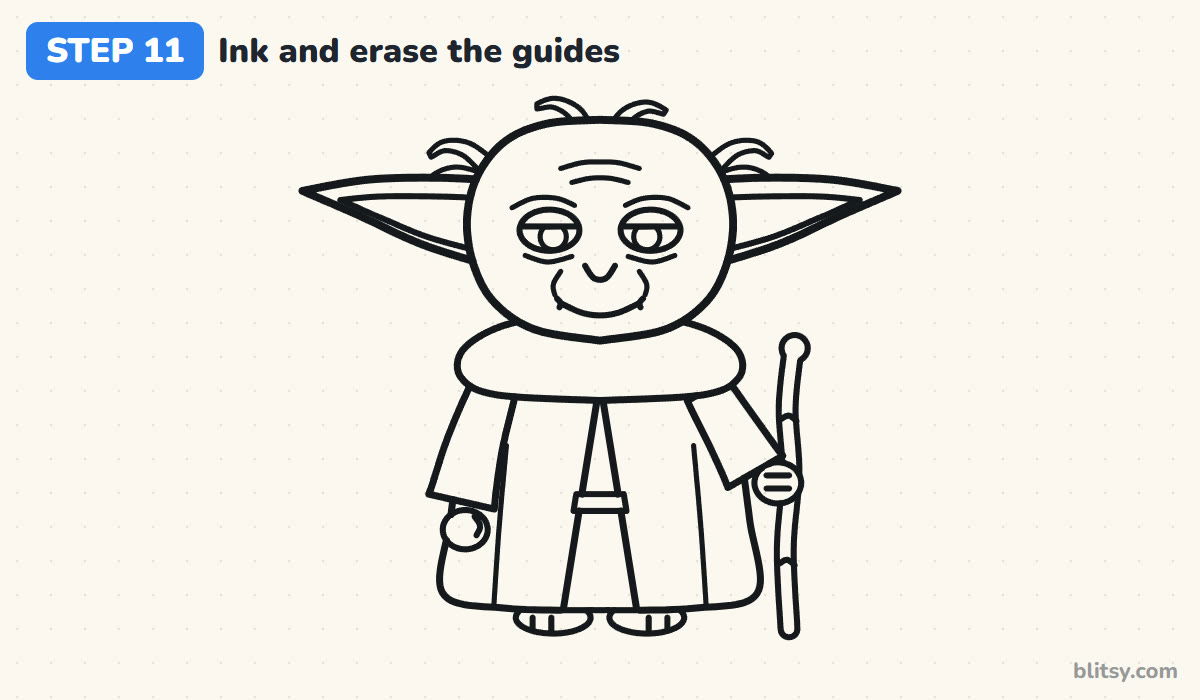
Trace every keeper line with your marker. I start at the face and work down, so my hand never smudges the wet ink. Once it's dry, erase all the light guide lines, including the triangles inside the ears.
💡 Tip: Use the thinnest marker you have for the wrinkles and eyes, and a thicker one for the outside outline.



Step 12: Color your Yoda
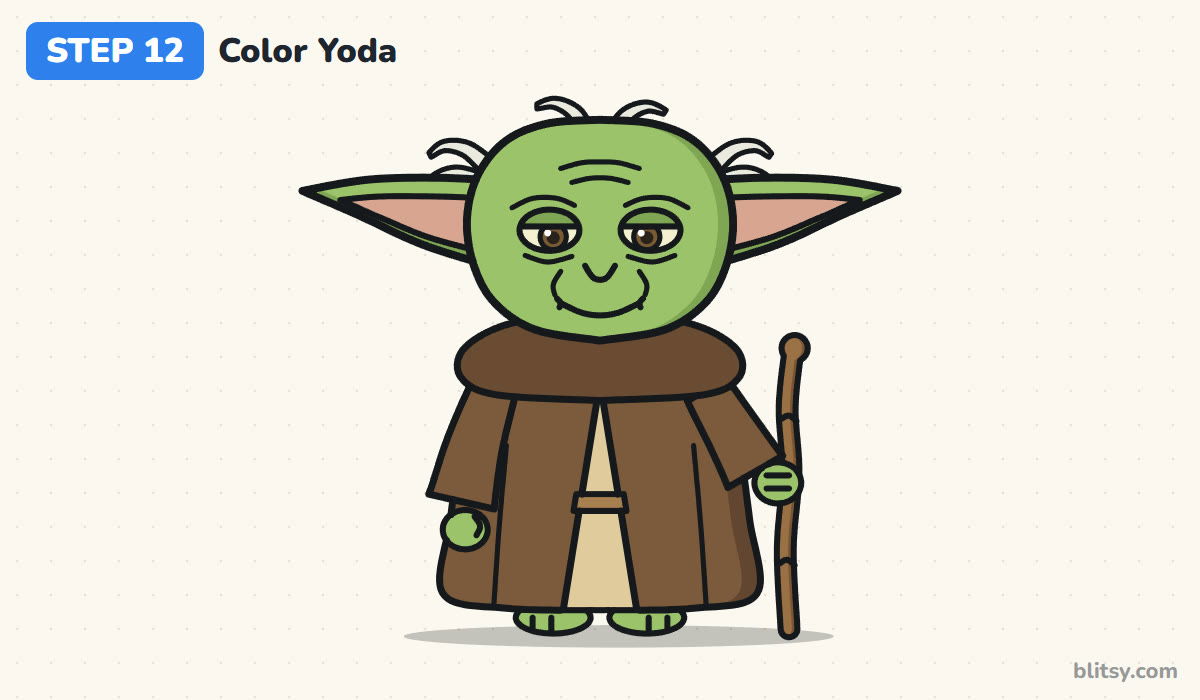
Light green goes on all the skin, from the ears down to the feet, with a darker green along the right side for shade. Color the inner ears pink and the irises brown. The cloak is brown, sleeves and hood included, and the robe in the middle is beige. Use light brown for the stick and belt, and leave the hair white or pale gray.
💡 Tip: Press lightly with the green first and add a second layer on the right side. It gives you shading without a second color.
Why Yoda Sketches Sometimes Look Off
- Ears that point up. Upward ears look like an elf or a goblin. Keep the top edge almost flat and let the tips sit level with the eyes.
- Wide-open eyes. Big round eyes make him look like a startled baby. Draw the eyelid line across the top of each eye so the iris hides partly under it.
- Too many wrinkles. Lots of lines turn a friendly face into a grumpy one. Keep a few short curves and leave the cheeks smooth.
- A tall, skinny body. If the robe is much taller than the head, the chibi look is gone. Keep the body about the same height as the head and ears together.
- Hands drawn as sticks. Thin lines for arms look stiff. Give the sleeves width and finish them with round mitten hands.
Twists on Your Little Jedi Sketch
Once the basic Yoda feels easy, change one thing at a time. Give him a small green lightsaber instead of the stick, sit him on a round stone, or draw him meditating with his eyes fully closed. Little ones can skip the wrinkles and the hair; he still looks like Yoda with just the ears and the sleepy eyes. For a matching pair, the how to draw Darth Vader step by step lesson uses the same chibi size, so the two can stand side by side on one page. The chibi drawing tutorial explains the big head, small body proportions in more detail, and the rocket drawing step by step guide adds a space ship for the background.
Free Yoda Coloring Page and Printable Steps
The free Yoda coloring page has a colored example and a key that shows which color goes where, plus a big outline to fill in. The step-by-step PDF guide puts all 12 steps on paper with their pictures and tips, handy for a classroom or a rainy afternoon away from the screen. Both print on Letter or A4.
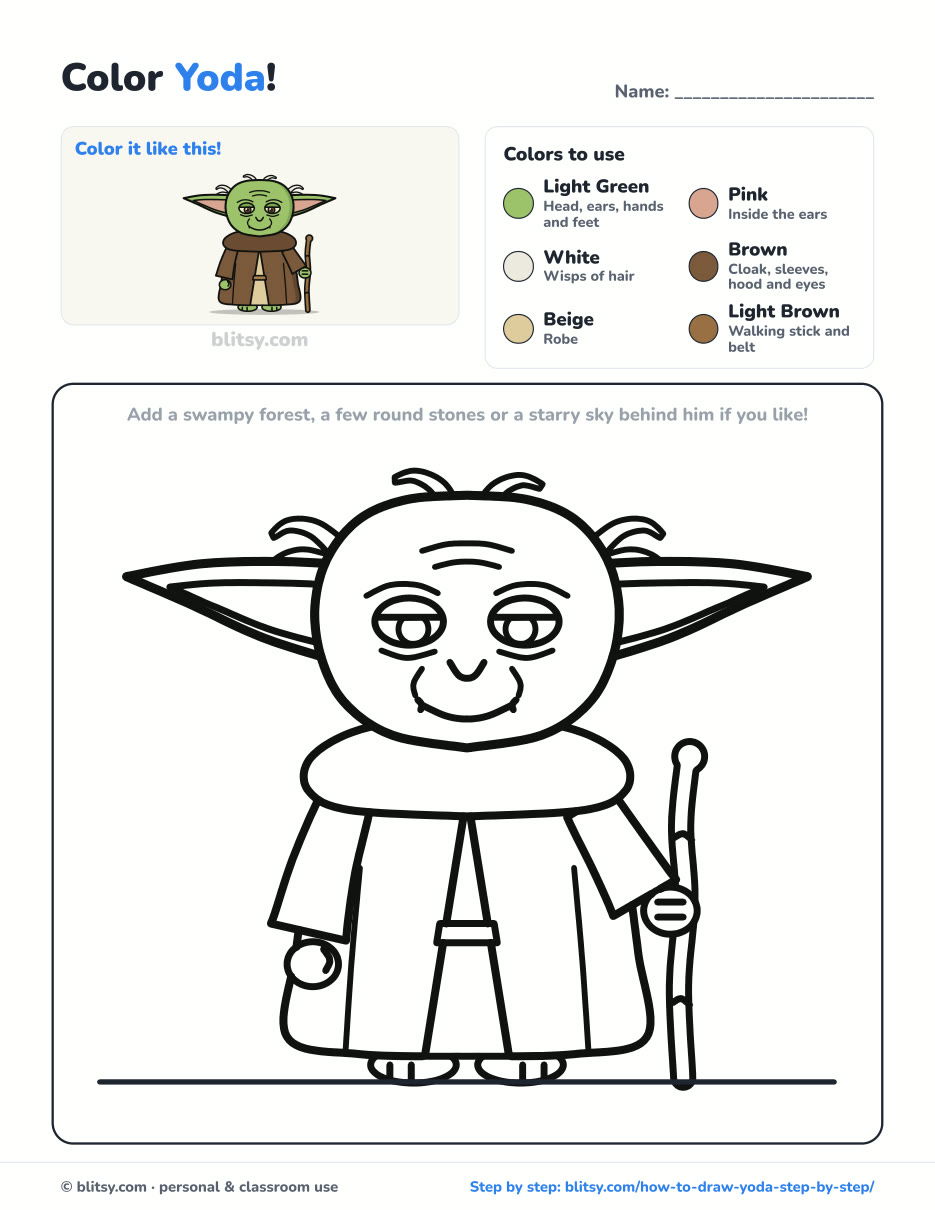
Black outlines with a colored example and the color names at the top. Ready to print and color.
⬇️ Download Coloring PageEvery step picture with its instructions and tips, to keep beside your paper while you draw.
⬇️ Download Drawing Guide📱 On a phone? Tap a download button, then open the file and choose Share → Save to Files or Print. On a computer, the PDF opens or saves straight to your Downloads folder.
Keep the Yoda Steps Handy
More Characters and Space Drawings to Try
Every lesson below has a picture for each step and the same build-from-simple-shapes method you just used.
- Darth Vader Drawing: A chibi Vader with a flared helmet and a red lightsaber in this how to draw Darth Vader tutorial.
- Chibi Drawing: Learn the big-head, small-body style step by step with this chibi drawing step by step lesson.
- Rocket Drawing: Draw a cartoon rocket blasting off with a porthole window and a bright flame in the how to draw a rocket tutorial.
- Frog Drawing: A smiling green frog on a mossy log, with big bulging eyes, in this frog drawing step by step guide.
- Hulk Drawing: A small, grinning Hulk flexing both arms in the how to draw the Hulk tutorial.
Yoda Drawing Questions From Beginners
How do you draw Yoda easy for kids?
Start with a wide oval head and two long triangle ears. Add sleepy eyes with a lid line and a small smile, then a puffy hood over a simple robe shape. Those few shapes are enough for anyone to recognize him.
How do you draw Yoda's ears?
Draw a long, flat triangle out from each side of the head, with the tip a little lower than the top edge. Curve the bottom edge back toward the cheek and add a smaller inner shape for the inner ear.
What colors do you need to color Yoda?
Mainly light green for the skin and brown for the cloak. The robe underneath is beige, the inner ears are pink, and the hair can stay white or pale gray.
Is this the same as drawing Baby Yoda?
No. Grogu, often called Baby Yoda, has huge round open eyes and wears a tan coat. This lesson draws the older Jedi master with sleepy eyes and a walking stick, though the ear shapes work for both.
A soft pencil plus a bit of patience is all your own little Jedi master needs. 🟢✏️
Related posts:
 How to Draw Nezuko Step by Step (Cute Chibi for Beginners)
 How to Draw the Joker Step by Step (Easy Chibi for Beginners)
 How to Draw Sonic Step by Step (Easy Chibi for Beginners)
 How to Draw Wonder Woman Step by Step (Chibi for Kids)
 How to Draw Iron Man Step by Step (Easy Chibi for Kids)
 How to Draw Cat Noir Step by Step (Easy Chibi Hero)
 How to Draw Goku Step by Step (Easy Chibi Version)
 How to Draw Freddy Krueger Step by Step (Cute Chibi Version)
 How to Draw Ariana Grande Step by Step (Cute Chibi Fan Art)
 How to Draw a Ninja Step by Step (Easy Chibi Ninja for Kids)
 How to Draw Batman Step by Step (Easy Chibi for Kids)
 How to Draw Toothless Step by Step (Easy Chibi Dragon)

