
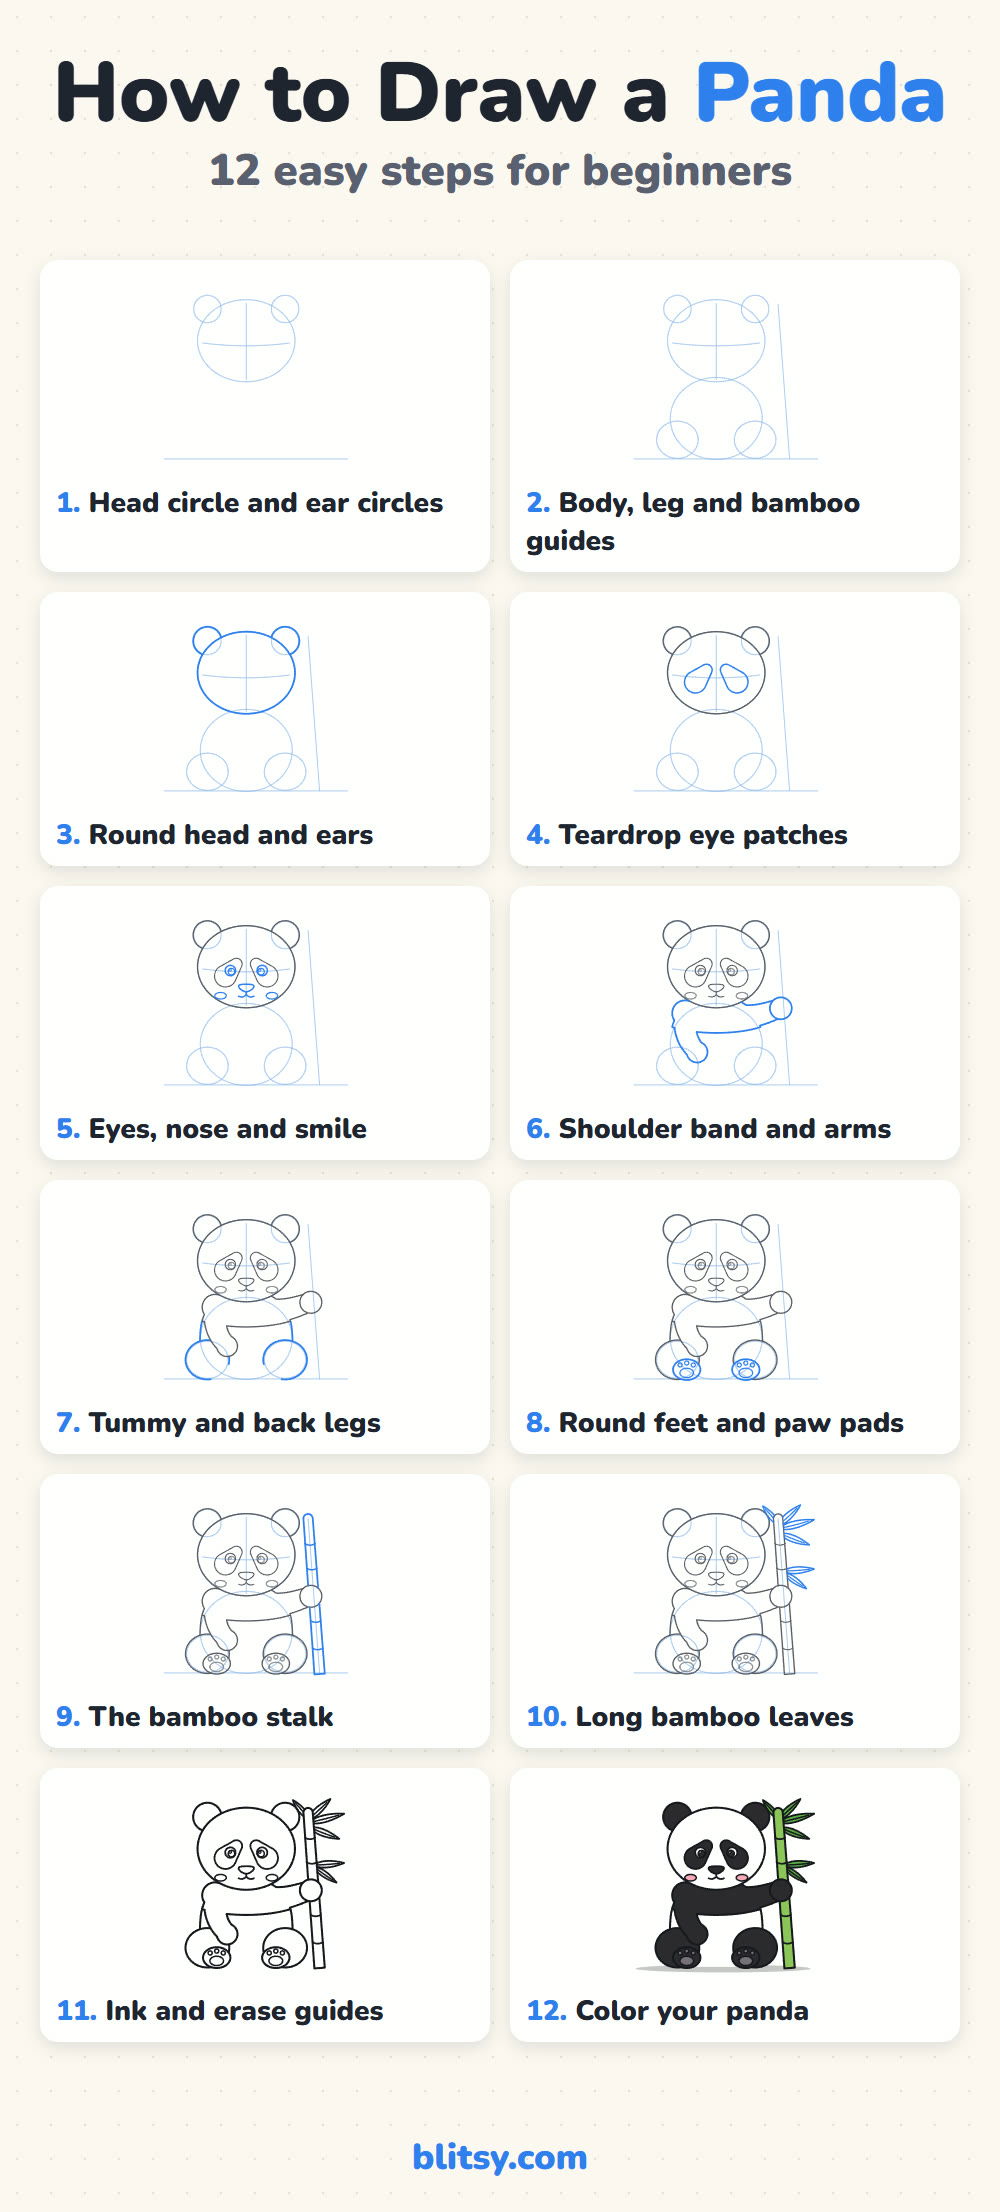
A panda is mostly circles, which makes it one of the friendliest animals to start with. Get the eye patches right and nobody will mistake it for anything else. In this lesson you'll learn how to draw a panda step by step, beginning with a head circle and two ear circles and ending with a chubby black and white giant panda holding a tall bamboo stalk.
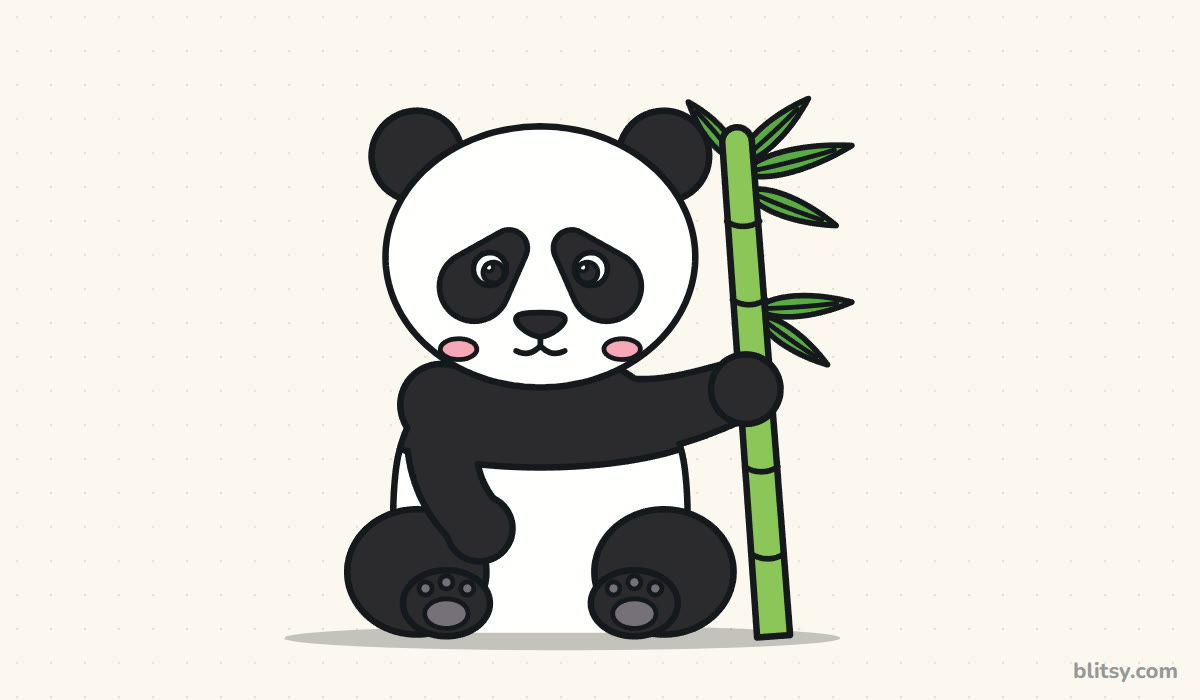
Watch for the color change in each picture: today's new lines are blue, while older lines sit in gray behind them.
Quick overview
⏱️ Time: about 25 to 35 minutes, coloring included
🎯 Level: easy, good for kids from about 6 and up
✏️ Steps: 12
🐼 You'll draw: a cartoon giant panda sitting with a bamboo stalk
Panda Sketching Supplies
- A pencil that erases cleanly (HB is fine)
- A soft eraser
- A black marker or fineliner for the outline
- Crayons or colored pencils: black, gray, pink, light green and green
- White paper, turned sideways
A black marker fills the big dark areas much faster than a pencil, so keep one handy for coloring.
How to Draw a Panda Step by Step
Step 1: Sketch a head circle and two ear circles
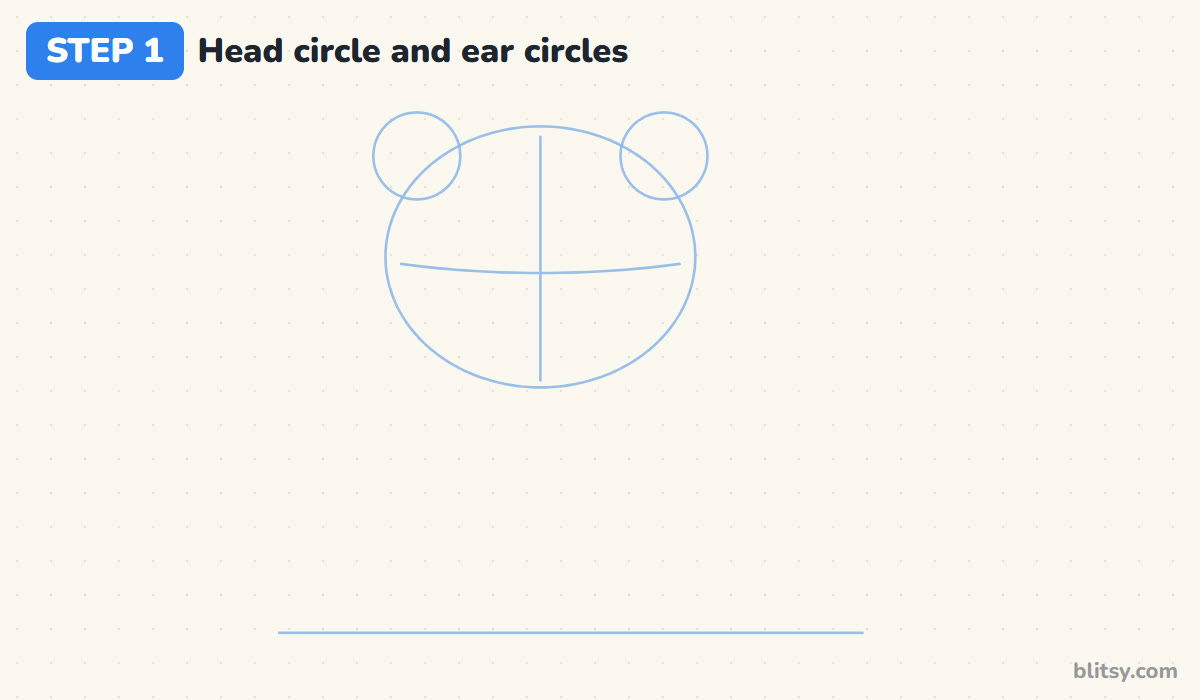
Draw a big circle in the upper middle of the page, a little wider than it is tall. Put a small circle on each top corner so it overlaps the head by about a third. Then draw a line down the middle and a slight curve across, just above the center. Those two lines tell you where the eyes and nose go later.
💡 Tip: Keep your pencil light here. You'll erase all of these guides at the end.
Step 2: Add guide shapes below the head
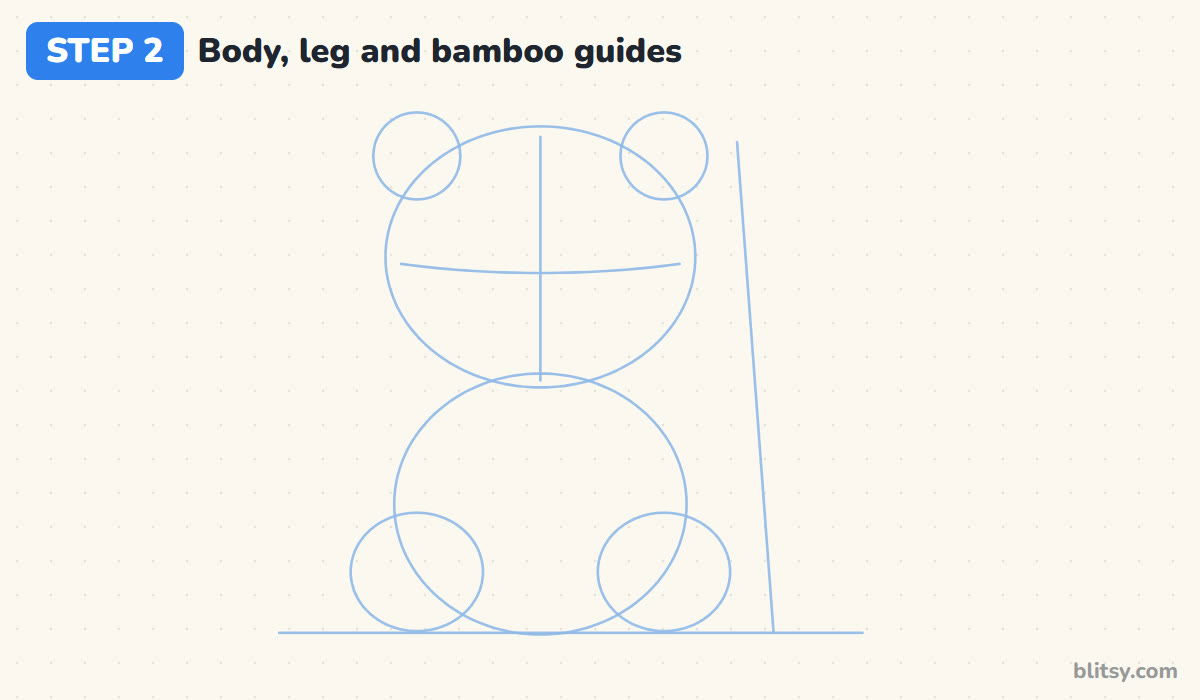
Under the head, draw an oval for the body that touches the chin. It should be about as wide as the head, because a cartoon panda looks chunky and round. Add two smaller ovals at the bottom corners for the back legs and a flat ground line under everything. Last, draw one long straight line on the right side, leaning a little, where the bamboo will stand.
💡 Tip: Leave a gap between the body and the bamboo line, about the width of a paw. The arm needs that space.
Step 3: Outline the round head and ears
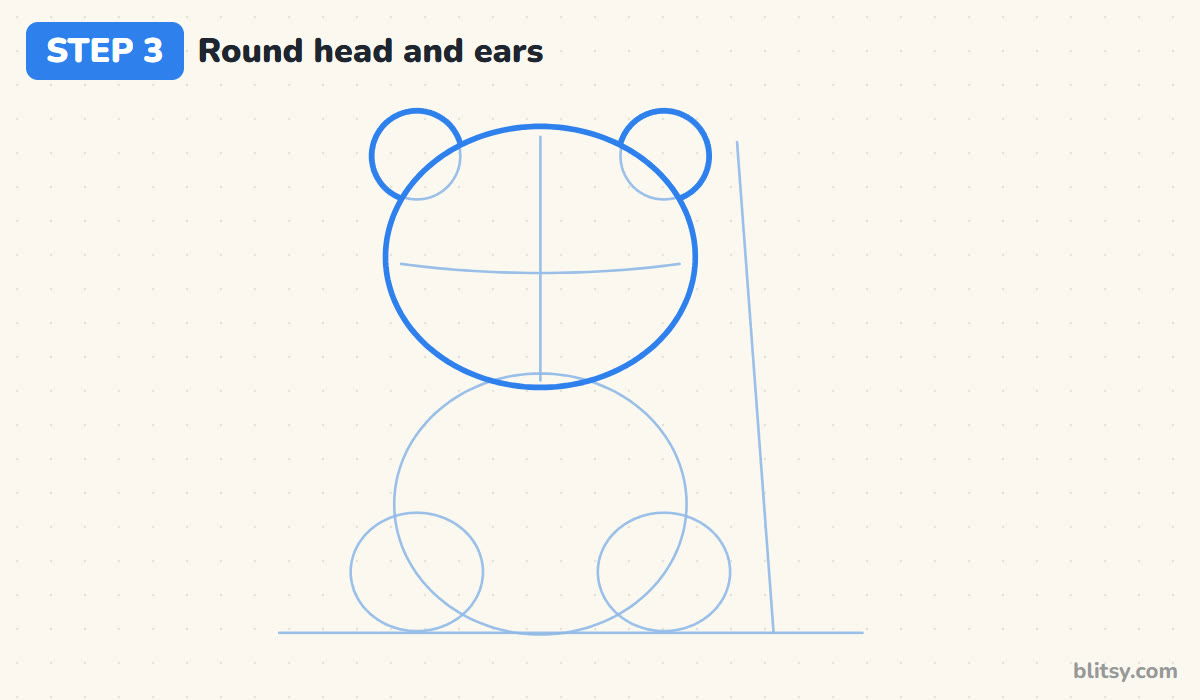
Trace around the head circle with a firm, smooth line. Then go over the outer part of each ear circle, stopping where it meets the head. I keep the ears small and fully round, since pointy or tall ears make a panda look like a cat or a fox.
💡 Tip: Turn your paper as you go around the head. Curves are smoother when your hand moves in its natural direction.



Step 4: Draw the teardrop eye patches
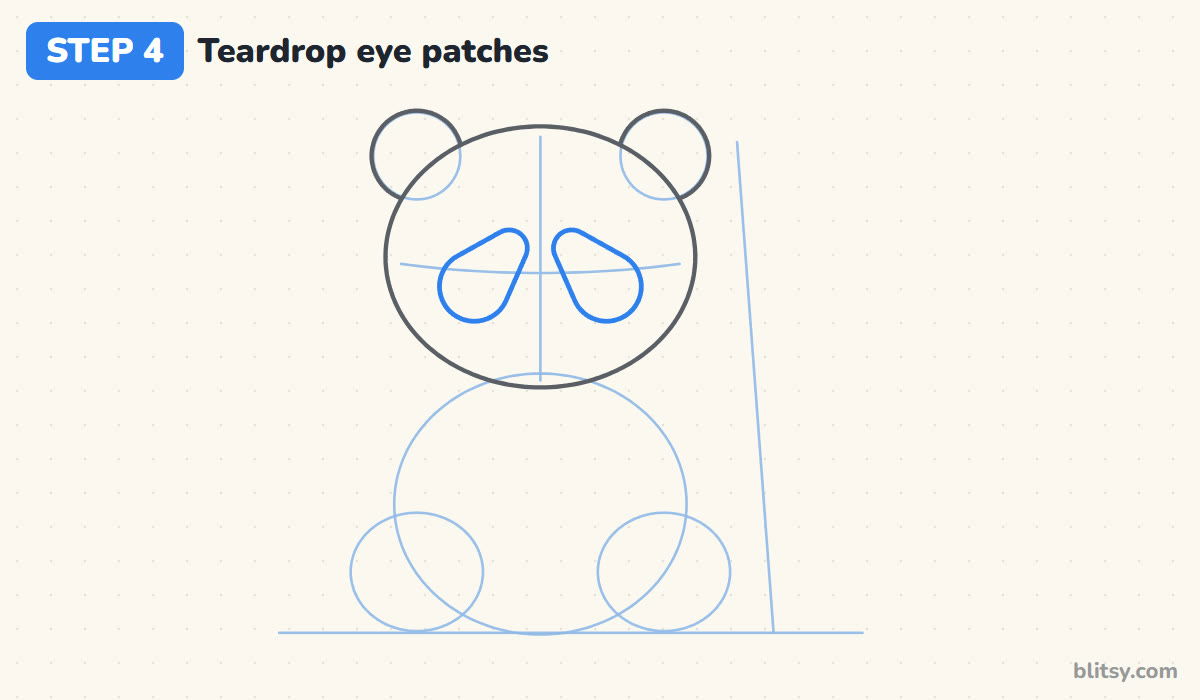
This is the step that turns a plain bear into a panda. Each patch is a teardrop lying on its side: the narrow end points up toward the middle line, and the wide end drops down and out toward the cheek. Sit both patches on the cross curve with a nose-sized gap between them.
💡 Tip: Draw one patch, then copy its tilt for the other side. Patches that tilt the same way make the panda look cross-eyed.
Step 5: Add the eyes and the rest of the face
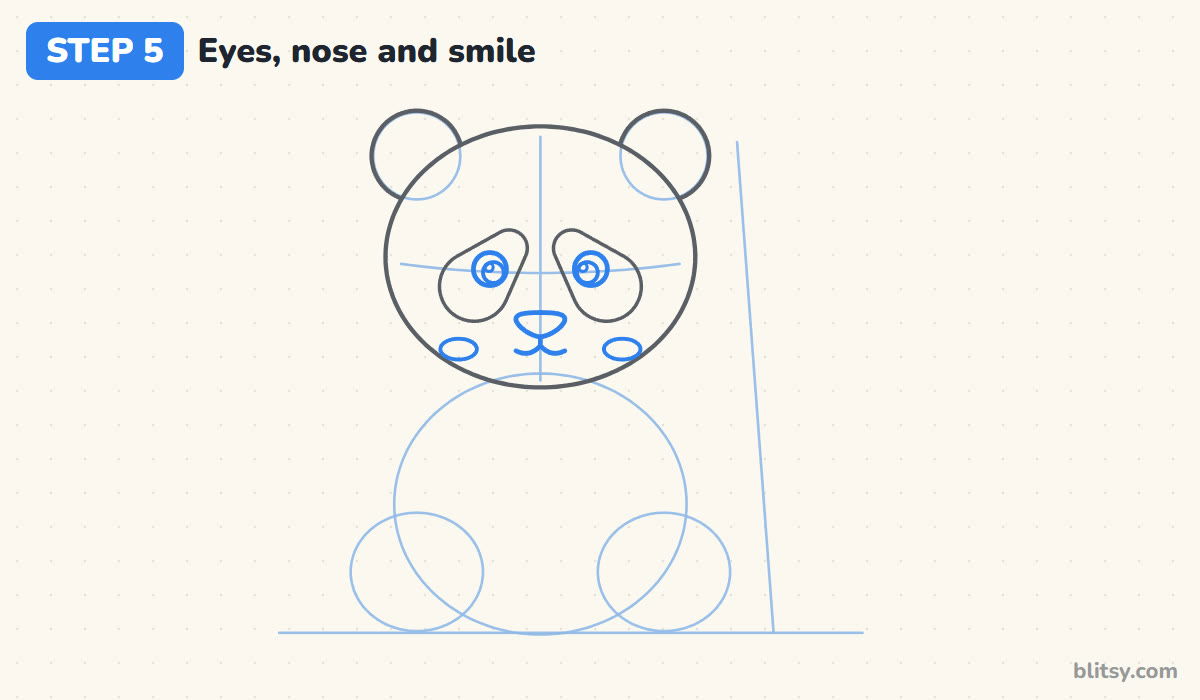
Inside each patch, near the top, draw a small circle for the eye with a smaller circle inside it for the pupil and a tiny shine dot. Below the patches, on the middle line, draw a nose shaped like a rounded upside-down triangle. A short line down from the nose splits into two little curves for the smile. Two flat ovals under the patches become pink cheeks.
💡 Tip: Put the shine dot on the same side in both eyes. It looks like light coming from one place.
Step 6: Draw the shoulder band and both arms
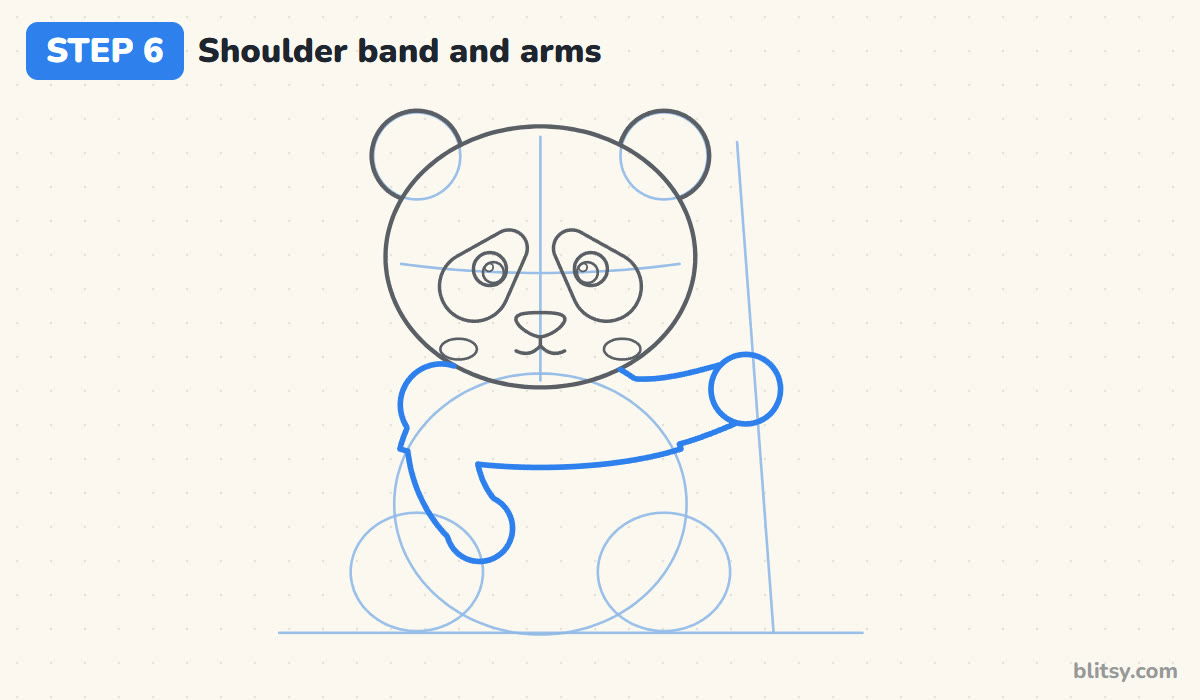
Pandas wear their black fur like a vest across the shoulders. Draw a gently curved line across the chest, a little under the chin, for the bottom of that band. The left arm comes down from the shoulder and ends in a round paw that rests on the tummy. The right arm reaches out to the bamboo line and ends in a round paw sitting right over it.
💡 Tip: Give both arms the same thick width all the way down. Thin arms make the panda look like it's wearing a jacket that's too big.
Step 7: Draw the tummy and the back legs
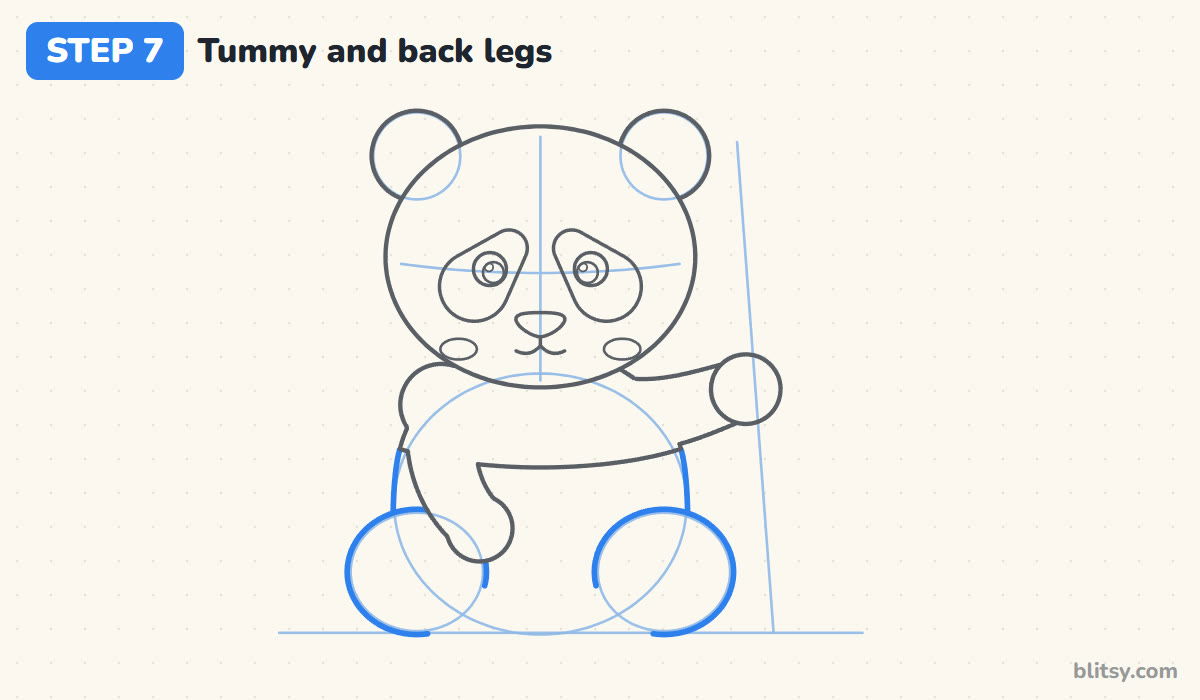
Follow the body oval down each side, only where you can still see it between the arms and the legs. Then trace the two leg ovals as big round shapes that bulge out past the body. Most beginners make the legs too small, and the panda ends up looking like it's standing instead of sitting.
💡 Tip: Skip the lines where the arm crosses the leg. The arm is in front, so the leg hides behind it.



Step 8: Add round feet and paw pads
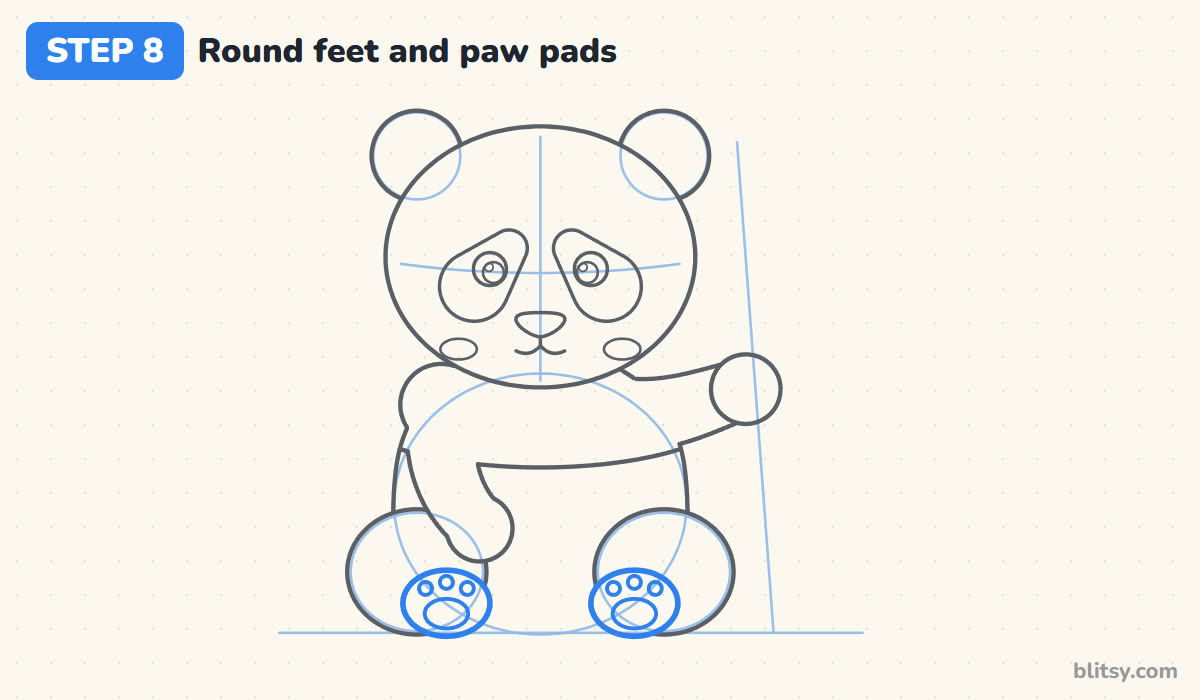
At the front of each leg, near the ground line, draw an oval foot facing you. Inside it, draw one larger oval pad and three small toe beans in an arc above it. I like this little detail because it shows the panda is sitting with its feet stuck out in front, like a toddler.
💡 Tip: Keep the toe beans close together and a bit smaller than you think. Big ones crowd the foot.
Step 9: Draw the bamboo stalk
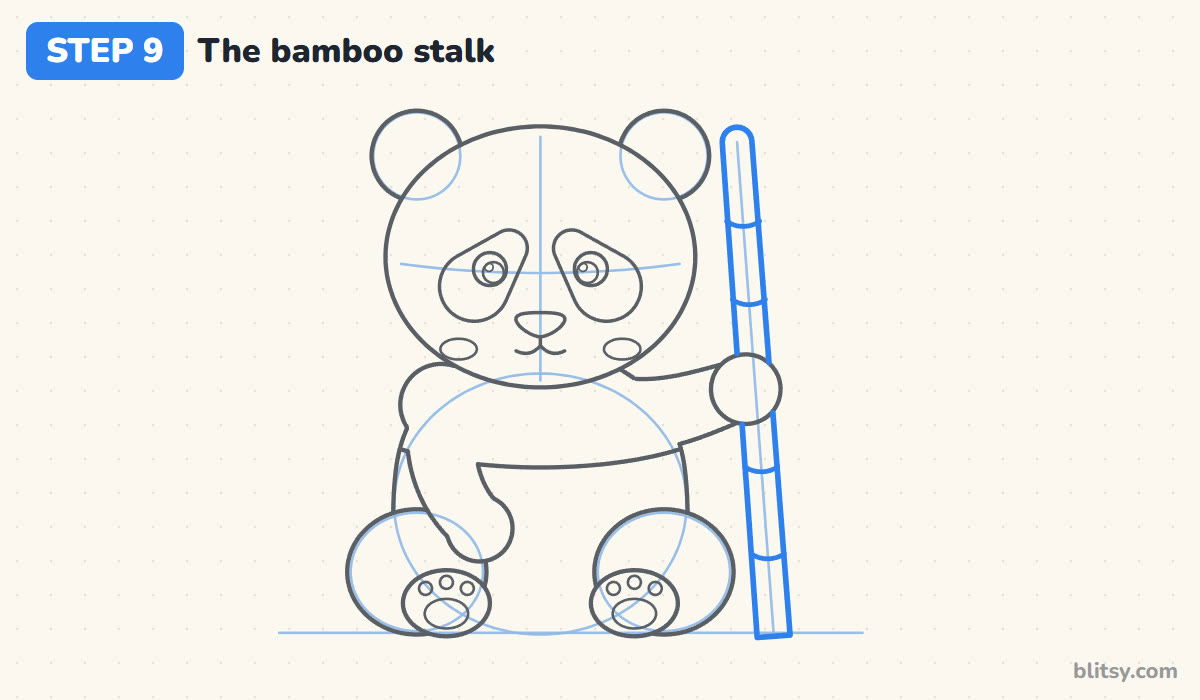
Follow the bamboo guide with two lines a finger's width apart and give the top a rounded end. The stalk goes behind the right paw, so stop your lines at the paw and start again just below it. Add four short curved lines across the stalk for the joints, spaced out evenly.
💡 Tip: Let the joints curve slightly downward. Flat lines make the bamboo look like a ruler.
Step 10: Add long, narrow bamboo leaves
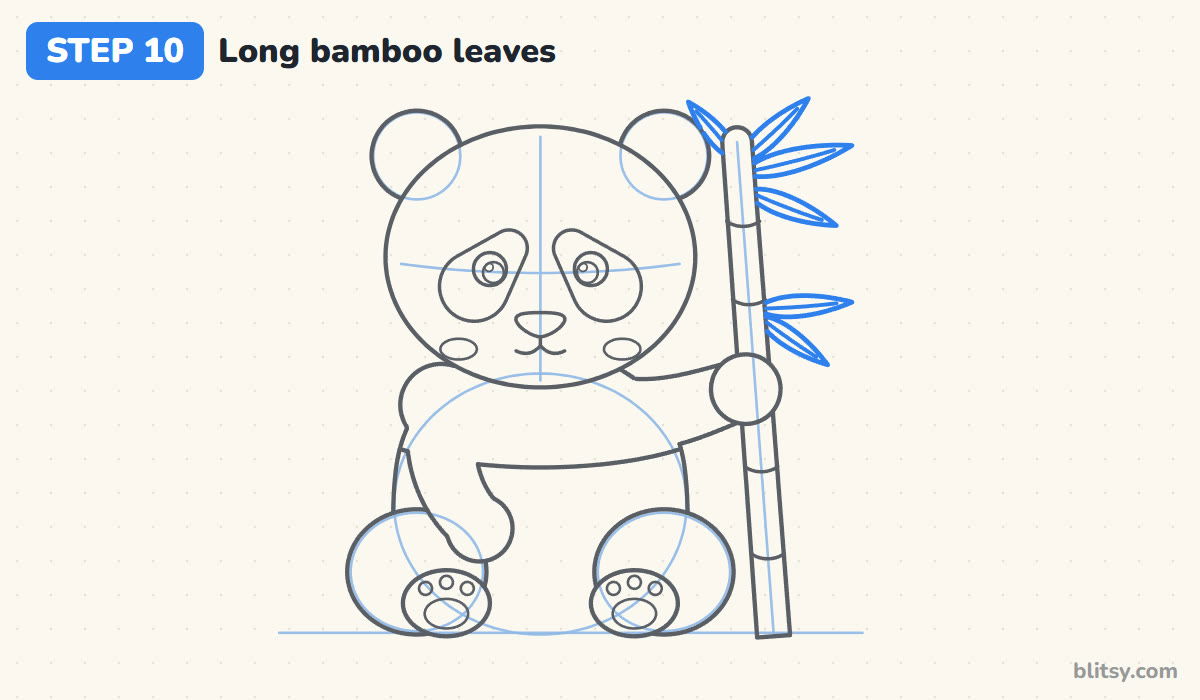
Bamboo leaves are long and thin with a sharp point. Draw a fan of four leaves near the top of the stalk and a pair coming out of a lower joint, all pointing out and away from the panda's head. Each leaf starts behind the stalk. A line down the center of each one makes the vein.
💡 Tip: Make a few leaves a little shorter than the others. Identical leaves look stamped on.
Step 11: Ink the lines and erase the guides
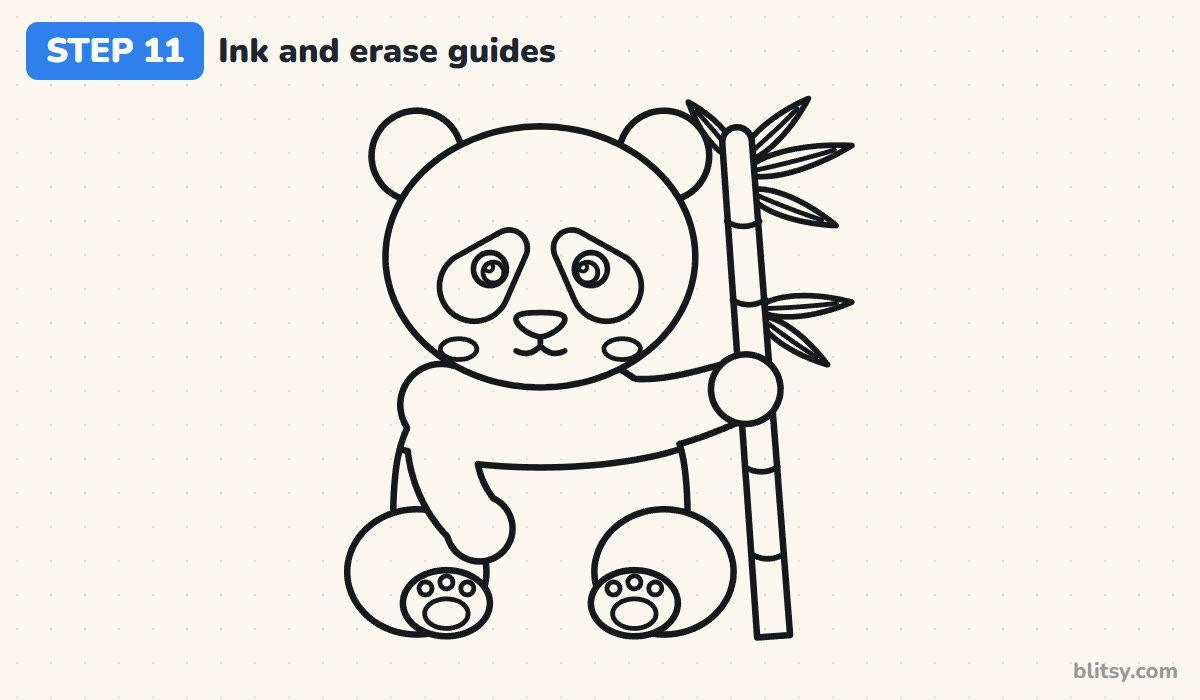
Go over every keeper line with your black marker. I start with the face, while my hand is fresh, and then work down to the feet and over to the bamboo. Wait a minute for the ink to dry, then erase all the pencil guides.
💡 Tip: Ink the small eye circles slowly. A wobble there changes the panda's whole expression.

Step 12: Color your panda
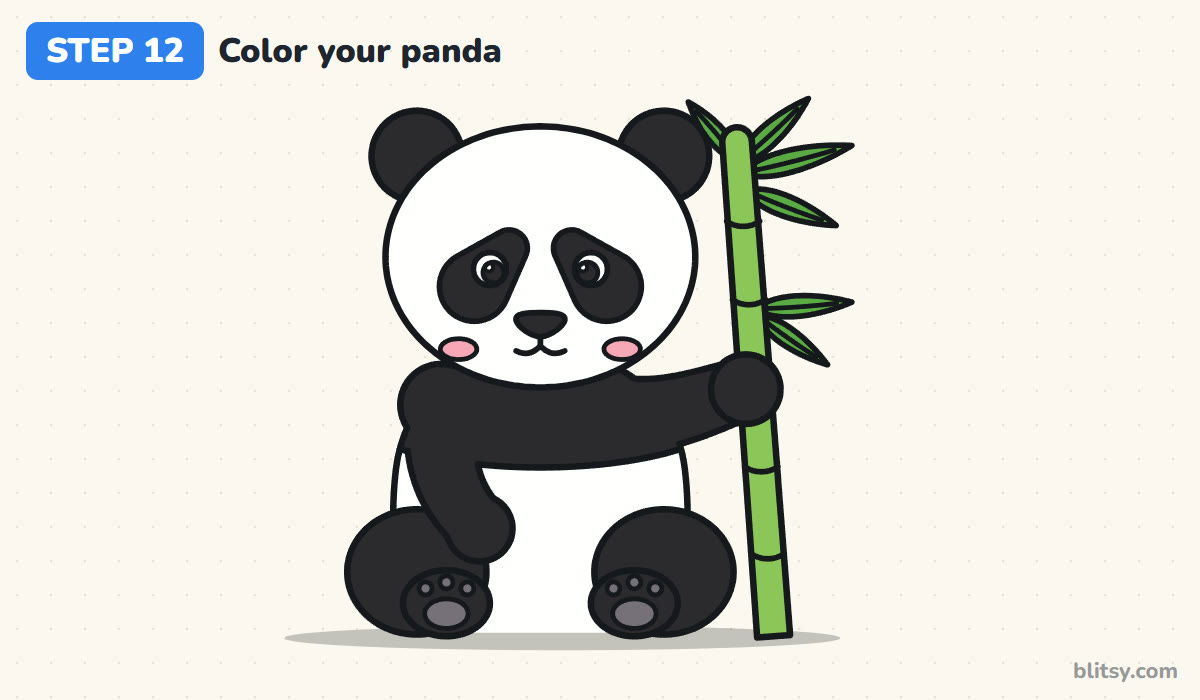
Use black for the ears and eye patches, the nose and pupils, and every arm and leg. The feet and the shoulder band are black too. Leave the head and tummy white, along with the eye shines. The paw pads are gray, the cheeks pink, the stalk light green and the leaves a deeper green.
💡 Tip: Color the big black areas with the marker and leave a thin white gap around each eye shine so it doesn't disappear.
Where Panda Drawings Usually Wobble
- Round eye patches. Perfect circles around the eyes look like goggles. Tilt each patch into a teardrop that droops down and out.
- Eyes drawn on the white fur. The eyes belong inside the black patches, with a white circle so they still show up.
- A white chest with no band. Without the black shoulder band, the arms look stuck on. Join both arms with that curved band under the chin.
- Long, thin legs. A sitting panda has big round legs and short feet sticking forward. Keep them chunky.
- Bamboo as one smooth tube. The joints are what make it bamboo. Add at least three of them.
Panda Poses to Try Next
When the basic pose feels easy, try one change at a time. Let the panda chew on a leaf, add a baby panda tucked against its side, or draw it lying on its back with the bamboo across its tummy. Younger kids can leave out the paw pads and leaf veins, and it still reads as a panda. Since a panda's shape is really a round bear, the bear drawing step by step lesson is a natural next try. For a white bear on ice, the polar bear drawing tutorial uses the same chunky build, and the panda coloring pages have plenty of other poses to color.
Free Panda Coloring Page and Step Guide
The free panda coloring page has a colored panda at the top as a guide, a key that names the color for each part, and a large outline to fill in below. The step-by-step PDF guide puts all 12 steps and tips on paper, so you can draw away from the screen. Both print fine on Letter or A4.
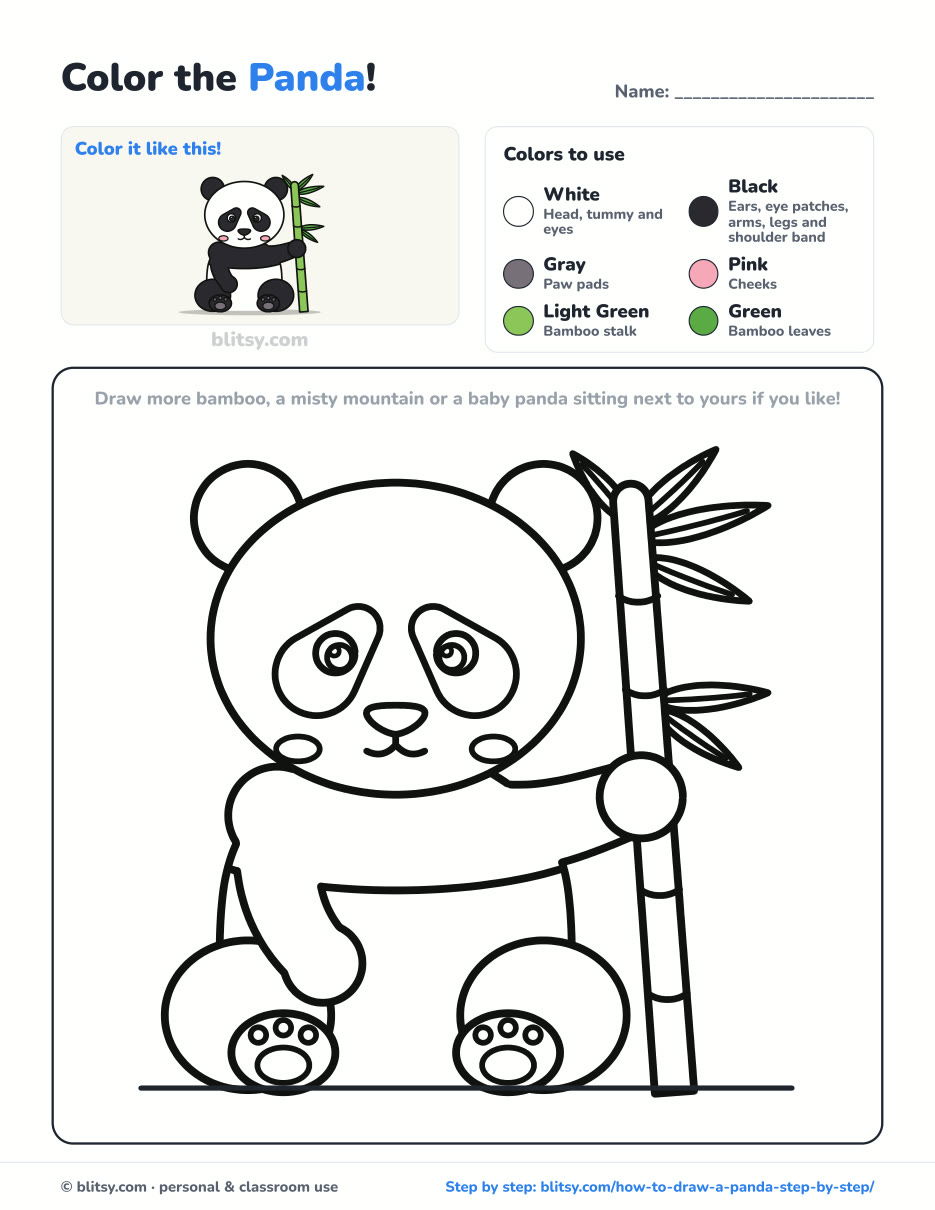
Black outlines with a colored example and the color names at the top. Ready to print and color.
⬇️ Download Coloring PageEvery step picture with its instructions and tips, to keep beside your paper while you draw.
⬇️ Download Drawing Guide📱 On a phone? Tap a download button, then open the file and choose Share → Save to Files or Print. On a computer, the PDF opens or saves straight to your Downloads folder.
Pin the Panda Steps for Later
More Round, Furry Animals to Draw Next
Each one is a full step-by-step tutorial with a picture for every stage and a free coloring page at the end.
- Bear Drawing: The panda's closest cousin, a friendly brown bear, in this how to draw a bear step by step guide.
- Polar Bear Drawing: A chubby white bear sitting on an ice floe in this polar bear drawing tutorial.
- Penguin Drawing: Another black and white favorite, drawn with simple ovals, in this penguin drawing step by step lesson.
- Raccoon Drawing: A masked face and a striped tail make this raccoon drawing tutorial fun practice for patches.
- Sloth Drawing: A slow, smiley sloth hanging from a leafy branch in this sloth drawing tutorial.
Panda Drawing Questions From Young Artists
What is the easiest way to draw a panda?
Start with a big head circle, two small ear circles and an oval body. Add teardrop eye patches, a small nose, and color the ears and limbs black.
How do you draw panda eyes?
Draw a black teardrop patch that tilts down and out, then put a small white circle near its top with a black pupil and a tiny shine dot inside.
Which parts of a panda are black?
A giant panda's ears, eye patches and nose are black, and so are its legs, its arms and the band across its shoulders. The head, tummy and back are white.
Why do pandas hold bamboo?
Giant pandas eat bamboo almost all day, and they grip the stalks with their front paws. That's why a stalk in one paw makes the drawing feel true to the animal.
Grab a black marker and a green crayon, and your panda will have its bamboo snack ready in no time. 🐼🎋
Related posts:
 How to Draw a Car Step by Step (Easy Drawing for Beginners)
 How to Draw a Whale Step by Step (Easy for Beginners)
 How to Draw an Arctic Fox Step by Step (Easy for Beginners)
 How to Draw a Shark Step by Step (Easy for Beginners)
 How to Draw a Chicken Step by Step (Easy for Beginners)
 How to Draw a Fish Step by Step (Easy Goldfish for Beginners)
 How to Draw a Snowman Step by Step (Easy for Beginners)
 How to Draw Hands Step by Step (Easy Palm View for Beginners)
 How to Draw an Airplane Step by Step (Easy Jet for Beginners)
 How to Draw a Mouse Step by Step (Easy for Beginners)
 How to Draw the Joker Step by Step (Easy Chibi for Beginners)
 How to Draw a T-Rex Step by Step (Easy for Beginners)

