
Two huge eyes and a wide grin carry this whole character. Get those right and the rest can wobble a little. In this lesson I'll show you how to draw Toothless step by step as a small chibi Night Fury sitting on the ground, ear-flaps up and tail curled out to one side. It's my own simple fan-art version for practice, not official How to Train Your Dragon artwork, so feel free to make it yours.
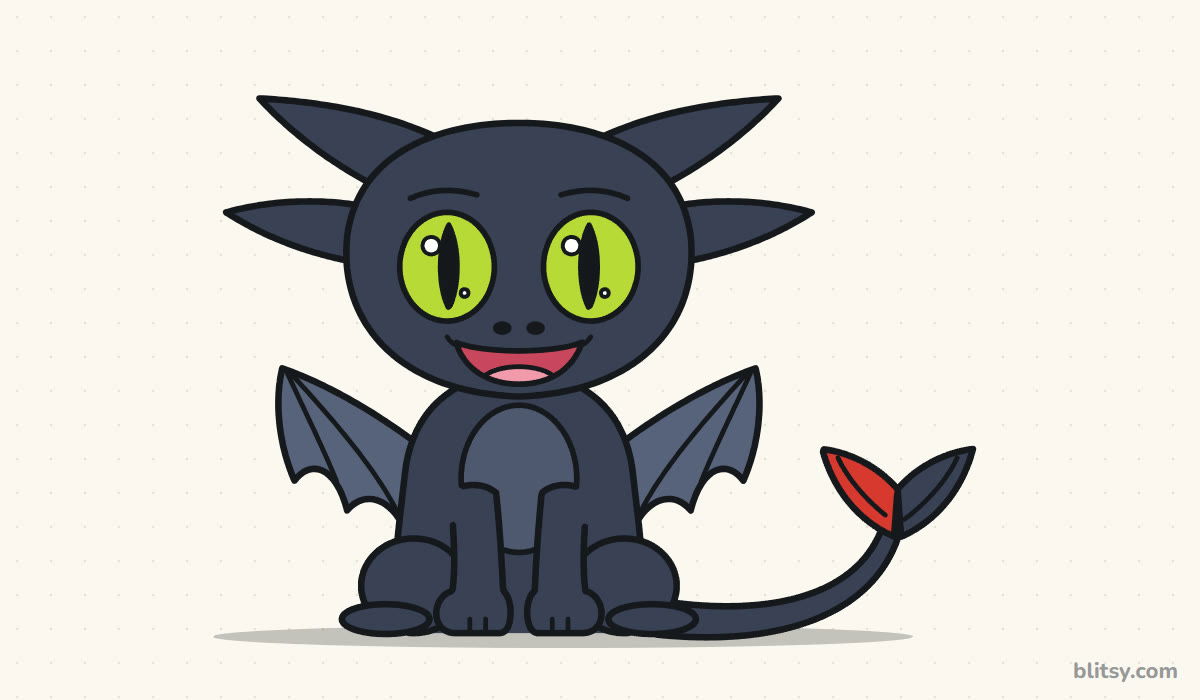
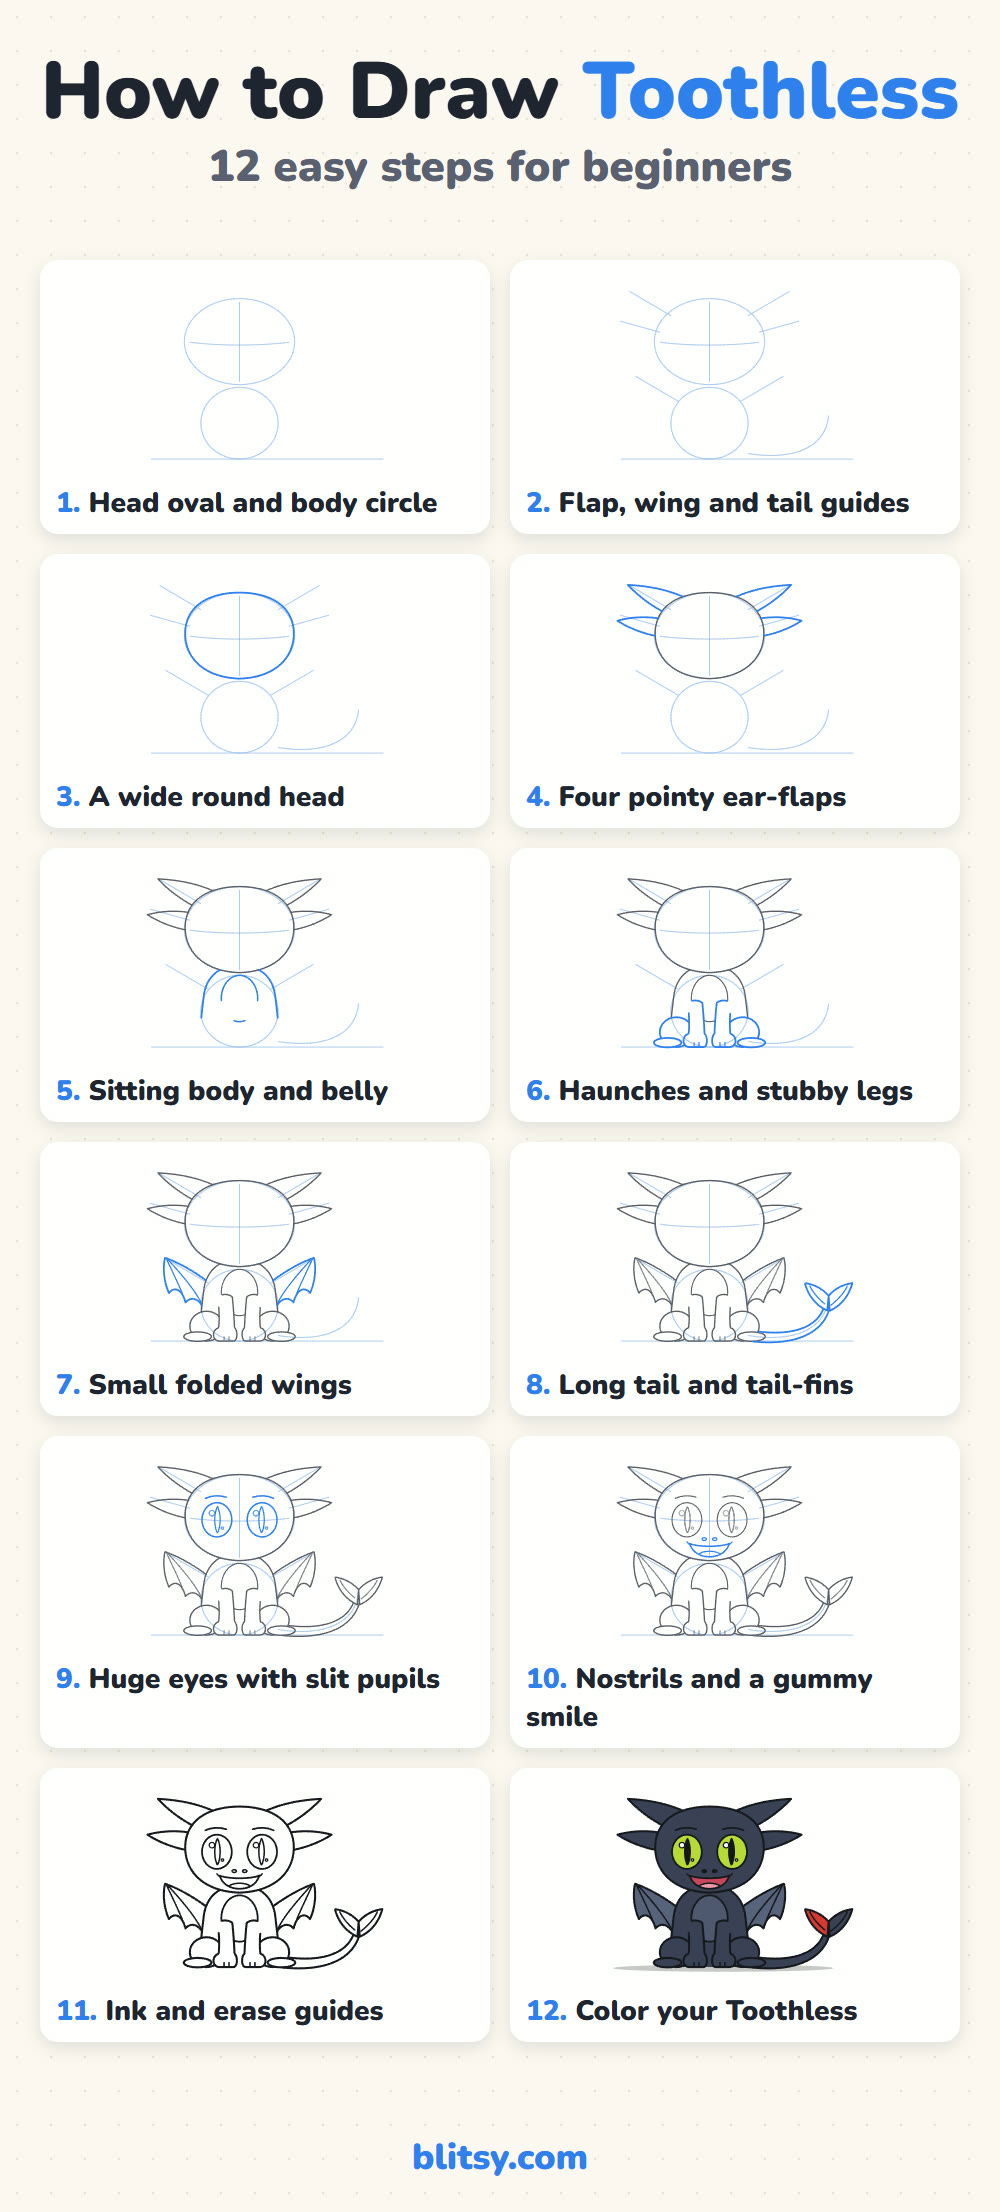
Toothless grows one part at a time below. Fresh lines in each picture are blue and earlier ones turn gray, so you only copy the blue.
Quick overview
⏱️ Time: about 30 to 40 minutes with coloring
🎯 Level: easy, fine for kids from about 7 up
✏️ Steps: 12
🐉 You'll draw: a sitting chibi Toothless with a red tail-fin
Supplies for Your Night Fury Sketch
- A pencil you can press lightly with (HB works well)
- A soft eraser
- A black marker or fineliner for the final outline
- Colored pencils or markers: black or charcoal, gray, yellow green, red and pink
- Plain white paper, turned sideways
Leave room on the right side of the page, because the tail swings out that way.
How to Draw Toothless Step by Step
Step 1: Sketch a head oval and a body circle
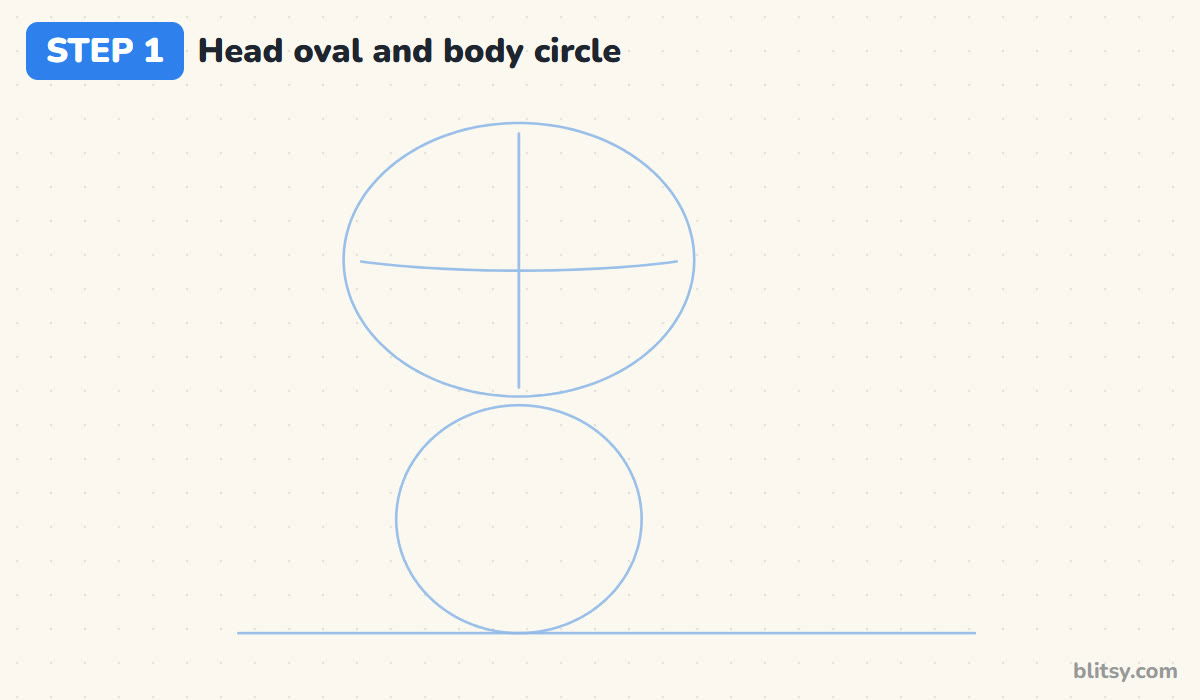
Draw a light ground line near the bottom of the page. Just above it, sketch a circle for the body. On top of that circle, and a bit bigger than it, draw a wide oval for the head, so the two shapes just touch. Add a line down the middle of the head and a gently curved line across it, a little below halfway. The eyes go on that curve.
💡 Tip: The head should be clearly bigger than the body. That size difference is what makes a chibi look cute.
Step 2: Add guide lines for the flaps, wings and tail
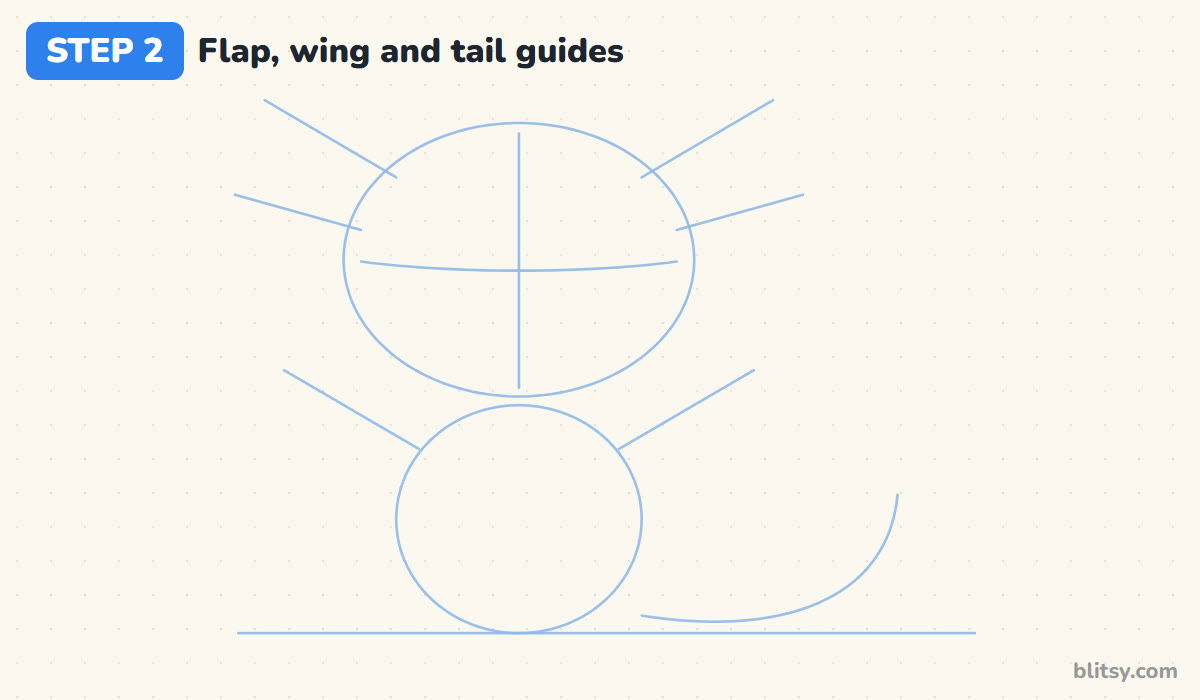
From the top corners of the head, draw two short slanted lines on each side for the ear-flaps, one pointing up and one more sideways. Add a slanted line from each shoulder toward the head for the wings, and a long curve from the right side of the body that sweeps along the ground and turns up. That curve is the tail.
💡 Tip: Keep every guide light and loose. They only show you directions, so they don't need to be neat.
Step 3: Outline a wide round head
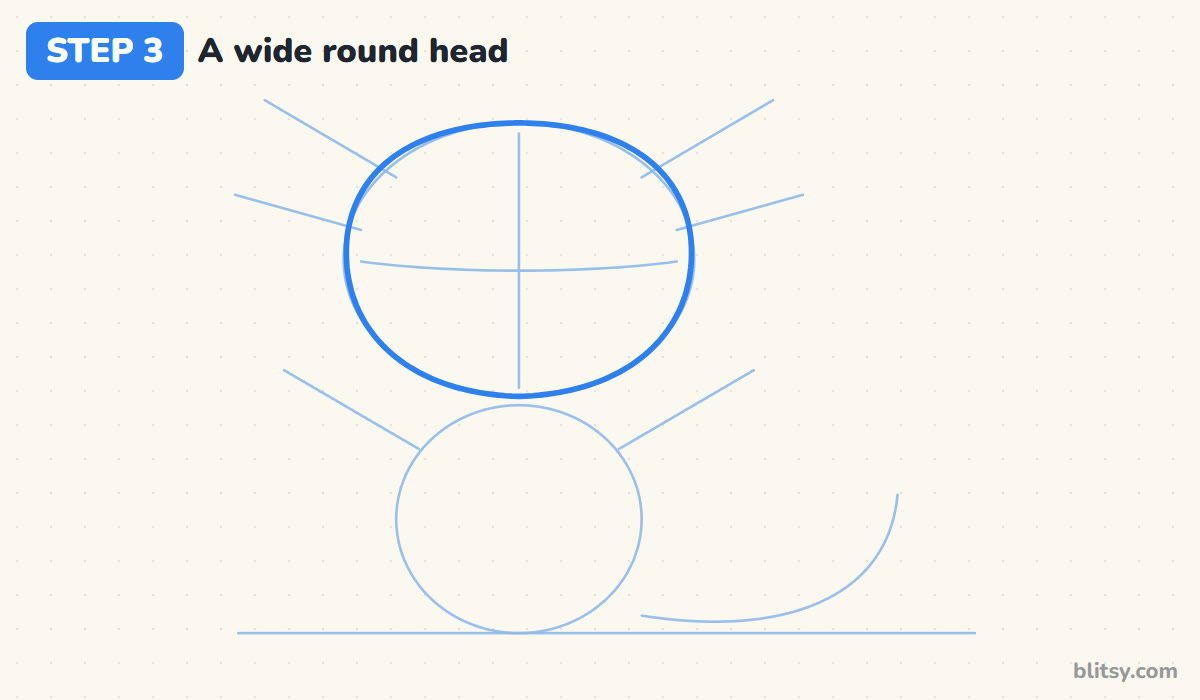
Go over the head oval with a firmer line. I let the top flatten just a touch and keep the cheeks full, which gives Toothless his broad, friendly face. The bottom of the head overlaps the body circle, and that's fine.
💡 Tip: If your head comes out taller than it is wide, widen the cheeks. A tall head looks more like a cat than a dragon.




Step 4: Draw four pointy ear-flaps
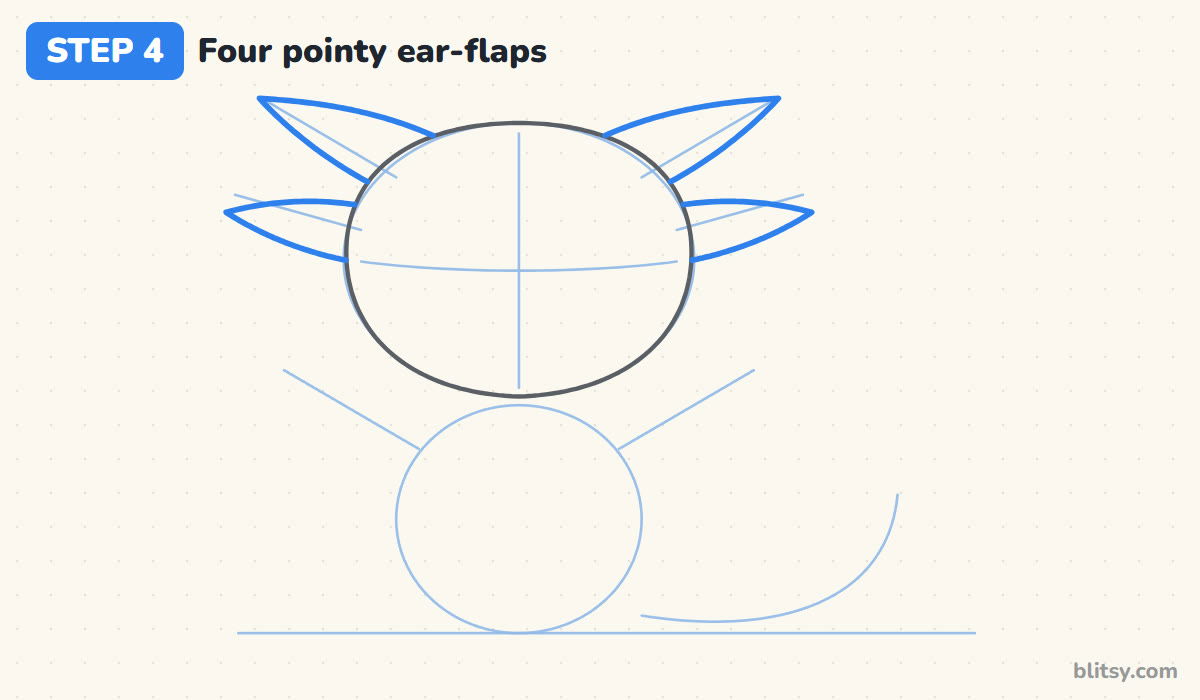
Along each upper guide, draw a long leaf shape with a sharp tip, starting at the edge of the head. Below it, add a slightly shorter flap pointing more to the side. Each flap is wide where it meets the head and narrows to a point. Stop the lines where they touch the head outline instead of drawing across the face.
💡 Tip: Point the top flaps up and out at the same angle on both sides. Mismatched flaps are the first thing people notice.
Step 5: Shape the sitting body and the belly
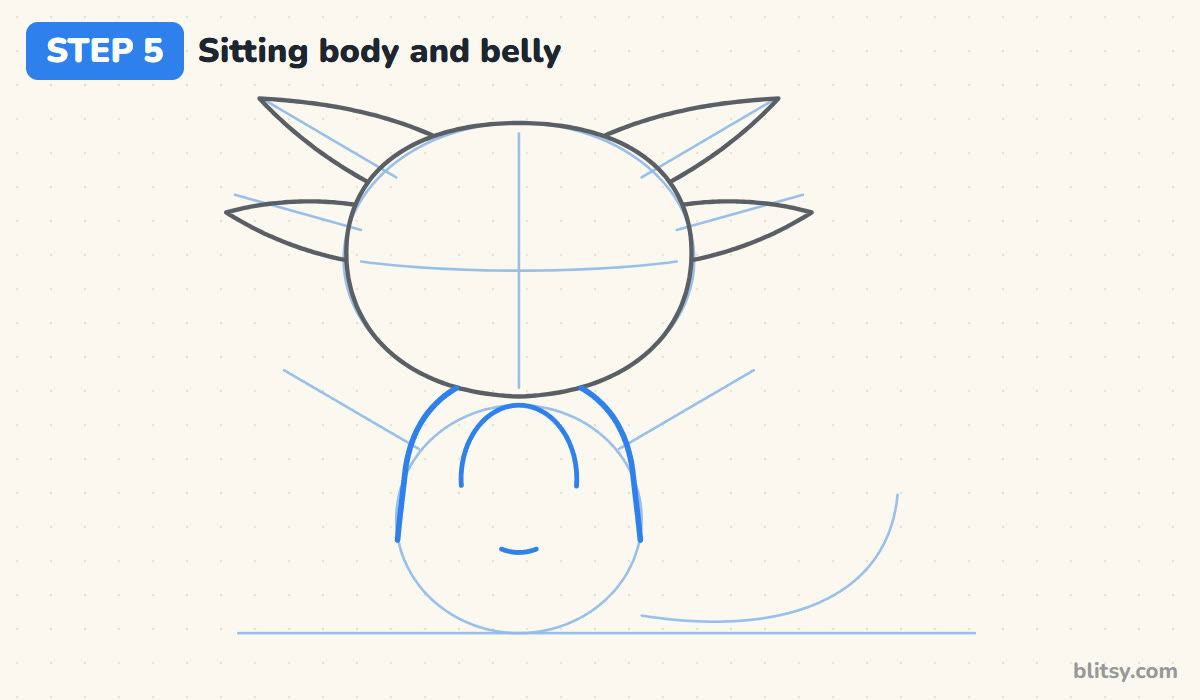
From under each cheek, bring a curved line down the side of the body circle, bulging out a little at the bottom like a pear. Then draw a rounded arch in the middle of the chest for a lighter belly patch. Its tiny bottom tip is the only part you'll still see between the front legs later.
💡 Tip: Keep the body narrower than the head. A wide body makes the chibi look heavy and grown up.
Step 6: Add haunches and stubby front legs
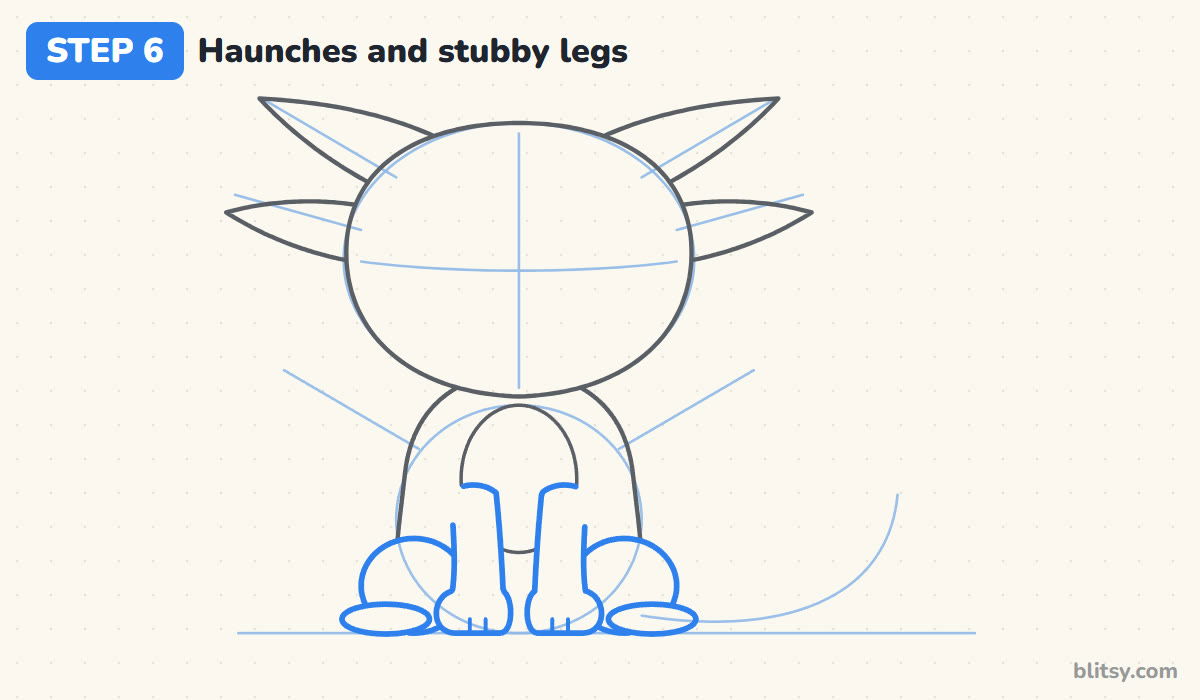
Draw a round bump on each side at the bottom for the back legs, with a flat oval foot in front of each. Between them, add two short front legs that come out of the belly and end in rounded paws. Two tiny lines on each paw make the toes.
💡 Tip: Rest every foot right on the ground line. It makes him look settled instead of floating.
Step 7: Draw two small folded wings
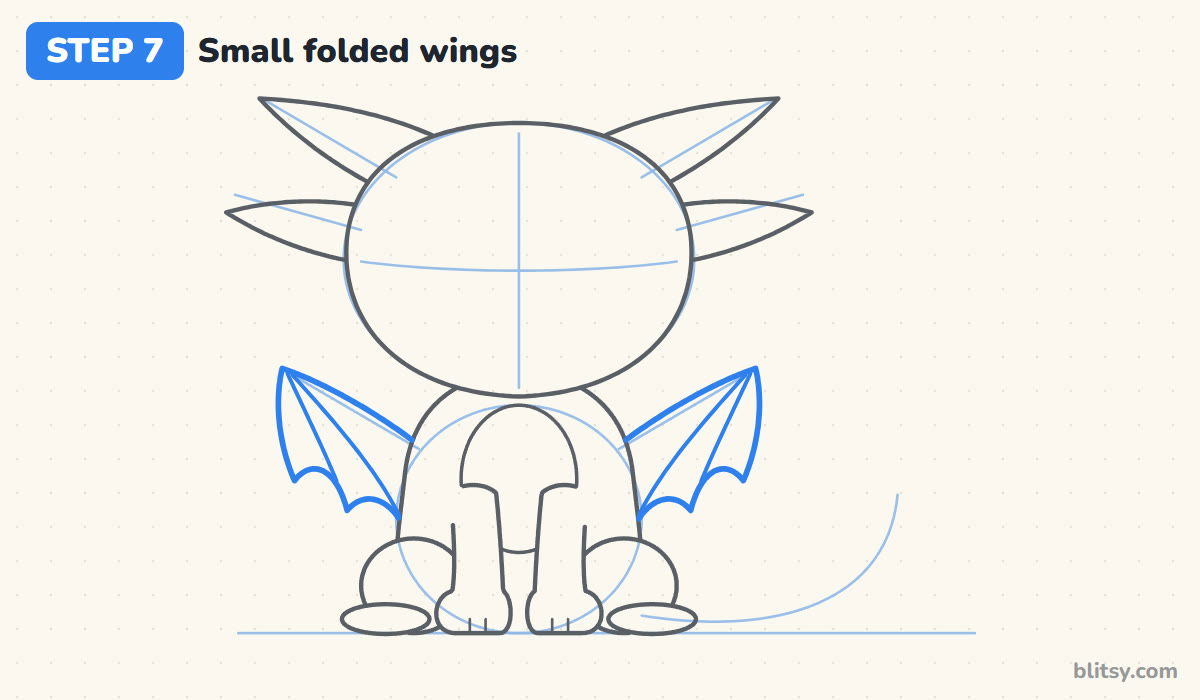
Follow each wing guide up from the shoulder to a point beside the head. From that point, bring the outer edge down, then finish the bottom with two soft scallops back toward the body, like a bat wing that's tucked in. Two thin lines from the top point down to the scallop tips show the wing bones.
💡 Tip: Keep the wings small and close to the body. Folded wings say he's relaxed and sitting, not about to take off.



Step 8: Draw the long tail and the tail-fins
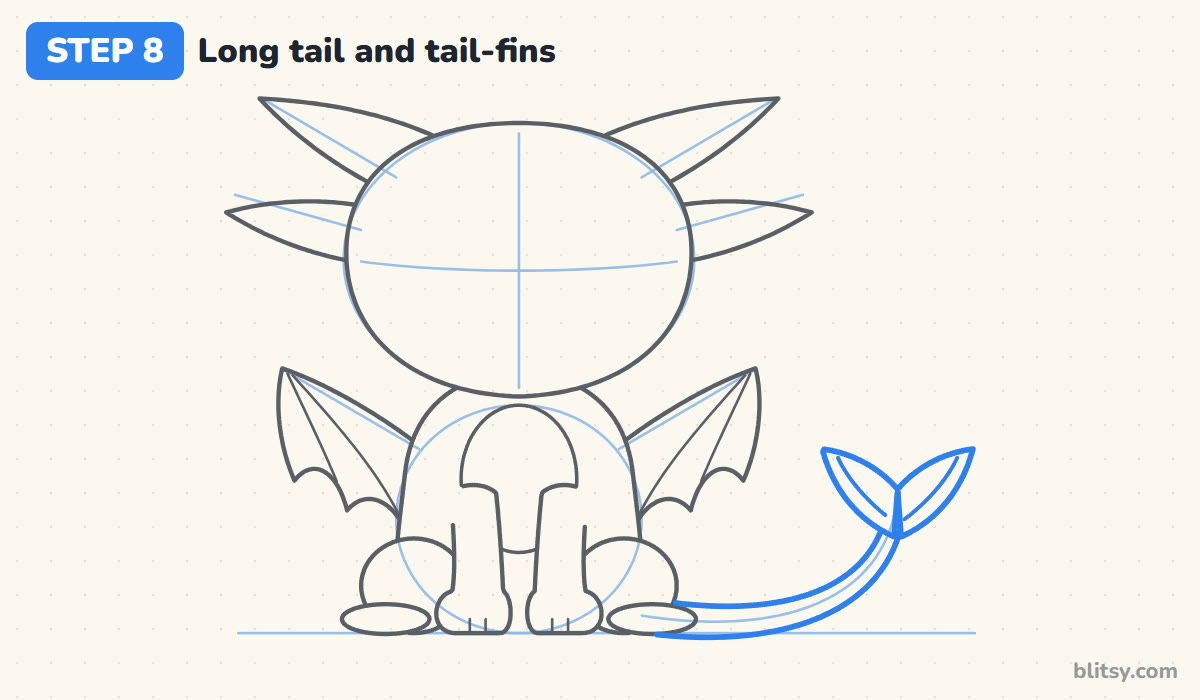
Starting behind the right haunch, draw two lines along the tail guide that get closer together as they curve up. At the tip, add two leaf-shaped fins, one leaning left and one leaning right, so the end looks like a little fishtail. A thin line inside each fin adds a rib.
💡 Tip: Make the tail thick near the body and thin at the tip. An even tube looks stiff.
Step 9: Draw huge eyes with slit pupils
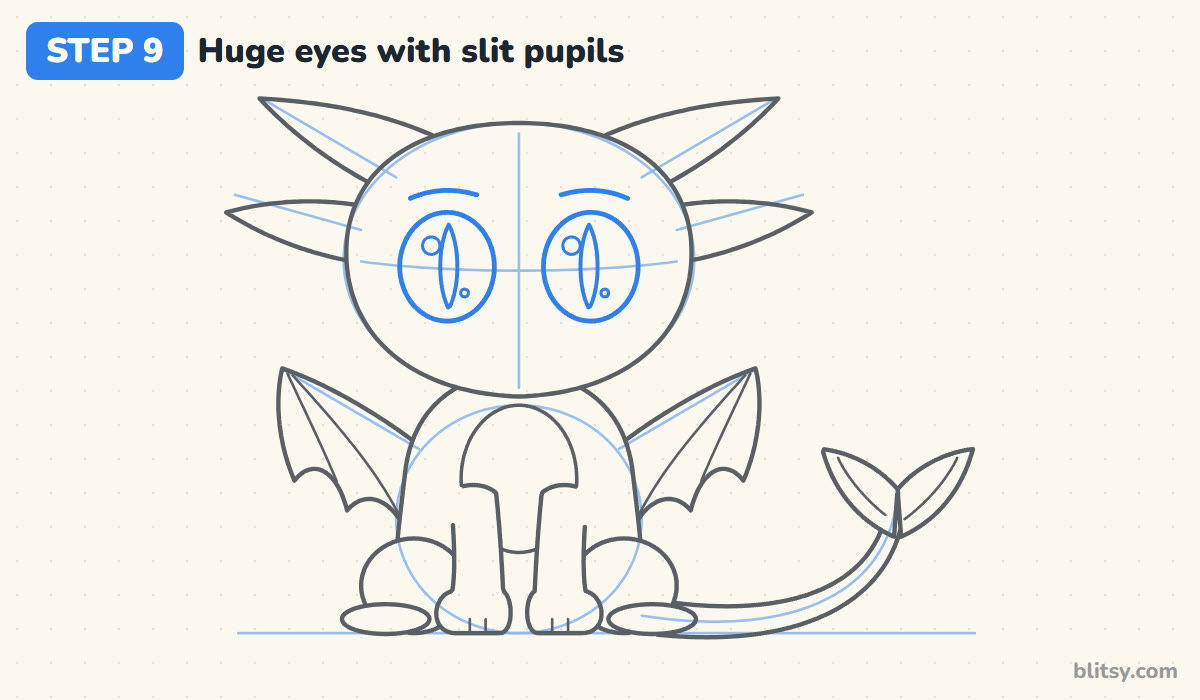
Place two big ovals on the curved cross line, leaving a gap a little narrower than one eye. Inside each, draw a tall pointed slit for the pupil, like a cat's eye. Add a round shine near the top, a tiny dot near the bottom, and two short curved brows above.
💡 Tip: Put the shines on the same side in both eyes, or he'll look like he's looking two ways at once.
Step 10: Add nostrils and a gummy smile
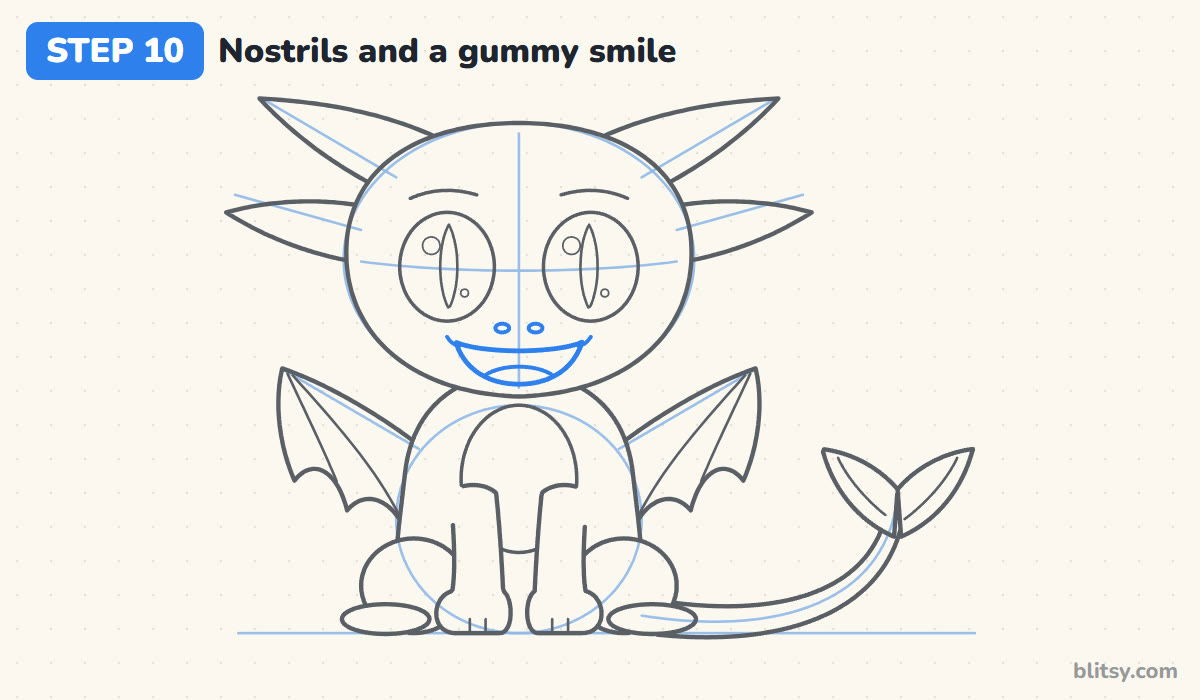
Below the eyes, draw two small ovals close together for the nostrils. Under them, draw a wide smile with a flat top and a round bottom. A curve inside makes the tongue. No teeth show, which is how he got his name, so keep it gummy. Two little curves at the corners lift the cheeks.
💡 Tip: Keep the mouth inside the lower half of the head. If it reaches the chin line the face gets crowded.
Step 11: Ink Toothless and erase the guides
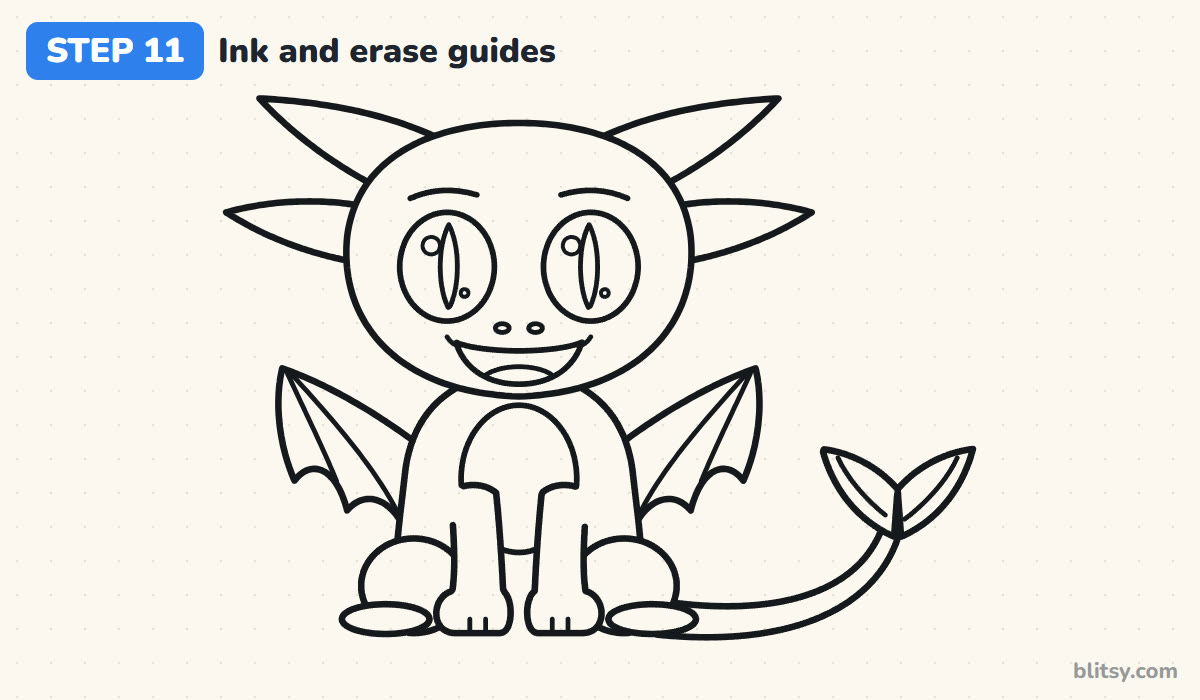
Trace every keeper line with a black marker. I start with the face while my hand is steady and finish with the wings and tail. Leave the light construction lines alone. When the ink is dry, erase all the pencil.
💡 Tip: Go slowly around the slit pupils. A wobble there changes the whole expression.


Step 12: Color your Toothless
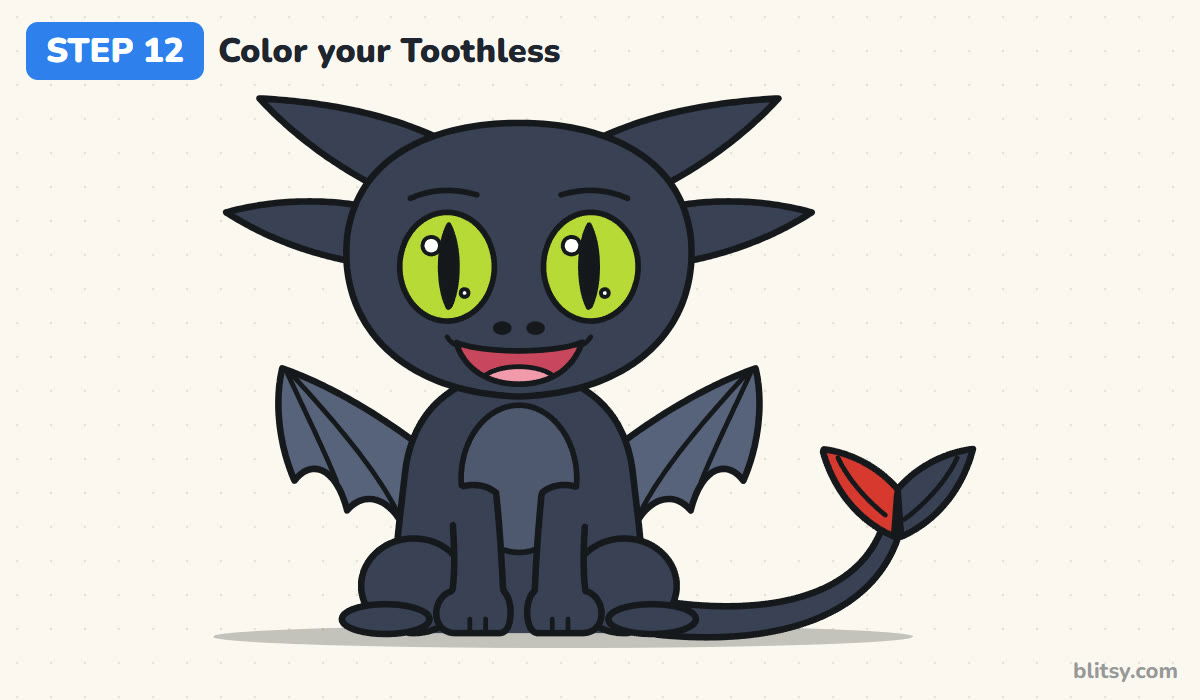
Fill the head, body and tail with a very dark gray or blue black. Real black would hide your outlines. Use a lighter gray for the wings and a middle gray for the belly. The eyes are yellow green with black slits and white shines. One tail-fin is red, the other stays dark, and the mouth gets pink.
💡 Tip: Color the eyes first while your pencils are clean. A bright yellow green next to the dark head is what makes him pop.
Where Toothless Sketches Tend to Slip
- Eyes that are too small. Little eyes turn him into a plain lizard. Each eye should take up almost a quarter of the head's width.
- Round pupils. Dots look like a puppy. Draw tall, pointed slits so he keeps his dragon look.
- Coloring everything pure black. The lines vanish and the shape goes flat. Pick a very dark gray and save true black for the pupils.
- Ear-flaps drawn as round cat ears. Keep them long and pointed, with two on each side.
- Forgetting the red fin. Without it the tail could belong to any black dragon. It's a small detail people recognize right away.
Night Fury Variations Worth a Try
Try him with his wings stretched wide and a starry night behind him, or give him a fish in his paws for a snack. Older kids can turn the head to one side once the front view feels easy. Younger kids can skip the wing bones and still get a clear Toothless. For a classic fire-breathing dragon built the same way, follow my how to draw a dragon step by step lesson next. If you like bigger detail, the dragon head drawing tutorial shows horns and scales up close, and the Stitch drawing step by step guide uses the same big-head chibi trick.
Free Toothless Coloring Page and Step PDF
The free Toothless coloring page has a colored example at the top and a key that says which color goes where, with a large outline below to fill in. The step-by-step PDF guide holds all 12 steps with pictures and tips, so you can draw away from the screen. Both print on Letter or A4 paper.
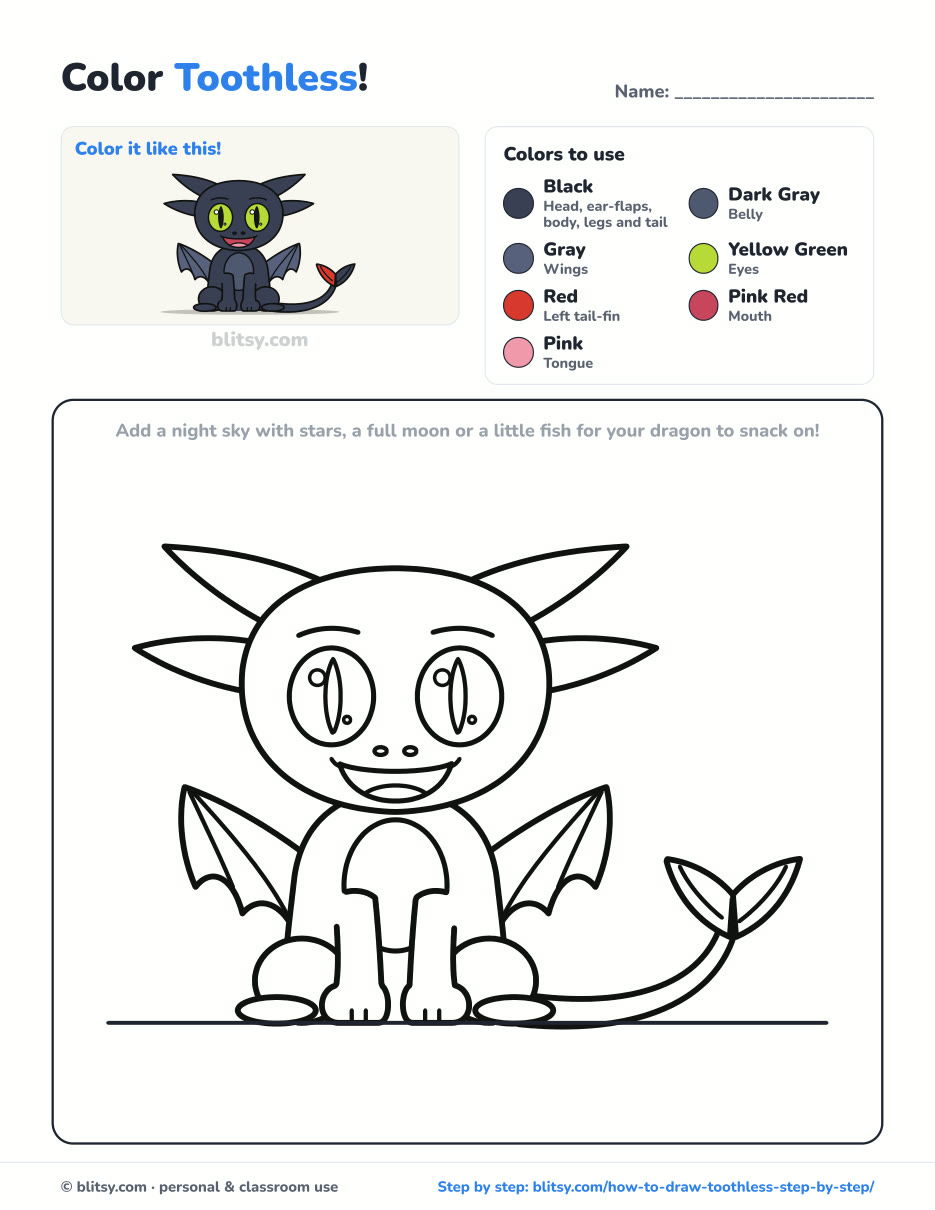
Black outlines with a colored example and the color names at the top. Ready to print and color.
⬇️ Download Coloring PageEvery step picture with its instructions and tips, to keep beside your paper while you draw.
⬇️ Download Drawing Guide📱 On a phone? Tap a download button, then open the file and choose Share → Save to Files or Print. On a computer, the PDF opens or saves straight to your Downloads folder.
Save the Toothless Steps on Pinterest
More Dragons and Chibi Friends to Draw
Each one below is a full step-by-step tutorial with a picture for every stage, so you can keep practicing the same circle-first method.
- Dragon Drawing: A friendly green dragon on four legs with bat wings, back spikes and a puff of fire in this how to draw a dragon step by step lesson.
- Dragon Head Drawing: Draw a dragon head in side view with horns, a cheek fin and throat plates in this dragon head drawing tutorial.
- Stitch Drawing: Another big-eyed movie creature, with giant ears and a chubby body, fills this Stitch drawing step by step guide.
- Godzilla Drawing: A friendly kaiju with tall back plates and a heavy tail grows from two ovals in this how to draw Godzilla lesson.
- Cat Drawing: Toothless often acts like a big cat, so try a sitting tuxedo cat with a ball of yarn in this cat drawing tutorial.
Toothless Drawing Questions Answered
How do you draw Toothless easy for kids?
Start with a wide oval head on top of a small circle body. Add pointed ear-flaps, two huge eyes with slit pupils and a big smile, then small wings and a curled tail with a red fin.
What colors do I need to draw Toothless?
A very dark gray for his body, lighter gray for the wings, yellow green for the eyes, red for one tail-fin and pink for the mouth.
How long does it take to draw Toothless?
Plan on about 30 to 40 minutes with coloring. The eyes and the tail-fins need the most care.
Why does Toothless have one red tail-fin?
In the story he loses one tail-fin and gets a replacement, which is usually shown in red. Drawing one fin red and one dark is the quickest way to make your dragon look like him.
That big round head is the only hard start, and after it your own little Night Fury will be grinning up at you. 🐉✏️
Related posts:
 How to Draw Wonder Woman Step by Step (Chibi for Kids)
 How to Draw the Hulk Step by Step (Easy Chibi for Kids)
 How to Draw Iron Man Step by Step (Easy Chibi for Kids)
 How to Draw Cat Noir Step by Step (Easy Chibi Hero)
 How to Draw Goku Step by Step (Easy Chibi Version)
 How to Draw Freddy Krueger Step by Step (Cute Chibi Version)
 How to Draw Ariana Grande Step by Step (Cute Chibi Fan Art)
 How to Draw Master Chief Step by Step (Easy Chibi Armor)
 How to Draw the Joker Step by Step (Easy Chibi for Beginners)
 How to Draw a Chibi Step by Step (Easy 2-Head Method)
 How to Draw a Ninja Step by Step (Easy Chibi Ninja for Kids)
 How to Draw Sonic Step by Step (Easy Chibi for Beginners)

