
Swords are one of those things kids love to draw and then feel let down by, because the blade ends up wobbly or one side of the guard sticks out further than the other. The fix is simple: build everything on one straight line. Here I'll show you how to draw a sword step by step, starting from that line and a couple of light helpers, so the blade stays straight and both halves match. We'll finish with a polished knight's longsword in silver, gold and brown, with a red gem in the pommel.
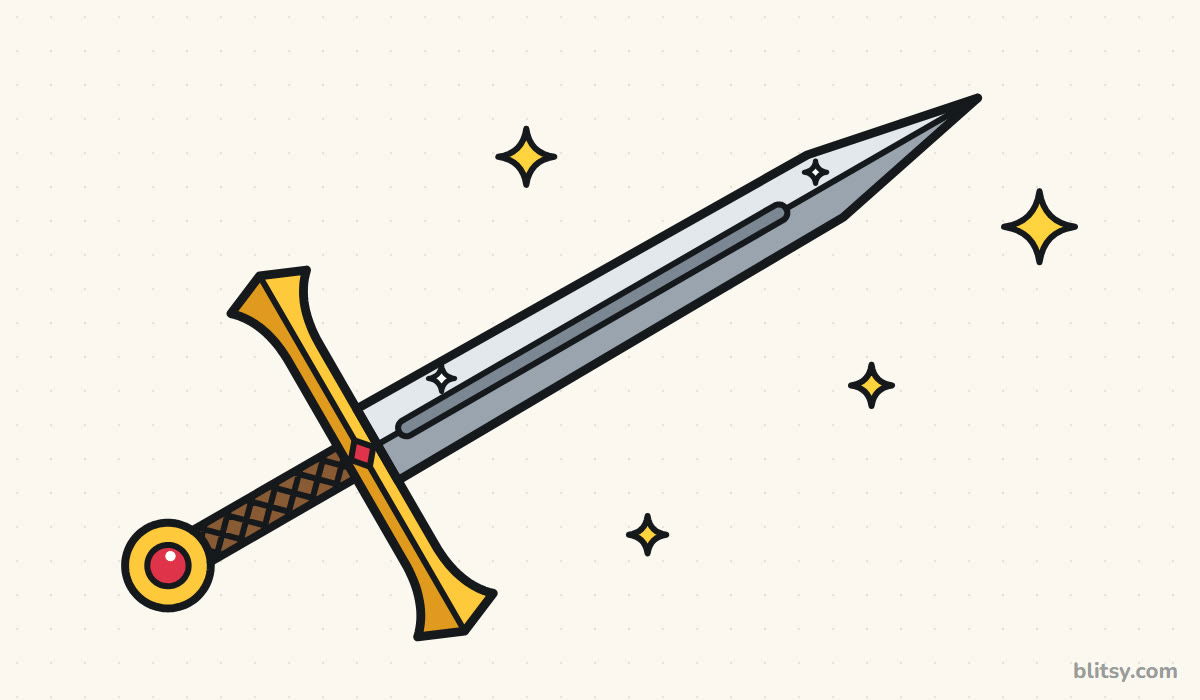
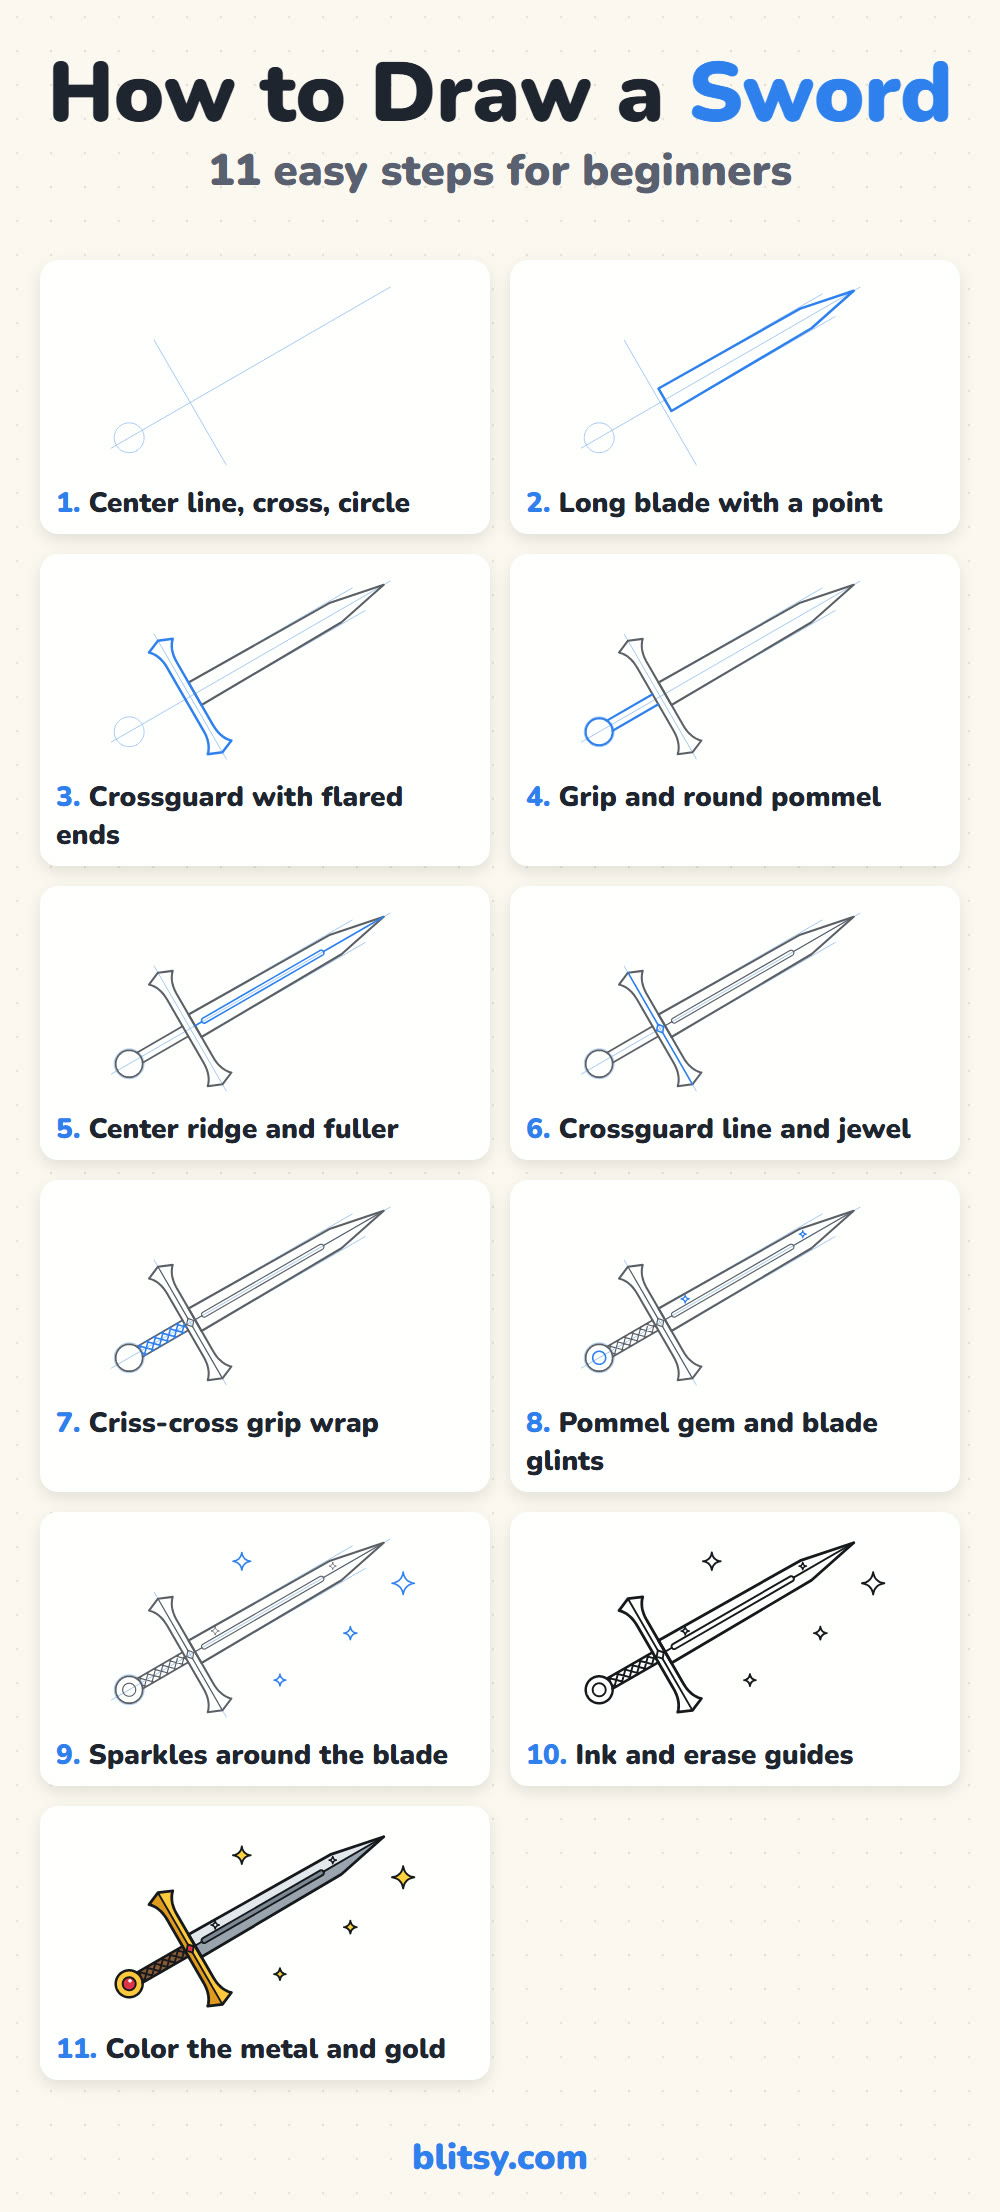
In every picture below, the bright blue lines are the new ones for that step. Gray shows what you already drew, and the pale blue helper lines disappear in step 10.
Quick overview
⏱️ Time: about 25 minutes
🎯 Level: easy to medium; kids from around 7 can manage it, younger ones with a ruler and some help
✏️ Steps: 11
⚔️ You'll draw: a knight's longsword with a fuller, a flared crossguard, a wrapped grip and a gem pommel
Gear for a Straight, Shiny Blade
- A pencil (an HB is fine)
- A soft eraser
- A ruler, because a sword is mostly straight lines
- A coin or bottle cap to trace the pommel circle
- A black fineliner or felt pen
- Colored pencils or markers: light gray, gray, dark gray, yellow, orange, brown and red
- Plain paper turned sideways
If you only have one gray pencil, press lightly for the light half of the blade and harder for the dark half.
How to Draw a Sword Step by Step
Step 1: Draw a tilted line, a cross and a circle
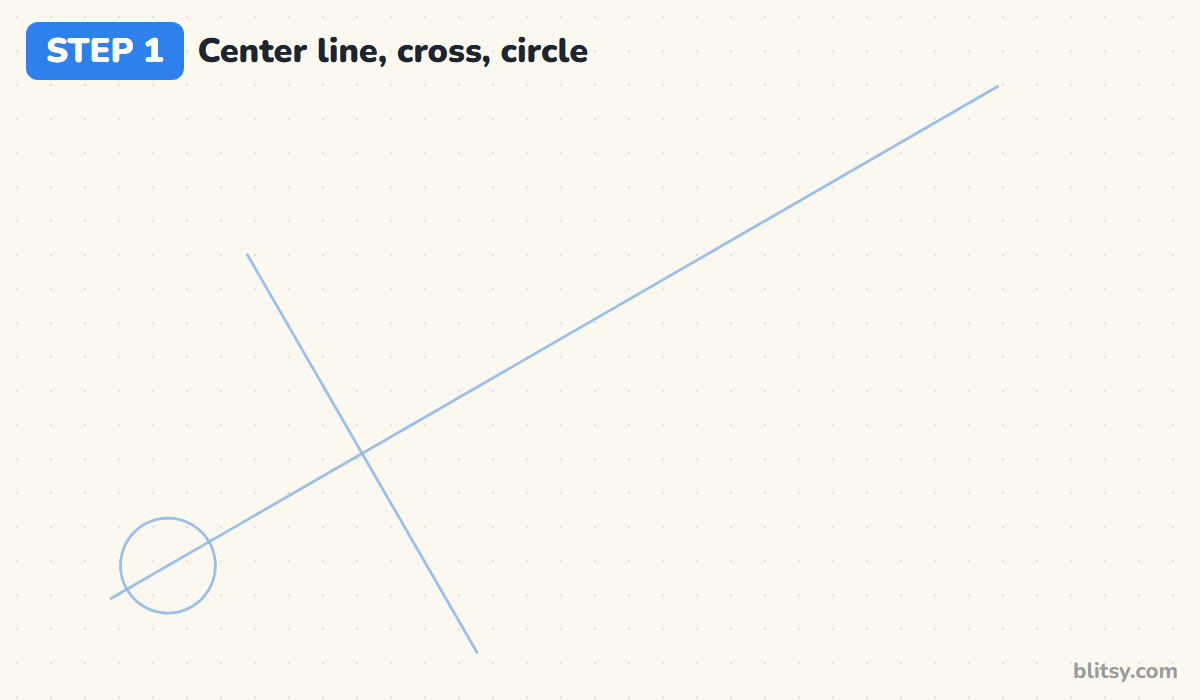
With a ruler, draw one long line rising from the bottom left to the top right at a gentle slope. About a quarter of the way along from the low end, cross it with a shorter line at a right angle. Trace a small circle at the low end. I tilt the sword because a long blade fits a sideways page far better than standing upright.
💡 Tip: Keep every helper line faint enough to vanish with one swipe of the eraser.
Step 2: Outline the long blade and its point
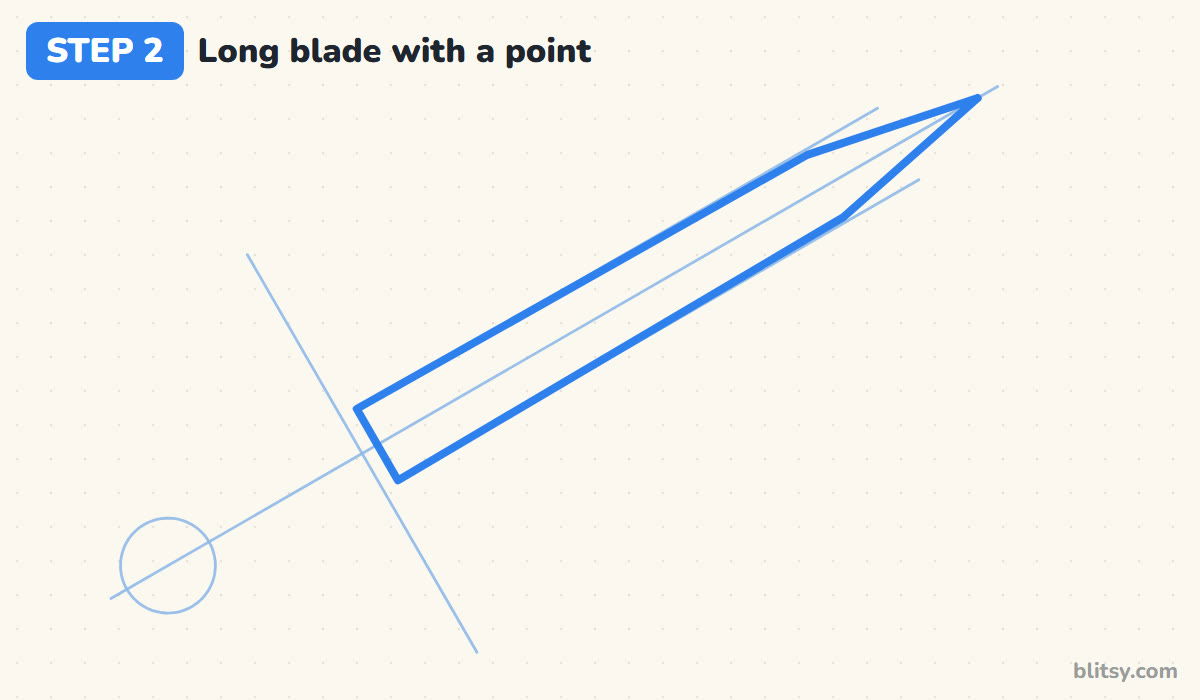
Rule a faint line on each side of the center line, the same distance away, to mark the blade's width. Draw the real edges along them from the cross line upward, letting them come in just a little. For the last fifth, angle both edges sharply in so they meet on the center line. Close the bottom with a short edge on the cross line.
💡 Tip: Measure the width on both sides with the ruler; matching gaps keep the blade straight.
Step 3: Add a crossguard with flared ends
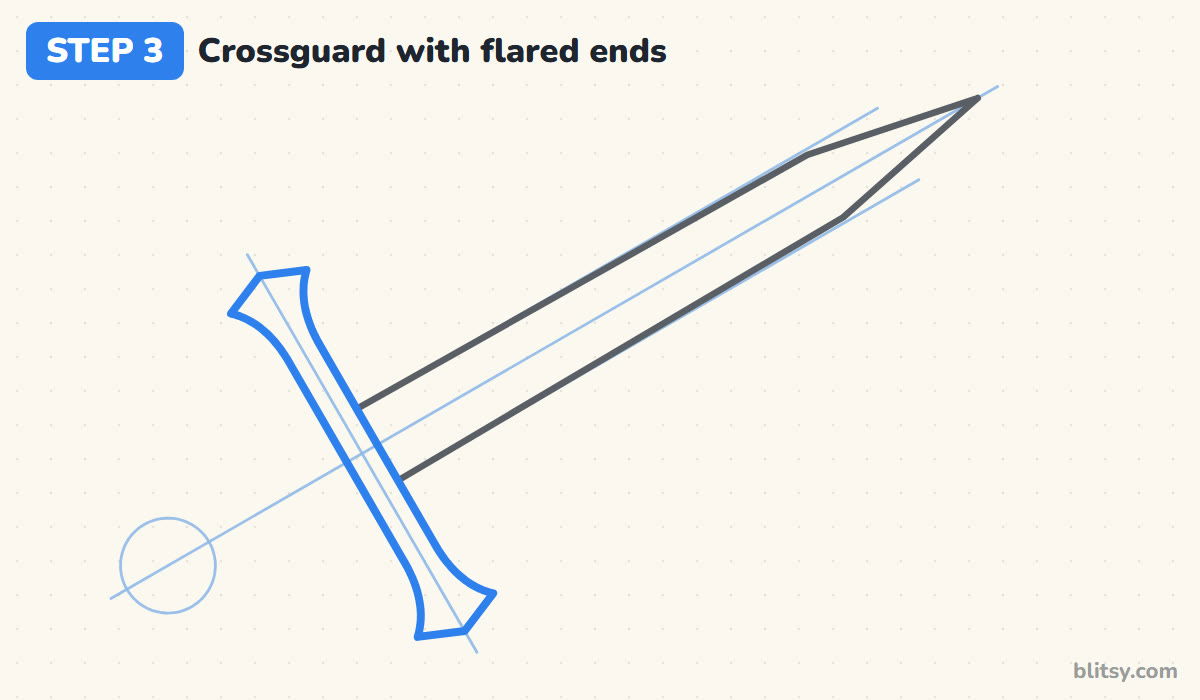
The crossguard is the bar where the blade stops, and on a real sword it protects the hand. Center it on your cross line and make it about five times as long as the blade is wide. Keep the middle slim, then let both ends curve outward into a small point. Check that both ends reach the same distance from the center line.




💡 Tip: Draw the left end first, then copy each curve on the right before moving on.
Step 4: Draw the grip and the round pommel
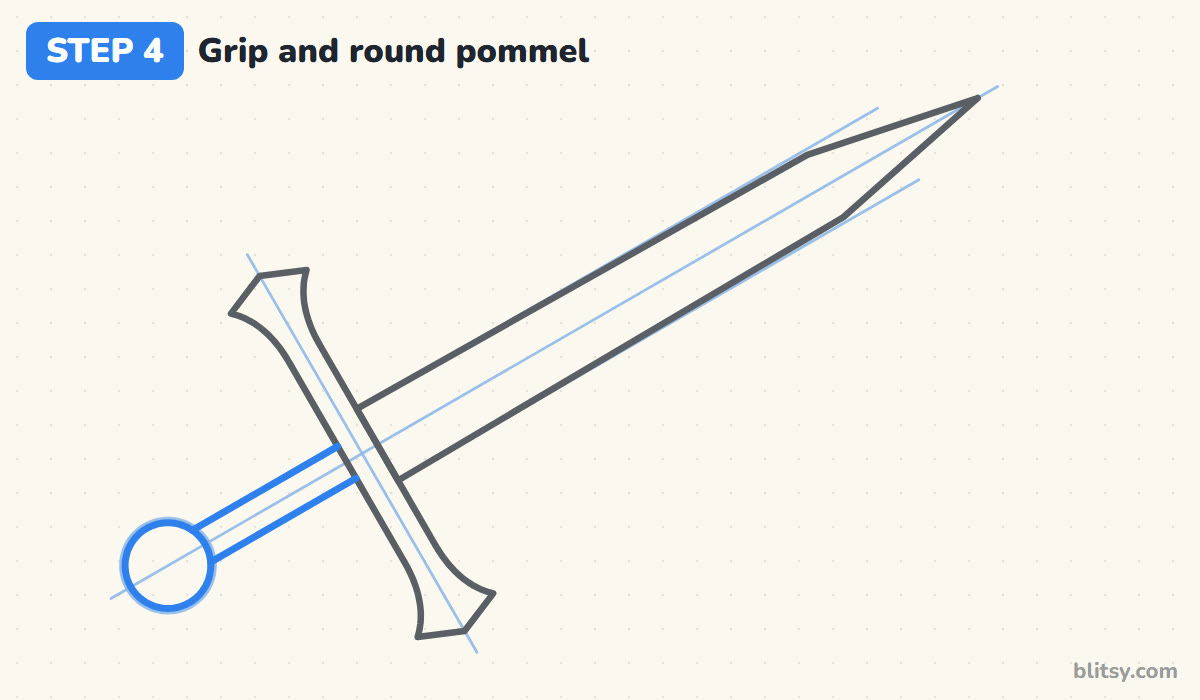
Run two short parallel lines from the crossguard down to the pommel circle, making the grip just under half as wide as the blade. A longsword's grip fits two hands, so don't squash it. Go over the circle for the pommel, the round knob that balances the heavy blade. Stop the grip lines exactly where they touch the circle.
💡 Tip: Trace a coin for the pommel; freehand circles tend to come out egg-shaped.
Step 5: Add the center ridge and the fuller
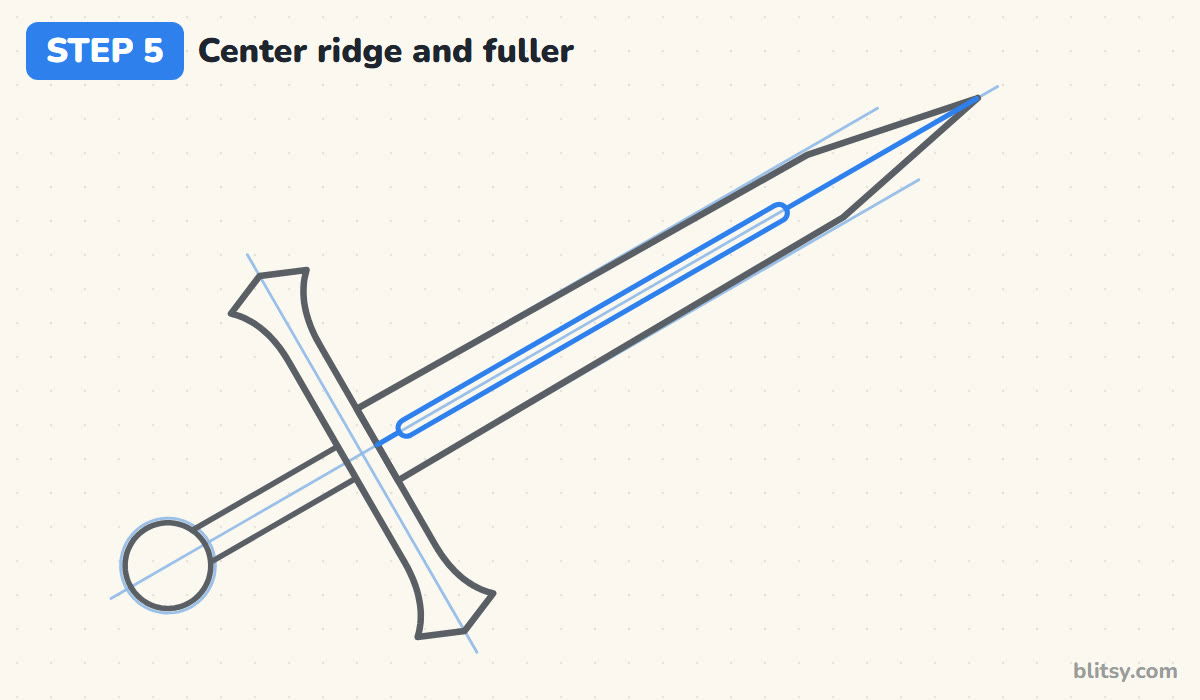
Most beginners leave the blade empty, and then it looks flat. Draw a thin ridge line down the middle from the tip. About a third of the way down, switch to a long narrow slot with rounded ends that stops just short of the crossguard. That slot is the fuller, a groove that makes the blade lighter. Add a tiny bit of ridge below it.
💡 Tip: Keep the fuller narrow; a wide one makes the blade look hollow.
Step 6: Split the crossguard and add a small jewel
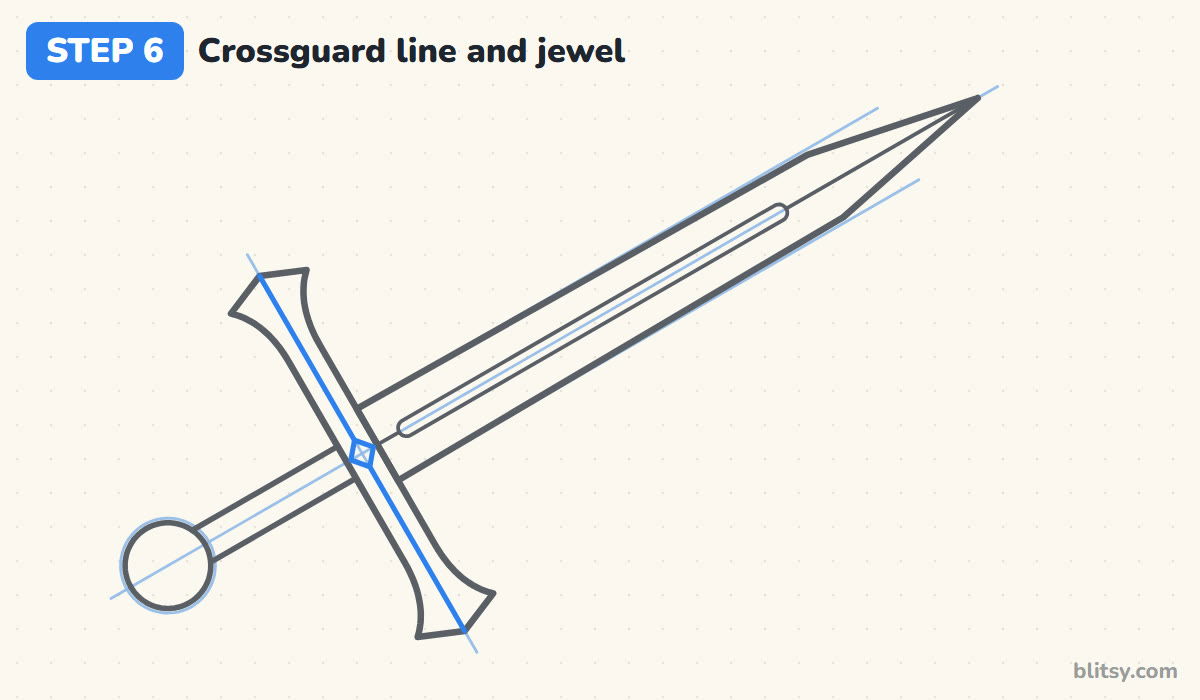
Rule a line along the middle of the crossguard, from one pointed end to the other. Where the blade meets the guard, draw a little diamond shape sitting on that line. The line is there for color later: one half of the guard will be bright gold and the other half a deeper orange gold, which makes the metal look rounded instead of flat.
💡 Tip: Stop the middle line at the edges of the jewel so it doesn't run through it.
Step 7: Wrap the grip with criss-cross bands
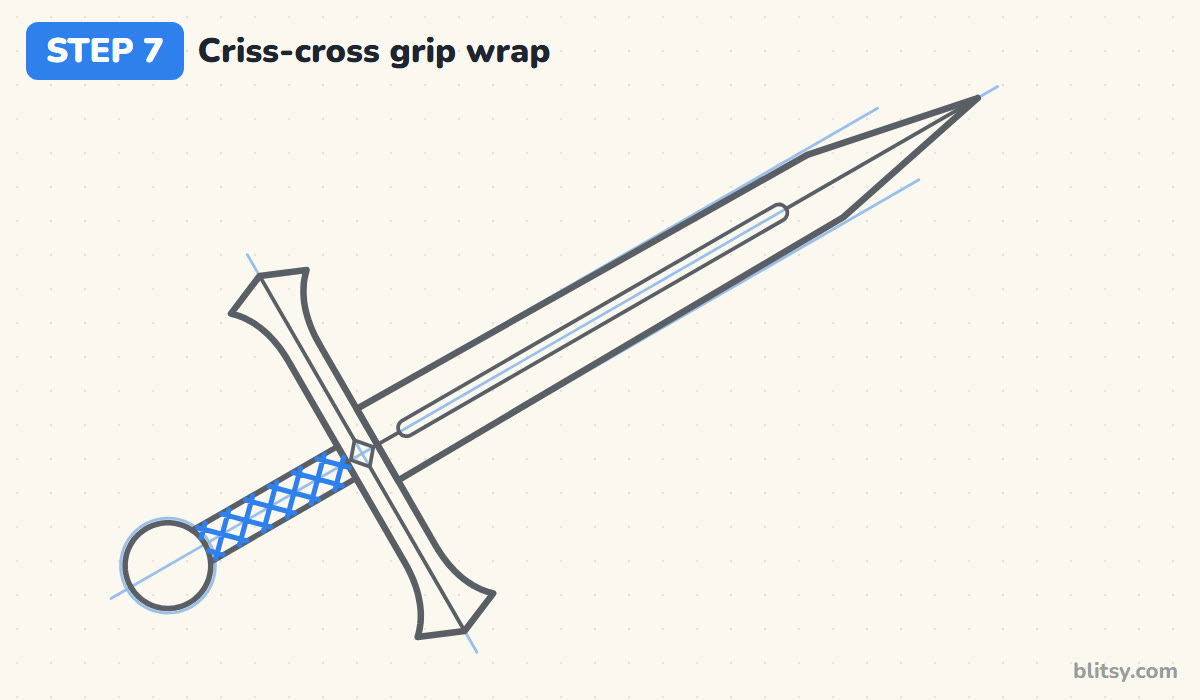
Real grips were often wrapped in leather or cord. Draw slanted lines across the grip, evenly spaced and all leaning the same way, then a second set leaning the other way so they form small diamonds. I start in the middle of the grip and work outward, which keeps the spacing even at both ends.




💡 Tip: Space the bands about as far apart as the grip is wide for neat diamonds.
Step 8: Put a gem in the pommel and glints on the blade
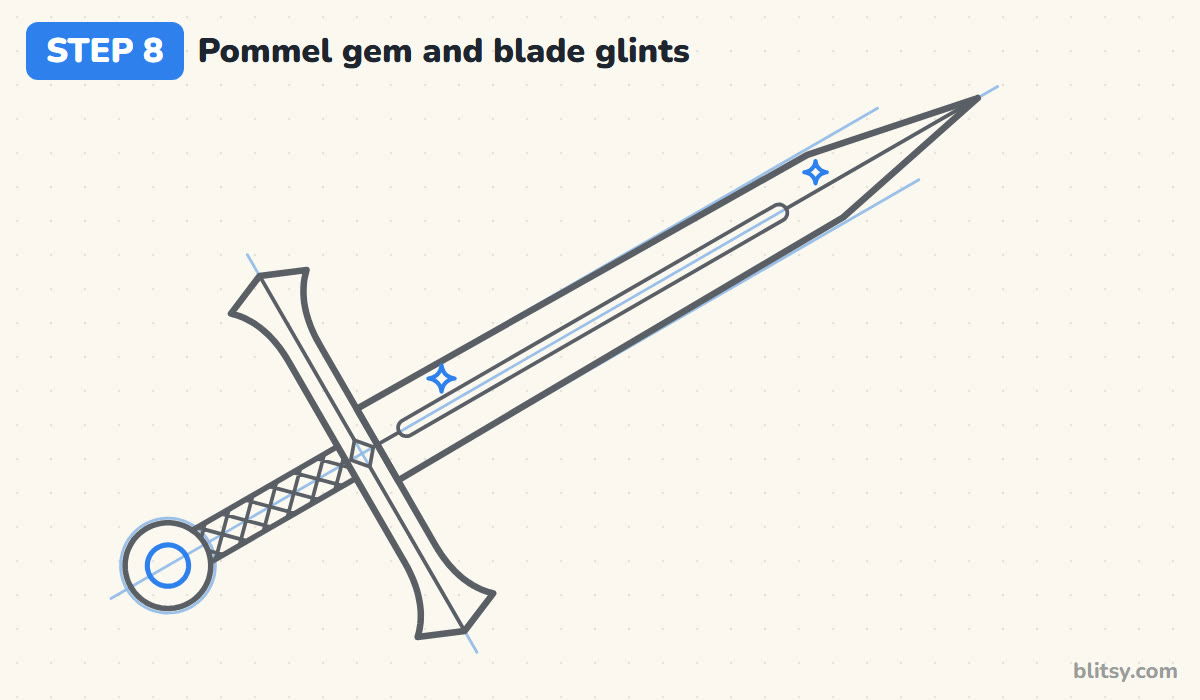
Inside the pommel, draw a circle about half as wide for the gem, centered so the gold ring stays even. Then add two tiny four-point glints on the upper half of the blade, one near the point and one near the crossguard. Glints belong on the side facing the light, so keep both on the half you'll color lightest.
💡 Tip: Curve the glint sides inward, like a pinched diamond, so they read as sparkles.
Step 9: Scatter sparkles around the sword
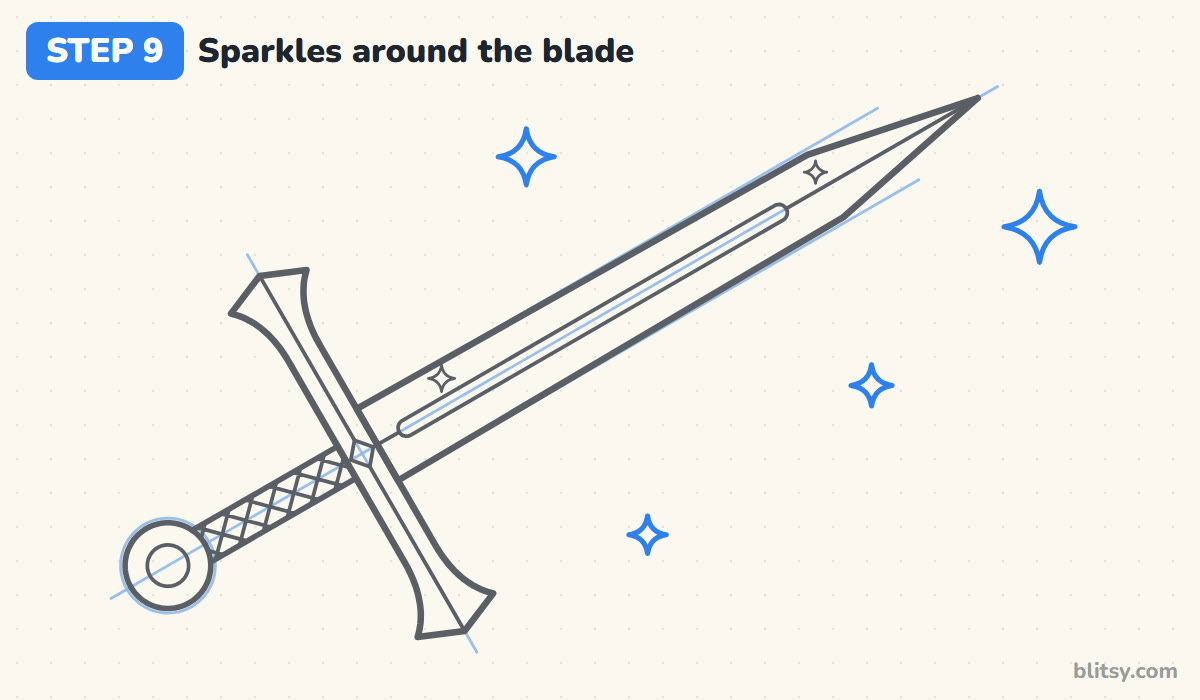
Use the empty spaces around the sword for four bigger sparkles: a large one near the point, another above the blade and two smaller ones below it. Mixed sizes look more natural than matching stars. Leave a clear gap between each sparkle and the outline so the sword stays easy to read.
💡 Tip: Draw sparkles last so you know exactly where the empty spaces are.
Step 10: Ink the sword and erase the guides
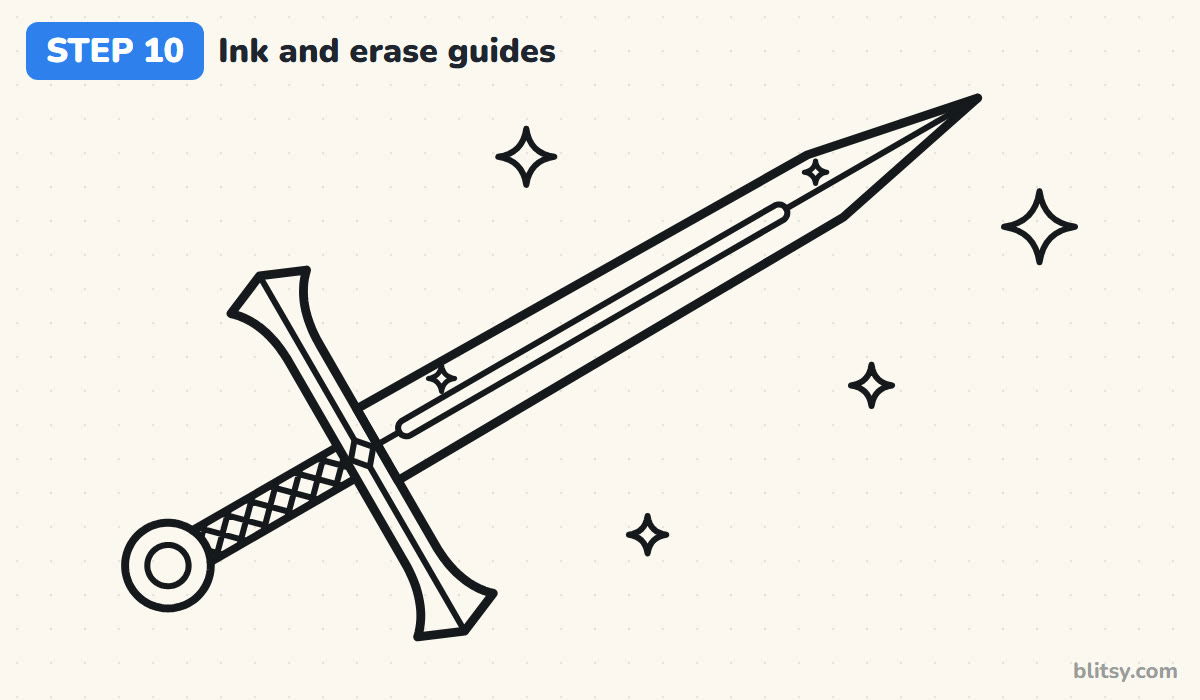
Trace every keeper line with the black pen, using the ruler again for the long blade edges. Skip the helper lines from step 1 and the width lines from step 2. When the ink has dried, gently erase all the pencil underneath.
💡 Tip: Give the ink a full minute to dry; smudged black lines are hard to fix.
Step 11: Color the steel, the gold and the leather
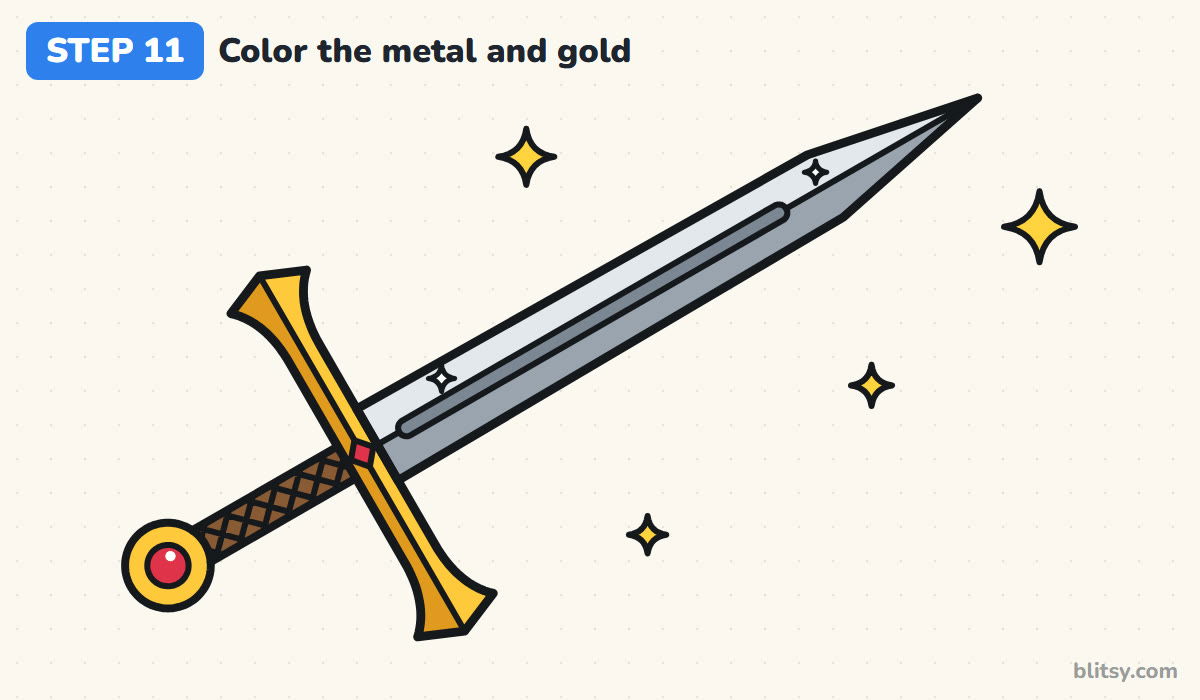
Color the upper half of the blade light gray, the lower half a darker gray and the fuller dark gray. That split turns flat shapes into polished steel. Leave the glints white and color the sparkles yellow. Make the crossguard yellow on the blade side and orange on the grip side, the pommel yellow, the grip brown and both gems red, with a white dot left on the pommel gem.




💡 Tip: Run your gray strokes along the length of the blade, never across it.
Why Sword Drawings Turn Out Bent or Lopsided
- Drawing the blade freehand. Even a small wobble shows on such a long shape. Use a ruler for the center line and both edges.
- A crossguard that sits off center. If one end is longer, the sword looks broken. Measure from the center line to each end before you draw the flares.
- A point that starts too early. Tapering from halfway up turns a longsword into a dagger. Keep the edges almost parallel until the last fifth of the blade.
- A tiny pommel. A small knob makes the hilt look weak next to a long blade. Make the circle a little more than twice as wide as the grip.
- Coloring the whole blade one gray. A single color looks like cardboard. Split it along the ridge into a light half and a dark half.
Ways to Make This Sword Yours
Once the basic longsword works, change one part at a time. A curved blade gives you a pirate cutlass, and a blue gem with a silver guard looks like an elf's sword. Little kids can skip the fuller and the wrap and still end up with a proud knight's sword. A sword needs a story, so pair it with the castle drawing tutorial or a friendly beast from the easy dragon drawing tutorial.
Free Sword Coloring Page and Step Guide PDF
Want to color on paper? The sword coloring page shows a small colored example and the colors to use at the top, with a big, bold outline below for crayons or markers. The step-by-step PDF guide holds all 11 steps and tips, two per page. Both print fine on Letter or A4 paper.
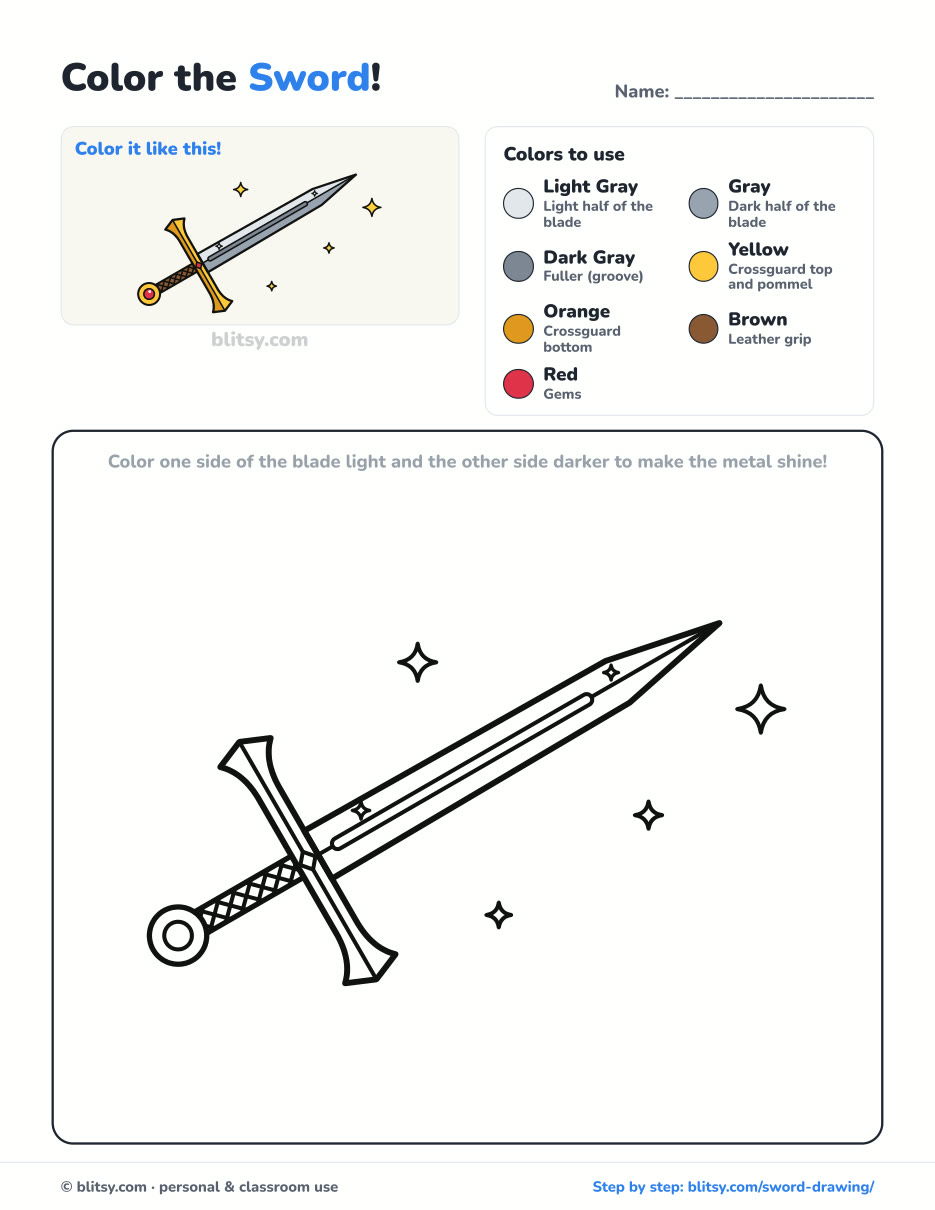
Black outlines with a colored example and the color names at the top. Ready to print and color.
⬇️ Download Coloring PageEvery step picture with its instructions and tips, to keep beside your paper while you draw.
⬇️ Download Drawing Guide📱 On a phone? Tap a download button, then open the file and choose Share → Save to Files or Print. On a computer, the PDF opens or saves straight to your Downloads folder.
Keep the Longsword Lesson on Pinterest
Sword Drawing Questions Kids Ask Me
What is the easiest way to draw a sword?
Start with one straight center line, add a short cross line for the guard and a circle for the pommel, then build the blade and hilt around them. The lines keep everything straight and even.
What are the parts of a sword called?
The long metal part is the blade, and the groove along it is the fuller. The bar across it is the crossguard, the handle is the grip and the round end is the pommel, which balances the sword.
How do I make a sword look shiny?
Color one half of the blade light gray and the other half darker, split along the center ridge. Then leave a few small glints white on the lighter half.
Is this sword drawing good for kids?
Yes. Children around 7 and up can follow it, especially with a ruler. Younger kids can leave out the fuller and the grip wrap and go straight to coloring.
Got your sword finished? Draw a shield beside it and give your knight a coat of arms of their own design. ⚔️
Related posts:
 How to Draw a Whale Step by Step (Easy for Beginners)
 How to Draw Lungs Step by Step (Easy Science Diagram)
 How to Draw a Pineapple Step by Step (Easy Crown and Slice)
 How to Draw Iron Man Step by Step (Easy Chibi for Kids)
 How to Draw a Dress Step by Step (Easy Party Dress)
 How to Draw a Chicken Step by Step (Easy for Beginners)
 How to Draw a UFO Step by Step (Cute Alien Saucer)
 How to Draw Flames Step by Step (Easy Campfire Drawing)
 How to Draw a Moon Step by Step (Sleepy Crescent + Phases)
 How to Draw a Sunflower Step by Step (Big and Bright)
 How to Draw a Heart Step by Step (Even, Symmetric Shape)
 How to Draw a Jellyfish Step by Step (Cute, Easy Guide)

