
A single feather looks delicate, yet it hides a very simple plan: one curved line down the middle and a leaf shape wrapped around it. In this lesson you'll learn how to draw a feather step by step, starting with that line and ending with a big teal-blue feather and a smaller orange one lying beside it. I teach feathers to complete beginners because nothing here has to be perfect. A wobble in the edge just looks like a real feather that has been through some weather.
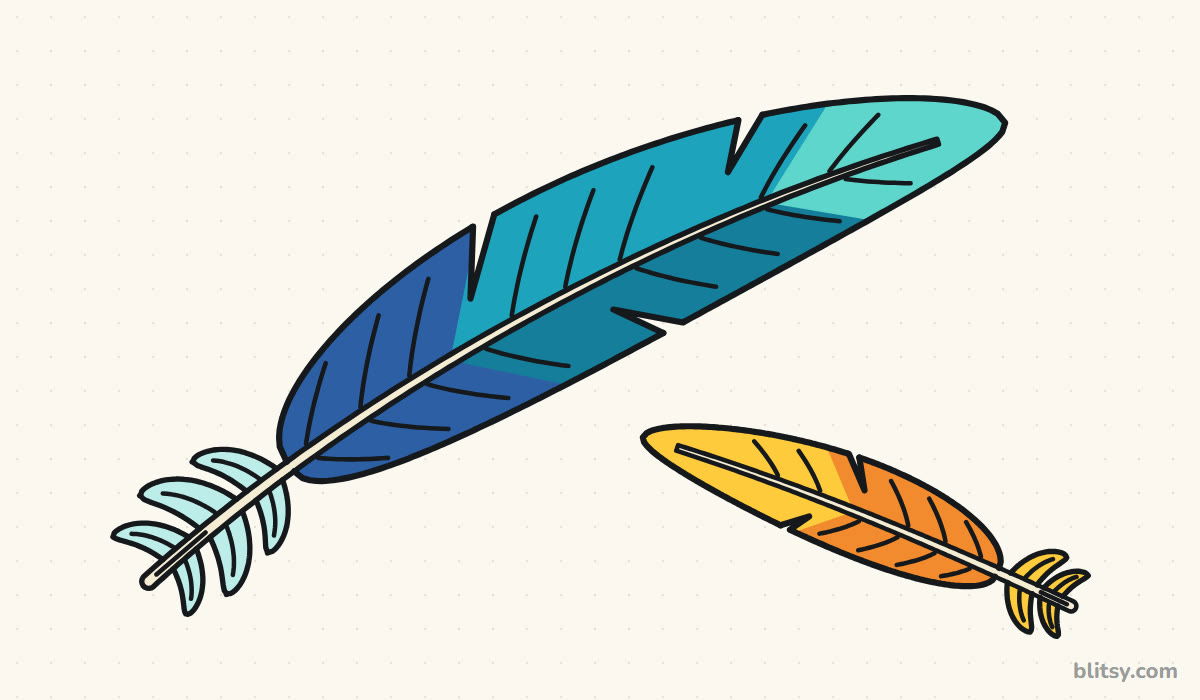
In each step picture, the lines you add right now are bright blue. Gray means you drew it in an earlier step. Pale blue curves and leaf shapes are helpers, so sketch them very lightly; the eraser takes them away in step 10.
Quick overview
⏱️ Time: about 25 to 35 minutes with coloring
🎯 Level: easy, good for kids from about 6 up
✏️ Steps: 12
🪶 You'll draw: a large teal-blue feather and a small orange-to-yellow feather
Supplies for a Soft Feather Sketch
- An HB pencil, sharpened
- A soft eraser
- A black fineliner or felt-tip pen
- Colored pencils or markers: dark blue, teal, dark teal, turquoise, light aqua, cream, orange and yellow
- Plain paper, turned sideways
If you only have one blue and one orange, that's fine; the bands just become a single color.
How to Draw a Feather Step by Step
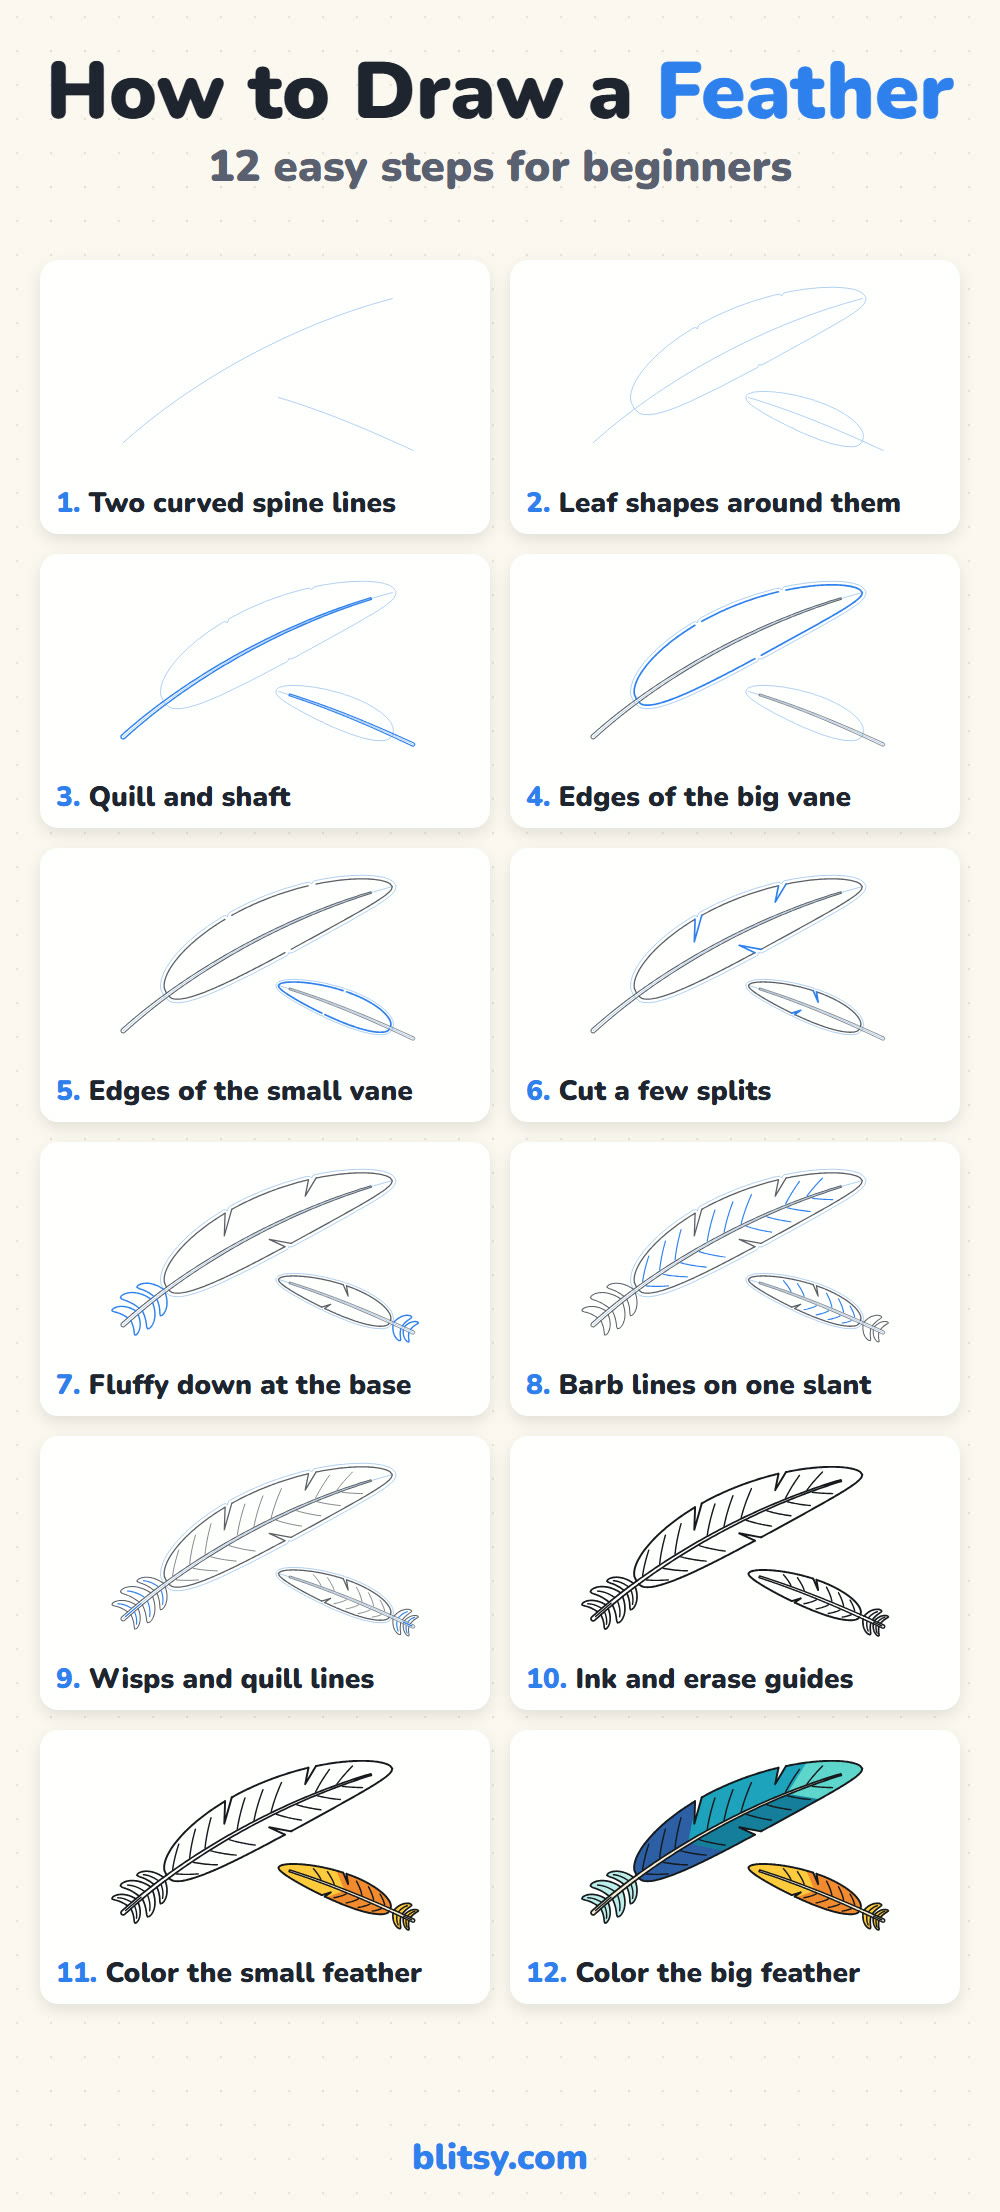
Step 1: Sketch two curved spine lines
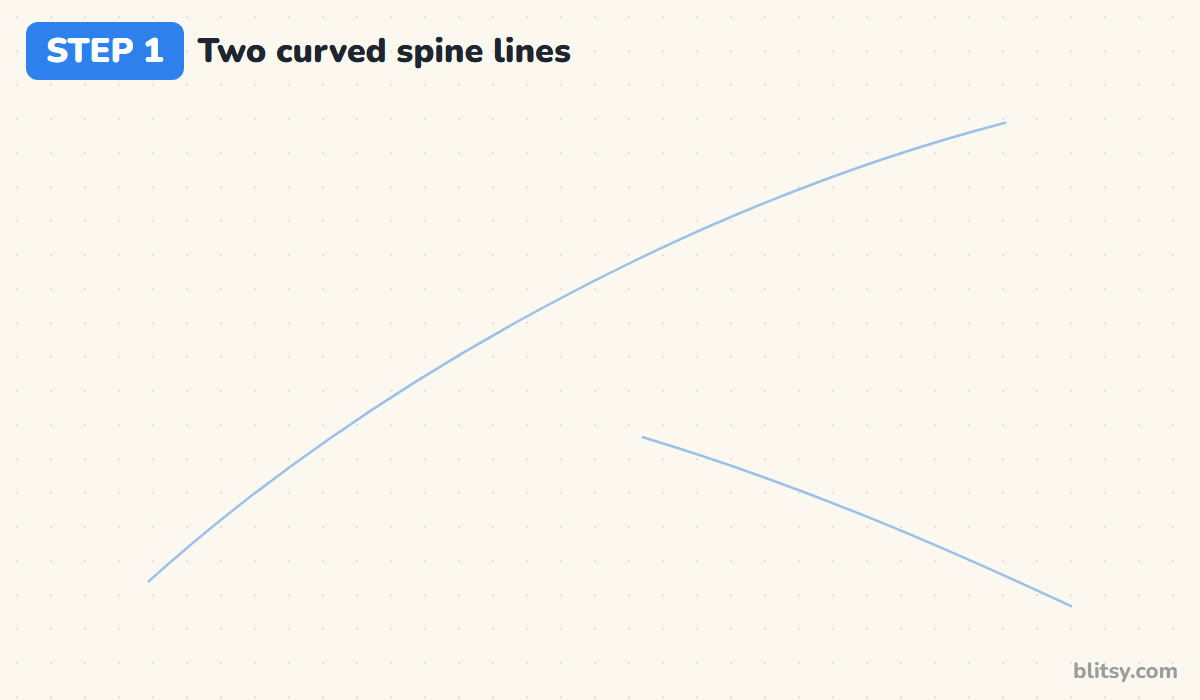
Turn the paper sideways. Draw one long, gently curved line from the lower left corner area up toward the top right, bending slightly like a stretched bow. Below it on the right, add a shorter line that slants the other way. These are the spines of the two feathers, and every later shape hangs from them.
💡 Tip: Swing from your elbow, not your wrist, for a smooth curve.
Step 2: Wrap a leaf shape around each spine
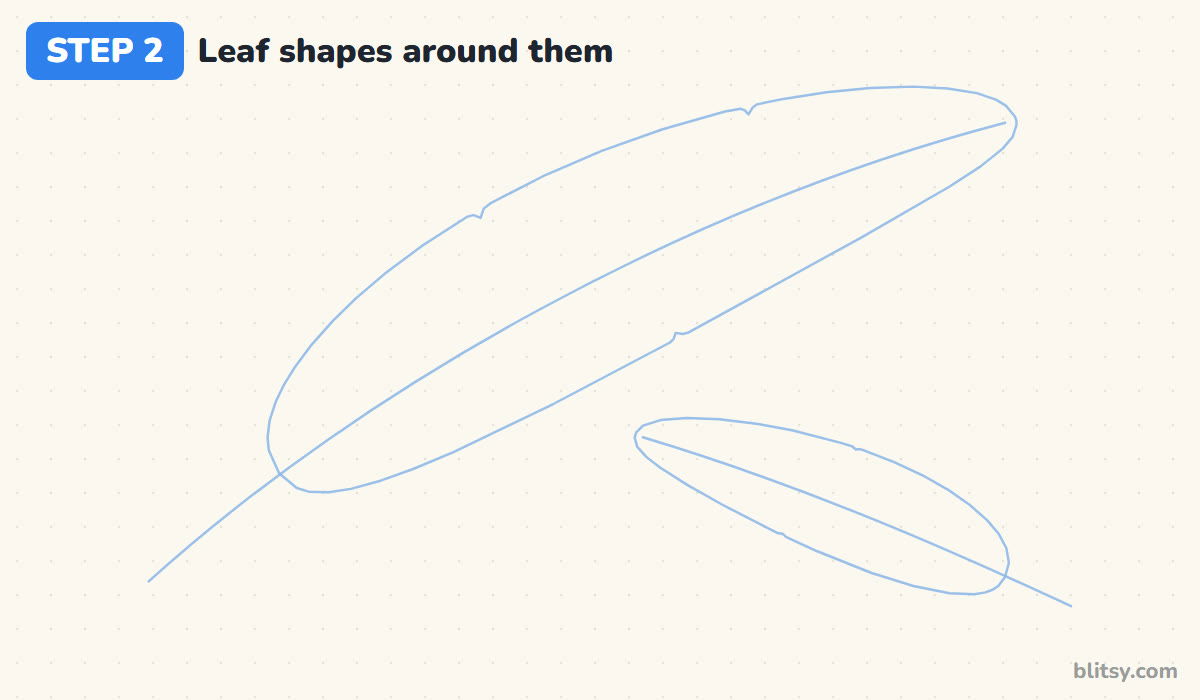
Around the top two thirds of the long line, sketch a long leaf shape that comes to a point near the end of the spine. Make the upper side a bit wider than the lower side. Real flight feathers are lopsided like this, and that small difference is what stops your drawing from looking like a plain leaf. Do the same, smaller, around the short line.
💡 Tip: Leave the bottom third of each spine bare. That's where the quill and the fluff go.
Step 3: Draw the quill and the shaft
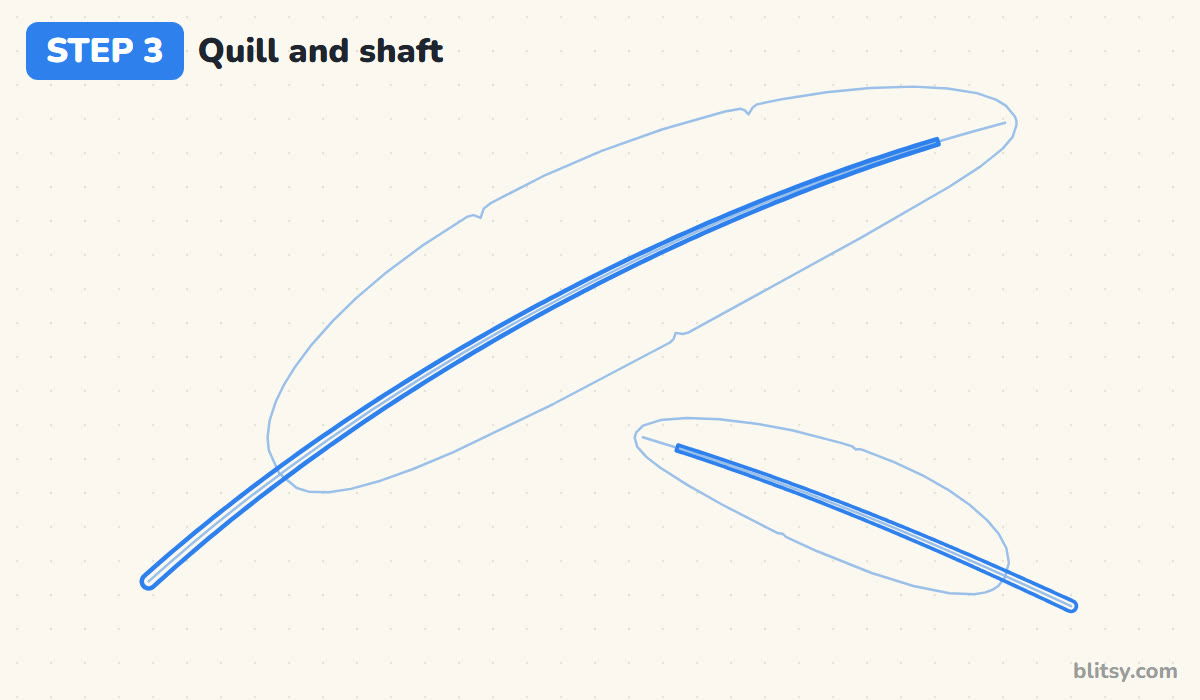
Go over each spine with two close lines to turn it into a thin tube. I make it widest at the bottom, where the quill ends in a small rounded tip, and let the two lines creep closer together as they travel up. Stop the shaft a little before the point of the leaf shape.



💡 Tip: If your two shaft lines touch too early, the tip turns into a black stick once you ink it.
Step 4: Trace the edges of the big vane
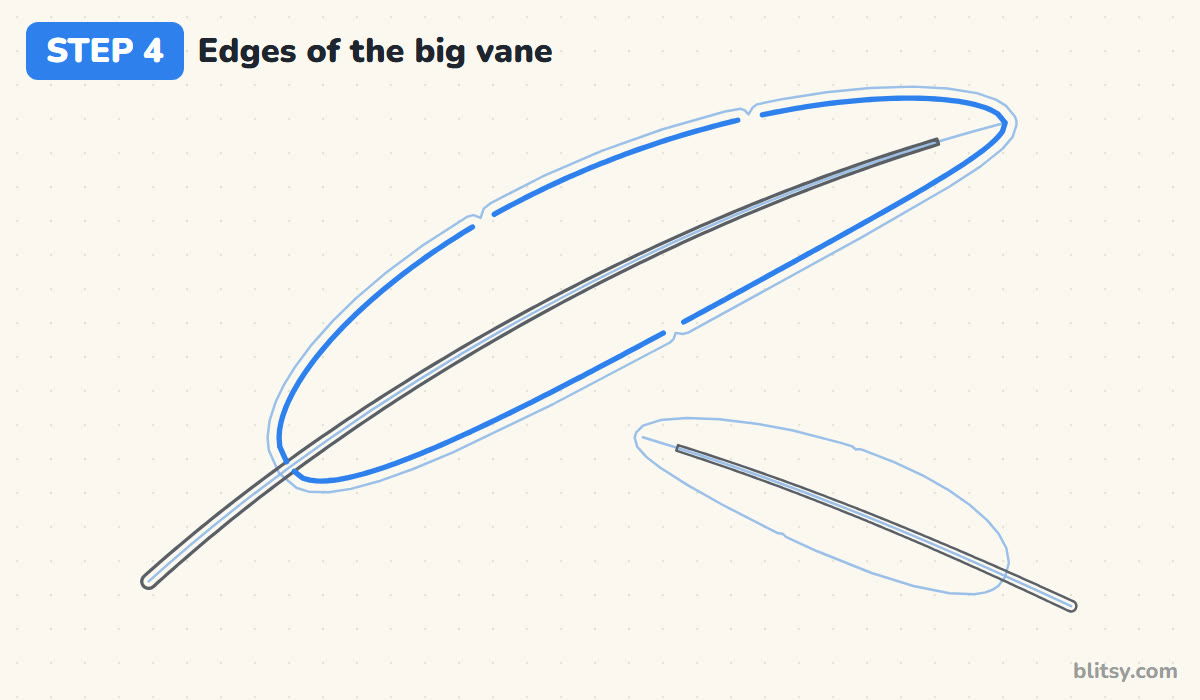
The flat part of a feather is called the vane. Trace over the big leaf guide with a firmer line, starting where it meets the shaft and curving out to the rounded tip. Leave three tiny gaps along the edge, two on the top and one underneath. Those gaps mark where the splits will cut in during step 6.
💡 Tip: Draw each side of the vane in one go, from the shaft toward the tip.
Step 5: Trace the edges of the small vane
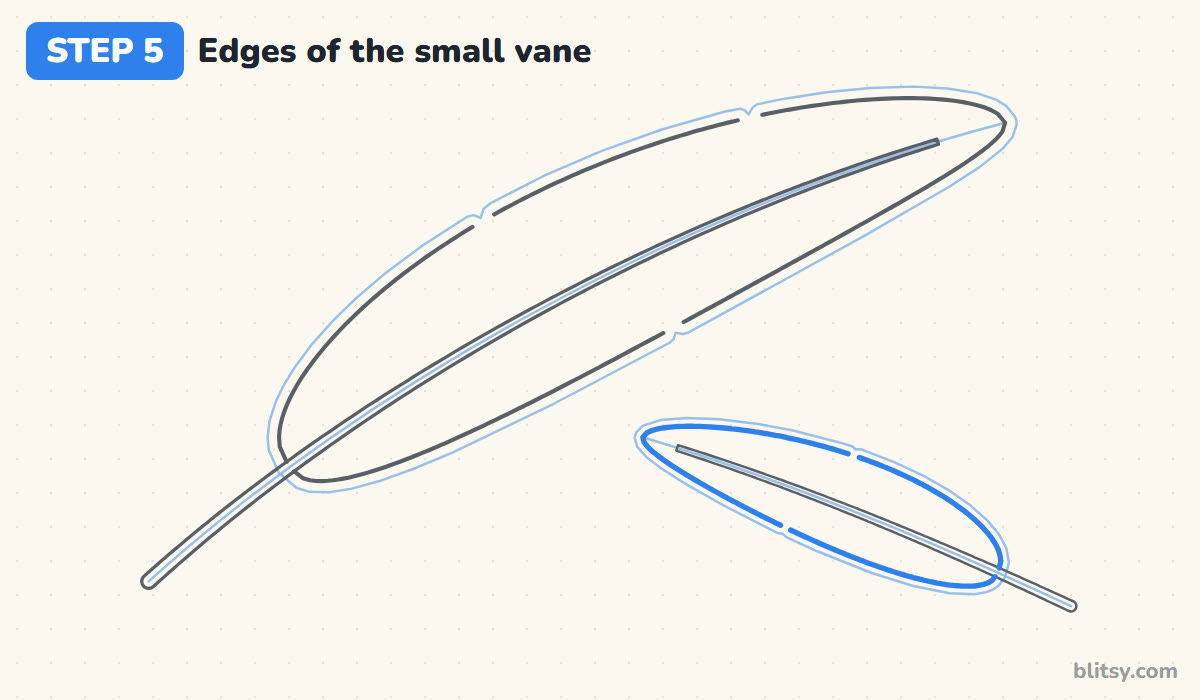
Now outline the small feather the same way. Here the wider side faces up toward the big feather, so the pair looks like it fell from two different birds. Leave two small gaps this time, one on each side. Keep the tip nicely rounded rather than sharp.
💡 Tip: Rotate the paper so the small feather points away from your drawing hand.
Step 6: Cut a few splits into the vanes
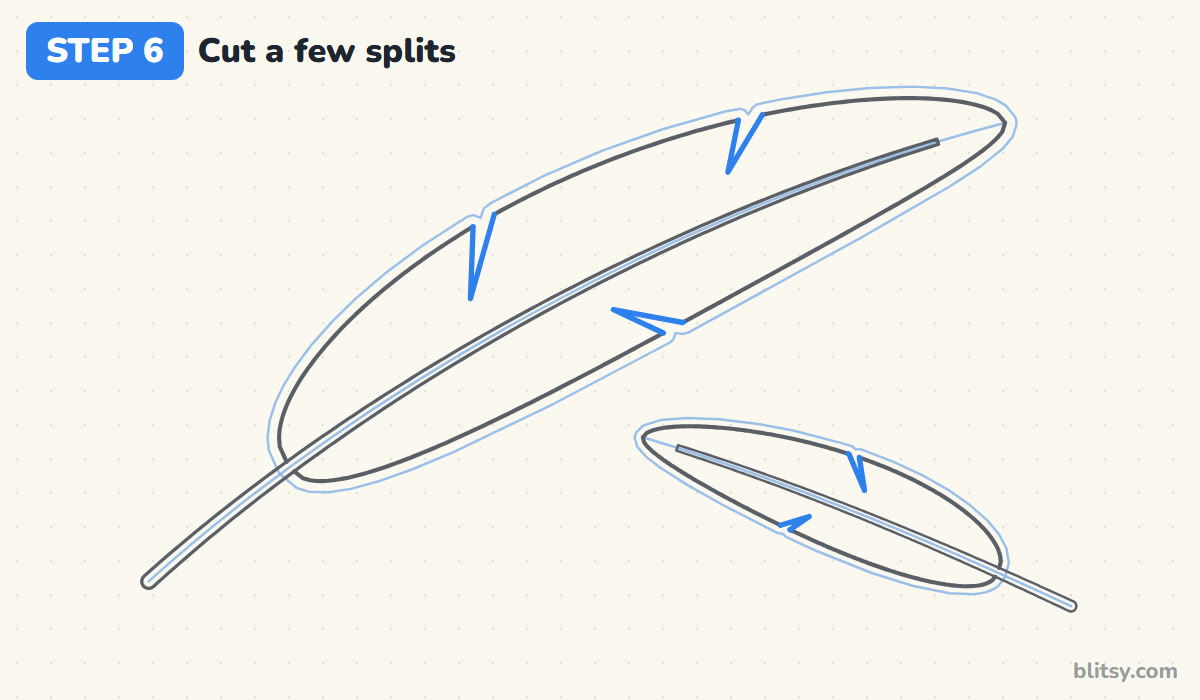
At each gap, draw a narrow V that points into the vane and leans back toward the quill. Push it about halfway to the shaft, never all the way. This is my favorite step. Splits happen on real feathers when the tiny hooks holding the barbs together let go, and adding just a few makes your drawing look natural instead of cut from plastic.
💡 Tip: Three splits on a big feather is plenty. Ten looks like it was chewed.
Step 7: Add fluffy down at the base
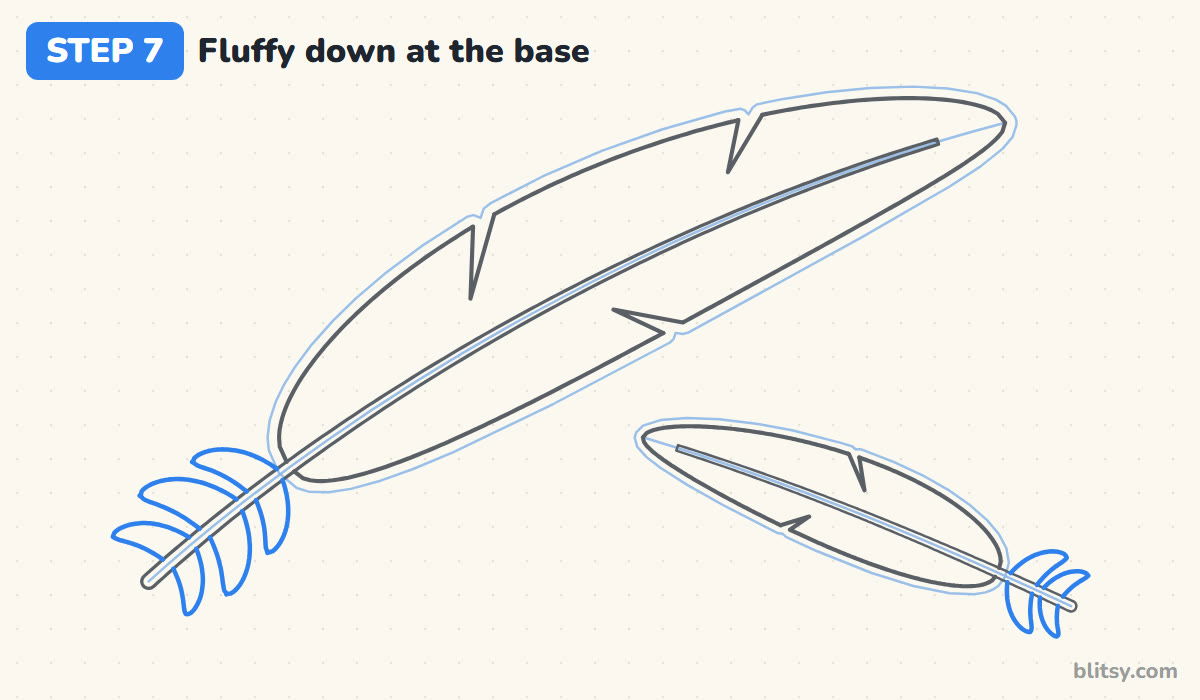
Just below each vane, on both sides of the quill, draw a few soft tufts shaped like curved bananas with round ends. Let them sweep back toward the quill tip. This loose fluff is called down, and it grows on most body and flight feathers. Make the tufts uneven in length; identical ones look like a comb.

💡 Tip: Keep a light, quick hand on the down so it stays airy.
Step 8: Draw barb lines on one slant
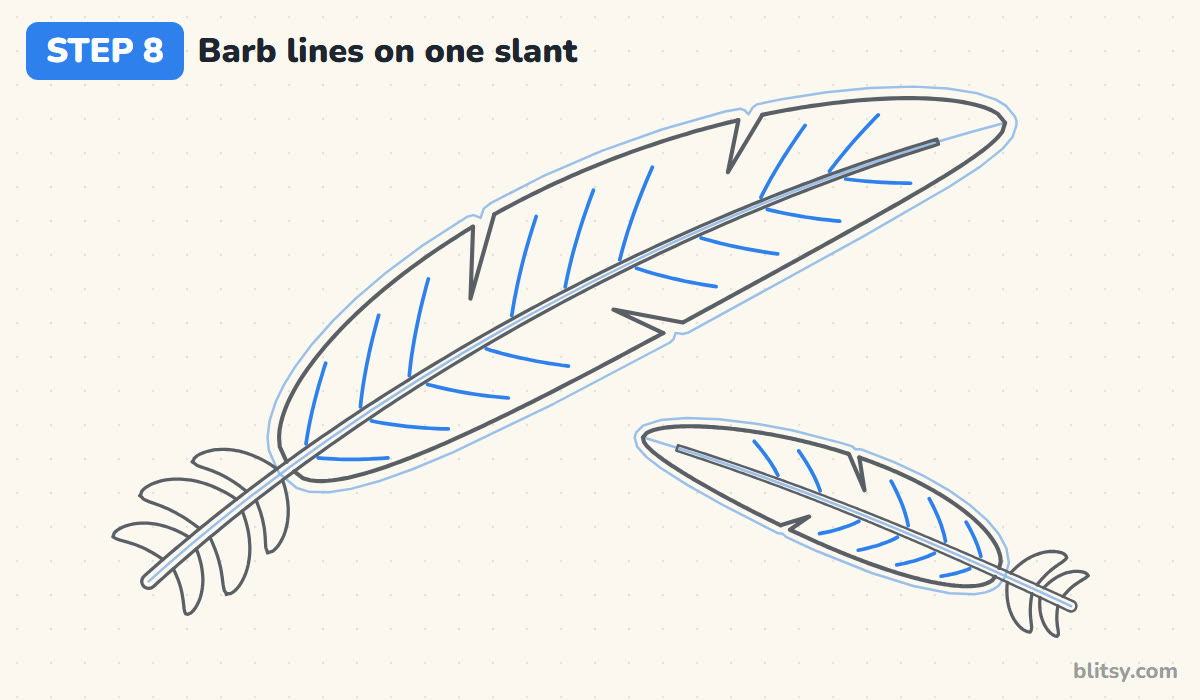
Barbs are the thin strands that make up the vane. Draw a short line from the shaft out toward the edge, slanting forward toward the tip, and stop before it touches the outline. Repeat along both sides, spacing them evenly and skipping the split areas. The one rule I'm strict about: every barb line leans the same way.
💡 Tip: Before each barb, glance at the one you drew last and copy its angle.
Step 9: Add wisps and quill lines
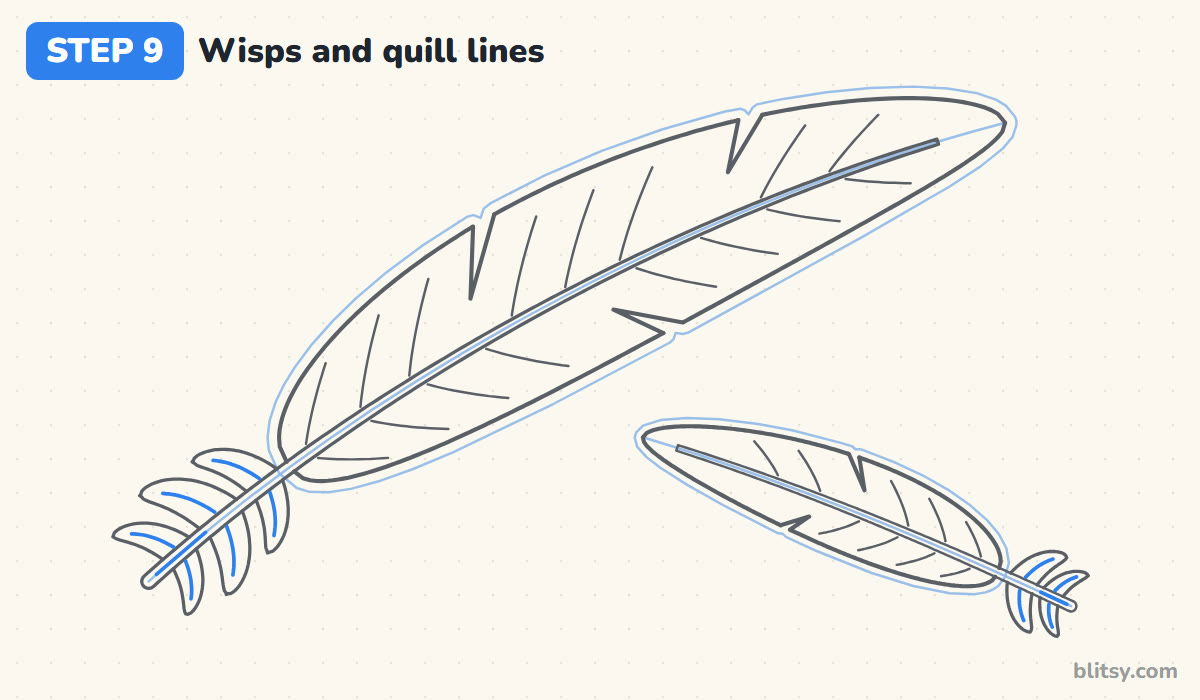
Inside each down tuft, draw one thin curved line down its middle. It splits the tuft into strands and makes it look softer. Then add a short line inside the bottom of the big quill, which hints that it's hollow. These lines are small, so use the sharpest part of your pencil.
💡 Tip: Stop each wisp line before the end of its tuft so the edge stays soft.
Step 10: Ink the lines and erase the guides
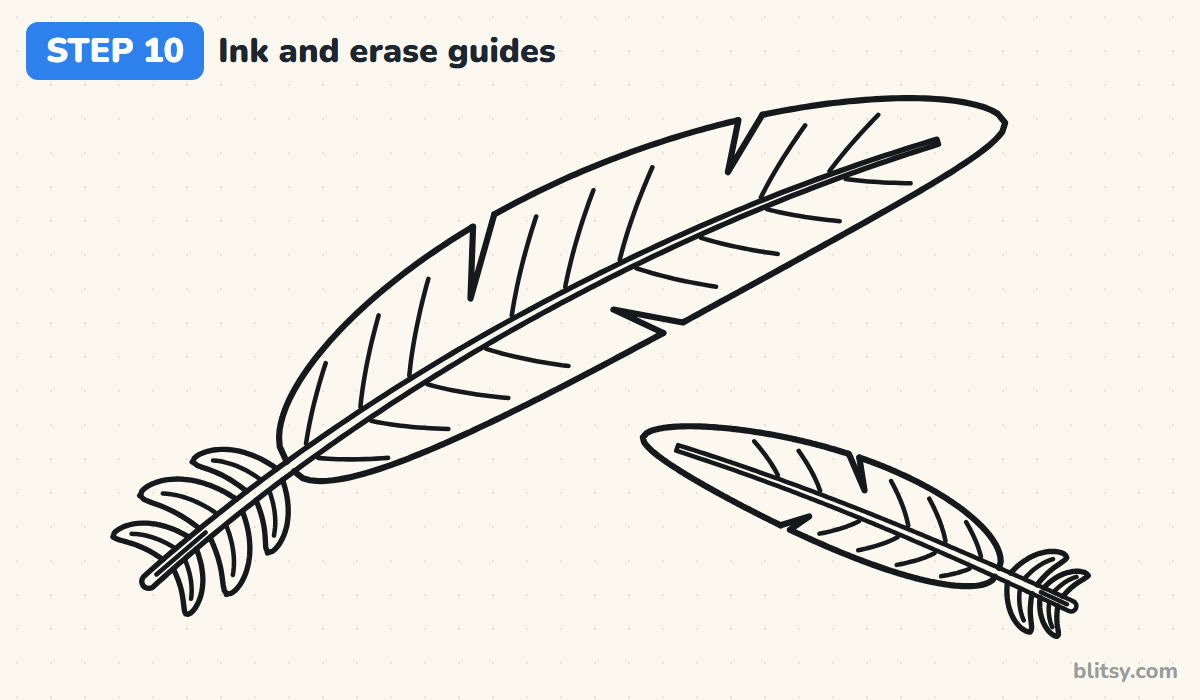
Trace every line you want to keep with the black pen. My order is shaft, vane edges, splits, down, barbs and wisps. Skip the pale spine curves and leaf guides. Wait a minute for the ink to dry, then erase all the pencil so only the clean black outline stays on the paper.
💡 Tip: Ink the long vane edges first, while your hand is still fresh and steady.
Step 11: Color the small feather
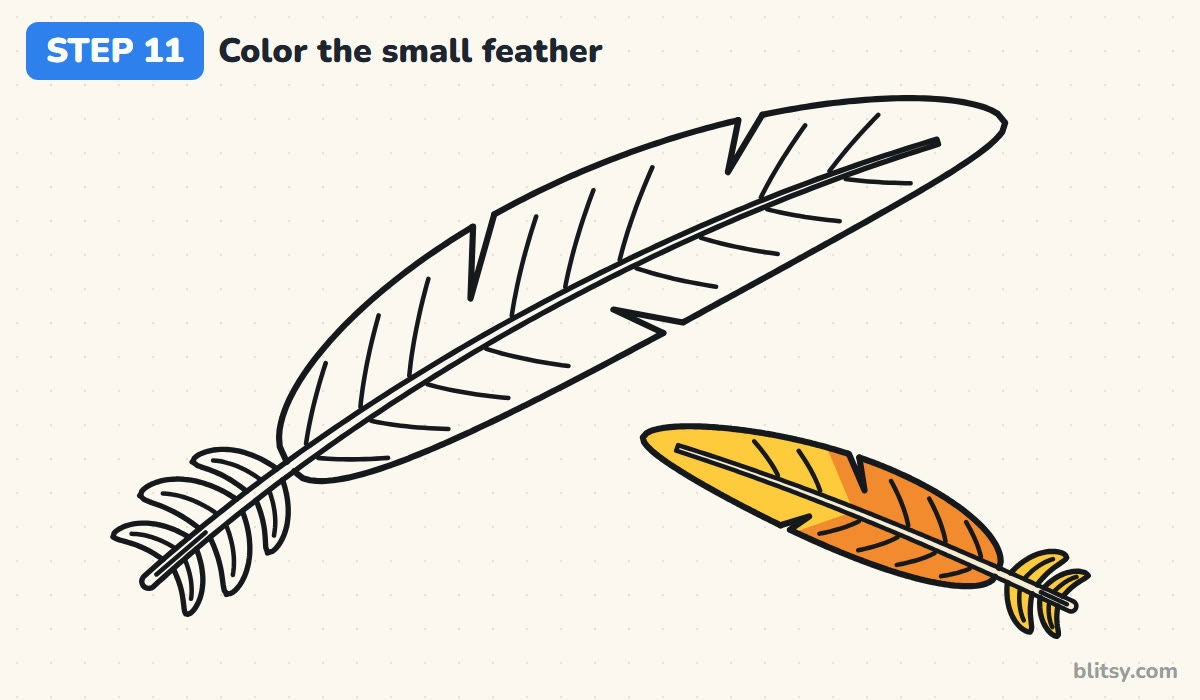
I start with the small feather because it's quicker and warms me up for the big one. Color the base and middle of the vane orange and the tip yellow, with the change in color slanting like the barbs. Use yellow for the fluffy down too, and a soft cream for the shaft.
💡 Tip: Color in the same direction as the barbs and the strokes blend right in.
Step 12: Color the big feather
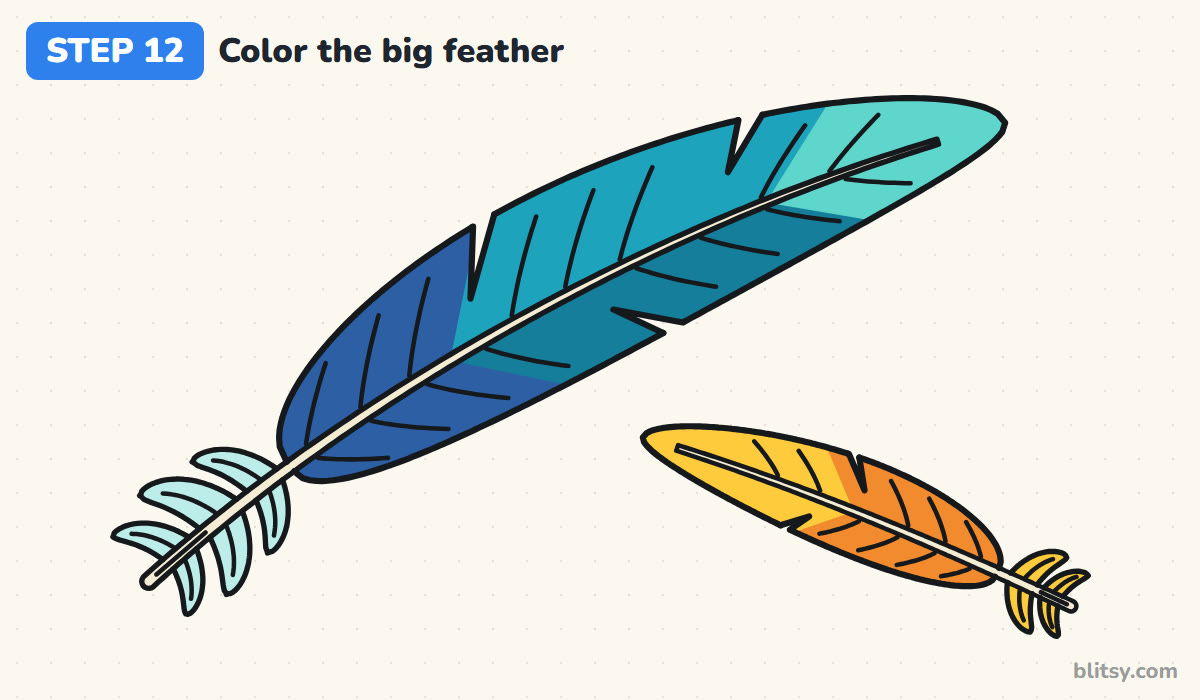
Fill the wide upper side of the big vane with teal and the narrow lower side with dark teal. That darker side quietly makes the feather look curved. Then go over the base in dark blue and the tip in turquoise, again with slanted edges between the bands. Finish with light aqua down and a cream shaft.
💡 Tip: Leave a hair of white between each barb line and the color if you like a crisp look.
Little Slips That Make a Feather Look Like a Leaf
- A perfectly even vane. Equal sides read as a leaf. Make one side of the vane a little wider.
- Barbs that point every which way. Mixed angles look messy. Slant all of them toward the tip.
- Barbs that touch the edge. Stopping each line short keeps the outline clean and the vane soft.
- A thick, straight shaft. A stiff rod looks like a stick. Curve it gently and let it thin out toward the tip.
- Splits cut all the way to the shaft. Deep cuts break the feather in two. Stop each V about halfway in.
New Twists for Your Feather Drawing
Once the pair feels easy, try a single feather standing upright with a long ribbon of down, or a peacock-style feather with a round eye spot near the tip. A ring of feathers around a circle turns into a dreamcatcher, and three feathers tied with string make a nice bookmark design. Small children can skip the splits and the wisps and still end up with a clear feather. If eye-spot feathers are your favorite, the peacock drawing tutorial shows the whole bird with its tail open, and the easy bird drawing tutorial is a good next step for putting feathers on wings.
Two-Feather Coloring Page and Step Guide PDF
Want to color without drawing first? Print the free feather coloring page. At the top you'll find a small colored example and a key with each color word and the part it belongs to, and below sits the big outline ready for pencils or markers. The PDF drawing guide collects all 12 steps with their tips, and it prints on Letter or A4 paper.
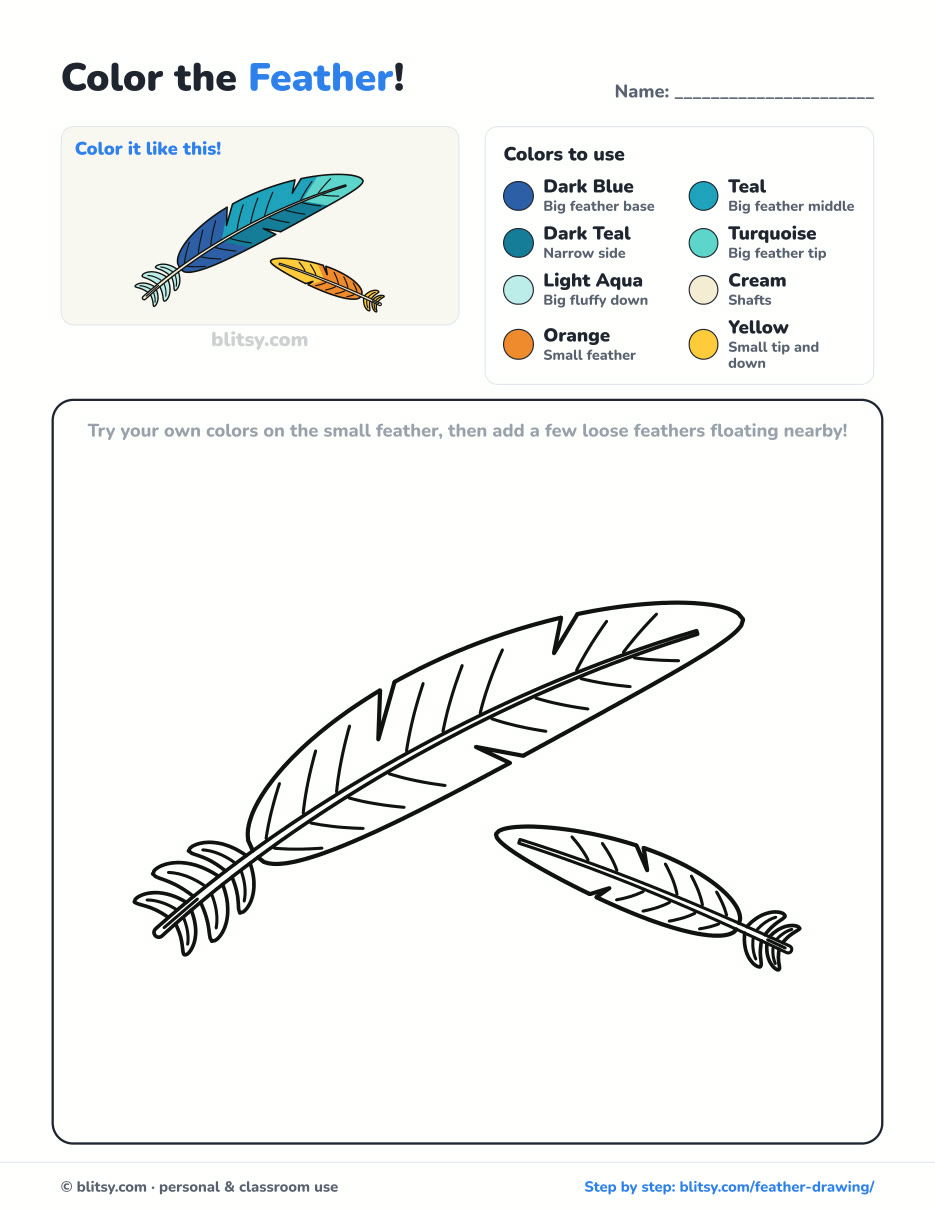
Black outlines with a colored example and the color names at the top. Ready to print and color.
⬇️ Download Coloring PageEvery step picture with its instructions and tips, to keep beside your paper while you draw.
⬇️ Download Drawing Guide📱 On a phone? Tap a download button, then open the file and choose Share → Save to Files or Print. On a computer, the PDF opens or saves straight to your Downloads folder.
A Feather Cheat Sheet for Pinterest
Masks, Clothes and More to Draw After Feathers
Each link below is a step-by-step tutorial for one subject, and a few of them, like the mask, use feathers too.
- Suit Drawing: The suit drawing tutorial draws a navy jacket, trousers and a red striped tie.
- Mask Drawing: A purple masquerade mask with three feathers is the goal of this how to draw a mask guide.
- Chalk Art: Draw hopscotch, a rainbow and a sun on the pavement with the chalk art tutorial.
- Shirt Drawing: Learn how to draw a shirt step by step, with a T-shirt and a plaid button-up side by side.
- Realistic Drawing: The realistic drawing tutorial shades a shiny apple under one lamp.
- Hoodie Drawing: Draw the front and back of one sage hoodie in the hoodie drawing tutorial.
- Dress Drawing: A twirly party dress and a sundress on a hanger fill this dress drawing step by step lesson.
- Shoe Drawing: The sneaker drawing tutorial draws a red high-top and a low-top facing the other way.
- Family Drawing: Four people, a puppy and a red balloon come from simple shapes in the family drawing tutorial.
Feather Questions Beginners Often Ask
What is the easiest way to draw a feather?
Draw one curved line, wrap a long leaf shape around its top part, and add slanted lines from the middle out to the edge. A couple of small V cuts in the edge make it look real.
How do you draw a feather for kids?
Keep it to a curved line, a leaf shape and a few slanted lines, then color it in bright bands. The fluffy down and the splits can wait until the basic shape feels easy.
How long does it take to draw a feather?
Around 25 to 35 minutes for both feathers with inking and coloring. One feather alone takes about half that.
Which way do the lines on a feather go?
The barbs start at the shaft and slant forward toward the tip, on both sides. Keeping them all at the same angle matters more than how many you draw.
Pick up the next feather you find on a walk and turn it over in your hand; you'll spot the same shaft, splits and slanting barbs you just drew. 🪶
Related posts:
 How to Draw a Car Step by Step (Easy Drawing for Beginners)
 How to Draw a Whale Step by Step (Easy for Beginners)
 How to Draw a Rat Step by Step (Easy for Beginners)
 How to Draw an Arctic Fox Step by Step (Easy for Beginners)
 How to Draw a Lion Step by Step (Easy for Beginners)
 How to Draw a Ladybug Step by Step (Easy for Beginners)
 How to Draw a Dog Step by Step (Easy Side View for Beginners)
 How to Draw a Butterfly Step by Step (Easy for Beginners)
 How to Draw a Leopard Step by Step (Easy for Beginners)
 How to Draw a Light Bulb Step by Step (Easy for Beginners)
 How to Draw a Crow Step by Step (Easy for Beginners)
 How to Draw an Eagle Step by Step (Easy for Beginners)

