
Monsters are the one drawing subject where nothing can look wrong, because nobody knows what a monster is supposed to look like. Here I'll walk you through how to draw a monster step by step, from a plain oval to a fluffy purple fur ball with one giant eye and a grin full of tiny fangs. The real lesson hiding inside it is simple: every monster is just shapes and features mixed together. Once you see that, you can invent a new one every day.
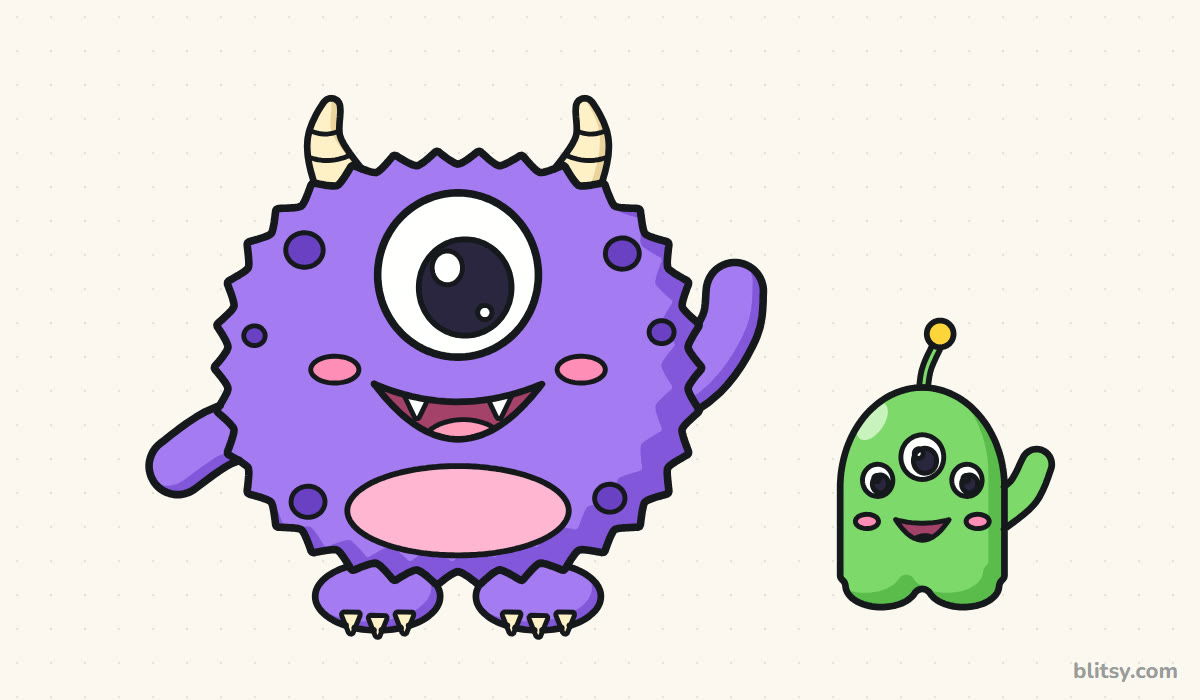
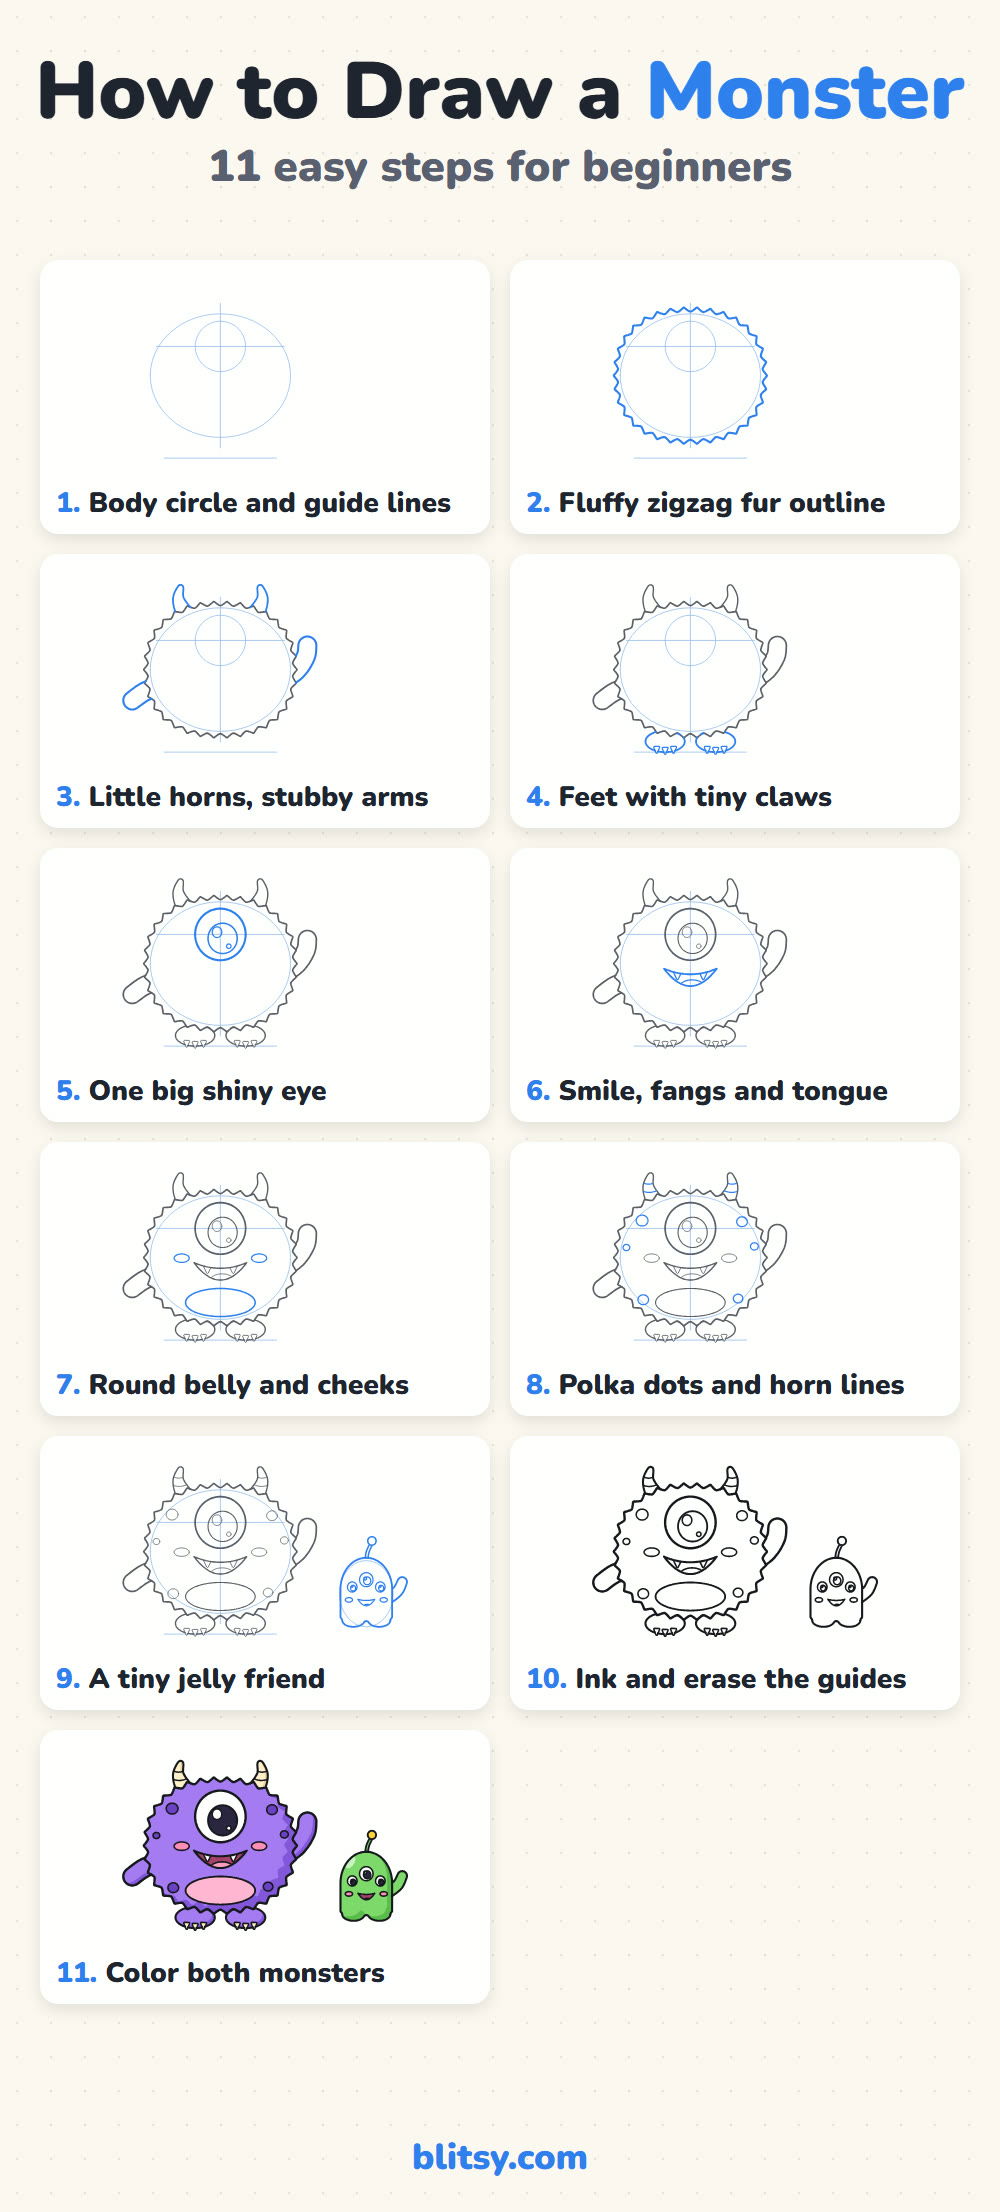
Whatever you add in a step glows bright blue in its picture. Anything you drew before turns gray, and the soft pale blue helper shapes hang around until step 10, when we erase them.
Quick overview
⏱️ Time: roughly 20 to 30 minutes, coloring included
🎯 Level: easy, good for kids from about 6
✏️ Steps: 11
👾 You'll draw: a fluffy one-eyed monster with horns and fangs, plus a small green friend
Monster-Making Supplies on the Table
- A pencil with a soft touch (HB or 2B)
- An eraser that rubs out cleanly
- A black marker or fine felt-tip for the final lines
- Colored pencils or markers: purple, dark purple, pink, cream or pale yellow, black, dark pink, green and yellow
- A sheet of plain paper turned sideways, so the friend has room
Any colors work here; a monster painted orange and blue is just as much a monster.
How to Draw a Monster Step by Step
Step 1: Sketch a body oval and guide lines
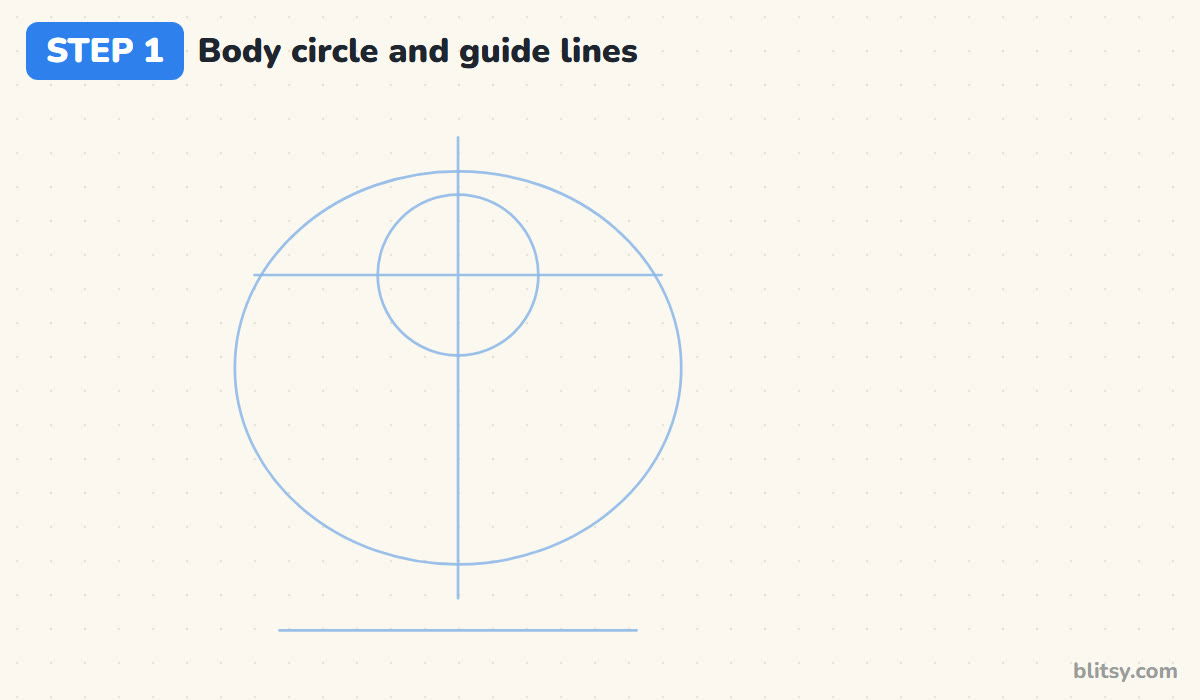
Draw a big oval, a bit wider than it is tall, on the left half of the page. Add a vertical line down its middle and a crossing line about a third of the way down; that's where the eye will sit. Center a circle on that crossing for the eye, then draw a flat line below the oval where the feet will stand.
💡 Tip: Keep your pencil loose and light. Nothing from this step will survive to the end.
Step 2: Turn the oval into a fluffy fur outline
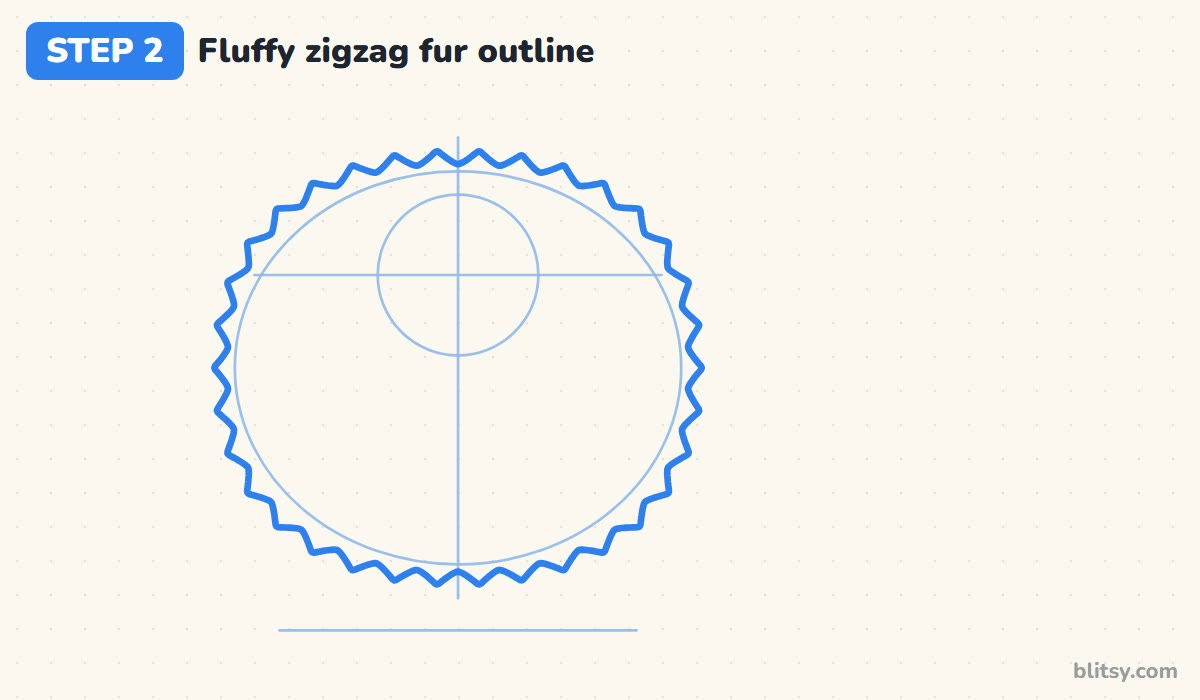
Now go around the oval with small zigzag tufts, sitting just outside the guide line. I make each tuft about as wide as a fingertip and keep them roughly the same size all the way round. That even rhythm is what reads as soft fur. Big, uneven spikes look like a cactus or a burst balloon instead.
💡 Tip: Turn the paper as you go, so your hand always zigzags in its most comfortable direction.
Step 3: Add little horns and stubby arms
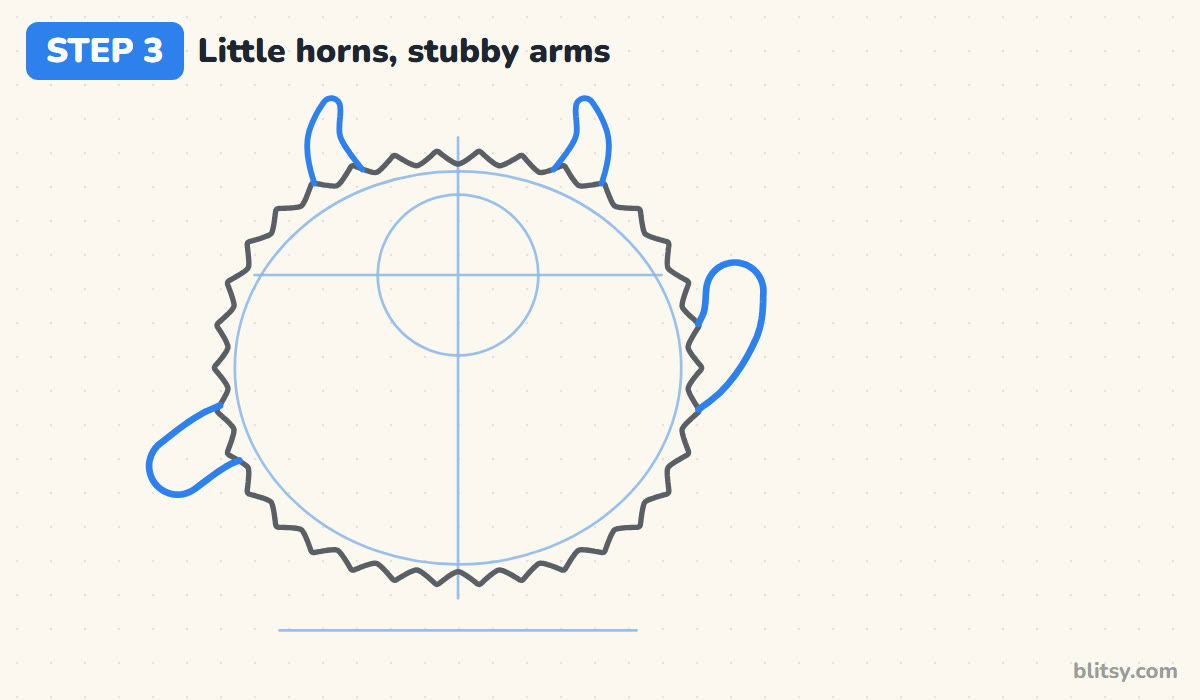
On top, draw two short curved horns that bend slightly toward each other. Only their upper part shows, because they disappear behind the fur. For the arms, let one reach out sideways near the bottom and lift the other one up as if it's waving hello. Both are just thick rounded tubes; no fingers needed.


💡 Tip: Stop each arm line right where it meets the fur, and the arm looks tucked behind it.
Step 4: Draw the feet with tiny claws
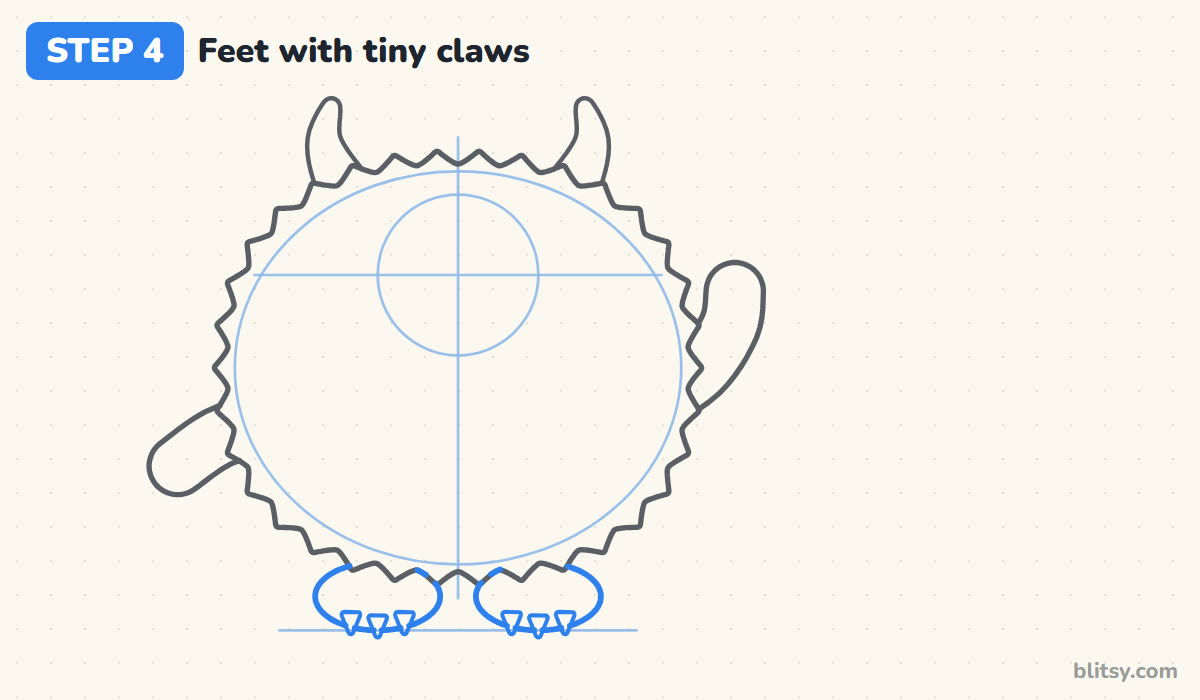
Two flat ovals sit on the ground line, peeking out from under the body. Leave a small gap between them so the monster doesn't look like it's standing on one lump. Along the bottom edge of each foot, add three little pointed claws. Small kids can skip them, but they give the feet a bit of monster attitude.
💡 Tip: Draw the claws tiny and blunt. Long sharp ones tip the whole mood toward scary.
Step 5: Give it one big shiny eye
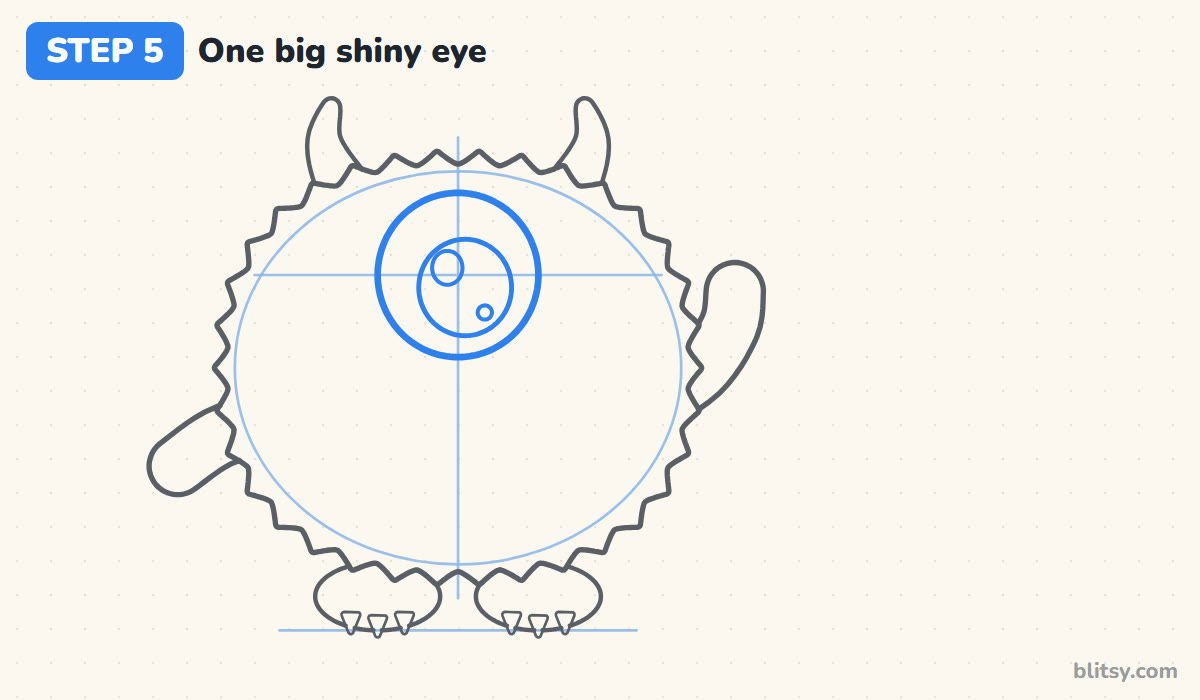
Trace firmly over the eye circle from step 1. Inside it, draw a large round pupil, nudged slightly down and to the right, so the monster seems to look at you. Finish with a big oval shine near the top of the pupil and a tiny dot near its lower edge. In my experience, that one shine does more for cuteness than any other line in the drawing.
💡 Tip: Make the pupil fill more than half the eye. A small pupil gives a staring, nervous look.
Step 6: Draw a wide smile with fangs and a tongue
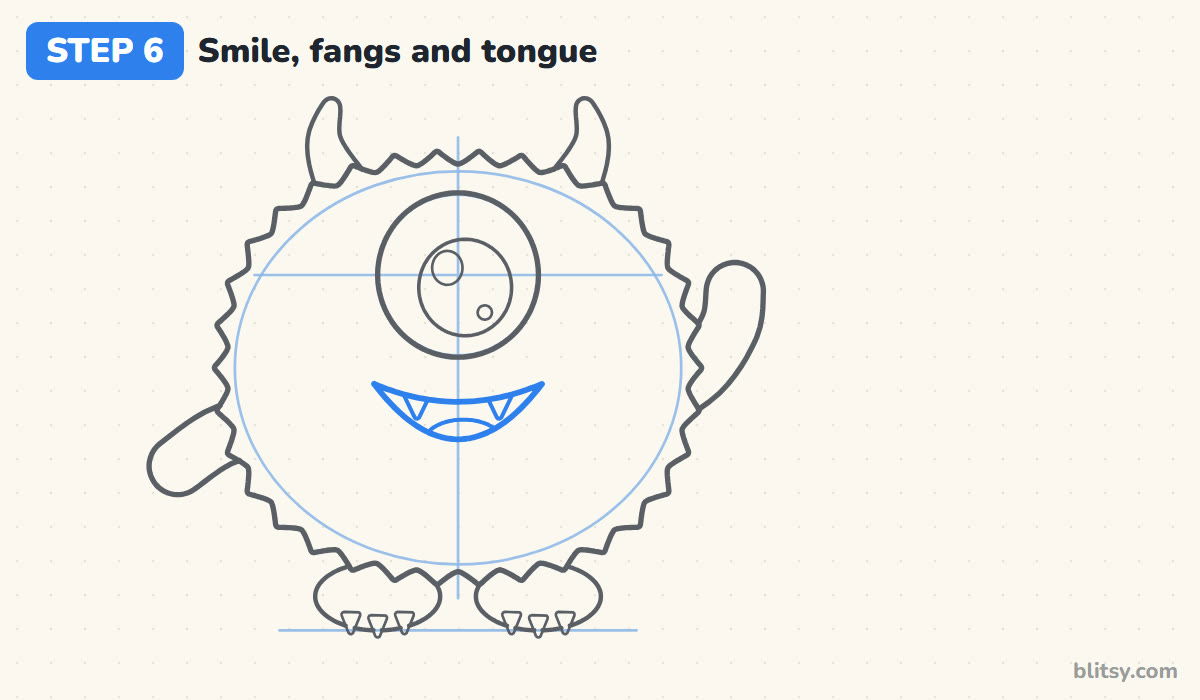
Below the eye, draw a gentle upward curve for the top lip, then a deeper curve underneath to close the mouth into a crescent. Hang two small rounded fangs from the top lip, spaced apart rather than in the middle. A soft curve near the bottom of the mouth becomes the tongue. Most beginners make the mouth too tall; a slim crescent stays friendly.
💡 Tip: Space the fangs evenly from the center line. Lopsided fangs look like a mistake, not a choice.
Step 7: Add a round belly and two cheeks
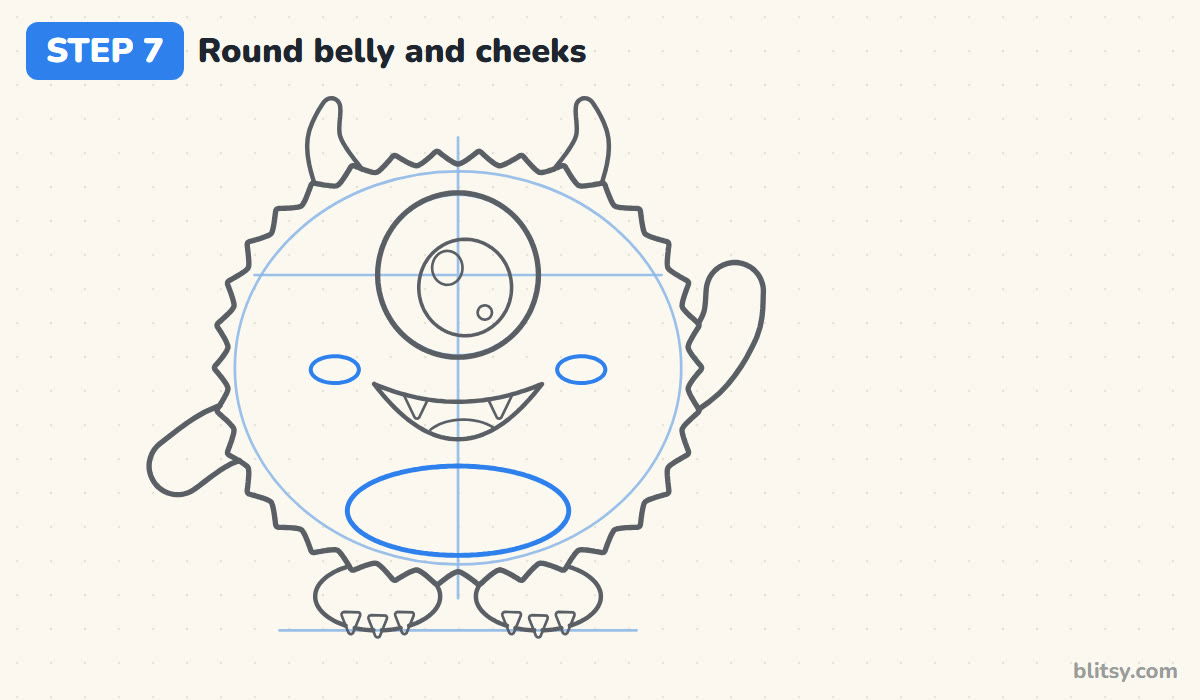
Draw a wide flat oval low on the body for the belly patch, leaving a small gap under the mouth. Then place a small flat oval on each side of the face, at mouth height and a little outside the eye. Those cheeks will be pink later. They're why the face reads as happy rather than hungry.

💡 Tip: Keep the belly centered on the vertical guide, even though the arms are uneven.
Step 8: Sprinkle polka dots and horn lines
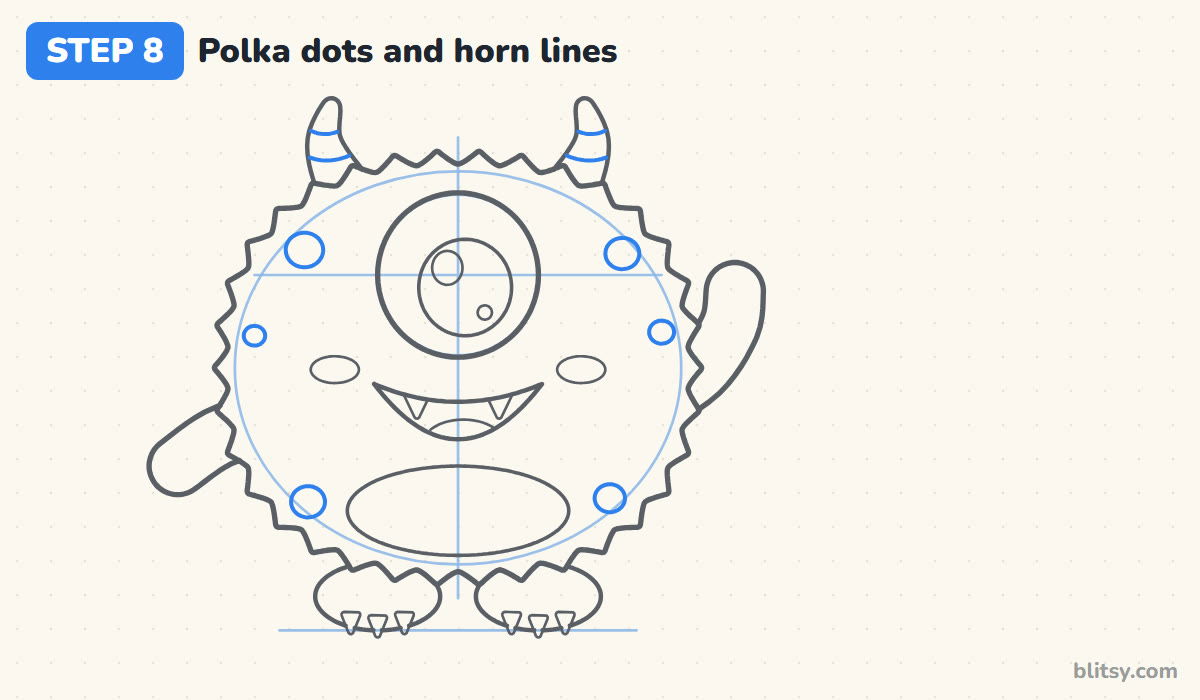
Scatter a few round spots over the fur in empty places: near the top corners, on the sides and beside the belly. Vary their sizes a little. Then draw two curved stripes across each horn, following its bend. I always keep spots away from the eye and mouth, because crowding the face makes it hard to read.
💡 Tip: Use an odd number of spots on each side. Exact mirror patterns look stiff.
Step 9: Draw a tiny jelly friend
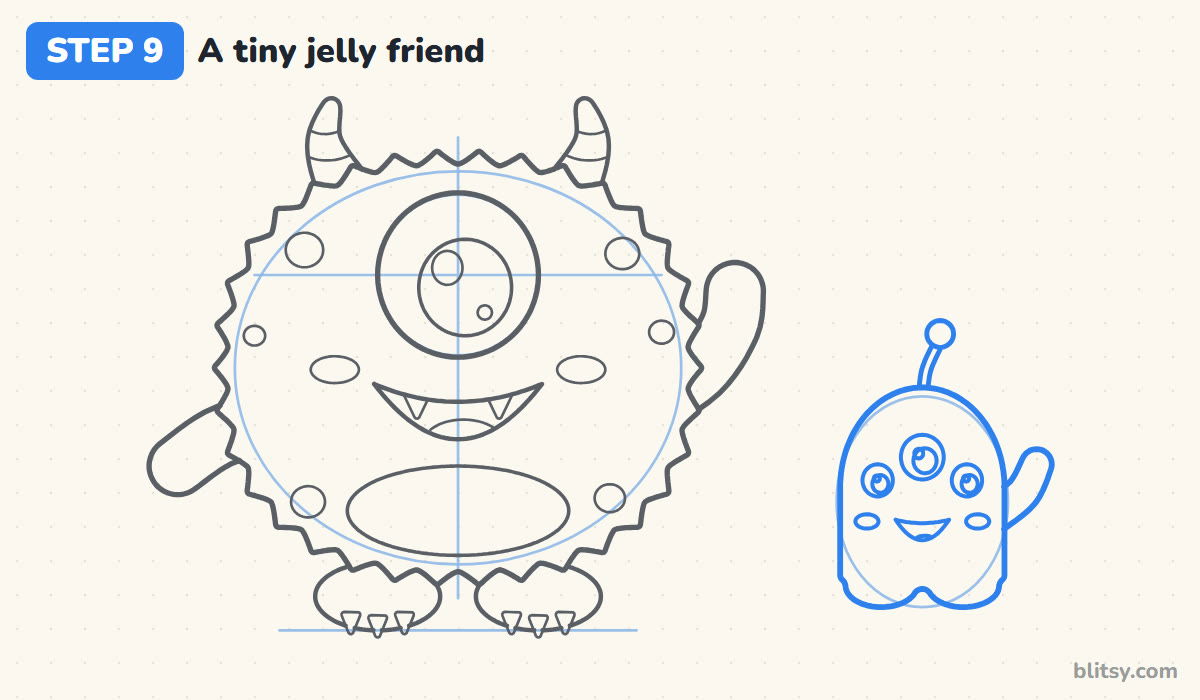
Here's where mixing features pays off. To the right, sketch a tall light oval and shape it into a smooth gumdrop body with two round feet at the bottom. This one gets three eyes instead of one, a little smile, cheeks, a waving arm and an antenna with a ball on top. Smooth skin next to fur makes the two look like different species.
💡 Tip: Put the middle eye a touch higher and bigger than the others. A straight row looks robotic.
Step 10: Ink the lines and erase the guides
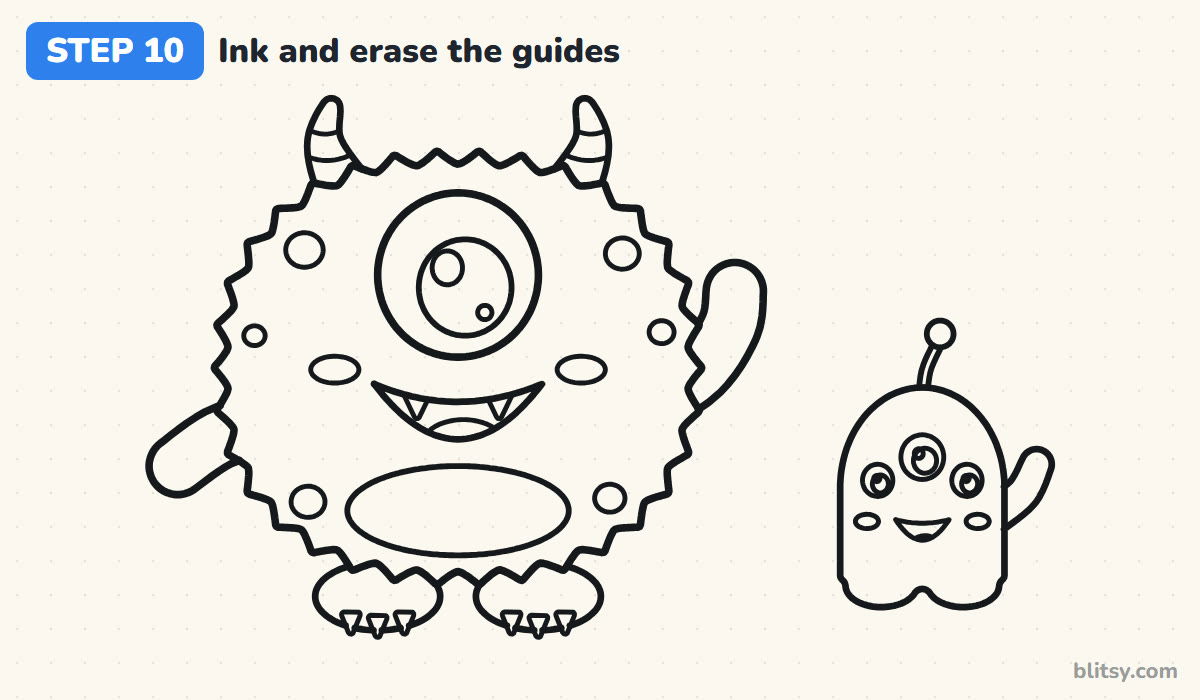
Go over every keeper line with the black marker, both monsters included. The zigzag fur takes the longest, so go slowly and keep the points crisp. Wait until the ink is properly dry, then erase the oval, the cross lines, the ground line and the friend's guide oval.
💡 Tip: Ink the big outer lines first and the small face details last, so your hand never rests on wet ink.
Step 11: Color both monsters
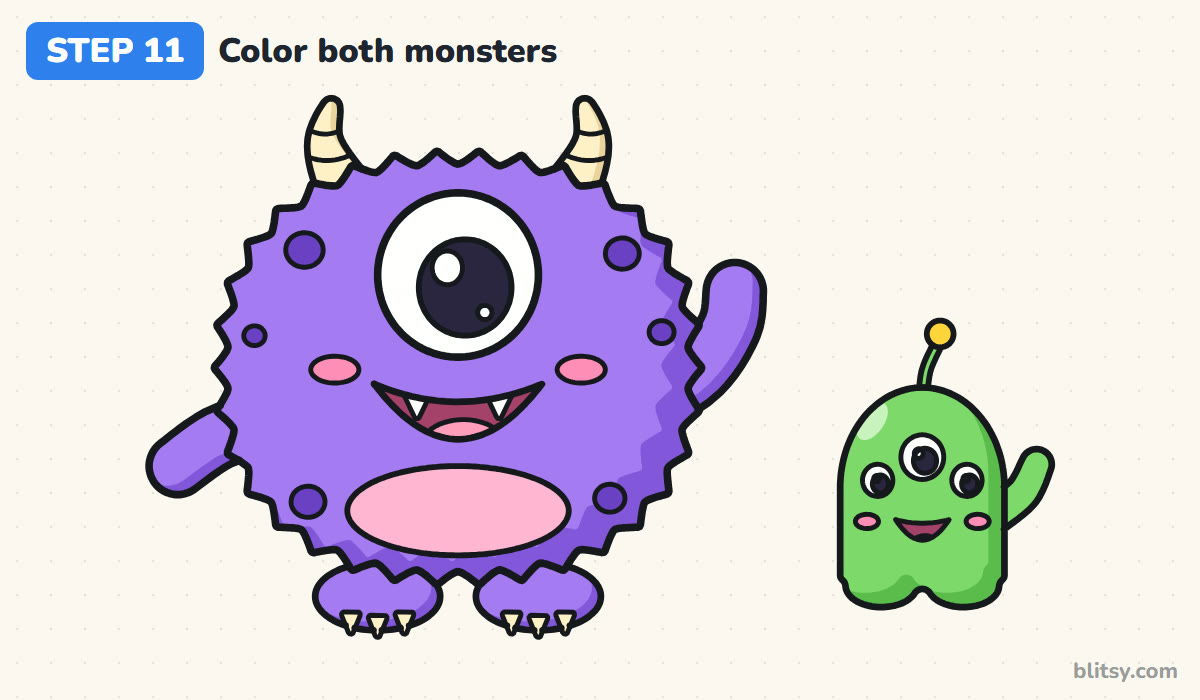
Color the fur purple, along with the arms and feet, then add dark purple spots and a band of shadow along the right edge. The belly, cheeks and tongue are pink, the horns and claws cream, the mouth dark pink and the pupil black, with the shines and fangs left white. Finish the friend in green with a darker green shadow and a yellow antenna ball.
💡 Tip: Leave the eye white bright and clean. Even a light smudge of purple there dulls the whole face.
Where Cute Monsters Slip Into Scary
- Spiky fur that's too big. Huge sharp tufts look aggressive. Keep them small and even, like soft fluff.
- A small eye with a tiny pupil. The face looks nervous or blank. Make the eye large and let the pupil fill most of it, with a clear shine.
- A big dark open mouth. A tall black mouth with long teeth looks hungry. Use a slim crescent, two short fangs and a pink tongue.
- Spots sitting right on the face. They compete with the eye and smile. Put them around the edges of the body.
- Arms drawn straight across the fur. If the arm lines continue into the body, the arms look stuck on. Stop them at the fur edge.
Mixing Shapes to Invent New Monsters
Treat this drawing as a recipe and start swapping ingredients. Change the body to a triangle, a long noodle or a square box. Try two eyes, three or five. Trade the horns for antennae, bunny ears or a single curly tuft, and give it wings, a tail or extra arms. I like to write a short list of shapes and features, then pick one from each line and draw whatever comes out. A friendly spook makes a good neighbor too, so try the cute ghost drawing tutorial, or send your monster into space with the UFO drawing step by step lesson.
Free Monster Coloring Page and Printable Drawing Steps
For a rainy afternoon or a classroom table, grab the monster coloring page: a small colored example and a color key sit at the top, with a big bold outline underneath for coloring. The step-by-step guide PDF holds all 11 steps and their tips, two per page. Both print fine on Letter or A4 paper.
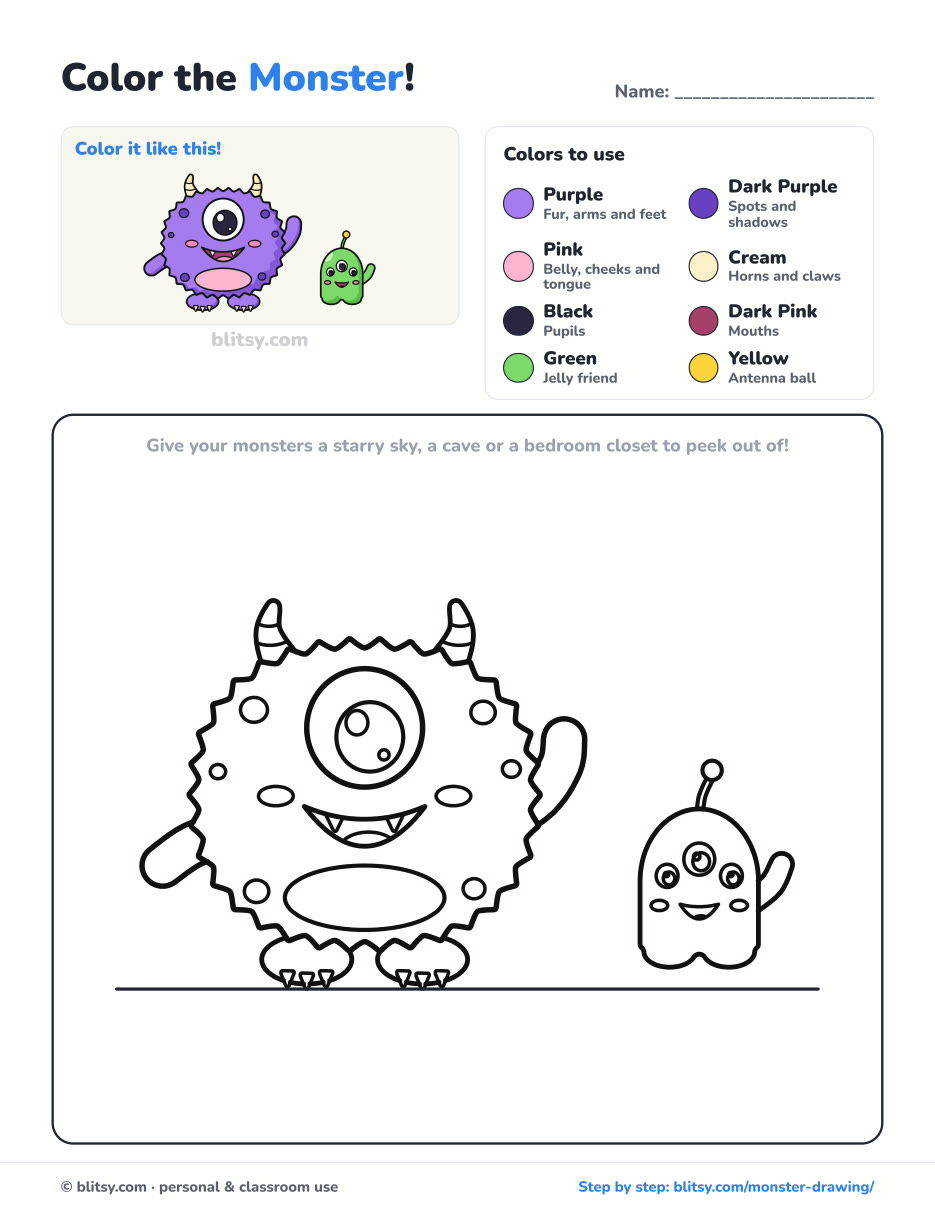
Black outlines with a colored example and the color names at the top. Ready to print and color.
⬇️ Download Coloring PageEvery step picture with its instructions and tips, to keep beside your paper while you draw.
⬇️ Download Drawing Guide📱 On a phone? Tap a download button, then open the file and choose Share → Save to Files or Print. On a computer, the PDF opens or saves straight to your Downloads folder.
Pin the Fuzzy Monster Steps
Monster Made? Draw These Characters Next
Here are more step-by-step character tutorials, from space travelers to famous faces, each one broken into short steps.
- Darth Vader Drawing: A big helmet, tiny boots and a red lightsaber glow make up the chibi in this how to draw Darth Vader step by step lesson.
- Cowboy Drawing: The cowboy drawing tutorial starts from a stick figure and ends with a waving kid, a lasso and a little cactus.
- Astronaut Drawing: Draw a chibi space explorer waving beside the moon with the astronaut drawing step by step guide.
- Tinkerbell Drawing: Four slim wings and a golden swoosh of pixie dust are the goal of this Tinkerbell drawing tutorial.
- Abraham Lincoln Drawing: For a calm portrait, learn how to draw Abraham Lincoln with his tall black hat and chin beard.
- Cat Noir Drawing: The Cat Noir drawing step by step lesson draws the chibi hero with ears up, staff in hand and tail curled.
Monster Questions From Young Artists
What is the easiest way to draw a monster?
Start with one simple shape, like an oval, and add one unusual feature, such as a single eye or horns. Add arms and feet, then a smile to finish it off.
How do you draw a cute monster instead of a scary one?
Use a big eye with a shine, a slim smile with short rounded fangs, pink cheeks and soft, small fur tufts. Avoid frowning brows and long teeth.
How do you draw monster fur?
Draw a smooth guide shape first, then go around it with small zigzag tufts of the same size. Erase the guide once the fur is inked.
How long does this monster drawing take?
About 15 minutes for pencil and ink and another 10 or so for coloring. Younger kids can leave out the claws and the jelly friend.
Next time, mix a new body with new features and see what kind of creature turns up on your paper. 👾
Related posts:
 How to Draw a Monster Truck Step by Step (Easy for Kids)
 How to Draw a Tooth Step by Step (Cute and Easy for Kids)
 How to Draw a UFO Step by Step (Cute Alien Saucer)
 How to Draw an Astronaut Step by Step (Cute and Easy)
 How to Draw an Owl Step by Step (Cute Night Owl)
 How to Draw an Axolotl Step by Step (Cute and Easy)
 How to Draw Freddy Krueger Step by Step (Cute Chibi Version)
 How to Draw a Frog Step by Step (Cute Frog on a Log)
 How to Draw a Jellyfish Step by Step (Cute, Easy Guide)
 How to Draw Ariana Grande Step by Step (Cute Chibi Fan Art)
 How to Draw a Care Bear Step by Step (Cute Fan Art for Kids)
 How to Draw Cerberus Step by Step (Cute and Easy)

