
Most of a Grim Reaper is just a costume: a hood, a long cloak and a tool to carry, which makes it a surprisingly easy character to draw. Here I'll walk you through how to draw a grim reaper step by step in a soft chibi style, with a round face peeking out of the hood and a little hand waving at you. He's a classic Halloween figure from old folklore, but this version is all big eyes and pink cheeks, so it suits kids who don't like spooky pictures. A jack-o'-lantern, a bat and a few stars finish the scene.

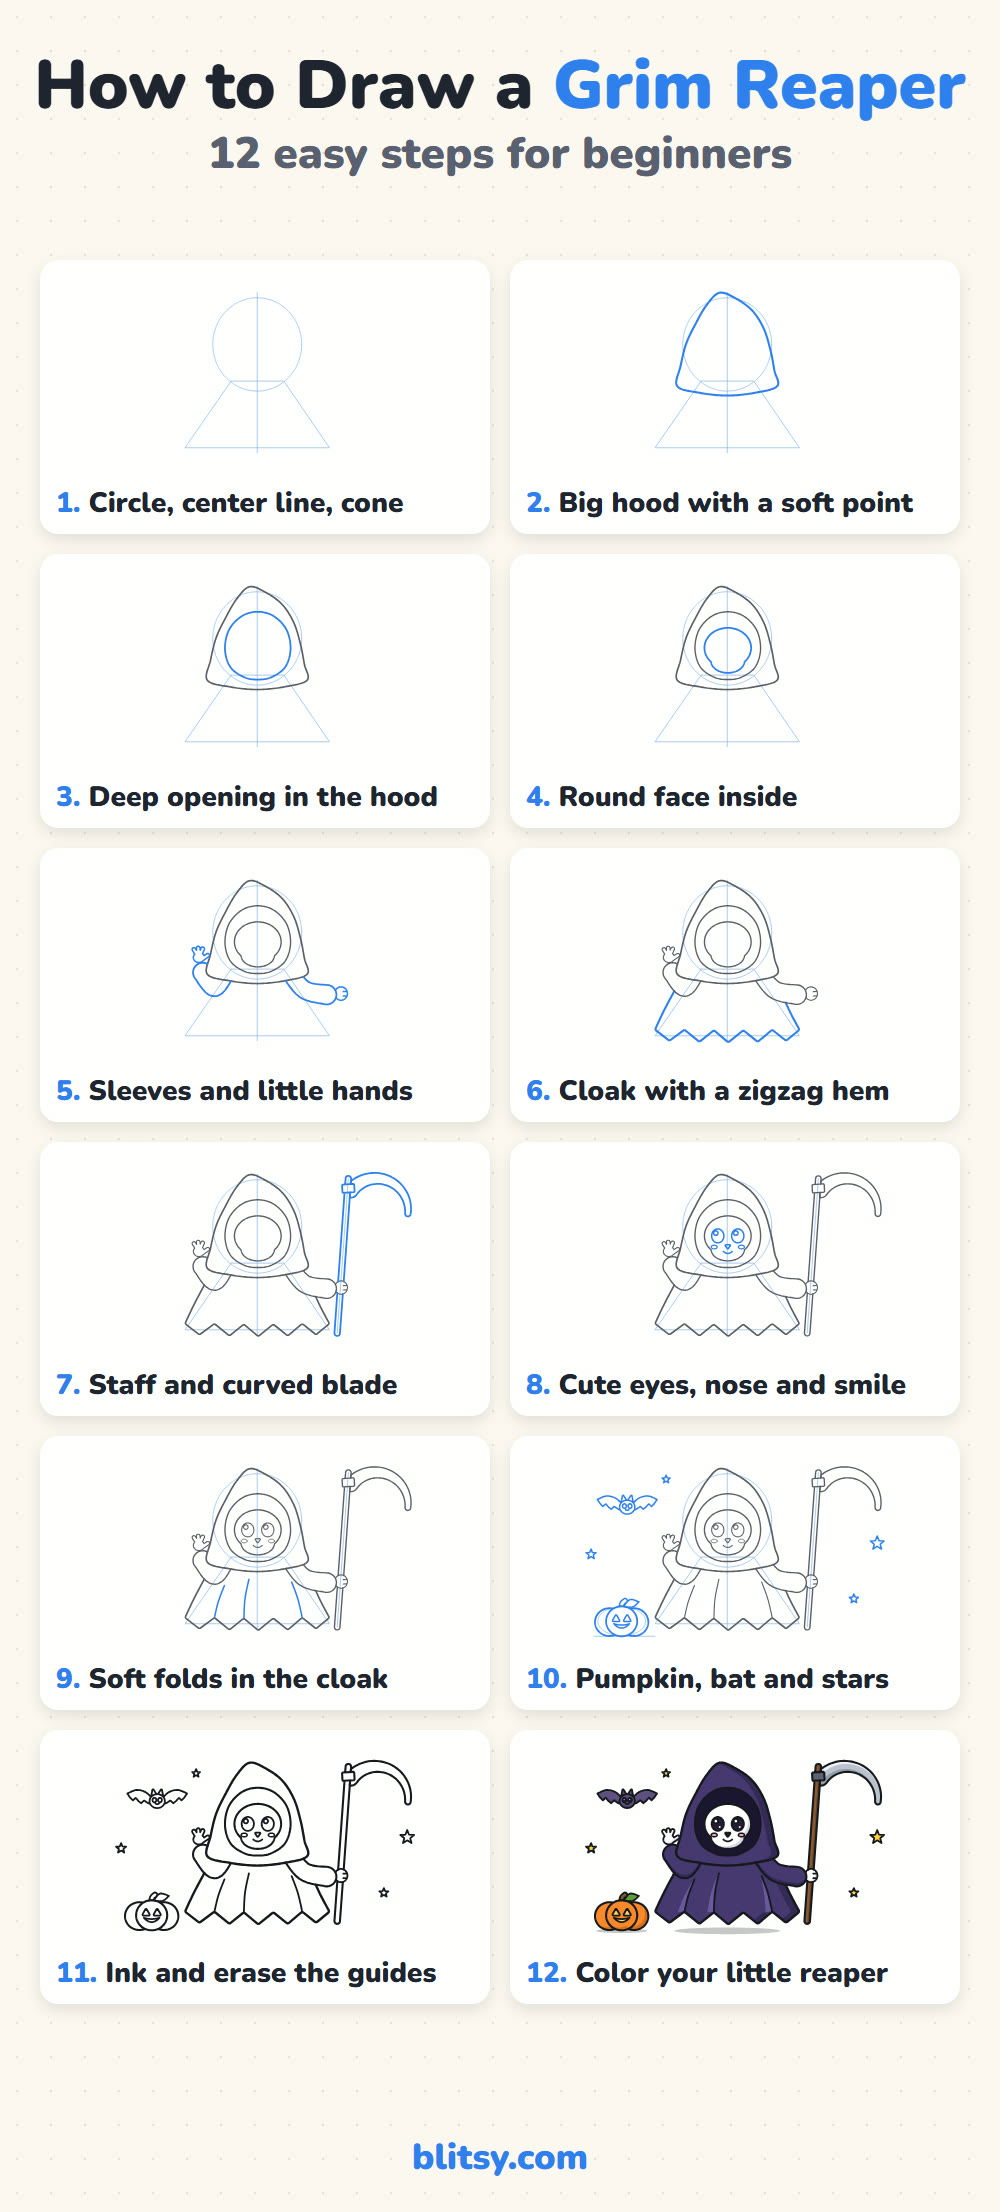
Blue marks the part you're adding in that picture, and gray shows what's already done. The pale blue helper shapes are temporary; they vanish in step 11 when we ink.
Quick overview
⏱️ Time: about 25 to 35 minutes, coloring included
🎯 Level: easy, good for kids from about 6
✏️ Steps: 12
🎃 You'll draw: a chibi reaper in a hooded cloak with a cartoon scythe, a jack-o'-lantern, a bat and stars
Pencils and Purples for a Hooded Reaper
- A pencil with a light touch (HB is fine)
- A soft eraser for the helper shapes
- A black marker or fine felt-tip pen
- Colored pencils or markers: two purples plus black, brown, gray, orange, yellow, pink
- Plain white paper, turned sideways
If your darkest purple looks almost black, test it on scrap paper first; a medium purple keeps the outlines easy to see.
How to Draw a Grim Reaper Step by Step
Step 1: Sketch a circle, a center line and a cone
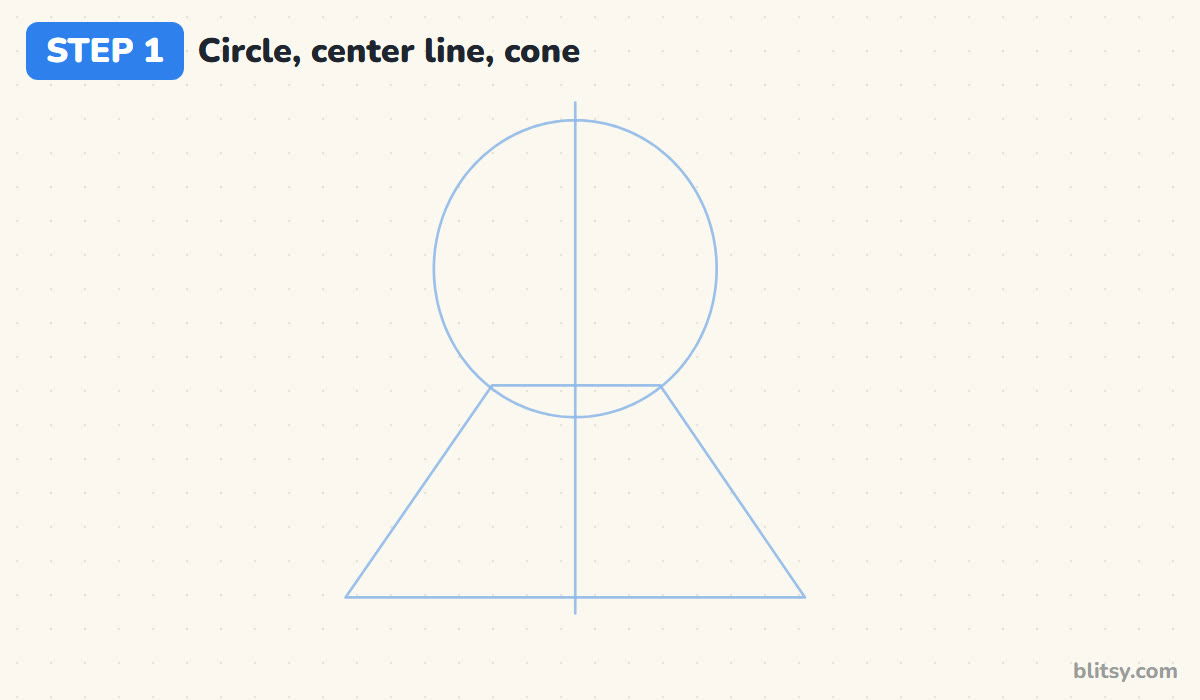
Draw a circle a little above the middle of your page. Run a straight line down through its center, then hang a wide cone, or trapezoid, below the circle. The circle holds the hood and the cone sets how wide the cloak will flare. When I teach this, I make the cone's bottom about three circles wide; a narrow cloak looks stiff.
💡 Tip: Use the lightest pressure you can. Every one of these lines gets erased.
Step 2: Draw a big hood with a soft point
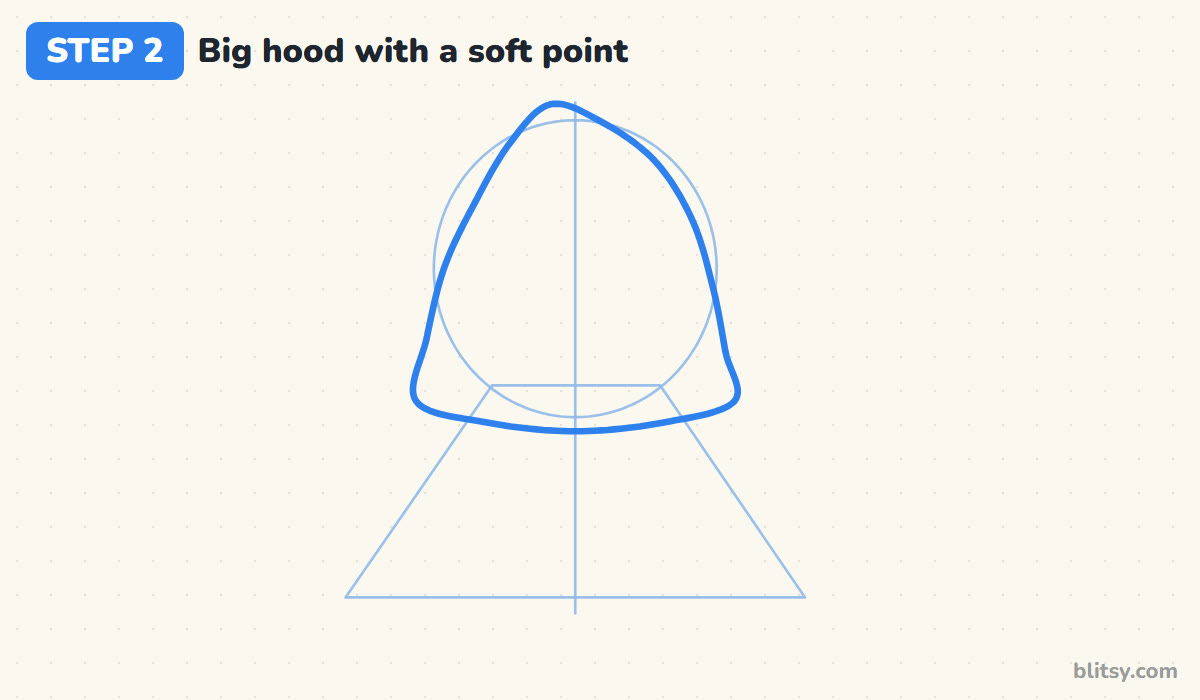
Start at the top of the circle and draw the hood's tip as a rounded point, leaning just a touch to the left like floppy fabric. Bring both sides down around the circle and finish with a curved bottom edge that rests over the shoulders. The hood should be bigger than the circle on every side. A huge hood on a tiny body is the chibi look.
💡 Tip: Round the very tip. A sharp spike reads as a witch hat.
Step 3: Add the deep opening
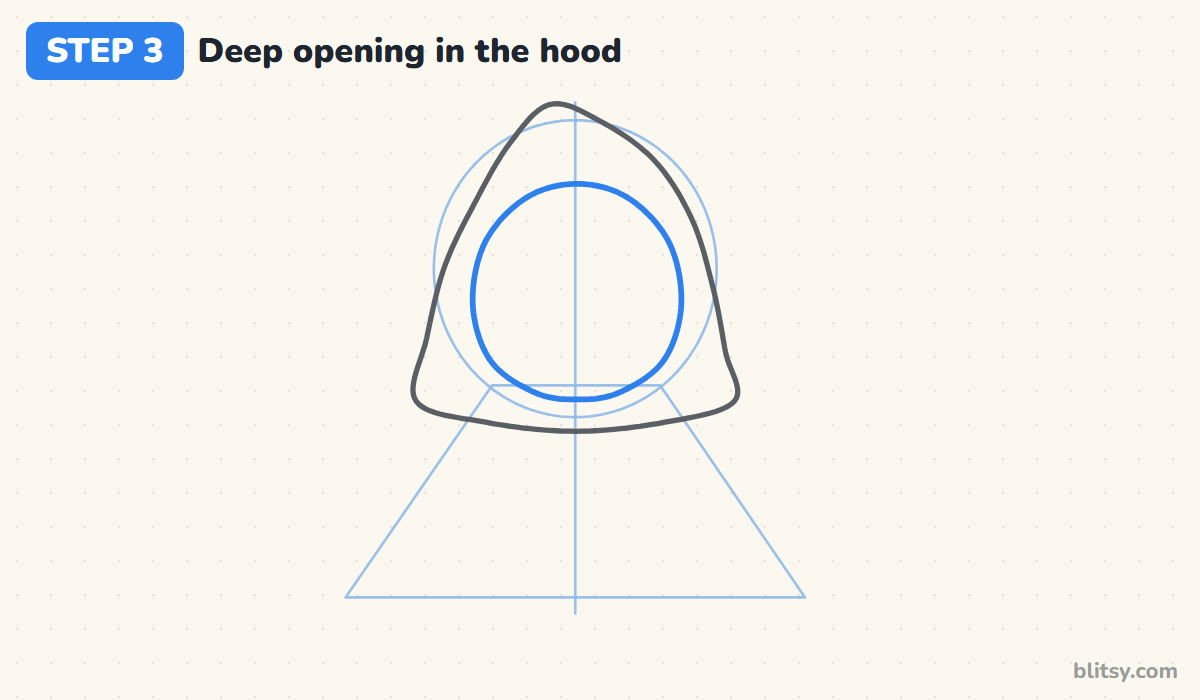
Inside the hood, draw a large oval opening with a slightly pointed top that echoes the hood's tip. Leave a thick band of hood all the way around it, roughly as wide as one of your fingers. That band is the fabric.



💡 Tip: Keep the band even on both sides so the hood faces straight at you.
Step 4: Draw the round face inside
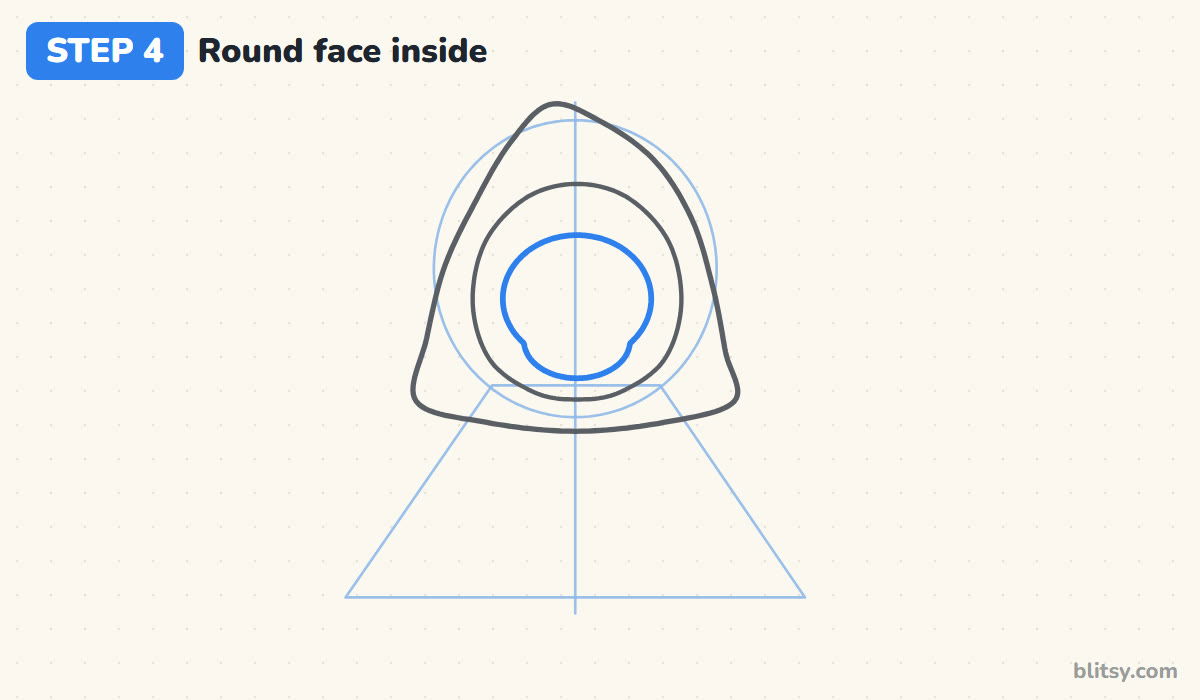
In the lower part of the opening, draw a round face that gets a little narrower at the chin, like a cartoon skull. Leave dark space showing above it and around the sides. I place it low on purpose, because the dark space above makes the hood look deep.
💡 Tip: Let the chin almost touch the bottom of the opening.
Step 5: Add two sleeves and little hands
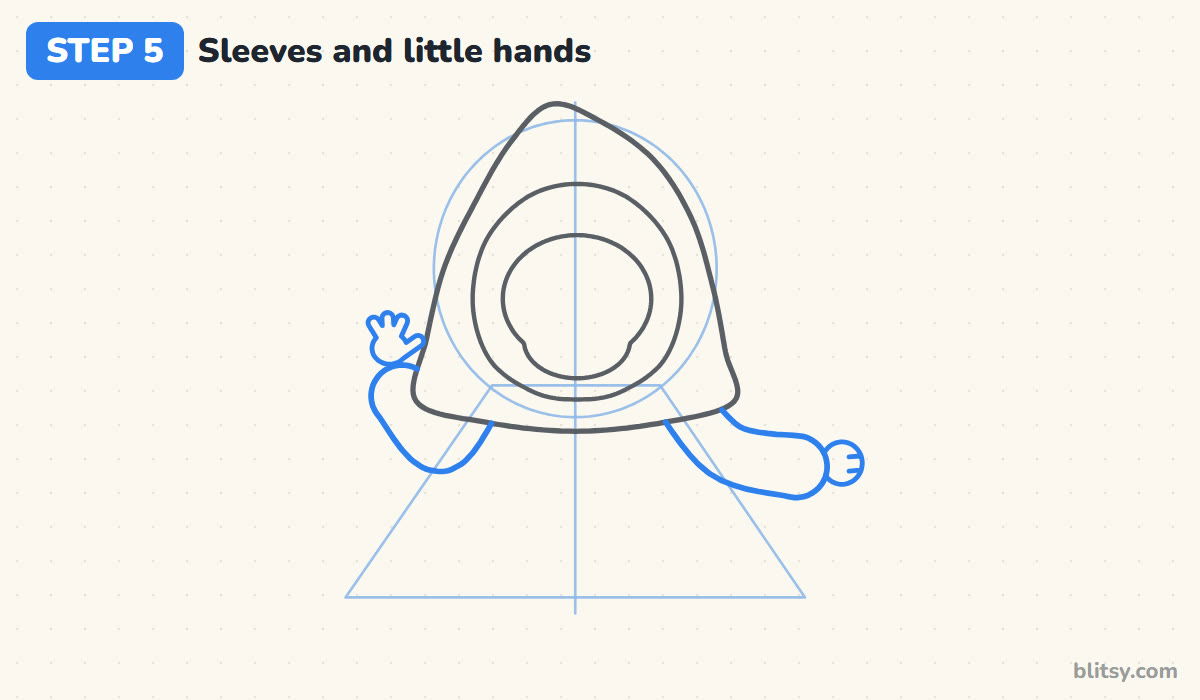
From under the hood's left edge, draw a wide sleeve that bends down at the elbow and comes back up, with a small hand waving above it: a round palm, three short fingers and a thumb. On the right, pull a longer sleeve straight out to the side and end it with a round fist.
💡 Tip: Draw the hands a bit smaller than the eyes will be. Big bony hands look creepy.
Step 6: Draw the cloak with a zigzag hem
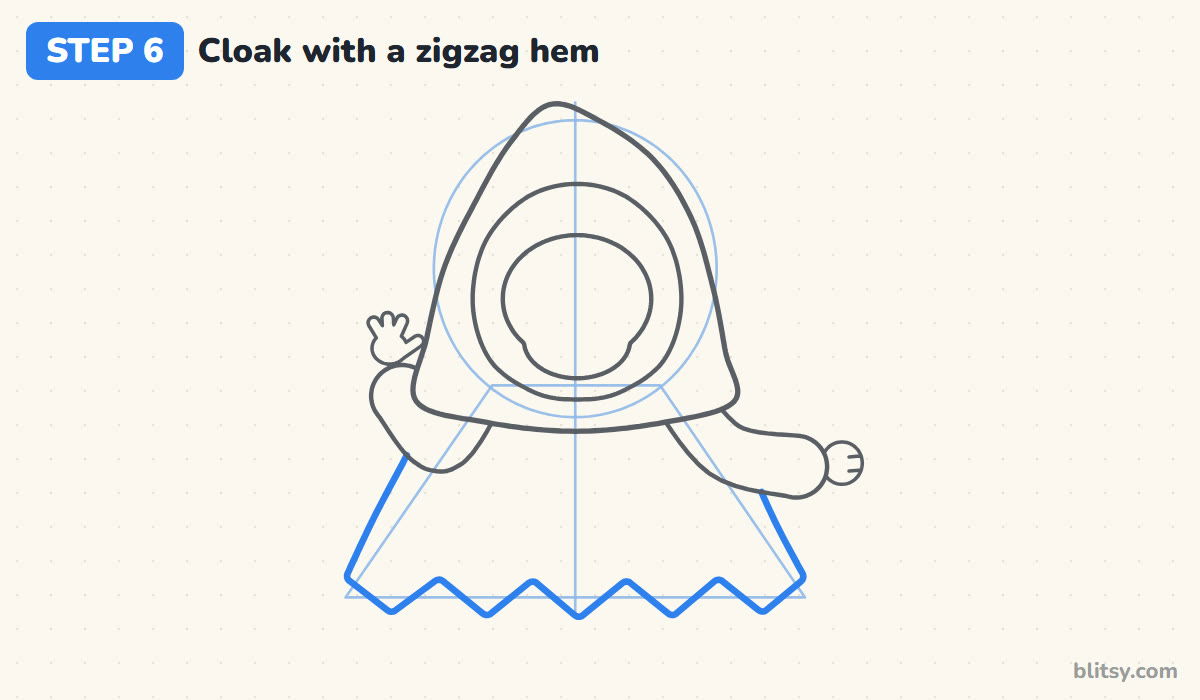
Now drop the cloak. From under each sleeve, draw a side line that slants outward, following the cone guide. Join their bottoms with a zigzag of five or six points. I round each point slightly, since crisp, jagged teeth start to look torn and scary. Keep the hem well above the ground; that gap makes him float.
💡 Tip: Space the zigzag points evenly before you worry about smooth lines.
Step 7: Add the staff and a curved blade
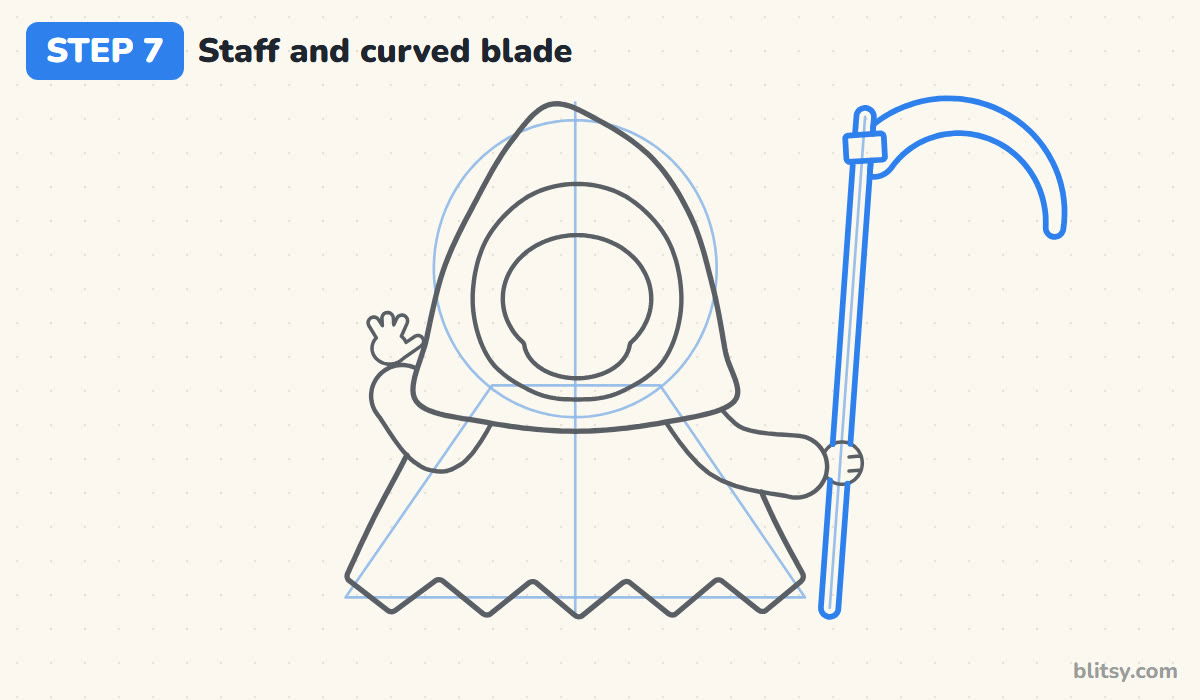
Draw a long straight guide line through the fist, from level with the hem up to the height of the hood's tip. Turn it into a thin staff with two parallel lines and round ends. At the top, add a small band, then pull a fat curved blade out to the right, like a banana that bends downward, ending in a rounded tip. A real scythe is an old farm tool for cutting tall grass; a soft, rounded blade keeps ours friendly.


💡 Tip: Draw the staff with a ruler if your hand wobbles. Nobody will know.
Step 8: Draw cute eyes, a nose and a smile
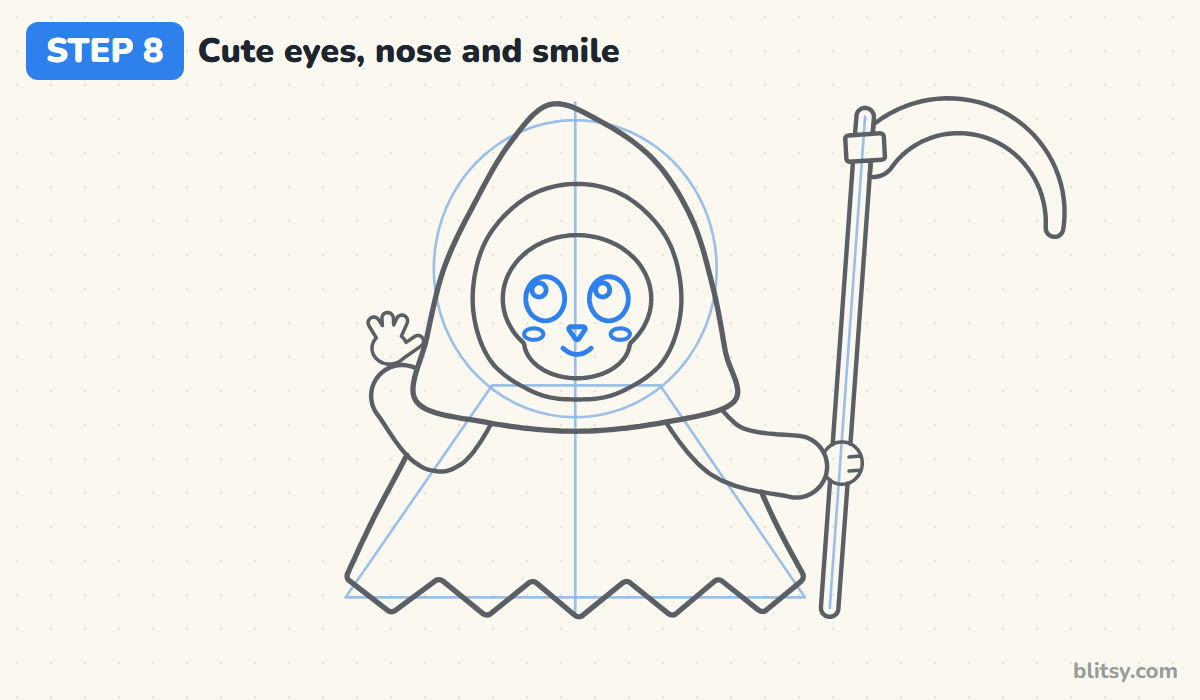
Place two big round eyes just above the middle of the face, close together. Add a round shine in the upper left of each one. Under them, a tiny upside-down triangle makes the nose hole of a cartoon skull, and a short curve becomes the smile. Add an oval cheek under each eye. Most beginners draw the eyes too small, and that's when a cute reaper turns eerie.
💡 Tip: Put both shines on the same side, or the eyes look like they're crossing.
Step 9: Sketch soft folds in the cloak
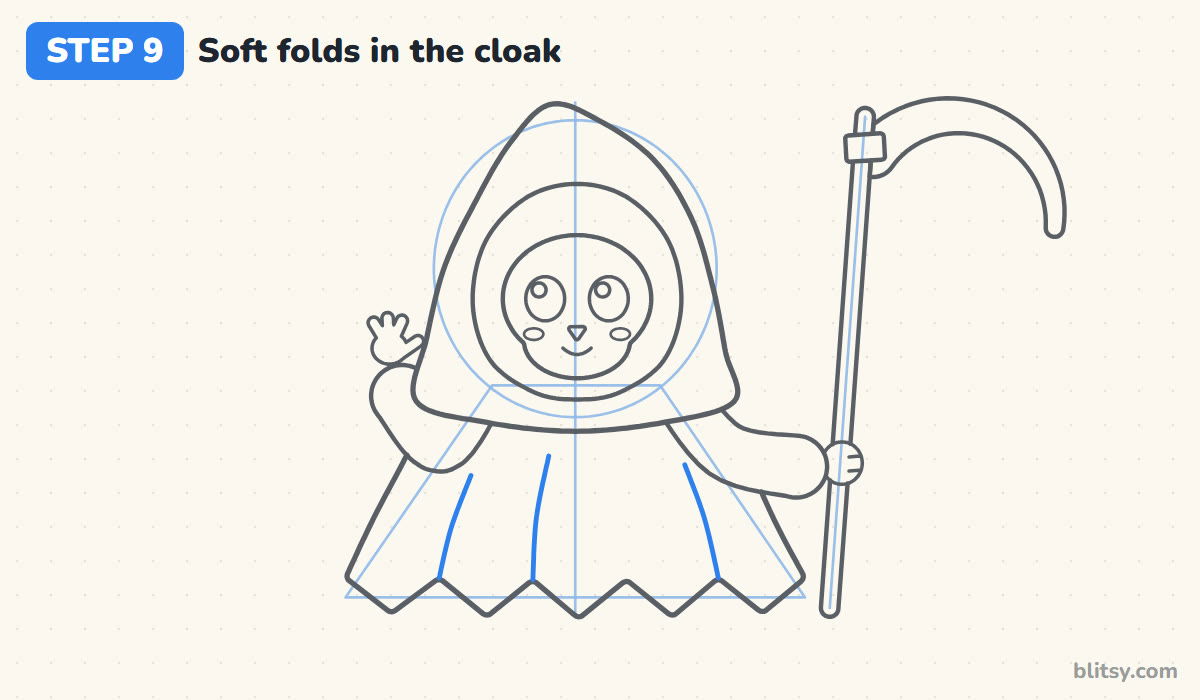
Draw three long, gently curved lines that start at the inner corners of the zigzag and fade out halfway up the cloak. Don't connect them to the hood. Folds that stop partway look like hanging fabric; lines that run all the way up cut the cloak into panels.
💡 Tip: Curve each fold the same way as the nearest side of the cloak.
Step 10: Add a jack-o'-lantern, a bat and stars
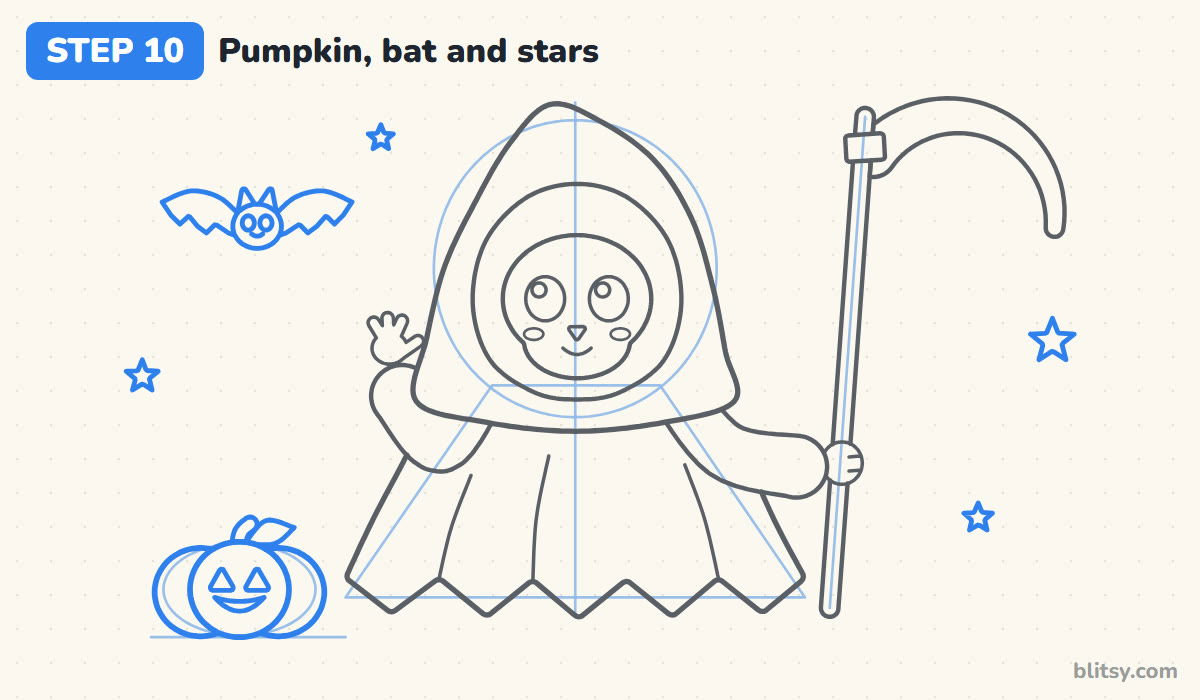
On the left, draw a short ground line and a wide pumpkin sitting on it: a round middle with a slightly smaller lobe peeking out on each side. Give it triangle eyes, a happy grin and a bent stem with a leaf. Above, draw a round bat with two pointy ears and scalloped wings. Scatter four stars in the gaps.
💡 Tip: Keep the pumpkin smaller than the hood so the reaper stays the star.
Step 11: Ink the outlines and erase the guides
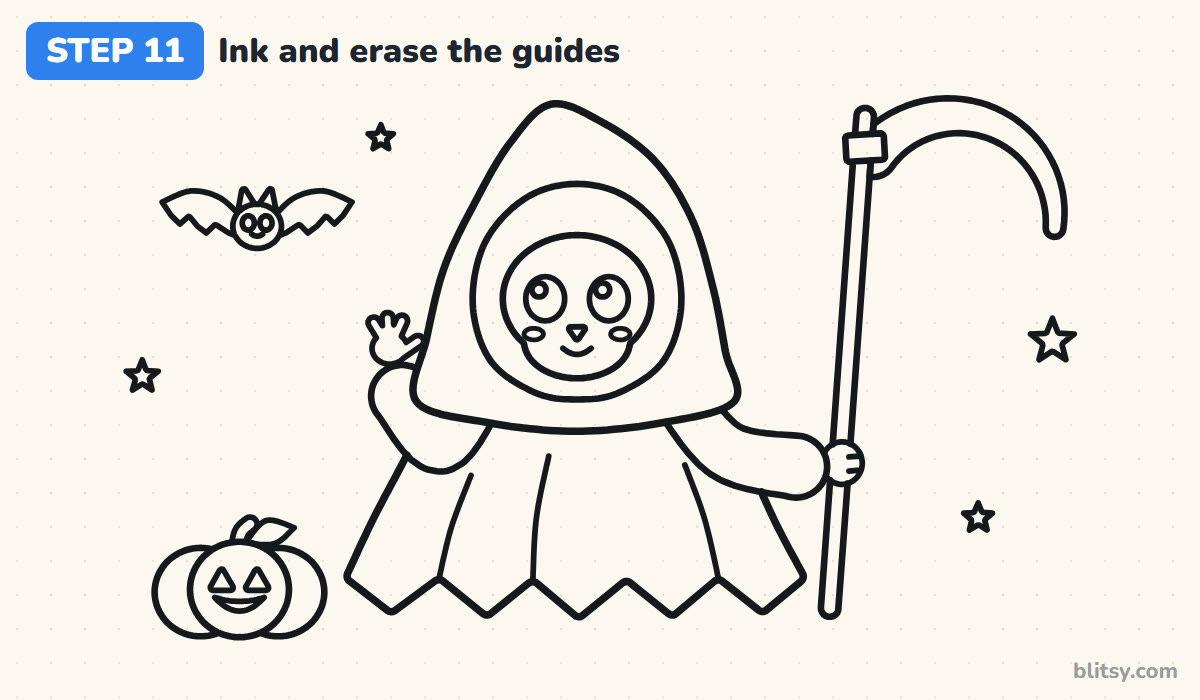
Trace every keeper line with your black marker, extras included, and let the ink dry for a minute. Then erase the circle, the center line, the cone and the staff guide. Go gently over the face, because white paper shows every smudge.
💡 Tip: Ink the long cloak sides in one steady pull instead of short dashes.
Step 12: Color your little reaper
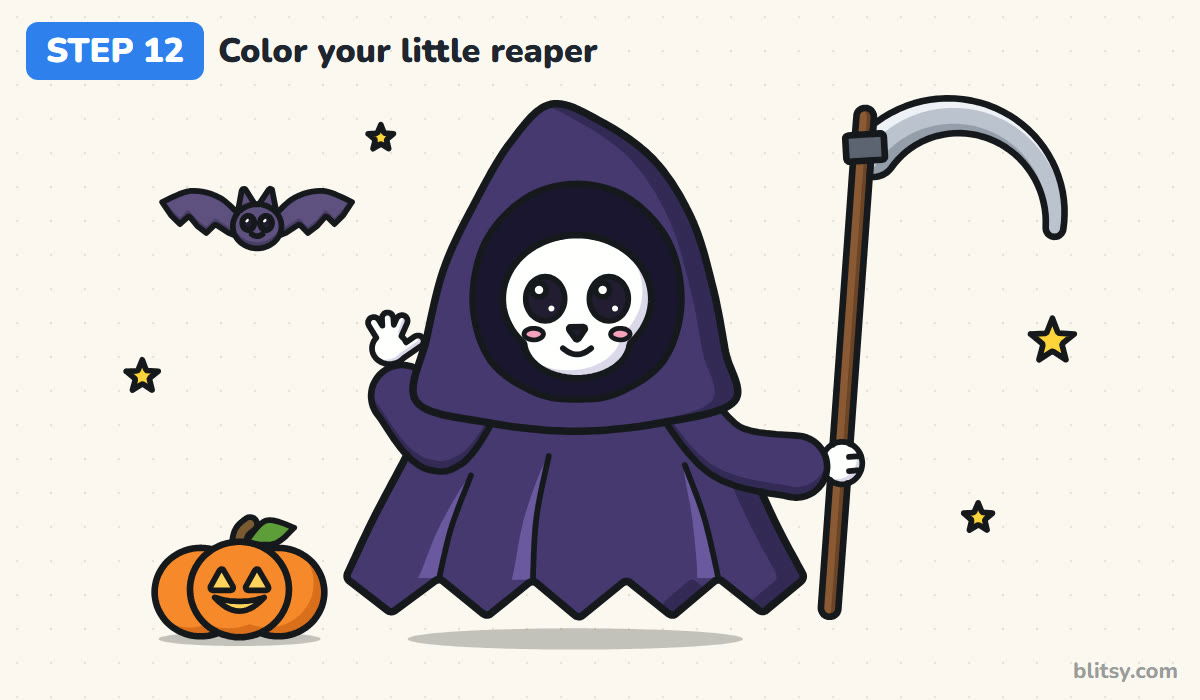
Fill the whole robe with dark purple, then add light purple strips beside each fold. Color the opening black, leave the face and hands white with a faint gray edge, and give the cheeks a touch of pink. The staff is brown, the blade gray, the pumpkin orange with a yellow glowing face, the bat purple and the stars yellow.
💡 Tip: Color the dark inside of the hood first, then the face edges stay crisp.
Where Reaper Drawings Get Too Spooky
- A small hood on a tall body. The figure looks grown-up and serious. Make the hood almost as wide as the cloak's top so he reads as chibi.
- Slanted brows or an empty skull stare. Skip the brows completely and use big round eyes with shines and a curved smile.
- A long, pointed blade. It looks sharp and harsh. Keep the blade thick with a round tip, more like a cartoon prop.
- Coloring the cloak pure black. You lose every fold and outline. A dark purple with lighter strips shows the shape.
- A hem that touches the ground. He stops floating. Leave a clear gap and put a small oval shadow underneath.
Costume Swaps and Silly Props for Your Reaper
Try a cloak in midnight blue or forest green, add a striped scarf, or trade the scythe for a giant lollipop or a trick-or-treat bucket. I sometimes let him hold the jack-o'-lantern instead, which turns the picture into a little story. If the round face was your favorite part, practice it more with the easy skull drawing tutorial, and build a bigger October scene with this Halloween drawing step by step lesson.
Free Grim Reaper Coloring Page and Step-by-Step PDF
The grim reaper coloring page has a small colored example at the top with a named color key, and a big bold outline below that's easy to stay inside. The step-by-step guide PDF holds all 12 steps with their tips, two per page. Both print on Letter or A4 paper.
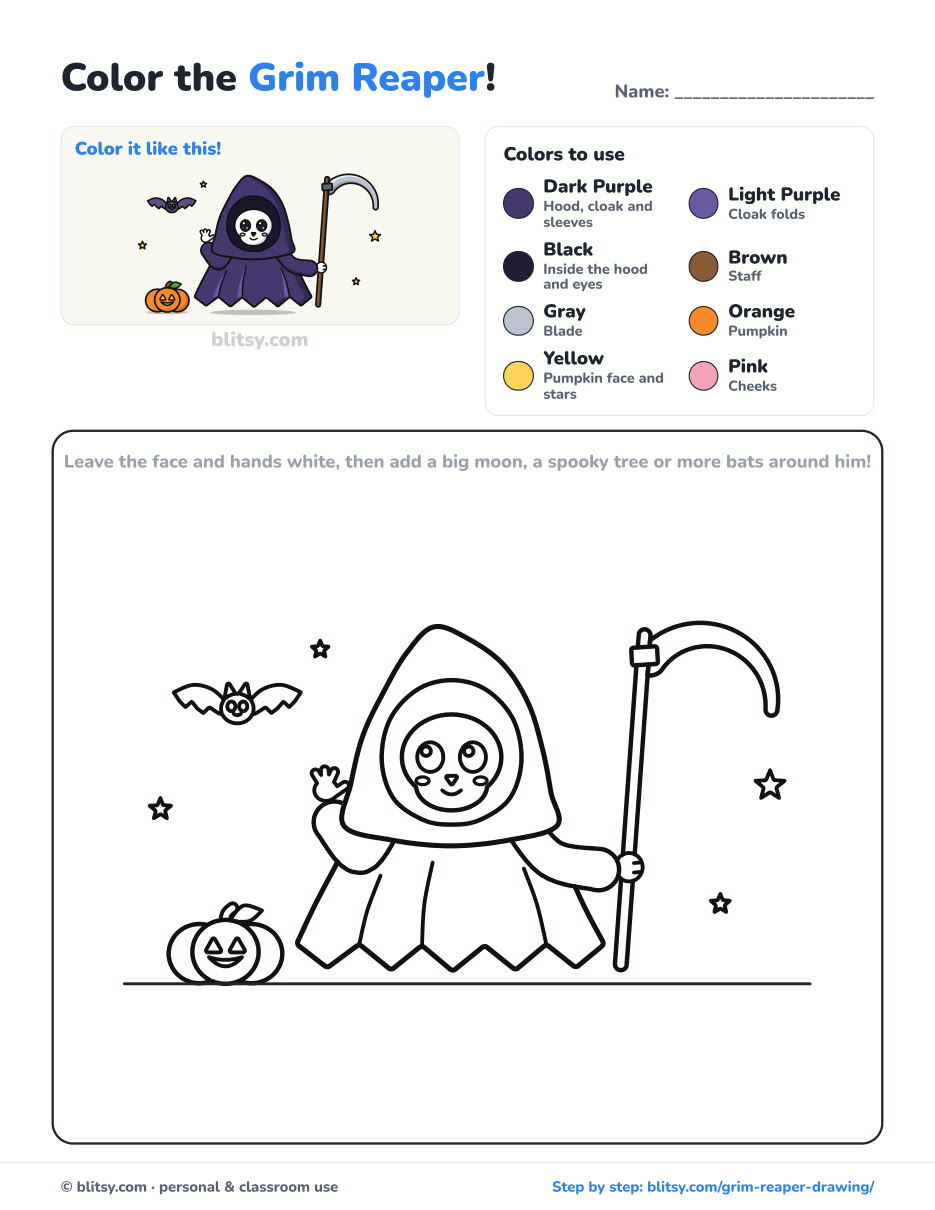
Black outlines with a colored example and the color names at the top. Ready to print and color.
⬇️ Download Coloring PageEvery step picture with its instructions and tips, to keep beside your paper while you draw.
⬇️ Download Drawing Guide📱 On a phone? Tap a download button, then open the file and choose Share → Save to Files or Print. On a computer, the PDF opens or saves straight to your Downloads folder.
Pin the Little Reaper for October
Reaper Drawing Questions Kids Ask
What is the easiest way to draw a grim reaper?
Think of it as a hooded cloak. Draw a big rounded hood, a cloak that widens to a zigzag hem, and a stick with a curved blade. A face inside the hood is optional.
How do you make a grim reaper drawing cute and not scary?
Give him a big hood and a short body, round eyes with shines, pink cheeks and a small smile. Keep every point rounded, including the blade and the hem.
What colors should I use for a grim reaper?
Dark purple or navy for the cloak, a lighter shade for the folds, black inside the hood, white for the face and hands, brown for the staff and gray for the blade.
How long does it take to draw a grim reaper?
Around 15 minutes for pencil and ink, plus 10 to 20 minutes to color. Younger kids can skip the bat and stars.
Give your next reaper a new cloak color and a different prop, then line them up like a tiny costume parade. 🎃
Related posts:
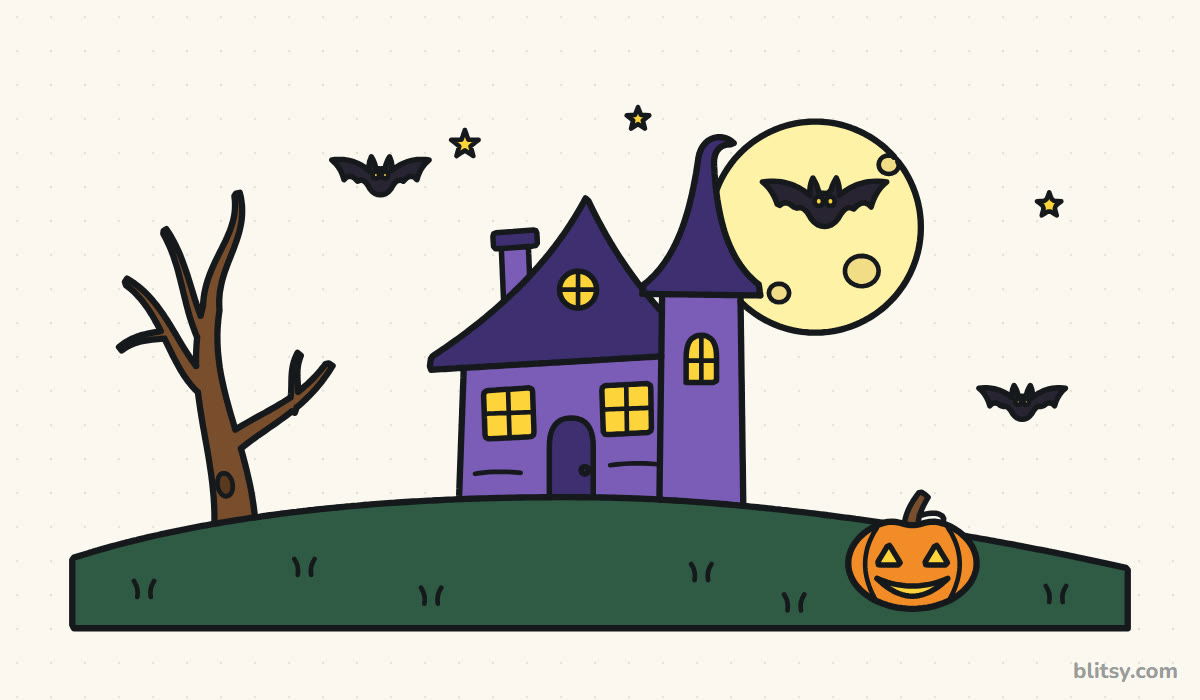 Halloween Drawing Step by Step (Cute Haunted House for Kids)
 How to Draw a Tooth Step by Step (Cute and Easy for Kids)
 How to Draw a UFO Step by Step (Cute Alien Saucer)
 How to Draw an Astronaut Step by Step (Cute and Easy)
 How to Draw an Owl Step by Step (Cute Night Owl)
 How to Draw an Axolotl Step by Step (Cute and Easy)
 How to Draw Freddy Krueger Step by Step (Cute Chibi Version)
 How to Draw a Frog Step by Step (Cute Frog on a Log)
 How to Draw a Jellyfish Step by Step (Cute, Easy Guide)
 How to Draw a Care Bear Step by Step (Cute Fan Art for Kids)
 How to Draw Cerberus Step by Step (Cute and Easy)
 How to Draw a Monster Step by Step (Cute and Easy)

