
Tanks look complicated at first glance, with all those wheels hiding inside the tracks. Underneath, though, a tank is just a long rounded loop, a box and a dome stacked on top of each other, and this lesson on how to draw a tank step by step builds it in exactly that order. I keep the shapes chunky and round so the tank looks friendly, more like a toy than a war machine. You'll finish with an olive green cartoon tank parked on a strip of dirt.
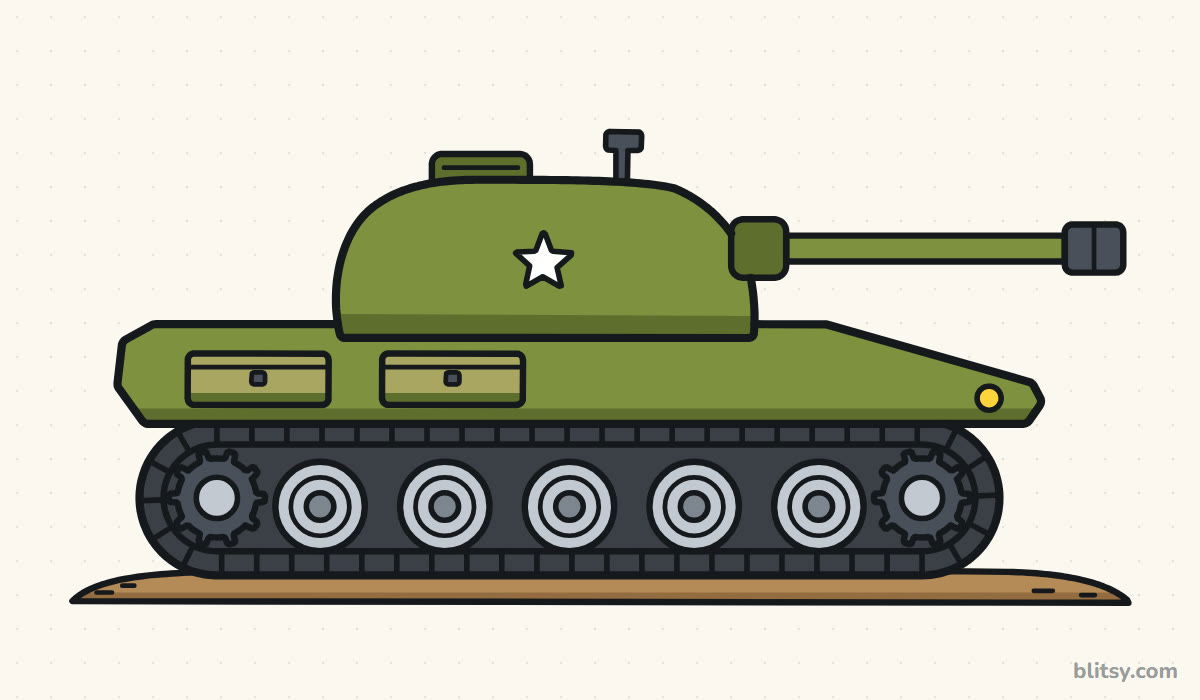
Blue lines in every picture are the ones to add now; gray lines are already on your page. Faint guide shapes come first and get erased in step 11, so sketch them softly.
Quick overview
⏱️ Time: about 30 to 40 minutes, coloring included
🎯 Level: easy, good for kids around 7 and up
✏️ Steps: 12
🪖 You'll draw: a friendly olive cartoon tank with tracks, road wheels and a round turret
Gear for Sketching Your Tank
- A pencil you can hold loosely
- A soft eraser
- A black fineliner or thin marker
- Colored pencils or markers (two greens, two grays, khaki, black, yellow, tan)
- A sheet of paper turned sideways
- A coin or bottle cap for tracing the wheels (optional)
If you don't have olive green, a plain green with a little brown rubbed over it gets you very close.
How to Draw a Tank Step by Step
Step 1: Draw a ground line and the track loop
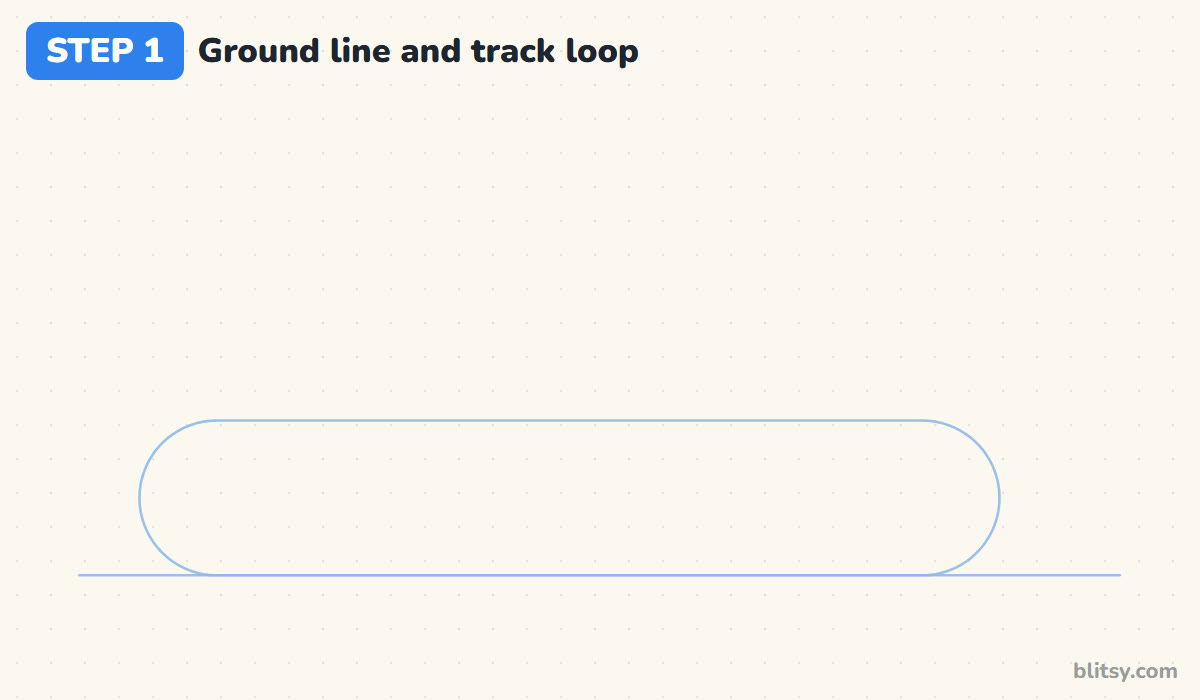
Near the bottom of the page, draw one long, flat line for the ground. Sitting right on it, sketch a long loop with round ends, like a stretched-out racetrack. I make this loop about four times longer than it is tall. That long, low shape is what tells everyone it's a tank.
💡 Tip: Draw the two straight sides first, then join them with the curved ends.
Step 2: Sketch guides for the hull, turret and gun
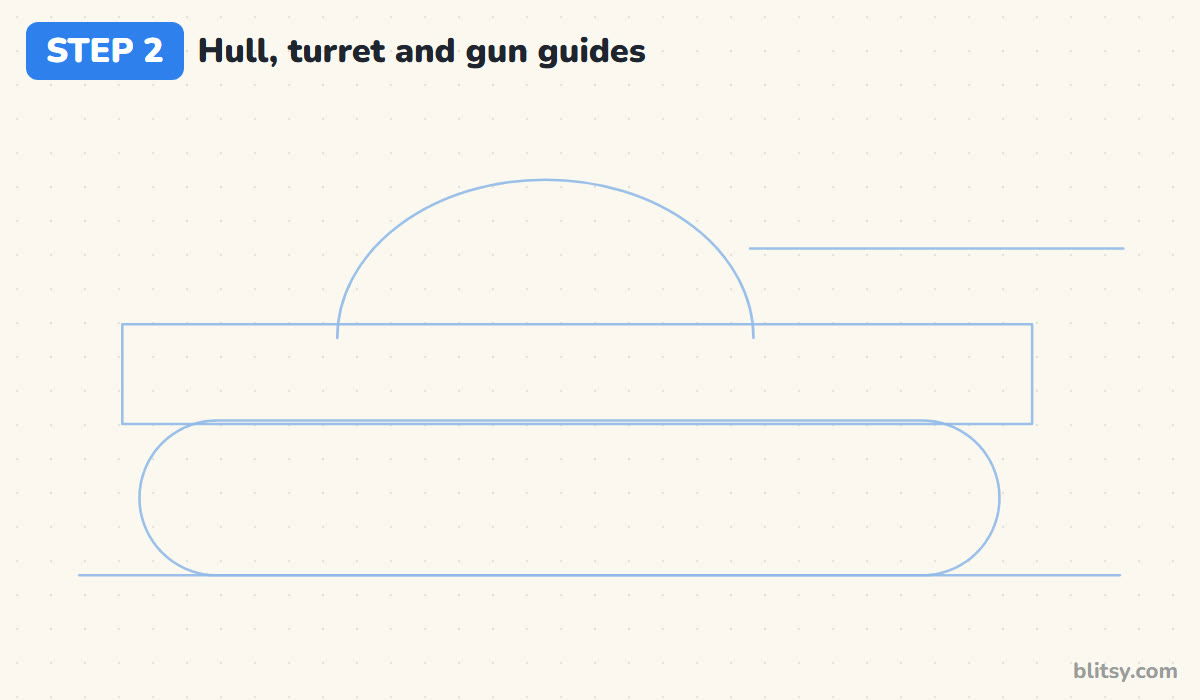
Above the loop, draw a flat rectangle that's a bit longer than the track; its bottom edge rests on top of the loop. On top of that box, a little left of center, add a half oval for the turret. Then draw one straight line sticking out to the right from the front of the half oval. That line shows where the gun barrel will go.
💡 Tip: Keep these guides faint enough to vanish under one pass of the eraser.
Step 3: Trace the track outline
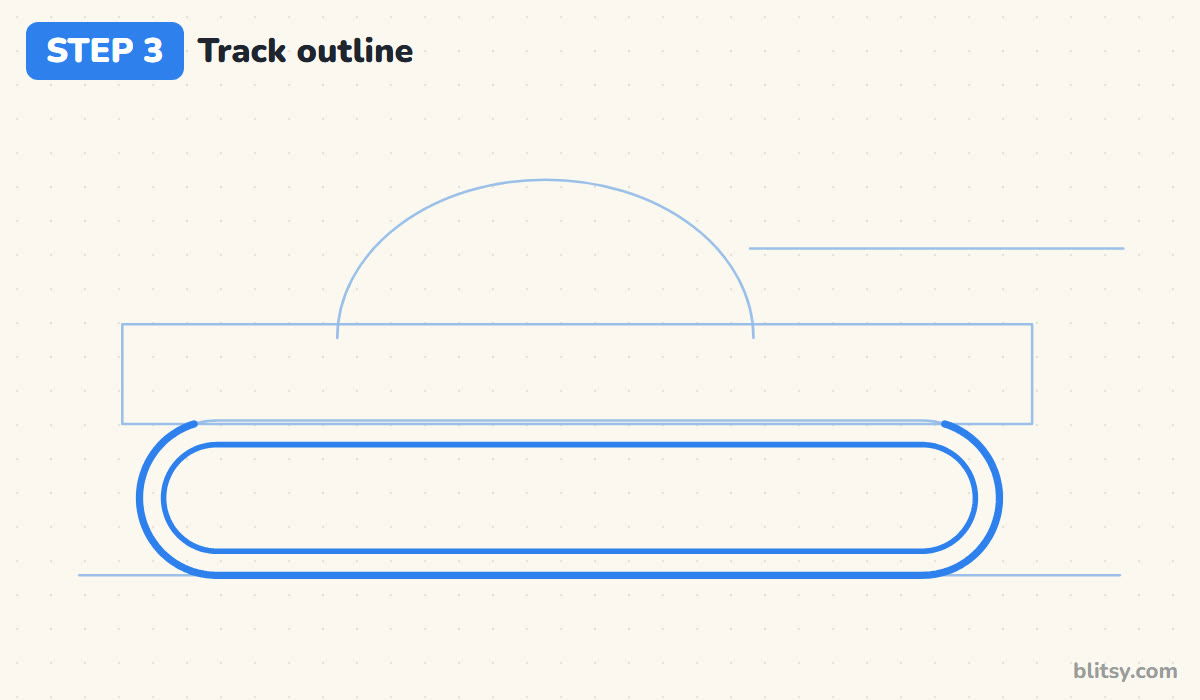
Go over the outside of the loop with a firm line, stopping where it tucks under the hull box. Then draw a second loop inside the first, about a finger's width in. The space between the two lines is the track band, the rubber and steel belt that the tank rolls on. Keep that gap the same width all the way round.



💡 Tip: Rotate the paper as you go around each curved end.
Step 4: Draw the sloped hull
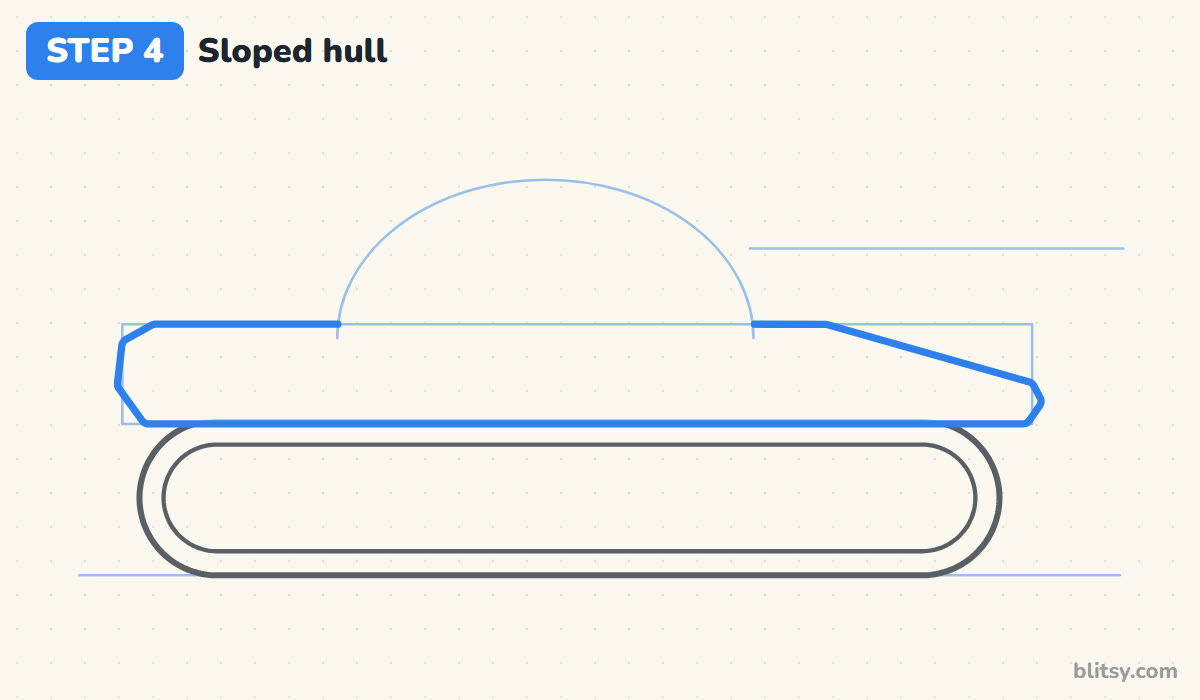
Now turn the hull box into a real shape. Round off the back corner, keep the top flat for most of the length, and then let the front slope down at a long angle to a short blunt nose. That slanted front plate gives the tank its forward-leaning look. Don't draw the part of the top edge where the turret will sit.
💡 Tip: Use a ruler for the long slope if your hand wobbles.
Step 5: Shape the rounded turret
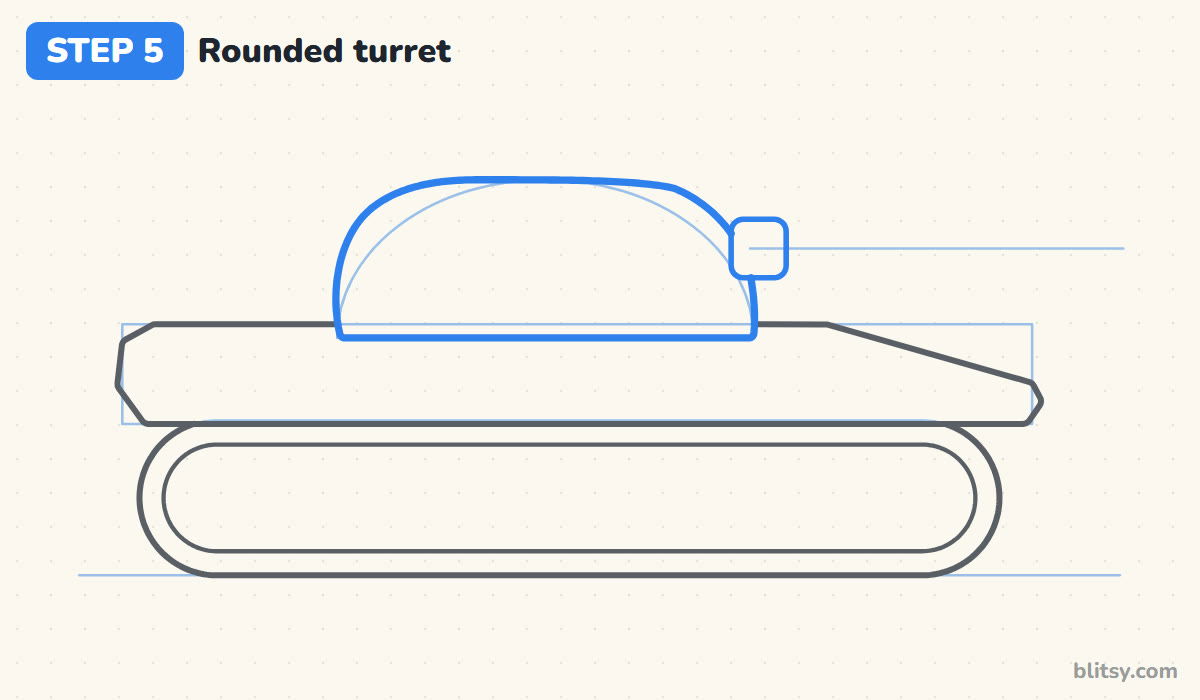
Use the half oval as your guide, but flatten the top and let the front curve down a little more steeply than the back. The turret should cover about half the hull's length. On the front of the turret, add a small rounded block called the mantlet. It's the piece the gun barrel pokes out of.
💡 Tip: Make the turret bottom a straight line that sits on the deck.
Step 6: Add the gun barrel and muzzle
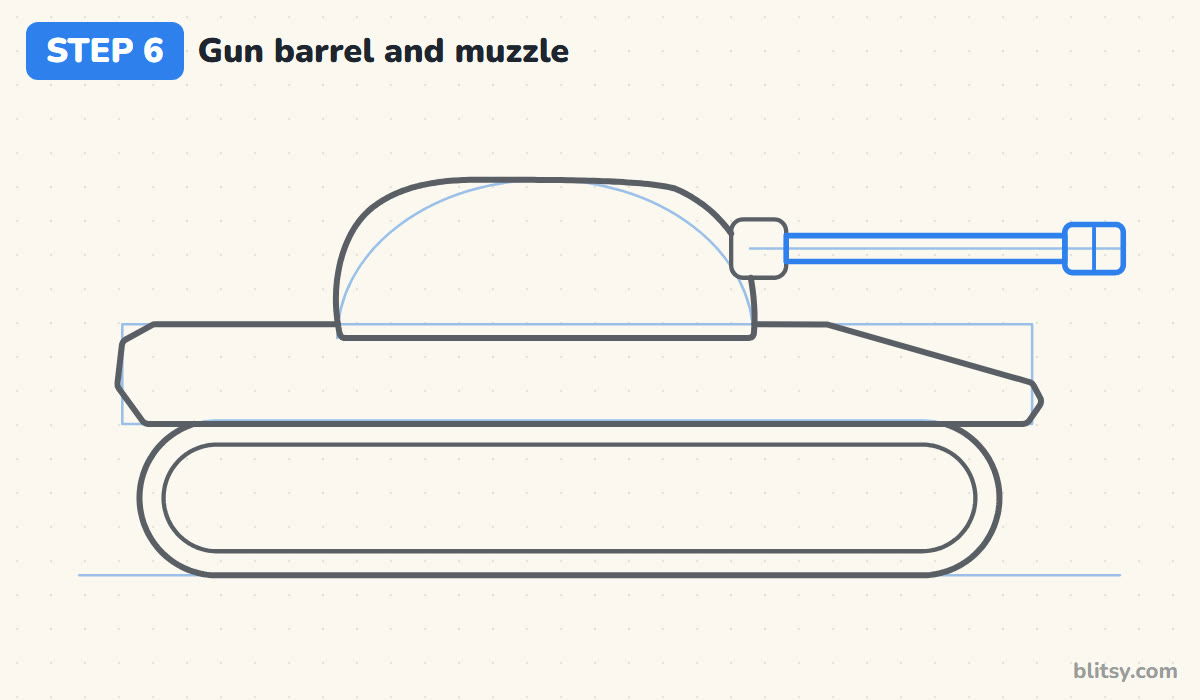
Following the straight guide line, draw two long parallel lines from the mantlet out to the right. At the end, add a slightly taller rectangle for the muzzle and split it with one short line down the middle. I let the barrel reach a little past the front of the hull, because a short barrel makes the tank look stubby.
💡 Tip: Check that the two barrel lines stay the same distance apart.
Step 7: Draw the sprockets and road wheels
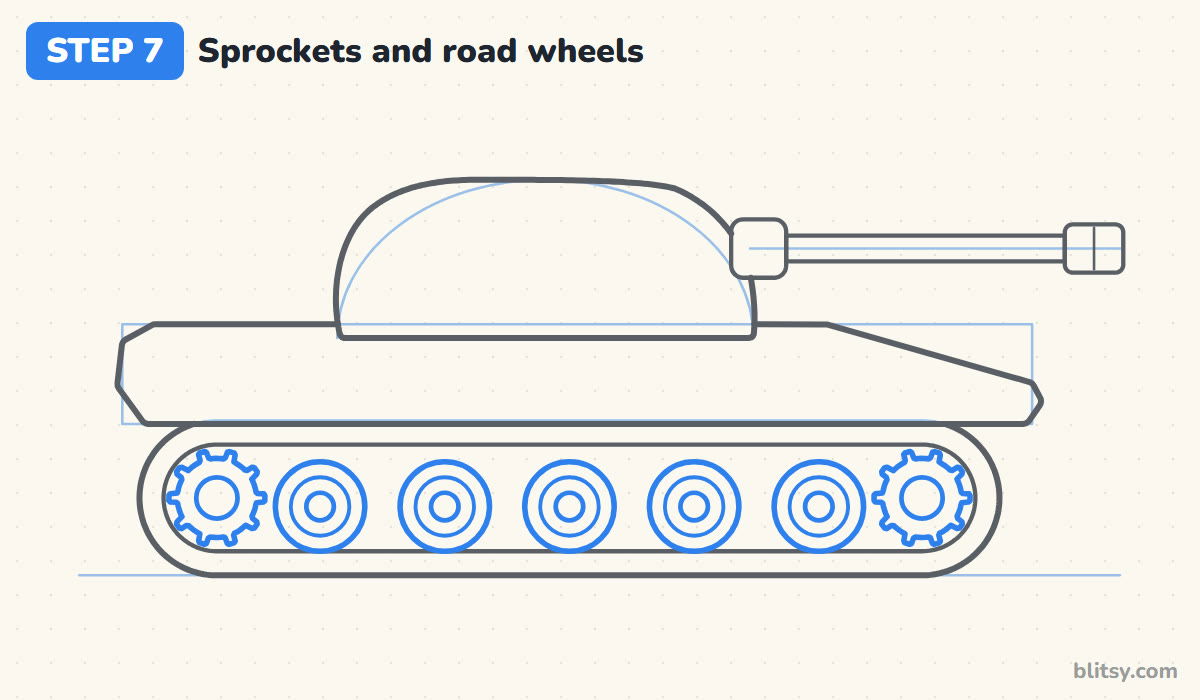
Inside each curved end of the track, draw a round gear with small teeth all around it. These are the sprockets, and their teeth grip the track and pull it around, which is how a tank moves. Between them, draw five road wheels in a row along the bottom. Give every wheel a ring and a little hub circle in the middle.



💡 Tip: Space the five wheels evenly before adding any rings.
Step 8: Mark the treads and the dirt
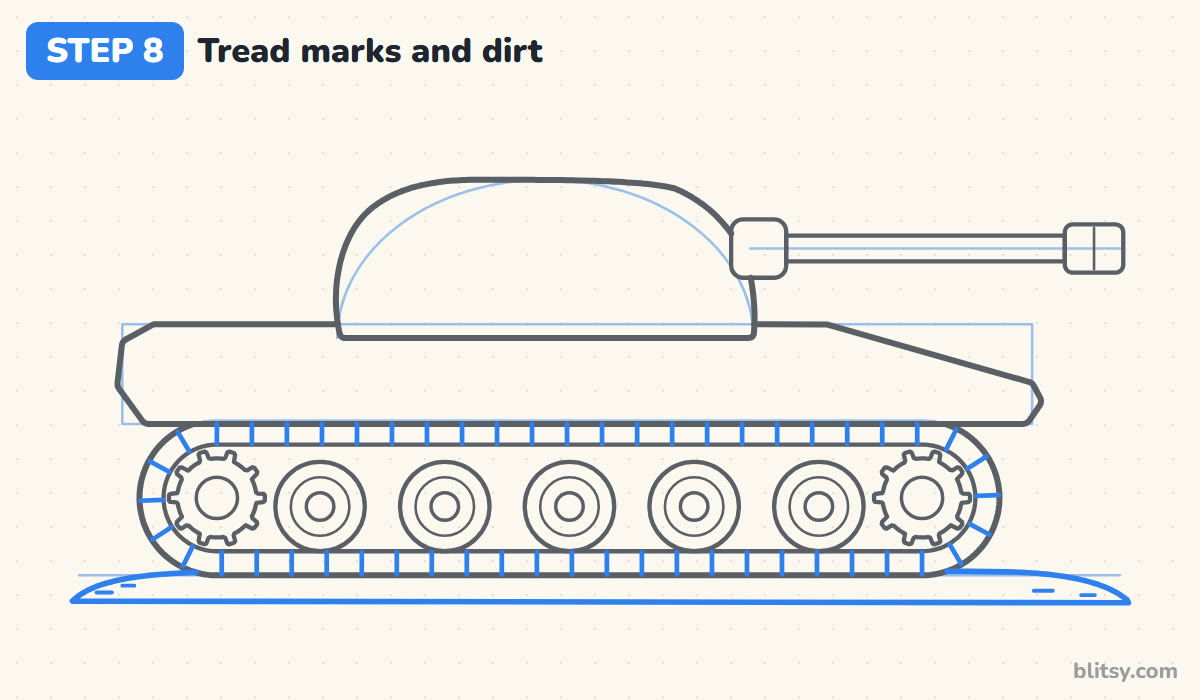
Across the track band, draw short lines from the inner edge to the outer edge, spaced evenly like the rungs of a ladder. On the curved ends, angle them so they point toward the center of the sprocket. Under the tank, sketch a low strip of dirt with ends that dip down, plus a few dashes for pebbles.
💡 Tip: Draw every tenth mark first, then fill in between them.
Step 9: Add the hatch, periscope and star
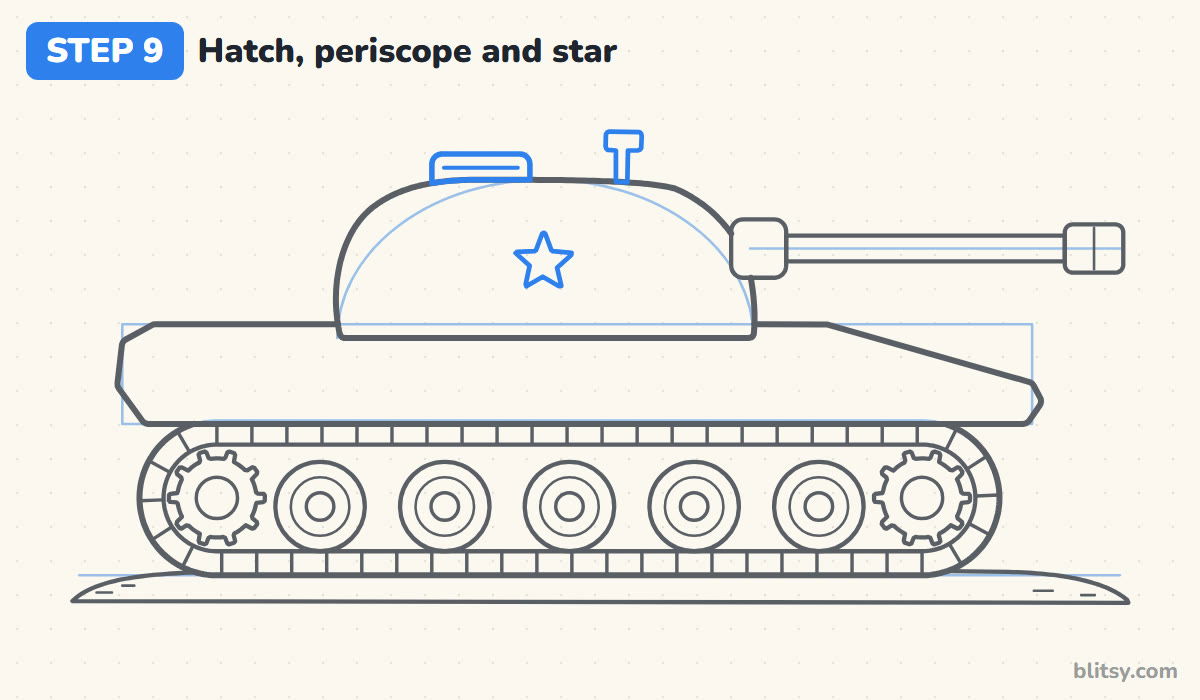
On top of the turret, draw a short rounded box for the hatch, with a thin line across it for the lid. A bit further forward, add a periscope: a thin post with a small flat box on top. It lets the crew see out without opening the hatch. Finish with a simple five-point star on the turret side.
💡 Tip: Start the star at the top point and go around without lifting the pencil.
Step 10: Draw the storage boxes and headlight
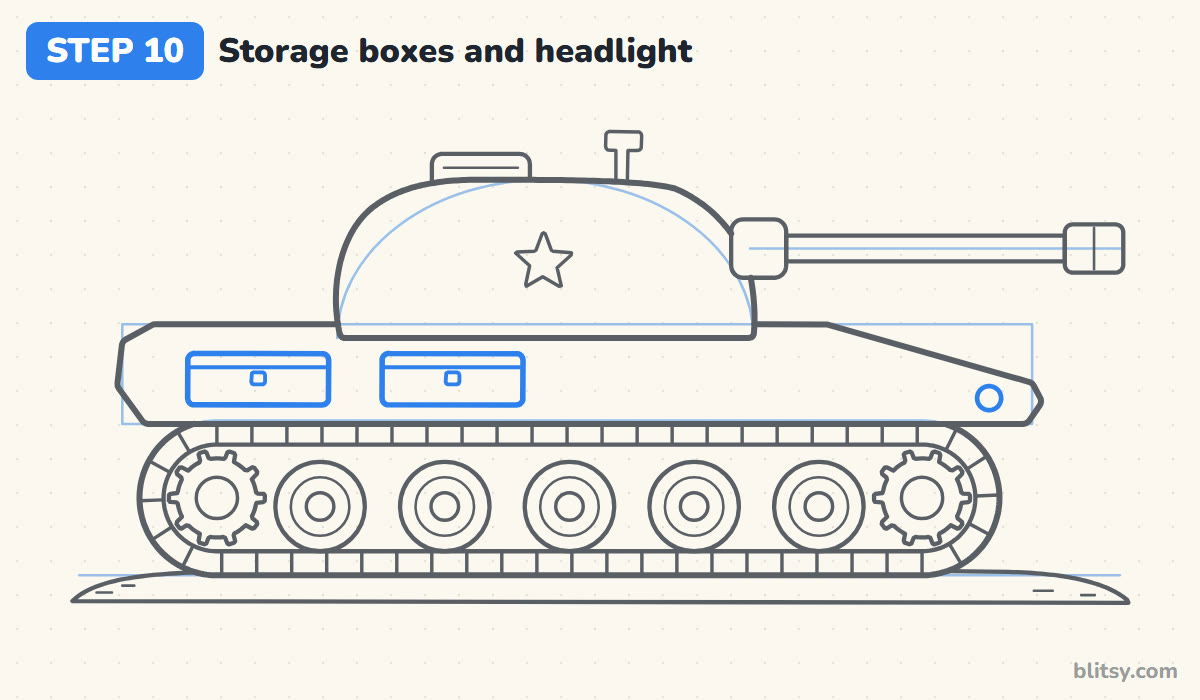
On the side of the hull, under the turret, draw two long boxes with rounded corners. Add a lid line near the top of each one and a tiny square latch in the middle. Then put a small round headlight on the sloped front. Younger kids can skip the latches.
💡 Tip: Line up the tops of both boxes with each other.
Step 11: Ink the lines and erase the guides
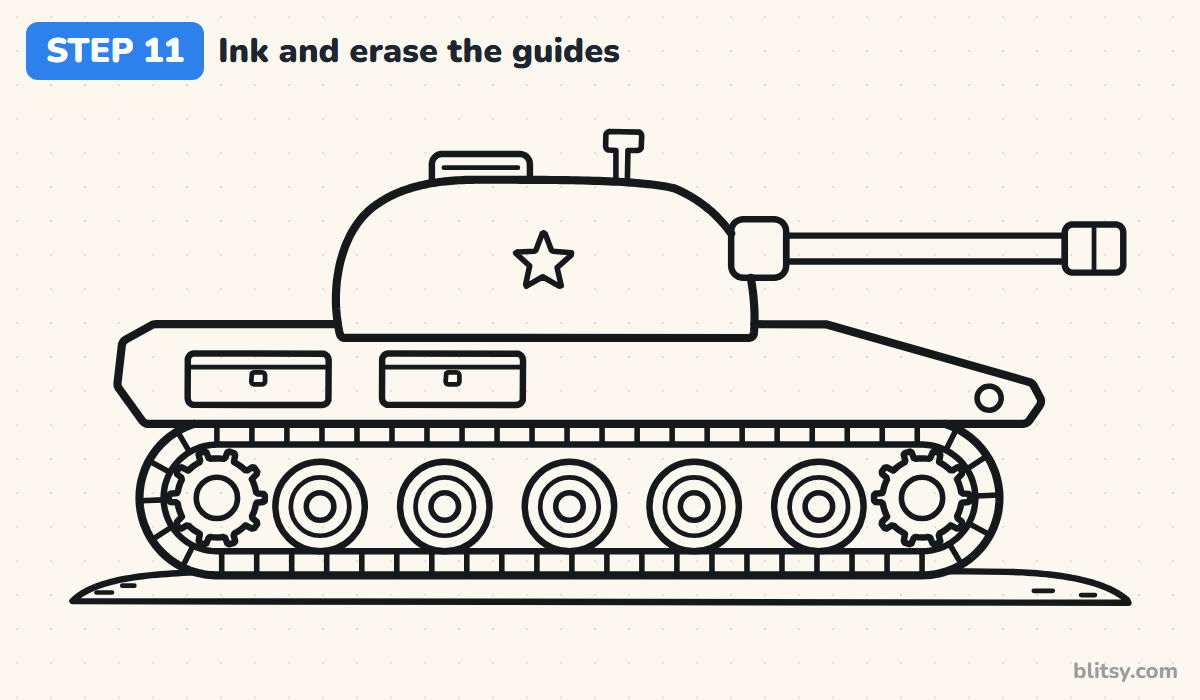
Trace every line you want to keep with the fineliner. I go from top to bottom: turret and barrel first, then the hull, and the track with its wheels last. Wait a minute or two for the ink to dry before erasing. Then rub out the box, the half oval, the barrel line, the first loop and the ground line.




💡 Tip: Ink the wheel circles in small arcs rather than one big swing.
Step 12: Color the tank
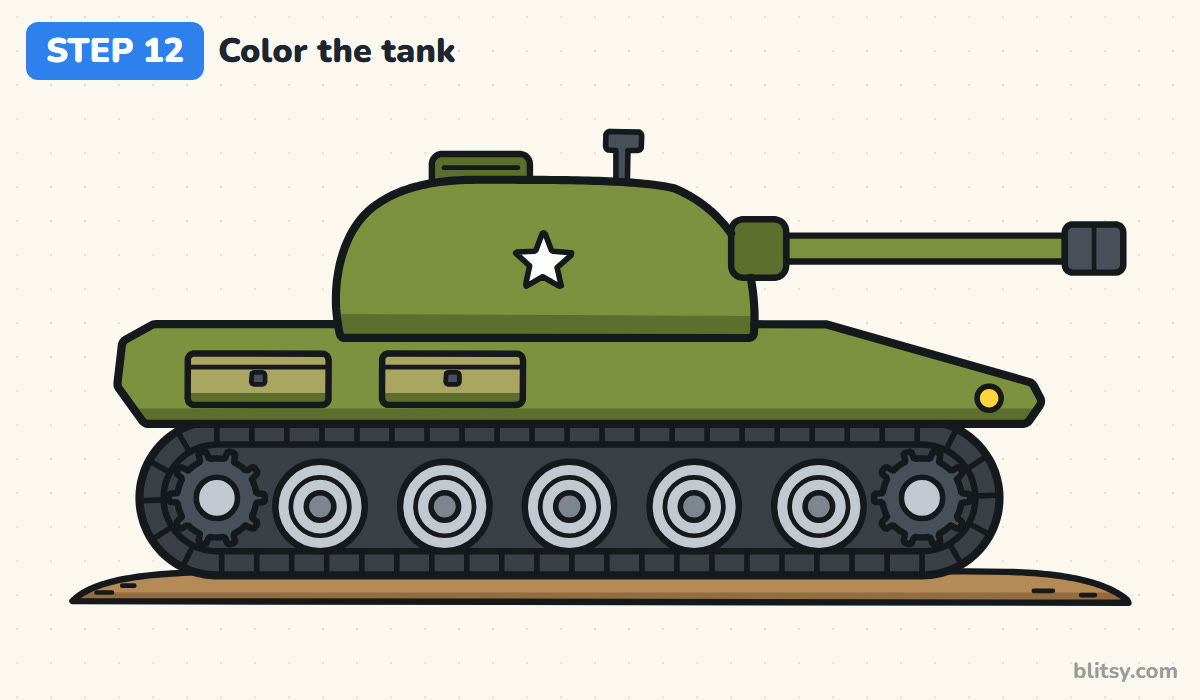
Fill the hull and turret with olive green, and the barrel too. Use dark green along the bottom of the hull and turret for shadow, and on the hatch and mantlet. The storage boxes are khaki, the star stays white and the headlight is yellow. Color the track black, the road wheels light gray and the sprockets and muzzle dark gray. Tan finishes the dirt.
💡 Tip: Leave the white star alone and color carefully around it.
Why Tank Sketches Sometimes Look Off
- A track loop that's too short. The tank ends up looking like a car. Stretch the loop to at least four times its height.
- Wheels floating in the middle of the track. They should touch the bottom of the band, because they carry the tank's weight. Line them up along the lower edge.
- A turret as big as the hull. The tank tips over visually. Keep the turret to about half the hull's length.
- Tread marks spaced at random. The track looks broken. Place a few marks first as markers, then fill the gaps evenly.
- Coloring the whole tank one flat green. It looks like a cutout. Add the darker green along the bottom edges so the shapes look solid.
Desert, Snow or Camo: Tank Variations
Once the basic shape feels easy, play with it. Paint a desert tank in sandy tan, try a snowy white one with gray patches, or add a camouflage pattern of green and brown blobs. I also like giving older kids the challenge of a slightly higher angle, so the top of the turret shows. If you liked the wheels and tracks, the monster truck drawing tutorial makes a fun next project, and the train drawing tutorial is great practice for long vehicles with lots of wheels.
Free Tank Coloring Page and Printable PDF Guide
The tank coloring page has a colored example and a color key at the top, with a big bold outline below and plenty of room to add hills, trees or clouds. The step-by-step PDF guide holds all 12 steps and their tips. Both print on Letter or A4 paper.
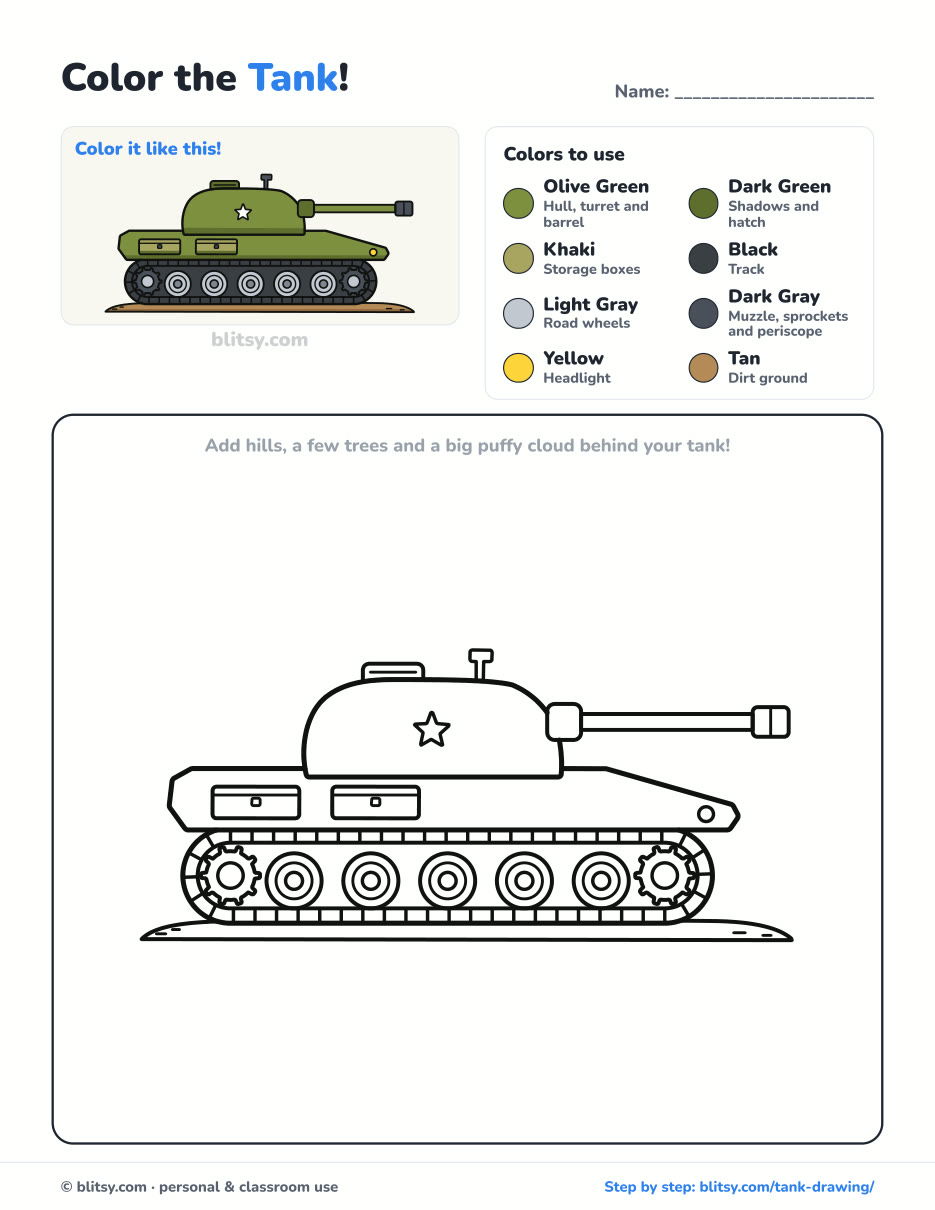
Black outlines with a colored example and the color names at the top. Ready to print and color.
⬇️ Download Coloring PageEvery step picture with its instructions and tips, to keep beside your paper while you draw.
⬇️ Download Drawing Guide📱 On a phone? Tap a download button, then open the file and choose Share → Save to Files or Print. On a computer, the PDF opens or saves straight to your Downloads folder.
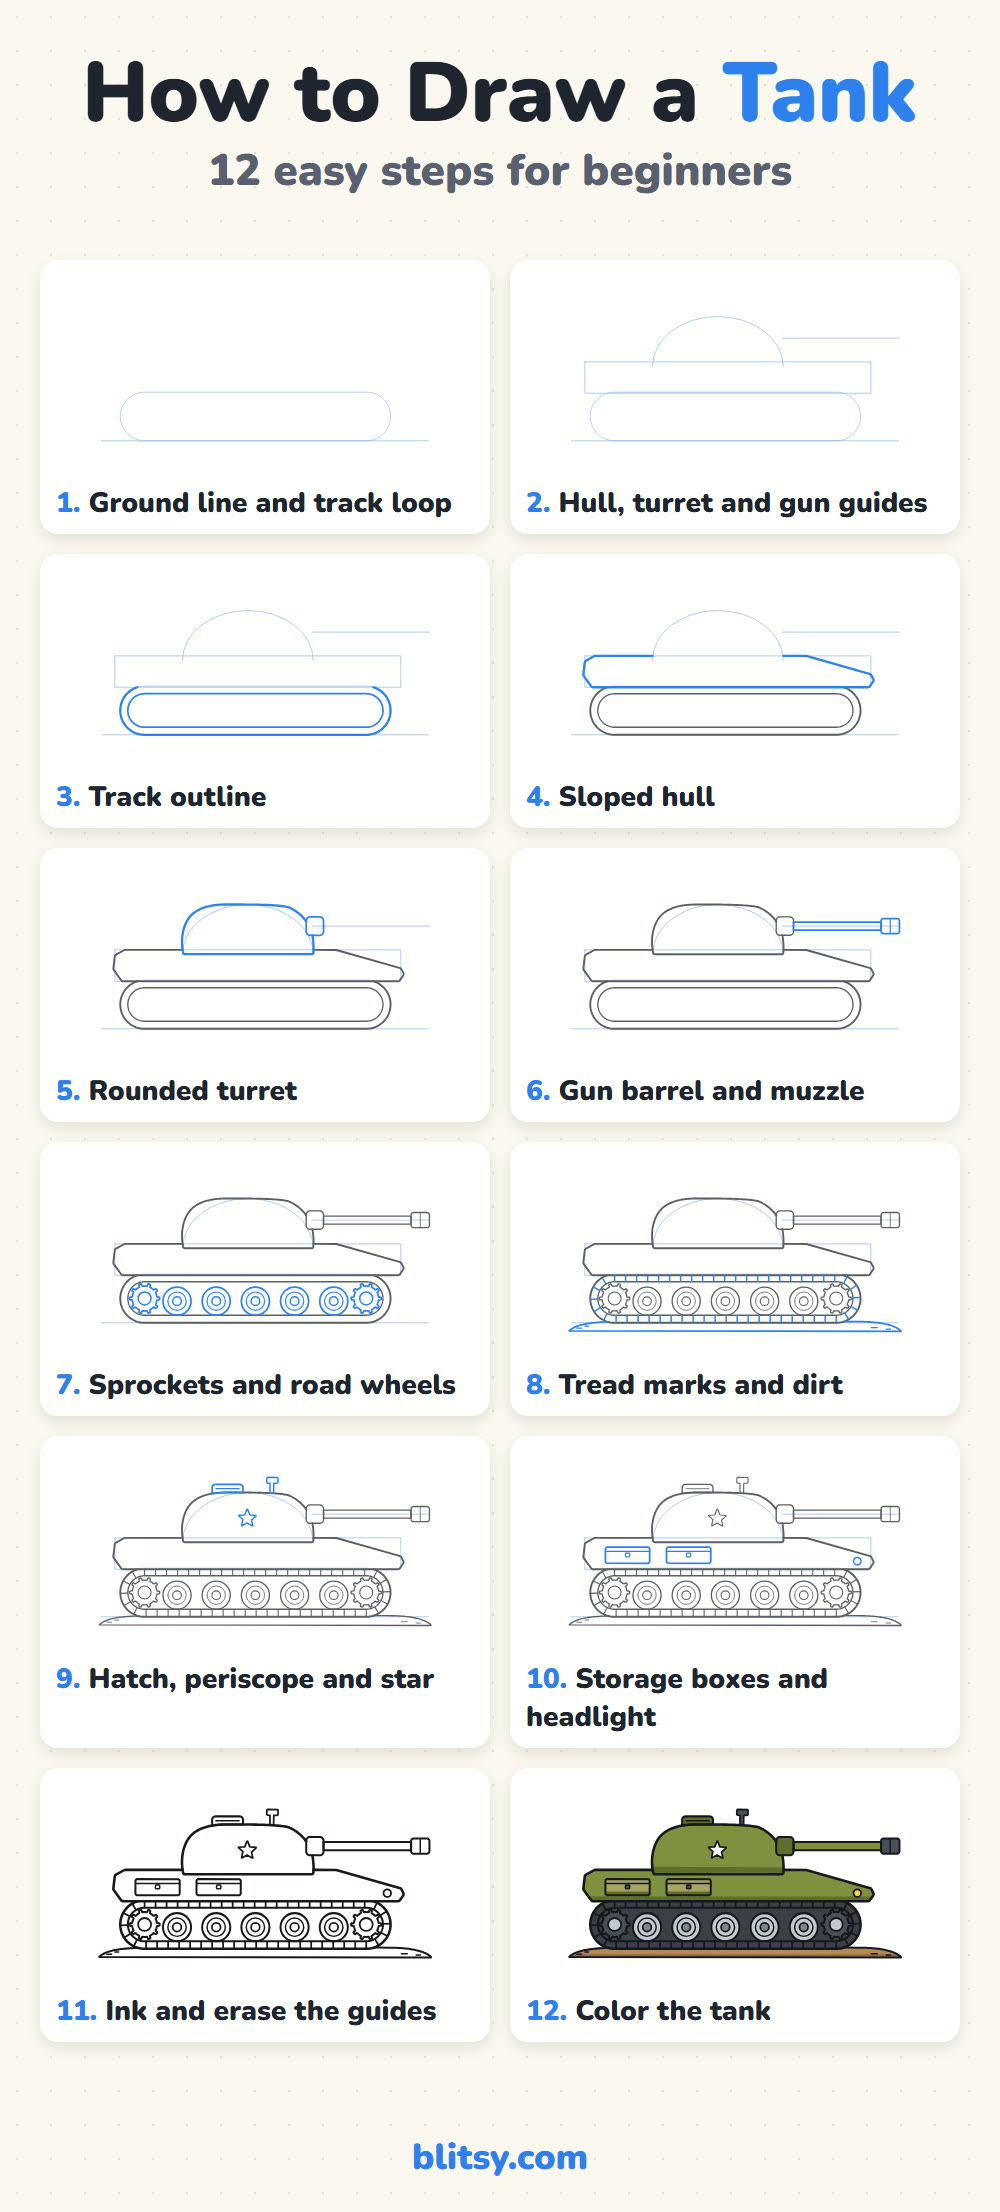
Pin the Tank Steps for Another Day
Vehicles, Gear and Buildings to Draw After the Tank
Below are more step-by-step tutorials, each with numbered pictures, from rockets and trains to a fairy-tale castle.
- Baseball Bat Drawing: A wooden bat on a slant, a glove and a ball make a small still life in the how to draw a baseball bat tutorial.
- Rocket Drawing: Draw a rocket mid-launch with a ringed planet behind it in this rocket drawing step by step lesson.
- Train Drawing: Our steam train drawing tutorial builds a red boiler, a blue cab and spoked wheels with three puffs of steam.
- Realistic Drawing: The realistic drawing tutorial teaches shading on one shiny apple, a good step toward realistic metal and paint.
- Rock Drawing: A chunky gray boulder and two neighbors take shape in the how to draw rocks step by step guide.
- Diamond Drawing: Straight lines turn into one brilliant-cut gem in this diamond drawing tutorial.
- Bed Drawing: Learn how to draw a bed in 3D, made up with two plump pillows and a blue star duvet.
- Monster Truck Drawing: Two circles grow into a flame-painted truck on a dirt mound in the monster truck drawing tutorial.
- Castle Drawing: Three towers and a drawbridge over the moat finish the castle drawing step by step lesson.
- UFO Drawing: A saucer with its beam on and an alien on board is the goal of the cute UFO drawing tutorial.
Tank Drawing Questions From Young Artists
What is the easiest way to draw a tank?
Start with a long loop with rounded ends for the track, put a flat box on top for the hull and a half circle on the box for the turret. Add a straight barrel and a row of circles inside the loop, and it already reads as a tank.
How do tanks move on tracks?
The track is a long belt that wraps around the wheels. A toothed sprocket at one end turns and pulls the belt around, while the road wheels roll along the inside of it. Because the track spreads the weight over a long strip, a tank can cross mud and soft ground where tires would sink.
How long does it take to draw a tank?
About 30 to 40 minutes with coloring. The tread marks take the longest.
Can little kids draw this tank?
Yes. Children around 5 or 6 can do the loop, the box, the turret and the wheels, and leave out small extras like the sprocket teeth or the periscope.
Park your tank on a hill, give it a name painted on the side, and show someone what you made. 🪖
Related posts:
 How to Draw Bart Simpson Step by Step (Easy Cartoon)
 How to Draw a Bee Step by Step (Easy Cartoon Bee)
 How to Draw a Boy Step by Step (Easy Full-Body Cartoon)
 How to Draw a Mermaid Step by Step (Easy Cartoon for Kids)
 How to Draw a Family Step by Step (Easy Cartoon Portrait)
 How to Draw a Princess Step by Step (Easy Ball Gown Cartoon)
 How to Draw a Cowboy Step by Step (Easy Cartoon Kid)
 How to Draw a Whale Step by Step (Easy for Beginners)
 How to Draw Lungs Step by Step (Easy Science Diagram)
 How to Draw a Pineapple Step by Step (Easy Crown and Slice)
 How to Draw Iron Man Step by Step (Easy Chibi for Kids)
 How to Draw a Dress Step by Step (Easy Party Dress)

