
Springtrap looks spooky in the game, but on paper he can be a goofy, worn-out bunny with a big grin. Here you'll learn how to draw Springtrap step by step in a chibi style, which means a huge head, a small round body and stubby arms and legs. I like this version for younger artists because nothing about it is creepy: the eyes are round and bright, the teeth form a happy smile, and the old-costume look comes from patches and stitches instead of scary damage. This is my own simple fan-art version for practice, not official art from Five Nights at Freddy's.
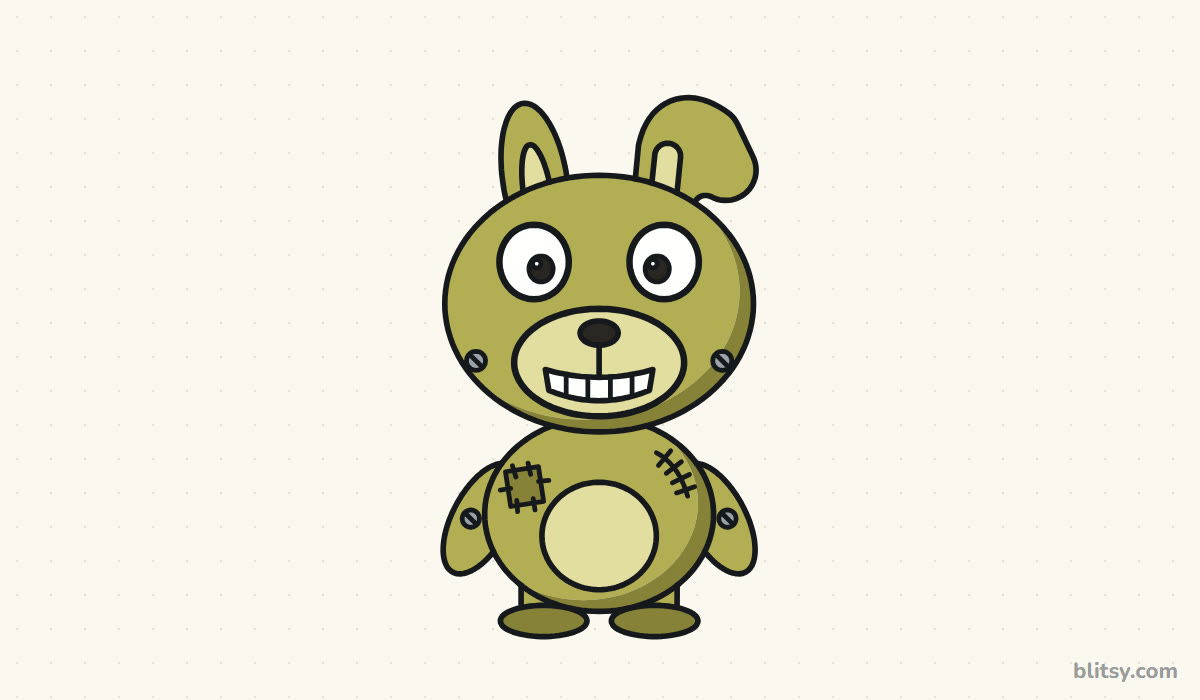
Blue marks the lines for the current step, while gray shows what you drew before. Match the blue part, then move to the next step.
Quick overview
⏱️ Time: around 30 minutes, coloring included
🎯 Level: beginner, fine for kids about 6 and older
✏️ Steps: 12
🐰 You'll draw: a friendly chibi Springtrap standing and smiling
Pencil Case Kit for a Worn-Out Bunny
- A regular pencil for light sketching
- A soft eraser
- A black fineliner or thin marker
- Olive green plus a darker olive for shading
- A pale yellow for the muzzle and belly
- Gray for the bolts and black for the pupils
A yellow-green crayon or pencil works fine if you don't own an olive one, so use what you have.
How to Draw Springtrap Step by Step
Step 1: Sketch the head and body guides
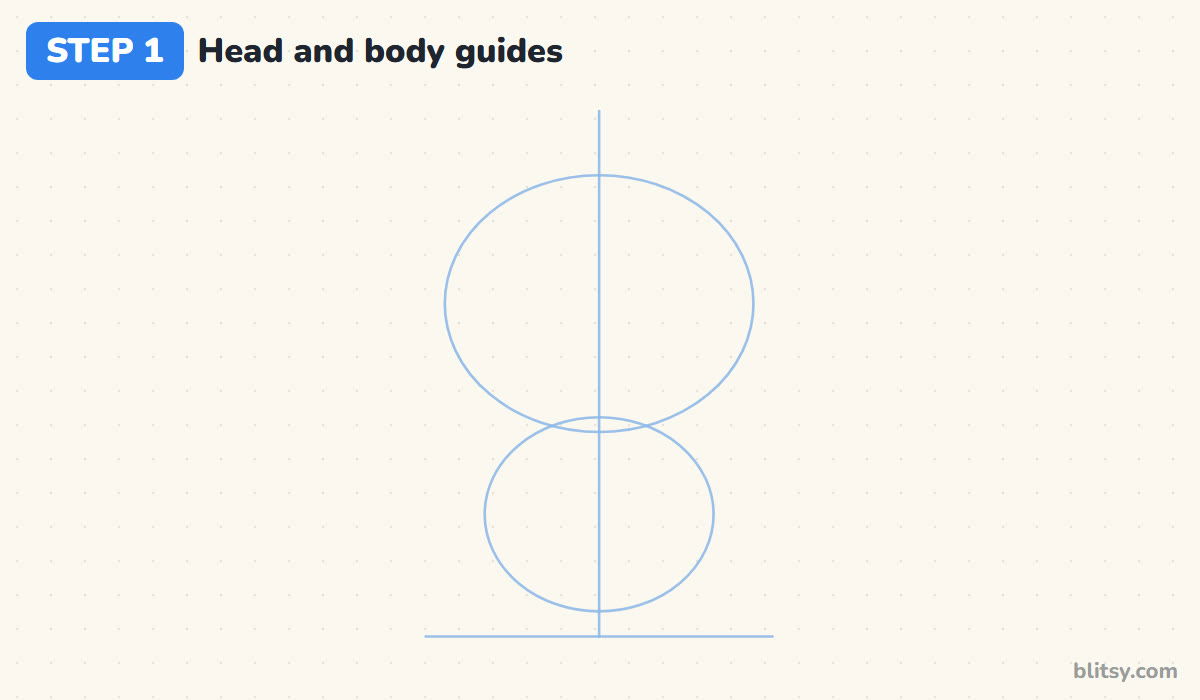
Lightly draw a straight line down the middle of your page and a short ground line at the bottom. Near the top, sketch a wide oval for the head. Just below it, overlapping a little, add a smaller oval for the body. The head should be clearly the bigger of the two, because that's what gives a chibi its cute look.
💡 Tip: Make the head oval roughly one and a third times as wide as the body. If they match, he looks like a snowman.
Step 2: Add guides for the ears, face and limbs
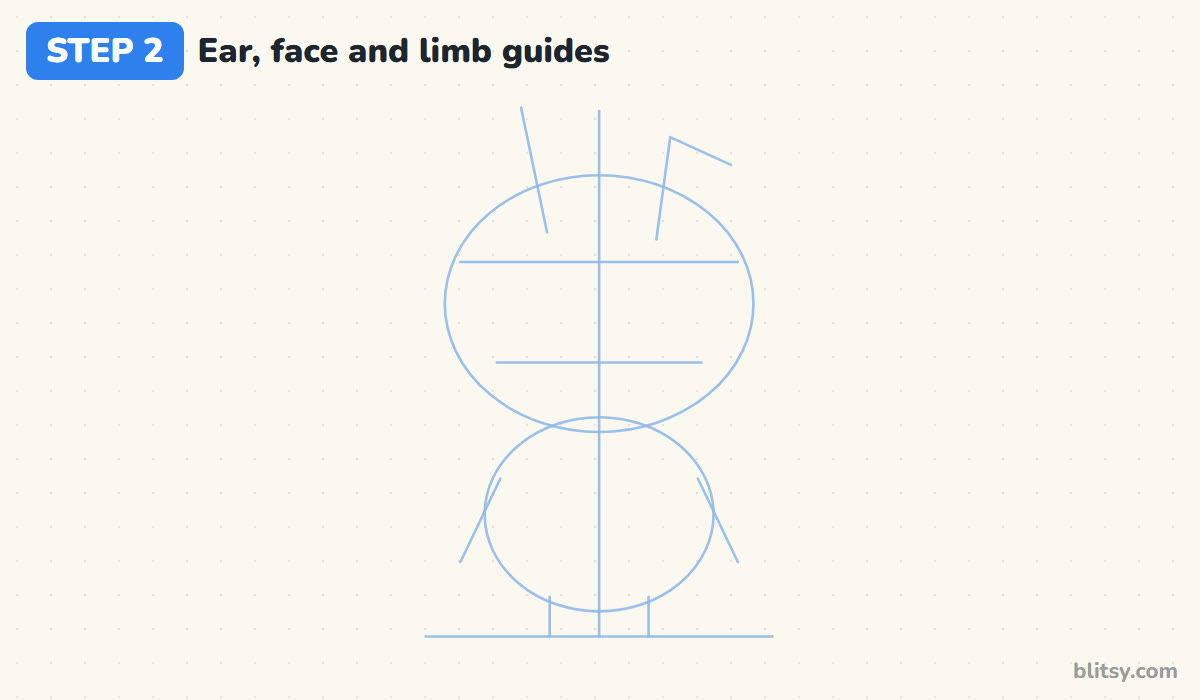
Draw two lines sticking up from the top of the head for the ears. The left one goes almost straight up. The right one goes up and then bends sharply to the right, since that ear will flop over. Add a line across the head at eye height and another lower down for the muzzle, then slanted lines beside the body for arms and two short lines under it for legs.
💡 Tip: Keep the eye line slightly above the middle of the head. Lower eyes push the muzzle onto the chin.
Step 3: Draw the big rounded head
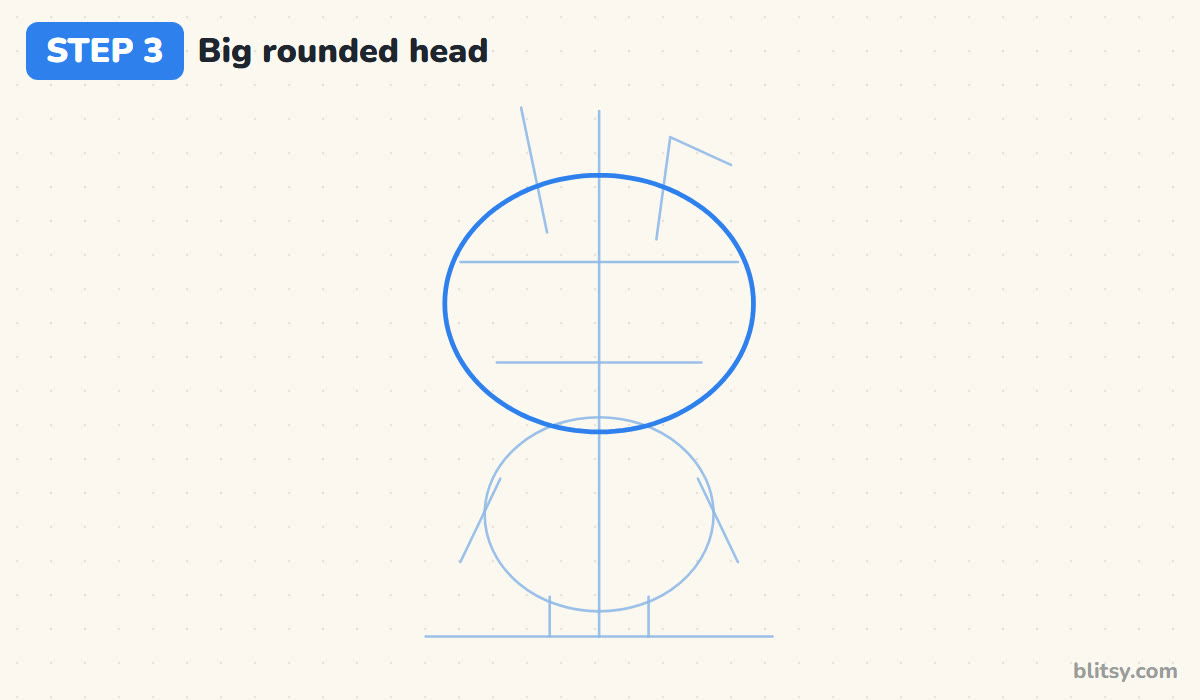
Trace over the head oval with a firmer, smooth line. That's the whole step, and it's worth taking your time. A lumpy head is the first thing people notice, so turn your paper if it helps you follow the curve.



💡 Tip: Draw the oval in two halves, left side then right side, meeting at the top and bottom.
Step 4: Draw two long rabbit ears
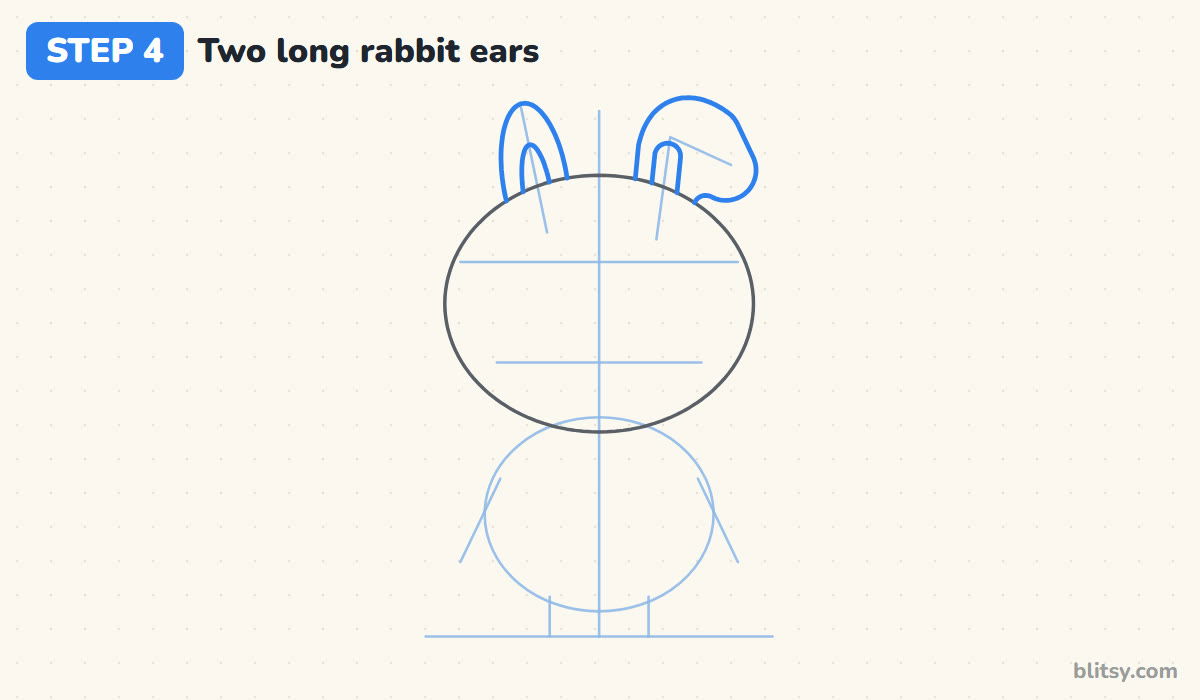
Around the left guide, draw a tall, narrow rounded ear that tucks behind the head. For the right ear, follow its bent guide: go up, curve over the top and let the tip hang down to the right like a sock with a fold. Put a thin oval inside each ear for the inner ear, stopping it below the bend on the floppy one.
💡 Tip: The bent ear is the detail that says Springtrap. Let the tip droop below the top of the other ear.
Step 5: Outline the round body and belly
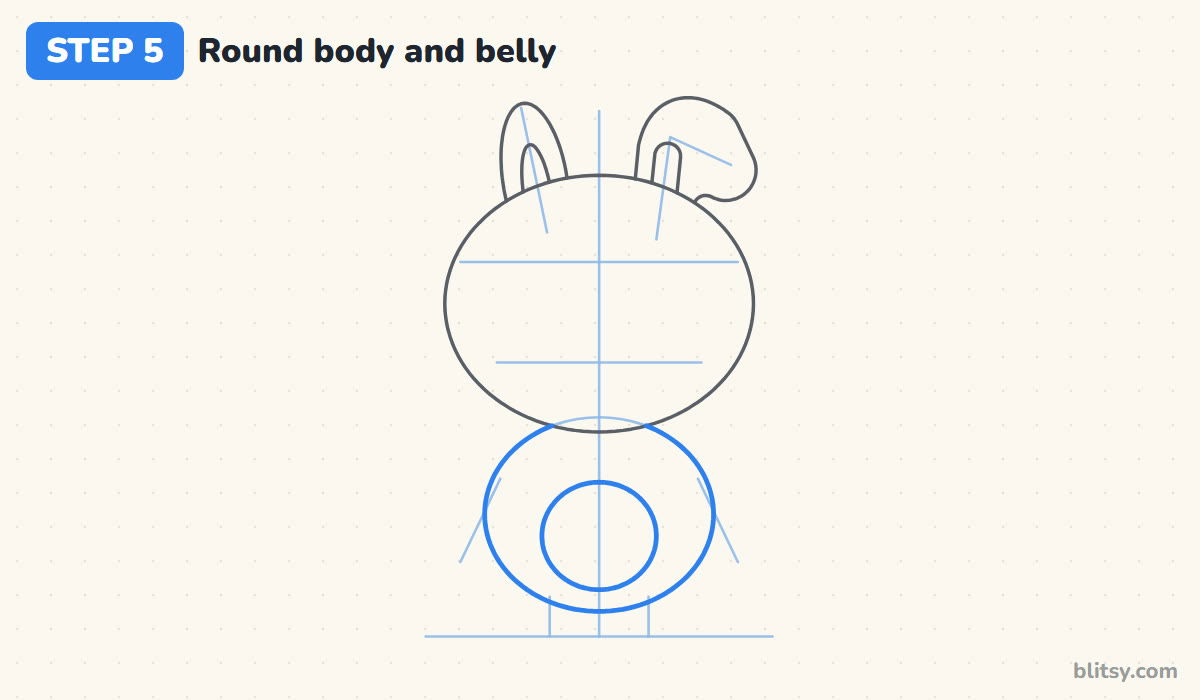
Go over the body oval, but stop where it meets the head, since the head sits in front. Then draw a smaller circle in the lower middle of the body for the belly panel. Leave a gap all around the belly so it doesn't touch the edges.
💡 Tip: Center the belly a little low on the body. Placed too high, it hides under the chin.
Step 6: Add short arms and stubby legs
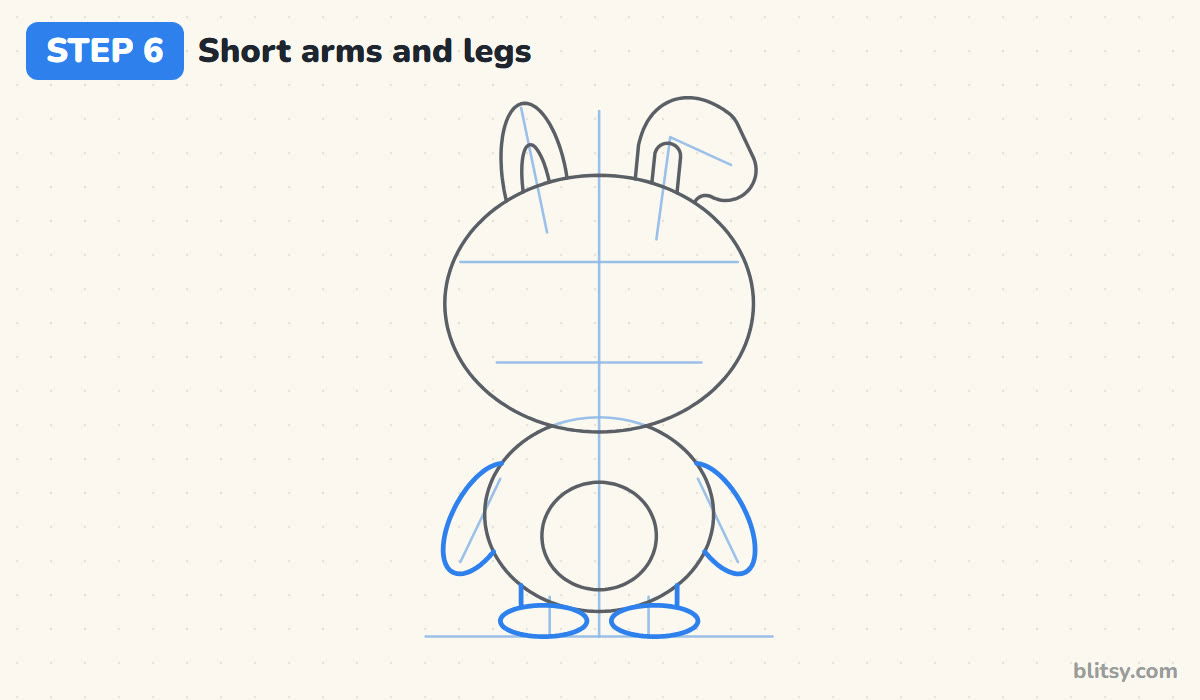
On each side, draw a long oval arm that leans outward at the bottom, partly hidden behind the body. Under the body, sketch two short legs and finish each with a flat oval foot sitting on the ground line. Chibi limbs are tiny, so if they feel too small, you've probably got them right.
💡 Tip: Tilt both arms by the same amount. One straight arm and one slanted arm make him look like he's waving by accident.
Step 7: Draw the muzzle and little nose
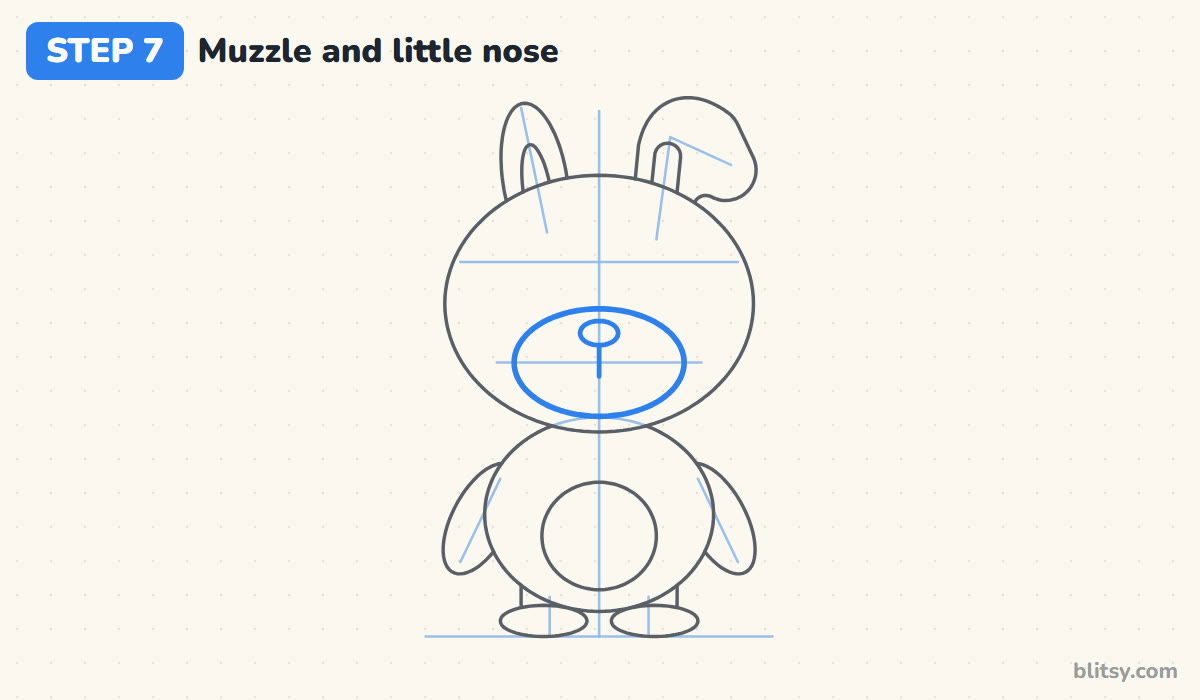
Center a wide oval on the lower guide line of the face. It should take up nearly half the width of the head. Near the top of this muzzle, draw a small flat oval nose, then a short line straight down from it, which becomes the middle of the mouth.


💡 Tip: I make the muzzle wider than it is tall. A round, tall muzzle turns the face into a bear.
Step 8: Draw round, friendly eyes
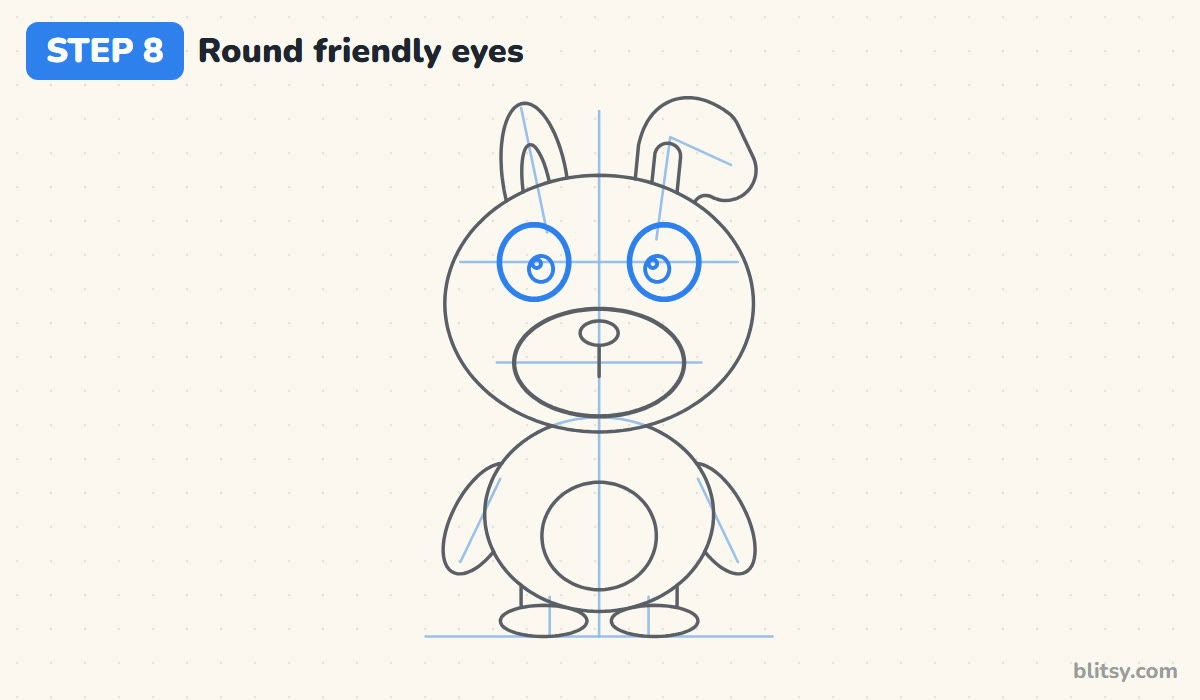
Place two big circles on the eye line, one on each side of the middle line, with a gap between them about as wide as one eye. Inside each, draw a small pupil and a tiny shine circle in it. Small pupils with white space around them look curious and happy rather than spooky.
💡 Tip: Leave the shine dot empty when you color. That little white spark is what makes the eyes look alive.
Step 9: Add a row of square teeth
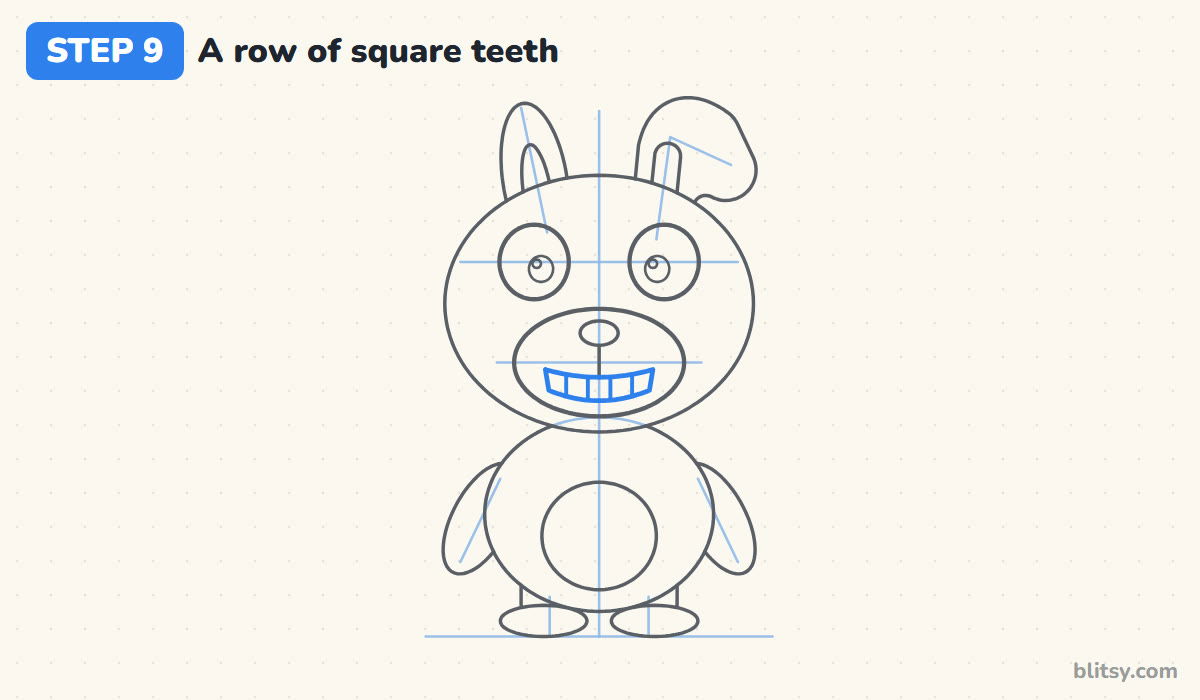
In the lower part of the muzzle, draw a wide smile shape: a top edge that dips gently in the middle and a bottom edge that dips a bit more. Divide it with four short vertical lines to make five square teeth. The curve is what turns the teeth into a grin.
💡 Tip: Space the dividing lines evenly by drawing the middle one first, then one in each half.
Step 10: Draw a patch, stitches and bolts
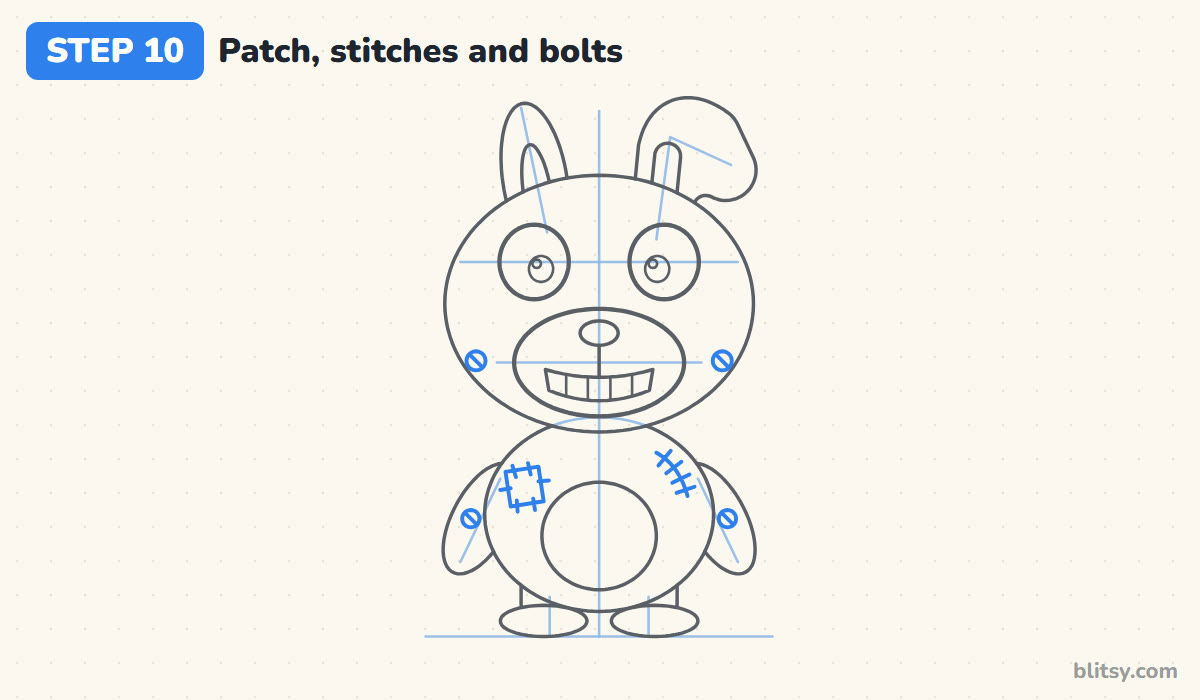
Now for the old-costume look. Draw a small tilted square on the upper left of the body with tiny dashes crossing its edges, like stitches holding a patch. On the right side, add a curved seam with four short cross marks. Finish with little circles for bolts on both cheeks and both arms, each with a slanted line through it.
💡 Tip: Keep the worn details few and small. Three or four are enough to tell the story without crowding the drawing.
Step 11: Ink the lines and erase the guides
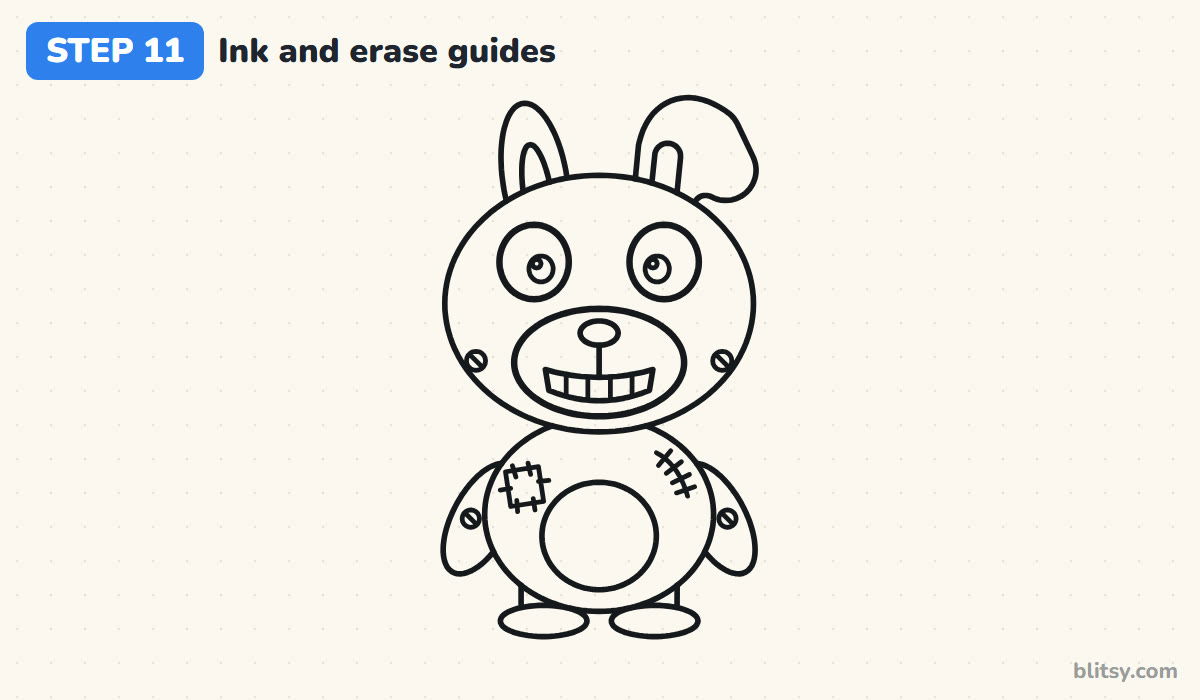
Trace every keeper line with your black marker, skipping the guide ovals and the straight construction lines. I ink the eyes and teeth first, while my hand is fresh, and save the big outline for last. Give the ink a minute to dry, then erase all the pencil underneath.


💡 Tip: Use the lightest pressure on the bolt slashes and stitch marks, so they stay thinner than the main outline.
Step 12: Color your Springtrap
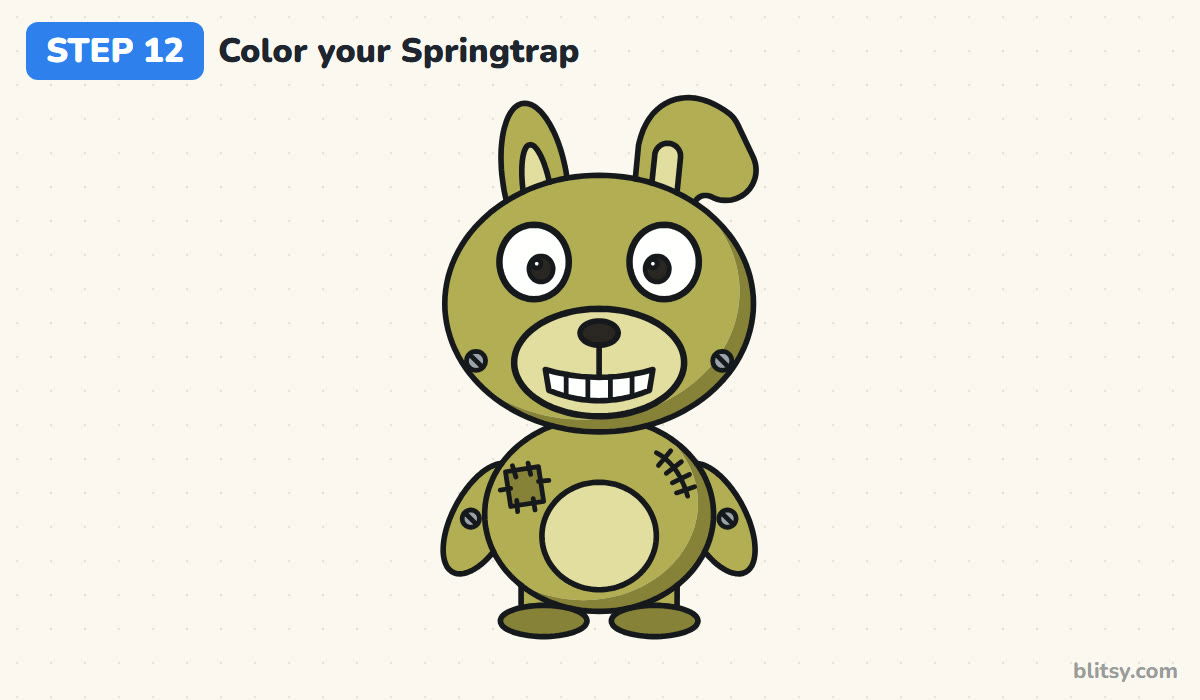
Color everything outside the muzzle and belly olive green. With a darker olive, shade a thin crescent along the lower right edge of the head and body, then fill the patch and feet. The muzzle and belly get pale yellow, and so do the inner ears. Make the bolts gray, the pupils and nose black, and leave the eyes and teeth white.
💡 Tip: Put down the pale yellow before the olive. If green slips into the muzzle, it's much harder to clean up than the other way around.
Spots That Turn a Chibi Springtrap Spooky
- Tiny eyes or dark empty sockets. They turn the face creepy fast. Keep the eyes big and white with a small pupil and a shine dot.
- Straight, flat teeth. A flat row reads as a grimace. Curve the band upward at both ends so it smiles.
- A head the same size as the body. The chibi charm disappears. Let the head clearly win.
- Both ears standing straight. Then he's just a green bunny. One bent ear is the quickest way to make him recognisable.
- Too many rips and wires. Heavy damage makes him scary for small kids. A patch, one seam and a few bolts do the job.
Party Hats, Balloons and Other Springtrap Ideas
After your first one, try giving Springtrap a party hat that sits between his ears, a balloon tied to one hand, or a second patch in a brighter color so he looks freshly mended. You could also draw him waving by lifting one arm above the shoulder. If you'd like a regular rabbit to practice the ears on, try this easy bunny drawing tutorial, and kids who enjoy friendly creatures can move on to how to draw a cute monster.
Springtrap Coloring Page and 12-Step Printable
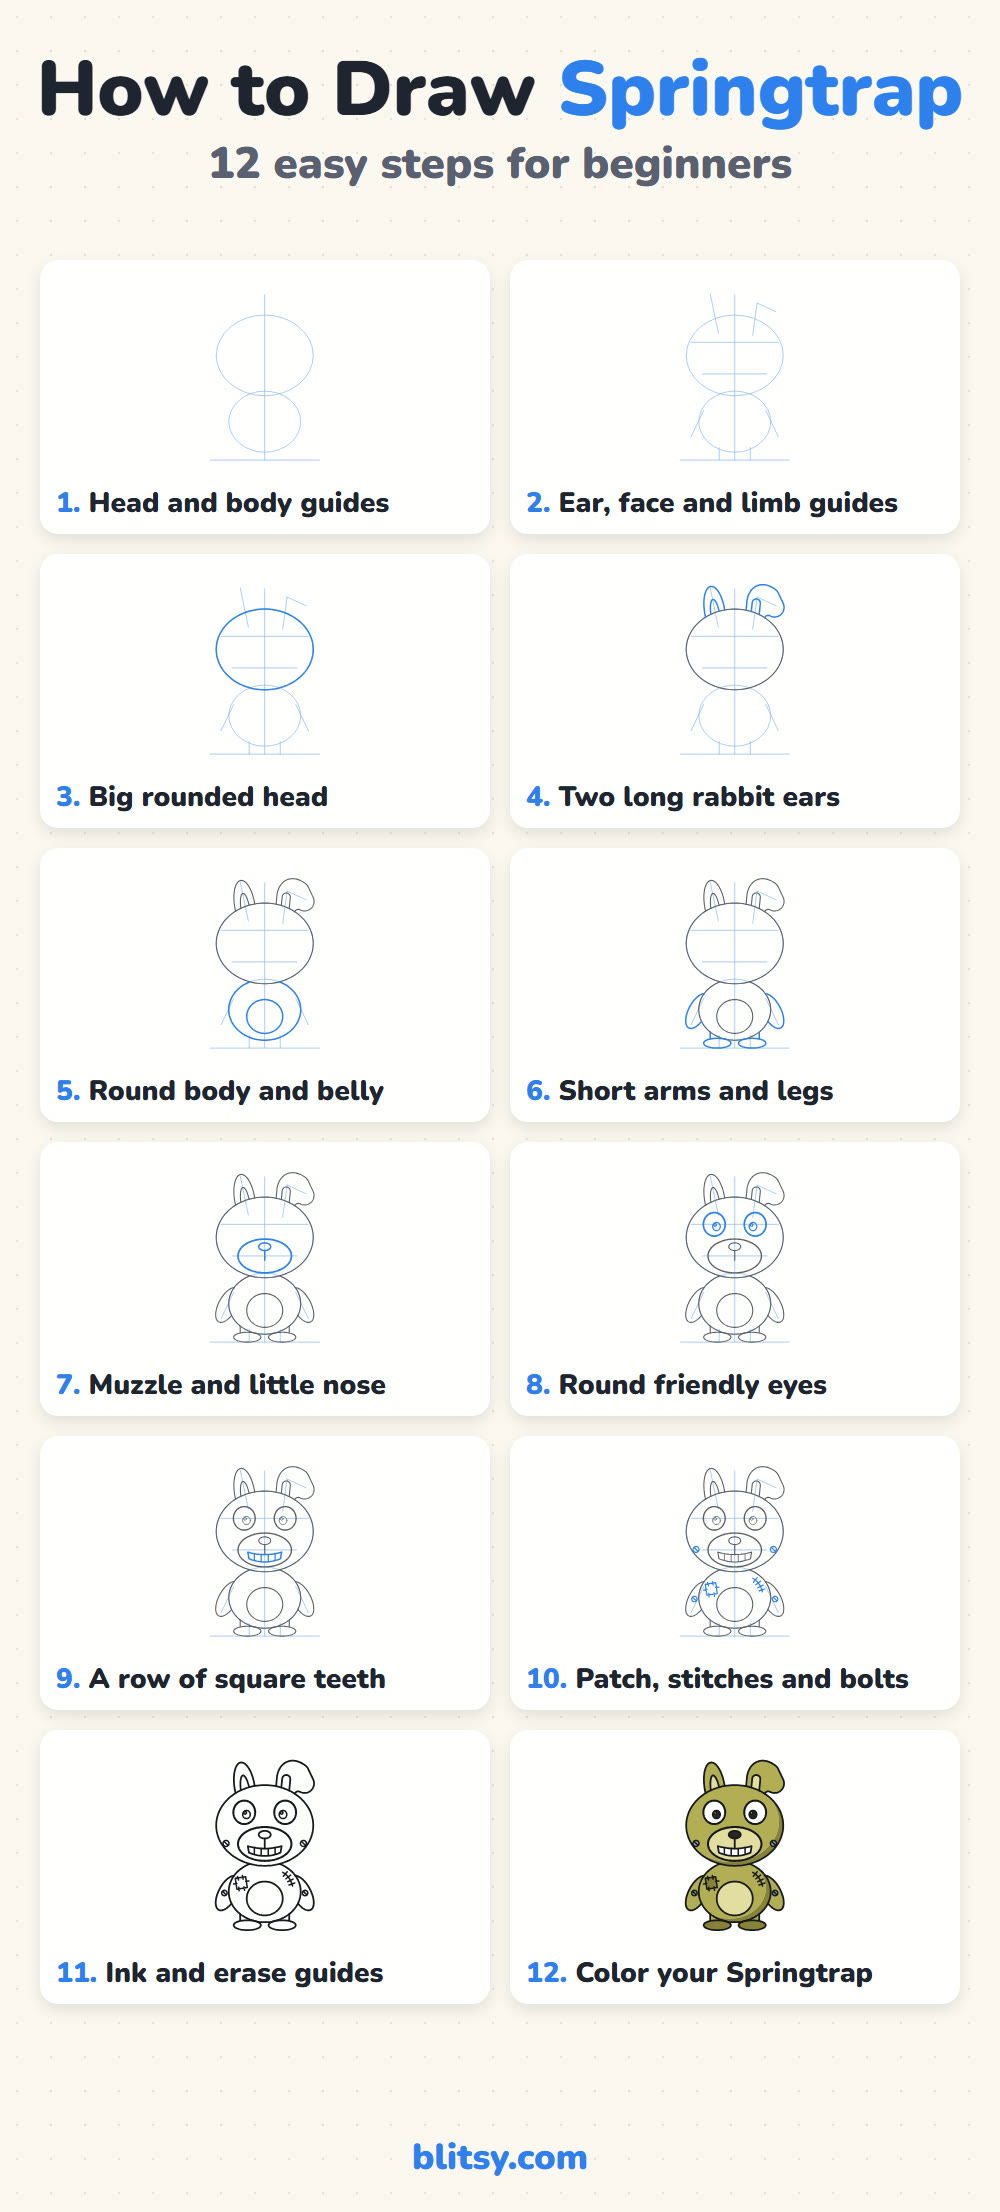
The Springtrap coloring page shows a colored example and a color key at the top, with a large outline underneath for your own version. The printable step guide has all 12 steps with their pictures and tips. Both print on Letter or A4 paper.
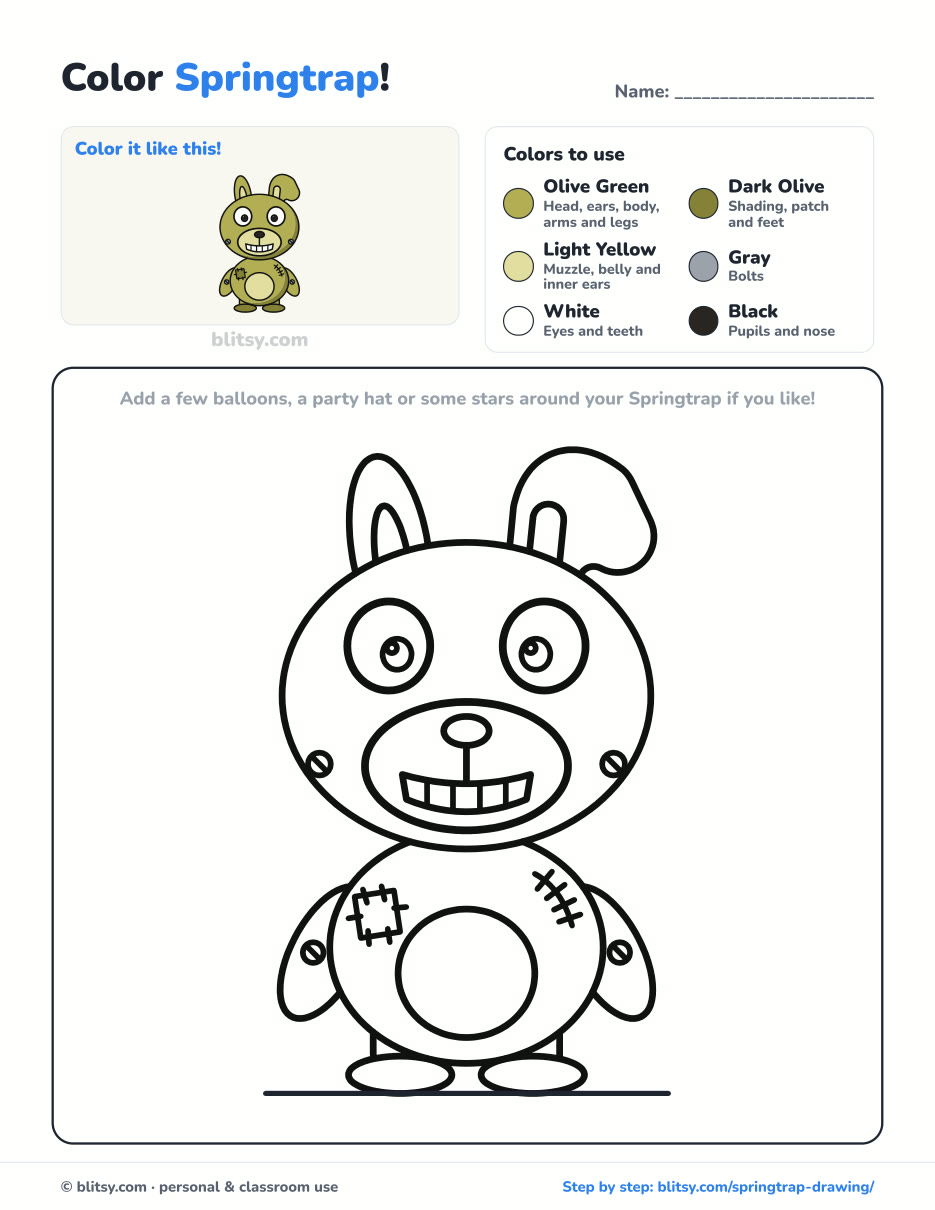
Black outlines with a colored example and the color names at the top. Ready to print and color.
⬇️ Download Coloring PageEvery step picture with its instructions and tips, to keep beside your paper while you draw.
⬇️ Download Drawing Guide📱 On a phone? Tap a download button, then open the file and choose Share → Save to Files or Print. On a computer, the PDF opens or saves straight to your Downloads folder.
Twelve Bunny Steps Saved on a Single Pin
Springtrap Done? Pick Another Character
Each one below is a step-by-step tutorial like this one, with a picture for every stage.
- Kurama Drawing: The Kurama drawing tutorial turns the Nine-Tails into a grinning chibi with all nine tails fanned out.
- Anime Drawing: Build an anime boy face on a plain circle in this anime drawing step by step lesson, spiky blue hair included.
- Hands Drawing: Springtrap's mitts are simple, so try real ones next with the how to draw hands step by step palm view.
- Cerberus Drawing: Three heads, three moods and one cute pup: that's the Cerberus drawing tutorial.
- Master Chief Drawing: Another armored character waits in the Master Chief drawing tutorial, visor shining.
- Pikachu Drawing: Learn how to draw Pikachu with its ears up and tail flashing out to the side.
- Mickey Mouse Drawing: Draw a cute Mickey with a wide grin and one glove raised in the Mickey Mouse drawing step by step guide.
- Juice WRLD Drawing: The Juice WRLD portrait tutorial ends with a tribute portrait in soft colors.
- Woman Drawing: Practice body proportions with the how to draw a woman step by step lesson, which starts with six head marks.
- Iron Man Drawing: A chibi Iron Man, palms ready to fire, is built in eleven small steps in this Iron Man drawing tutorial.
- Ghost Drawing: Keep the spooky mood light with the ghost drawing tutorial: two friendly ghosts and a pumpkin.
- Bart Simpson Drawing: Finish with a cartoon classic in the Bart Simpson drawing tutorial, spikes up and smirk ready.
Springtrap Drawing Questions Kids Often Ask
How do you draw Springtrap easy?
Draw him chibi style: a big oval head, a smaller oval body, long ears with one bent over, and a muzzle with square teeth. Skip the scary damage and use a patch and a few bolts instead.
What color is Springtrap?
He's a faded olive or yellow-green, with a paler muzzle and belly. I add a darker olive for shading and gray for the bolts.
Is this Springtrap drawing scary for young kids?
No. The round eyes, smiling teeth and floppy ear keep it friendly. Younger kids can also leave out the stitches and bolts.
How long does it take to draw Springtrap?
Most kids need about 15 to 20 minutes for the drawing and another 10 or so for coloring. The teeth and the bent ear take the most care.
Sharpen that olive pencil and give your Springtrap the goofiest grin you can manage. 🐰✏️
Related posts:
 How to Draw Miraculous Ladybug Step by Step (Cute Chibi)
 How to Draw Nezuko Step by Step (Cute Chibi for Beginners)
 How to Draw Freddy Krueger Step by Step (Cute Chibi Version)
 How to Draw Ariana Grande Step by Step (Cute Chibi Fan Art)
 How to Draw Wonder Woman Step by Step (Chibi for Kids)
 How to Draw the Hulk Step by Step (Easy Chibi for Kids)
 How to Draw Iron Man Step by Step (Easy Chibi for Kids)
 How to Draw Kurama Step by Step (Easy Chibi Nine-Tails)
 How to Draw Cat Noir Step by Step (Easy Chibi Hero)
 How to Draw Master Chief Step by Step (Easy Chibi Armor)
 How to Draw Tinkerbell Step by Step (Easy Flying Chibi)
 How to Draw a Chibi Step by Step (Easy 2-Head Method)

