
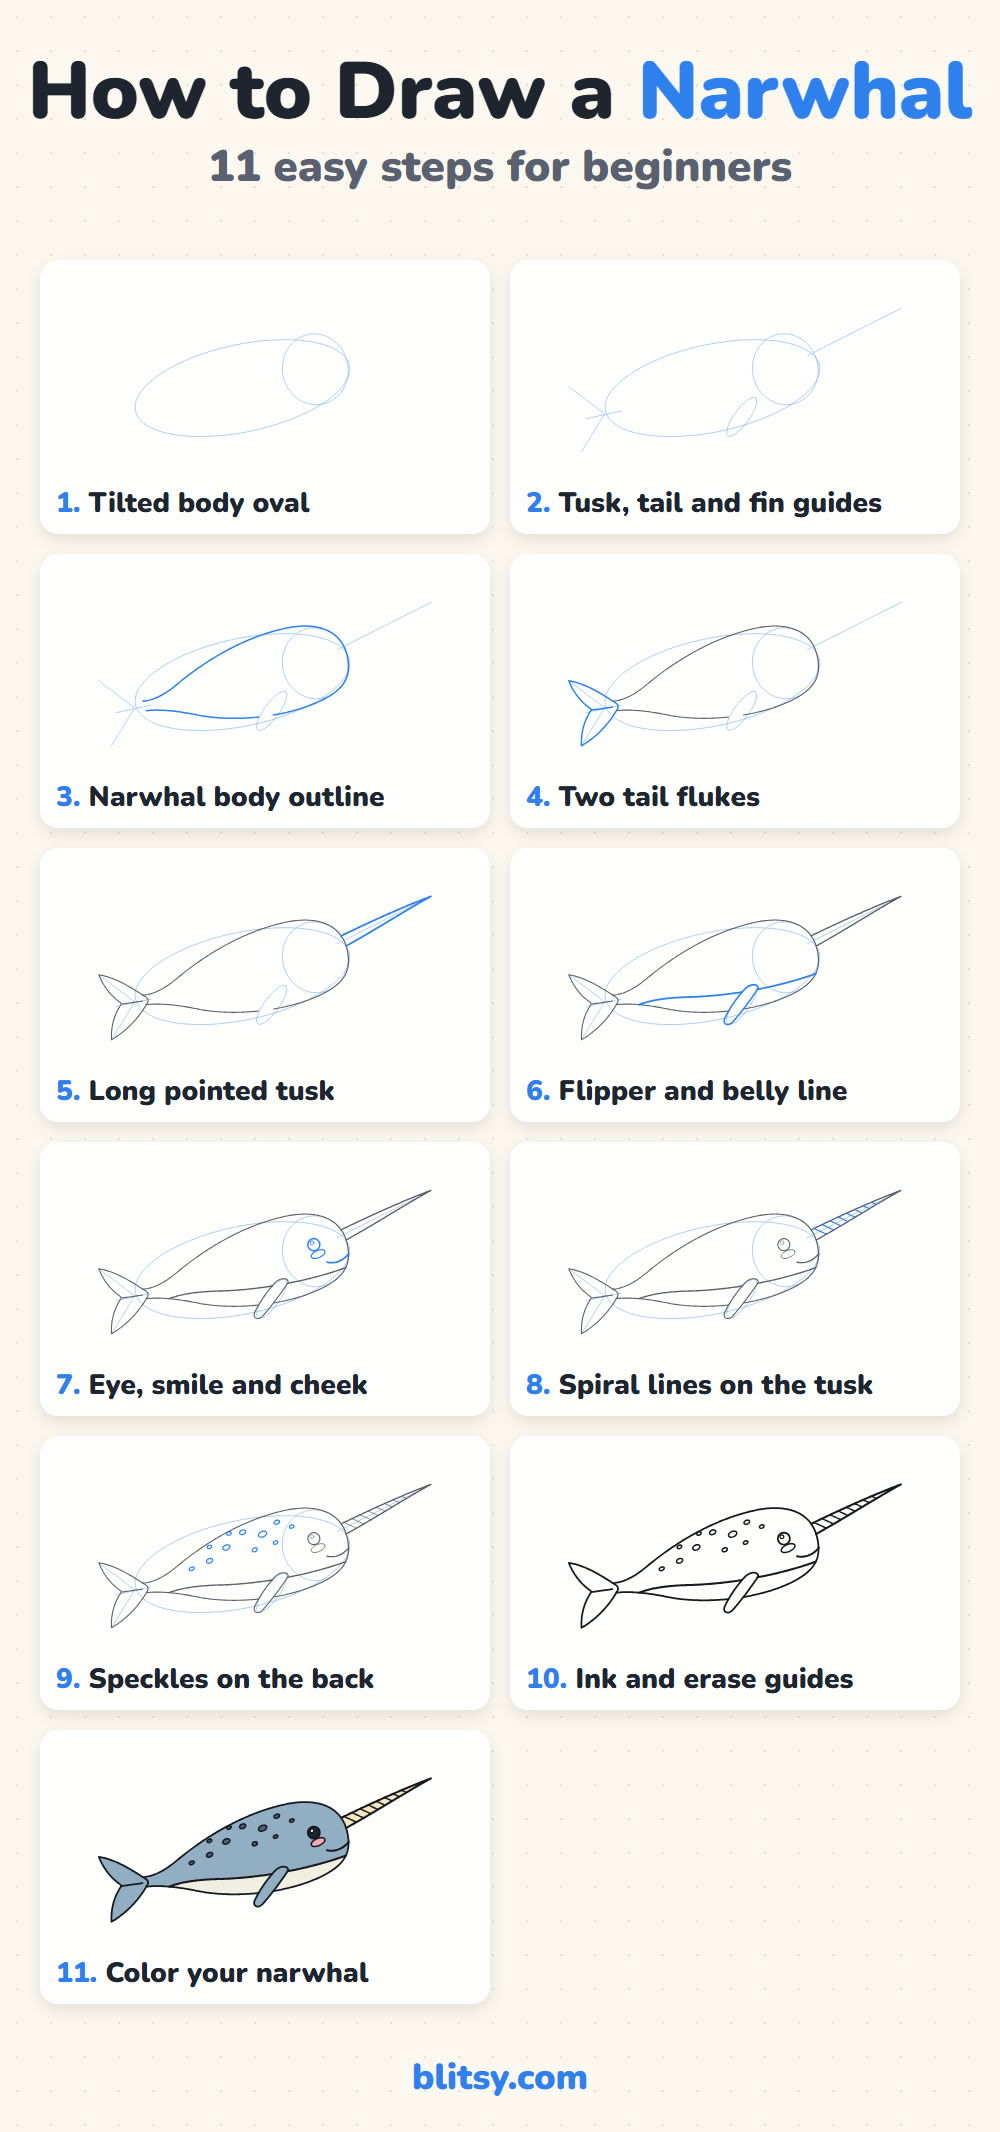
Narwhals look like something out of a fairy tale, yet the body underneath that famous tusk is one of the simplest shapes in the ocean. Strip away the tusk and you have a smooth, rounded torpedo with a small flipper and a split tail. This lesson shows you how to draw a narwhal step by step, swimming slightly uphill with its tusk pointing the way. You'll start with an oval and a circle, and finish with a colored narwhal that has a creamy belly and dark speckles along its back.
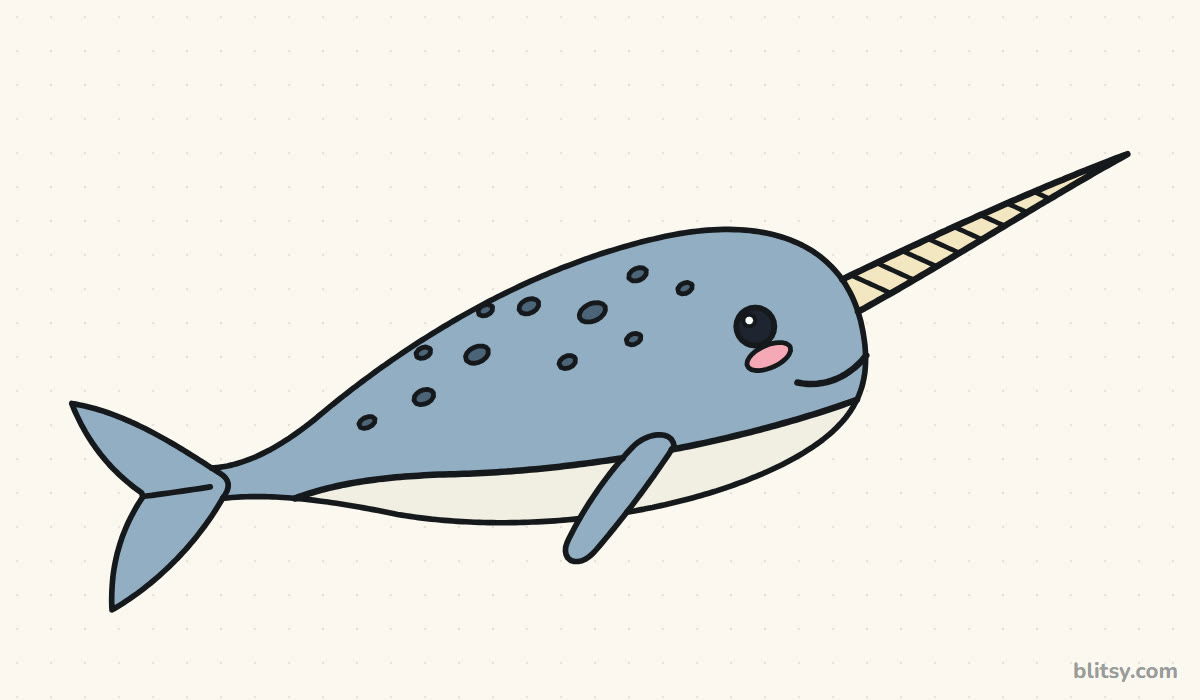
Look for the bright blue lines in each picture. Those are the only ones you add in that step. Dark gray lines are already finished from earlier steps, and the soft pale blue shapes are light guides that disappear when you ink.
Quick overview
⏱️ Time: about 25 to 35 minutes
🎯 Level: easy, good for kids around 6 and up
✏️ Steps: 11
🦄 You'll draw: a speckled narwhal swimming up and to the right, tusk first
Arctic Art Kit for Your Narwhal
- A light pencil (HB works well)
- A soft eraser that won't smear
- A black fineliner or felt-tip pen
- Colored pencils or markers: blue-gray, a darker slate, cream, pale yellow, pink plus black
- A ruler, if you want a perfectly straight tusk
- Plain paper turned sideways
The tusk sticks out a long way, so leave plenty of empty space on the right side of your page before you begin.
How to Draw a Narwhal Step by Step
Step 1: Sketch a tilted oval and a head circle
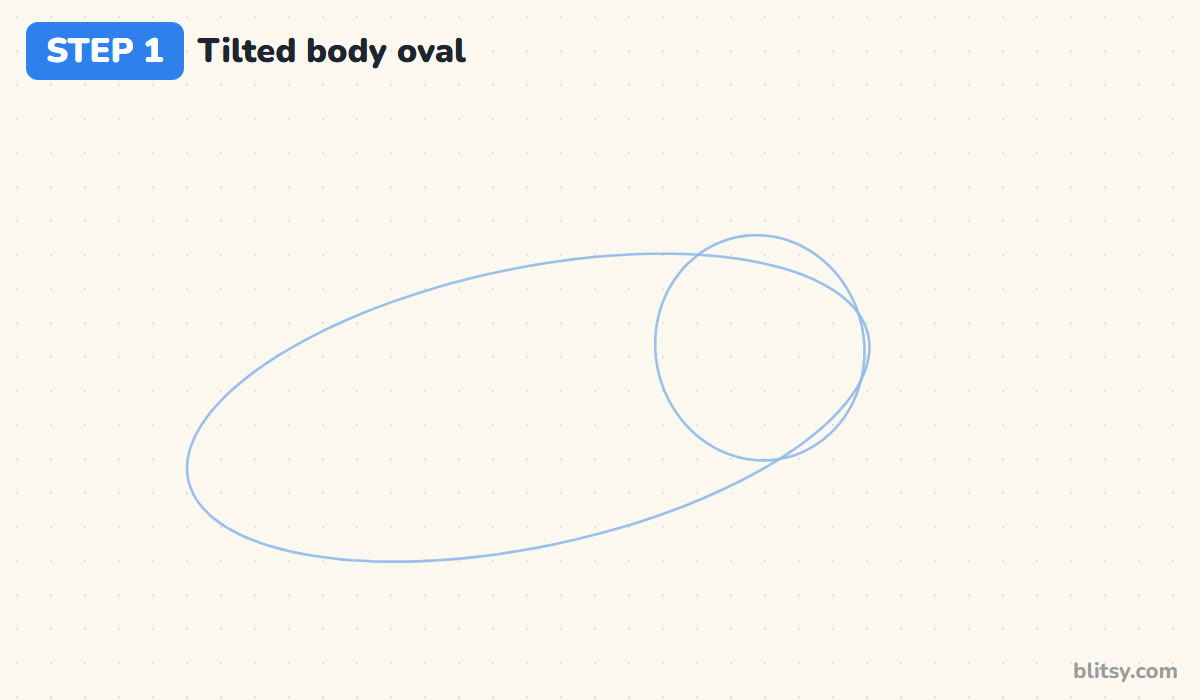
Draw a long oval across the middle of the page, tilted so its right end sits higher than its left. Make it a bit more than twice as wide as it is tall. Then draw a circle over the right end of the oval for the head. The circle should poke slightly above the oval, because a narwhal's forehead is rounded and bulgy.
💡 Tip: Keep your pencil pressure light enough that the lines almost vanish when you squint.
Step 2: Add guides for the tusk, tail and flipper
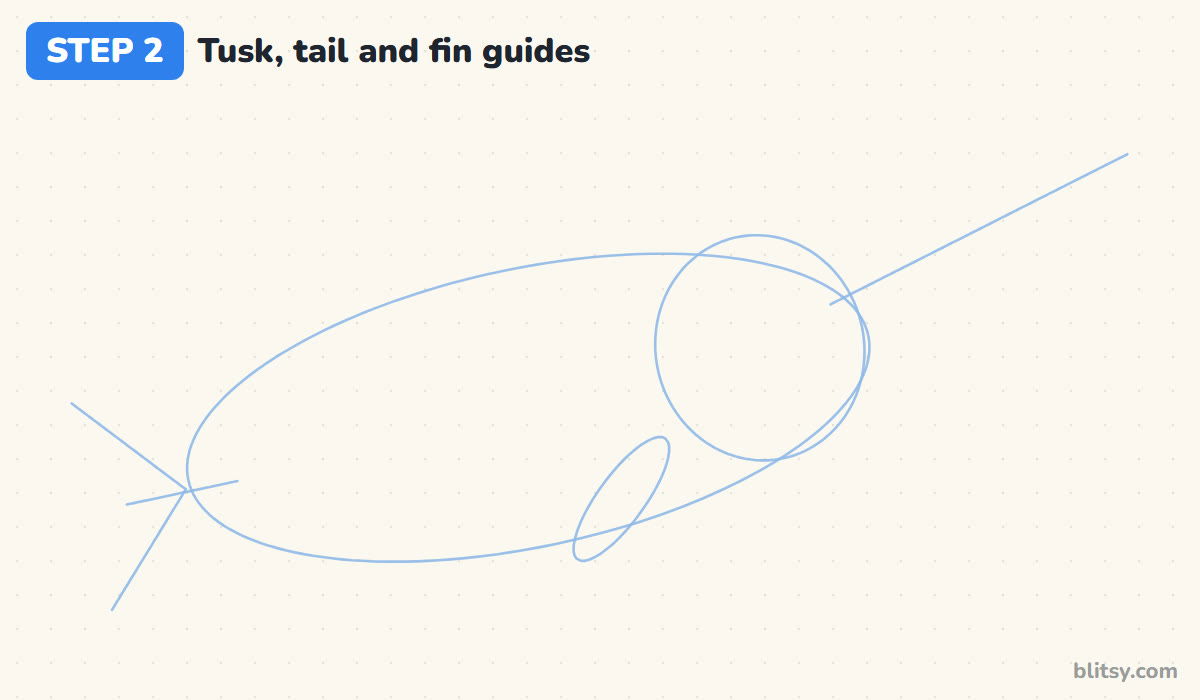
From the front of the head circle, pull one long straight line up and to the right. It's longer than you'd guess, roughly two thirds the length of the body. At the far left of the oval, draw a short line out for the tail, then a wide V opening to the left. Finally, add a thin slanted oval under the body, a little behind the head, for the flipper.
💡 Tip: A ruler helps on the tusk line. Every other guide looks better drawn freehand.
Step 3: Draw the narwhal body outline
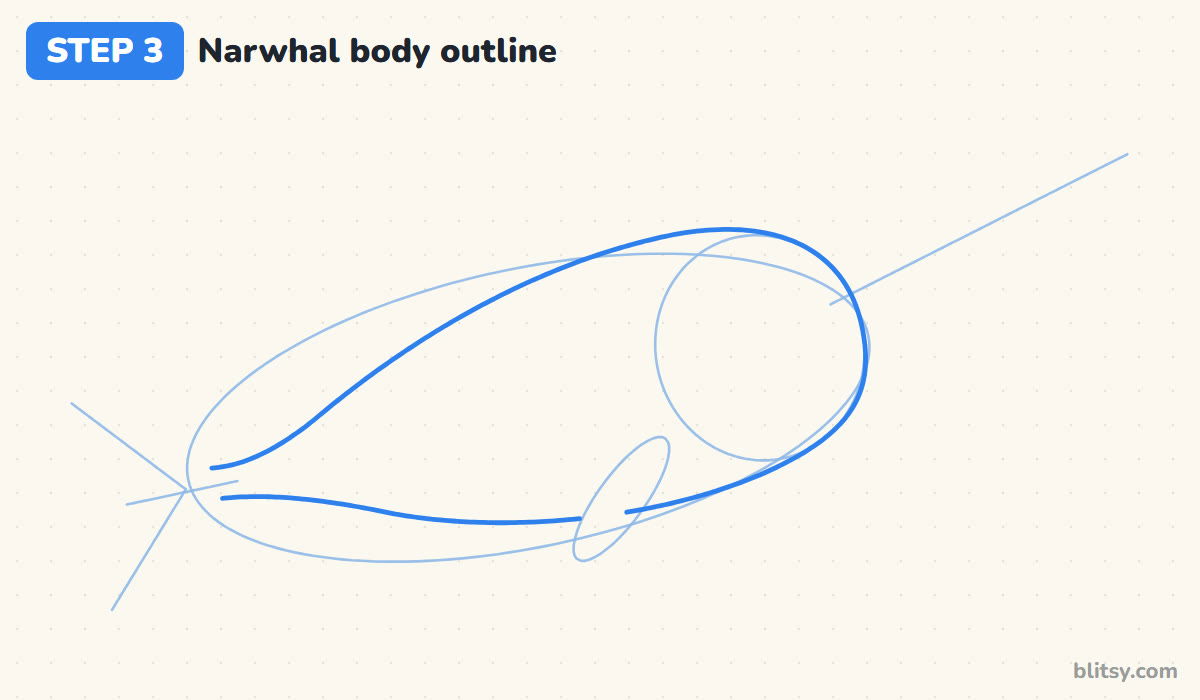
Start at the front of the head and follow the circle over the top, then let the line slide down the back toward the tail. The back curves gently, and the body gets narrow fast near the end. For the bottom, curve from the chin along the oval and rise toward the tail. Leave a small gap where the flipper will sit, and stop both lines before the tail tip.




💡 Tip: I round off the front of the head like a blunt thumb. Narwhals have no beak or snout.
Step 4: Shape the two tail flukes
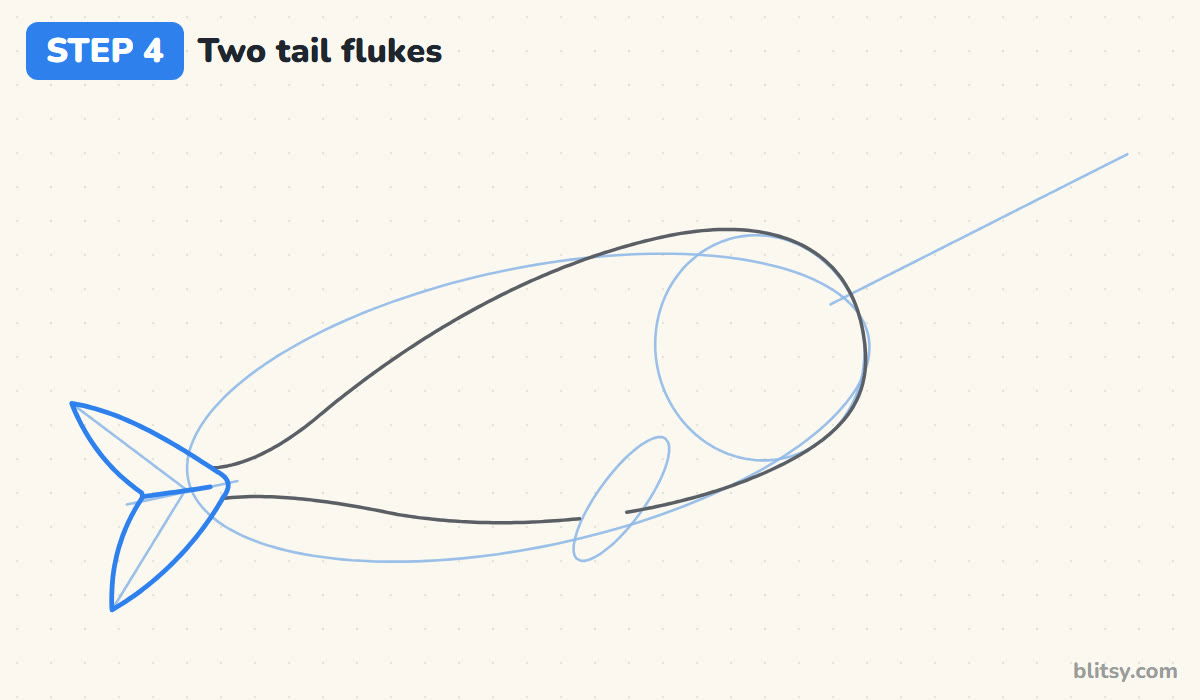
Use the arms of your V as the center of each fluke. I draw the top fluke first, from the tail stalk out to a point, then curve back in to the notch. Repeat it below so the two lobes look like a mirror image. Add a short line from the notch to the stalk to show where they split.
💡 Tip: Curve the outside edge of each fluke more than the inside edge so they look like they're pushing water.
Step 5: Draw the long tusk
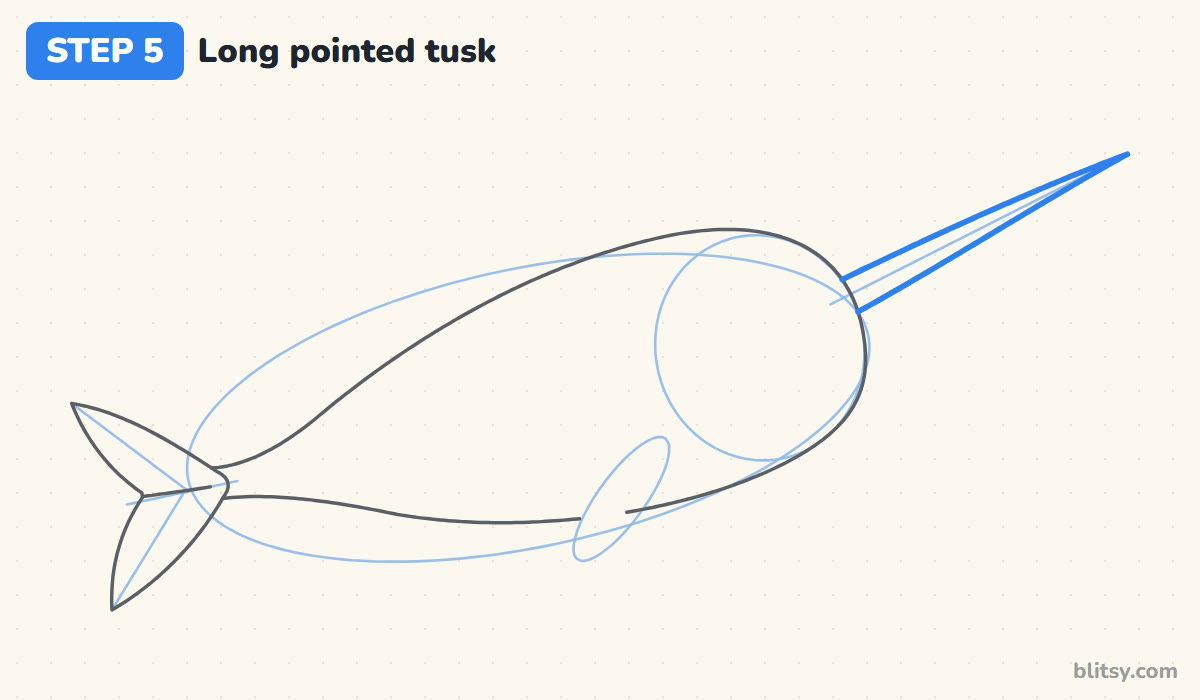
This is the part everyone recognizes, so take your time. The tusk is a very long, thin cone. Draw two lines along your guide that start a finger's width apart where they leave the head and meet in a sharp point at the end. The tusk comes out of the upper part of the face, above where the mouth will go.
💡 Tip: Stop the tusk lines where they touch the head outline so the head looks like it's in front.
Step 6: Add the flipper and the belly line
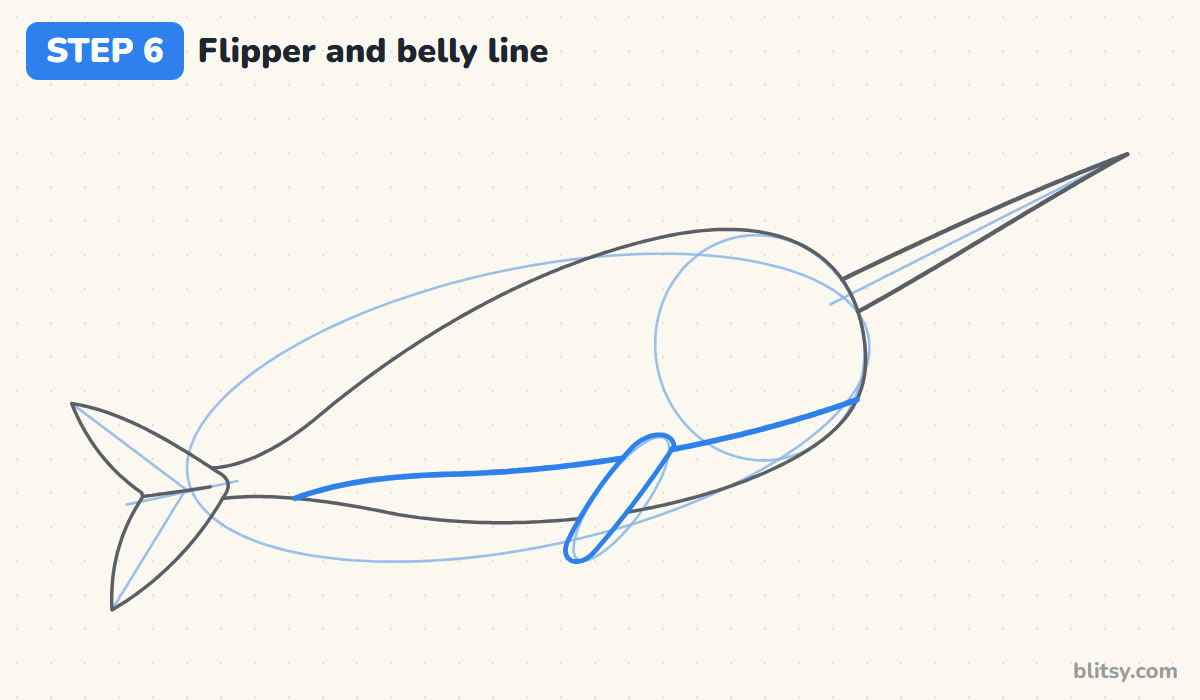
Turn the flipper guide into a narrow paddle with a rounded tip that points back and down. Then draw one smooth line from the lower front of the face back toward the tail. Everything under it becomes the pale belly. When the belly line reaches the flipper, stop. Pick it up again on the other side.
💡 Tip: I keep the flipper small, because a narwhal's flippers are short compared with its body.
Step 7: Draw the eye, smile and cheek
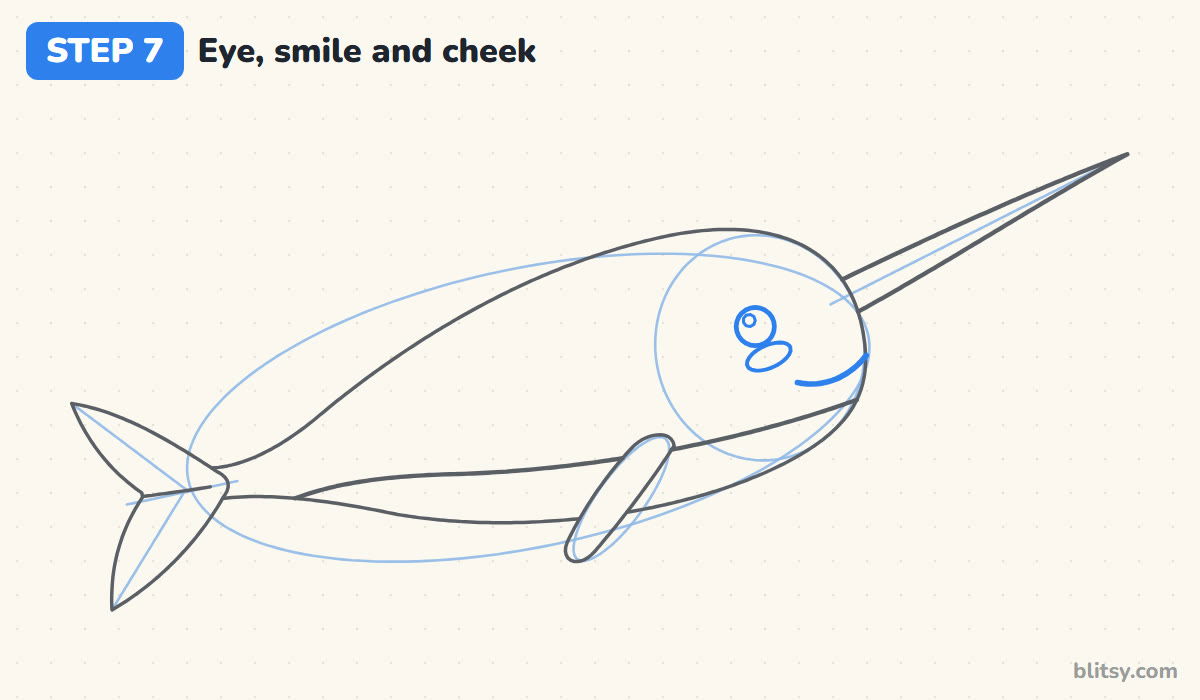
Place a small circle for the eye inside the head circle, about halfway between the top of the head and the belly line, and a little back from the front. Add a tiny circle in its upper corner for the shine. Under the eye, draw a short oval cheek. Then curve a small smile from the front of the face back toward the cheek.


💡 Tip: Set the eye well behind the tusk base. If it touches the tusk, the face gets crowded.
Step 8: Add spiral lines to the tusk
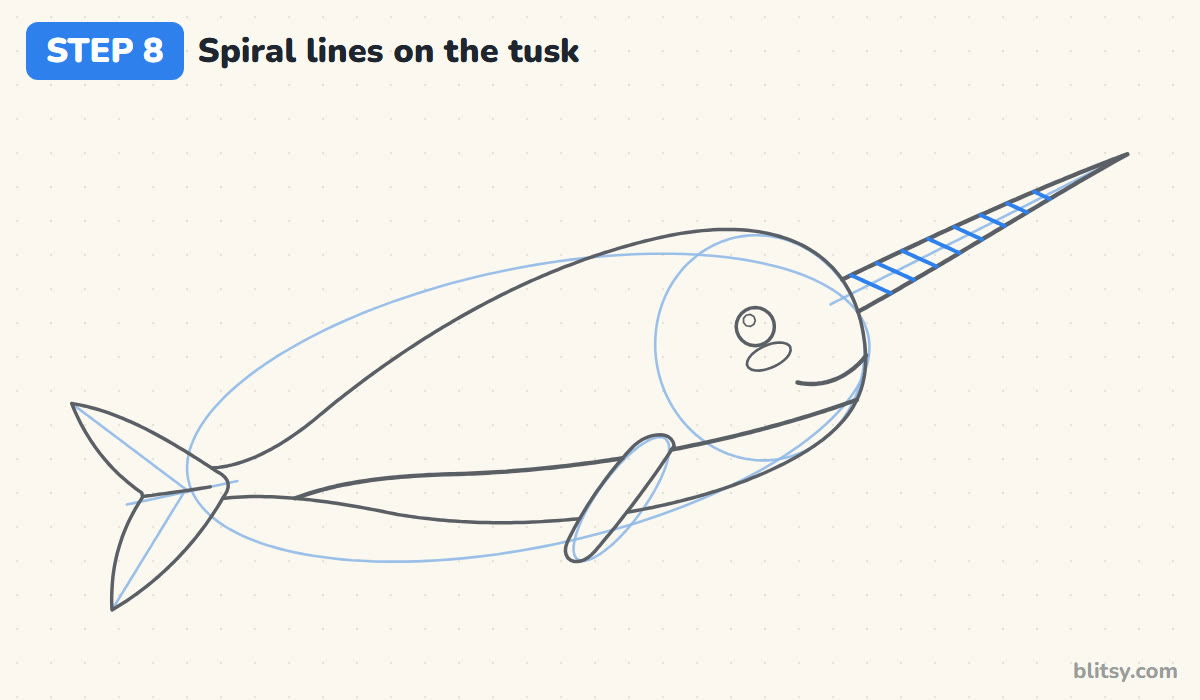
A real narwhal tusk twists along its length, and a few slanted lines are enough to show it. Draw short diagonal strokes across the tusk, all leaning the same direction and evenly spaced. Make them closer together as the tusk gets thinner. I usually stop a little before the tip, because tiny lines there just look like scribbles.
💡 Tip: Count your stripes as you go. Seven or eight is plenty for a tusk this size.
Step 9: Draw the speckles on the back
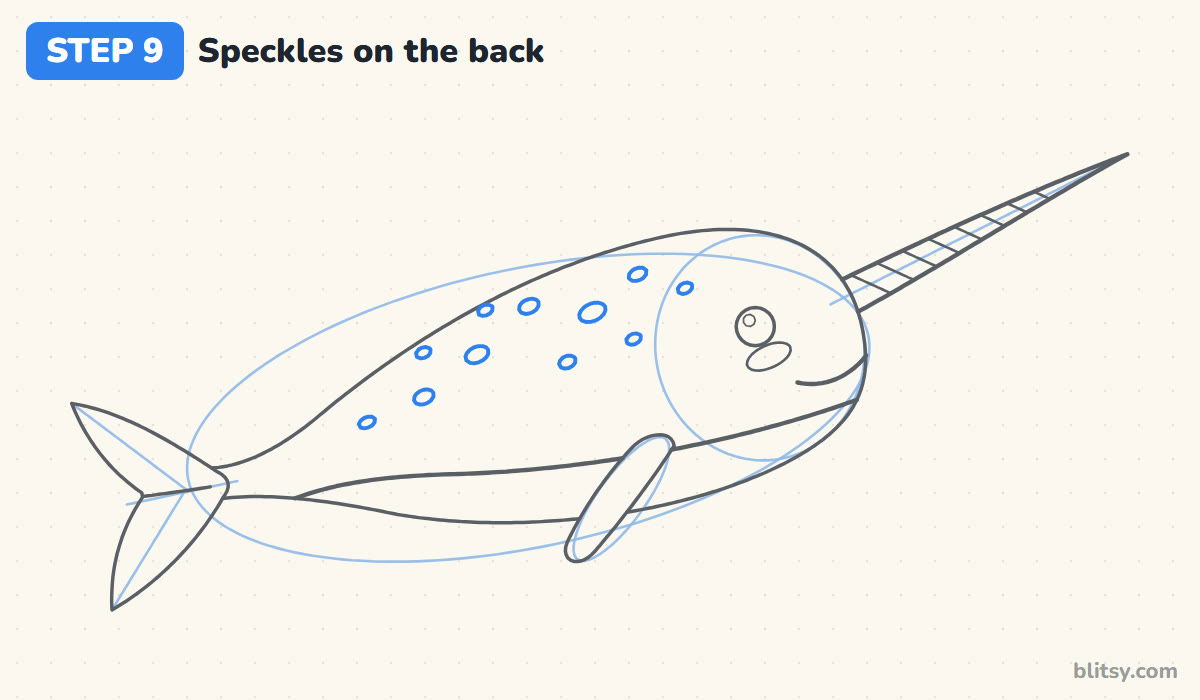
Narwhals are covered in dark mottled spots, mostly on top. Scatter small ovals across the back, above the belly line and behind the eye. I vary the sizes, mixing a few medium ovals with several tiny ones. Don't line them up in rows, since random spacing looks natural.
💡 Tip: Turn your paper upside down for a moment to spot any gaps or clusters in your speckles.
Step 10: Ink the lines and erase the guides
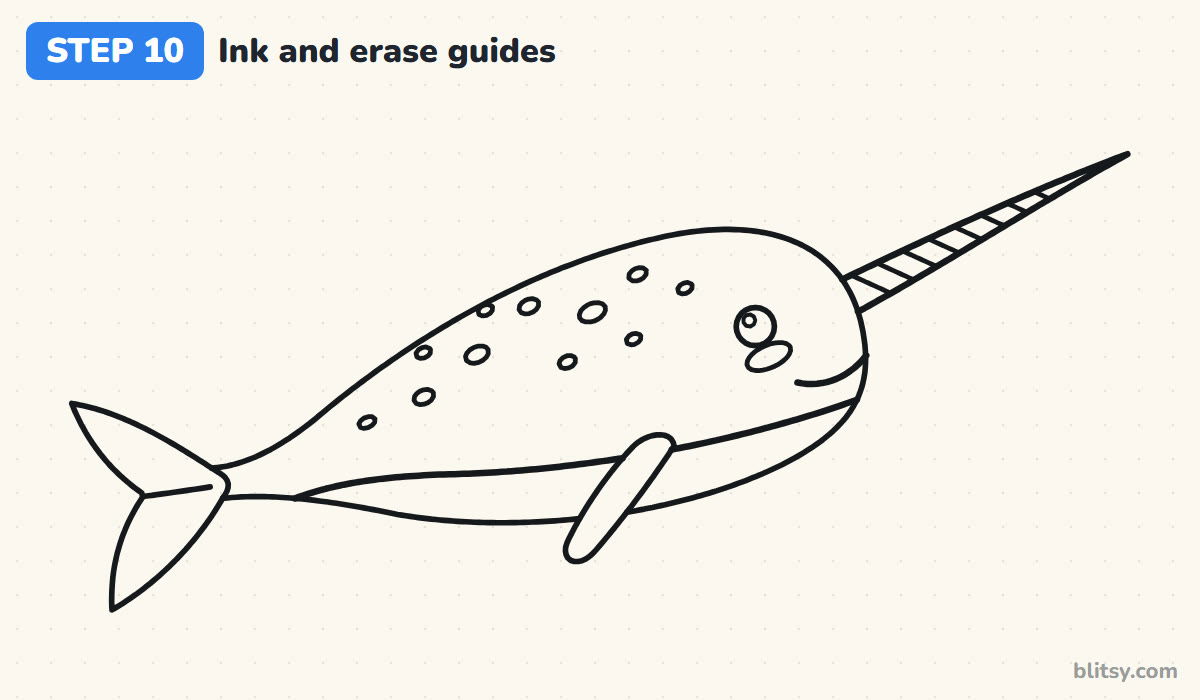
Go over every keeper line with your black pen: the outline, flukes, tusk, flipper, the belly line, the face and the speckles. Leave out the oval, the circle, the V and the tusk guide. Once the ink is fully dry, erase everything in pencil. Most beginners rush this and smudge the pen, so give it a minute.
💡 Tip: Ink the speckles with a lighter touch than the outline so they don't compete with the shape.
Step 11: Color your narwhal
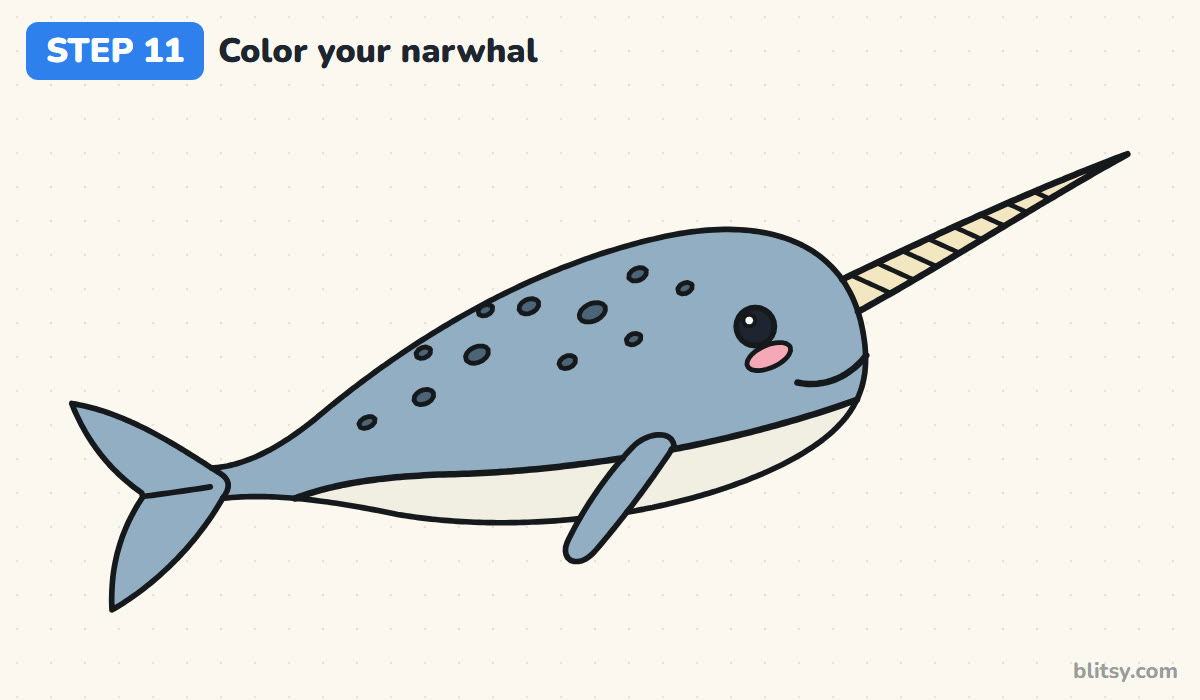
Fill the body, the flukes and the flipper with a soft blue-gray. Color the speckles a darker slate so they stand out. The belly gets cream, and the tusk a pale, warm yellow like old ivory. Finish with a pink cheek and a black eye, leaving the shine white.
💡 Tip: I color the speckles first, then the body around them. It's easier than coloring dark over light.
When a Narwhal Starts Looking Like a Unicorn Fish
- A tusk that grows from the top of the head. That's a unicorn horn. Start the tusk at the front of the face, above the mouth, and angle it forward.
- A short, stubby tusk. The tusk is the whole point of a narwhal. Make it at least half as long as the body.
- A pointed nose. Narwhals have a round, bulging forehead. A sharp snout turns them into a dolphin or a swordfish.
- Speckles all over the belly. A narwhal's spots are thickest on the back and fade toward a paler belly. Keep the belly smooth and light.
- Spiral lines going different ways. If the stripes lean in random directions the tusk looks broken. Slant them all the same way.
Narwhal Variations to Try Next
Once this narwhal feels easy, play with it. Draw a baby narwhal beside the big one without a tusk, since young ones haven't grown theirs yet. Try a narwhal curled into a C shape, or one peeking out of a hole in the ice. Kids who like fantasy colors can go pastel pink and lilac with a gold tusk, and younger artists can leave out the spiral lines entirely. The narwhal is a cousin of the big whales, so this whale drawing tutorial makes a natural next project, and these free whale coloring pages are great for a quiet afternoon.
Free Narwhal Coloring Page and Printable Steps
Prefer paper? The narwhal coloring page has a colored example at the top with a key showing which shade goes where, and a big clean outline below to fill in. The step-by-step PDF guide puts all 11 steps and tips on a few pages. Both print on Letter or A4.
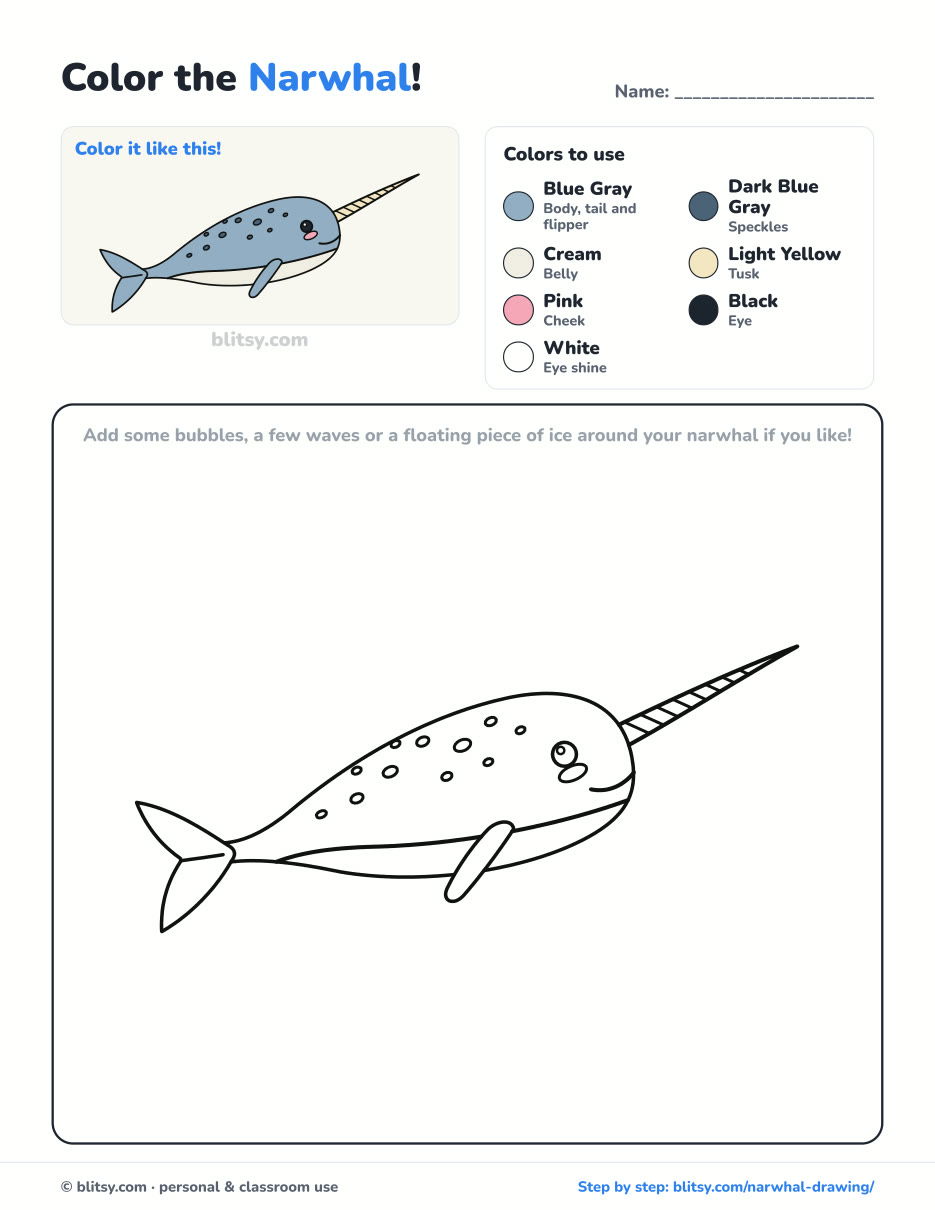
Black outlines with a colored example and the color names at the top. Ready to print and color.
⬇️ Download Coloring PageEvery step picture with its instructions and tips, to keep beside your paper while you draw.
⬇️ Download Drawing Guide📱 On a phone? Tap a download button, then open the file and choose Share → Save to Files or Print. On a computer, the PDF opens or saves straight to your Downloads folder.
Keep This Narwhal Lesson on Pinterest
After the Narwhal, Pick Your Next Animal
These are step-by-step tutorials too, each one broken into small numbered steps you can follow at the kitchen table.
- Arctic Fox Drawing: Cheek tufts and a curled tail make this arctic fox drawing tutorial a cozy follow-up to a cold-water animal.
- Puppy Drawing: Learn how to draw a puppy step by step, finishing with a happy pup in a collar, tongue out.
- Realistic Drawing: Try real light and shadow with the realistic drawing step by step lesson, where you shade one shiny apple.
- Rat Drawing: A curious gray rat leads with its nose in this easy rat drawing tutorial, tail curled up behind.
- King Kong Drawing: Go big with this how to draw King Kong tutorial, which ends with the gorilla roaring, fists down.
- Paw Print Drawing: A dog print and a cat print share the page in this step-by-step paw print drawing, with a little heart in the middle.
- Dragonfly Drawing: Draw spread wings and wide-open eyes with the dragonfly drawing tutorial, ten steps from start to finish.
- Penguin Drawing: Another polar friend waits in this easy penguin drawing tutorial, complete with rosy cheeks and a tiny head tuft.
- Godzilla Drawing: Two ovals grow into a friendly kaiju when you follow how to draw Godzilla step by step.
- Sloth Drawing: This sloth drawing tutorial keeps things slow and calm, ending with a smiling sloth after 11 steps.
- Miraculous Ladybug Drawing: Draw Ladybug as a chibi, mask on and yo-yo in hand, with the how to draw Miraculous Ladybug guide.
- Whale Drawing: The narwhal's bigger cousin gets its own lesson: this whale drawing step by step ends with a happy blue whale and its spout.
- Kitten Drawing: A ginger kitten sits nicely for you in the kitten drawing tutorial.
- Ant Drawing: Build a red ant from three ovals in this how to draw an ant tutorial, antennae up.
Narwhal Drawing Questions, Answered
What is the easiest way to draw a narwhal?
Start with a tilted oval for the body and a circle for the head, then add a straight line for the tusk. Draw the outline over those shapes. Guides keep the tusk and tail in the right place.
How do you draw a cute narwhal for kids?
Use a big round head, a large eye with a shine, a pink cheek and a little smile. Kids can skip the spiral lines and speckles and still get a cheerful narwhal.
What color is a narwhal?
Real narwhals are mottled gray with dark spots on the back and a paler belly. The tusk is ivory, a creamy off-white. In cartoons, many people use blue-gray or even pastel colors.
How long does it take to draw a narwhal?
Plan for 25 to 35 minutes including ink and color. The outline goes quickly, while the speckles and tusk lines need a bit more patience.
Sharpen that pencil, aim the tusk high, and give your narwhal a name when you're done. 🐋✨
Related posts:
 How to Draw a Car Step by Step (Easy Drawing for Beginners)
 How to Draw a Whale Step by Step (Easy for Beginners)
 How to Draw a Rat Step by Step (Easy for Beginners)
 How to Draw a Puppy Step by Step (Easy for Beginners)
 How to Draw a Rose Step by Step (Spiral Method for Beginners)
 How to Draw Olaf Step by Step (Easy for Beginners)
 How to Draw a Ladybug Step by Step (Easy for Beginners)
 How to Draw a Dog Step by Step (Easy Side View for Beginners)
 How to Draw a Leopard Step by Step (Easy for Beginners)
 How to Draw a Light Bulb Step by Step (Easy for Beginners)
 How to Draw a Crow Step by Step (Easy for Beginners)
 How to Draw an Eagle Step by Step (Easy for Beginners)

