
Almost every penguin starts life on paper as an egg. That is good news, because an egg is one of the easiest shapes to draw, and everything else in this lesson hangs off it. Below I'll walk you through how to draw a penguin step by step, from a faint oval to a finished cartoon penguin with rosy cheeks and orange feet. If you can draw an oval and a few soft curves, you already have the skills this needs.
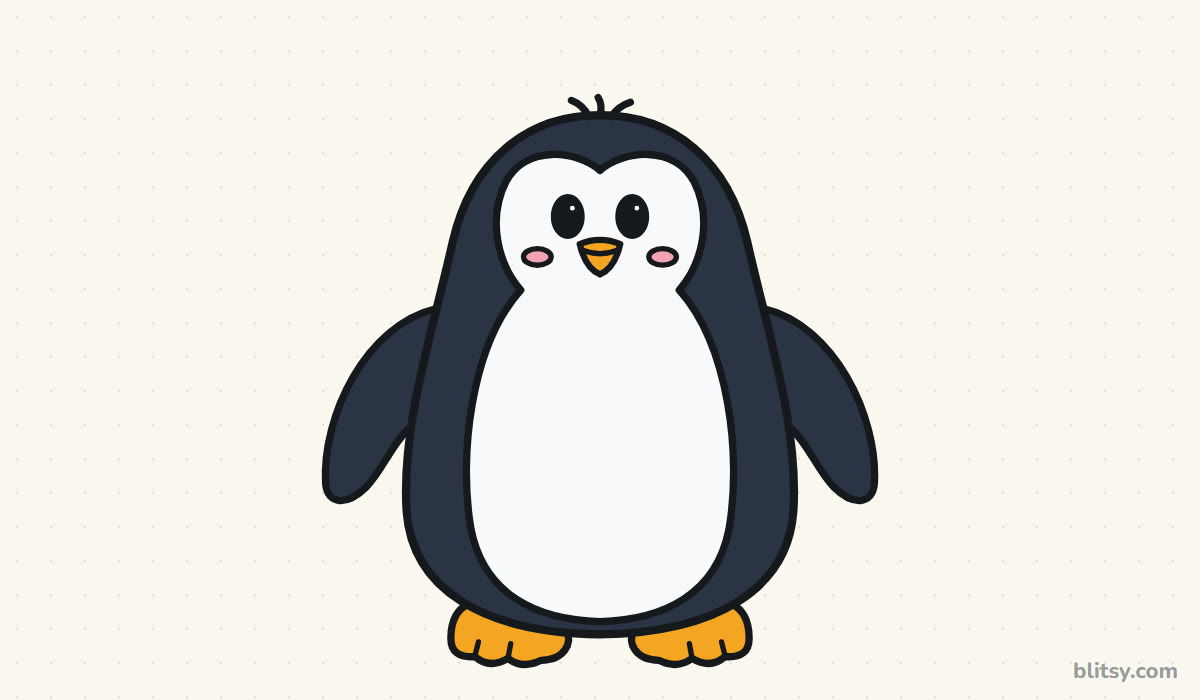
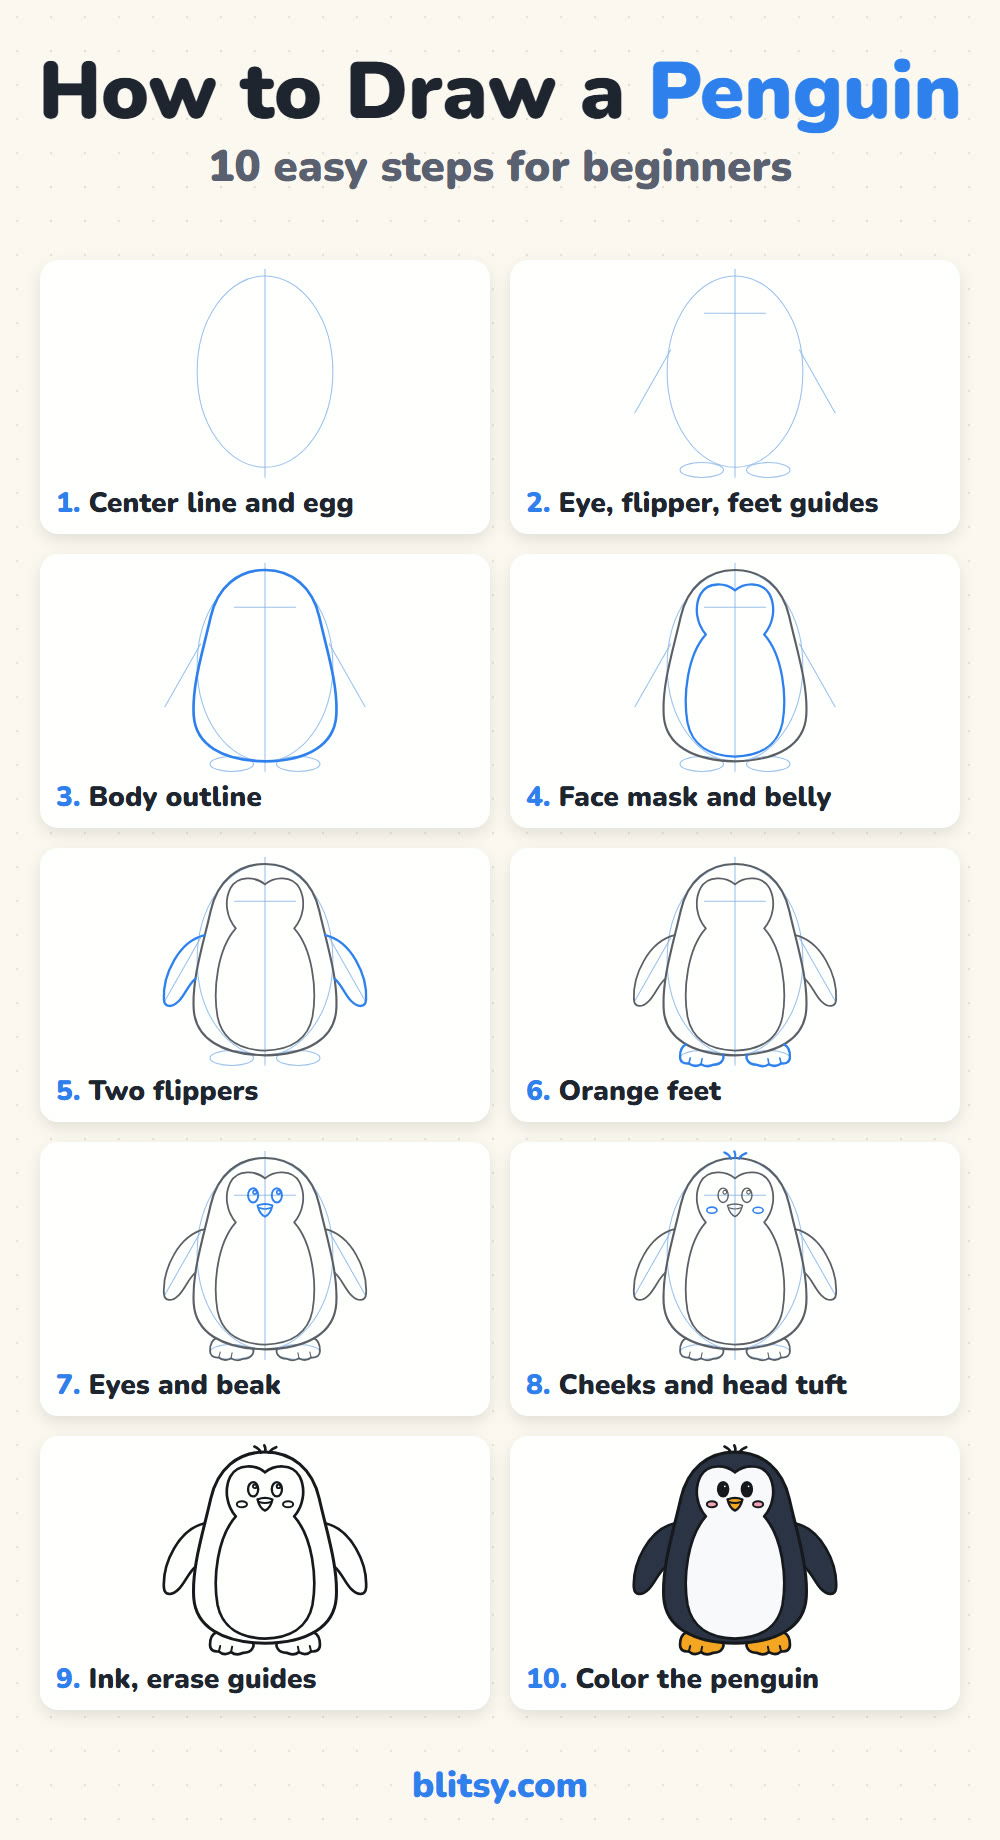
Every step picture works the same way. The part you should add right now is drawn in blue, and the gray lines are what you finished earlier. The pale blue shapes in the first steps are guides, so sketch them softly, since you'll erase them before coloring.
Quick overview
⏱️ Time: about 15 to 25 minutes
🎯 Level: easy, fine for kids from about 5
✏️ Steps: 10
🐧 You'll draw: a round cartoon penguin standing and facing you
Gather These Before the Penguin Lesson
- A regular pencil, sharpened but not too pointy
- A clean eraser
- A black marker or fineliner to trace the final lines
- Crayons, colored pencils or markers (black, orange and pink are the main ones)
- White paper, held the tall way
If you only have a pencil and paper, that's enough for the drawing itself; color is a bonus.
How to Draw a Penguin Step by Step
Step 1: Sketch a center line and an egg
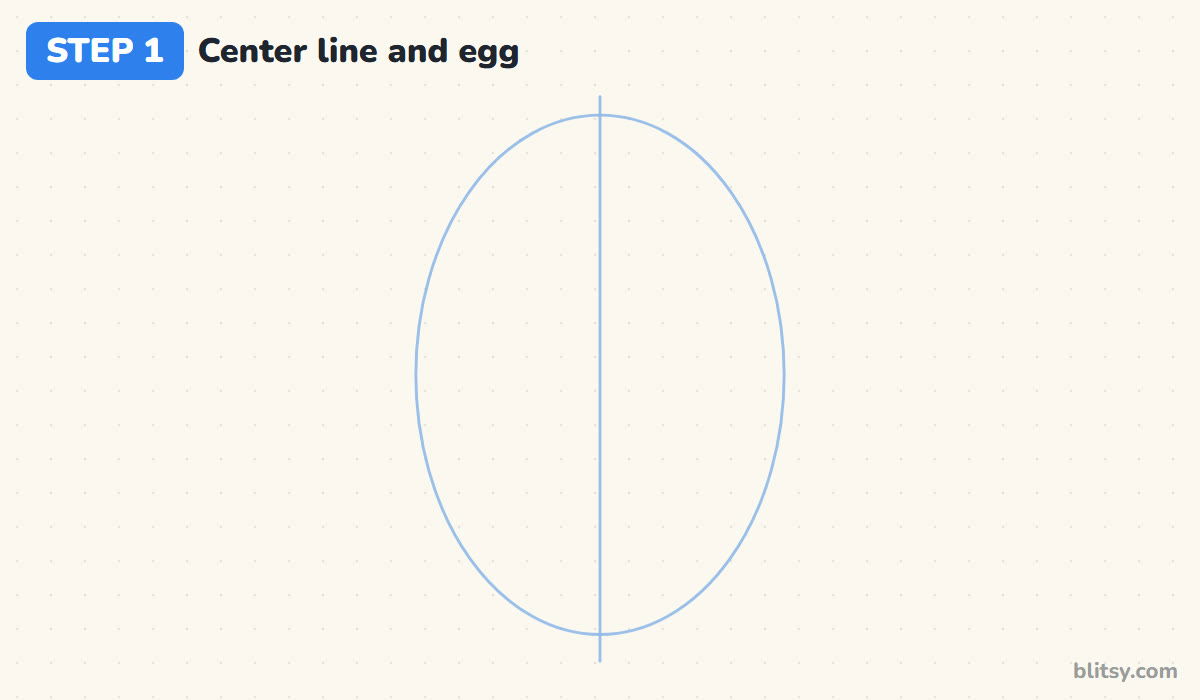
Draw a straight vertical line down the middle of your page. Then sketch a tall oval around it, a little like an egg standing on its end, filling most of the page from top to bottom. This oval decides how big your whole penguin will be. I tell beginners to make it bigger than feels comfortable, because small drawings are much harder to fit details into.
💡 Tip: Keep your pencil pressure light enough that you could erase the oval with one swipe.
Step 2: Add guides for the eyes, flippers and feet
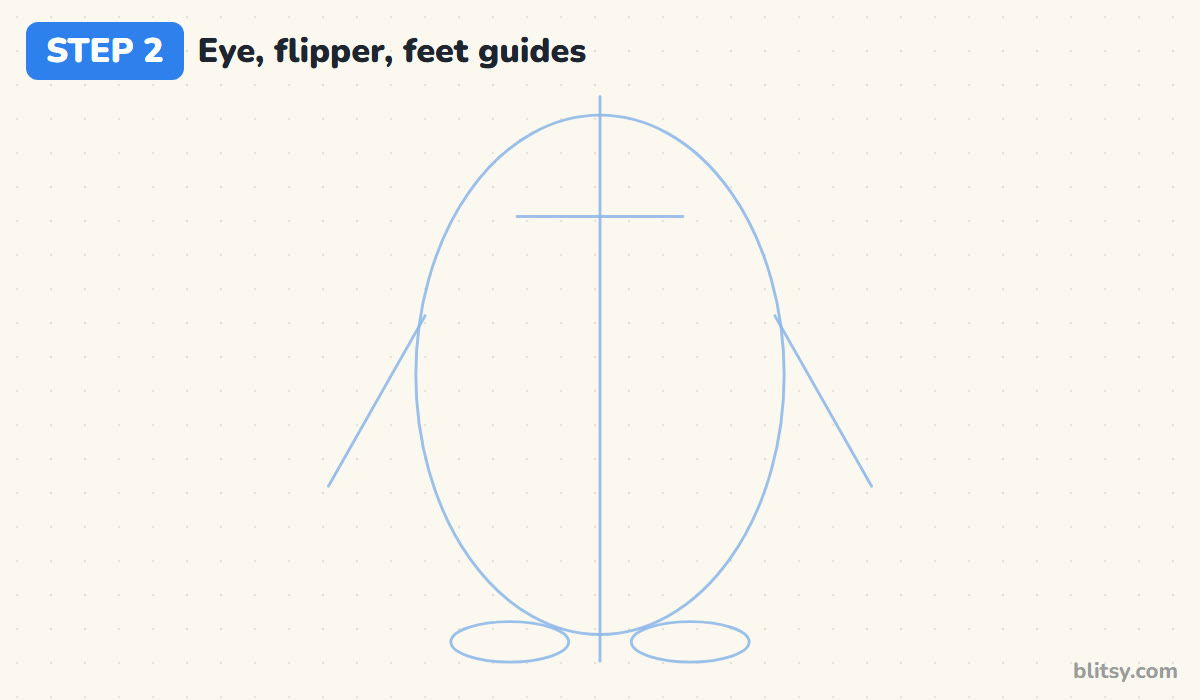
About a quarter of the way down the oval, draw a short line across for the eyes. On each side of the oval, draw a slanted line pointing down and out, starting a little above the middle. These show where the flippers will hang. At the bottom, sketch two flat little ovals, one on each side of the center line, for the feet.
💡 Tip: Check that both slanted lines lean out at the same angle before you go on.
Step 3: Draw the body outline
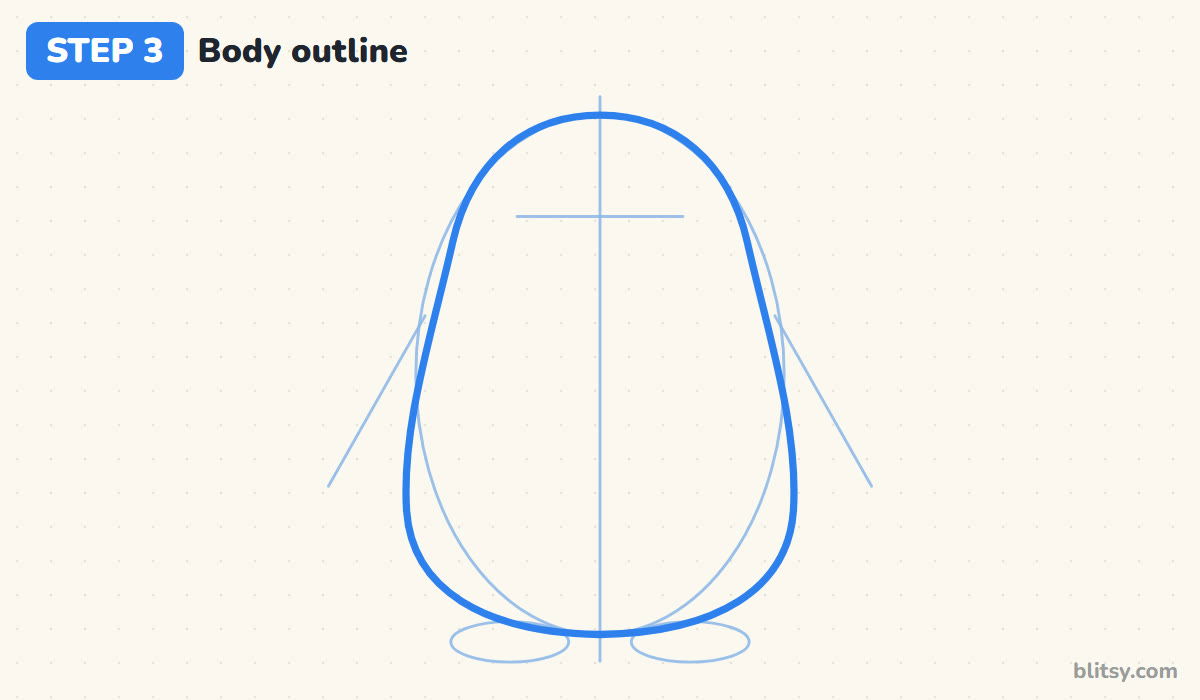
Now trace a real outline over the egg. Keep the top round and slightly narrow, then let the sides bulge outward as they go down, so the penguin is widest near its lower half. Close it with a wide, soft curve at the bottom. That bottom-heavy shape is what makes a penguin look like a penguin instead of a bowling pin.



💡 Tip: If the sides look straight, push them outward a little just below the middle.
Step 4: Add the face mask and the belly
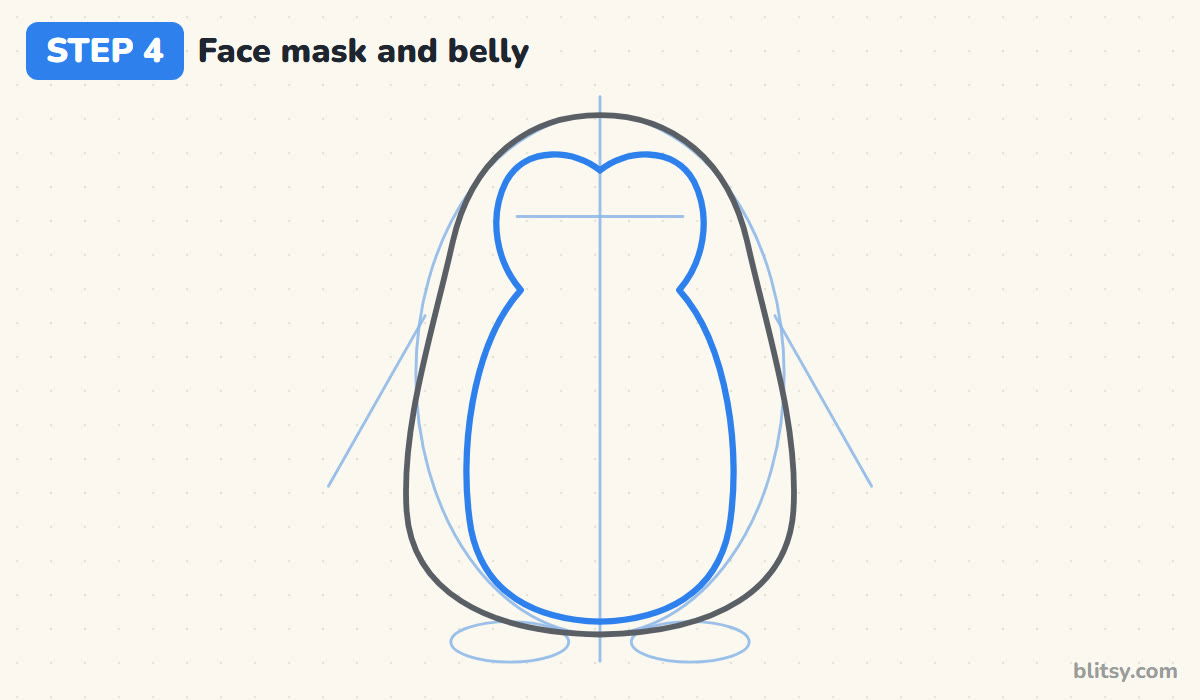
Inside the body, draw the white patch. It starts at the top as a heart shape around the eye line, with a small dip in the center. Under the eyes it pinches in at the neck, then swells into a big rounded belly that almost reaches the bottom. I leave a dark band all around this shape, roughly a finger wide, so the black of the back still shows.
💡 Tip: Draw one half, then copy it on the other side using the center line as your mirror.
Step 5: Draw two flippers
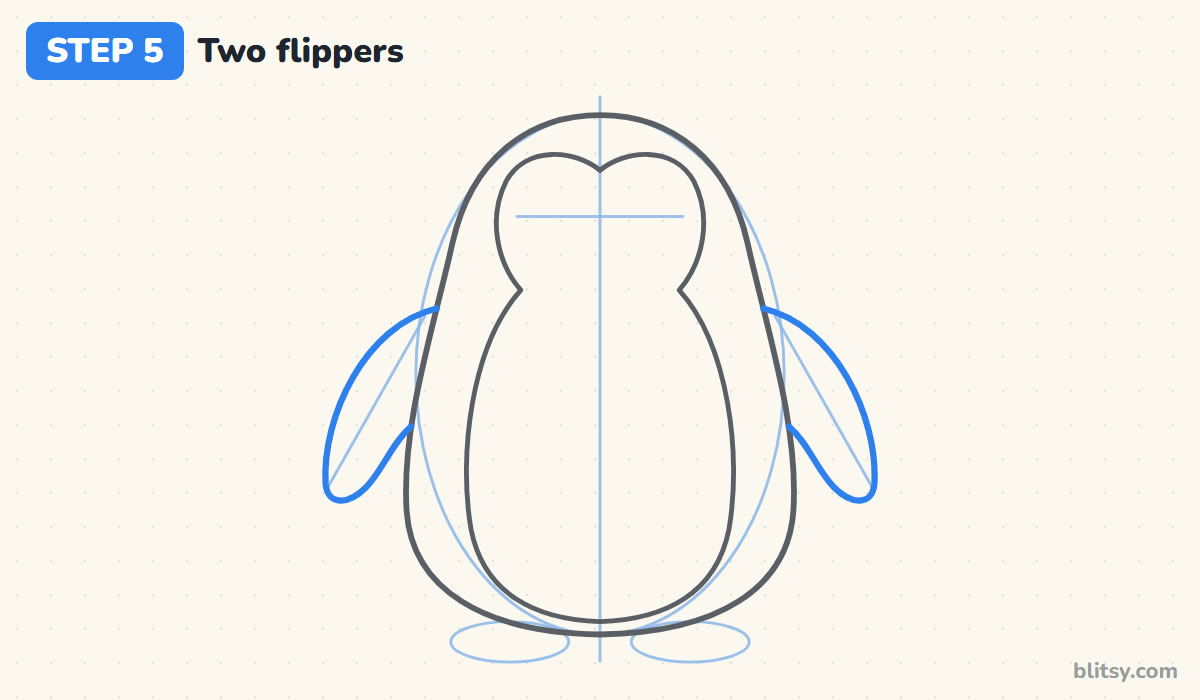
Follow each slanted guide to draw a flipper. Start on the body edge, curve outward and down to a rounded tip, then come back up and rejoin the body a bit lower. The flippers should be about as long as the face mask is tall. Holding them slightly away from the body gives the penguin a happy, balancing pose rather than a stiff one.
💡 Tip: Make the outer edge of each flipper curve more than the inner edge.
Step 6: Add the orange feet
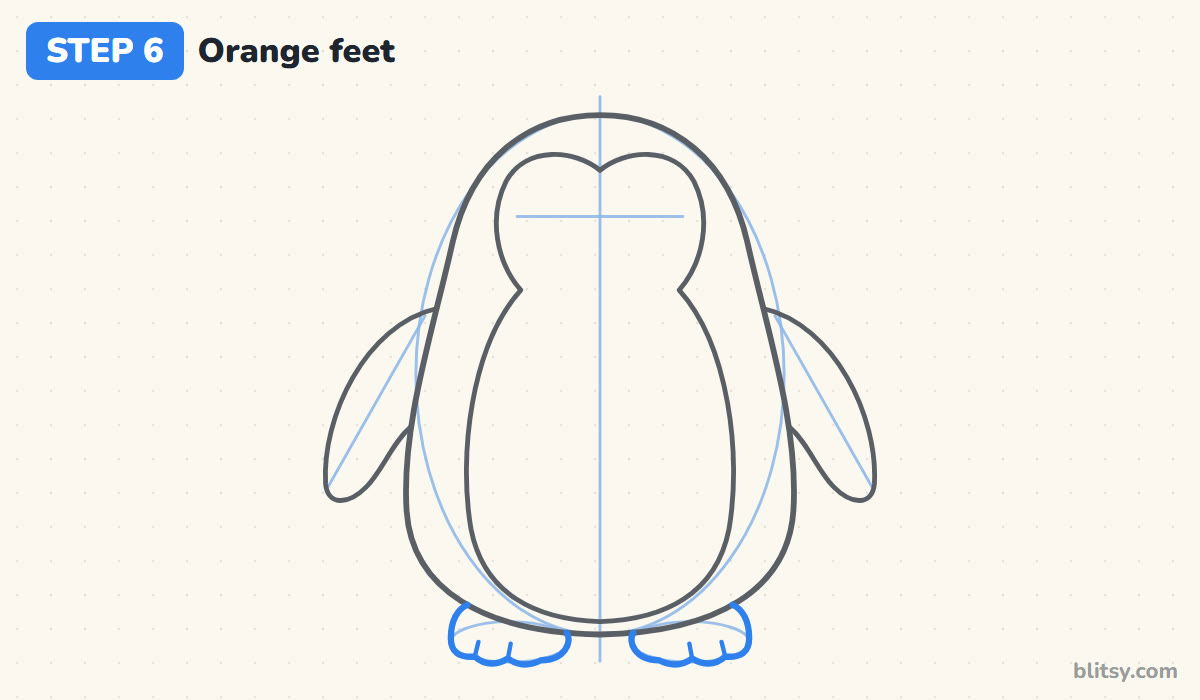
Use the little foot ovals as your guide. Each foot starts at the bottom of the body, drops down, and ends in three rounded toes along its bottom edge. Add two short lines between the toes so they separate. Most of each foot hides behind the body, so only the front edge needs to show.
💡 Tip: Scallop the toes like the edge of a cloud. Pointy toes look more like a duck.
Step 7: Draw the eyes and the beak
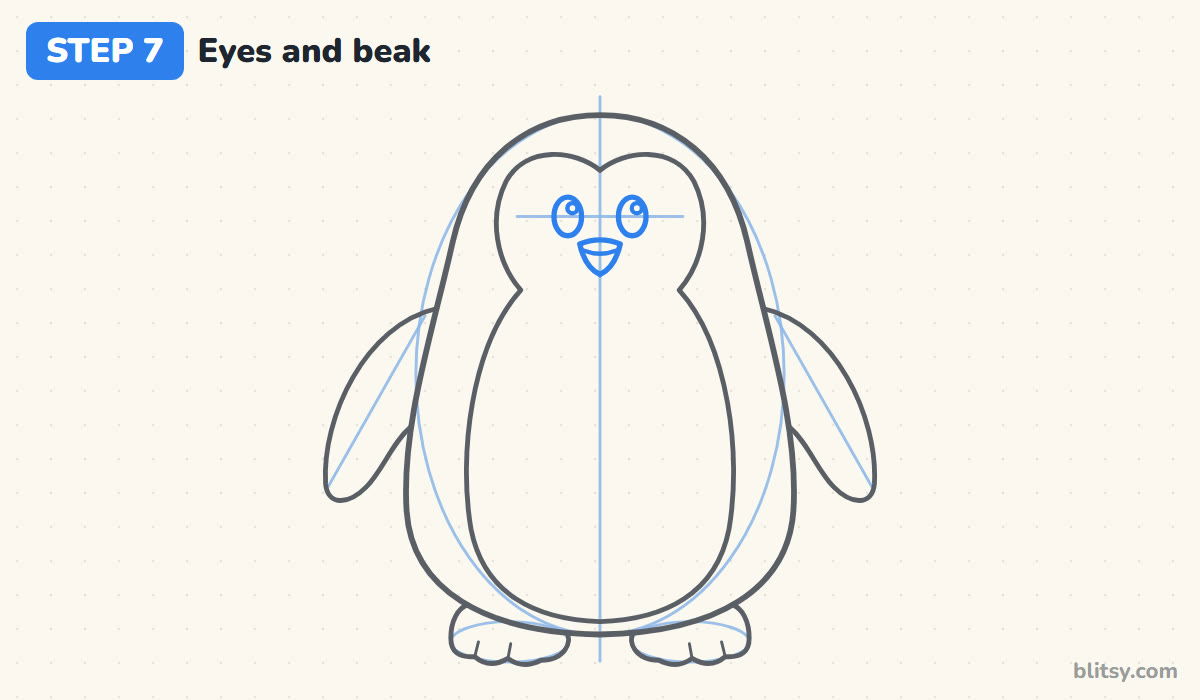
Sit two upright ovals on the eye line, one on each side of the center, with a small circle inside each for the shine. Just below them, right on the center line, draw a small rounded triangle for the beak, pointing down. A short curved line across the beak shows the mouth. Keep the beak little; a big one quickly turns the face into a toucan.

💡 Tip: Place both eye shines on the same side so the light seems to come from one place.
Step 8: Add rosy cheeks and a head tuft
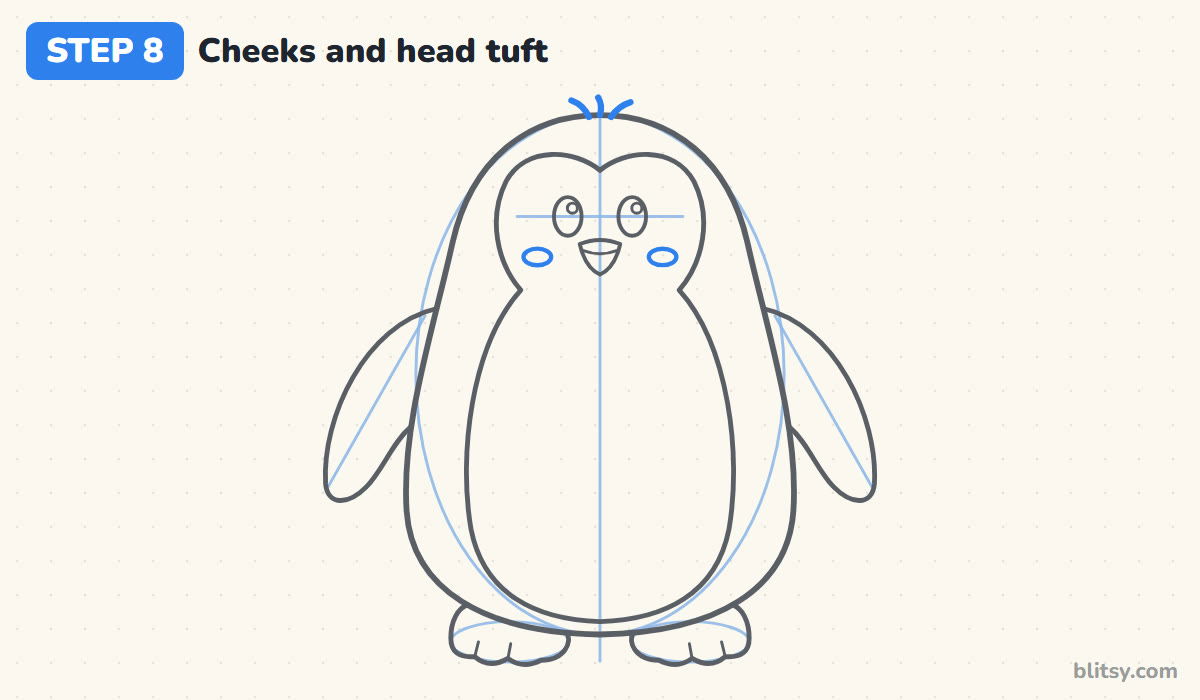
Draw a small flat oval under each eye, a little toward the outside. These cheeks are what make the face read as friendly. Finish with three short curved strokes poking up from the top of the head. That tiny tuft isn't on a real adult penguin, but in a cartoon it adds a lot of personality.
💡 Tip: Flick each tuft stroke quickly upward so it tapers at the end.
Step 9: Ink the lines and erase the guides
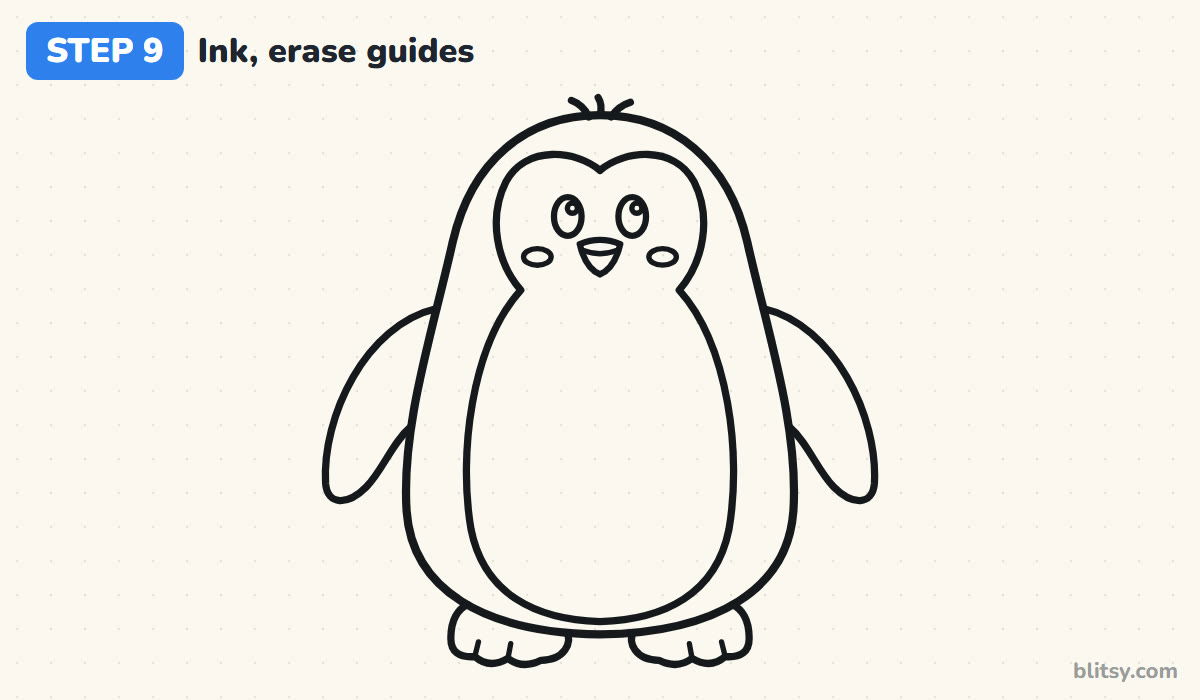
Trace over the outline, the face mask, the flippers, the feet and the face details with your black marker. Leave the center line, the egg, the eye line, the slanted lines and the foot ovals in pencil. When the ink is dry, rub out all the pencil. You should be left with a clean cartoon penguin and no extra lines inside it.
💡 Tip: Turn the paper as you trace the big curves so your hand always pulls toward you.
Step 10: Color your penguin
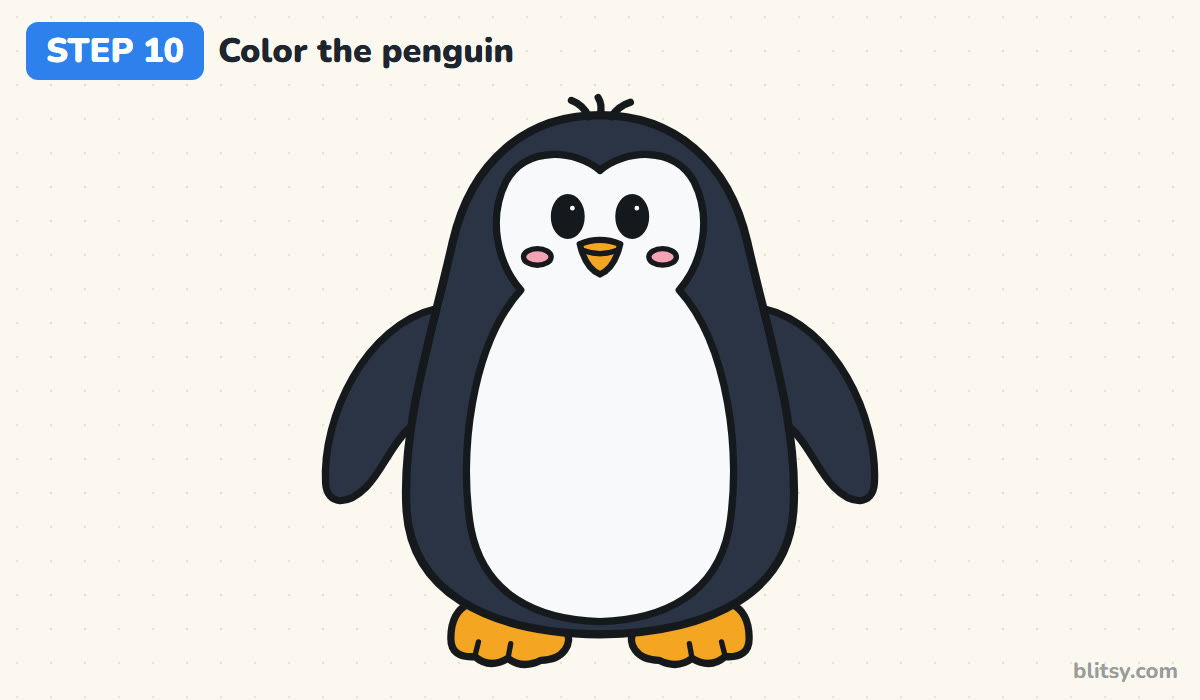
Color the body and both flippers black, or a very dark blue if you want it softer. Leave the face and belly white. Orange goes on the beak and the feet, pink on the cheeks, and the eyes stay black with white shine circles. My trick for the dark parts is to color in small circles instead of back-and-forth lines, which gives an even, smooth finish.
💡 Tip: Color the white belly last with nothing at all. Bare paper is the cleanest white you'll get.
Small Slips That Turn a Penguin into a Blob
- A body with straight sides. Straight sides make a pillar, not a bird. Let the body swell out below the middle so the penguin looks heavy and round at the bottom.
- No dark band around the white patch. When the belly touches the outline, the penguin loses its tuxedo look. Keep a strip of black all the way around.
- Eyes placed too low. Eyes near the middle of the body make the head disappear. Keep them in the upper quarter, inside the heart-shaped mask.
- A long, pointy beak. It turns the penguin into a different bird. A short rounded triangle is all it needs.
- Flippers stuck flat to the sides. They look like they're glued on. Tilt them slightly away from the body for a lively pose.
Dressing Up Your Penguin for Every Season
Once the basic penguin feels easy, start changing small things. A knitted scarf and a bobble hat make a nice winter card, and a red Santa hat turns it into a holiday drawing. Draw a second, smaller penguin beside it for a parent and chick, or tilt one flipper up so it waves. For an emperor penguin look, add a soft yellow patch on each side of the neck. Very young artists can skip the tuft and the toe lines and still get a clear penguin. If you like cold-weather animals, the arctic fox drawing tutorial is a good next lesson, and our winter coloring pages pair well with a snowy penguin scene.
Penguin Coloring Page and Printable PDF Steps
Want a version you can color without drawing first? Grab the free penguin coloring page. A small colored penguin at the top shows which color goes where, with a simple color key next to it. The step-by-step PDF guide has all 10 steps and tips on printer-friendly pages, so you can keep it beside you while you draw.
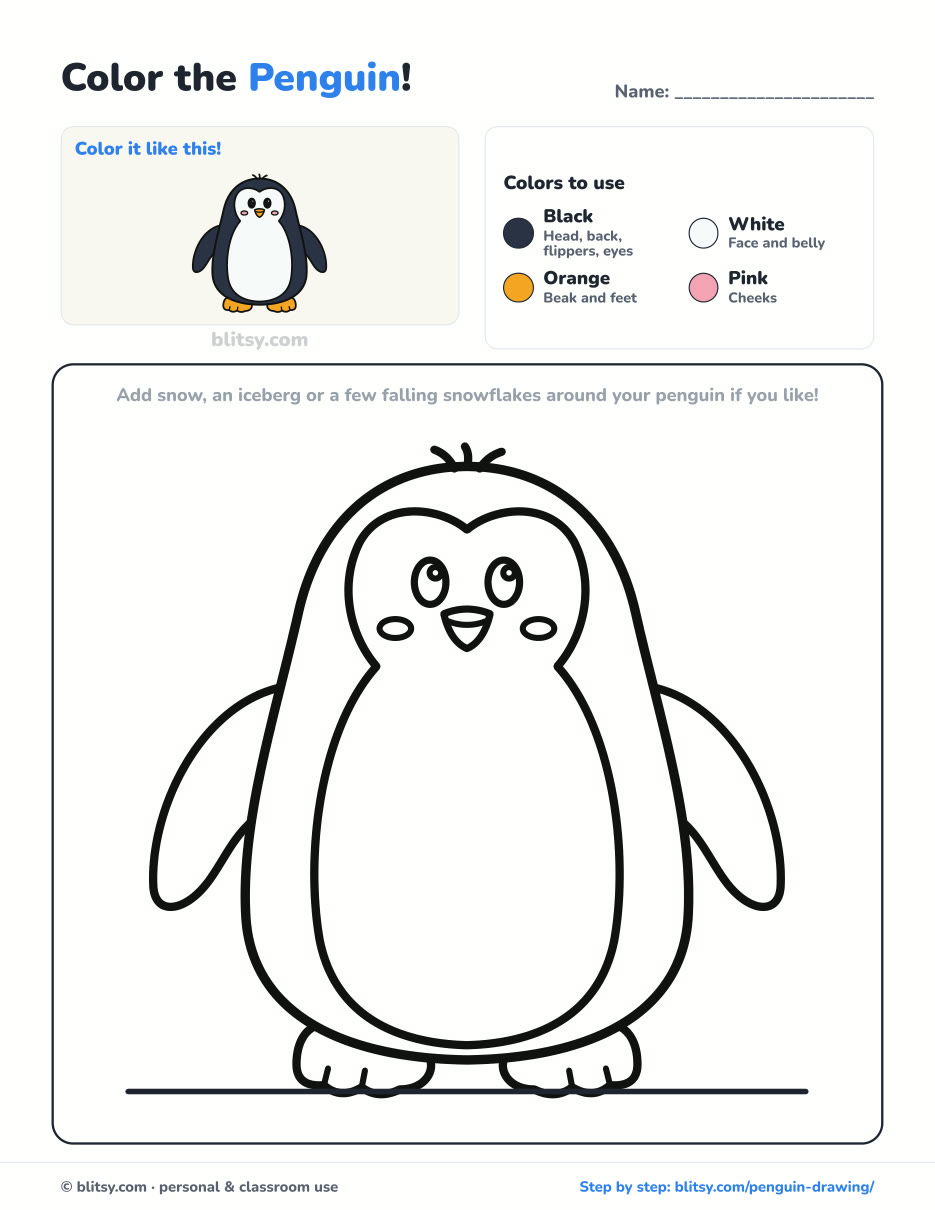
Black outlines with a colored example and the color names at the top. Ready to print and color.
⬇️ Download Coloring Page
Every step picture with its instructions and tips, to keep beside your paper while you draw.
⬇️ Download Drawing Guide📱 On a phone? Tap a download button, then open the file and choose Share → Save to Files or Print. On a computer, the PDF opens or saves straight to your Downloads folder.
Pin the Full Penguin Sequence
Penguin Finished? Draw These Animals Next
Every link below opens a step-by-step tutorial with its own step pictures, so you can pick the next animal and start right away.
- Narwhal Drawing: Stay in icy water with this how to draw a narwhal step by step lesson, which takes the whale and its tusk from blank paper in 11 steps.
- Miraculous Ladybug Drawing: Draw a chibi Ladybug with her mask on and yo-yo ready in this Miraculous Ladybug drawing tutorial.
- Realistic Drawing: For a change from cartoons, the realistic drawing step by step guide shows how one lamp lights a shiny apple and where its shadow falls.
- Paw Print Drawing: Make a dog print, a cat print and a small heart between them with this paw print drawing tutorial.
- Dragonfly Drawing: Learn how to draw a dragonfly with its wings spread and big eyes wide open, in ten steps.
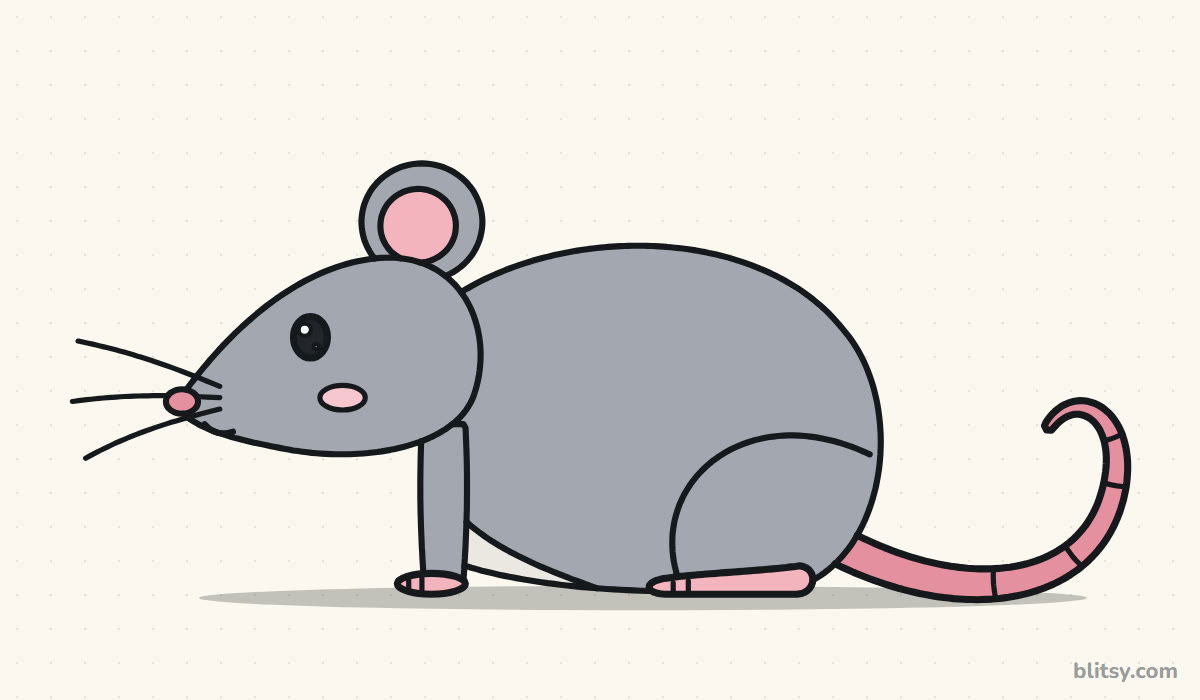
- Rat Drawing: A curious gray rat with its tail curled up behind is the goal of this easy rat drawing tutorial.
- Whale Drawing: Another sea animal to try: the whale drawing step by step lesson ends with a happy blue whale and its spout.
- Kitten Drawing: Draw one ginger kitten sitting politely with this how to draw a kitten tutorial.
- Ant Drawing: Three ovals turn into a red ant with its antennae up in this ant drawing step by step guide.
- King Kong Drawing: Fists down and mouth open, the giant gorilla in this King Kong drawing tutorial is ready to roar by step 11.
- Godzilla Drawing: Start from two ovals and finish a friendly kaiju with this how to draw Godzilla step by step lesson.
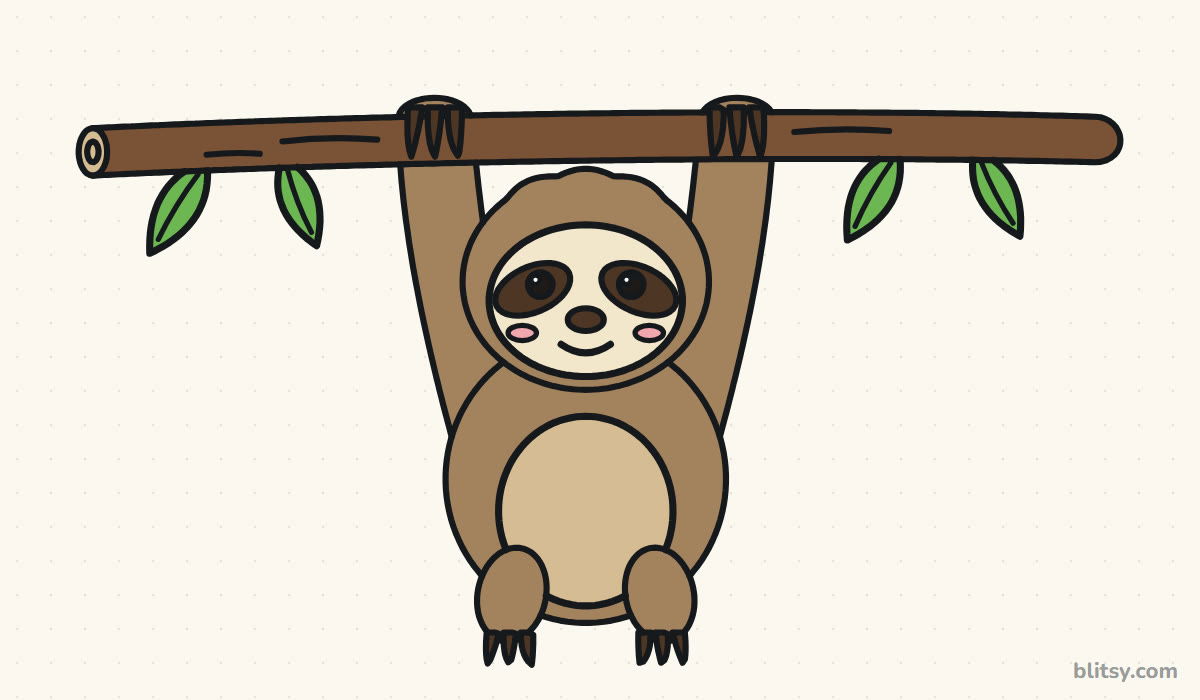
- Sloth Drawing: The sloth drawing tutorial gives you a smiling sloth hanging from a branch after 11 short steps.
- Arctic Fox Drawing: Another snow animal, drawn sitting with cheek tufts out and tail curled, in this arctic fox drawing step by step guide.
- Puppy Drawing: Follow the easy puppy drawing tutorial to draw a pup with its tongue out and collar on, ready for a walk.
Penguin Questions Beginners Usually Ask
What is the easiest way to draw a penguin?
Start with an egg shape for the body and put a white heart-shaped face and belly inside it. Add two flippers and two feet, then the eyes and a small beak. Almost the whole penguin is built from ovals and soft curves.
How do you draw a cute penguin for kids?
Make the body round and the eyes big, then add pink cheeks and a tiny tuft on the head. Kids can use thick markers and leave out the toe lines. A smaller beak always looks cuter than a large one.
What colors do I need to color a penguin?
Black or dark blue for the back and flippers, orange for the beak and feet, and pink for the cheeks. The face and belly can stay as white paper. Emperor penguins also have a little yellow near the neck.
How long does it take to draw a penguin?
Around 15 to 25 minutes for most beginners, including coloring. The face mask takes the most care, because both halves need to match.
Your egg is waiting, so grab a pencil and give your penguin its first waddle onto the page. 🐧✏️
Related posts:
 How to Draw a Car Step by Step (Easy Drawing for Beginners)
 How to Draw a Rat Step by Step (Easy for Beginners)
 How to Draw a Sloth Step by Step (Easy for Beginners)
 How to Draw a Puppy Step by Step (Easy for Beginners)
 How to Draw a Rose Step by Step (Spiral Method for Beginners)
 How to Draw Olaf Step by Step (Easy for Beginners)
 How to Draw a Ladybug Step by Step (Easy for Beginners)
 How to Draw a Dog Step by Step (Easy Side View for Beginners)
 How to Draw a Leopard Step by Step (Easy for Beginners)
 How to Draw a Light Bulb Step by Step (Easy for Beginners)
 How to Draw a Crow Step by Step (Easy for Beginners)
 How to Draw an Eagle Step by Step (Easy for Beginners)

