
Three circles stacked like a snowman's head and you're already halfway to the most famous mouse in cartoons. In this lesson you'll learn how to draw Mickey Mouse step by step, from those first light circles to a colored, waving figure in red shorts and yellow shoes. It's my simple fan-art version for practice, not official Disney artwork, so relax and enjoy the shapes instead of chasing a perfect copy.
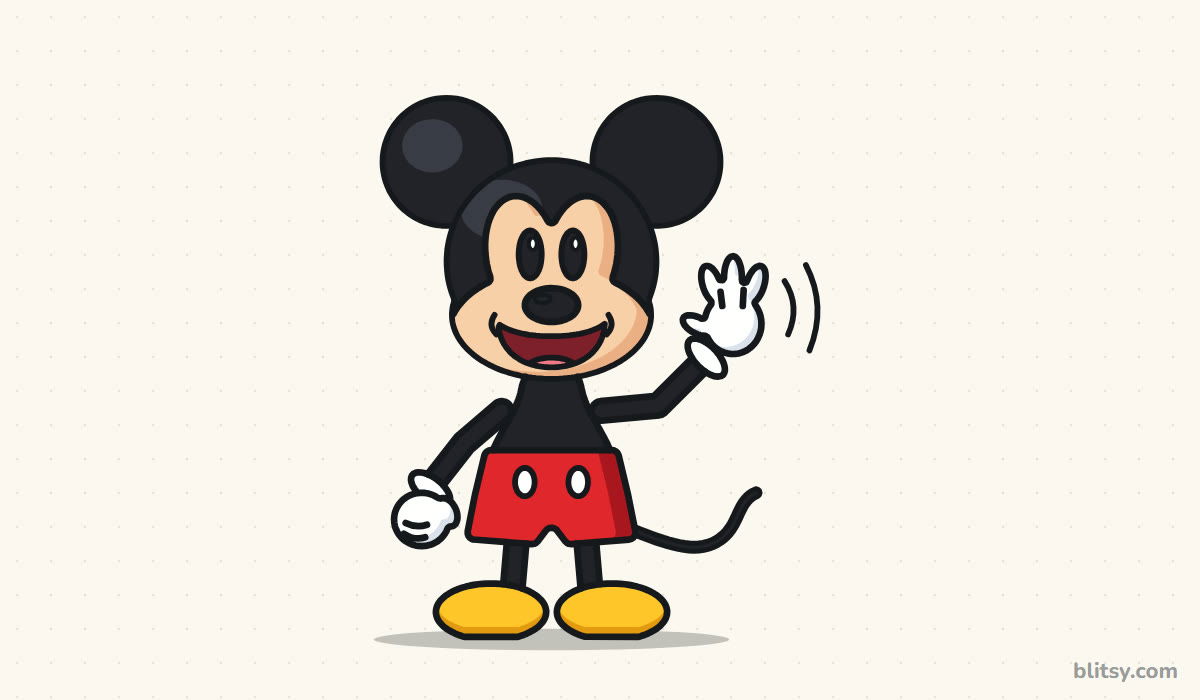
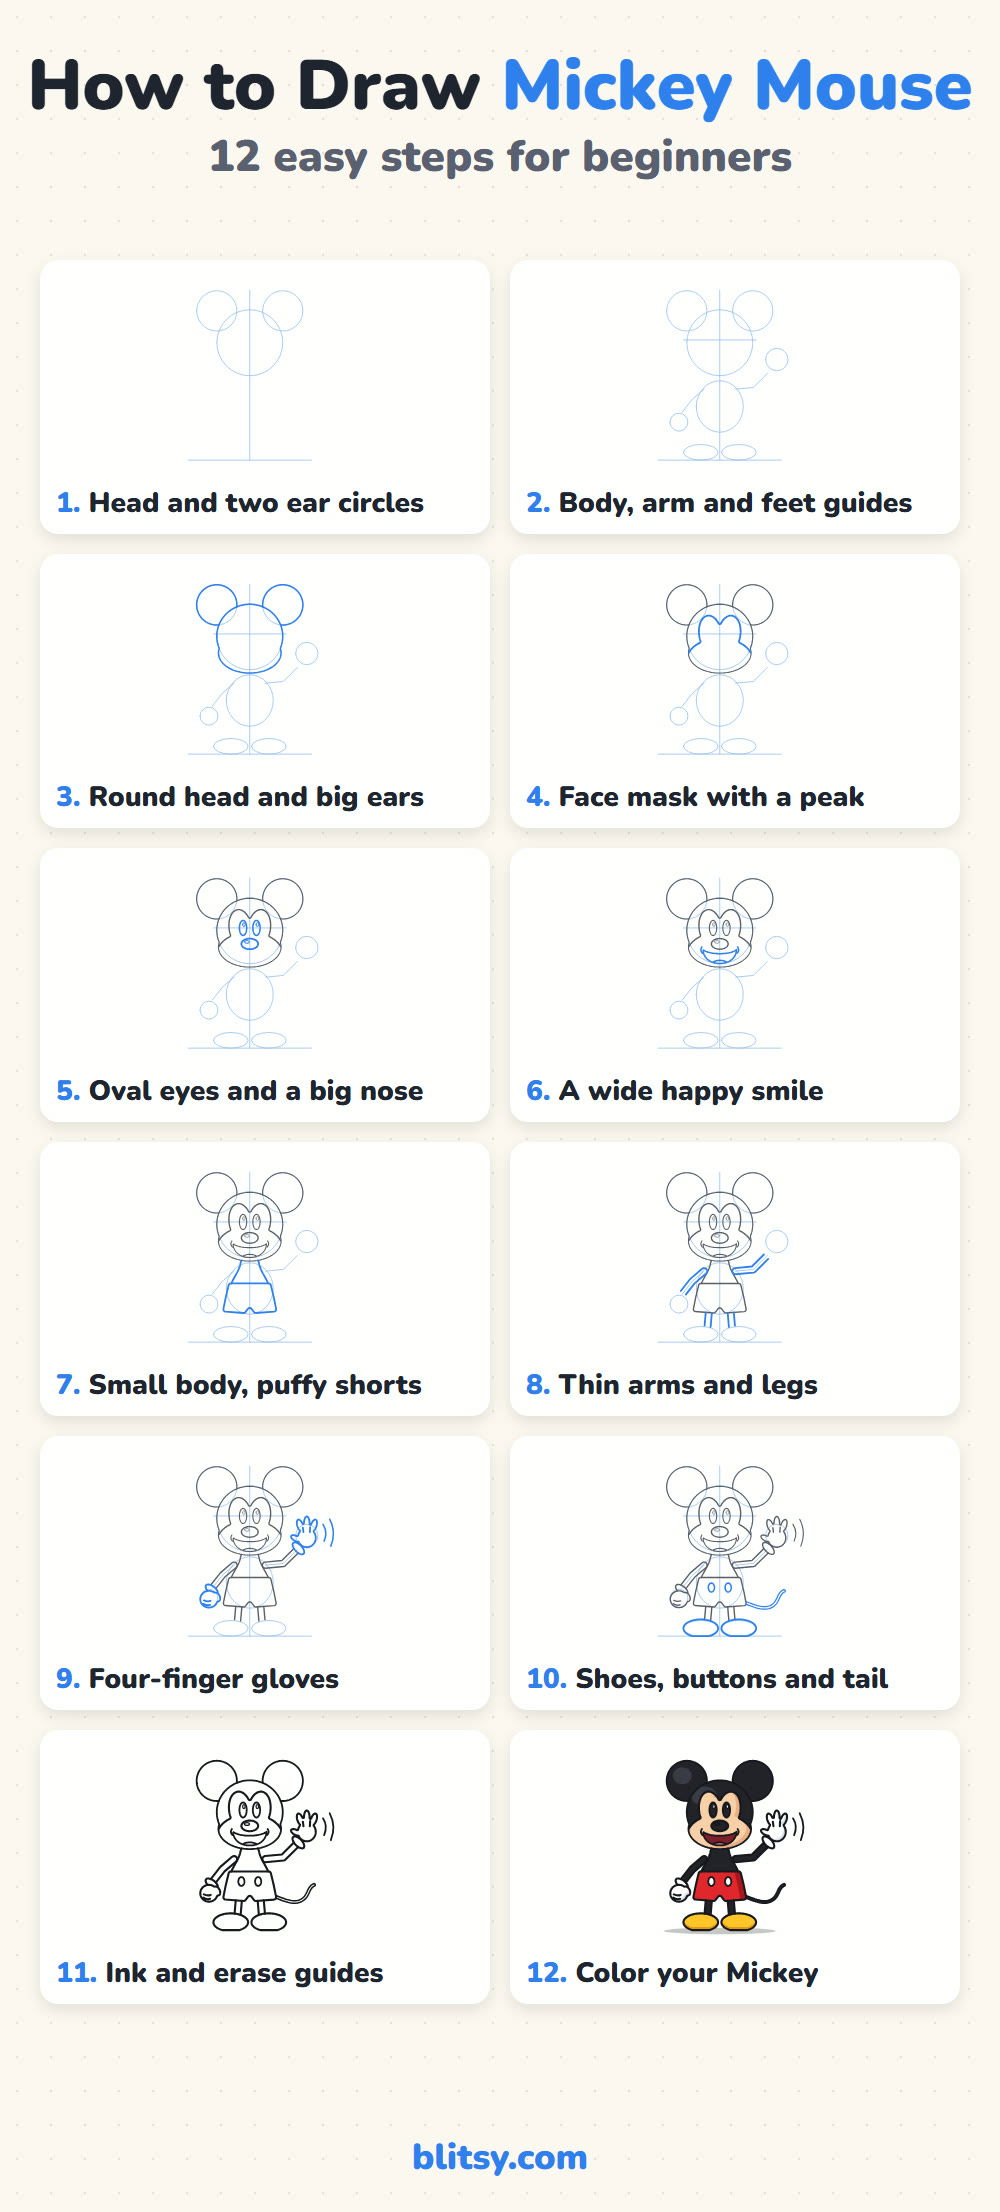
In each picture below, the part you add in that step shows up in blue. Anything you drew before turns gray, and the pale blue helper shapes vanish once you ink.
Quick overview
⏱️ Time: roughly 30 to 45 minutes with coloring
🎯 Level: easy; most kids from about 6 can follow it
✏️ Steps: 12
🐭 You'll draw: a full-body cartoon Mickey waving hello
Supplies for a Smiling Mouse Sketch
- An HB or 2B pencil for the light helper circles
- An eraser that lifts graphite cleanly
- A black marker or fineliner for the final outline
- Colored pencils or markers in black and peach, plus red and yellow
- A sheet of plain white paper held upright
Leave the gloves and buttons as bare paper; white pencil on white paper only makes them look dull.
How to Draw Mickey Mouse Step by Step
Step 1: Draw the head circle and two ear circles
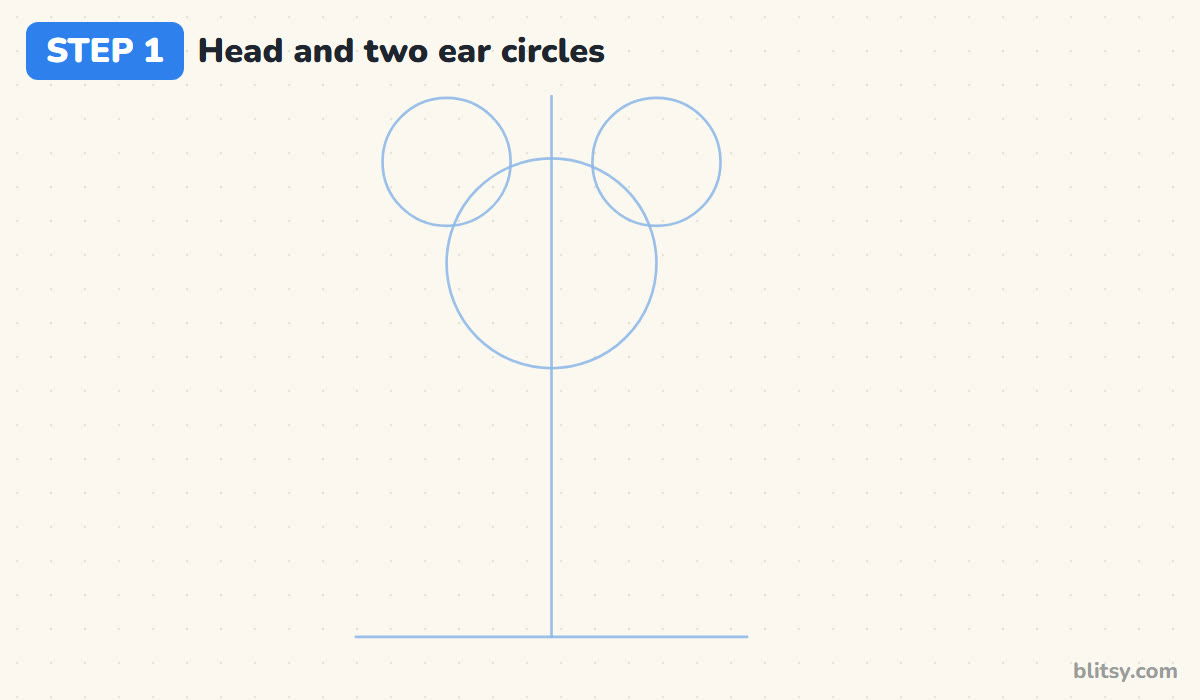
Start with a vertical center line and a flat ground line near the bottom of the page. Draw a circle for the head in the upper third, then two circles of about the same size for the ears, sitting up and out at the top corners. Each ear should overlap the head a little. Press lightly; these are only helpers.
💡 Tip: Trace a coin or a bottle cap for the ears if freehand circles keep coming out egg-shaped.
Step 2: Sketch the body guide plus arm and foot lines
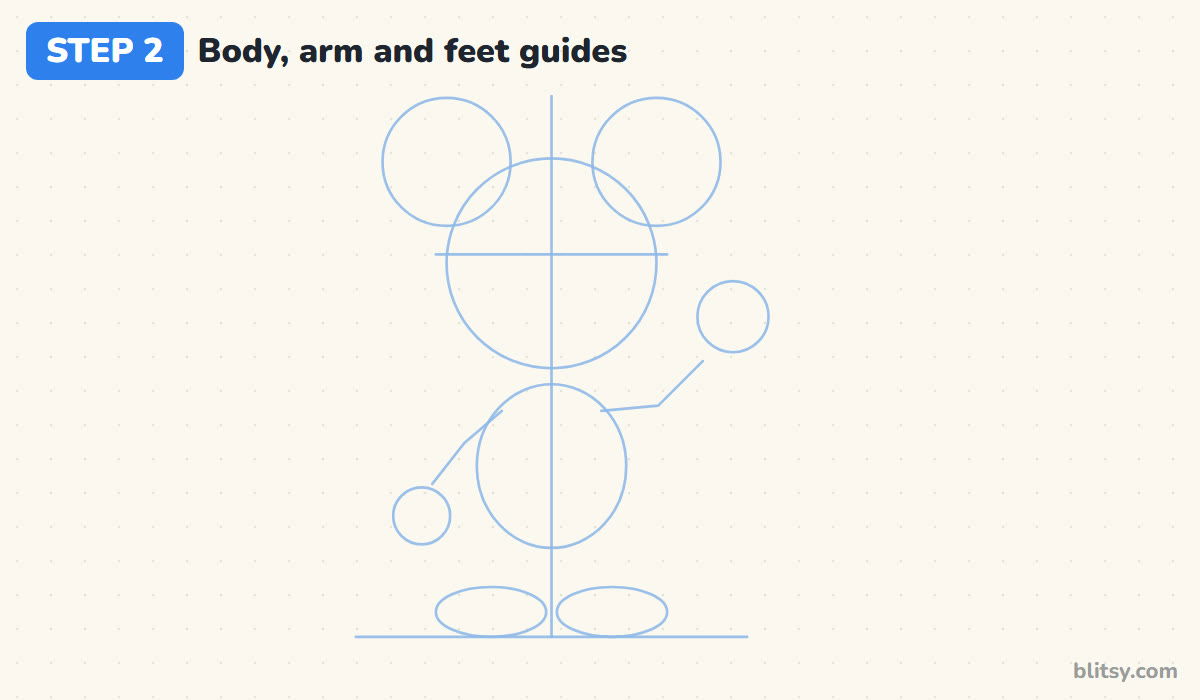
Mark an eye line straight across the middle of the head. Below the head, add a tall oval for the body that's narrower than the head. Now the arms: one stick line bends down to a small circle beside the hip, and the other rises to a bigger circle up by his cheek. Finish with two flat ovals on the ground line for the shoes.
💡 Tip: Keep the waving hand circle a hand's width away from the head so the glove has room.
Step 3: Outline the round head and big ears
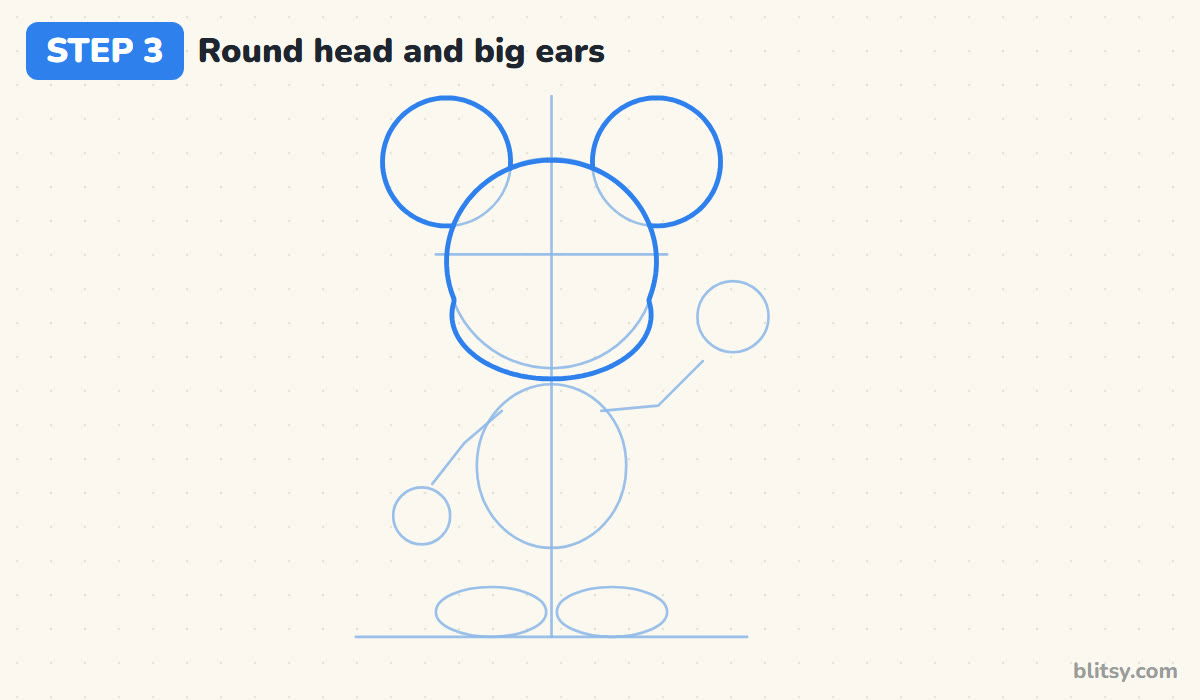
Press a bit harder now. Go around the head circle, but let the bottom swell out slightly into soft, full cheeks; that small bulge makes him look friendlier. Then trace both ears, stopping each line where it meets the head. I always leave the ears perfectly round, since any flat spot reads as a different animal.



💡 Tip: Turn the paper as you trace each ear so your hand curves naturally instead of fighting the circle.
Step 4: Draw the face mask with a pointed peak
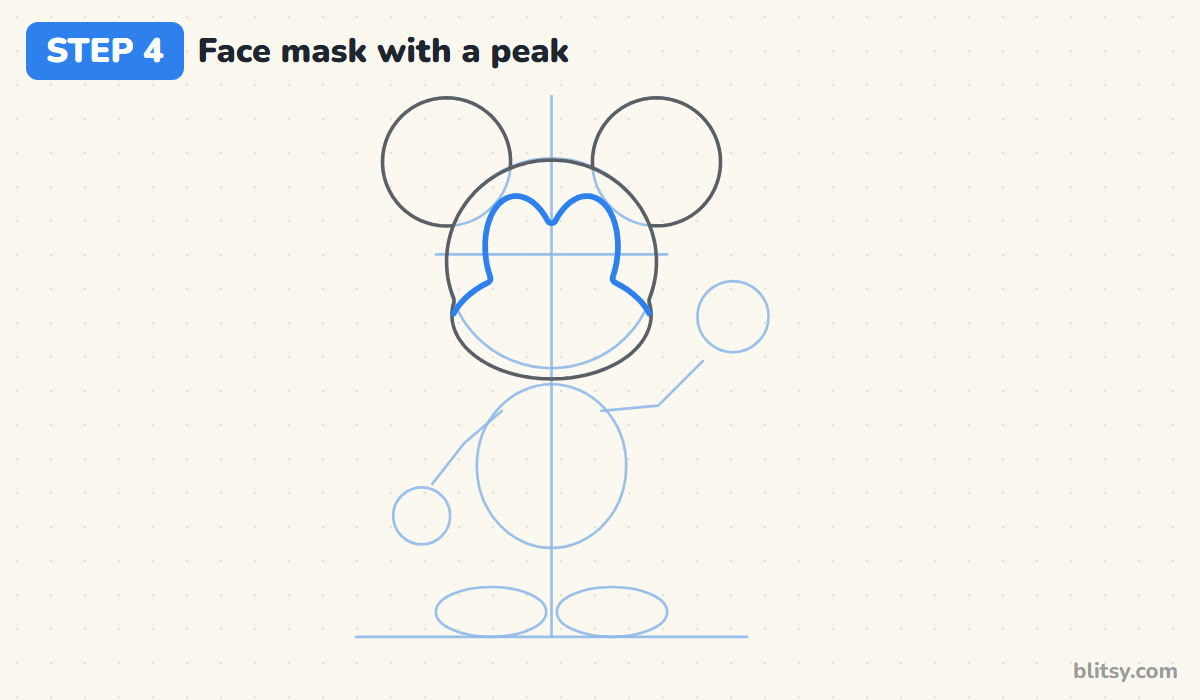
This shape is what makes the drawing look like Mickey. Draw two tall rounded bumps above the eye line, one over each eye area, so they meet in a little point in the middle like a widow's peak. From the outer side of each bump, curve down and out until the line touches the head outline near the cheeks.
💡 Tip: Sketch the two bumps a tiny bit taller than they are wide; short bumps make the face look squashed.
Step 5: Add the oval eyes and a big nose
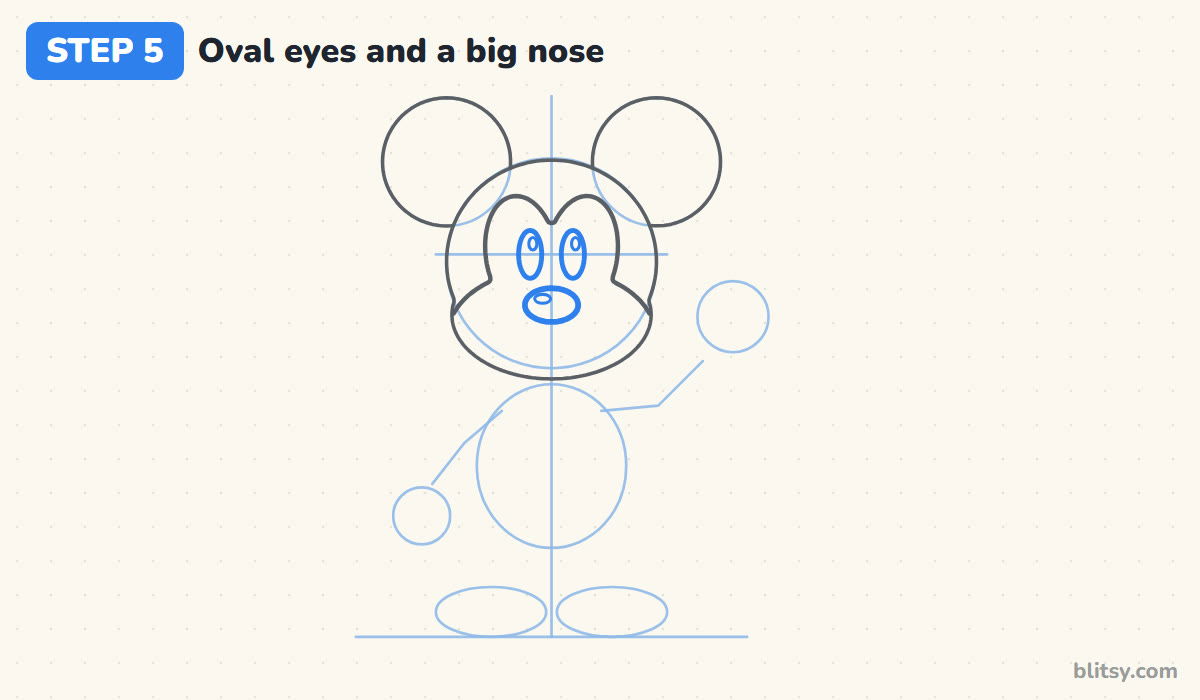
Inside each bump, right on the eye line, draw a tall narrow oval. Place them close to the center, nearly touching the peak's sides. Just below the eye line, draw a wide oval nose, roughly as wide as the gap between the outer edges of both eyes. Add a small shine to each eye and one on the nose.
💡 Tip: Put every shine on the upper left so the light seems to come from one place.
Step 6: Draw a wide, happy smile
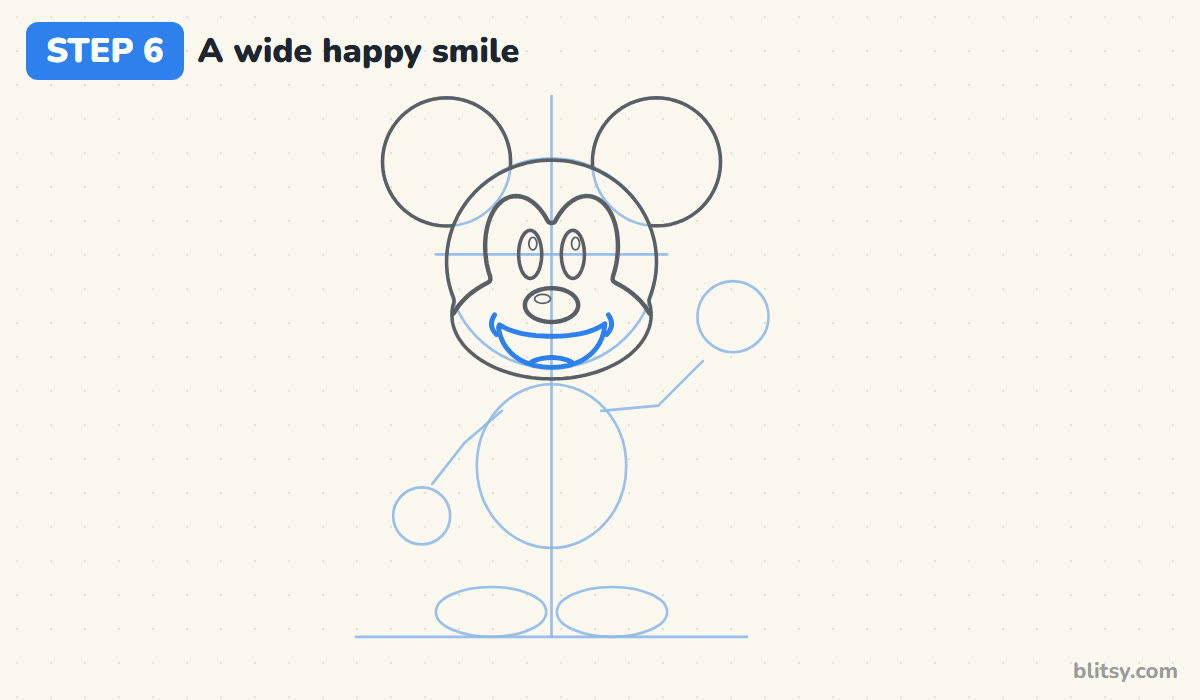
His grin starts just under the nose and stretches almost to the edges of the mask. Draw a gentle curve for the top lip, then a deep U underneath for the open mouth. A small curved tongue sits at the bottom. Finish with a short cheek line at each corner, which pushes the cheeks up the way a real smile does.
💡 Tip: Stop the mouth before it reaches the chin; leave a finger of space or the face looks crowded.
Step 7: Shape the small body and puffy shorts
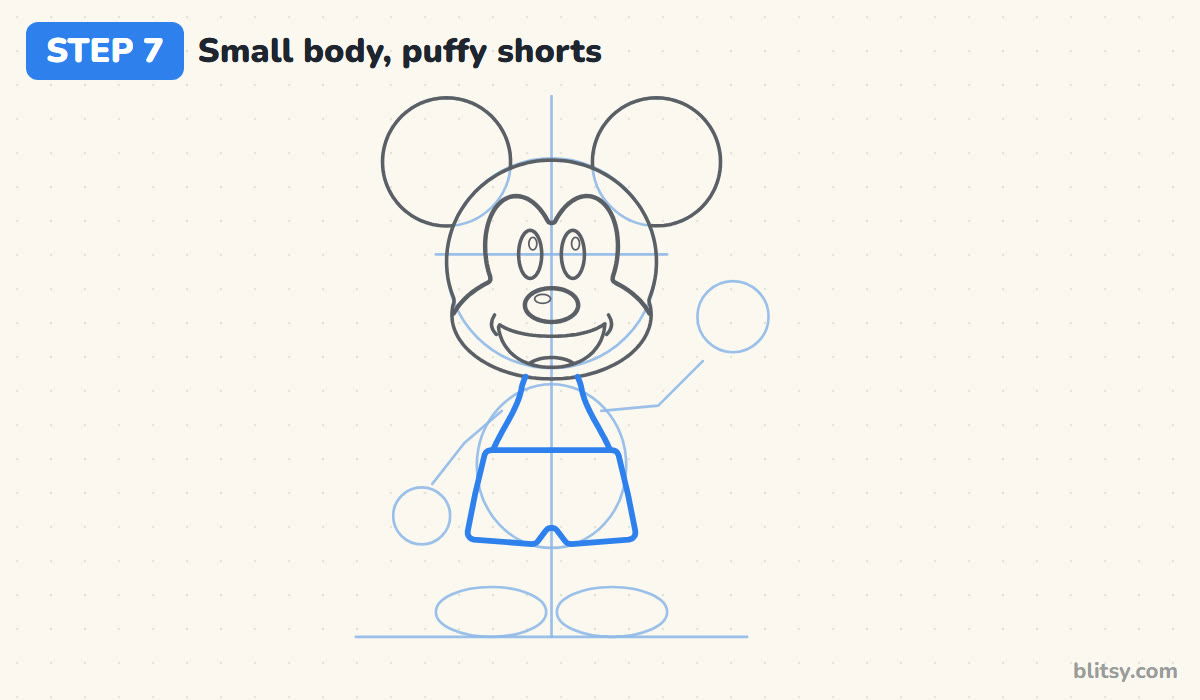
Follow the body oval to draw a little pear shape, narrow at the neck and wider at the hips. Over the lower half, draw his shorts as a rounded box with a short notch between the legs. Most beginners make the body too long here. Keep it short, about half the height of the head, and he stays cartoon cute.



💡 Tip: Round the corners of the shorts generously so they look soft and puffy, not like a stiff box.
Step 8: Add thin arms and legs
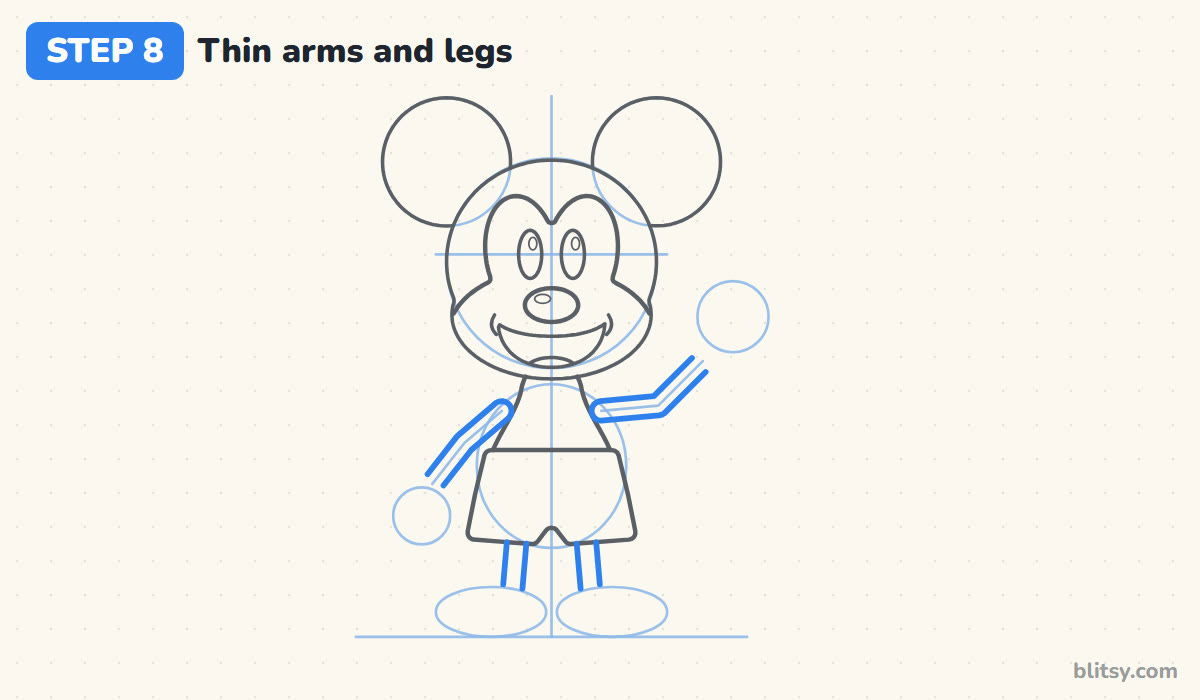
Mickey's arms and legs are thin tubes, like bendy straws. Draw two parallel lines along each arm guide, keeping the same gap all the way. Do the same for two short legs dropping from the shorts toward the shoe ovals. I leave the ends open at this point, because gloves and shoes will cover them.
💡 Tip: Use the width of your pencil tip as a measuring stick so all four limbs match.
Step 9: Draw the four-finger gloves
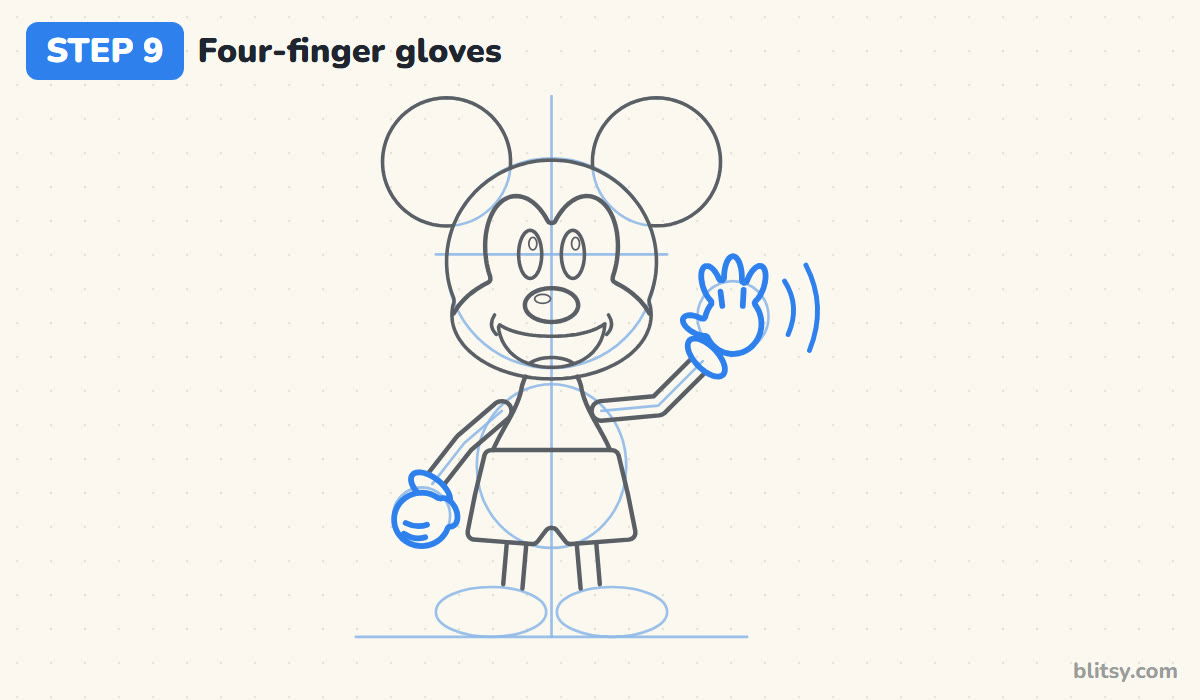
Each glove begins with a flared cuff at the end of the arm. The low hand is a round fist with a small thumb and two short knuckle lines. The waving hand is open: a round palm, three fingers fanned on top and a thumb out to the side. Cartoon hands usually have four fingers in all, so don't add a fifth. Two curved lines beside it show the wave.
💡 Tip: Draw the middle finger first and tallest, then tuck one shorter finger on each side of it.
Step 10: Add the shoes, buttons and tail
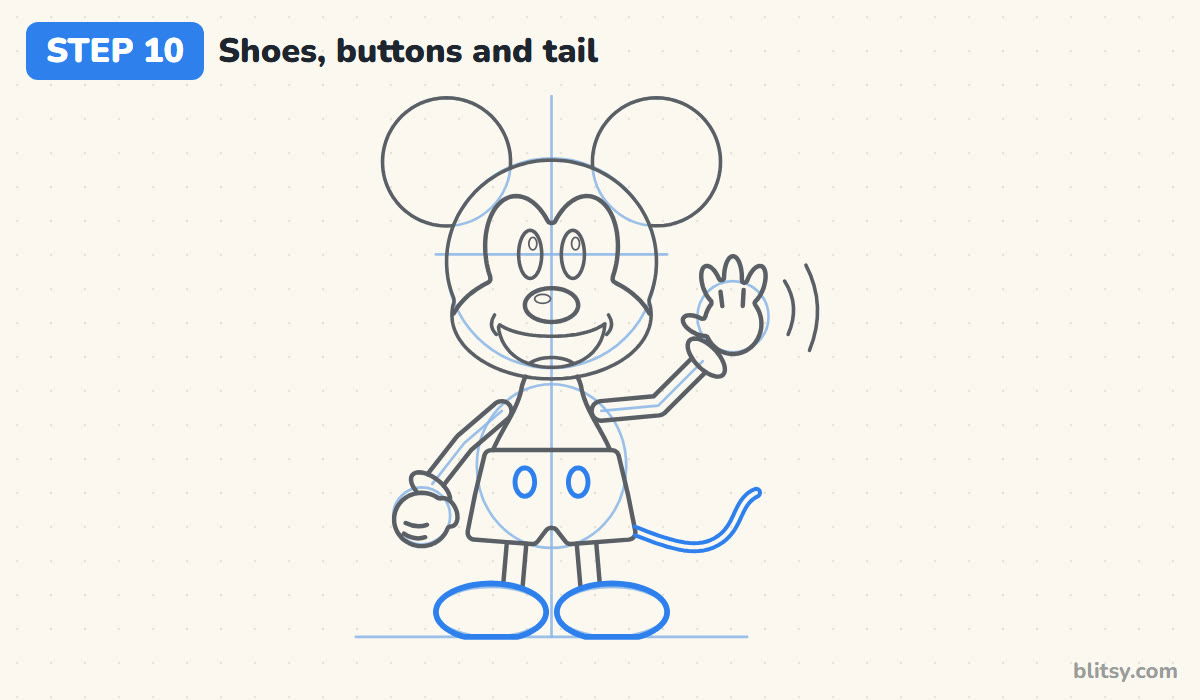
Wrap each shoe oval into a big rounded shoe with a flat sole on the ground line. They should look almost too large; that's the classic cartoon look. Put two tall oval buttons on the front of the shorts. Last, curl a thin tail out from behind the shorts on the open side, ending in a small hook.
💡 Tip: Make the two shoes almost touch in the middle; that small gap keeps him planted and steady.
Step 11: Ink the lines and erase the guides
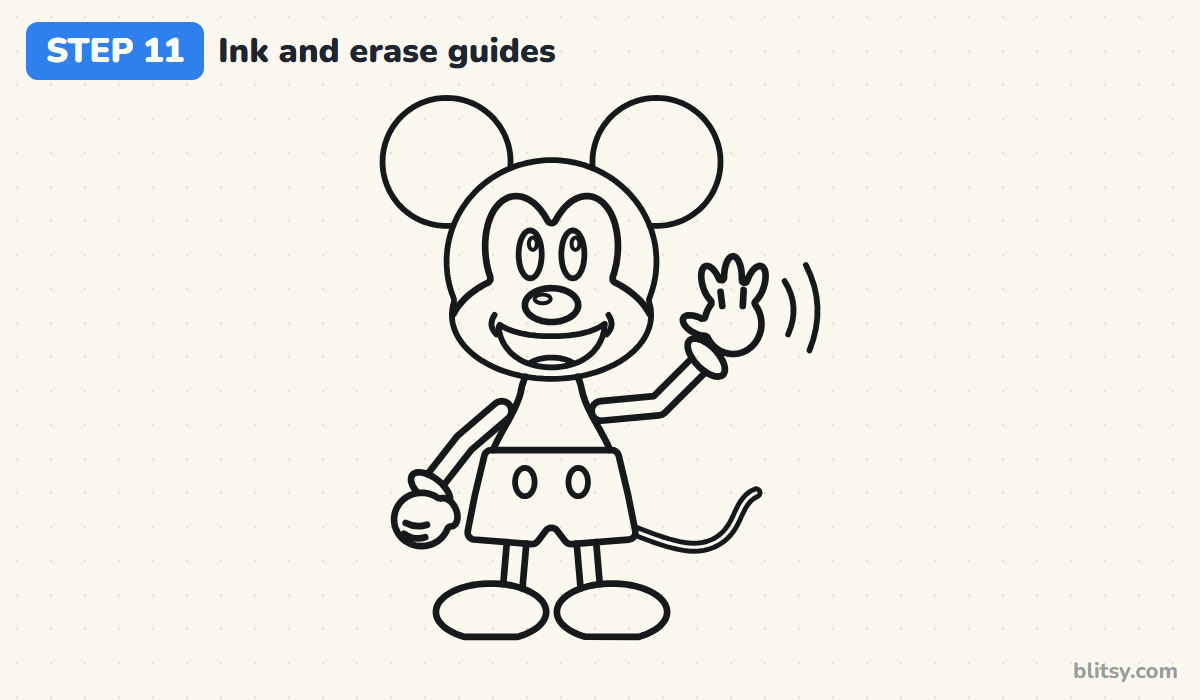
Trace every keeper line with your black marker. I start with the face, because a shaky line there is the hardest to hide, then move outward to the hands and shoes. Leave the circles and stick lines alone. Wait a minute for the ink to dry, then erase all the helper shapes gently.


💡 Tip: Use a heavier line for the outer outline and a lighter one for the eyes and fingers.
Step 12: Color your Mickey
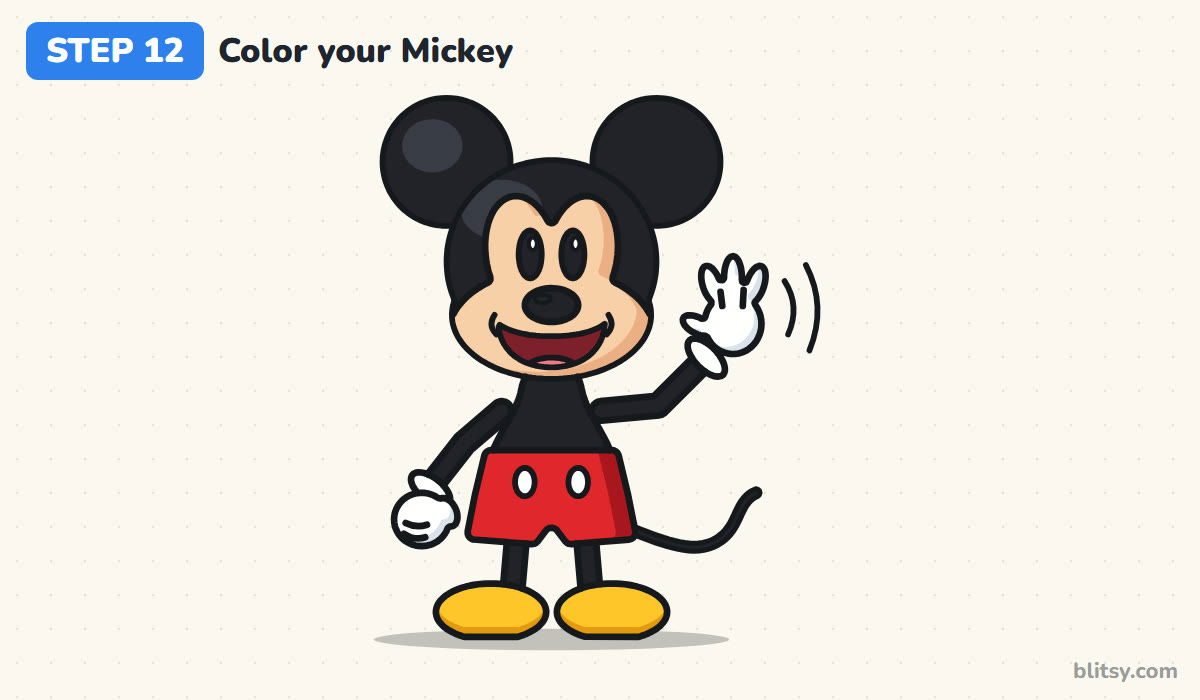
Color the head and ears black, along with the body, the limbs and the tail, but keep the eyes' shines and nose shine white. The face mask is peach, the shorts are red and the shoes are bright yellow. Inside the mouth use dark red with a pink tongue. A slightly darker red on the right side of the shorts and a deeper yellow under the shoes add some roundness.
💡 Tip: Color the big black areas last with a marker, so they don't smear onto the peach face.
Little Slips That Change Mickey's Face
- Ears that shrink. Small ears turn him into a generic mouse. Make each ear nearly as large as half the head.
- A mask with no peak. A flat line across the forehead looks like a mask from a different character. Draw two bumps meeting in a point.
- Eyes spaced too far apart. Wide eyes make him look surprised or sleepy. Keep both ovals close to the center line.
- A tiny nose. His nose is big and bold. Go about as wide as the space across both eyes.
- A long body. If he looks like a teenager, shorten the body and legs until the head is the biggest part.
New Looks and Poses for Your Mickey
Once this version feels easy, change one detail per drawing. Give him a party hat, swap the wave for both hands on his hips, or close his eyes in a big laugh. Younger kids can skip the tail and the glove lines. If you'd like to stay in the same world, the Disney character drawing tutorial is a natural next step, and the mouse drawing tutorial shows how a real mouse compares to the cartoon.
Free Mickey Coloring Page and Step Guide PDF
Prefer to color first? The free Mickey Mouse coloring page has a clean outline, a small colored example and a color key to copy. The printable drawing guide keeps all 12 steps and tips together on pages that print on Letter or A4.
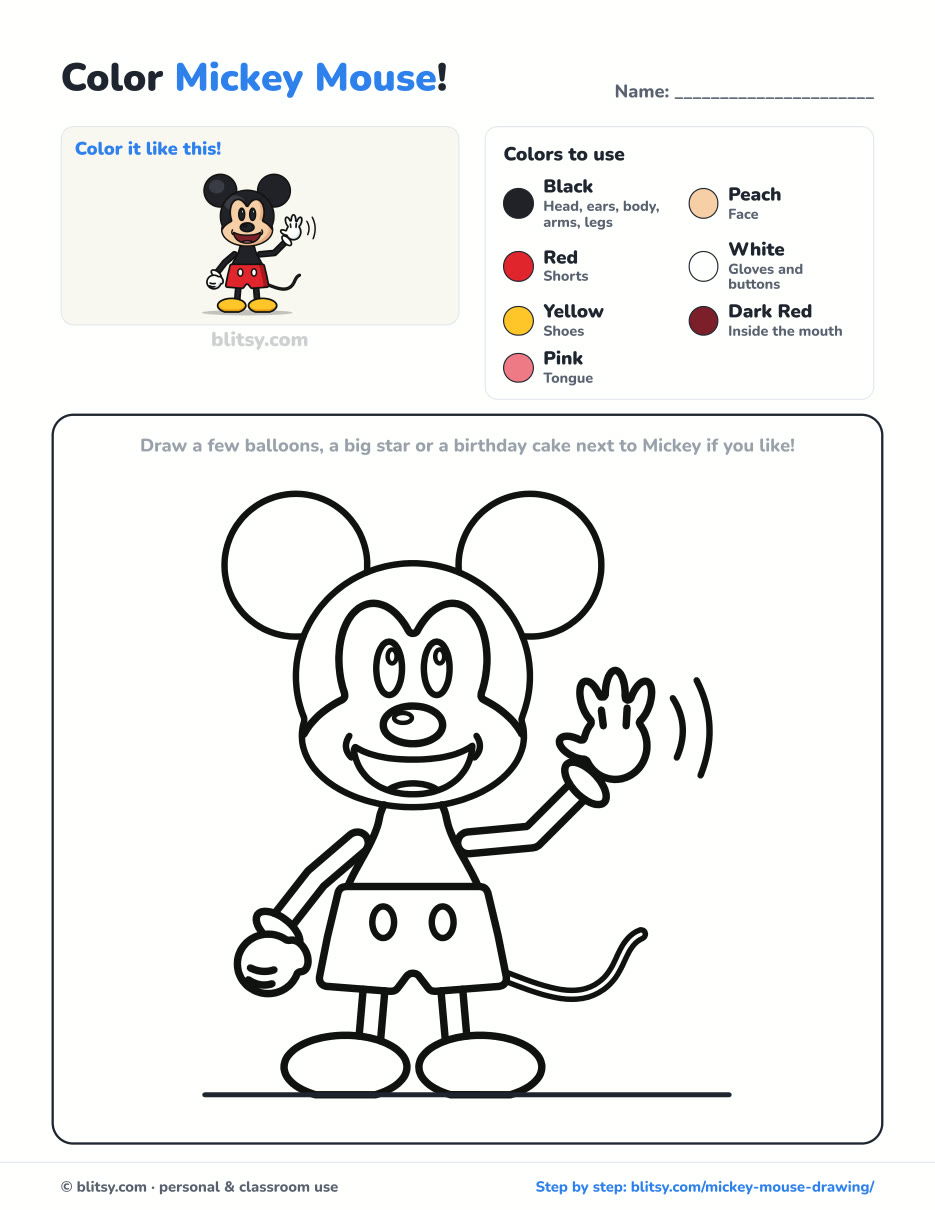
Black outlines with a colored example and the color names at the top. Ready to print and color.
⬇️ Download Coloring PageEvery step picture with its instructions and tips, to keep beside your paper while you draw.
⬇️ Download Drawing Guide📱 On a phone? Tap a download button, then open the file and choose Share → Save to Files or Print. On a computer, the PDF opens or saves straight to your Downloads folder.
Keep Mickey's Twelve Steps on Pinterest
Mickey Fans Can Draw These Characters Next
Each link opens a step-by-step tutorial, from other cartoon stars to a few practice subjects like hands and faces.
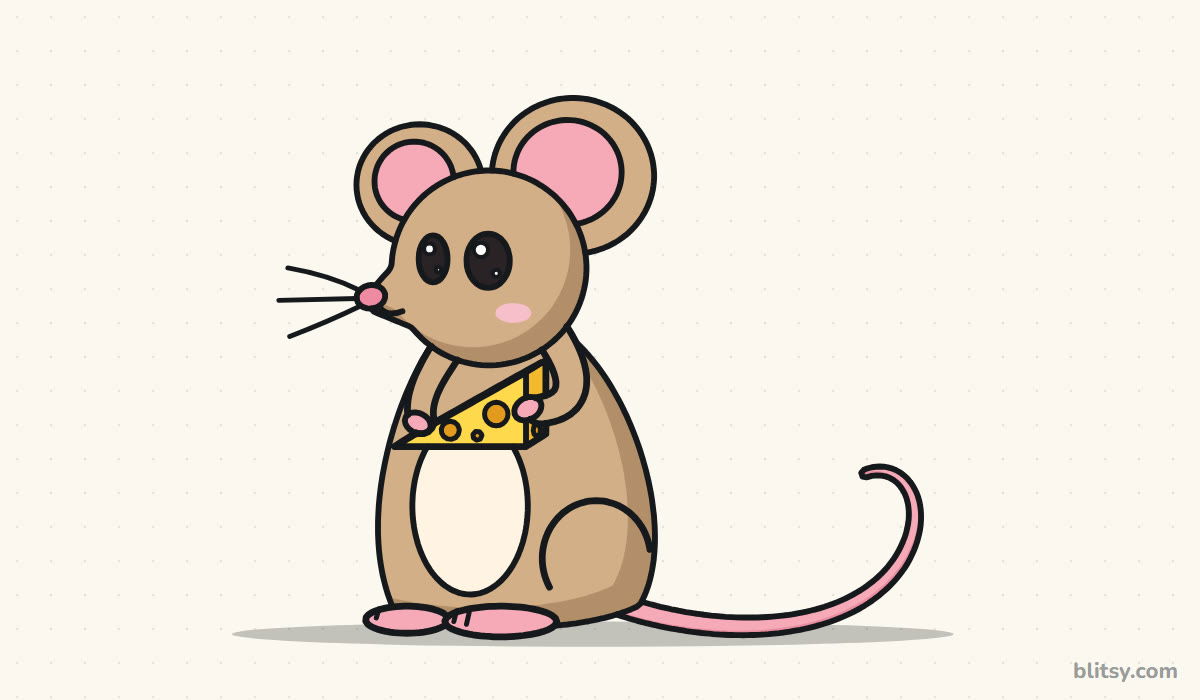
- Mouse Drawing: See how a real mouse compares to the cartoon in this how to draw a mouse step by step lesson, cheese in paws.
- Heart Drawing: The heart drawing tutorial shows how two circles and a V make an even heart.
- Sharingan Drawing: Draw a red anime eye with three tomoe in the Sharingan drawing tutorial.
- Bart Simpson Drawing: Spiky hair and a smirk finish the Bart Simpson drawing step by step guide.
- Disney Drawing: The Disney character drawing tutorial draws Nemo the clownfish with his bubbles.
- Hands Drawing: Cartoon gloves are easier once you know the real thing, and the hands drawing tutorial starts with one open palm.
- Woman Drawing: Learn body proportions, six heads tall, in the how to draw a woman lesson.
- Kurama Drawing: A chibi nine-tails grins in front of his orange tails in this Kurama drawing tutorial.
- Anime Drawing: The anime drawing step by step lesson builds a boy's face with spiky blue hair on one circle.
- Side Profile Drawing: Try a head from the side with the side profile drawing tutorial.
- Juice WRLD Drawing: This Juice WRLD drawing tutorial is a quiet tribute portrait in soft colors.
- Stitch Drawing: Big ears and a small grin make up the how to draw Stitch lesson.
- Ghost Drawing: A waving ghost and its baby float above a pumpkin in the cute ghost drawing tutorial.
- Skull Drawing: The skull drawing step by step guide draws a friendly front view with two marigolds.
Mickey Drawing Questions Parents and Kids Ask
What is the easiest way to draw Mickey Mouse?
Start with three circles: one for the head and two for the ears. Once those sit right, the mask, the eyes and the nose fall into place on top of them.
How do you draw Mickey Mouse's face?
Draw a peach mask with two tall bumps meeting in a point at the top, put two tall oval eyes inside the bumps, then a big oval nose and a wide open smile below.
Can a young child draw Mickey Mouse?
Yes. Kids around 6 manage the head and face well. Let them skip the gloves' small lines and the tail, and help with the arm tubes if needed.
How long does it take to draw Mickey Mouse?
Plan for 30 to 45 minutes with coloring. The face takes the longest, and the next try usually goes much faster.
Pull out three coins or just your pencil, sketch those circles, and let your own Mickey wave hello from the page. 🐭✏️
Related posts:
 How to Draw Freddy Krueger Step by Step (Cute Chibi Version)
 How to Draw Mario Step by Step (Easy Chibi Version)
 How to Draw Goku Step by Step (Easy Chibi Version)
 How to Draw Darth Vader Step by Step (Easy Chibi Version)
 How to Draw a Mouse Step by Step (Easy for Beginners)
 How to Draw an Owl Step by Step (Cute Night Owl)
 How to Draw an Axolotl Step by Step (Cute and Easy)
 How to Draw a Frog Step by Step (Cute Frog on a Log)
 How to Draw a Jellyfish Step by Step (Cute, Easy Guide)
 How to Draw a Care Bear Step by Step (Cute Fan Art for Kids)
 How to Draw Cerberus Step by Step (Cute and Easy)
 How to Draw a Monster Step by Step (Cute and Easy)

