
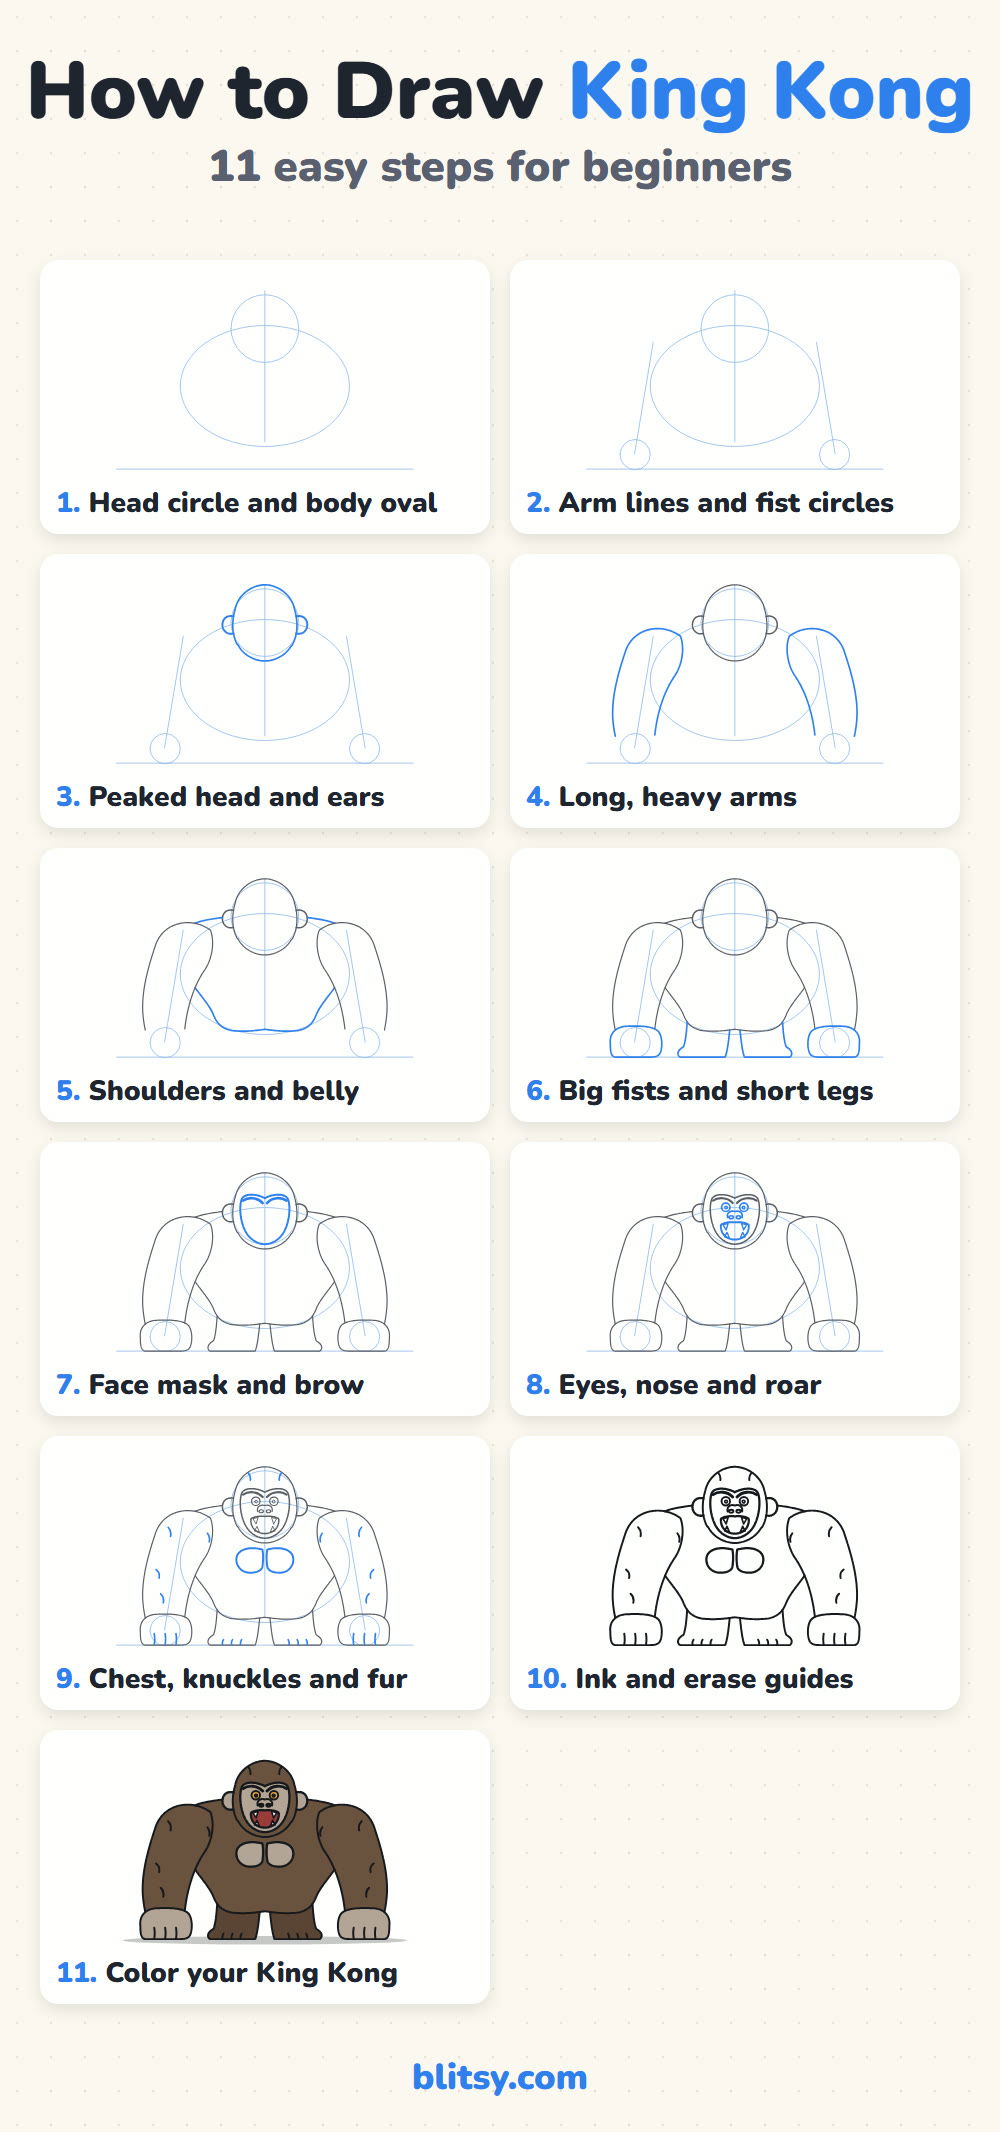
The biggest ape in the movies is surprisingly kind to beginners, because seen from the front he's built almost entirely from big, simple shapes. A round head, a wide body and two long arms do most of the work. In this lesson I'll walk you through how to draw King Kong step by step, from a light circle and oval to a brown, roaring giant leaning on his fists. It's my own simple fan-art version for practice, not official movie art, so you're free to change anything you like.
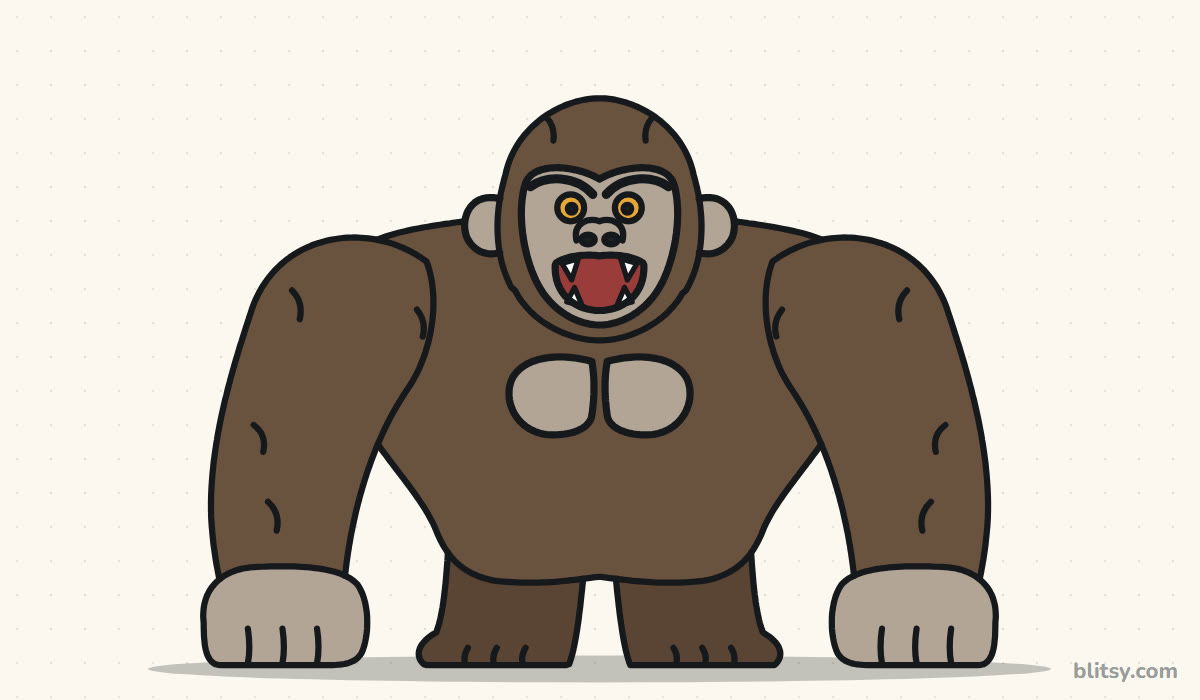
Blue marks the work for the current step. Gray lines are things you already drew, so you can compare your page with the picture at a glance. The pale blue circles and lines in the first steps are only scaffolding, and they get erased near the end.
Quick overview
⏱️ Time: about 30 minutes, a little more if you add the fur
🎯 Level: easy, good for kids around 7 and up
✏️ Steps: 11
🦍 You'll draw: King Kong from the front, leaning on both fists and roaring
What Goes on the Desk Before Kong Shows Up
- A regular HB pencil for the light guide shapes
- A clean eraser (a kneaded one lifts guides without scuffing)
- A black marker or fineliner for the final lines
- Brown, gray, dark red and orange colored pencils or markers
- Plain paper, held sideways
Hold the paper sideways, since his arms spread out much wider than his head is tall.
How to Draw King Kong Step by Step
Step 1: Sketch the head circle and body oval
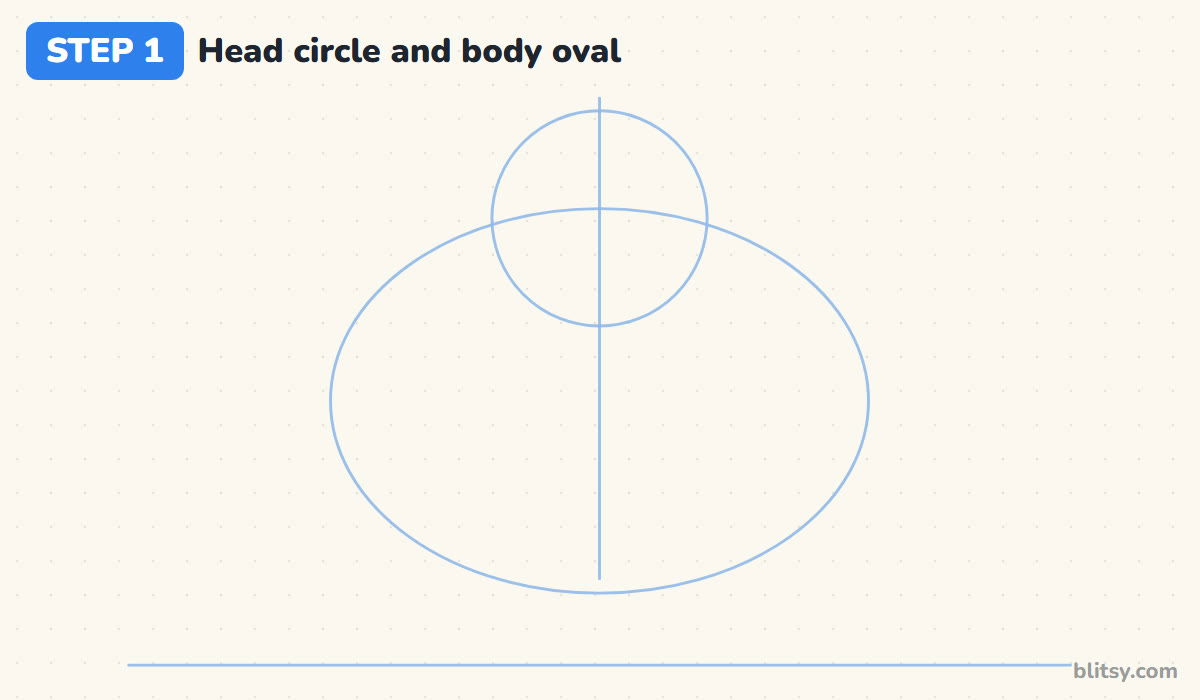
Draw a light ground line across the lower part of the page and a straight line down the middle. Near the top of that center line, draw a circle for the head, then a wide oval below it that overlaps the bottom of the circle. I keep the head low on purpose. Gorillas have almost no neck, and that sunken head makes him look powerful.
💡 Tip: The center line is your best friend in a front view. Measure every left-side part from it, then copy it on the right.
Step 2: Add the arm lines and fist circles
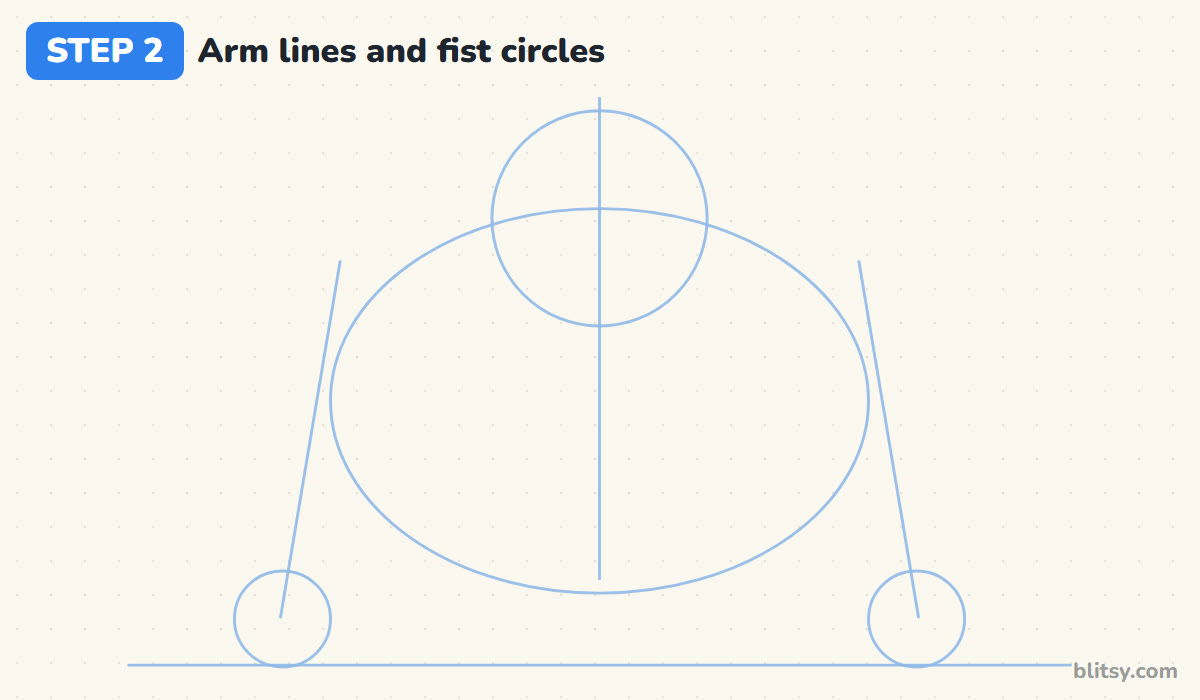
From the top corners of the oval, draw two long lines that slant outward as they go down, stopping just above the ground line. At the bottom of each, draw a circle that touches the ground. These are for the fists, and they sit well outside the body oval because his arms are longer than his legs.
💡 Tip: Check that both fist circles sit the same distance from the center line. Lopsided fists are hard to fix later.
Step 3: Draw the peaked head and small ears
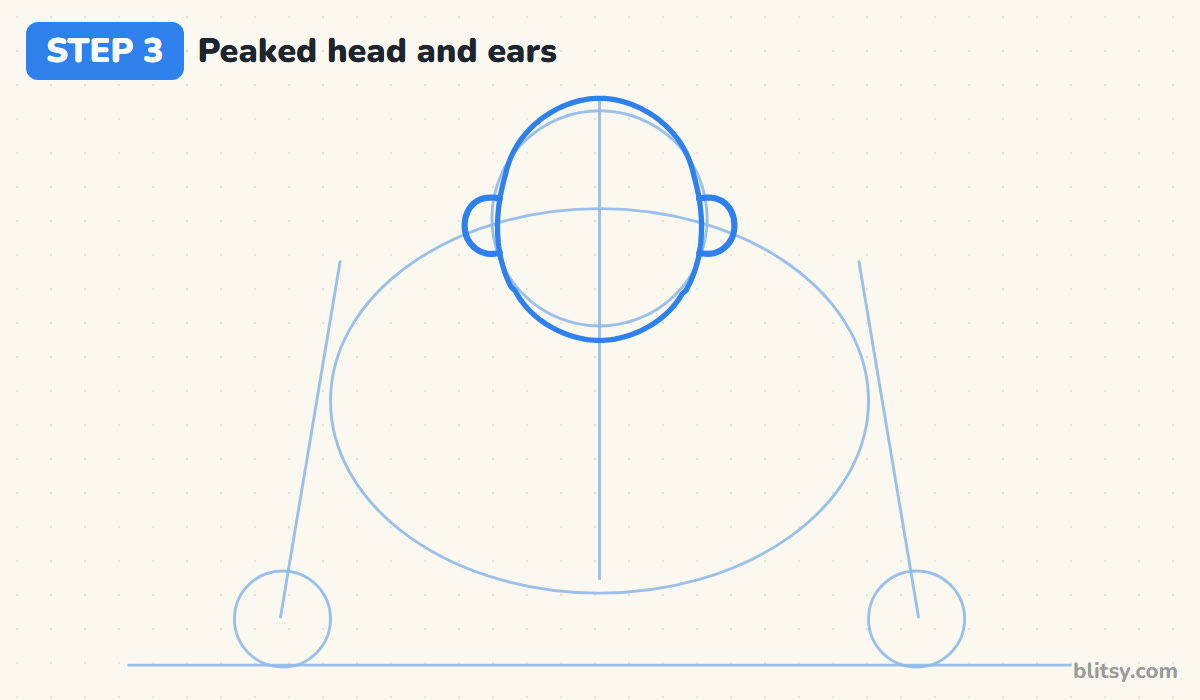
Trace around the head circle, but let the top rise into a soft point. That raised crown is a real gorilla feature, and it's the quickest way to say 'ape' instead of 'bear'. Round off the chin just below the circle, then add a small half-circle ear on each side, peeking out from behind the head.


💡 Tip: Keep the ears tiny. Big round ears turn him into a monkey from a cartoon.
Step 4: Draw the long, heavy arms
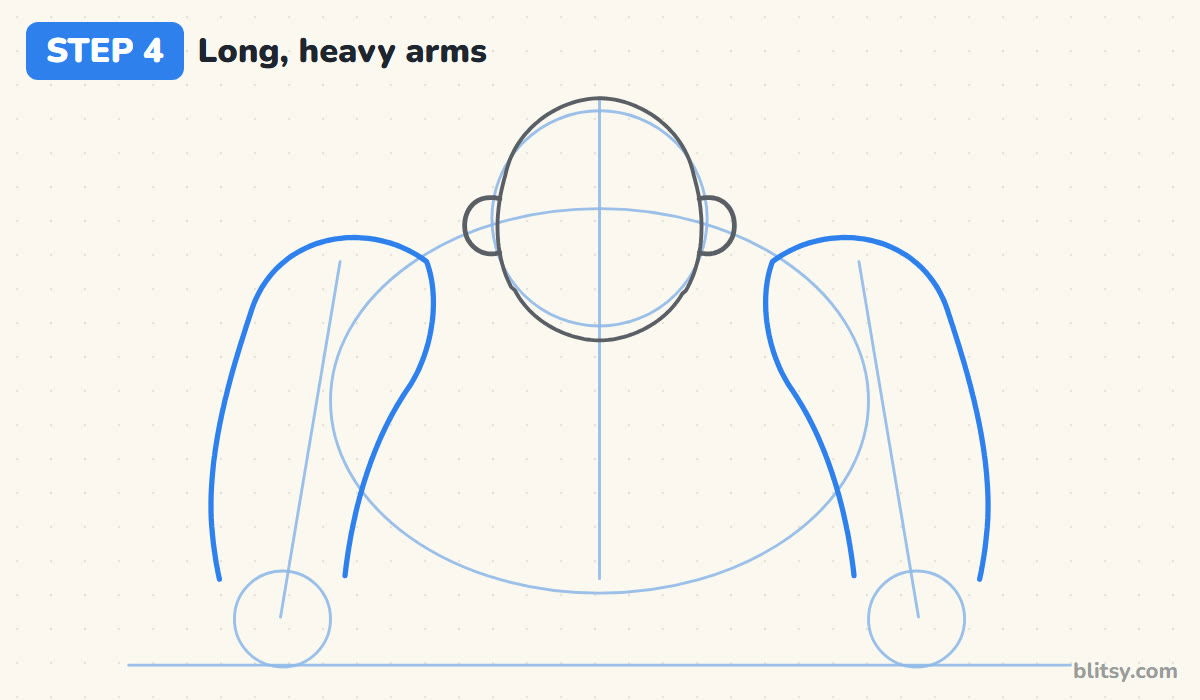
Each arm starts as a round shoulder bump that bulges out past the body oval. The outside edge follows your arm line down and stops just above the fist circle. The inside edge curves in toward the body, then heads down to the fist too. I make the forearms nearly as wide as the upper arms, since Kong walks on them.
💡 Tip: Draw one arm, pause, then draw the other while looking back at the first.
Step 5: Add the shoulders and belly
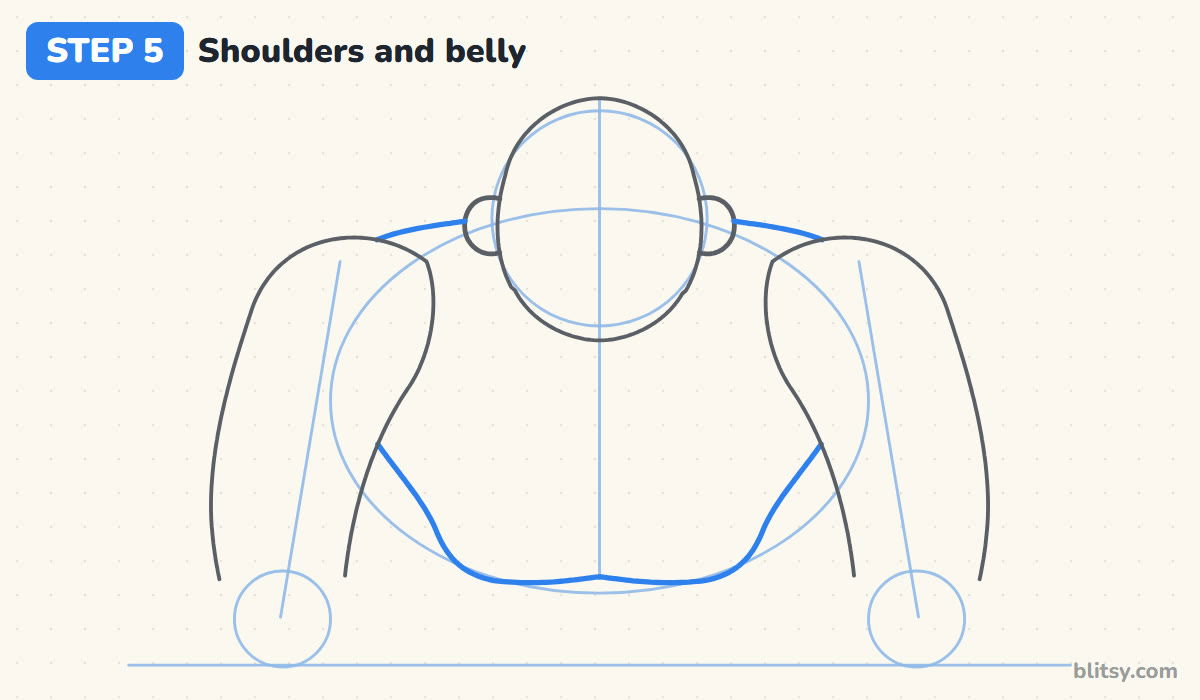
Now connect the arms to the head with a gently sloping line from each shoulder to the side of the head, behind the ear. Then draw the belly: it starts at the inside of each arm, curves in toward the middle and ends in a wide, rounded bottom edge. The body ends up shaped like an upside-down triangle.
💡 Tip: Make the shoulders much wider than the hips. That top-heavy shape is what makes a gorilla read as strong.
Step 6: Draw the big fists and short legs
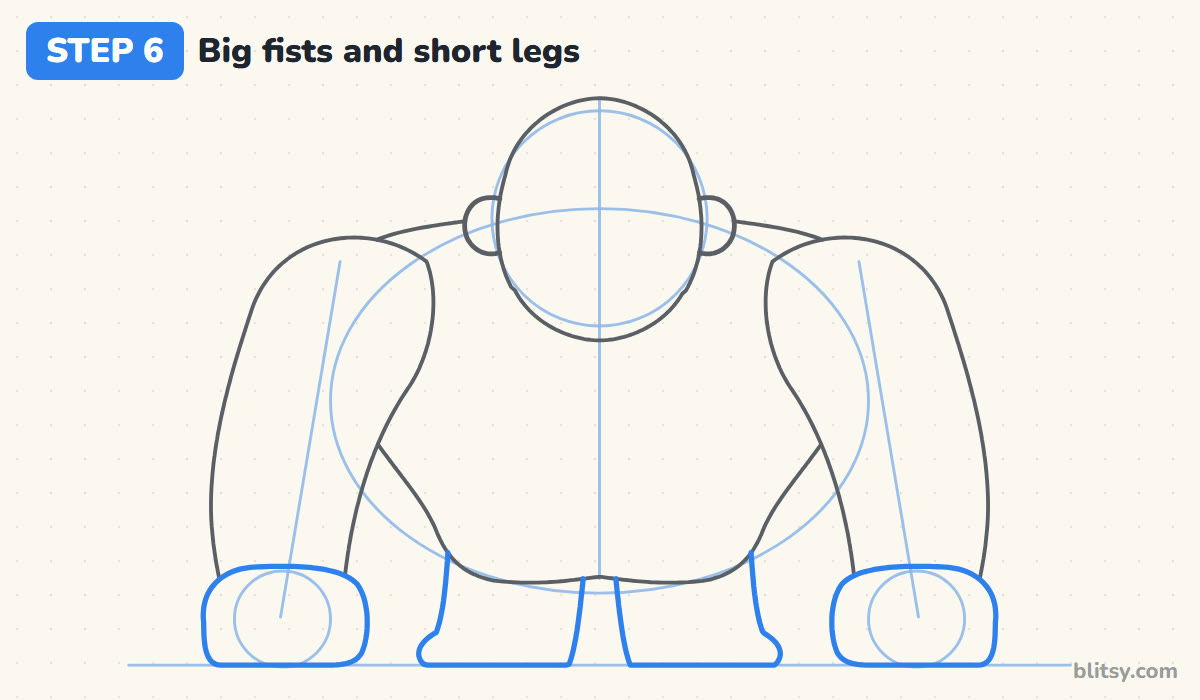
Around each fist circle, draw a rounded box with a flat bottom sitting on the ground line, its top tucked under the arm. Next, draw two short, thick legs under the belly with a small gap between them, and flare each one into a wide foot. Stubby legs are exactly right for a gorilla.
💡 Tip: If the legs come out taller than the fists, he starts to look like a person in a costume.
Step 7: Add the face mask and brow
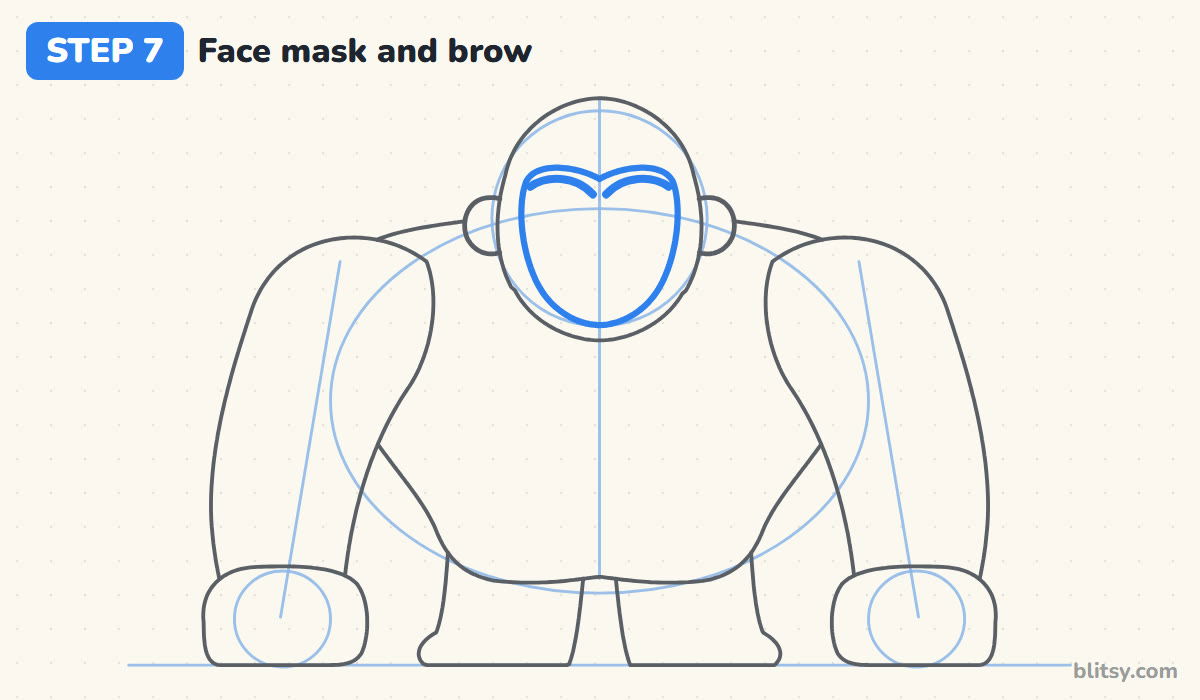
Inside the head, draw a rounded shape that fills most of the front, from just under the crown to near the chin. This is the bare skin of his face. Across the top, draw a thick brow line that dips down in the middle. When I want a scowl, that downward V does almost all of the work.


💡 Tip: Press a little harder on the brow than on anything else in the face.
Step 8: Draw the eyes, nose and a roaring mouth
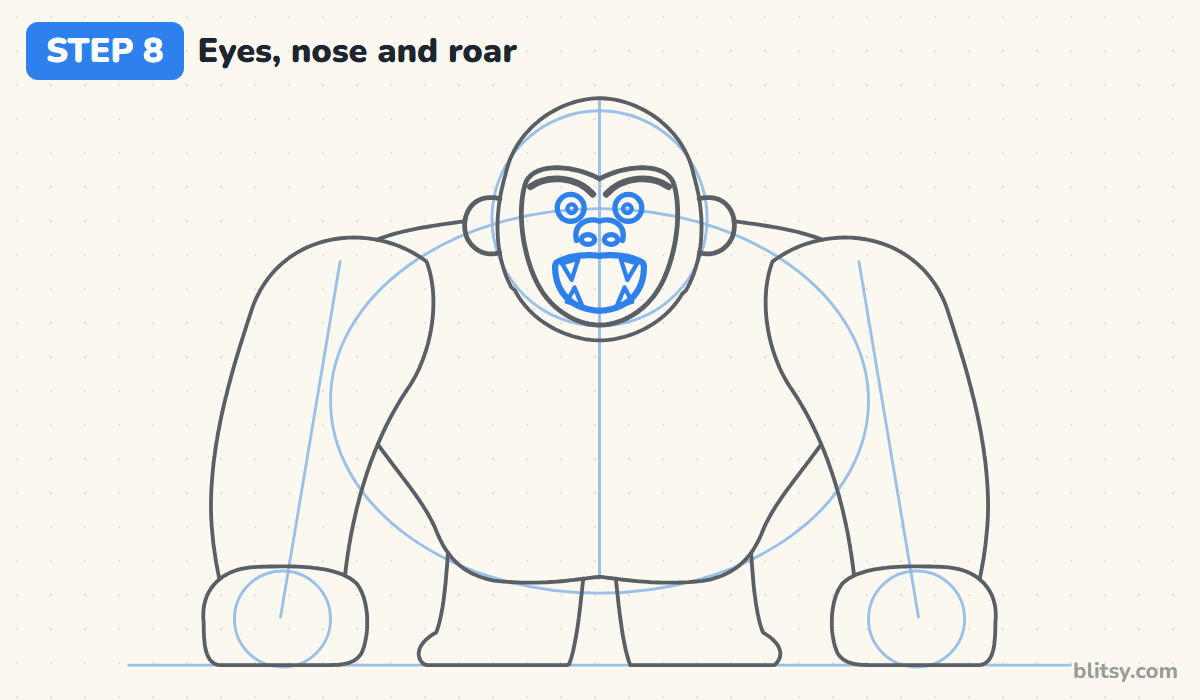
Tuck two round eyes right under the brow, close together, each with a small pupil. Below them, draw a wide nose shaped like a low arch with two oval nostrils. For the mouth, draw a big rounded shape that's wider at the top, then add two sharp fangs hanging from the top lip and two smaller ones pointing up.
💡 Tip: Want a friendlier Kong? Draw the mouth as a simple closed curve and leave out the fangs.
Step 9: Add the chest plates, knuckles and fur
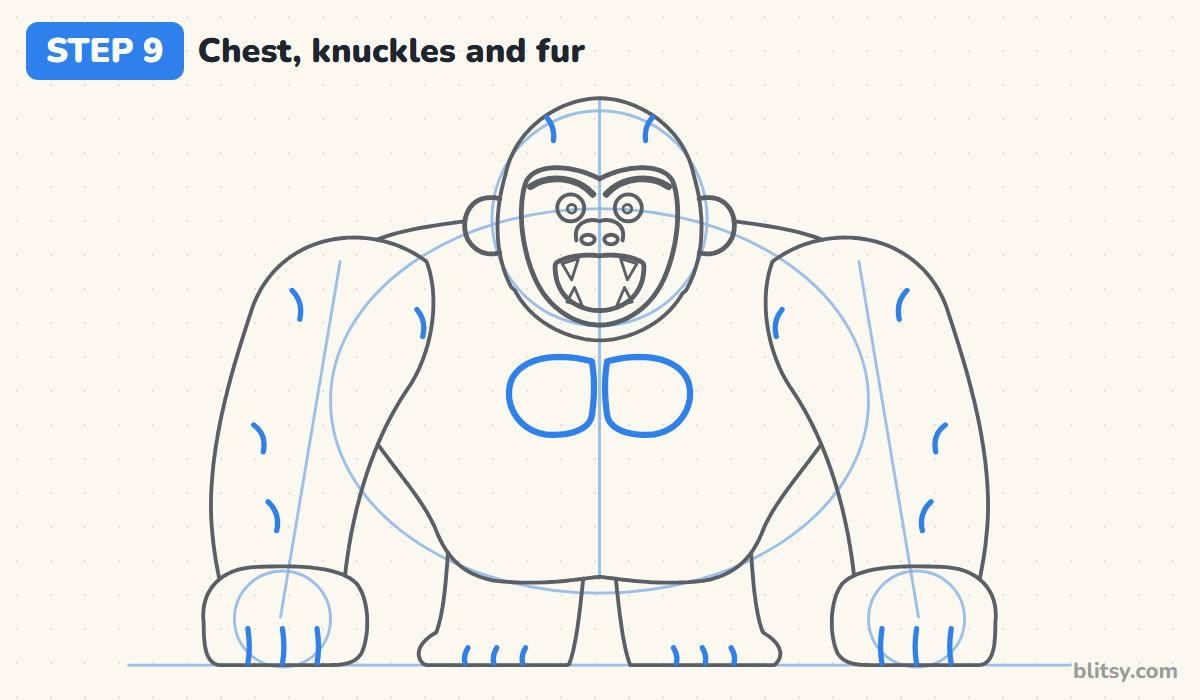
Draw two rounded chest plates side by side under the chin, touching at the center line. On the bottom of each fist, add three short curved lines for folded fingers, and do the same on the feet for toes. Last, scatter a few small curved strokes on the arms and shoulders, plus two on top of the head, to hint at fur.
💡 Tip: Five or six fur marks per arm is plenty. Too many and the coloring step gets messy.
Step 10: Ink the lines and erase the guides
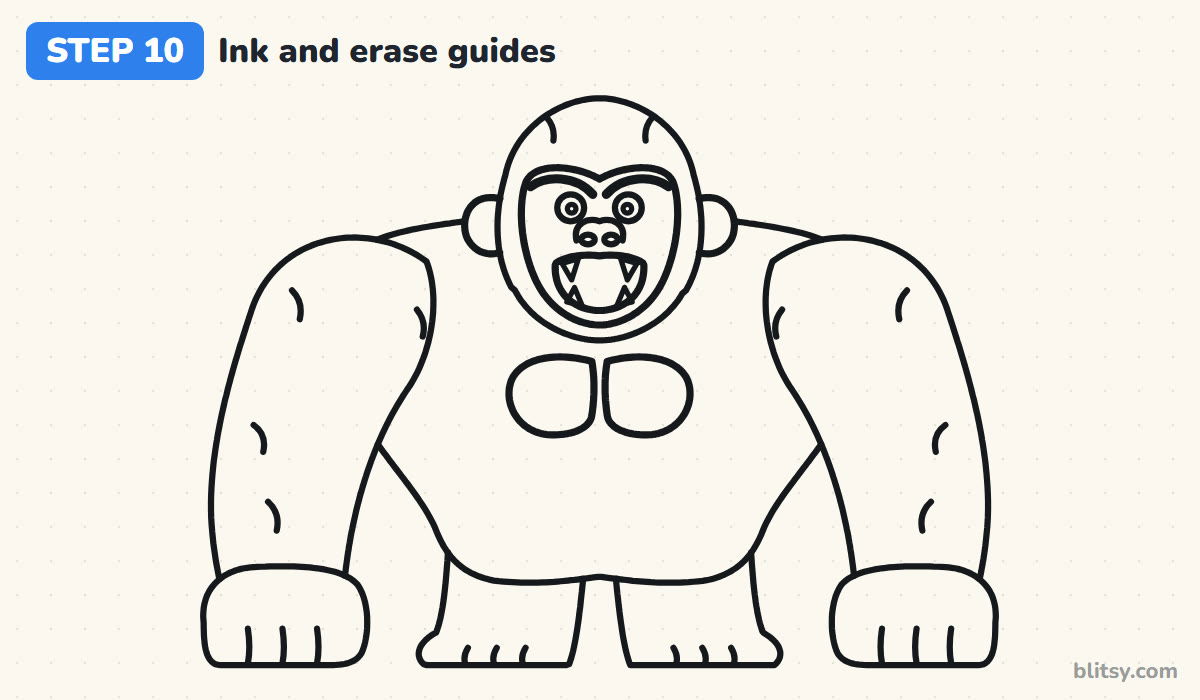
Go over every line you want to keep with a black marker or fineliner. Skip the circles, the oval and the guide lines, since those were only there to help. Give the ink a minute to dry, then erase the pencil with light strokes so the paper doesn't wrinkle.
💡 Tip: Ink the face first while your hand is fresh. Small curves like the nostrils are the easiest place to wobble.
Step 11: Color your King Kong
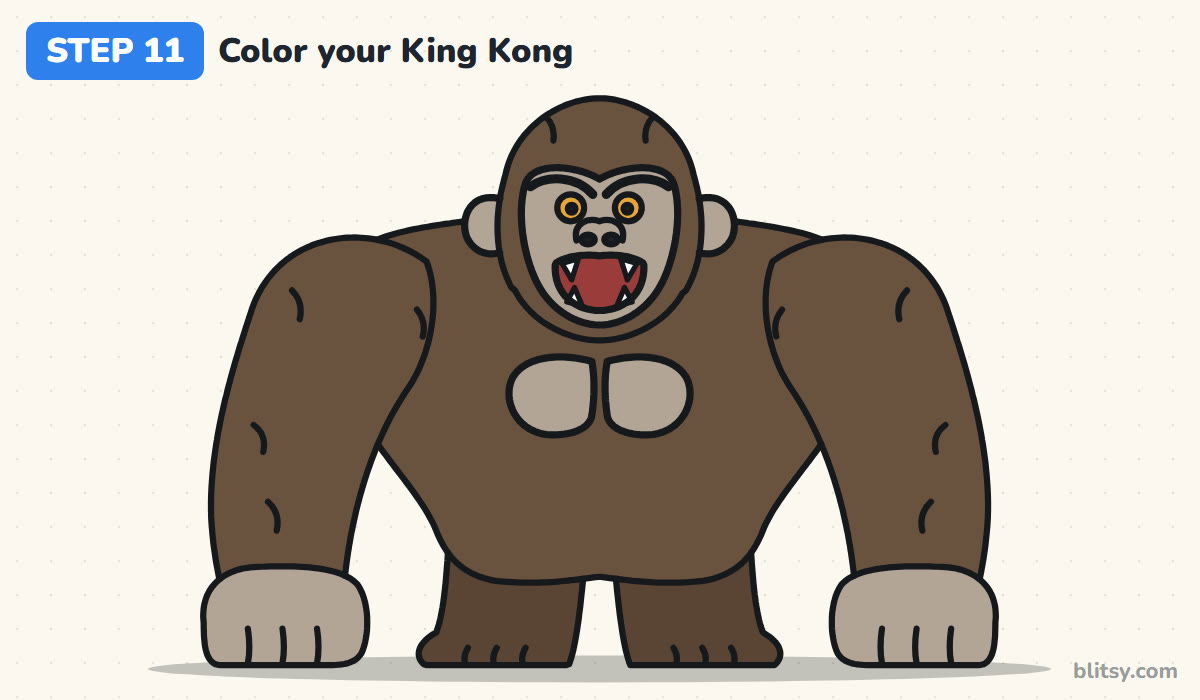
Use a warm brown for the head, the body and both arms, and a slightly darker brown for the legs so they sit back behind the belly. The face and chest get a soft gray, and so do the ears and fists. Fill the mouth with dark red, leave the fangs white and make the eyes orange.


💡 Tip: Color the brown in small circles instead of straight strokes. It leaves tiny gaps that look a lot like fur.
Why Kong Sometimes Ends Up Looking Like a Teddy Bear
- A round head with no crown. A perfect circle reads as a bear. Let the top of the head rise into a soft peak.
- Arms that are too short. If the fists don't reach the ground, he's lost his gorilla shape. Make the arms long enough to lean on.
- A long neck. When the head floats above the shoulders, he looks small and timid. Sink the head down so the chin overlaps the chest.
- Narrow shoulders. King Kong should be widest at the shoulders, with the body narrowing toward the hips.
- Coloring the face brown. Without the lighter face, the eyes and mouth disappear. Keep the face mask gray so his expression shows.
Giving Kong a Different Mood or Setting
Once this pose feels easy, I like to change the story around him. Close the mouth and curve it up for a gentle giant, raise one fist as if he's about to beat his chest, or draw a row of tiny skyscrapers by his feet so he towers over a city. If you'd like a real-world version, the gorilla drawing tutorial is a good next step, and you can set up a monster showdown with this how to draw Godzilla lesson.
King Kong Coloring Page Plus a Printable Step Guide
If you'd rather work on paper, print the free King Kong coloring page, with a colored example and a color key at the top. The PDF drawing guide has all 11 steps and tips, two to a page. Both fit Letter or A4 paper.
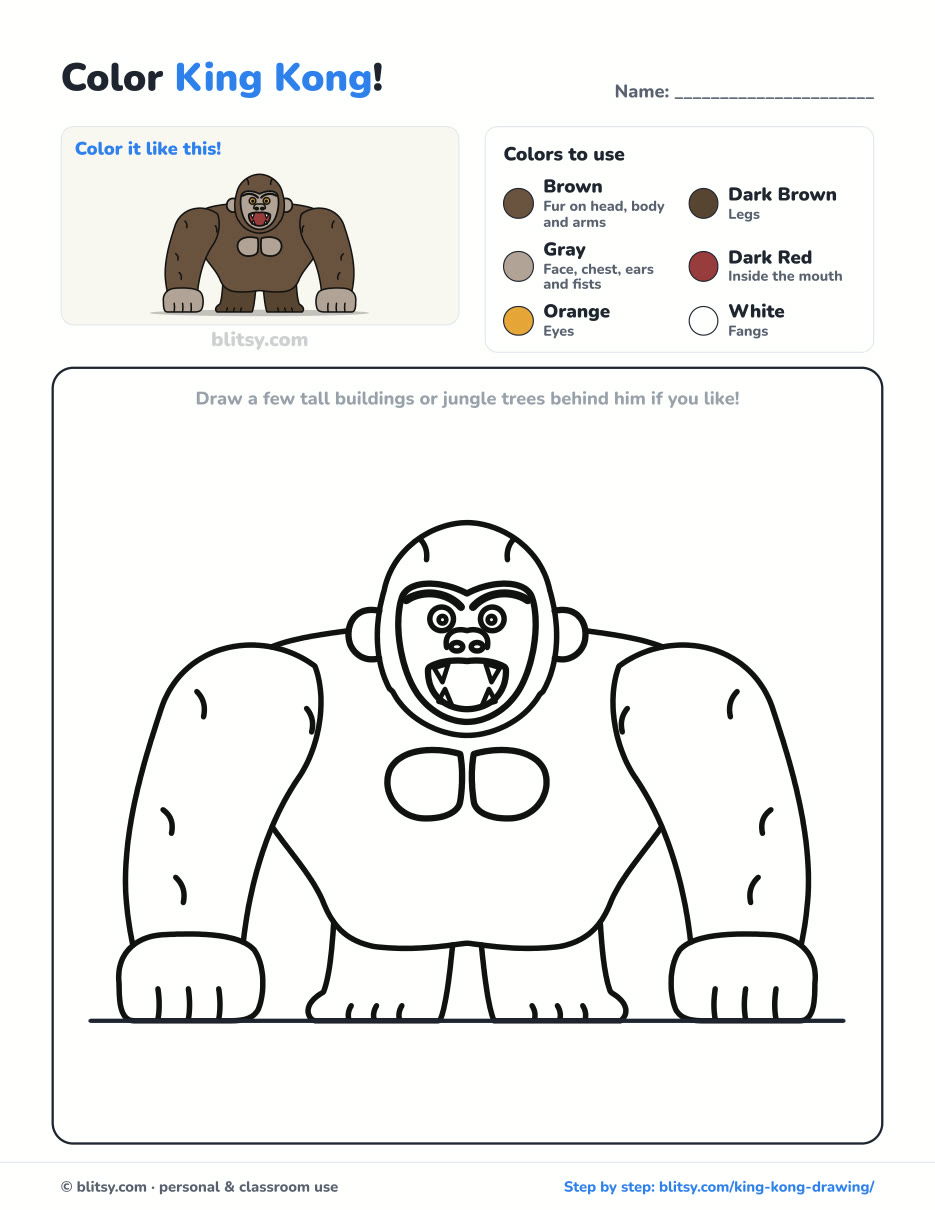
Black outlines with a colored example and the color names at the top. Ready to print and color.
⬇️ Download Coloring PageEvery step picture with its instructions and tips, to keep beside your paper while you draw.
⬇️ Download Drawing Guide📱 On a phone? Tap a download button, then open the file and choose Share → Save to Files or Print. On a computer, the PDF opens or saves straight to your Downloads folder.
Keep Every Kong Step on One Pin
After King Kong, Try These Animal and Monster Tutorials
Every link below opens a full step-by-step tutorial with a picture for each stage, so you can pick your next subject and start right away.
- Ant Drawing: Build a red ant from three ovals with this how to draw an ant step by step lesson, then add six jointed legs and two bent antennae.
- Godzilla Drawing: Give Kong a rival. This Godzilla drawing tutorial starts with two ovals and a tail line and finishes with the famous back plates.
- Sloth Drawing: Slow things down with a smiling sloth hanging from a leafy branch in this easy sloth drawing tutorial.
- Kitten Drawing: A sitting ginger kitten with tabby stripes and big eyes comes together in 11 steps in this kitten drawing step by step guide.
- Realistic Drawing: Learn light, value and shadow by shading one shiny red apple in this realistic drawing tutorial.
- Paw Print Drawing: Draw a big dog print and a smaller cat print side by side with this paw print drawing tutorial.
- Dragonfly Drawing: One straight line grows four long wings and a ringed tail in this how to draw a dragonfly guide.
- Penguin Drawing: Start from a single egg shape and finish with rosy cheeks and flippers in this penguin drawing step by step lesson.
- Rat Drawing: A curious gray cartoon rat, seen from the side, is built from a circle, an oval and a tail line in this easy rat drawing tutorial.
- Arctic Fox Drawing: Draw a fluffy fox sitting in the snow with its tail swept to one side using this arctic fox drawing tutorial.
- Puppy Drawing: Floppy ears, an eye patch and a pink tongue all start from light circles in this how to draw a puppy step by step lesson.
- Narwhal Drawing: Swim from giant apes to the sea with this narwhal drawing tutorial, twisting tusk and speckled back included.
- Miraculous Ladybug Drawing: Draw a small chibi Ladybug with red ribbons and a spotted suit in this Miraculous Ladybug drawing tutorial.
- Whale Drawing: A smiling blue whale begins as one long oval and ends with a splashy spout in this easy whale drawing step by step guide.
Things People Ask About Drawing King Kong
What is the easiest way to draw King Kong?
Draw him from the front over guide shapes: a circle for the head, an oval for the body, two slanted arm lines and two fist circles. Outlining around shapes is much easier than drawing a gorilla freehand.
How do you draw King Kong for kids?
Follow the same steps, but leave out the fangs and most of the fur marks, and use a thick marker for the outline. In my experience kids enjoy the roaring face most, so give them extra time there.
How long does it take to draw King Kong?
About 30 minutes from the first guide shape to the last bit of color. The arms and the face take the longest the first time.
What's the difference between drawing King Kong and a regular gorilla?
The shapes are almost the same. What makes it Kong is the attitude: a scowling brow, a roaring mouth with fangs and a wide, heavy pose.
Start with that circle and oval, give him the loudest roar you can draw, and see how big your King Kong turns out. 🦍✏️
Related posts:
 How to Draw a Gorilla Step by Step (Easy for Beginners)
 How to Draw a Whale Step by Step (Easy for Beginners)
 How to Draw a Woman Step by Step (Easy Body Proportions)
 How to Draw a Plant Step by Step (Easy Potted Monstera)
 How to Draw the Fortnite Llama Step by Step (Easy Fan Art)
 How to Draw a Hoodie Step by Step (Front and Back View)
 How to Draw a Parrot Step by Step (Easy Scarlet Macaw)
 How to Draw a Police Car Step by Step (Easy for Kids)
 How to Draw a Volcano Step by Step (Easy Erupting Volcano)
 How to Draw a Crow Step by Step (Easy for Beginners)
 How to Draw a Tiger Step by Step (Easy Walking Pose)
 How to Draw a Heart Step by Step (Even, Symmetric Shape)

