
A hamster is mostly one big, soft roundness with a face on top, and that makes it a kind subject for a first animal drawing. The trick is the cheeks. In this lesson I'll show you how to draw a hamster step by step, starting from two light circles and ending with a golden, chubby little fellow clutching a sunflower seed. You won't need any shading skills, and the whole thing fits on one sheet of paper.
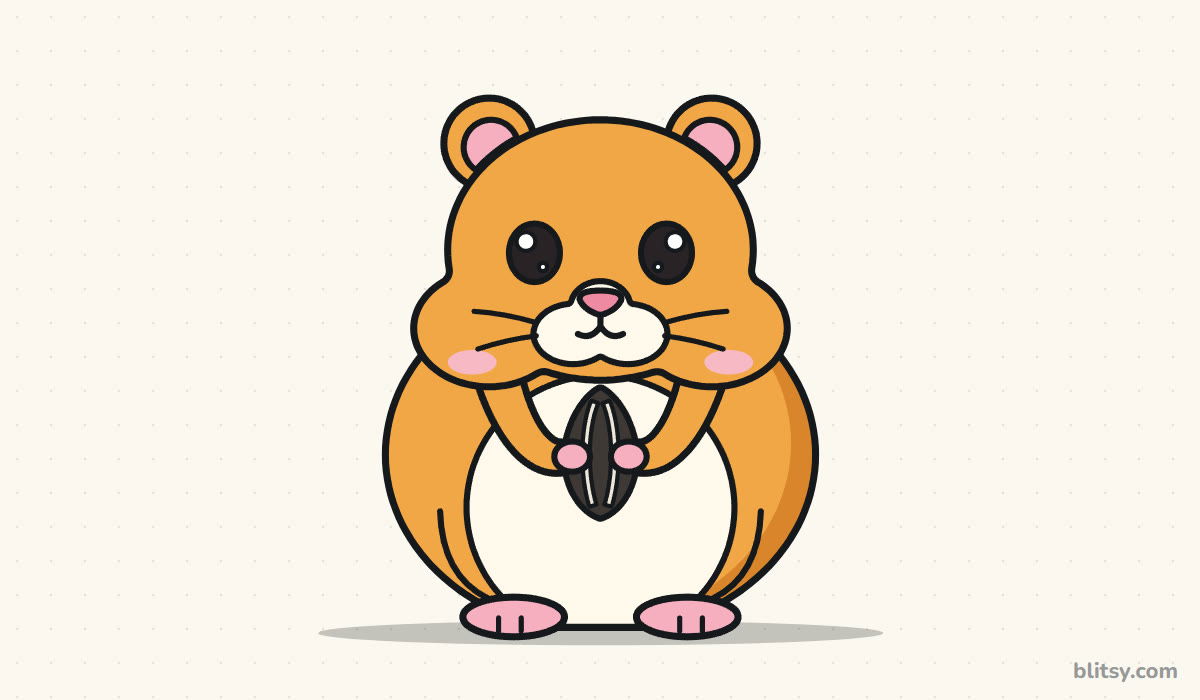
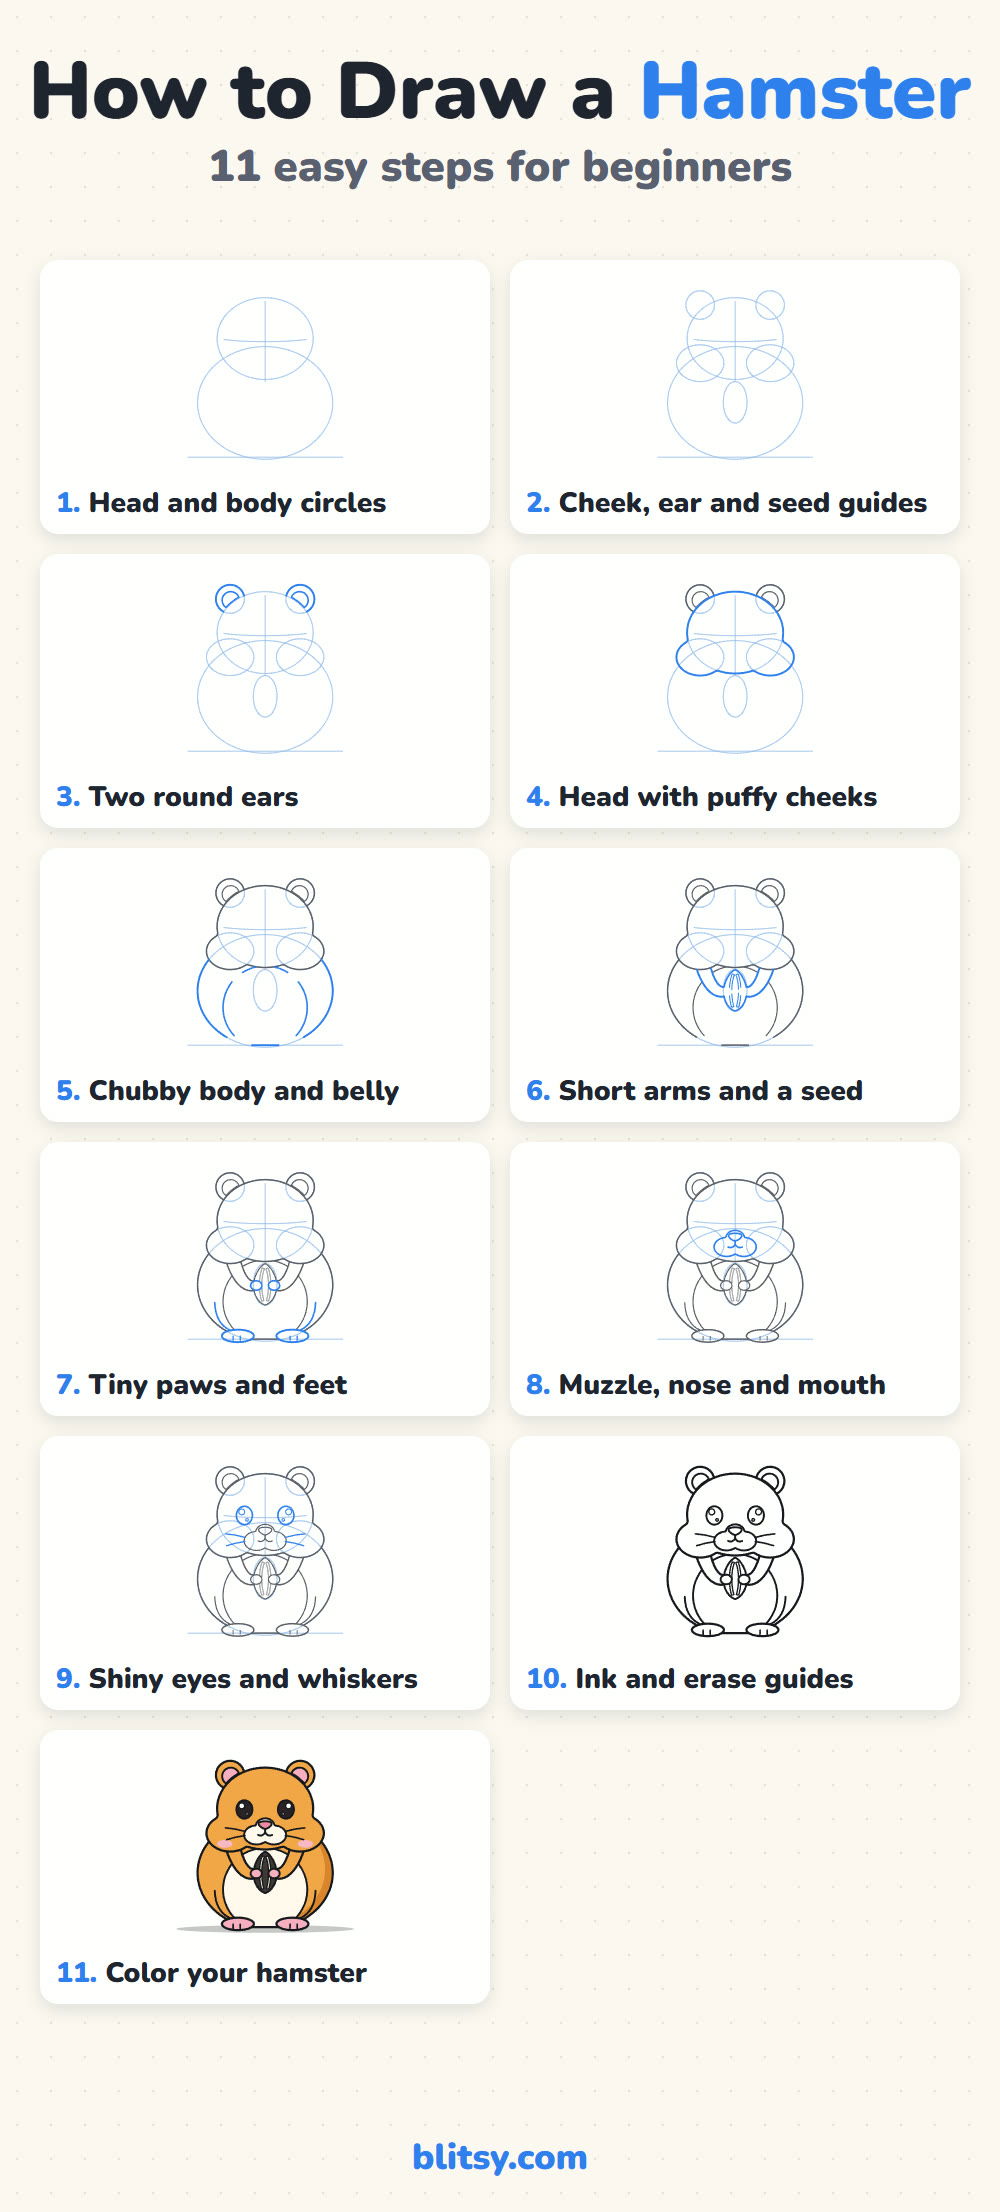
Hamster lines you add in a given step show up in blue, while everything from earlier steps fades to gray behind it. That way you always know what's new and where it belongs.
Quick overview
⏱️ Time: about 25 to 35 minutes
🎯 Level: easy, fine for kids from about 5 with a little help
✏️ Steps: 11
🐹 You'll draw: a chubby hamster sitting up and holding a sunflower seed
Supplies for a Chubby Hamster Sketch
- A pencil (HB is fine; a softer 2B makes lighter guides easier)
- An eraser that doesn't smudge
- A black fineliner or thin marker for the final lines
- Colored pencils, crayons or markers in orange and pink, plus black and gray
- Plain white paper, turned sideways or upright
The hamster sits straight up in the middle, so start your first circle a little above the center of the page.
How to Draw a Hamster Step by Step
Step 1: Sketch the head and body circles
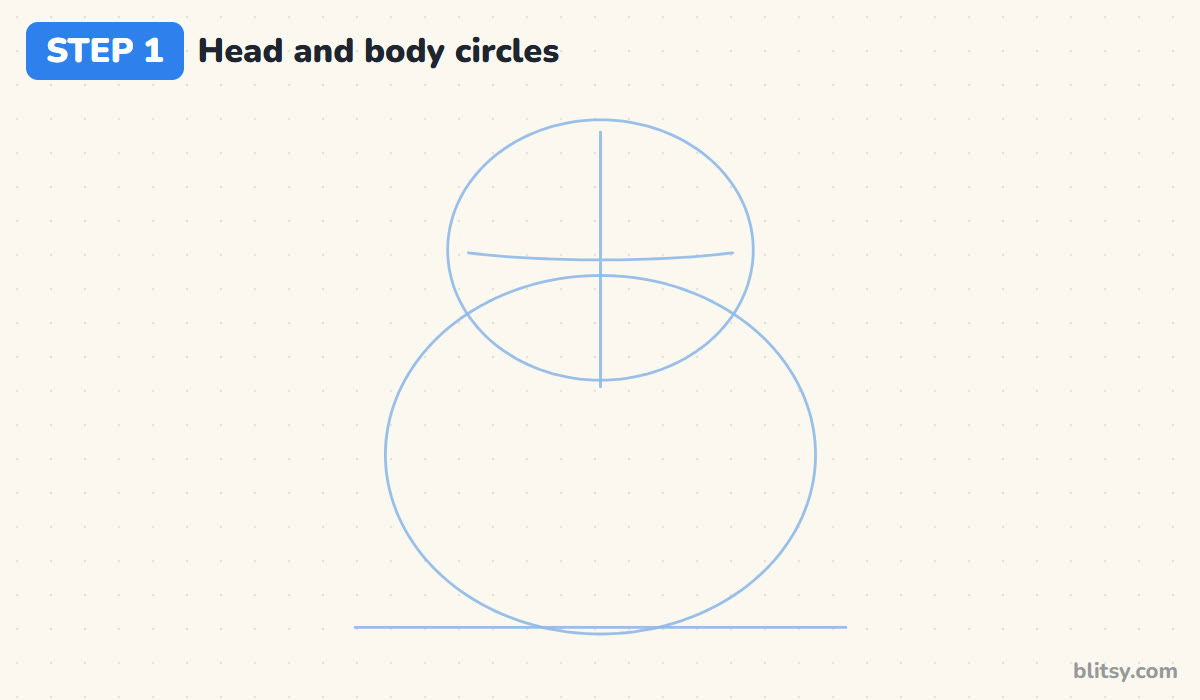
When I teach this, I start with a short ground line near the bottom. On it, sketch a big oval for the body, a bit wider than it is tall. Overlap it with a smaller oval for the head, so the two shapes share a good chunk of space. Add a vertical center line and a gently curved line across the head where the eyes will sit.
💡 Tip: Press so lightly that you can barely see the lines. They're only a map.
Step 2: Add guides for the cheeks, ears and seed
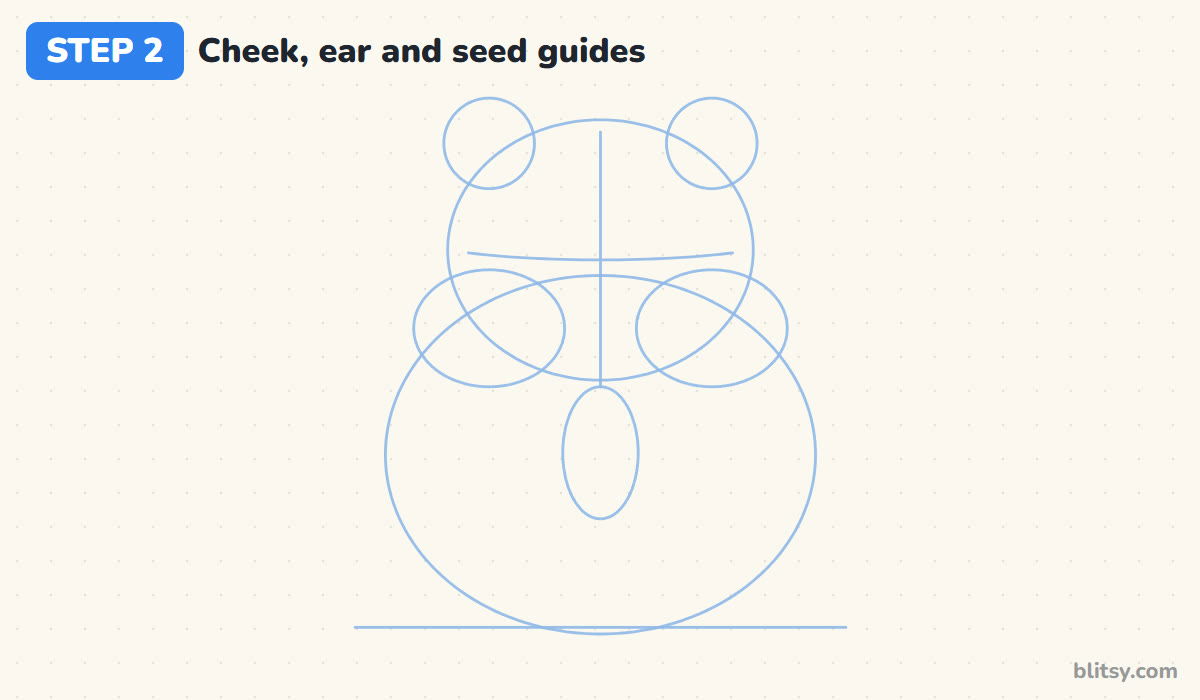
Place two ovals at the bottom corners of the head, poking out past its sides. These are the cheek pouches, and they're the single feature that tells people this is a hamster and not a mouse. Next come two small circles on top for the ears. Finish with a tall oval in the middle of the chest, where the sunflower seed will go.
💡 Tip: Make both cheek ovals the same size. Uneven cheeks make the face look lopsided.
Step 3: Draw two round ears
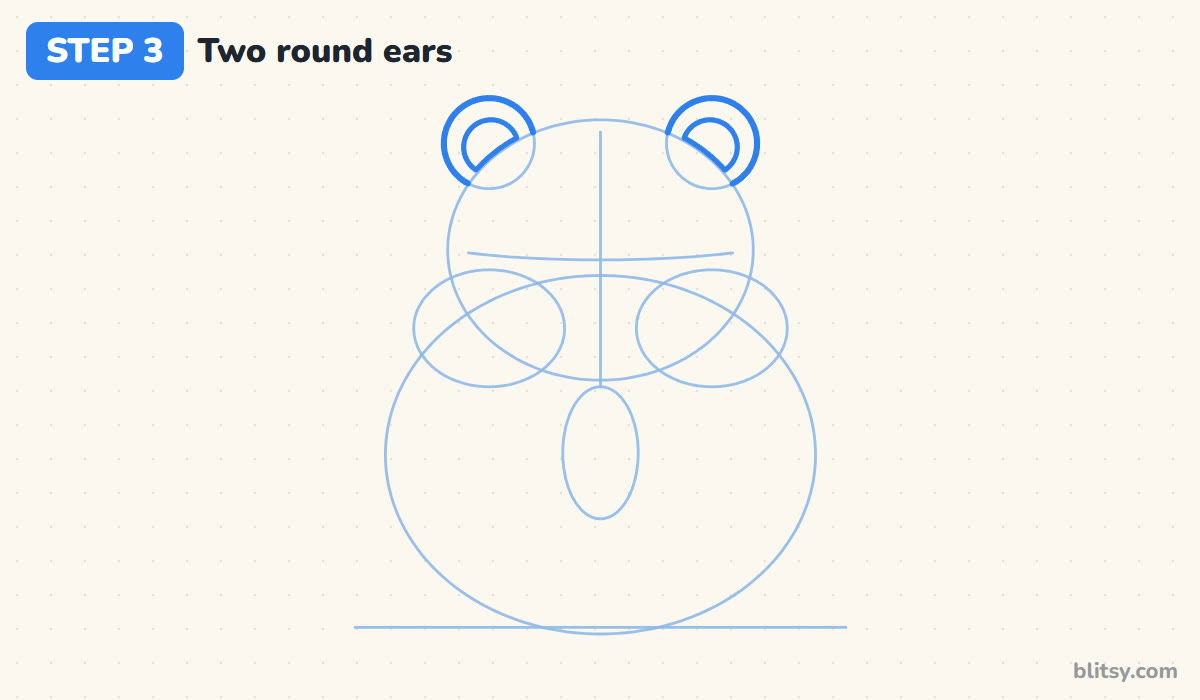
Trace the ear circles, but stop where they meet the head, because the head sits in front. Inside each one, draw a smaller curve for the pink inner ear. Hamster ears are small compared with a mouse's, so resist the urge to make them bigger.
💡 Tip: Draw the inner ear a little lower than the middle of the outer one. It looks more natural.




Step 4: Outline the head with puffy cheeks
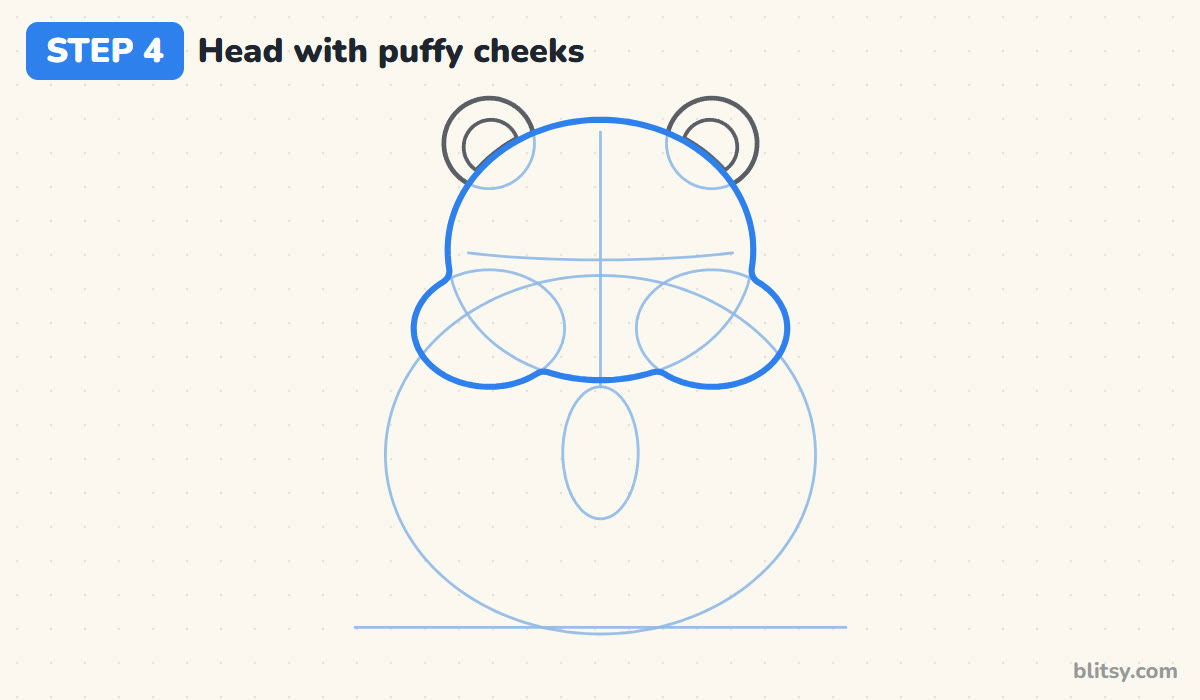
Now go around the head circle and both cheek ovals in one smooth line, so they melt into a single shape. At the top it's a gentle dome; at each side it swells out over the cheek and then tucks back in under the chin. I like to draw this line slowly, because a wobbly cheek is the hardest thing to fix later.
💡 Tip: Round every corner where the cheek meets the head. Sharp dents look like a mask.
Step 5: Draw the chubby body and belly
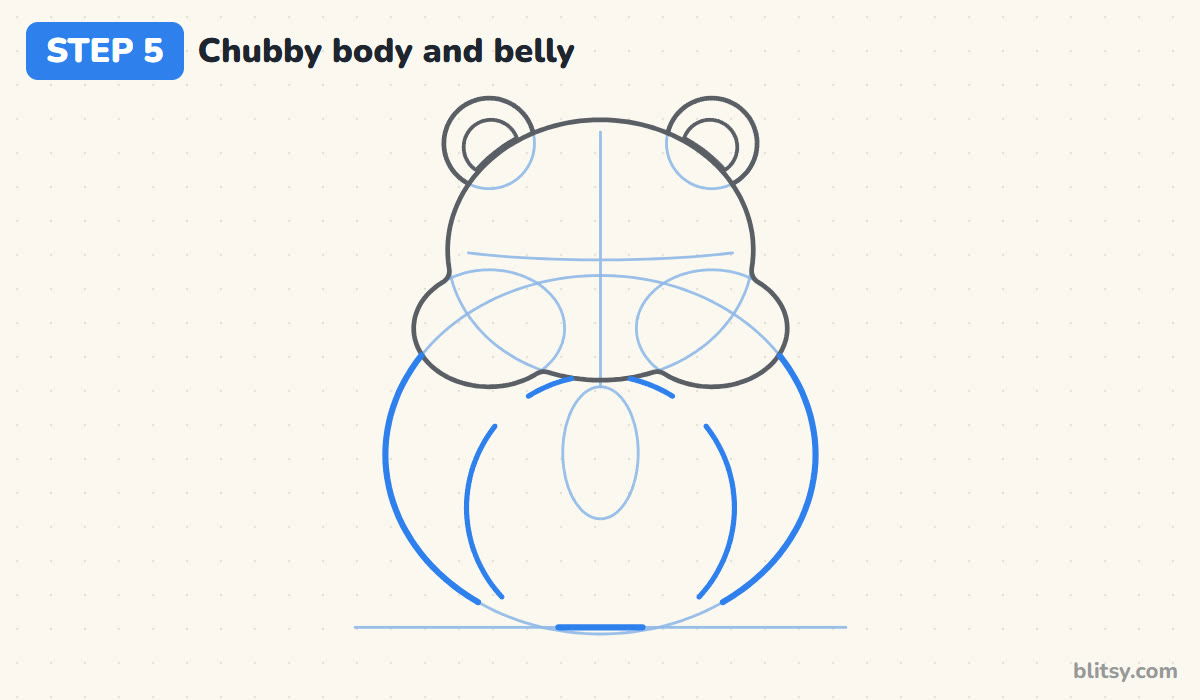
Follow the big body oval from under the cheeks down to the ground on both sides, and flatten it where it touches the ground line. Inside, draw a large rounded shape for the white belly. It should start under the chin and reach almost to the bottom. Leave gaps where the arms and feet will cover the lines.
💡 Tip: A wide, heavy bottom makes the hamster look comfy. Don't pinch the waist.
Step 6: Add short arms and a sunflower seed
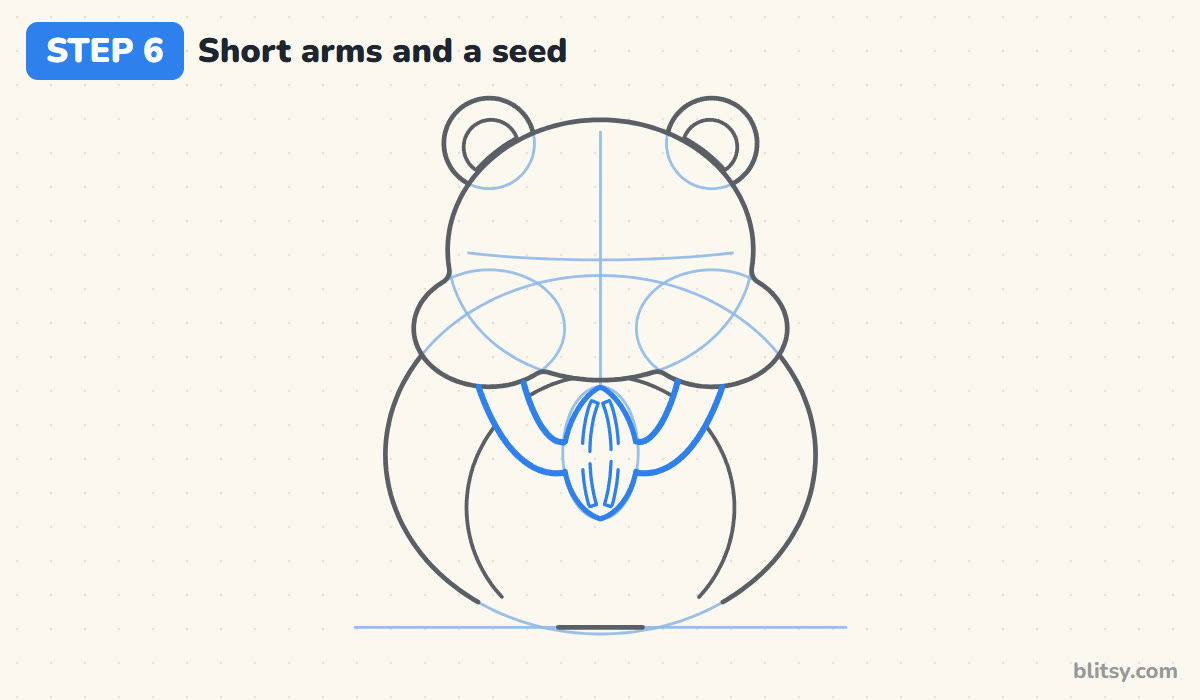
I draw the seed before the arms: a tall, pointy oval like a teardrop, using the seed guide. Add two thin stripes along its length, a little in from each edge. Then bring a short, thick arm down from under each cheek toward the seed. Each arm bends inward and ends right at the side of the seed.
💡 Tip: Keep the arms short and chunky. Long thin arms turn the hamster into a monkey.
Step 7: Draw tiny paws and small feet
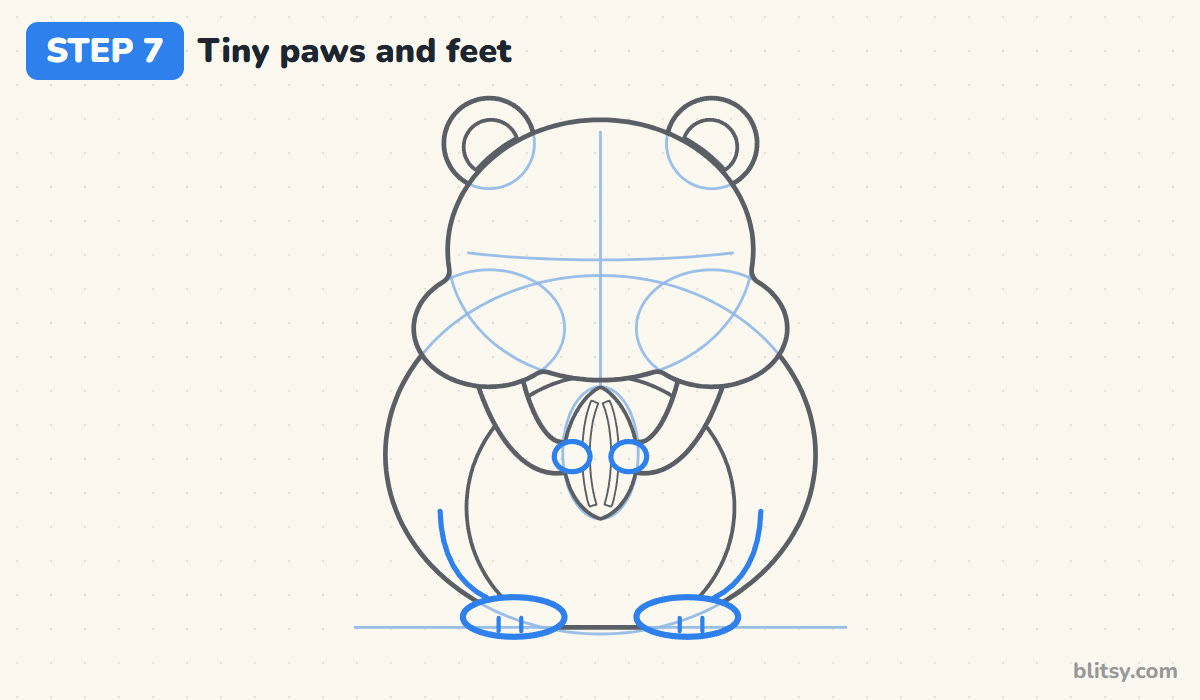
At the end of each arm, draw a small oval paw that overlaps the seed's edge, which makes it look gripped. Down at the ground, add two flat ovals for the feet poking out in front, with two short toe lines on each. A soft curved line on each side of the body shows the back legs tucked underneath.
💡 Tip: Feet that stick out only a little make the hamster look small and cozy.


Step 8: Add the muzzle, nose and mouth
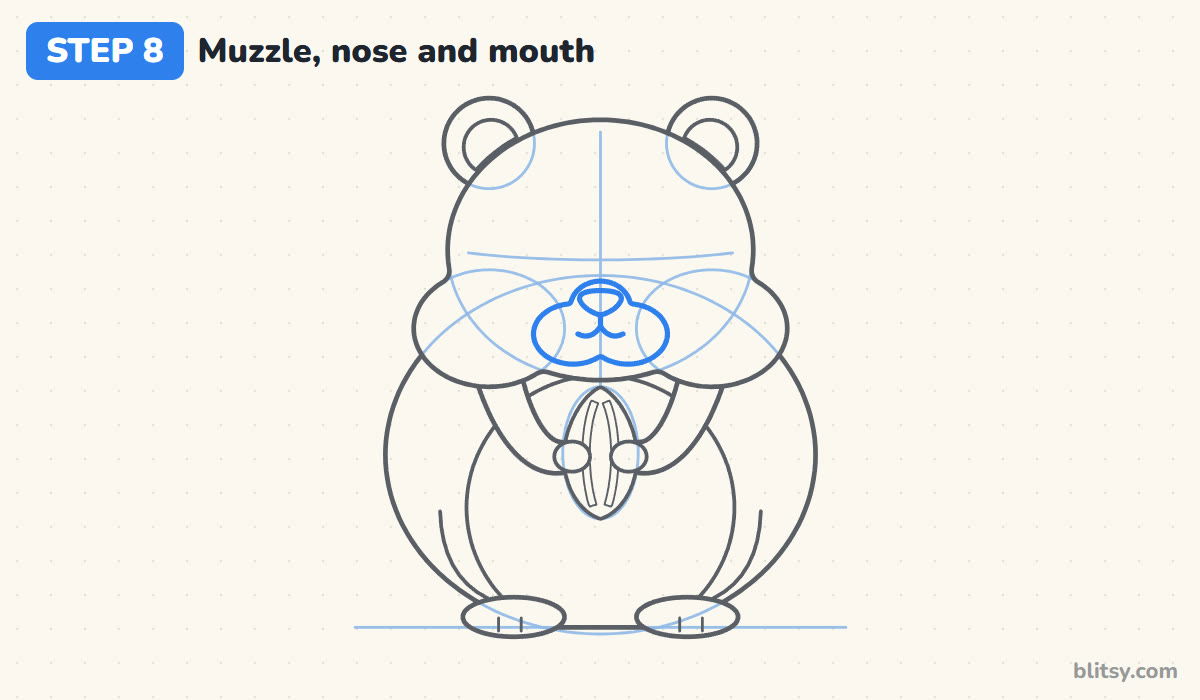
Right on the center line, below the eye line, draw a soft cloud shape for the white muzzle. It has two round bumps at the bottom, one on each side. Put a small rounded triangle near its top for the nose. Under the nose, draw a short line down that splits into two little curves, like a wide letter w.
💡 Tip: Keep the nose tiny. A big nose takes over the whole face.
Step 9: Draw shiny eyes and whiskers
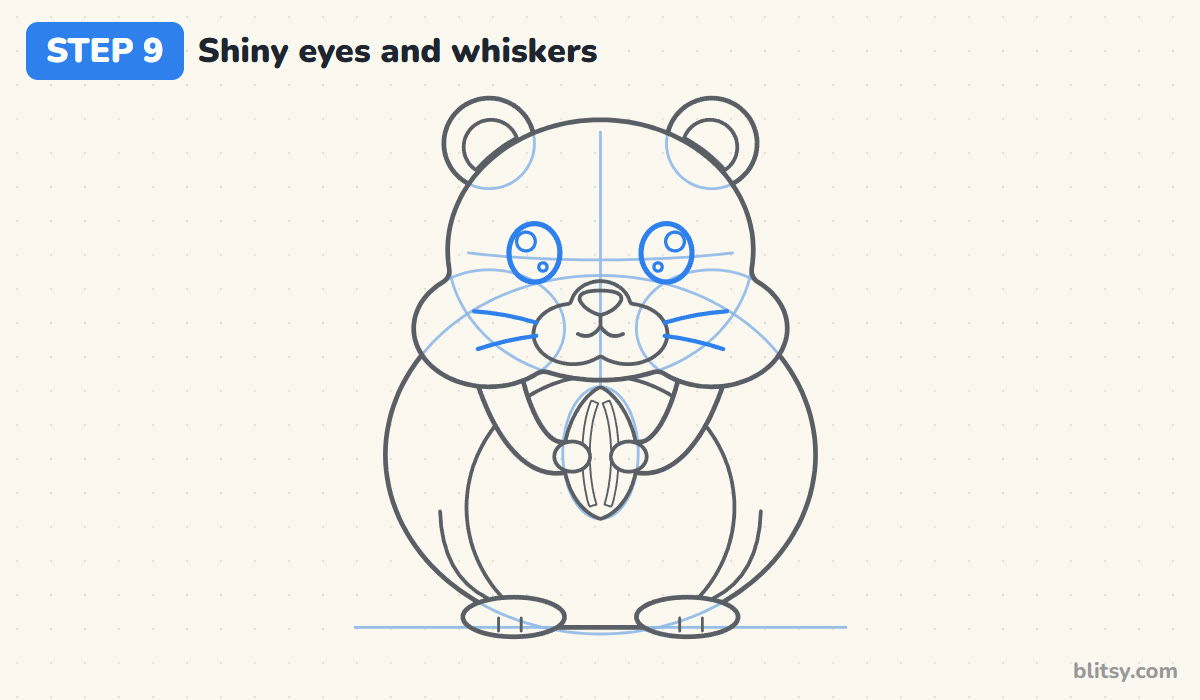
Place two big oval eyes on the eye line, spaced wide apart with the muzzle between them. Inside each, draw one large circle and one tiny circle for the shine; these stay white later. Finish the face with two curved whiskers on each side, coming out of the muzzle and resting on the cheeks.
💡 Tip: Put both shines on the same side of each eye, so the light seems to come from one place.
Step 10: Ink the lines and erase the guides
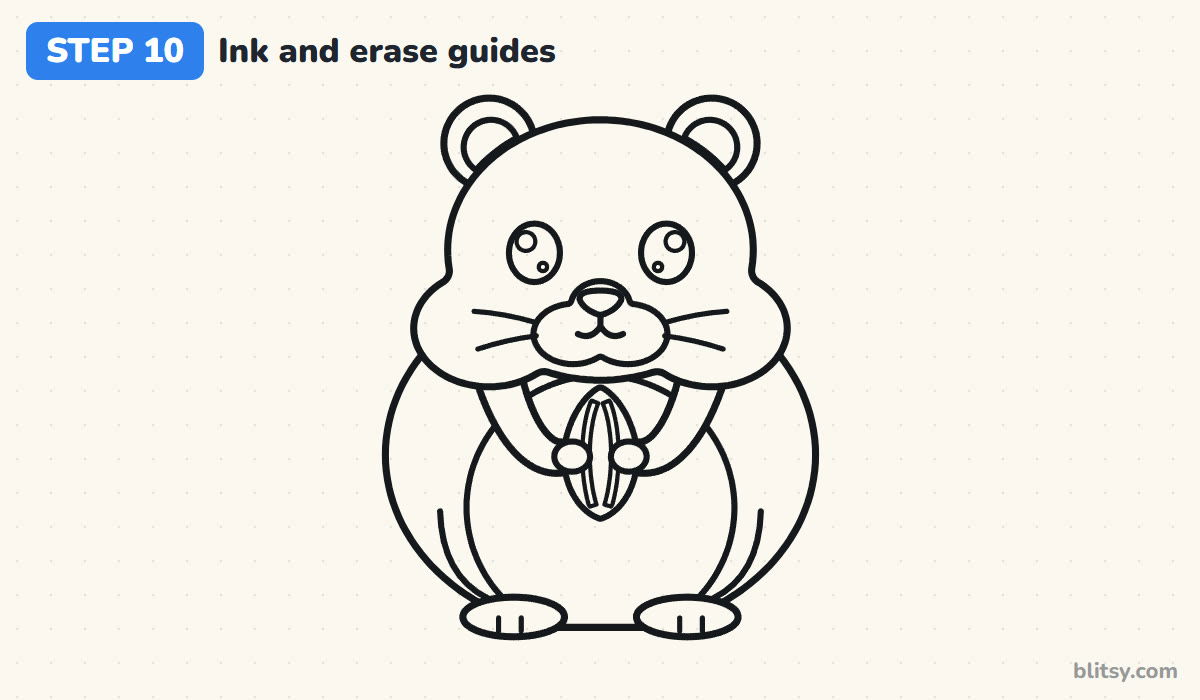
Trace every line you want to keep with the black pen, including the stripes on the seed and the whiskers. Let the ink dry for a minute. Then erase all the pencil guides, the circles and the center line. Most beginners rush this part, and the smear isn't worth it.
💡 Tip: I always ink the face first, while my hand is steadiest.
Step 11: Color your hamster
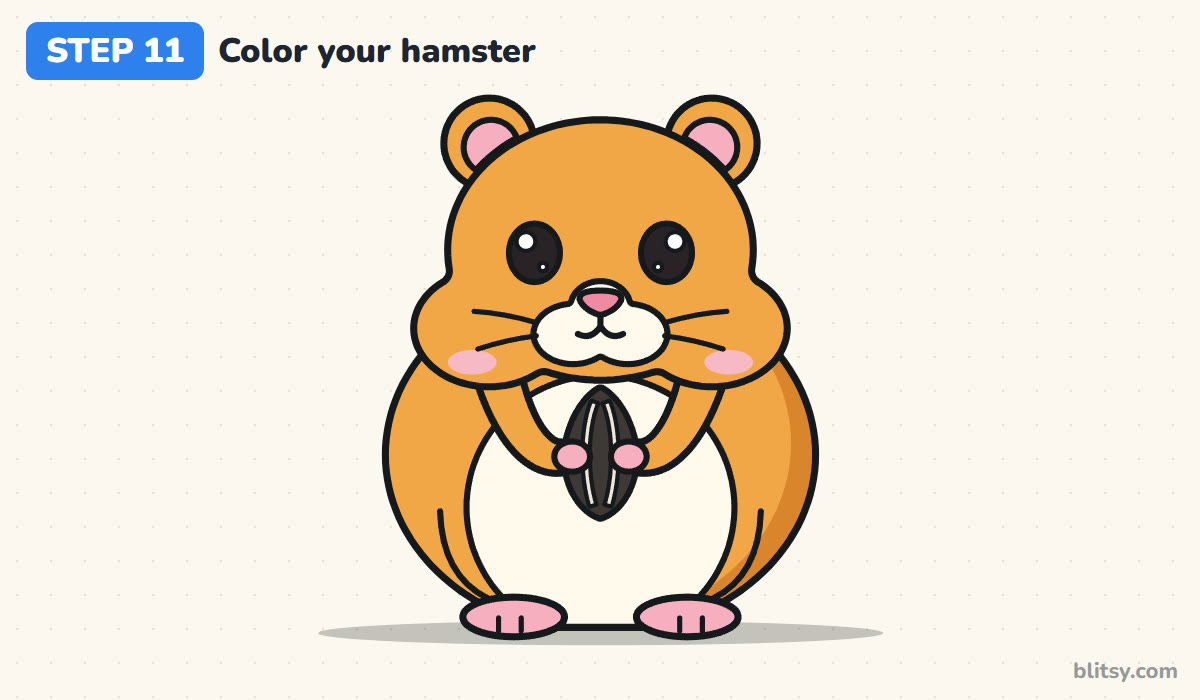
Color the whole head and body golden orange, ears and arms included. Add a darker orange along the right side of the body for shading. Leave the muzzle and belly white, or give them a whisper of cream. Pink goes in the inner ears and on the paws and feet, a deeper pink on the nose, and a soft pink oval on each cheek. Fill the eyes black around the white shines, and color the seed dark gray with light gray stripes.
💡 Tip: Color the orange with small circles instead of back-and-forth strokes. It looks more like fur.

Where Hamster Drawings Usually Go Wrong
- Skinny cheeks. Without the side bulges it reads as a mouse or a bear. Let the cheeks push past the head circle on both sides.
- Ears that are too big. Large ears pull it toward a mouse too. Keep each ear about a third as wide as the head.
- A visible neck. Hamsters look like the head sits right on the body. Tuck the cheeks down so they touch the body line.
- A floating seed. If the paws don't overlap it, the seed looks pasted on. Draw each paw a little over its edge.
- Long legs. Only the tips of the feet should show. Keep them small and flat on the ground.
Giving Your Hamster a New Coat or Snack
Swap the sunflower seed for a strawberry, a peanut or a tiny piece of carrot. Real hamsters come in lots of coats, so try a gray and white one, an all-cream one, or a golden hamster with a white stripe running up the forehead. Smaller kids can skip the seed stripes and the whiskers and it still looks like a hamster. If you want a relative with bigger ears, try this mouse drawing tutorial. You can also compare it with the longer face in the rat drawing step by step lesson, or draw a fluffy friend for it with the easy bunny drawing tutorial.
Free Hamster Coloring Page and Printable Guide
The hamster coloring page has a colored example at the top and a color key that tells you which shade goes on which part. The step-by-step PDF guide puts all 11 steps and their tips on paper, sized for Letter or A4.
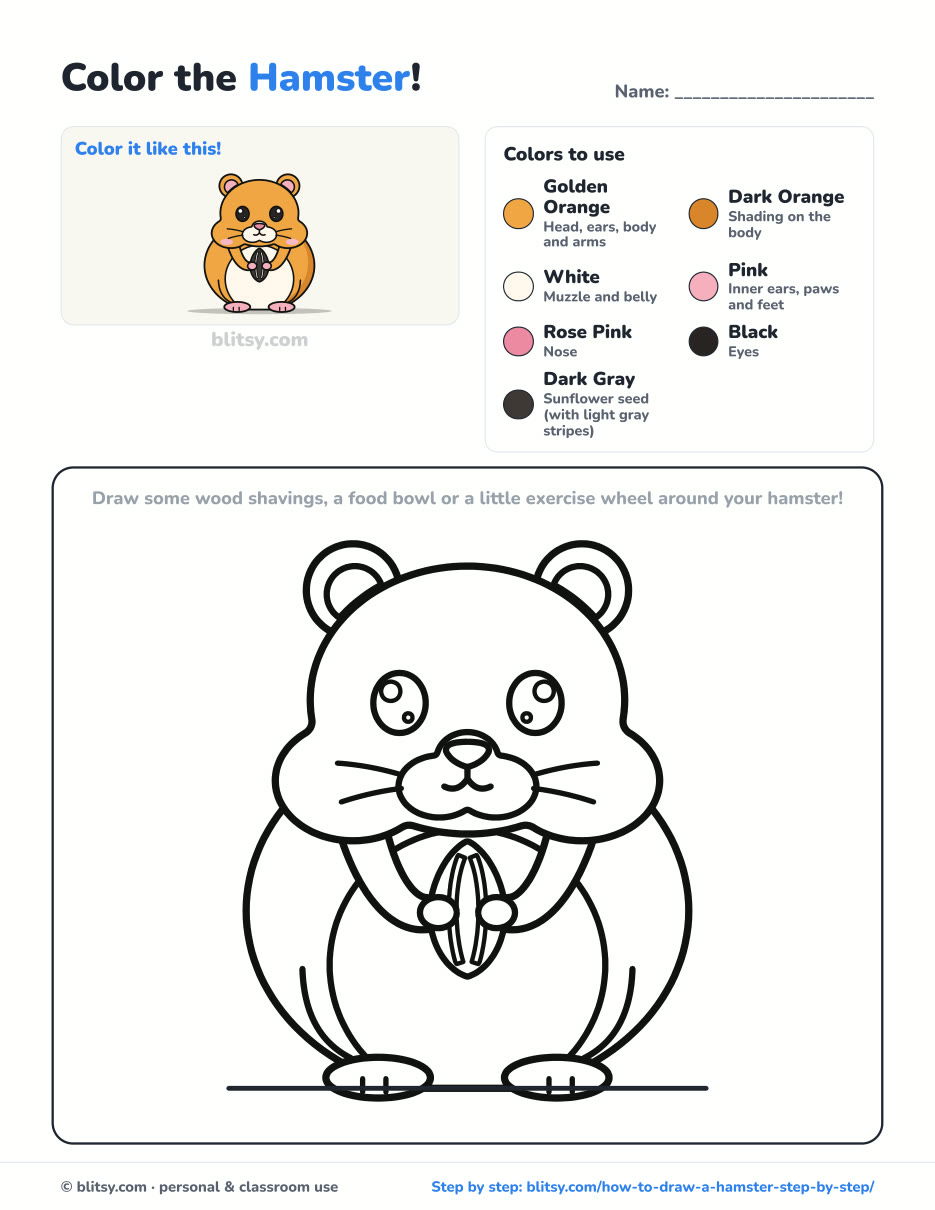
Black outlines with a colored example and the color names at the top. Ready to print and color.
⬇️ Download Coloring PageEvery step picture with its instructions and tips, to keep beside your paper while you draw.
⬇️ Download Drawing Guide📱 On a phone? Tap a download button, then open the file and choose Share → Save to Files or Print. On a computer, the PDF opens or saves straight to your Downloads folder.
All Eleven Hamster Steps on One Pin
More Small Furry Animals to Draw Next
Each of these is a full step-by-step tutorial with a picture for every stage, built from the same circles and ovals you just used.
- Mouse Drawing: A little field mouse sits up on its back legs with a cheese wedge in this mouse drawing tutorial.
- Rat Drawing: Try a longer face and a long curling tail with this rat drawing step by step lesson.
- Bunny Drawing: Tall ears and a round fluffy body make the bunny drawing tutorial a good next step.
- Kitten Drawing: Another small pet with big eyes waits in this kitten drawing tutorial.
- Sunflower Drawing: Draw the flower your hamster's seed came from with this sunflower drawing step by step guide.
Hamster Drawing Questions From Young Artists
What is the easiest way to draw a hamster?
Start with a big oval for the body and a smaller one on top for the head. Add two puffy cheek bulges, two small round ears, big eyes and a tiny nose, and you already have a hamster.
How do you make a hamster drawing look cute?
Use a round body with no neck, big shiny eyes set wide apart, pink cheeks and very small paws and feet. A snack in its paws helps too.
How is a hamster different from a mouse in a drawing?
A hamster has a rounder, chubbier body, fat cheek pouches, smaller ears and almost no tail. A mouse has big ears, a pointed snout and a long tail.
Do hamsters really eat sunflower seeds?
Yes, they're a favorite treat, though they should only be a small part of a pet hamster's food. Hamsters also stuff seeds into their cheek pouches to carry them away.
Two circles and two cheeks are all you need to begin. What snack will your hamster be hugging? 🐹🌻
Related posts:
 How to Draw a Car Step by Step (Easy Drawing for Beginners)
 How to Draw a Whale Step by Step (Easy for Beginners)
 How to Draw an Arctic Fox Step by Step (Easy for Beginners)
 How to Draw a Chicken Step by Step (Easy for Beginners)
 How to Draw a Snowman Step by Step (Easy for Beginners)
 How to Draw an Airplane Step by Step (Easy Jet for Beginners)
 How to Draw a Mouse Step by Step (Easy for Beginners)
 How to Draw a T-Rex Step by Step (Easy for Beginners)
 How to Draw a Pig Step by Step (Easy for Beginners)
 How to Draw a Minion Step by Step (Easy for Beginners)
 How to Draw a Yorkie Step by Step (Easy for Beginners)
 How to Draw a Notebook Step by Step (Easy for Beginners)

