
Kids love ninjas because they're quick and a little bit mysterious. The good news for your pencil is that a cartoon ninja hides most of the hard parts, like hair and a mouth, under one round hood. In this lesson you'll learn how to draw a ninja step by step, starting from a circle and a stick figure. My ninja is an original chibi kid with friendly eyes, a red headband and one hand up in a quiet "shh" as he tiptoes along.
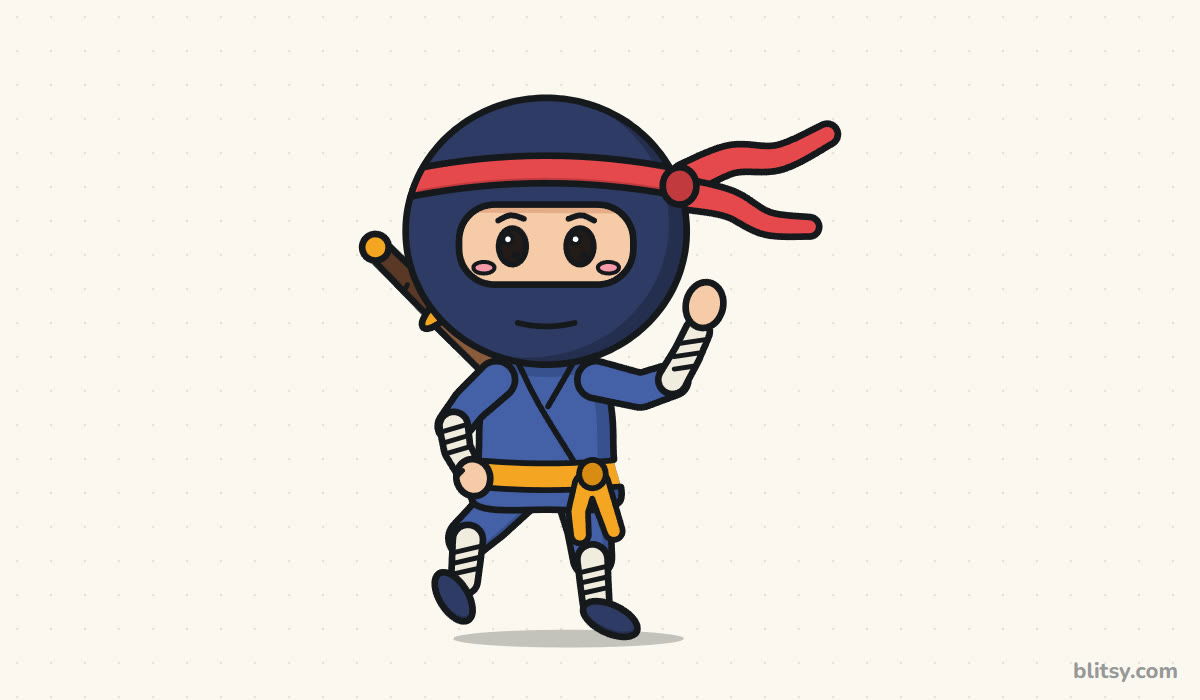
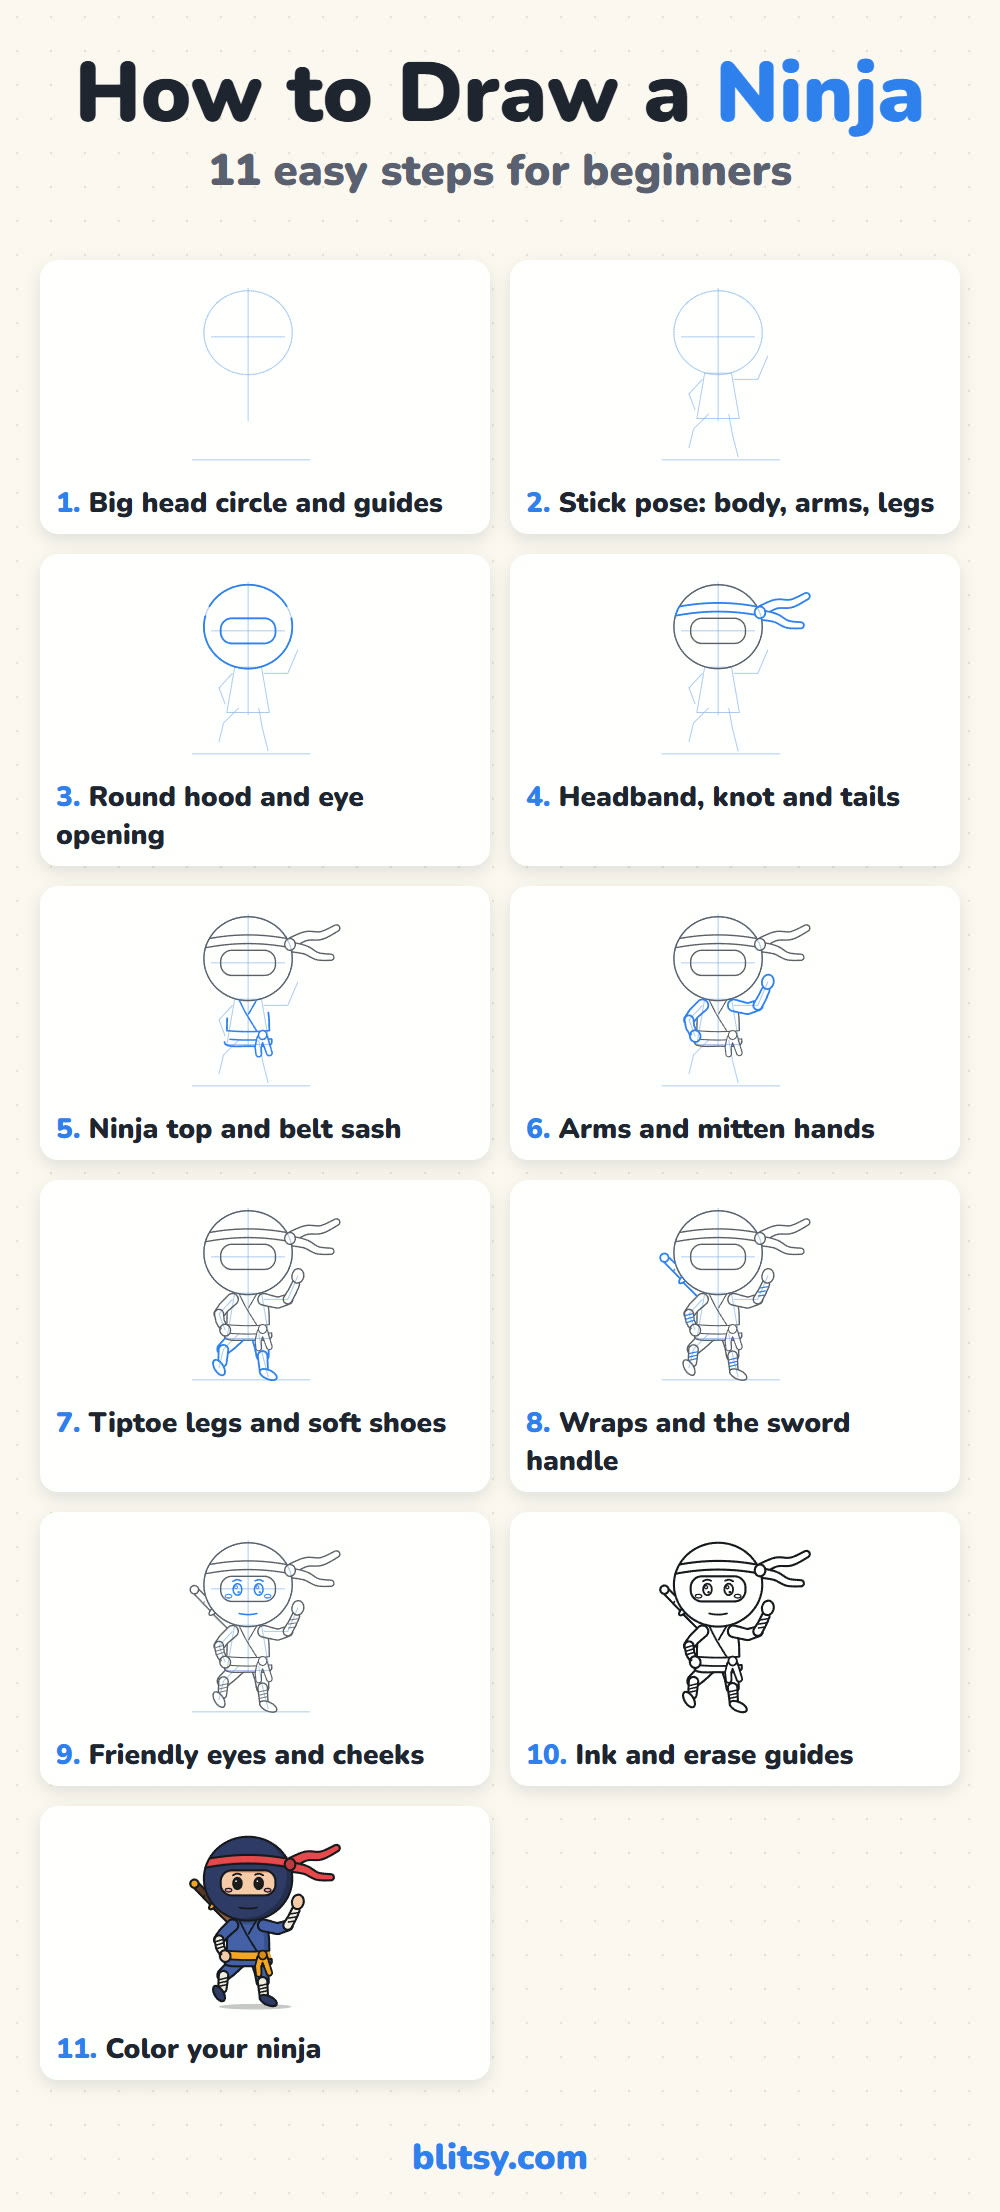
Watch for the color change: blue is what you add in that step, and gray lines are the ones you already drew, so it's easy to spot what each picture adds.
Quick overview
⏱️ Time: about 25 to 35 minutes, coloring included
🎯 Level: easy, good for kids from about 6 and up
✏️ Steps: 11
🥷 You'll draw: a chibi ninja kid on tiptoe with a headband, a belt sash and a sword handle on his back
Gear for Your Sneaky Ninja Sketch
- A pencil, for guide lines you'll erase later
- A soft eraser
- A black marker or fineliner for the final lines
- Crayons, markers or colored pencils: dark blue, blue, red, orange, cream, peach, brown and pink
- Plain white paper, turned the wide way so the headband tails fit
If you only have one blue, use it for the clothes and press harder on the hood so it turns darker.
How to Draw a Ninja Step by Step
Step 1: Draw a big head circle and the guide lines
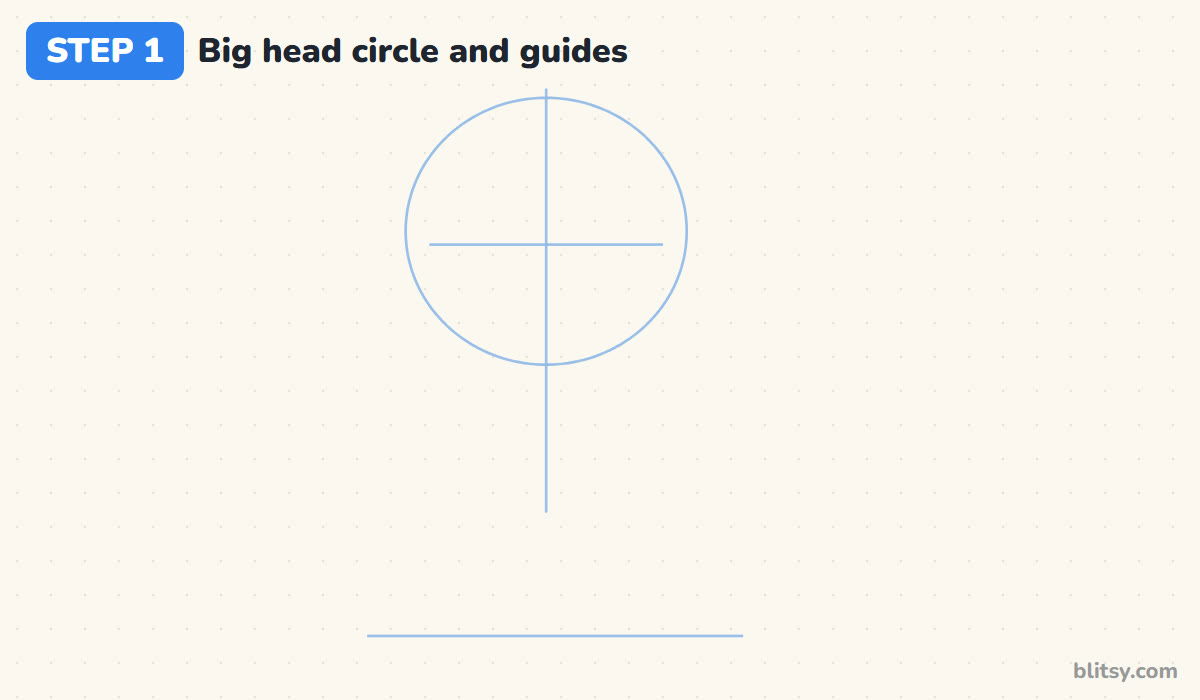
When I teach this, I start with a ground line near the bottom of the page and a light line straight up the middle. Near the top, draw a big circle for the head, then a short line across it just below the center. That cross line is where the eyes will sit. Chibi characters have huge heads, so this circle should take up almost half the height of the whole drawing.
💡 Tip: Press lightly. Every line in this step gets erased later, so it doesn't have to be neat.
Step 2: Sketch the pose with simple stick lines
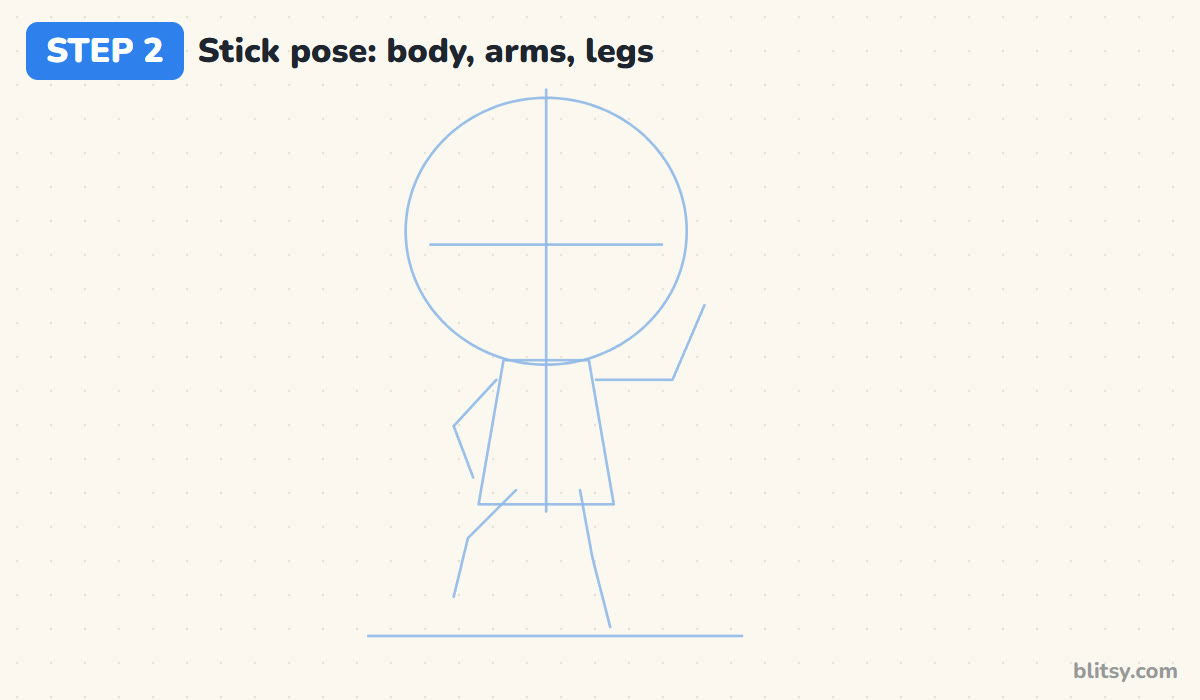
Under the circle, draw a small box that's a little wider at the bottom. That's the body. For the raised arm, go out to the right from the shoulder and then up beside the head. The other arm bends down near the hip. One leg steps out to the left with a bent knee, and the other one goes straight down to the ground line.
💡 Tip: Look at your stick figure before going on. If it already looks like it's sneaking, the rest will follow.
Step 3: Turn the circle into a round hood and add the eye opening
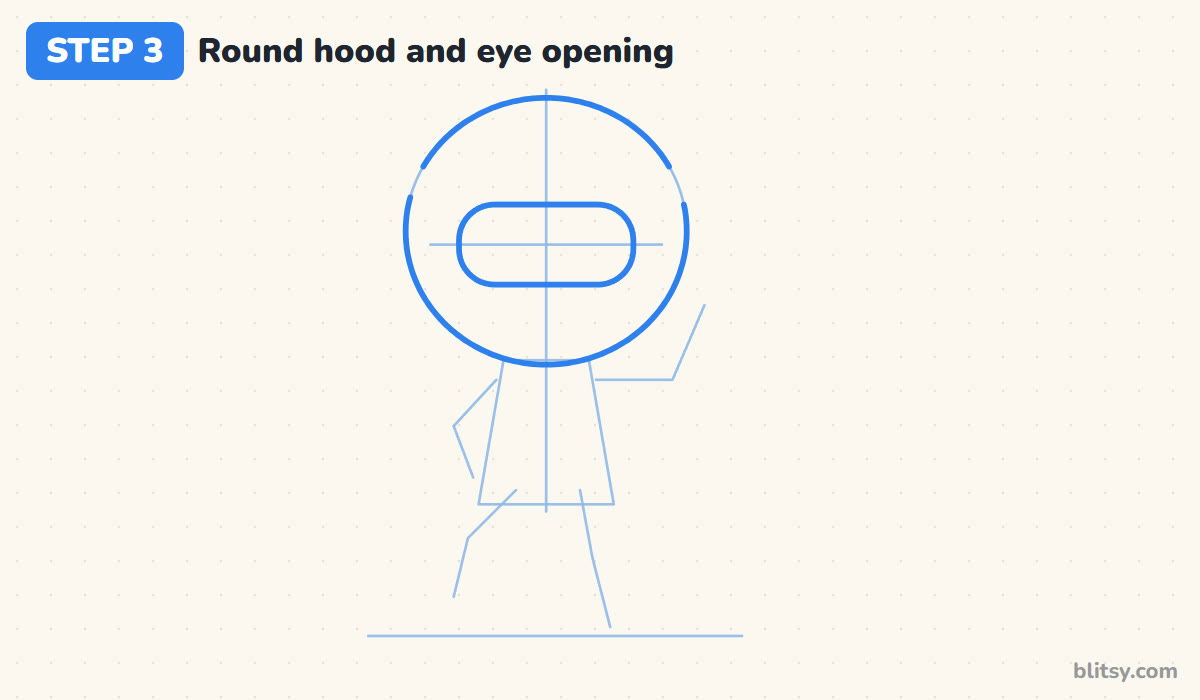
Trace around the head circle with a smooth line. This is the hood, and it also works as the mask, so there's no separate face shape to worry about. Across the eye line, draw a long rounded rectangle, like a capsule lying on its side. Leave a bit of space above it for the headband.
💡 Tip: I make the eye opening about two thirds as wide as the hood. Much narrower and the eyes get squeezed.


Step 4: Add the headband, the knot and the flowing tails
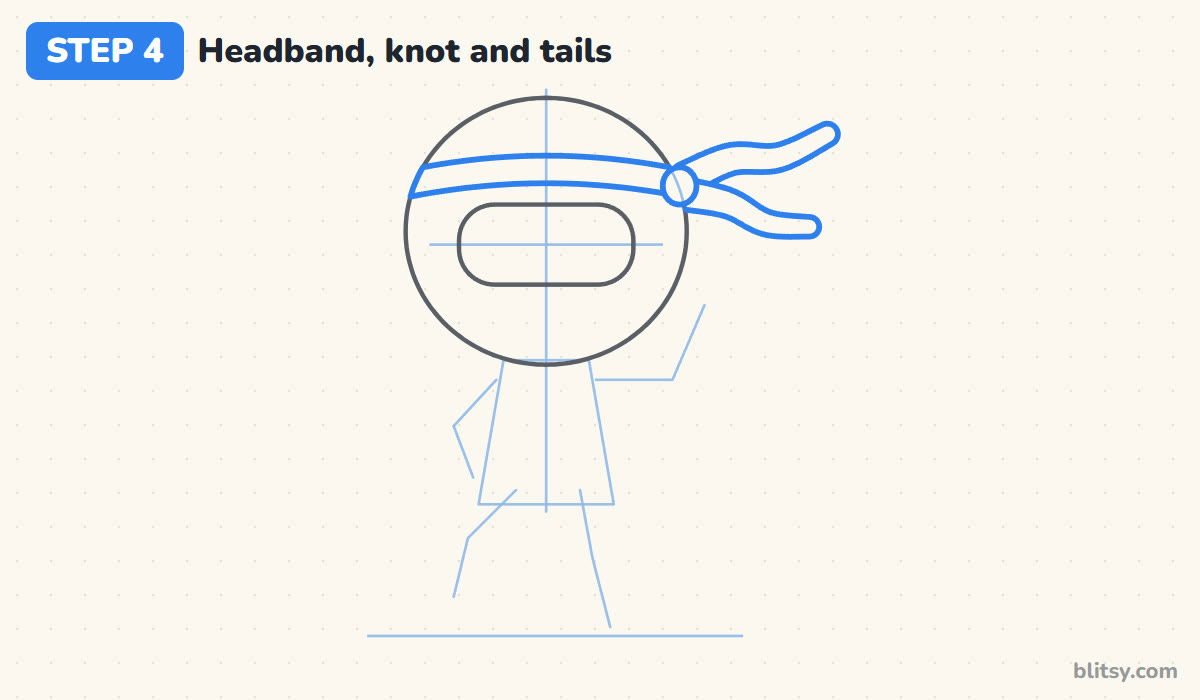
Draw two gently curved lines across the top of the hood, a little above the eye opening. On the right side, put a small circle for the knot. Two ribbon tails come out of it and wave off to the right, one higher and one lower, a bit thinner at the ends.
💡 Tip: Give the tails a slight wave. Straight tails look stiff, while a wave makes it feel like he's moving.
Step 5: Draw the ninja top and the belt sash
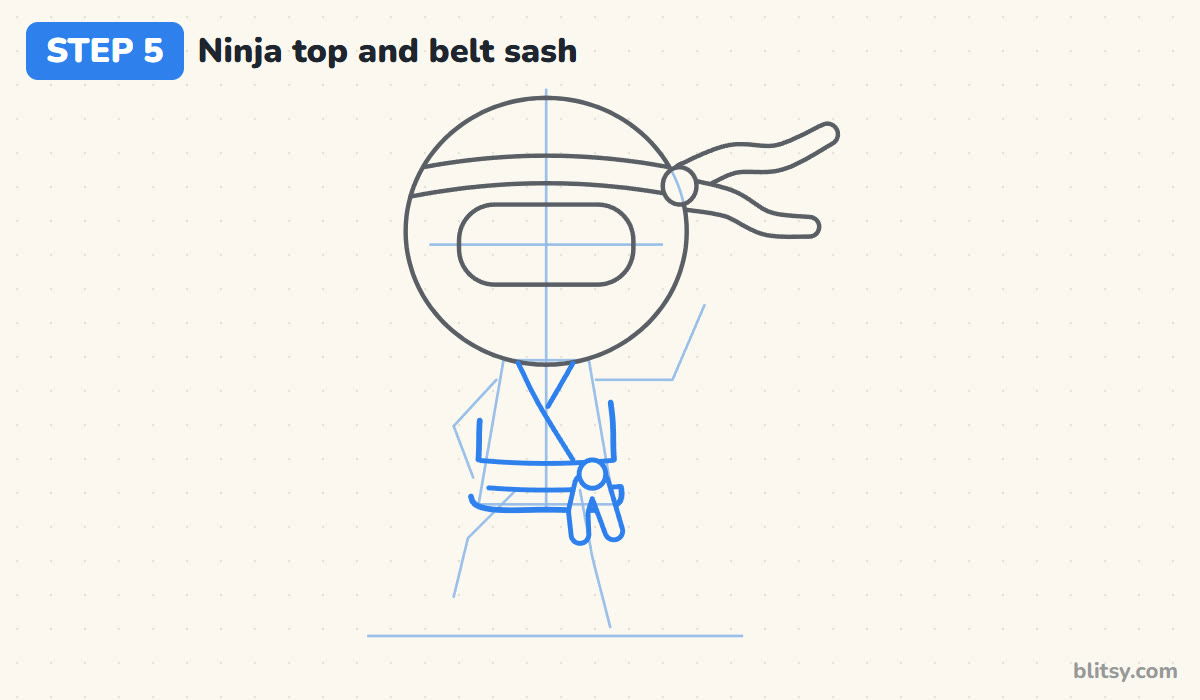
Follow the body box with soft lines, rounding the shoulders where they meet the hood. A diagonal line from the left side of the neck down toward the right hip shows the wrap-front top, with a short second line under it. Then draw a wide belt sash across the waist, a little knot on the right, and two short ends hanging down.
💡 Tip: Curve the sash a tiny bit downward in the middle so the body looks round instead of flat.
Step 6: Add soft arms and mitten hands
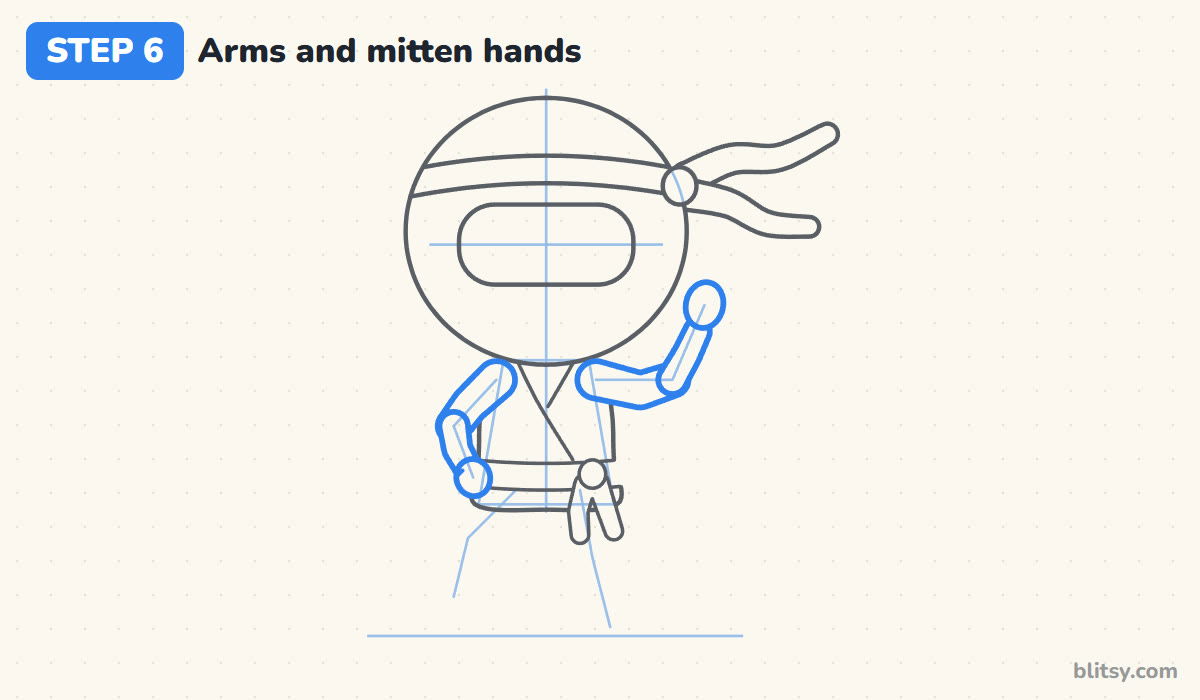
Around each stick arm, draw two lines so the arm has real width, like a soft tube. The sleeve covers the upper arm and a narrower wrapped forearm sits below the elbow. Finish each arm with an oval mitten hand and a small curved line for the thumb. The right hand is raised next to the hood, palm out.
💡 Tip: Make the arms about as wide as the eyes are tall. Thin stick arms look strange next to that big head.
Step 7: Draw tiptoe legs and soft shoes
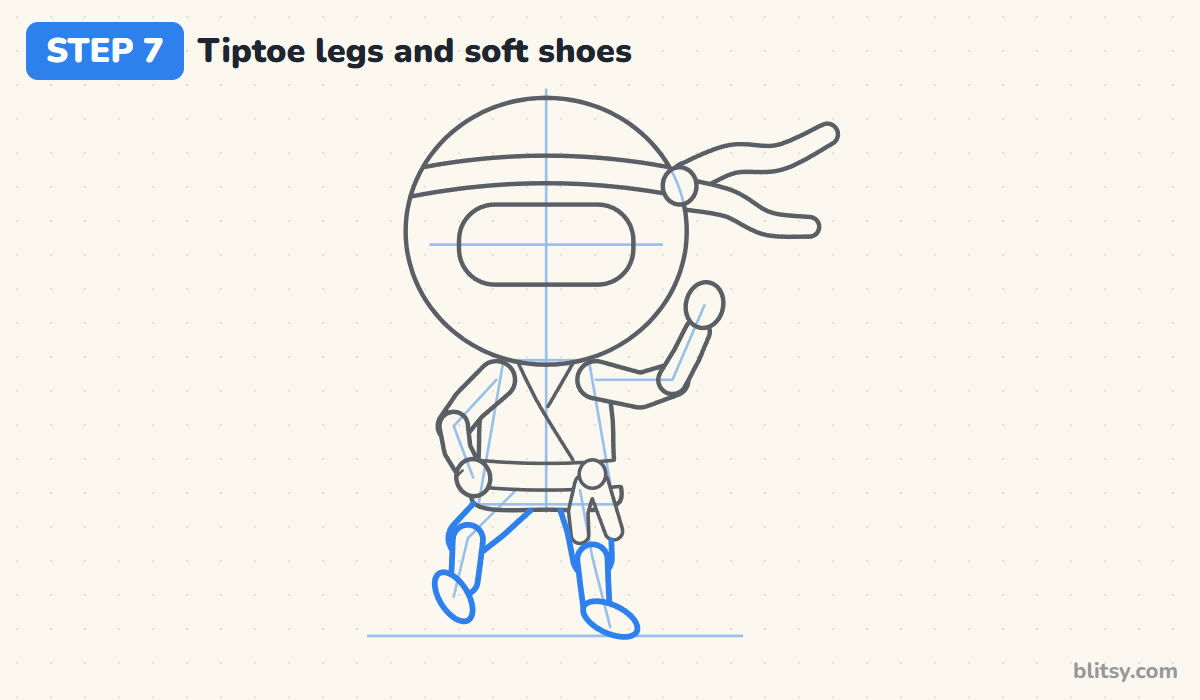
Ninja pants are baggy, so draw the thighs wide and rounded. Below each knee, the shin narrows into the leg wraps. The right foot touches the ground only with its toe, tilted down, while the left foot hangs in the air under the lifted knee. I keep both shoes small and round, with no laces or heels.
💡 Tip: Leave a small gap between the lifted shoe and the ground line. That gap is what makes the step look sneaky.

Step 8: Draw the wraps and the sword handle
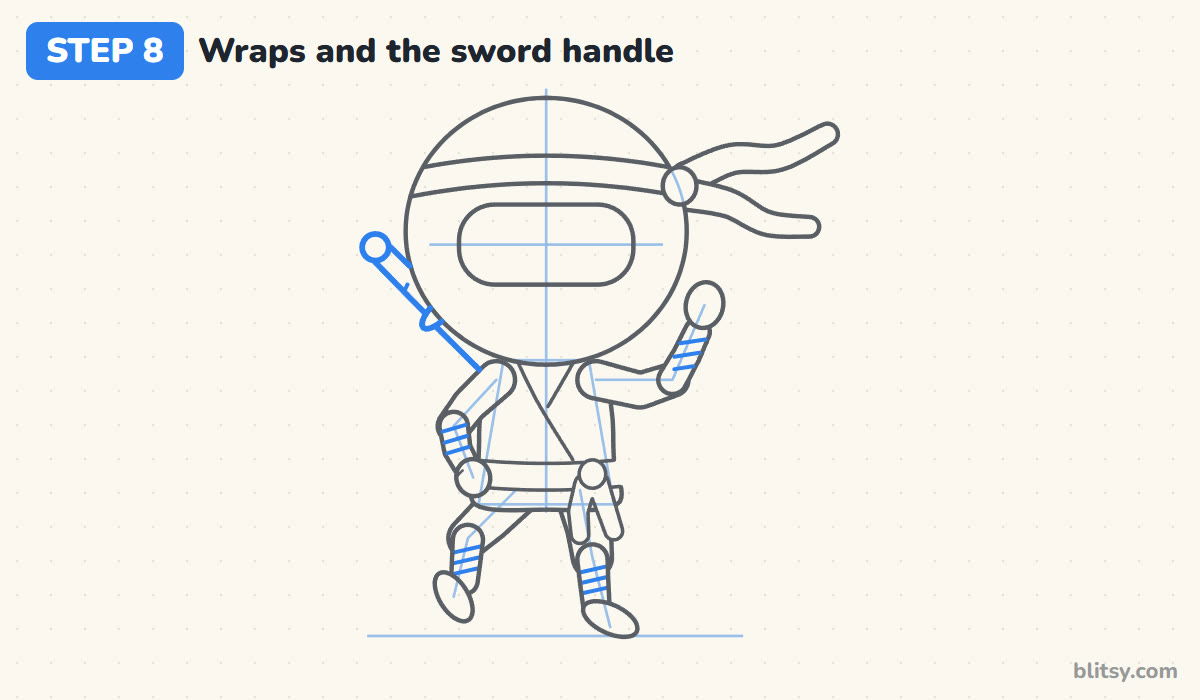
Add three short slanted lines across each forearm and each shin. They turn plain tubes into cloth wraps. Behind the left shoulder, draw a short diagonal handle with a round cap on top and a small oval guard where it meets the hood. The sword stays in its case on his back, so only the handle shows.
💡 Tip: Slant all the wrap lines the same way on each limb. Mixed angles look like scribbles.
Step 9: Give him friendly eyes and rosy cheeks
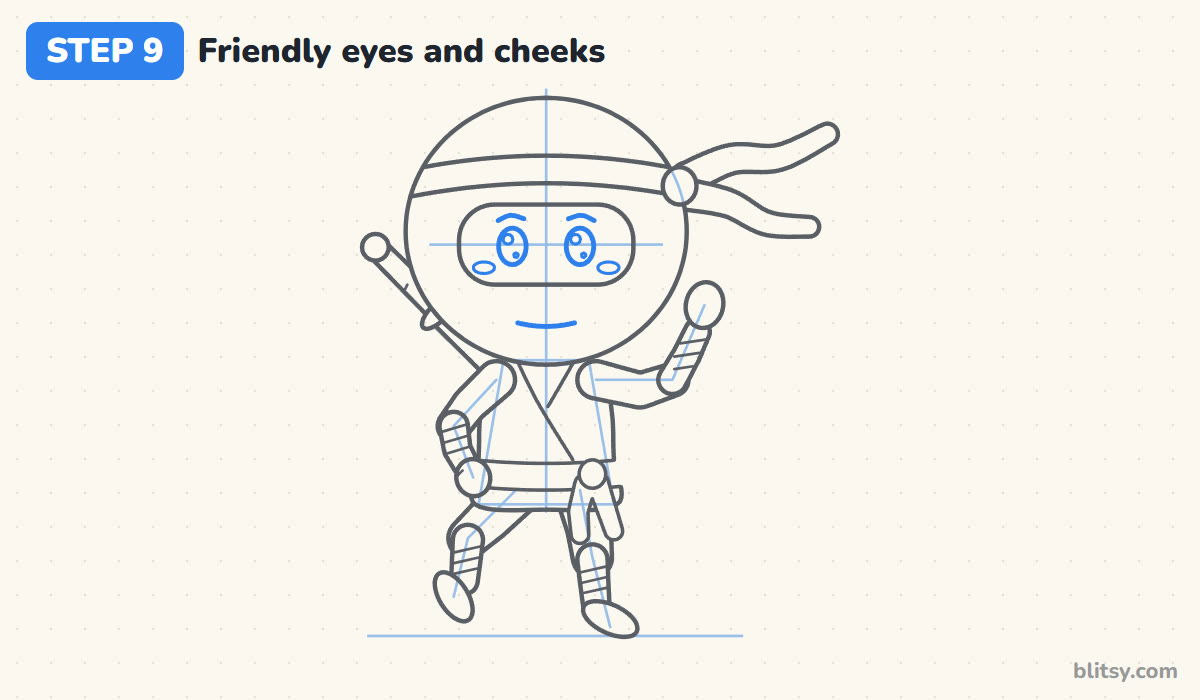
Inside the eye opening, draw two tall ovals with a big shine dot and a tiny one in each. Add short curved brows just above them. Small ovals in the lower corners become pink cheeks, and one short curve on the mask hints at a smile underneath.
💡 Tip: Big round eyes keep a ninja cute. Narrow, slanted eyes quickly make him look grumpy.
Step 10: Ink the keeper lines and erase the guides
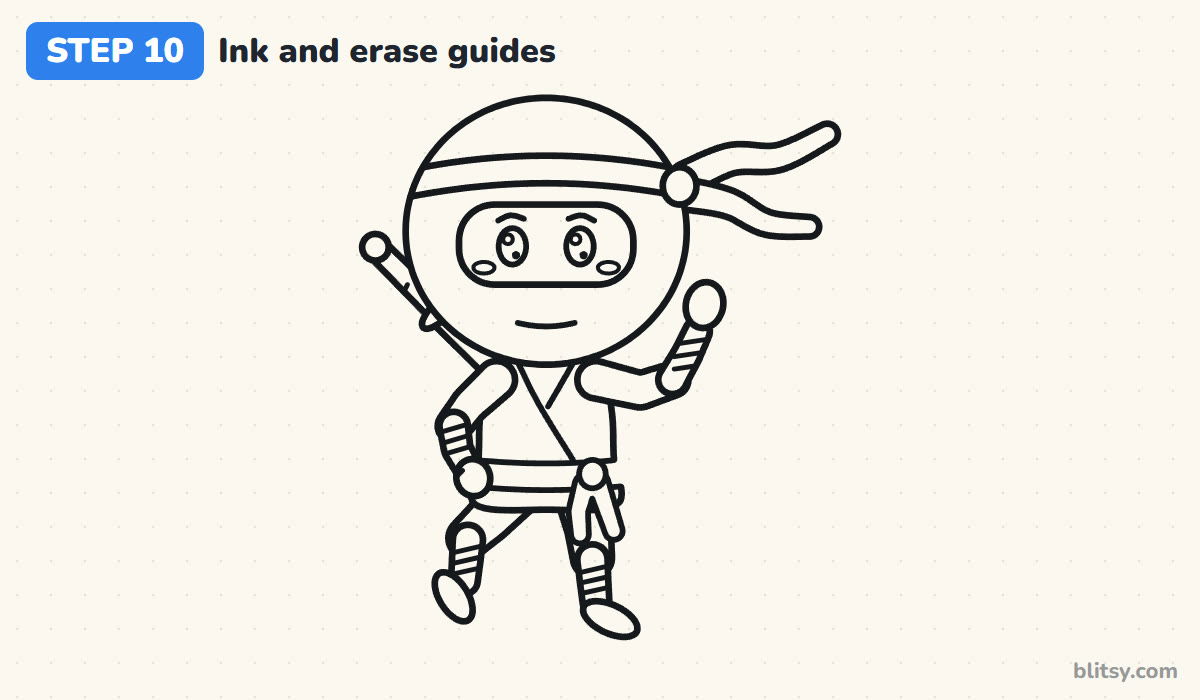
Go over every line you want to keep with a black marker. Slow, steady strokes look cleaner than quick ones. Once the ink is dry, erase all the light pencil guides, including the circle and the stick figure.
💡 Tip: Wait a full minute before erasing. Marker that's still wet smears straight across the page.
Step 11: Color your ninja
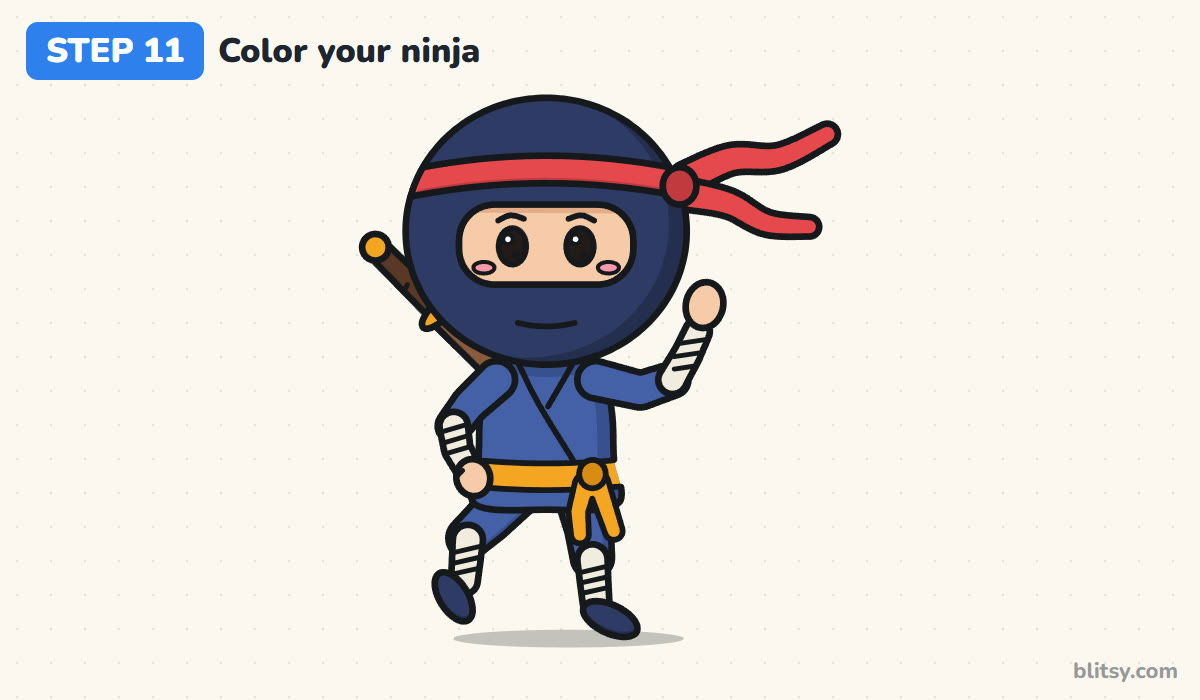
I color the hood and shoes dark blue first, then use a lighter blue for the top, the sleeves and the pants, so the head stands out. The headband is red, the sash and sword guard orange, the wraps cream, the face and hands peach, and the handle brown. A touch of pink goes on the cheeks.
💡 Tip: Press a little harder on one side of the hood and the pants. That darker edge makes the shapes look round.

Where Ninja Drawings Tend to Trip Up
- A tiny head. With a normal-sized head he looks like a small adult. Make the hood almost as tall as the body and legs together.
- A narrow eye slit. A thin slit hides the eyes and looks unfriendly. A wide capsule shape gives the face room to smile.
- Stick arms and legs. Single lines look unfinished. Give every arm and leg two sides, with soft round ends.
- Both feet flat on the ground. Then he's just standing. Lift one foot and tip the other onto its toe.
- Everything in the same dark color. An all-black ninja turns into one blob. Use dark blue for the hood and a lighter blue for the clothes.
Dressing Your Ninja for a Different Clan
Once you know the shapes, your ninja can join any clan. Swap the red headband for green or purple, color the outfit gray or black with a bright sash, or give him a little star on the headband. Smaller kids can skip the wraps and the sword handle, and he still reads as a ninja. Since he uses the same big-head body, my how to draw a chibi step by step lesson is a great way to practice the proportions. For a closer look at a blade, the sword drawing tutorial goes step by step, and if your kids love shell-wearing heroes, the Ninja Turtle coloring pages make a fun extra.
Free Ninja Coloring Page and Printable Steps
The free ninja coloring page shows a colored example and a color key at the top, with a big outline underneath that's ready for crayons. The step-by-step PDF guide holds all 11 steps with pictures and tips, so you can draw without a screen. Both print on Letter or A4 paper.
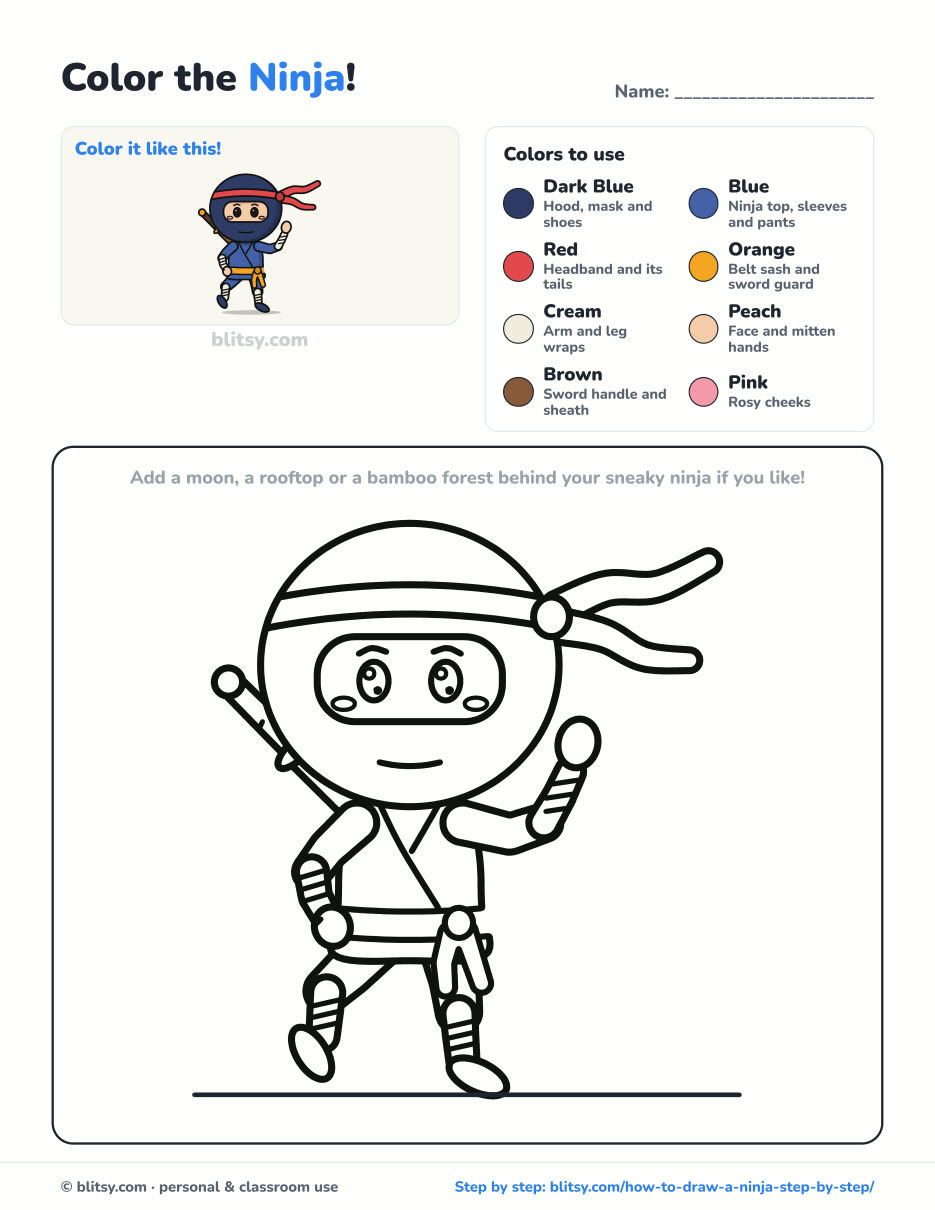
Black outlines with a colored example and the color names at the top. Ready to print and color.
⬇️ Download Coloring PageEvery step picture with its instructions and tips, to keep beside your paper while you draw.
⬇️ Download Drawing Guide📱 On a phone? Tap a download button, then open the file and choose Share → Save to Files or Print. On a computer, the PDF opens or saves straight to your Downloads folder.
Pin the Ninja Steps for Your Next Drawing Day
More Character Drawings to Try After Your Ninja
Each of these is a full lesson with a picture for every step, so your ninja can make some new friends.
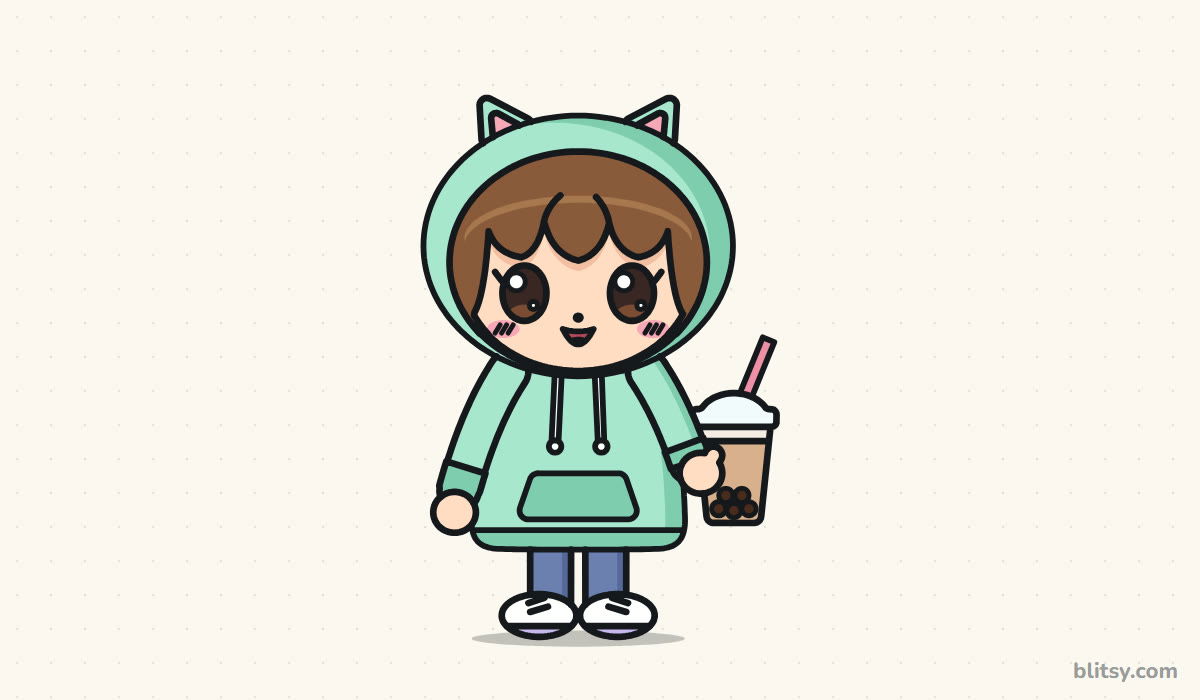
- Chibi Drawing: A cute chibi kid in a cat-ear hoodie holding a boba cup, built on the same big-head body, in this how to draw a chibi step by step lesson.
- Demon Slayer Drawing: Draw Tanjiro as a little chibi in his checkered jacket with this Demon Slayer drawing tutorial.
- Boy Drawing: A friendly cartoon boy from head to shoes in this how to draw a boy step by step guide.
- Sword Drawing: A classic sword with a crossguard and a shiny blade in this sword drawing tutorial.
- Anime Drawing: Try a taller anime character with big expressive eyes in this anime drawing step by step lesson.
Ninja Drawing Questions Kids Ask
How do you draw a ninja easy for kids?
Start with a big circle for the head and a stick figure for the pose. Turn the circle into a hood with a wide eye opening, add a headband, then give the body and limbs some width. A chibi ninja like this one only needs simple rounded shapes.
How do you draw a ninja mask?
In a cartoon, the hood and the mask are one shape. Draw a round hood and cut a long rounded opening across the middle for the eyes. Everything below the opening is mask, so there's no mouth to draw.
What colors is a ninja?
Ninjas are usually drawn in dark blue, black or gray. Adding one bright color, like a red headband or an orange sash, makes your drawing much more fun to look at.
How long does it take to draw a ninja?
Most kids finish the drawing in about 20 minutes and spend another 10 or so on coloring. The arms and the tiptoe legs take the longest.
Now sharpen that pencil, tiptoe over to your paper and let your ninja sneak onto the page. 🥷✏️
Related posts:
 How to Draw Wonder Woman Step by Step (Chibi for Kids)
 How to Draw the Hulk Step by Step (Easy Chibi for Kids)
 How to Draw Iron Man Step by Step (Easy Chibi for Kids)
 How to Draw Springtrap Step by Step (Cute Chibi for Kids)
 How to Draw Spider-Man Step by Step (Easy Chibi for Kids)
 How to Draw Cat Noir Step by Step (Easy Chibi Hero)
 How to Draw Goku Step by Step (Easy Chibi Version)
 How to Draw Freddy Krueger Step by Step (Cute Chibi Version)
 How to Draw Ariana Grande Step by Step (Cute Chibi Fan Art)
 How to Draw Master Chief Step by Step (Easy Chibi Armor)
 How to Draw the Joker Step by Step (Easy Chibi for Beginners)
 How to Draw a Chibi Step by Step (Easy 2-Head Method)

