
Tall white hair standing straight up, a black band where the eyes should be, and a little smile that says he isn't worried about anything. That's Satoru Gojo from Jujutsu Kaisen, and he's one of the easiest anime characters to recognize from a few simple shapes. Below you'll learn how to draw Gojo step by step as a small chibi who is about two heads tall and waving hello. This is my own simple fan-art version for practice, not official art, so feel free to change anything you like.
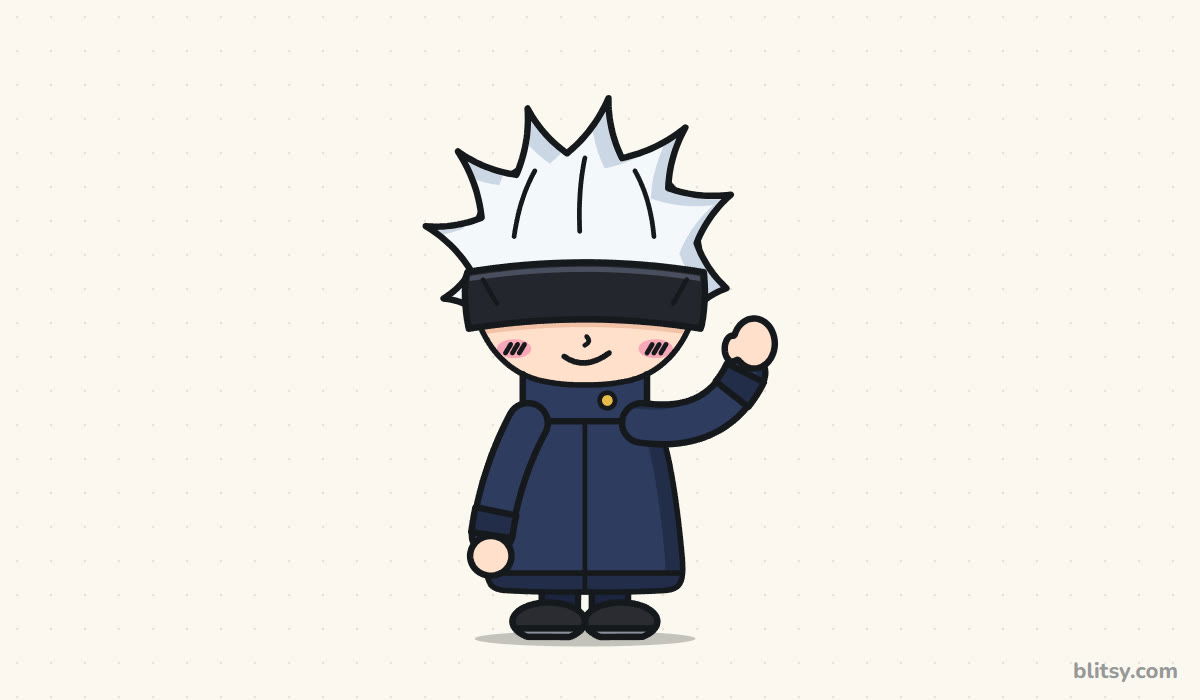
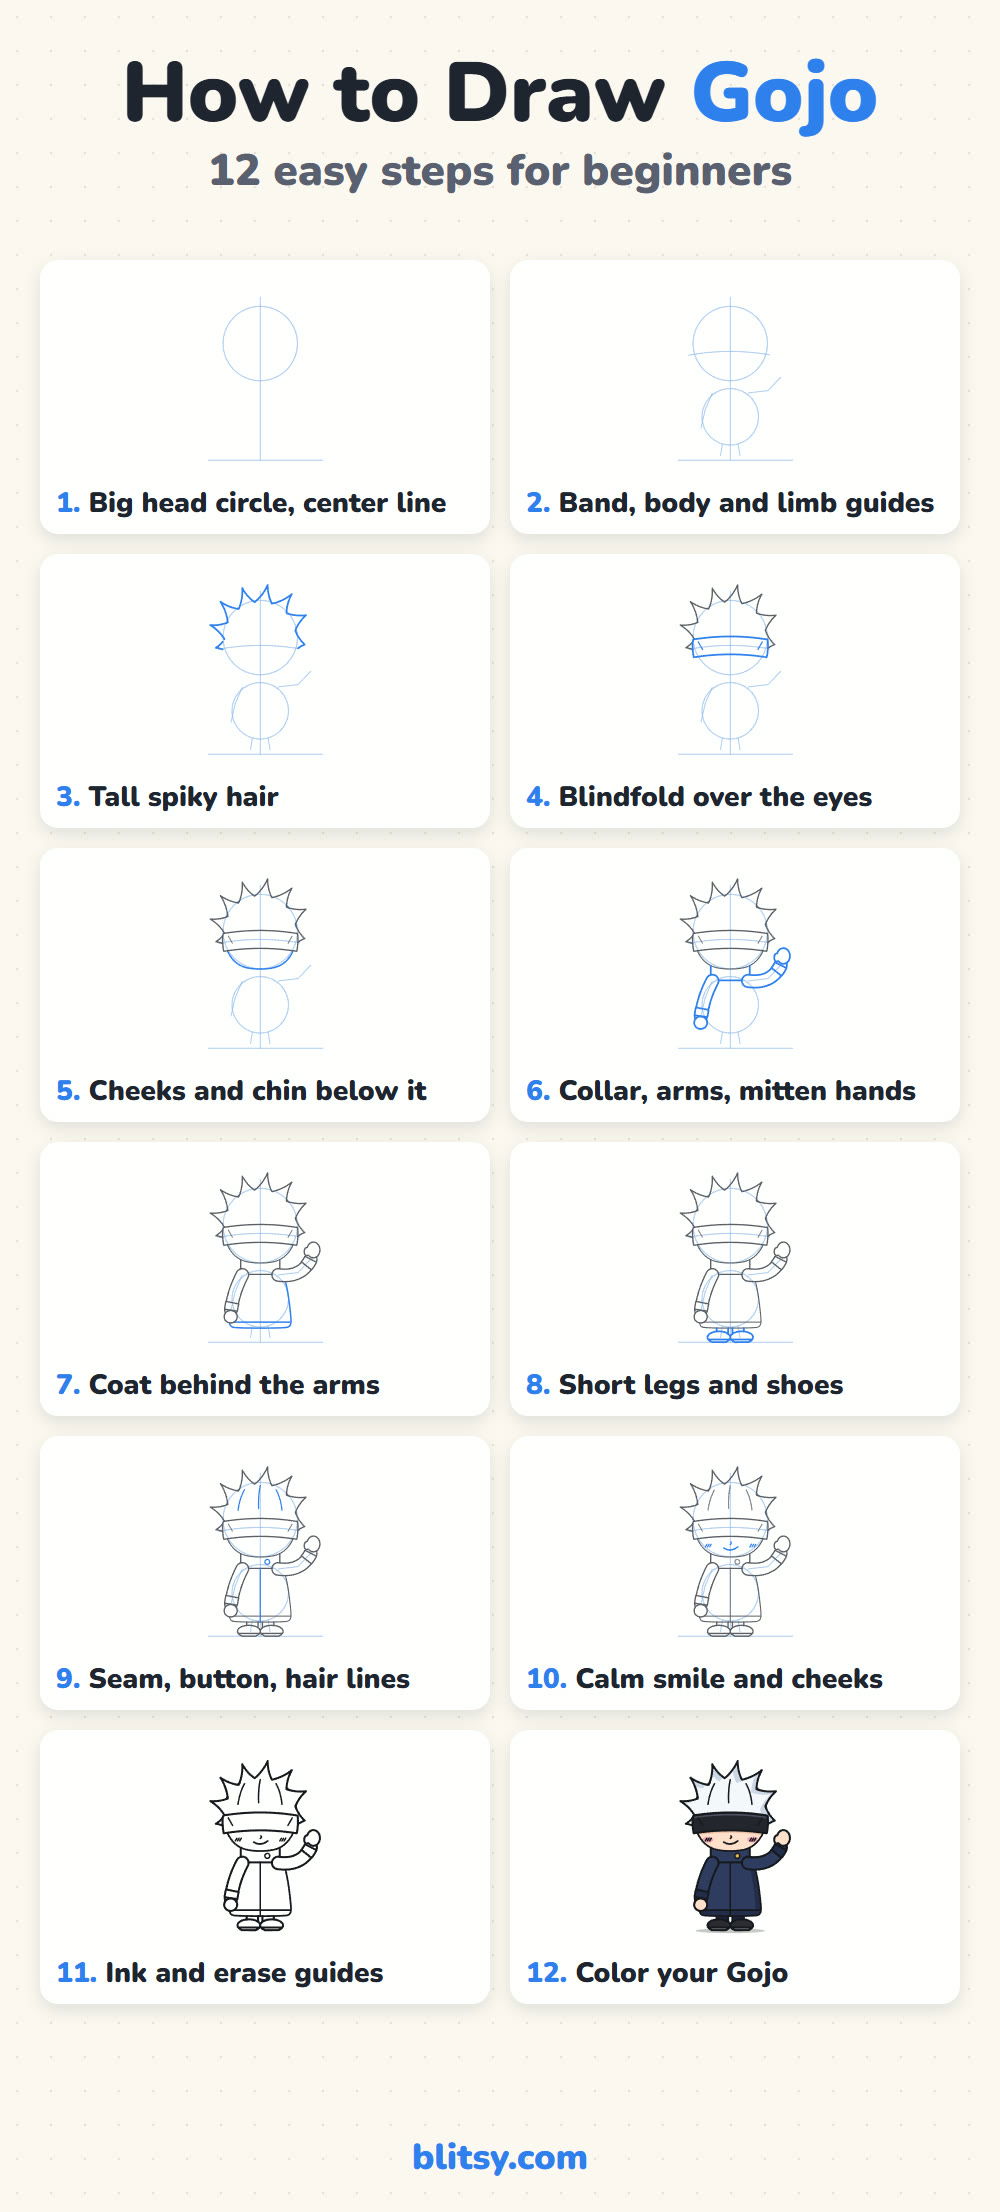
New lines for a step are drawn in blue. Lines from earlier steps turn gray, and the pale helper shapes you sketch at the start disappear in step 11, after you ink the keepers.
Quick overview
⏱️ Time: about 30 minutes, plus coloring
🎯 Level: easy, good for ages 7 and up
✏️ Steps: 12
🕶️ You'll draw: a standing chibi Gojo with his blindfold on and one hand raised
Supplies for Snow-White Hair and a Navy Uniform
- A pencil you can press lightly, such as an HB
- A soft eraser for the helper shapes
- A black marker or fineliner for the final outline
- Colored pencils or markers in navy blue and black, plus peach and pink
- A pale blue-gray pencil for shadows in the hair
- Plain white paper, held the tall way
The hair is white, so most of it stays as bare paper. Keep that area clean and only add a soft gray-blue shadow on one side.
How to Draw Gojo Step by Step
Step 1: Draw a big head circle and a center line
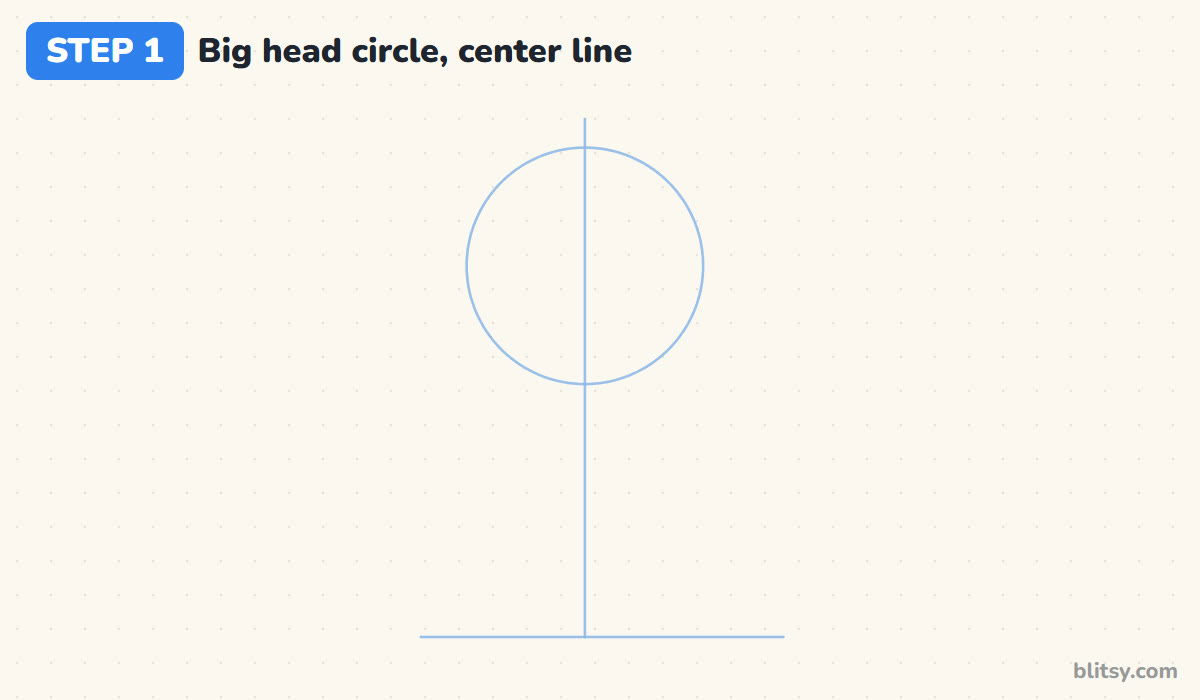
Start near the top of the page with a large circle for the head. In chibi style the head is huge, almost as big as the whole body, so don't be shy with the size. Drop a straight line from the circle down to a short ground line near the bottom of the page.
💡 Tip: Leave a hand's width of empty paper above the circle, because the hair will grow upward.
Step 2: Add the band line and the body guides
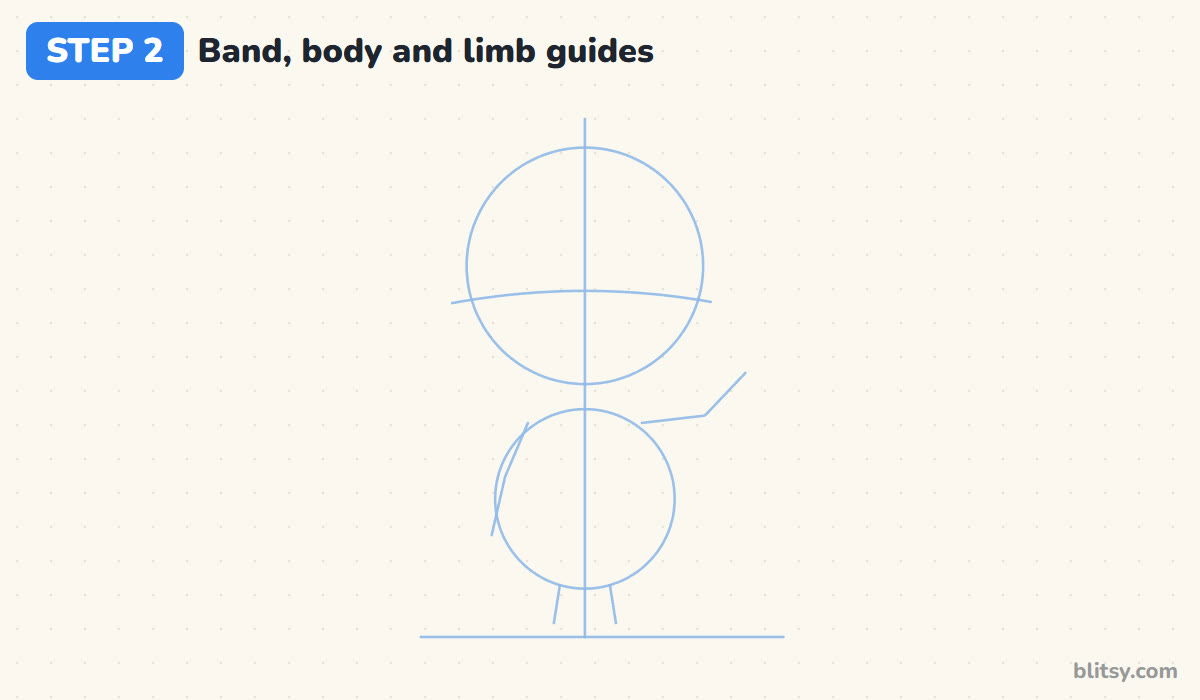
Draw a gently curved line across the circle a little below its middle. That's where the blindfold will sit. Under the head, sketch a smaller circle for the body. Then add simple lines for the limbs: one arm hanging down on the left, one arm bending up on the right, and two short legs.
💡 Tip: Curve the band line slightly downward at the ends so it wraps around the round head.
Step 3: Draw the tall spiky hair
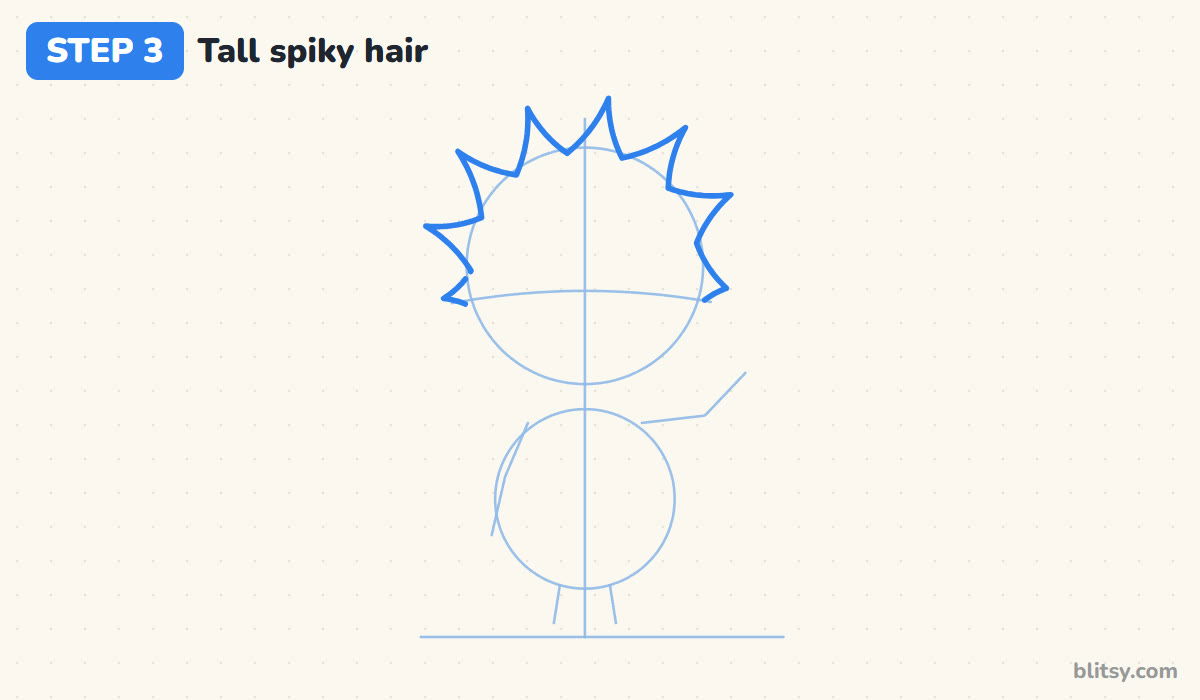
Here's the part everyone recognizes. Draw zigzag spikes all around the top of the head circle, going a good way above it. I make the spikes on top the longest and let them get shorter toward the sides, which gives the hair that pushed-up look. Stop each side just at the band line.
💡 Tip: Make your spikes different widths. Perfectly even zigzags look like a crown instead of hair.


Step 4: Wrap the blindfold over the eyes
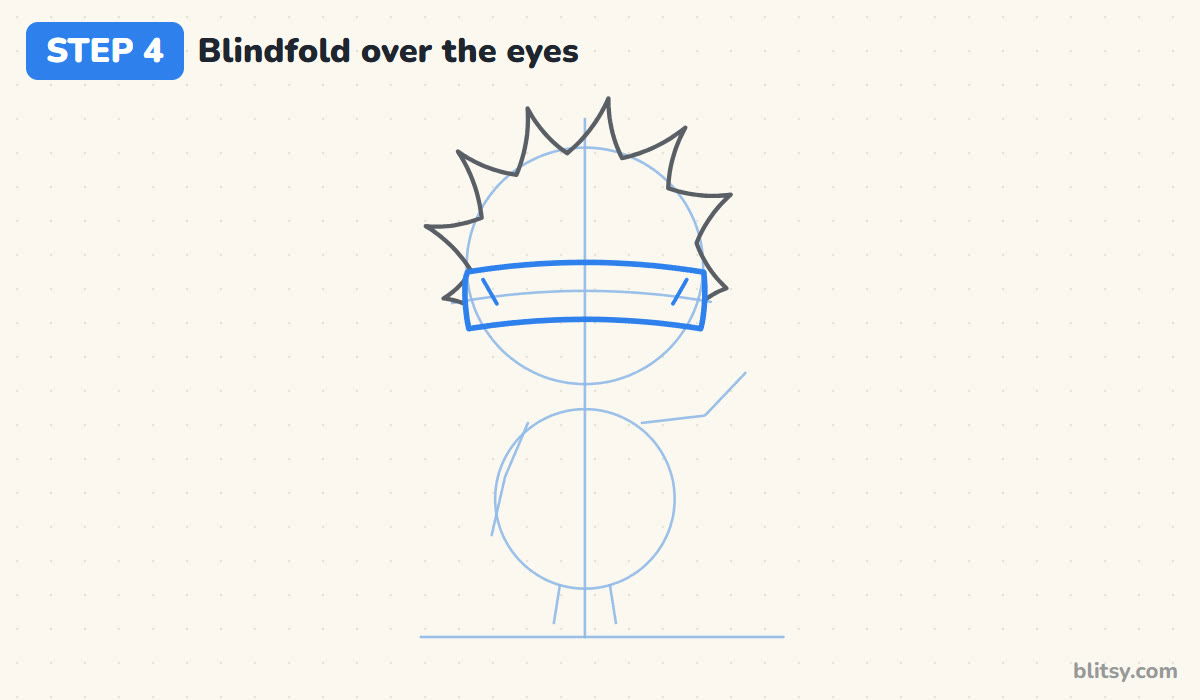
Draw two curved lines along the band guide, one above and one below, and close them at both sides so the band pokes out a tiny bit past the face. The blindfold is what holds the hair up, so the spikes should look like they burst out right above it. Add a small fold line near each end.
💡 Tip: Keep the band thick, about a third of the space between the band guide and the chin.
Step 5: Shape the cheeks and chin
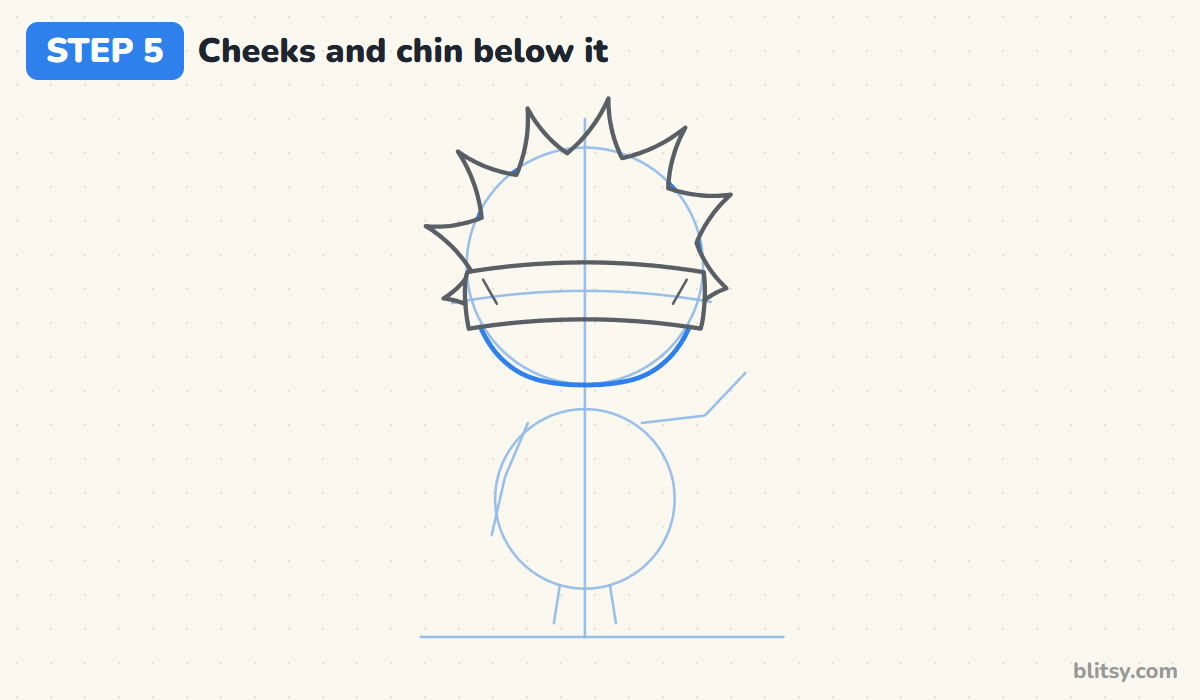
Now finish the face below the band. Follow the head circle down each side and round it into a soft chin. Chibi faces are wide and short, so the chin should never come to a sharp point. Most beginners make the face too long here, which quickly turns a chibi into a grown-up.
💡 Tip: If the chin dips below the head circle, erase it and pull it back up.
Step 6: Add the collar, arms and mitten hands
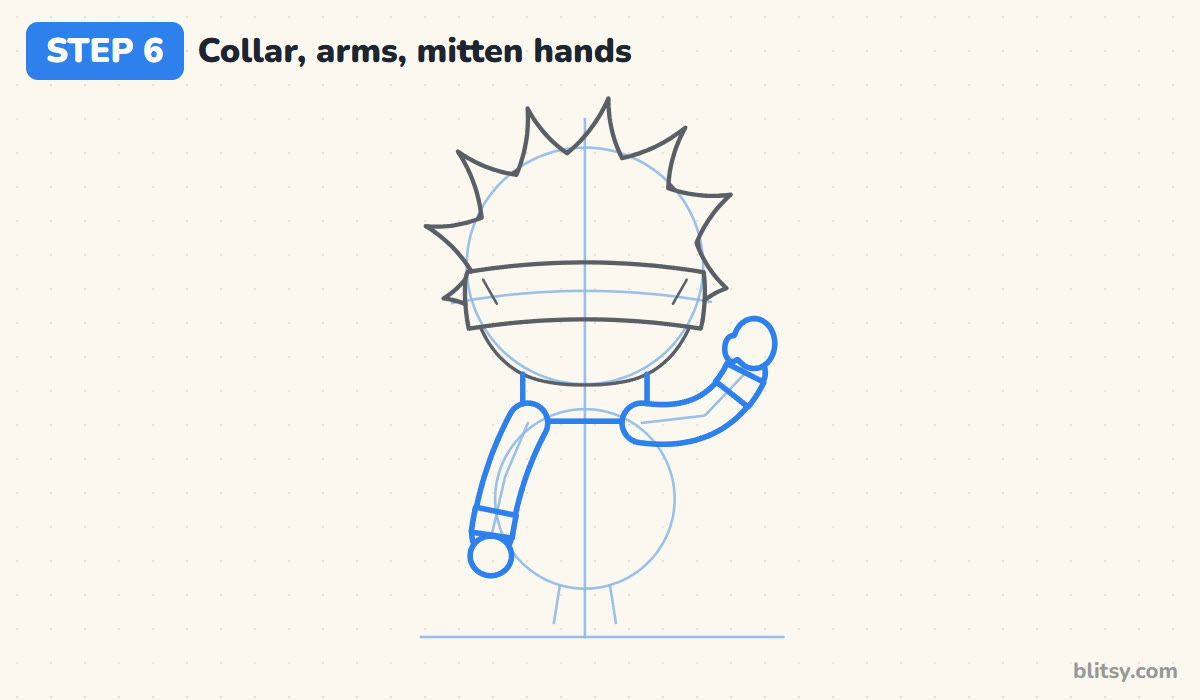
Draw a tall, rounded collar right under the chin. His uniform collar is high, so it should almost touch the face. Next, wrap the arm guides in soft tube shapes with a band at each wrist. Finish with mitten hands: a round one at the bottom on the left and an oval one held up on the right with a small thumb on its inner side.
💡 Tip: Give the arms real thickness, about as wide as the collar is tall. Thin stick arms make him look fragile.
Step 7: Draw the coat behind the arms
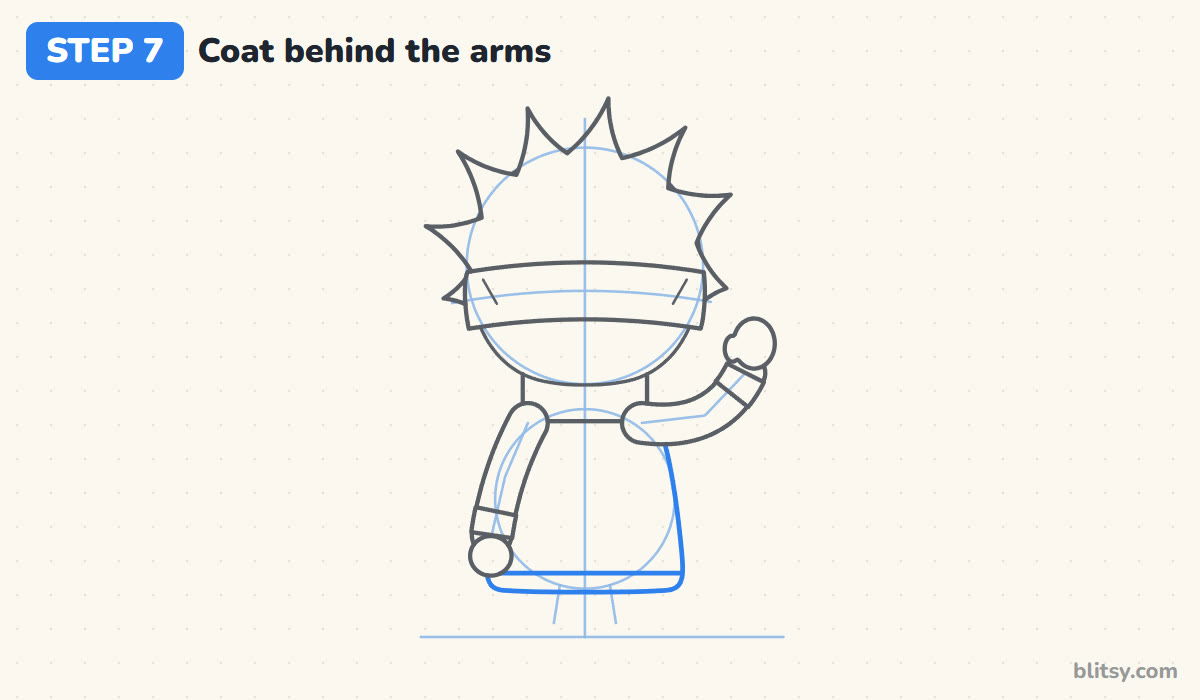
From each side of the collar, slope the shoulders down and let the coat flare out a little toward the bottom, like a short bell. Because the arms are already drawn, you only draw the coat edges you can still see. Close it with a flat hem and add a second line just above it for the bottom band.
💡 Tip: Stop the hem a bit above the ground line so there's room for legs.
Step 8: Add short legs and shoes
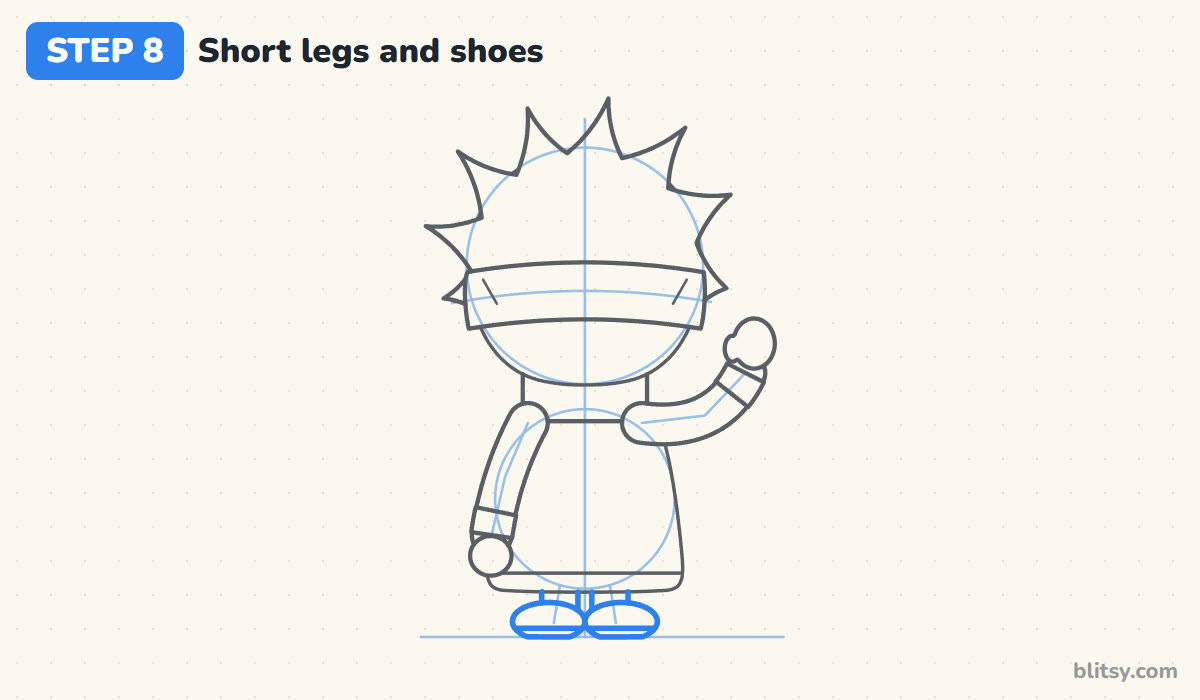
Draw two short rounded rectangles under the hem for the legs. Under them, add two oval shoes with flat bottoms that sit right on the ground line. A line near the bottom of each shoe makes the sole. I keep the legs very short on purpose, since long legs break the chibi look.
💡 Tip: Point the toes slightly outward so he stands steady.
Step 9: Draw the seam, the button and a few hair lines
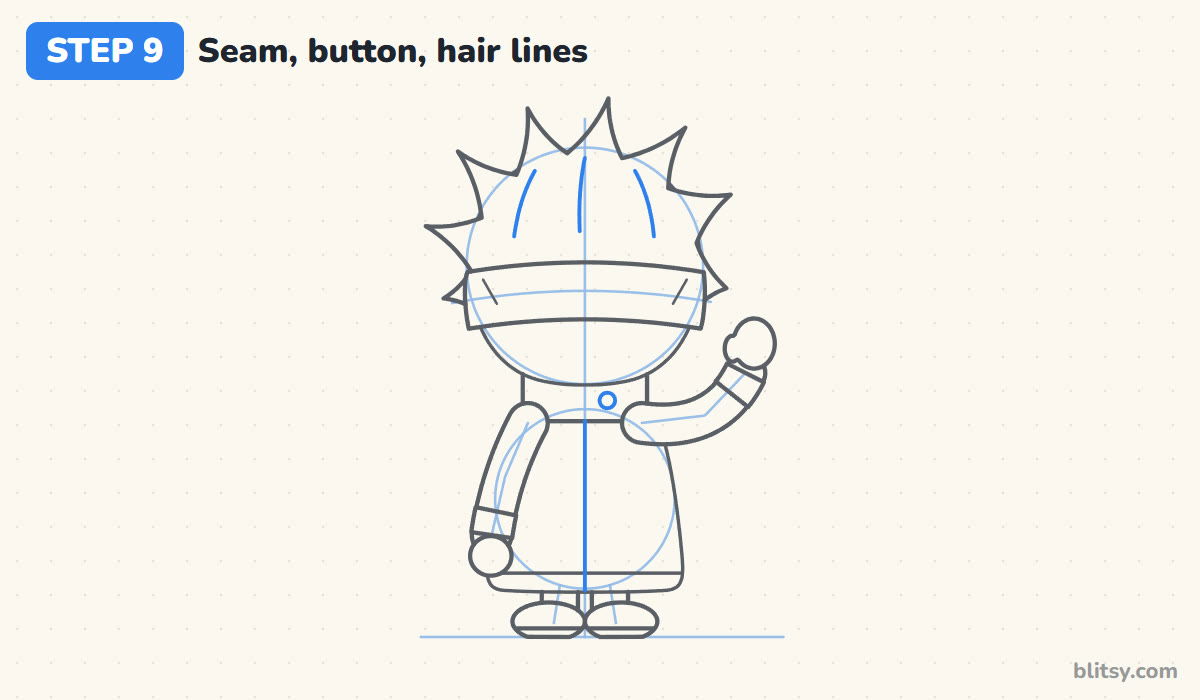
Run a straight line down the middle of the coat from the collar to the hem. That's the front seam of his uniform. Put a small round button on the collar, just right of center. Then add three curved lines inside the hair, following the direction of the spikes, so the hair has some movement.
💡 Tip: Hair lines should start low and sweep upward, the same way the spikes go.
Step 10: Give him a calm smile and pink cheeks
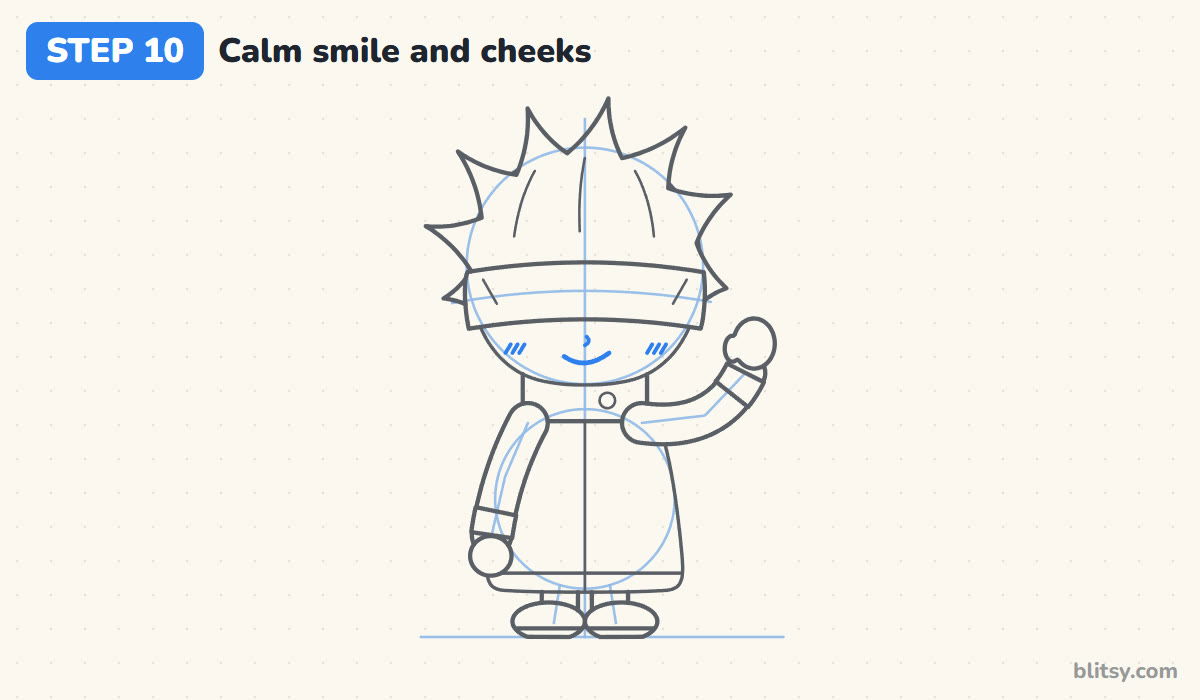
Under the blindfold, draw a tiny hook for the nose. Below it, add a relaxed smile that rises a little more on one side. Gojo looks confident rather than giggly, so a slightly crooked smile fits him. Finish with two small ovals on the cheeks and three short slanted lines in each one.
💡 Tip: Keep the mouth smaller than the gap between the cheeks, or the face starts to look crowded.
Step 11: Ink the lines and erase the guides
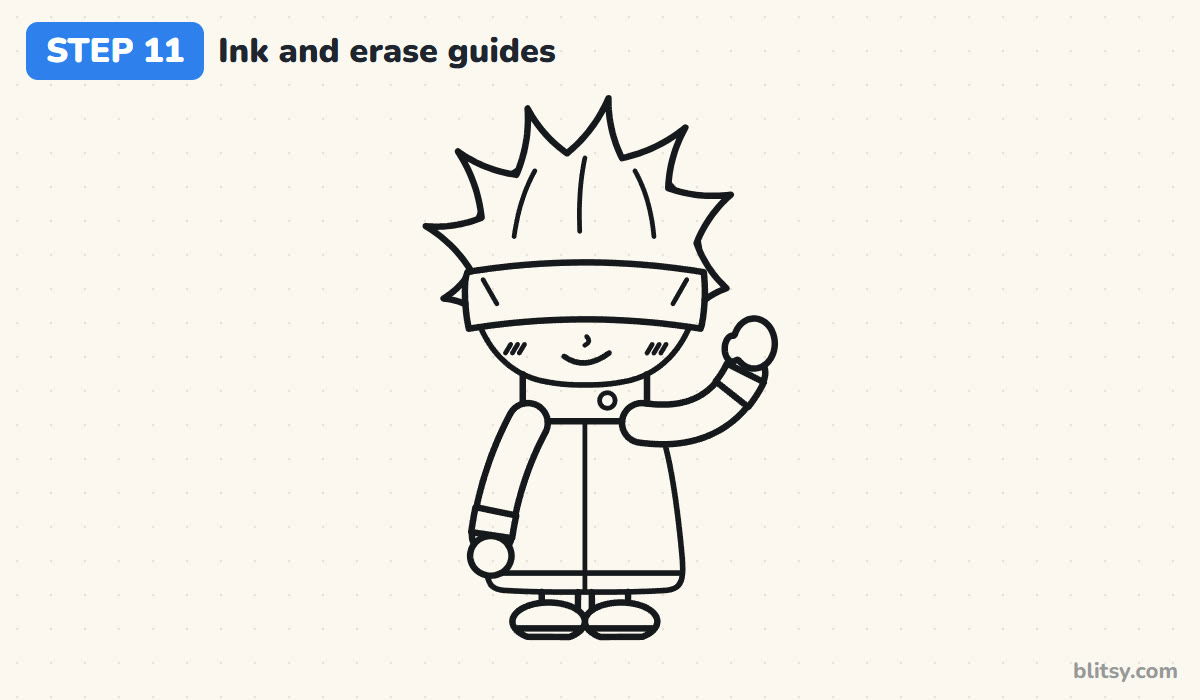
Trace over every line you want to keep with a black marker or fineliner. Go slowly around the hair spikes, since sharp tips look best when each one ends in a clean point. Wait until the ink is fully dry, then erase the head circle, body circle and limb lines.
💡 Tip: Turn the paper as you ink the spikes so your hand always pulls the line toward you.
Step 12: Color your Gojo
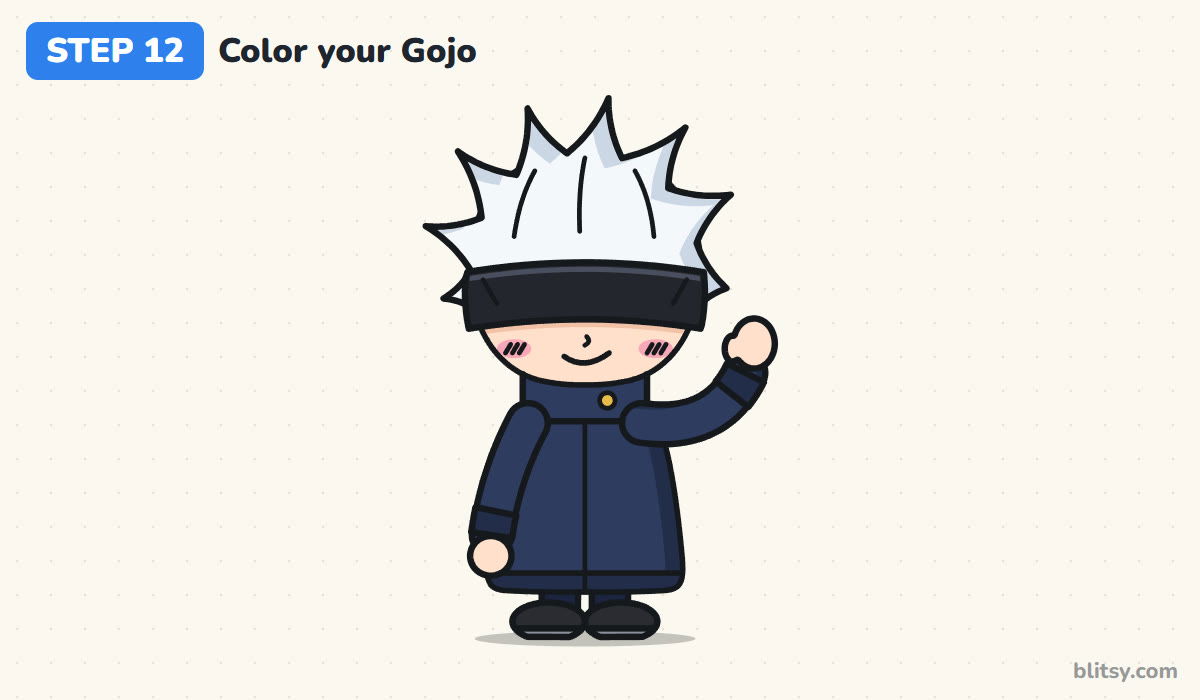
Leave the hair white and shade only its right side with a pale blue-gray. Color the blindfold and shoes black, and leave a thin lighter strip along the top of the band. Fill the coat and arms with navy blue, collar included,, and press harder on the right side for shadow. Use peach for the face and hands, pink for the cheeks and gold for the button.
💡 Tip: Color the black band before the white hair, so you don't smudge dark pencil into the white.
Why a Gojo Doodle Can Lose Its Look
- Hair that's too short. Low spikes make him look like a different character. Let the top spikes rise well above the head circle.
- A thin blindfold. A skinny band reads like a headband. Make it thick enough to cover the whole eye area.
- A long face. Chibi faces stay wide and round. Keep the chin inside the head circle.
- Coloring the hair gray all over. White hair needs bare paper. Shade only one side lightly.
- Stick arms. Thin lines look odd next to the big head. Draw soft, thick sleeves with round mitten hands.
Switching Gojo to Sunglasses and Other Twists
Once the blindfold version feels easy, try him in small round dark glasses instead. Draw two little circles where the band was and add bright blue eyes peeking over the top. You can also turn the raised hand into a peace sign, or give him a cup of something sweet to hold. Younger kids can skip the hair lines and the coat seam. If you like this calm anime look, the how to draw Todoroki tutorial uses the same center line trick, and the chibi drawing tutorial explains the two-head method in more detail. For a regular anime face, try the anime drawing step by step guide.
Gojo Coloring Page and a Printable Step Guide
The free Gojo coloring page has thick outlines, a colored example and a color key for every part. There's also a printable step-by-step guide with all 12 steps and their tips, sized for Letter or A4 paper.
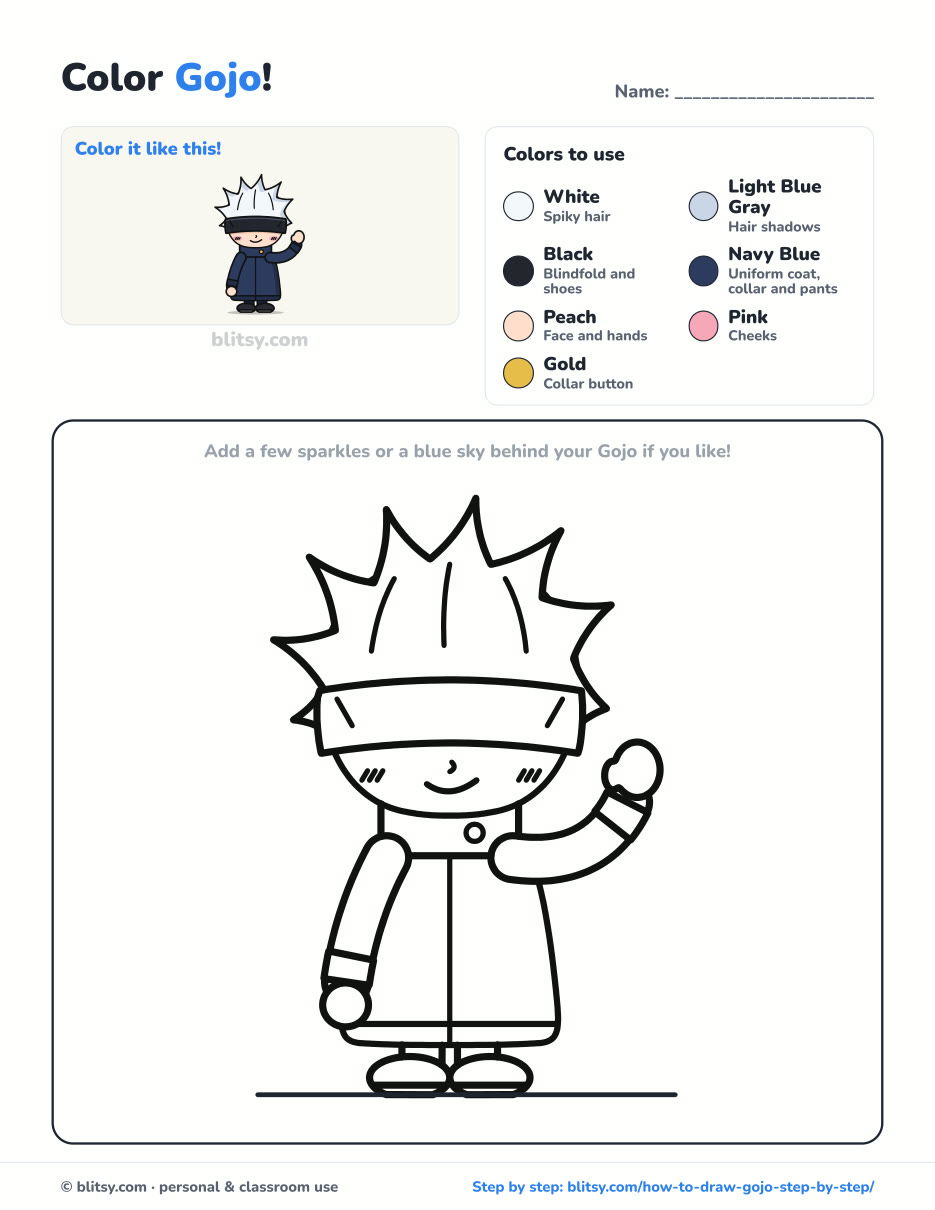
Black outlines with a colored example and the color names at the top. Ready to print and color.
⬇️ Download Coloring PageEvery step picture with its instructions and tips, to keep beside your paper while you draw.
⬇️ Download Drawing Guide📱 On a phone? Tap a download button, then open the file and choose Share → Save to Files or Print. On a computer, the PDF opens or saves straight to your Downloads folder.
Every Gojo Step Stacked in One Tall Pin
More Anime Heroes to Draw After Gojo
Every link below is a full tutorial with a picture for each step and a free coloring page.
- Tanjiro Drawing: Draw a standing chibi Tanjiro in his checkered haori with this how to draw Tanjiro tutorial.
- Nezuko Drawing: A small chibi Nezuko with pink eyes and orange-tipped hair comes together in this Nezuko drawing step by step lesson.
- Goku Drawing: More tall spiky hair to practice, with a fist in the air, in this chibi Goku drawing tutorial.
- Luffy Drawing: A grinning Luffy in his straw hat and red vest grows from a few basic shapes in this how to draw Luffy guide.
- Kurama Drawing: Spread nine orange tails like a fan with this Kurama drawing tutorial.
Gojo Drawing Questions Kids Often Ask
Is Gojo hard to draw?
Not in chibi style. His look comes from three big shapes: spiky white hair, a black band over the eyes and a high navy collar. Get those right and he's recognizable even with a very simple face.
Why does Gojo wear a blindfold?
In Jujutsu Kaisen his eyes are extremely powerful, so he covers them most of the time. For drawing, the band is handy because you don't have to draw the eyes at all.
What colors do I need for Gojo?
Navy blue and black do most of the work, with peach for skin and a little pink. Add a pale blue-gray for hair shadows and a gold or yellow for the collar button.
How do I draw Gojo without the blindfold?
Swap the band for small round sunglasses or draw his eyes open. He has bright blue eyes, so color them a light sky blue with a white shine dot in each one.
Get those white spikes standing tall, give him a little wave, and your Gojo is ready to say hi from the page. 🕶️
Related posts:
 How to Draw Ariana Grande Step by Step (Cute Chibi Fan Art)
 How to Draw the Fortnite Llama Step by Step (Easy Fan Art)
 How to Draw a Care Bear Step by Step (Cute Fan Art for Kids)
 How to Draw Wonder Woman Step by Step (Chibi for Kids)
 How to Draw the Hulk Step by Step (Easy Chibi for Kids)
 How to Draw Iron Man Step by Step (Easy Chibi for Kids)
 How to Draw Cat Noir Step by Step (Easy Chibi Hero)
 How to Draw Goku Step by Step (Easy Chibi Version)
 How to Draw Freddy Krueger Step by Step (Cute Chibi Version)
 How to Draw Master Chief Step by Step (Easy Chibi Armor)
 How to Draw the Joker Step by Step (Easy Chibi for Beginners)
 How to Draw a Chibi Step by Step (Easy 2-Head Method)

