
Kids who love the show usually ask for Bluey first, and luckily she's mostly ovals, two tall ears and a lot of blue. Here I'll show you how to draw Bluey step by step, from two light ovals to a cheerful blue heeler puppy waving hello. This is my own simple fan-art version for practice, not official art from the show.
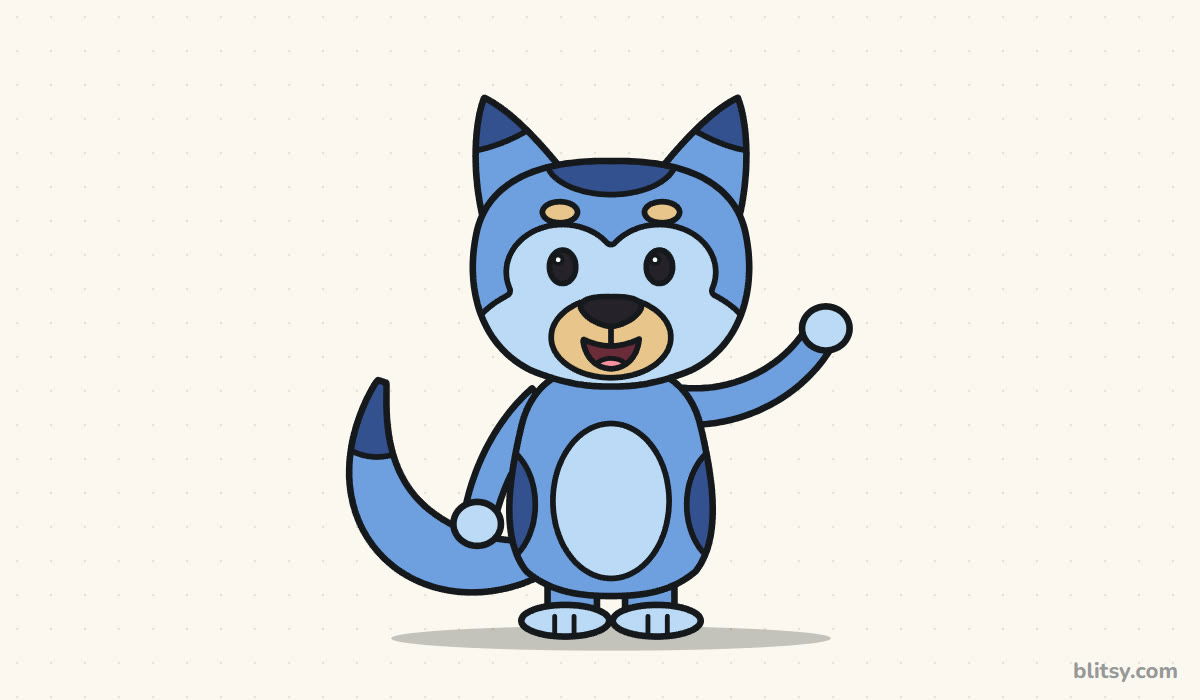
Bluey herself is blue, so mind the step pictures: there, blue means the lines you add now and gray means earlier work. Copy the blue, compare, carry on.
Quick overview
⏱️ Time: about 30 to 35 minutes with coloring
🎯 Level: easy, fine for kids from about 6 up
✏️ Steps: 12
🐶 You'll draw: a standing blue heeler puppy waving one paw
Bluey Drawing Supplies From Your Pencil Case
- A pencil you can press lightly (HB works well)
- A soft eraser
- A black marker or fineliner for the final outline
- Colored pencils or crayons in mid blue, dark blue, light blue and tan
- Black for the nose and eyes, pink for the tongue
- A sheet of plain white paper
Only one blue? Press hard for the dark patches and softly for the light ones.
How to Draw Bluey Step by Step
Step 1: Sketch a head oval and a body oval
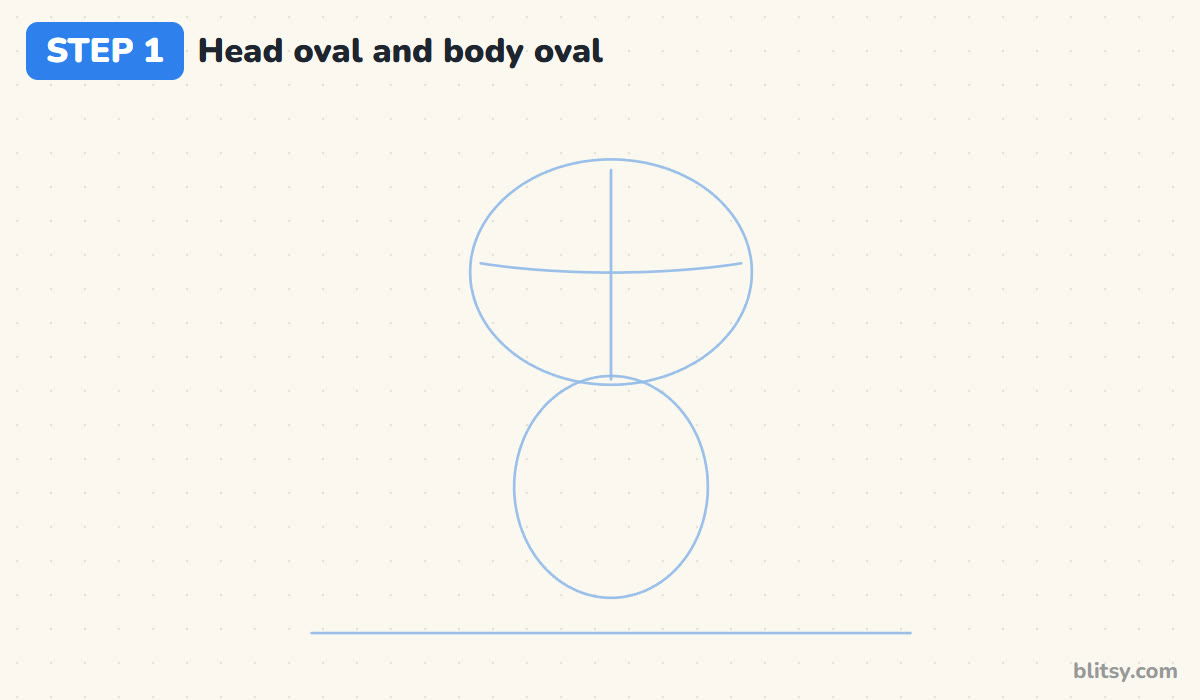
Draw a light ground line near the bottom of the paper. Above the middle of the page, sketch a wide oval for the head. Under it, touching it, add a taller oval for the body that ends a little above the ground line. Then draw a line down the middle of the head and a gentle curve across it, slightly below halfway, where the eyes will go.
💡 Tip: Keep these guide lines so faint you can hardly see them, because every one gets erased later.
Step 2: Add guides for the ears, arms, legs and tail
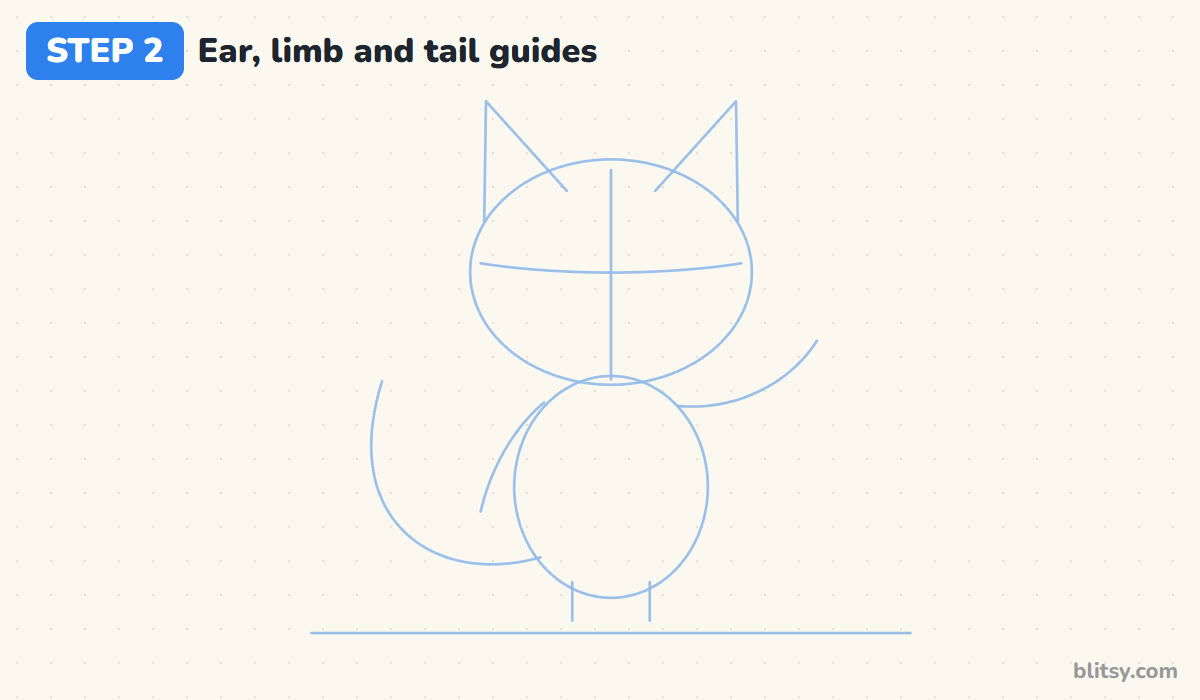
From the top of the head, draw two tall pointed shapes that lean slightly outward. Add the limbs as simple lines: one arm hanging down on the left, one curving up and out on the right as if she's waving. Two short lines under the body mark the legs. Last, sweep one long curve out from the lower left of the body and up for the tail.
💡 Tip: Make the waving arm line reach well past the head so the hand won't bump into her cheek.
Step 3: Draw the wide head and two pointy ears

Go around the head oval with a firm line, letting the cheeks bulge out a little and the top stay fairly flat. A heeler's face is broad, so don't pinch it in. Then trace the ears over their guides with softly rounded tips. Stop each ear where it meets the head.
💡 Tip: Check that both ear tips sit at the same height before you go on. Lopsided ears are the first thing people notice.


Step 4: Mark the dark ear tips and the head cap
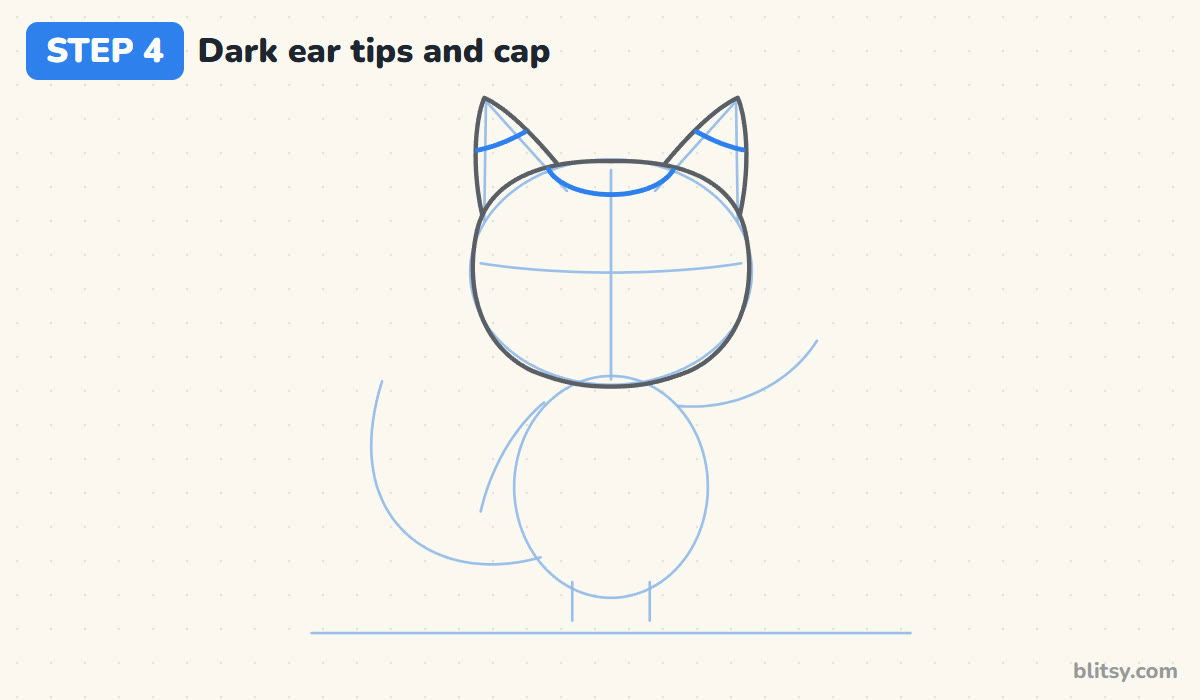
Near the top of each ear, draw a curved line across it. The part above that line will be dark blue. On top of the head, between the ears, draw a shallow curve for a dark patch, almost like a little cap. These markings are why she looks like a heeler and not just any blue dog.
💡 Tip: Curve the ear tip lines upward a touch. Curves look like fur markings.
Step 5: Draw the light face patch and the eyes
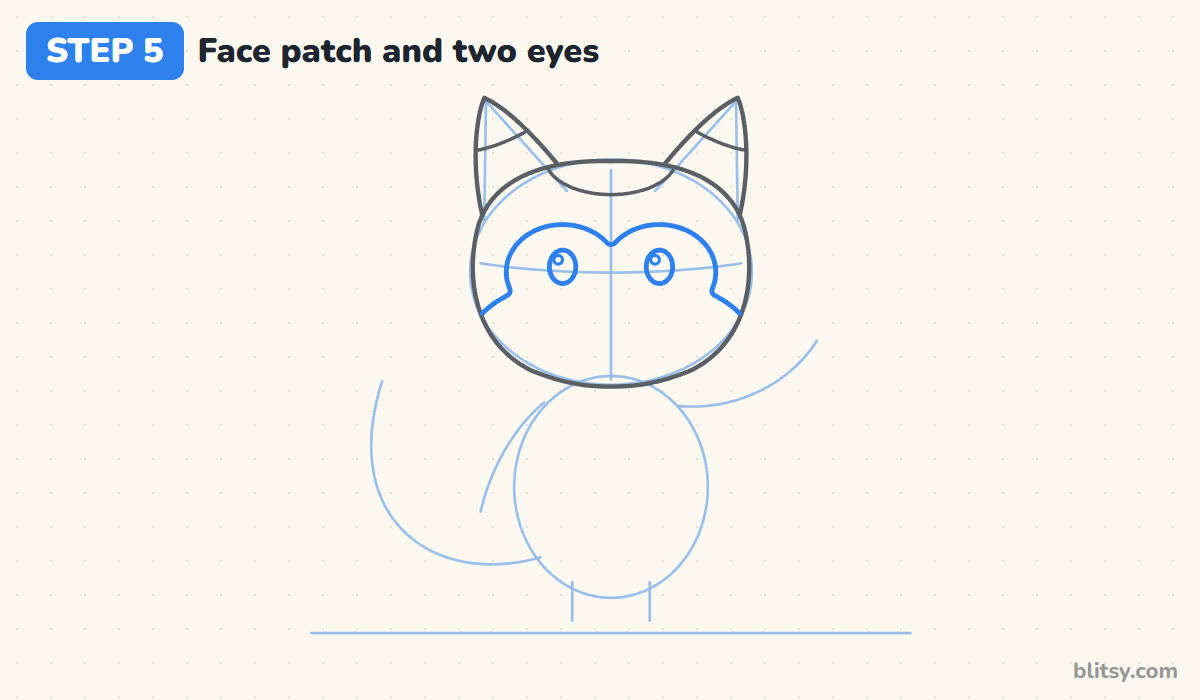
The light face patch starts at the left cheek, rises in a round bump over the left eye, dips at the middle, rises over the right eye and runs down to the other cheek, like a soft letter M. Inside each bump, right on the guide curve, draw an oval eye with a tiny circle for the shine.
💡 Tip: Put both shine circles in the same top corner of the eyes. If they point different ways, she looks cross-eyed.
Step 6: Add brow spots, the muzzle and the smile
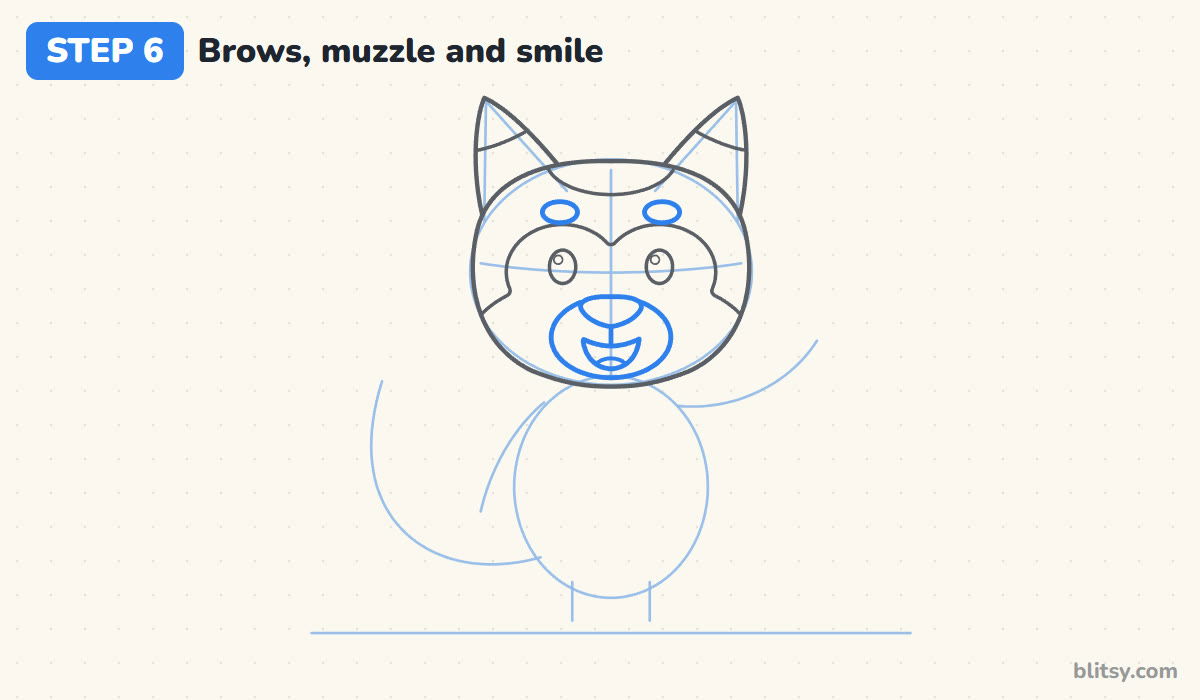
Above each eye, outside the face patch, draw a small flat oval for an eyebrow spot. Low in the face, draw a wide round muzzle. At its top goes a big nose shaped like a rounded upside-down triangle. A short line drops from the nose to a small open smile, and a little curve inside makes the tongue.
💡 Tip: I make the nose bigger than feels right at first. A tiny nose turns the face into a teddy bear.
Step 7: Draw the body with its tummy and patches
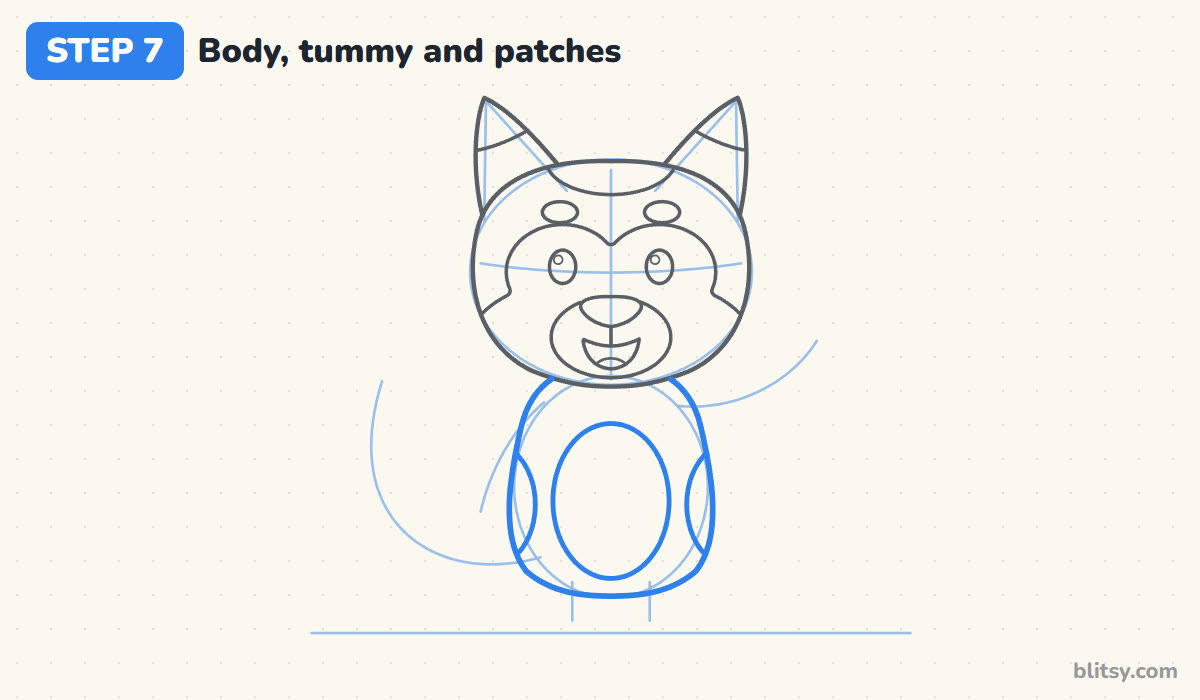
Shape the body like a pear: narrow under the head, rounder toward the bottom. Inside it, draw a tall oval for the light tummy. Near each hip, add a curved line that cuts off a crescent along the edge. Those crescents get dark blue later and stand in for her back patches in this front view.
💡 Tip: Leave a clear gap between the tummy oval and the side patches so each one gets its own color.


Step 8: Add soft arms and mitten paws
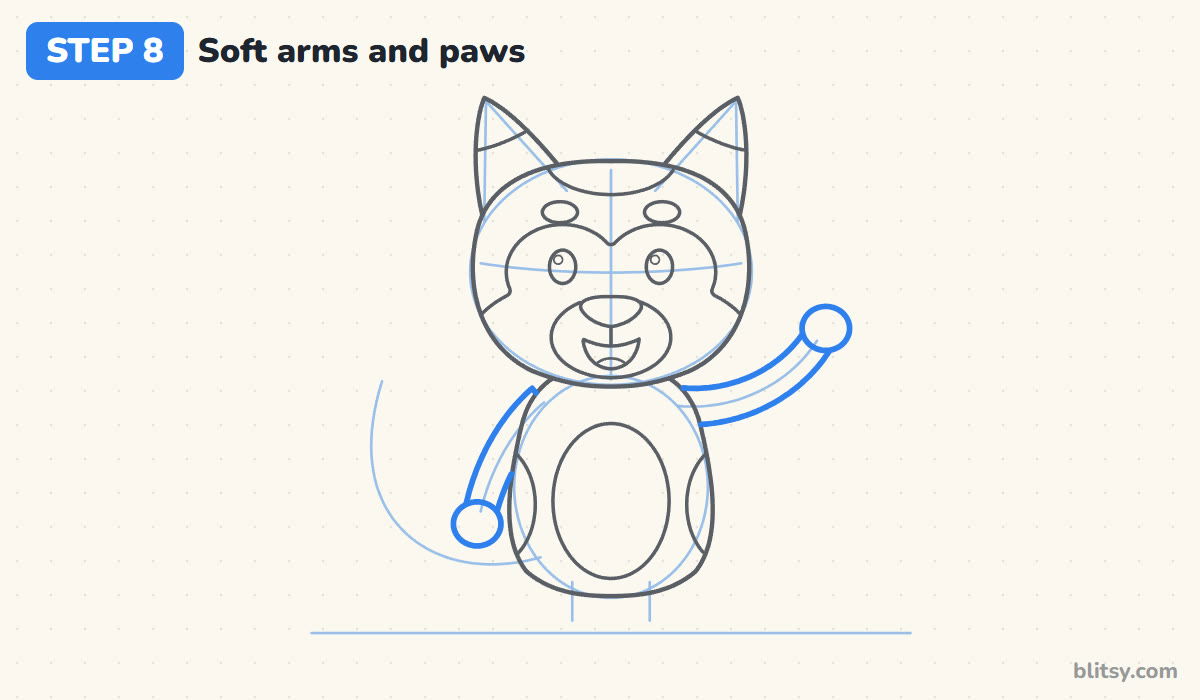
Each arm is a soft tube with two lines about a finger width apart, not a single stick. The left arm comes out from behind the body and hangs at the side. The right arm curves up from the shoulder in a friendly wave. Finish both with a round mitten paw a little wider than the arm.
💡 Tip: Start each arm where it peeks out from the body. That way you never draw a line across the tummy by accident.
Step 9: Draw short legs and big feet
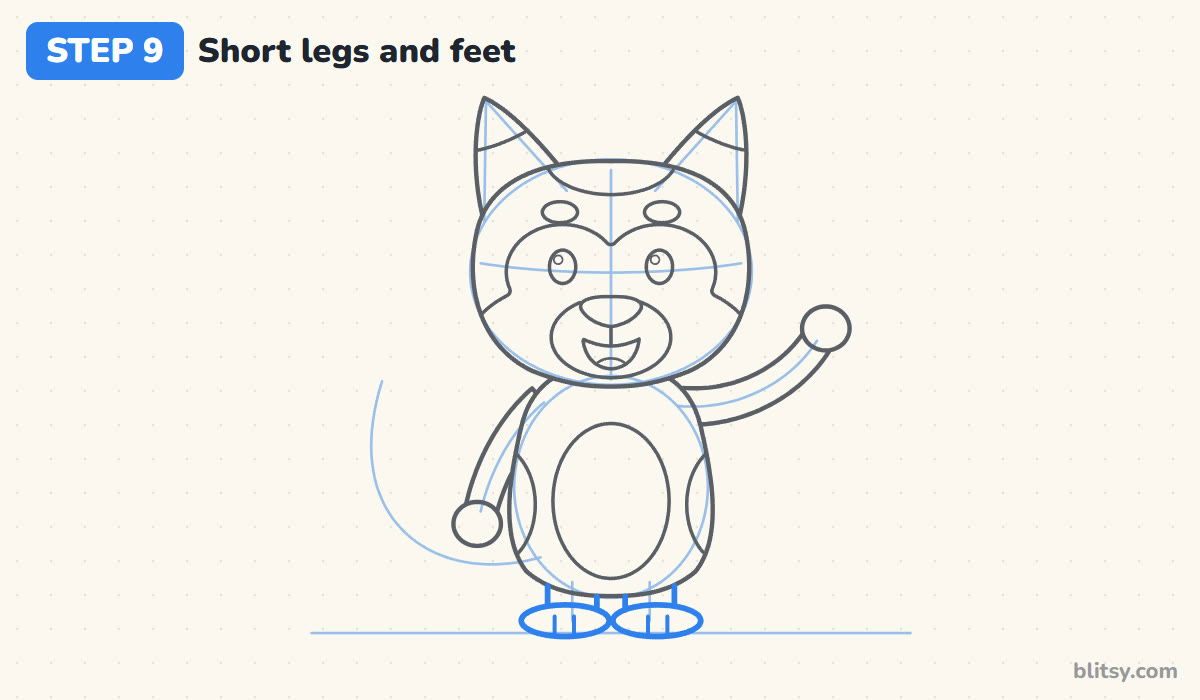
Under the body, draw two short, chunky legs, then a flat oval foot at the bottom of each one, resting on the ground line. Two little lines on each foot show the toes. Short legs and big feet give her the cartoon puppy look.
💡 Tip: Let the feet overlap the ground line slightly so she stands firmly instead of floating.
Step 10: Draw the big curvy tail
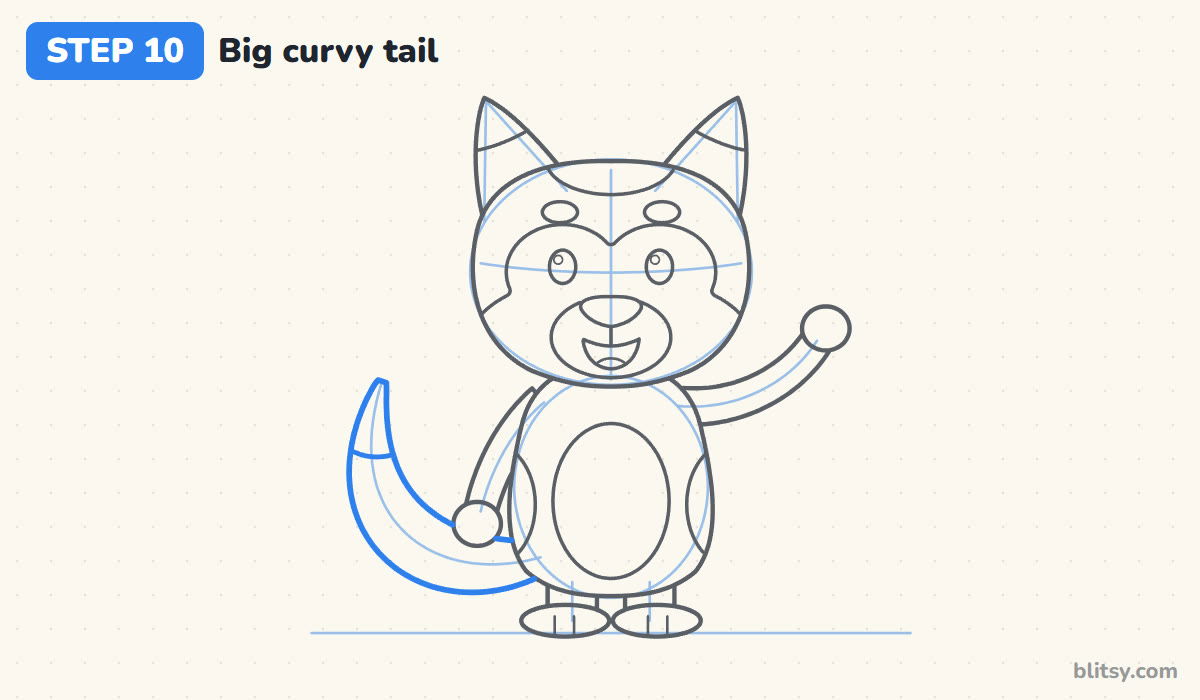
Follow the tail guide with two lines that start behind the lower left of the body. Let them spread far apart in the middle so the tail looks thick and fluffy, then close in to a soft point at the top. A curved line across the top part marks the dark tip. The paw hides a small piece, so skip that bit.
💡 Tip: Make the tail wider than the arm at its thickest point. A thin tail makes her look like a cat.
Step 11: Ink the outline and erase the guides
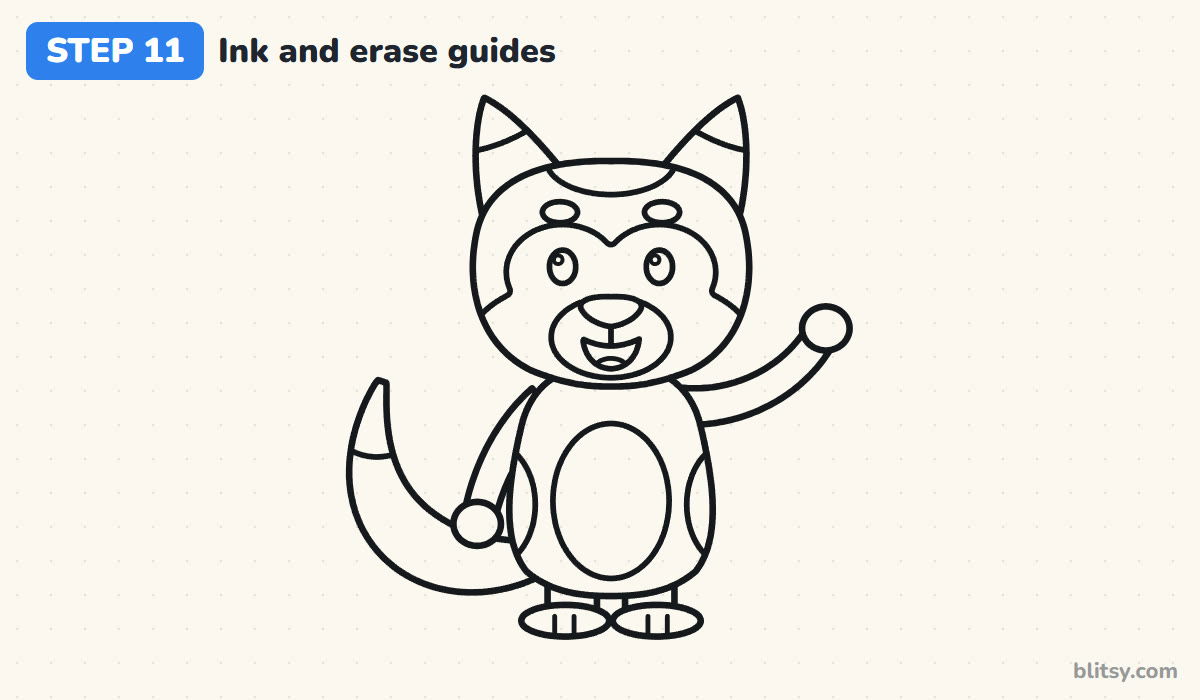
Trace every keeper line with the black marker. I start with the face while my hand is steadiest and work down to the feet and tail. Skip the ovals and the guide lines. Once the ink is dry, erase the pencil until only the clean outline is left.
💡 Tip: Turn the paper as you ink round curves like the tail, so your hand always pulls the marker toward you.


Step 12: Color your Bluey
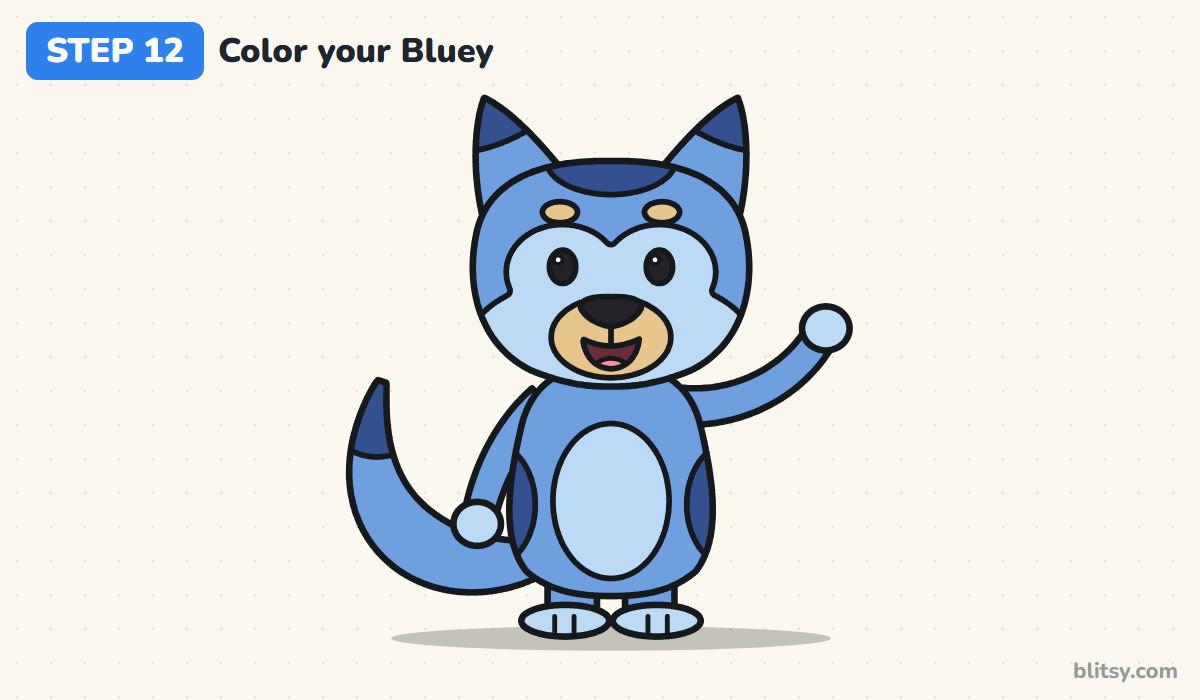
Mid blue goes on the head and ears, the body and limbs, and the tail. Dark blue covers the ear tips, the cap, the side patches and the tail tip. Light blue fills the face patch, the tummy and the paws and feet. The muzzle and brow spots are tan, the nose and eyes black, the tongue pink, and the eye shines stay white.
💡 Tip: Color the big mid-blue areas first, then the smaller patches on top, so the dark blue stays crisp.
Bluey Drawing Slip-Ups and Quick Fixes
- Ears that are too short. Short round ears make a bear. Bluey's ears should be almost as tall as half her head.
- A thin, stringy tail. Give the tail real width in the middle, and finish it with a dark tip.
- Forgetting the face patch. Without the lighter M-shaped patch around the eyes, the face looks flat. Draw it before the muzzle.
- Stick arms. One-line arms look stiff. Use two lines and a round paw so they look soft and puppy-like.
- A small nose. A big dark nose at the top of the muzzle tells everyone this is a dog.
Ideas for Your Own Heeler Family
Once Bluey feels easy, try orange and tan instead of blue for a whole new pup. You can change the pose too: both arms up for a jump, or a ball in the waving paw. Younger kids can skip the side patches and the brow spots and the drawing still reads clearly. For a puppy drawn with floppy ears instead, try this how to draw a puppy step by step lesson. A real dog standing in side view is the next challenge in the dog drawing tutorial, and if your kids love cartoon families, the Peppa Pig drawing step by step guide uses the same simple shapes.
Free Bluey Coloring Page and Printable Step Guide
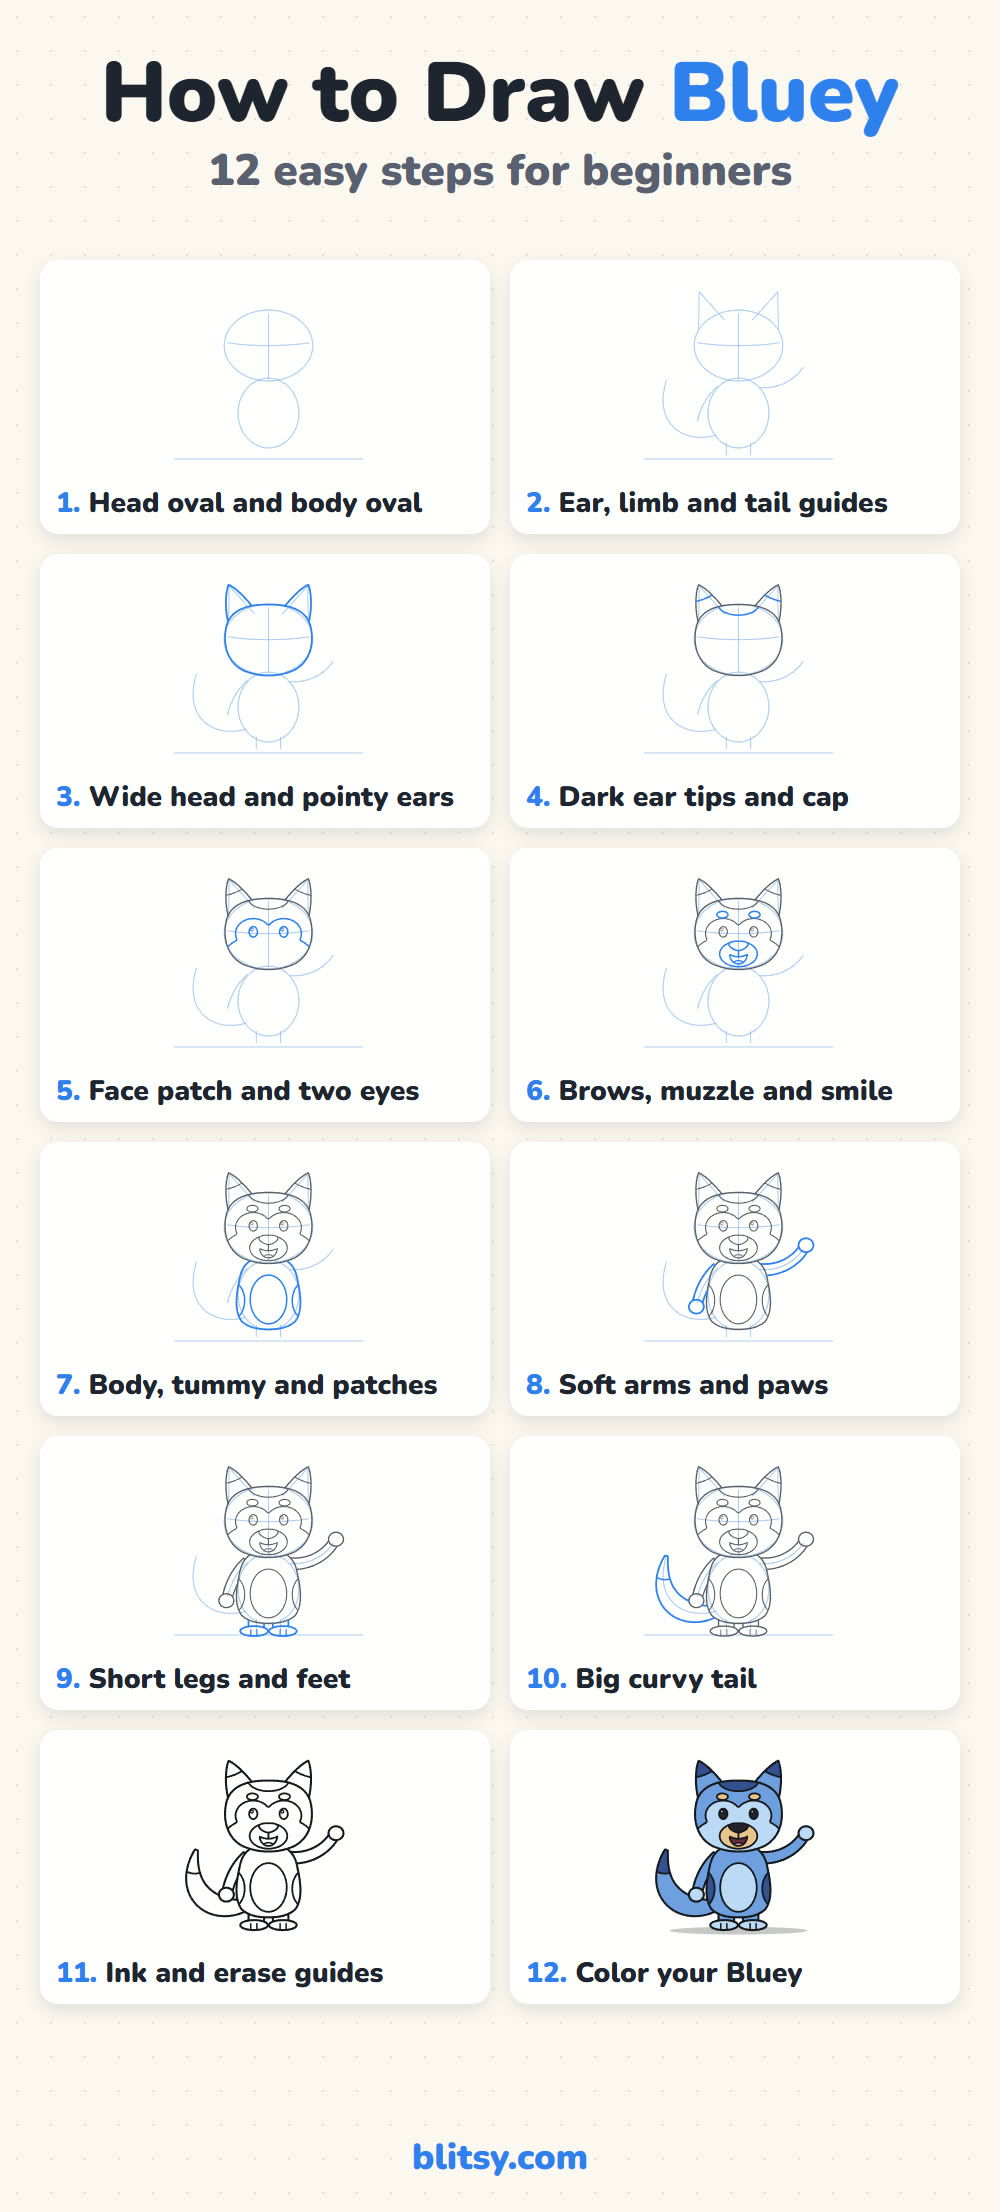
The free Bluey coloring page has a colored example and a color key at the top, with a big clean outline below. The step-by-step PDF guide holds all 12 steps with pictures and tips for drawing away from a screen. Both print on Letter or A4 paper.
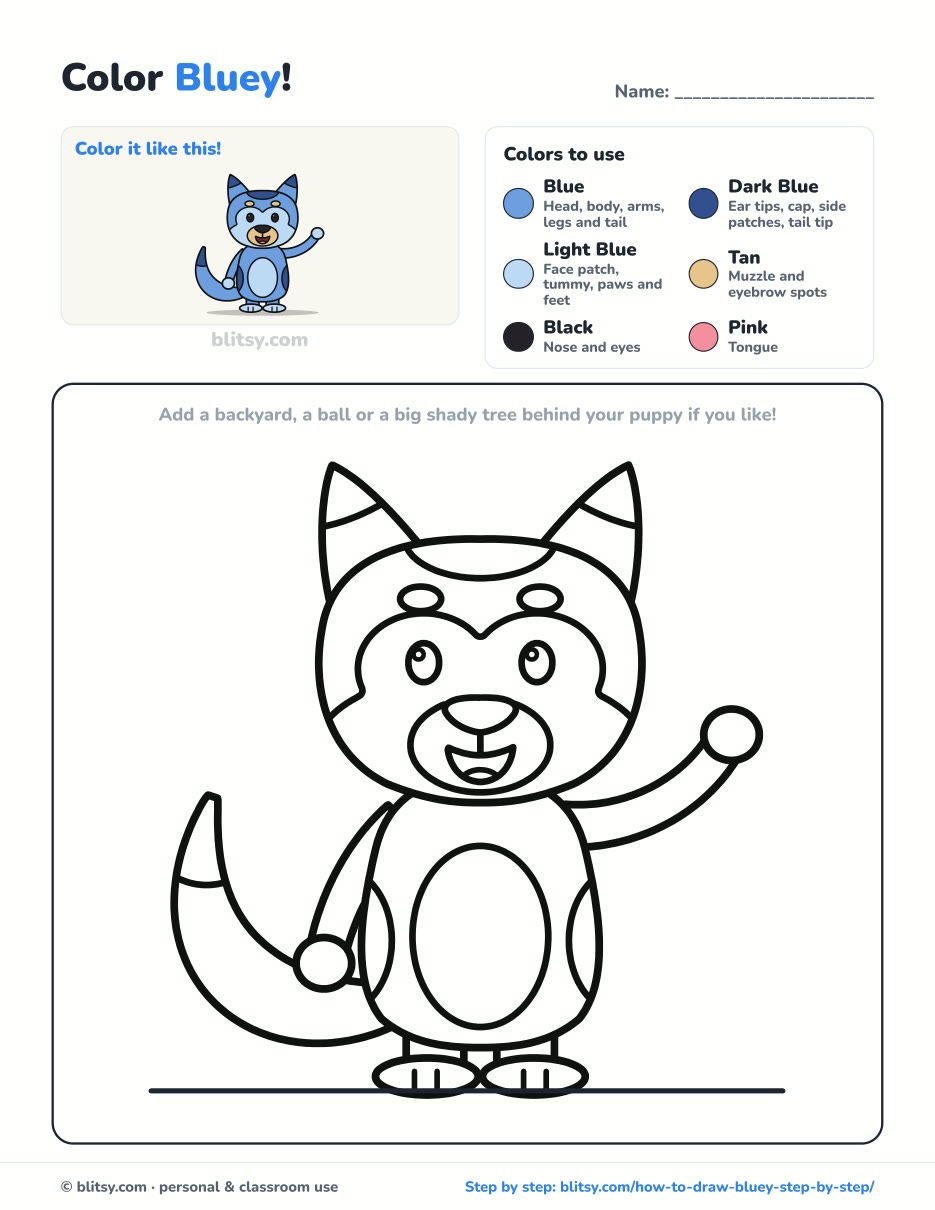
Black outlines with a colored example and the color names at the top. Ready to print and color.
⬇️ Download Coloring PageEvery step picture with its instructions and tips, to keep beside your paper while you draw.
⬇️ Download Drawing Guide📱 On a phone? Tap a download button, then open the file and choose Share → Save to Files or Print. On a computer, the PDF opens or saves straight to your Downloads folder.
Keep the Blue Heeler Steps Handy
More Dogs and Cartoon Friends to Draw
Each of these is a full lesson like this one, with a picture for every step and a free coloring page.
- Puppy Drawing: A sitting puppy with floppy ears, a patch over one eye and a pink tongue in this how to draw a puppy step by step lesson.
- Dog Drawing: Draw a friendly beagle-style dog standing in side view with this dog drawing tutorial.
- Peppa Pig Drawing: Peppa in her red dress, standing in a muddy puddle, in this Peppa Pig drawing step by step guide.
- French Bulldog Drawing: A sitting Frenchie with big bat ears and a red bow tie in this French bulldog drawing tutorial.
- Paw Print Drawing: A dog paw print and a cat paw print side by side in this how to draw a paw print lesson.
Bluey Drawing Questions From Young Fans
What is the easiest way to draw Bluey?
Start with a wide oval for the head and a taller oval for the body. Add two tall pointy ears, a light face patch around the eyes and a round muzzle, then the limbs and a thick tail.
What colors do I need to draw Bluey?
Three blues (mid, dark and light), tan for the muzzle and brow spots, black for the nose and eyes, and pink for the tongue.
Is this Bluey drawing good for young kids?
Yes. Kids from about 6 can follow the steps. Very young artists can leave out the side patches, the cap and the brow spots and still get a happy blue puppy.
How long does it take to draw Bluey?
About 15 minutes for pencil and ink, plus 15 to 20 for coloring.
Grab a blue pencil, give her those tall ears and a big swishy tail, and see whose Bluey waves the friendliest. 🐶✏️
Related posts:
 How to Draw a Care Bear Step by Step (Cute Fan Art for Kids)
 How to Draw the Fortnite Llama Step by Step (Easy Fan Art)
 How to Draw Ariana Grande Step by Step (Cute Chibi Fan Art)
 How to Draw Gojo Step by Step (Easy Chibi Fan Art)
 How to Do Chalk Art Step by Step (Hopscotch and Rainbow)
 How to Draw Wonder Woman Step by Step (Chibi for Kids)
 How to Draw Iron Man Step by Step (Easy Chibi for Kids)
 How to Draw a Police Car Step by Step (Easy for Kids)
 How to Draw a Valentine Step by Step (Easy Card Set for Kids)
 How to Draw a Bat Step by Step (Cute Cartoon Bat for Kids)
 How to Draw a Rainbow Step by Step (Easy for Kids and Beginners)
 How to Draw a Ninja Step by Step (Easy Chibi Ninja for Kids)

