
Nobody can tell you your alien looks wrong, because nobody has ever met one. That freedom makes aliens a great first character for kids. In this lesson I'll show you how to draw an alien step by step, starting with two plain ovals and finishing with a cheerful green visitor with three big eyes and one hand up to say hi. He's my own original design, and a little ringed planet and some stars keep him company.
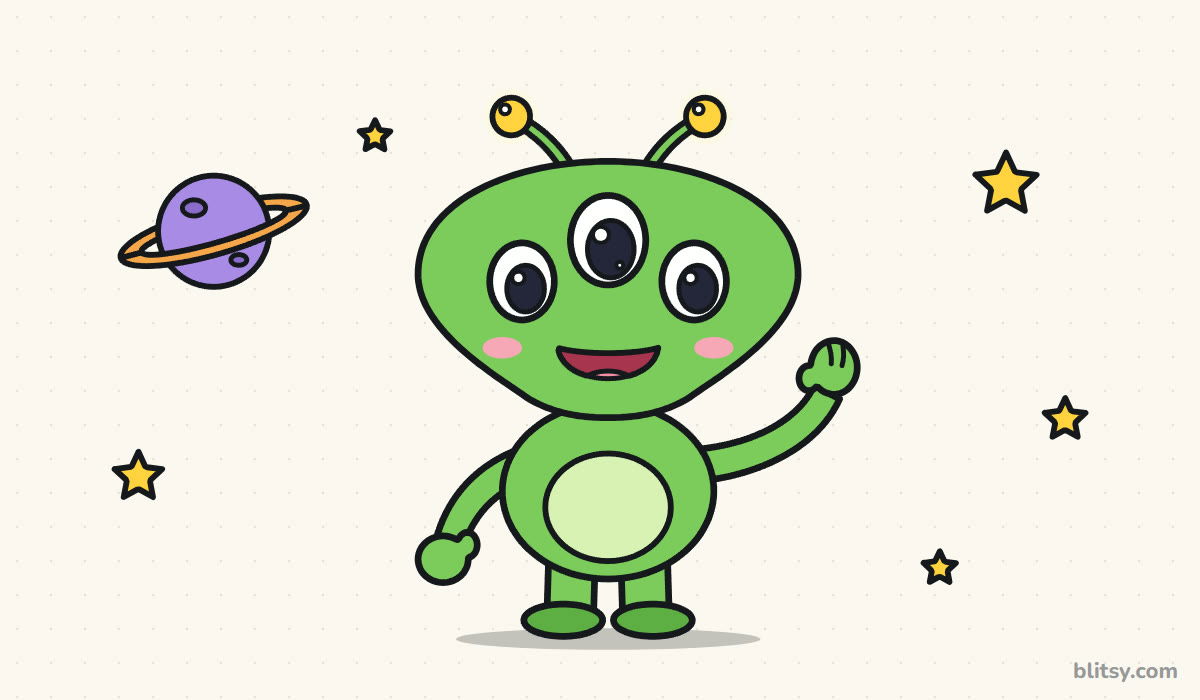
Look for the blue lines: they're the only new ones in each picture, while gray shows your earlier work. Copy the blue, check yours, then carry on.
Quick overview
⏱️ Time: about 30 minutes, coloring included
🎯 Level: easy, fine for kids around 6 and up
✏️ Steps: 12
👽 You'll draw: a friendly three-eyed alien with a planet and stars
Launch Kit for a Friendly Alien
- A pencil for light sketching (HB works well)
- An eraser that doesn't smudge
- A black marker or fineliner for the final outline
- Colored pencils, crayons or markers in green, light green, yellow, pink, purple and orange
- Plain white paper, turned sideways
Sideways paper gives the planet and the stars enough room on both sides of your alien.
How to Draw an Alien Step by Step
Step 1: Sketch the head and body guides
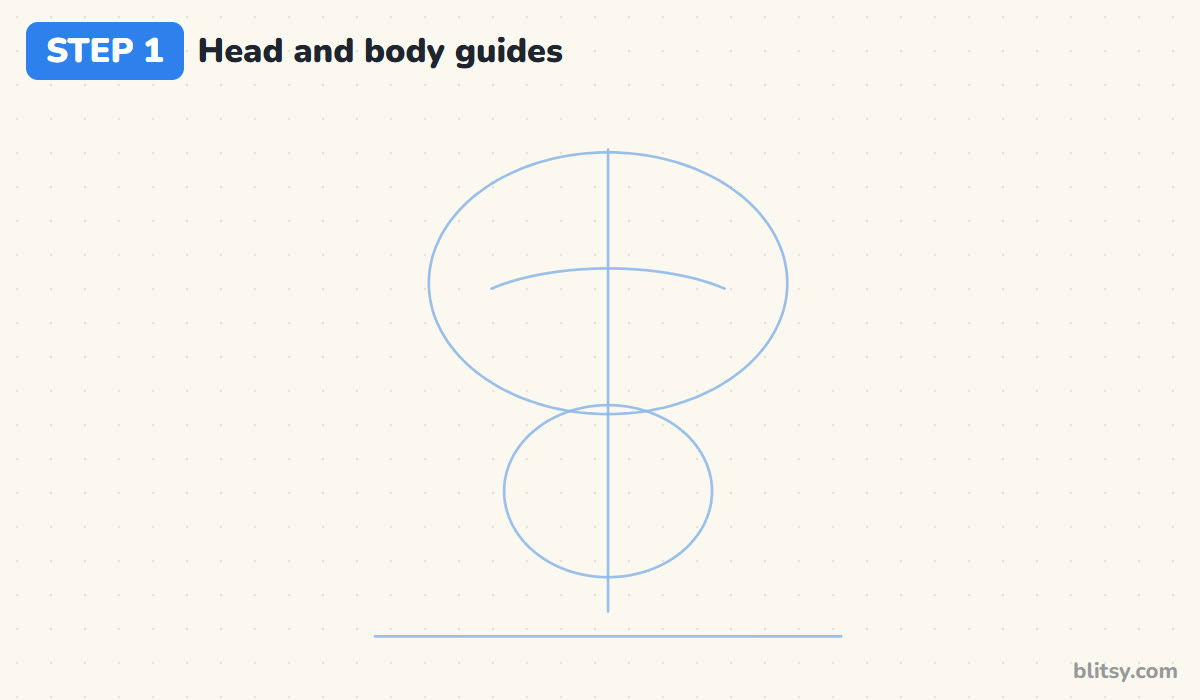
Draw a light ground line near the bottom of the page. Above it, sketch a wide oval for the head, then a smaller oval below it for the body, overlapping the head a little. Add a straight line down the middle and a soft curve across the head, just above its center. The eyes will sit on that curve.
💡 Tip: Make the head oval clearly bigger than the body. A big head is what makes a cartoon alien look cute and young.
Step 2: Add guide lines for the limbs and antennae
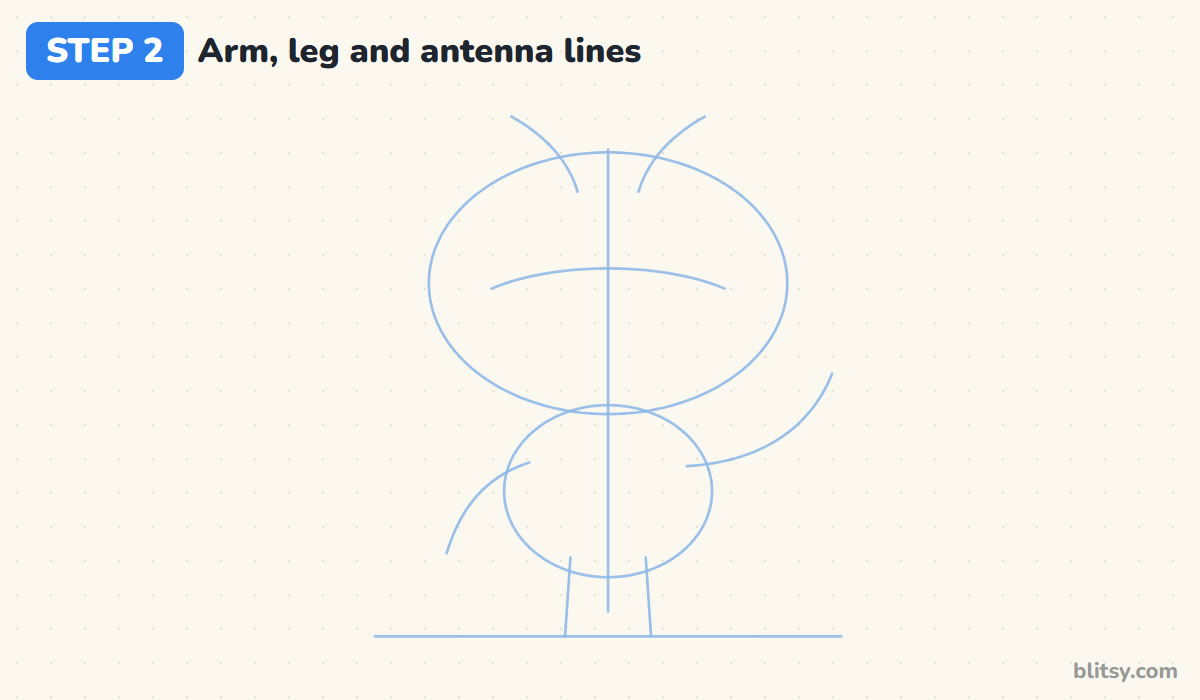
Two short curves rise from the top of the head and lean outward. Those are the antennae. On the left, a curve drops down and away from the body for a relaxed arm. On the right, a longer curve sweeps up past the head for the waving arm. Finish with two short, straight lines from the body to the ground for the legs.
💡 Tip: Keep the leg lines short. Stubby legs suit a round little body much better than long ones.
Step 3: Draw a big bulb head
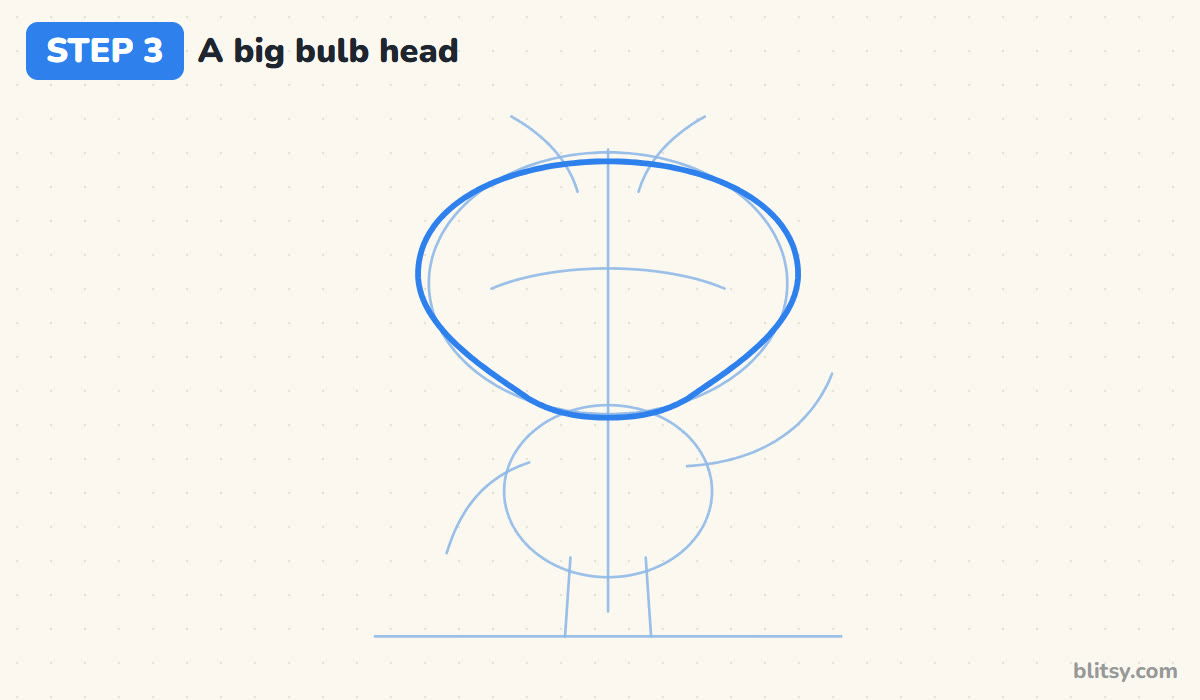
Now trace the head with a firmer line. Follow the guide around the wide top, then let the sides curve inward toward a narrower, rounded chin, a bit like an upside-down light bulb. That narrow chin is what makes the head read as alien.
💡 Tip: Turn your paper so your hand always pulls the pencil toward you. Curves come out smoother that way.




Step 4: Give him two antennae with round tips
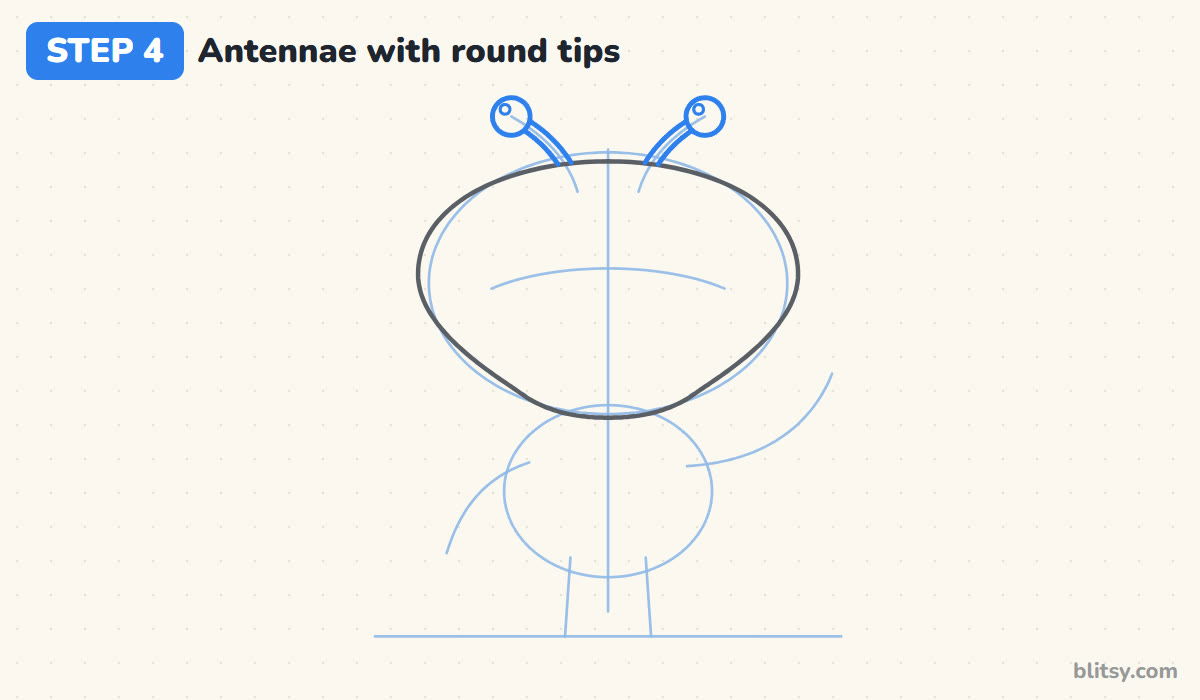
Follow each antenna guide with two thin lines close together, like a skinny tube growing out of the head. Stop where they touch the head outline. Put a circle on the end of each one and a tiny circle inside it near the top left. That small circle turns into a shine when you color, so the tips look like they glow.
💡 Tip: Draw both tips the same size. Uneven balls make the head look tilted.
Step 5: Draw three big eyes
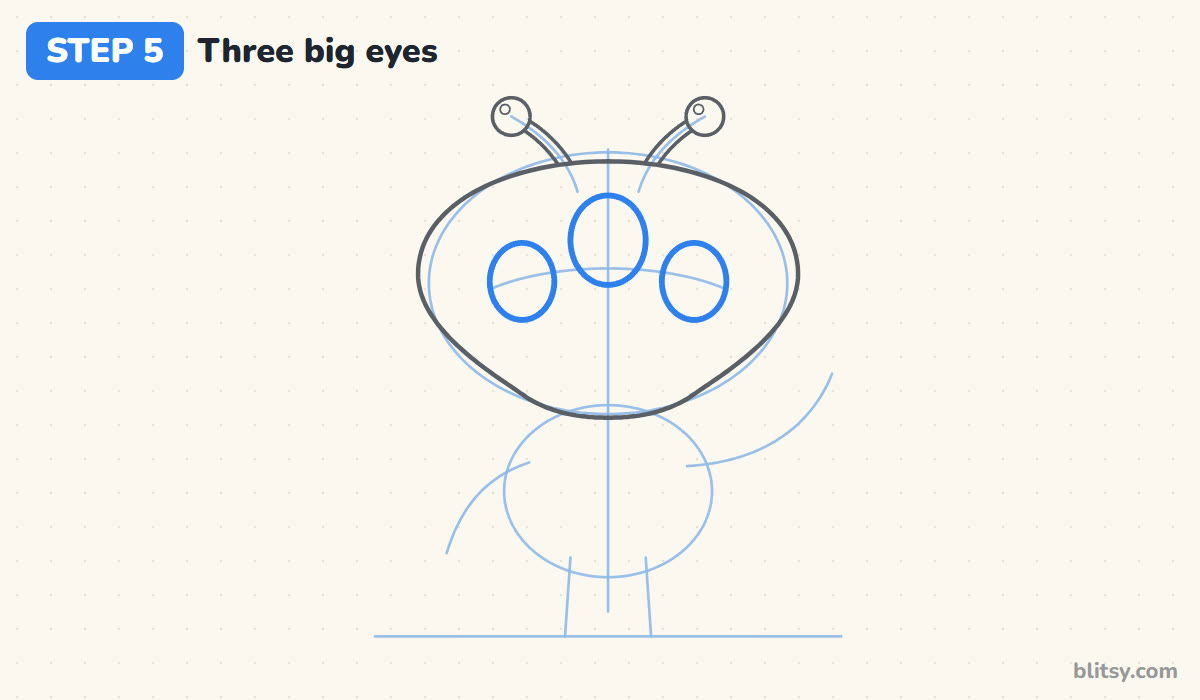
Place a tall oval right on the center line for the middle eye, sitting a little above the curve. Then add two slightly smaller ovals lower down, one on each side, resting on the curve. Leave a small gap between all three so they don't touch. If three eyes feel like too many, two big ovals work fine too.
💡 Tip: Draw the middle eye first. It's much easier to space the side eyes once it's in place.
Step 6: Add pupils, eye shine and a big smile
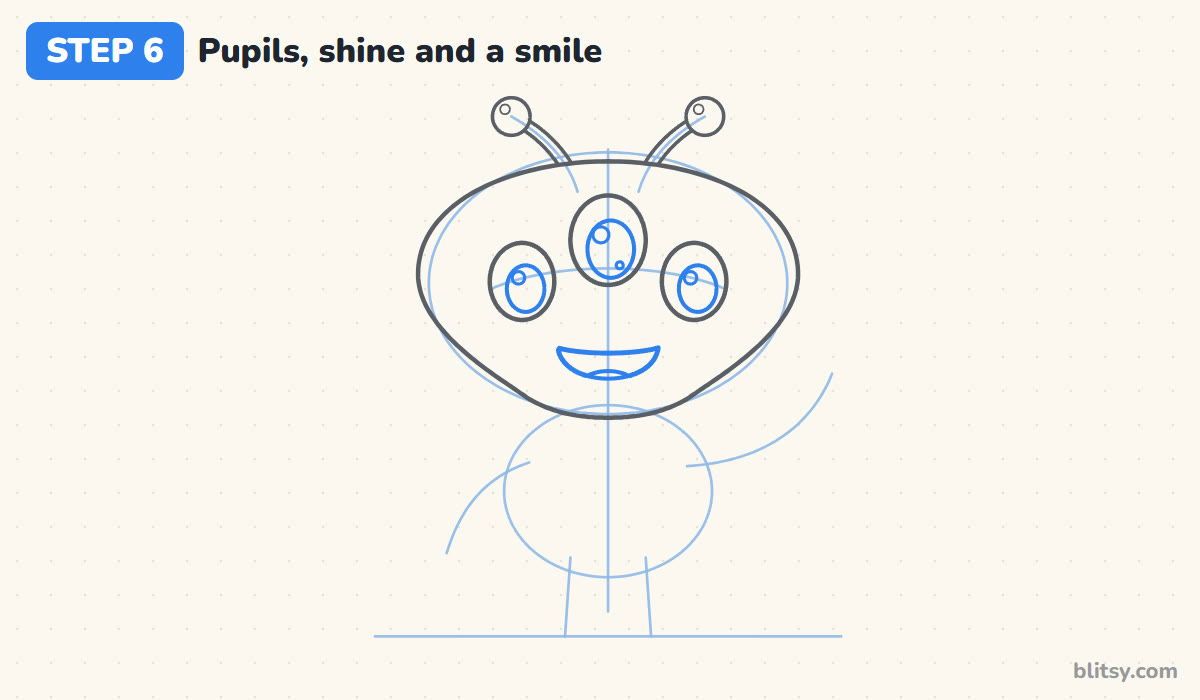
Inside each eye, draw a large oval pupil that fills most of it. Add a small shine circle in the top left of every pupil, plus a tiny dot lower in the middle one. Below the eyes, draw a wide smile: a gently curved top line and a deeper round line underneath. A small curve near the bottom of the mouth makes the tongue.
💡 Tip: Put every shine in the same corner. That's the trick that makes all three eyes look at you together.
Step 7: Outline the round body and belly
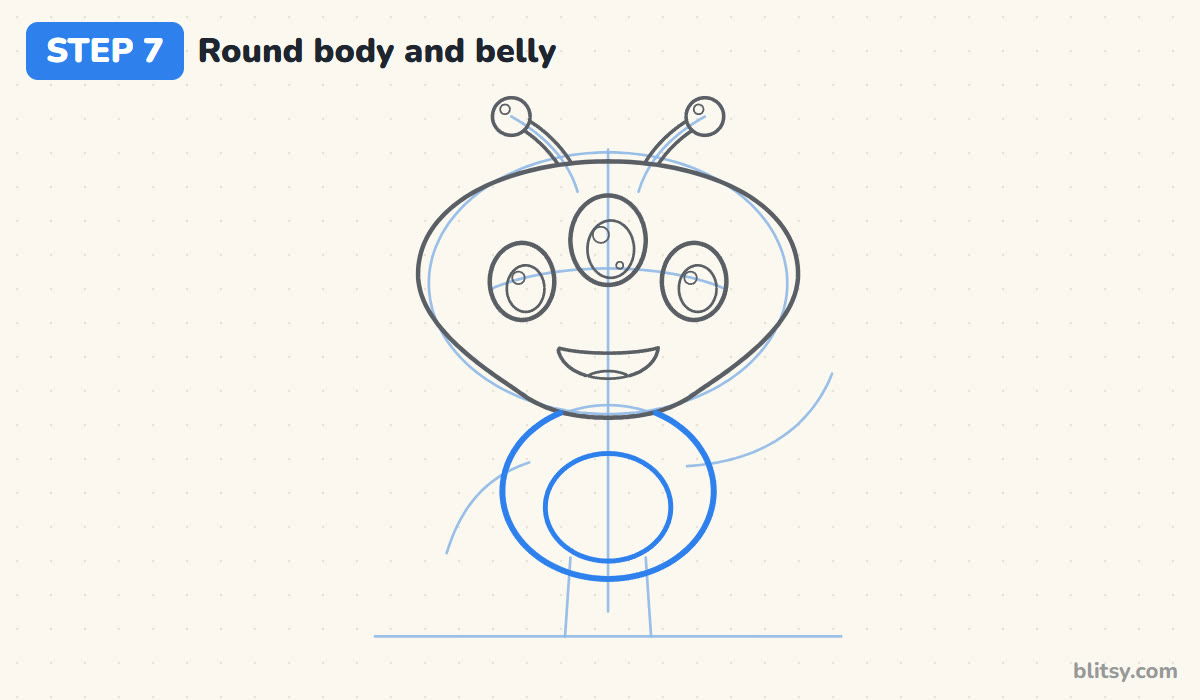
Go over the body oval with a firm line, starting where it peeks out under the chin. Stop at the head, since the head sits in front. Then draw a smaller oval inside, a little low, for the belly. It gets a lighter green later and makes the alien look soft.
💡 Tip: Leave a thick band of body around the belly. If the belly touches the edge, it looks like a hole.


Step 8: Draw waving arms with mitten hands
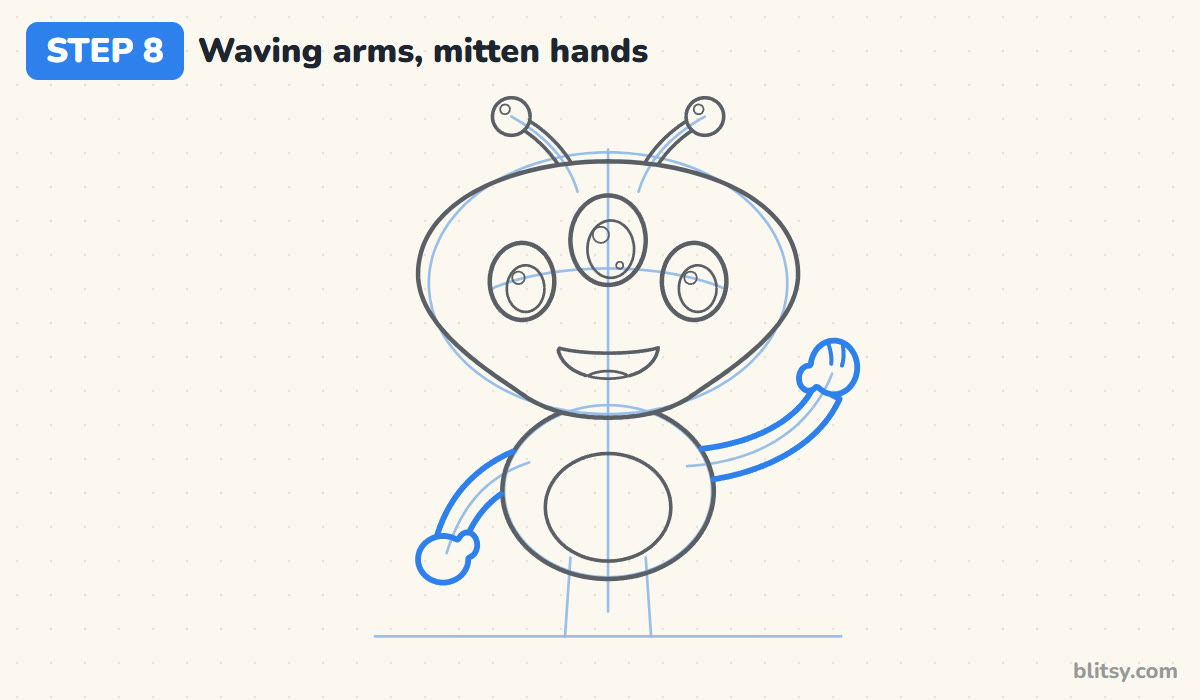
Follow each arm guide with two lines about a finger width apart, starting behind the body. The left arm ends in a round mitten hand with a small thumb bump pointing toward the body. The right arm bends up, and its hand is a taller mitten with a thumb on the side facing the head. Two little lines on that hand suggest fingers.
💡 Tip: Make the hands a touch wider than the arms. Hands that are too small make the wave hard to see.
Step 9: Add short legs and round feet
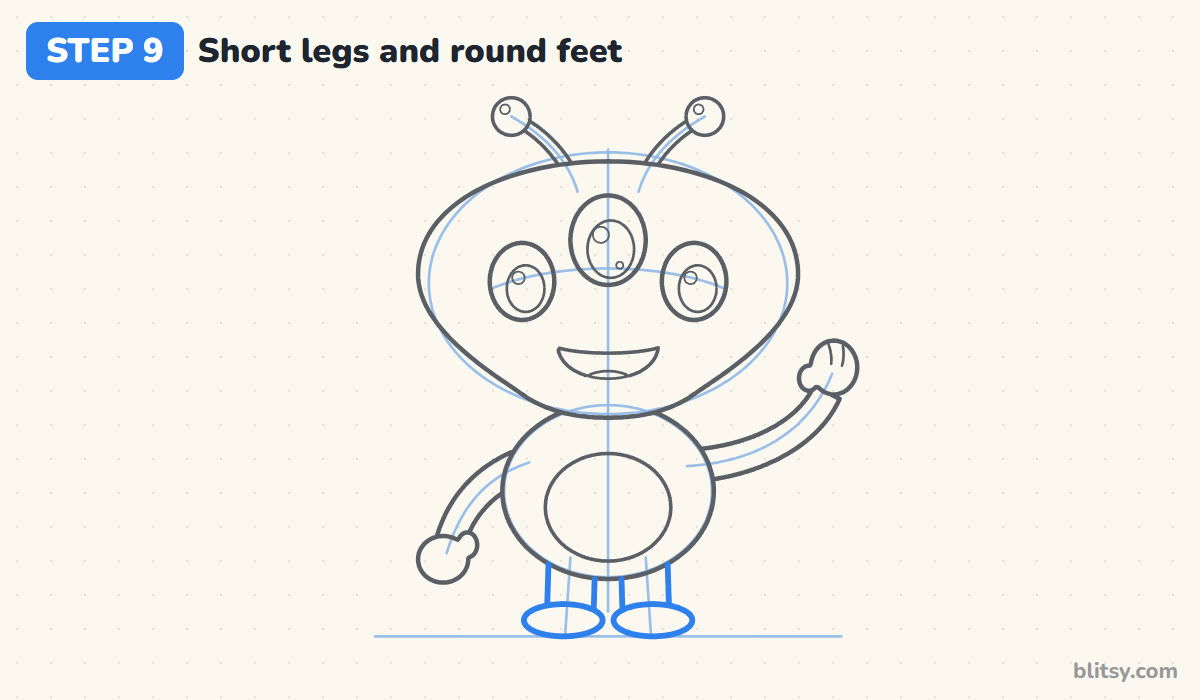
Under the body, draw two short legs as rounded tubes along the leg guides. At the bottom of each, add a flat oval foot sitting right on the ground line. The feet should be wider than the legs, which keeps your alien steady instead of tipping over.
💡 Tip: Let the feet nearly touch in the middle. A wide stance looks stiff on such a small character.
Step 10: Draw a ringed planet and some stars
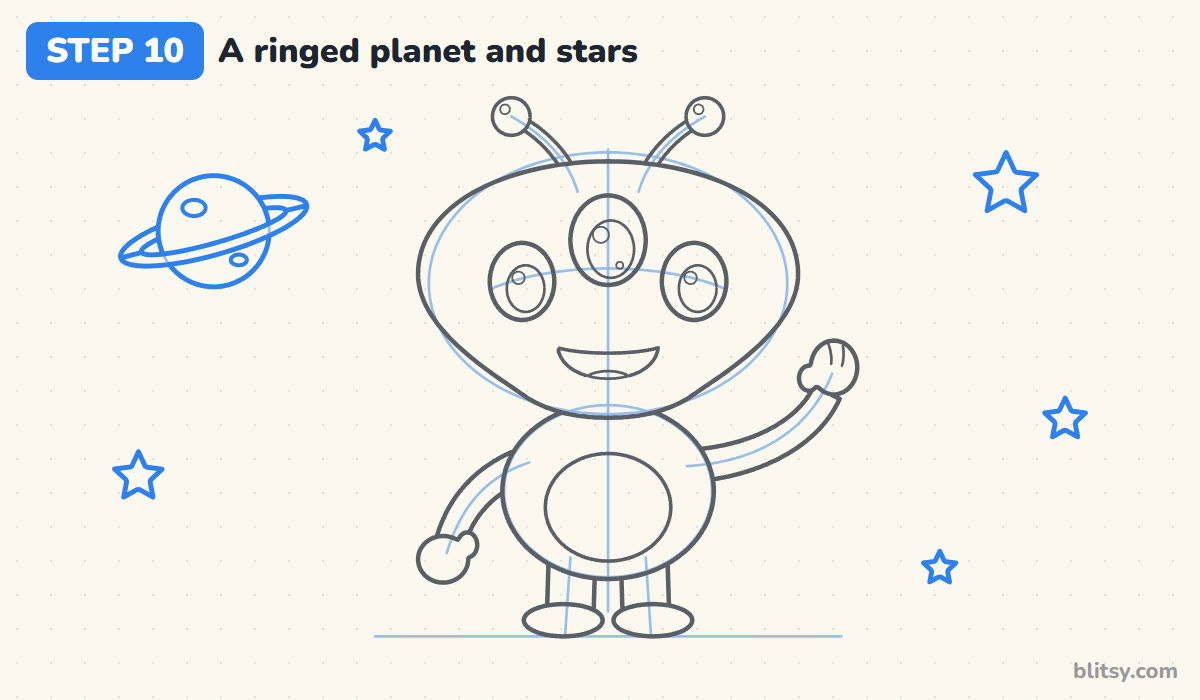
In the top left corner, sketch a circle for a planet. Wrap a long, thin, tilted band around its middle for the ring, leaving out the part hidden behind the planet. Add two small craters. Then scatter five stars of different sizes around the alien, away from his antennae and hands.
💡 Tip: Draw each star in one go: five points, never lifting the pencil. Then round the corners slightly.
Step 11: Ink the outline and erase the guides
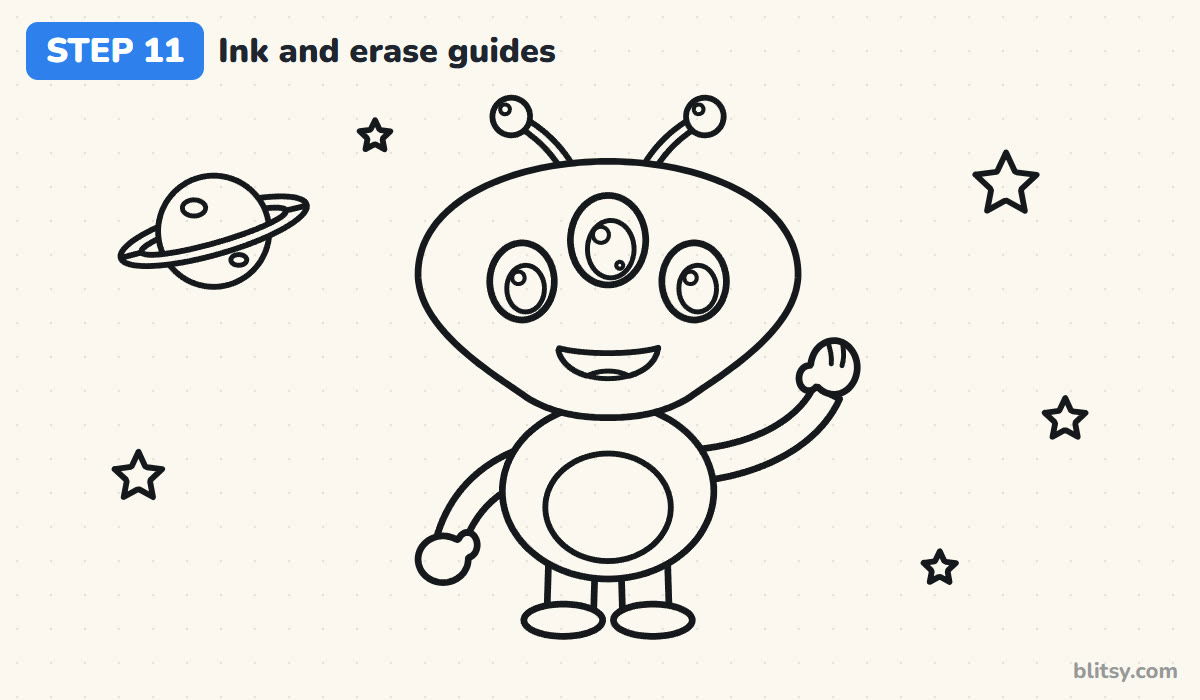
Trace every keeper line with the black marker. I do the face first while my hand is steady and the planet and stars last. Skip the guide ovals and the center line. Wait a minute for the ink to dry, then erase the pencil underneath.
💡 Tip: Go slowly around the eyes. Small circles show every wobble, so lift the pen and restart if you need to.




Step 12: Color your alien
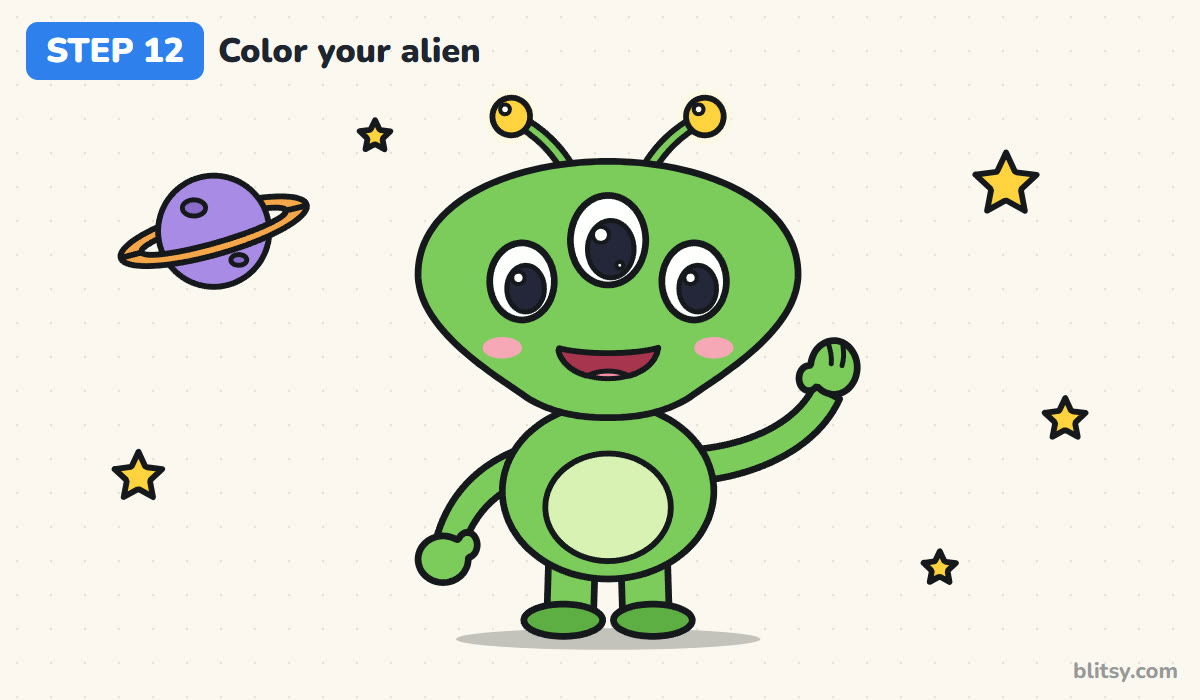
Green covers the head and stalks plus the body and limbs, with a darker green for the feet. The belly is light green and the antenna tips yellow. Fill the pupils black but keep the shine spots white. The mouth is dark pink with a lighter pink tongue, and two soft pink cheeks finish the face. Make the planet purple with an orange ring and the stars yellow.
💡 Tip: Press lightly for the pink cheeks. A soft blush looks cute, but a heavy one looks like a sunburn.
Alien Mix-Ups and How to Fix Them
- A head that's too small. With a tiny head, the alien looks like a green person. Make the head at least as wide as the body plus both arms together.
- Eyes squeezed together. When the three eyes touch, they turn into one blob. Leave a clear gap between each pair.
- Shine spots in different corners. The alien ends up looking cross-eyed. Pick one corner and use it in every eye.
- Stick arms. Single lines look stiff and unfinished. Give the arms some width and round mitten hands.
- Stars crowding the alien. Stars touching the antennae or hands make the picture busy. Keep them in the empty corners.
New Planets, New Alien Friends
Once your alien looks right, try changing one thing at a time. Swap the three eyes for two big almond eyes, give him one antenna or four, or color him purple with spots. Small kids can skip the planet and draw only the stars. Your alien needs a ride home, so park him in the dome of a flying saucer from the UFO drawing step by step lesson. You can also send a human visitor to meet him with the astronaut drawing tutorial, or give the scene a glowing night sky using this moon drawing step by step guide.
Free Alien Coloring Page and Printable Steps
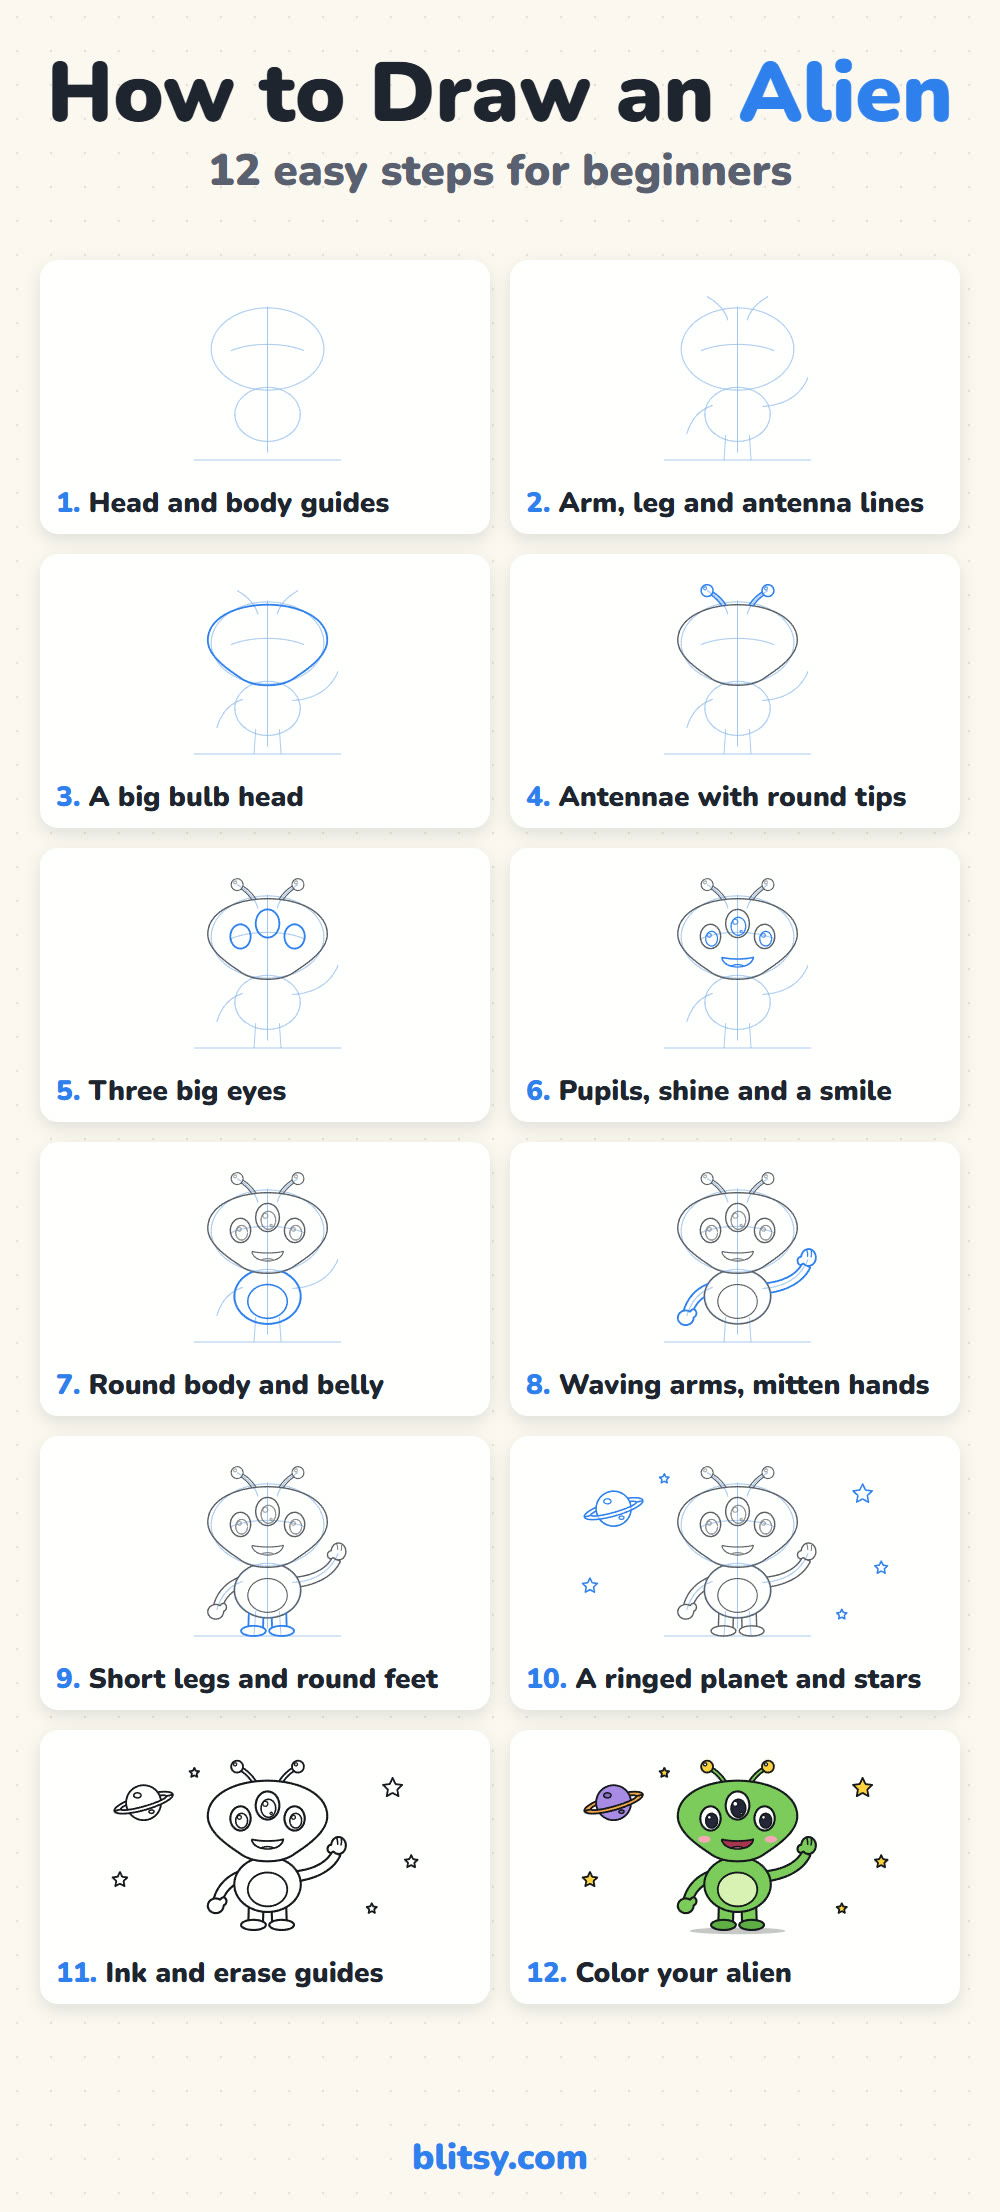
The free alien coloring page shows a colored alien at the top as an example, next to a key that says which color goes where. Below it is a big outline with space to add more planets. The step-by-step PDF guide has all 12 steps with pictures and tips. Both print on Letter or A4 paper.
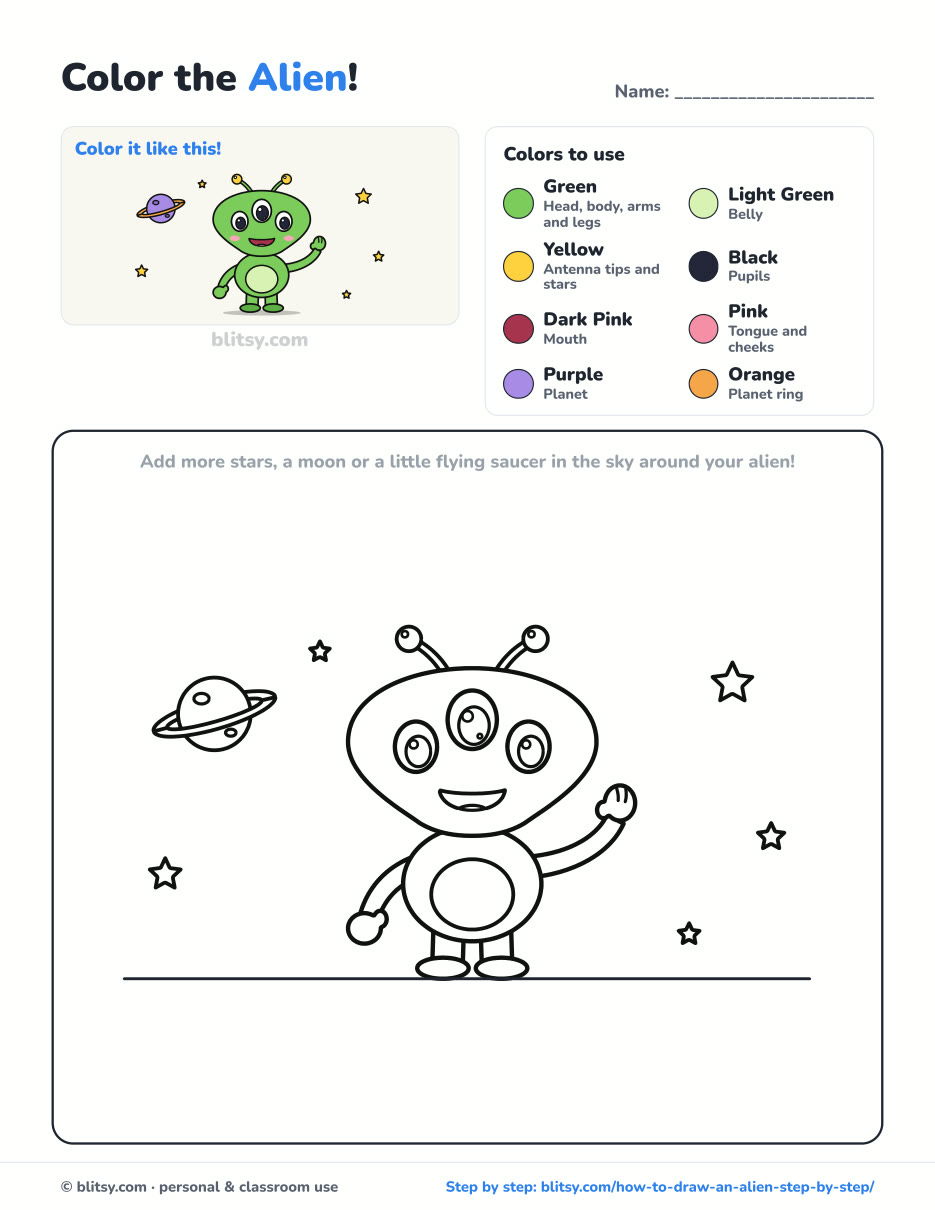
Black outlines with a colored example and the color names at the top. Ready to print and color.
⬇️ Download Coloring PageEvery step picture with its instructions and tips, to keep beside your paper while you draw.
⬇️ Download Drawing Guide📱 On a phone? Tap a download button, then open the file and choose Share → Save to Files or Print. On a computer, the PDF opens or saves straight to your Downloads folder.
Save the Alien Steps for Drawing Day
More Space Friends to Draw Next
Each of these is a full step-by-step tutorial with a picture for every stage, so you can build a whole space scene with the same shape-first method.
- UFO: A flying saucer with a glass dome and a beam of light, drawn from a simple oval in this UFO drawing step by step lesson.
- Rocket: Build a classic rocket with fins, a round window and a fiery tail in this rocket drawing tutorial.
- Astronaut: Draw a cute astronaut in a puffy suit and a round helmet with this astronaut drawing step by step guide.
- Monster: A cute, friendly monster built from soft shapes in this how to draw a monster step by step lesson.
- Moon: A glowing crescent moon for your night sky in this moon drawing tutorial.
Alien Drawing Questions from Young Artists
How do you draw a simple alien for kids?
Start with a big oval for the head and a small one for the body. Add big eyes, two antennae and a smile, then short arms and legs. Those few shapes already read as an alien.
How many eyes should an alien have?
Any number you like. Three eyes make it look clearly alien, two big almond eyes give the classic look, and one giant eye is fun too.
What color should I make my alien?
Green is the classic choice, with a lighter belly. Blue or purple aliens look great too. Just keep the eyes white so they stand out.
How long does it take to draw an alien?
About 30 minutes with coloring. The eyes take the most care, and the planet and stars are quick.
Somewhere out there your alien is waiting for a name, so finish the drawing and give him one. 👽✏️
Related posts:
 How to Draw a UFO Step by Step (Cute Alien Saucer)
 How to Draw a Tooth Step by Step (Cute and Easy for Kids)
 How to Draw Springtrap Step by Step (Cute Chibi for Kids)
 How to Draw a Care Bear Step by Step (Cute Fan Art for Kids)
 How to Draw a Bat Step by Step (Cute Cartoon Bat for Kids)
 How to Draw a Yeti Step by Step (Easy and Cute for Kids)
 Halloween Drawing Step by Step (Cute Haunted House for Kids)
 How to Draw an Astronaut Step by Step (Cute and Easy)
 How to Draw Freddy Krueger Step by Step (Cute Chibi Version)
 How to Draw a Jellyfish Step by Step (Cute, Easy Guide)
 How to Draw Ariana Grande Step by Step (Cute Chibi Fan Art)
 How to Draw Cerberus Step by Step (Cute and Easy)

