
Here's a secret about zebras: the stripes are the easy part. Get the horse-like body right first and the black bands almost draw themselves. In this lesson I'll show you how to draw a zebra step by step, starting with one oval and two circles and ending with a chunky, smiling zebra standing on a strip of grass. Kids and beginners can follow along, and nothing here needs a steady hand.
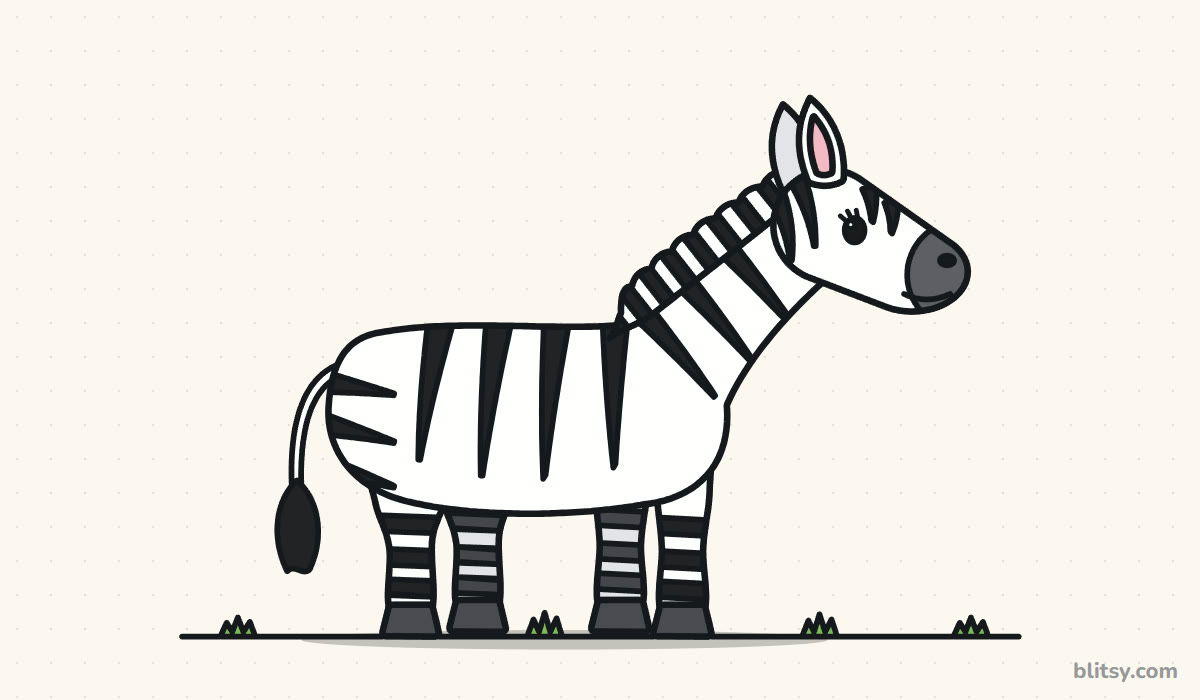
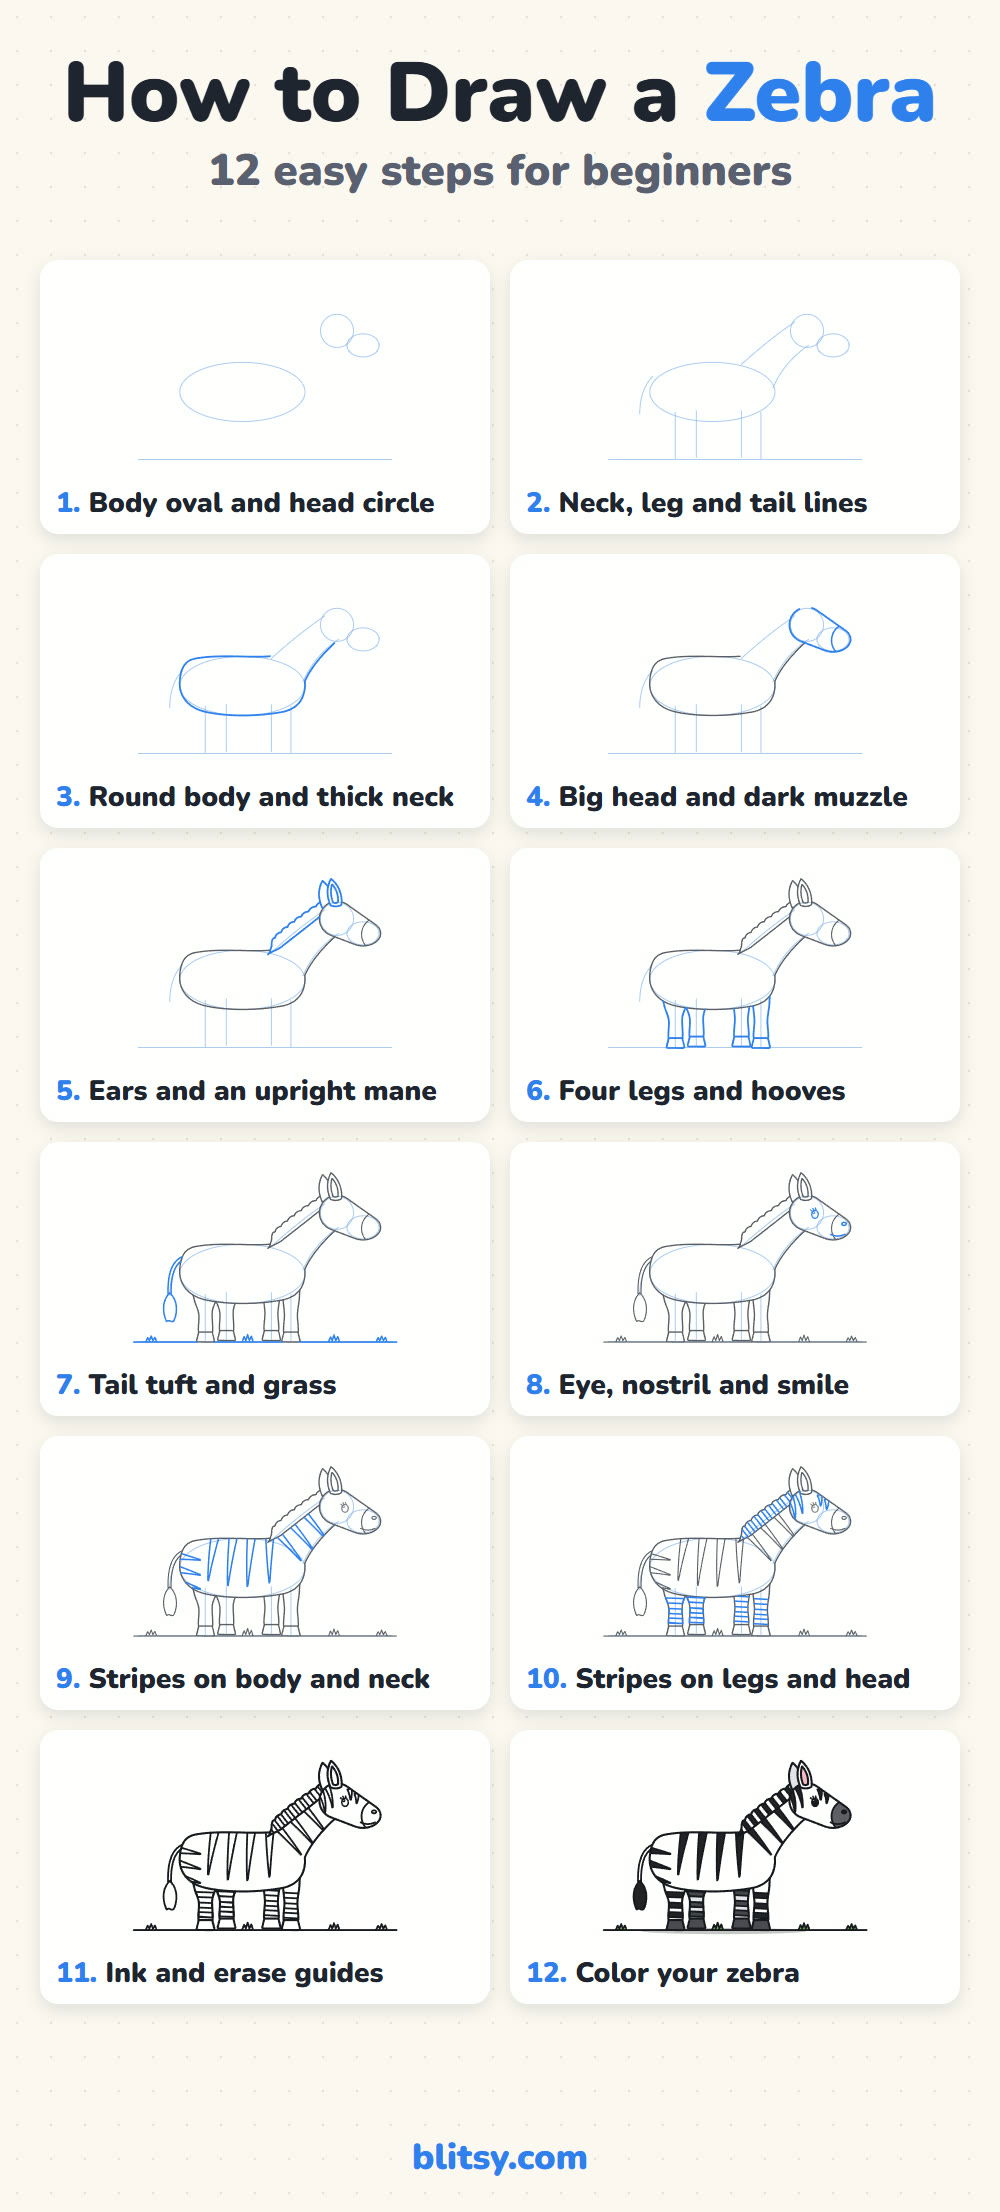
Watch the color of the lines: blue means new in this step, gray means already done. Copy only what's blue, check it, then go to the next one.
Quick overview
⏱️ Time: about 30 to 40 minutes, coloring included
🎯 Level: easy, fine for kids around 6 and up
✏️ Steps: 12
🦓 You'll draw: a cartoon zebra standing in side view
Supplies for Black and White Stripes
- A pencil you can press lightly (HB or 2B)
- A soft eraser
- A black marker or felt pen for the outline and the stripes
- A gray pencil or crayon for the muzzle and hooves
- Pink for the ear plus green for the grass
- Plain white paper, turned sideways
A thicker black marker makes filling the stripes much quicker than a fine pen.
How to Draw a Zebra Step by Step
Step 1: Sketch the body oval and the head circles
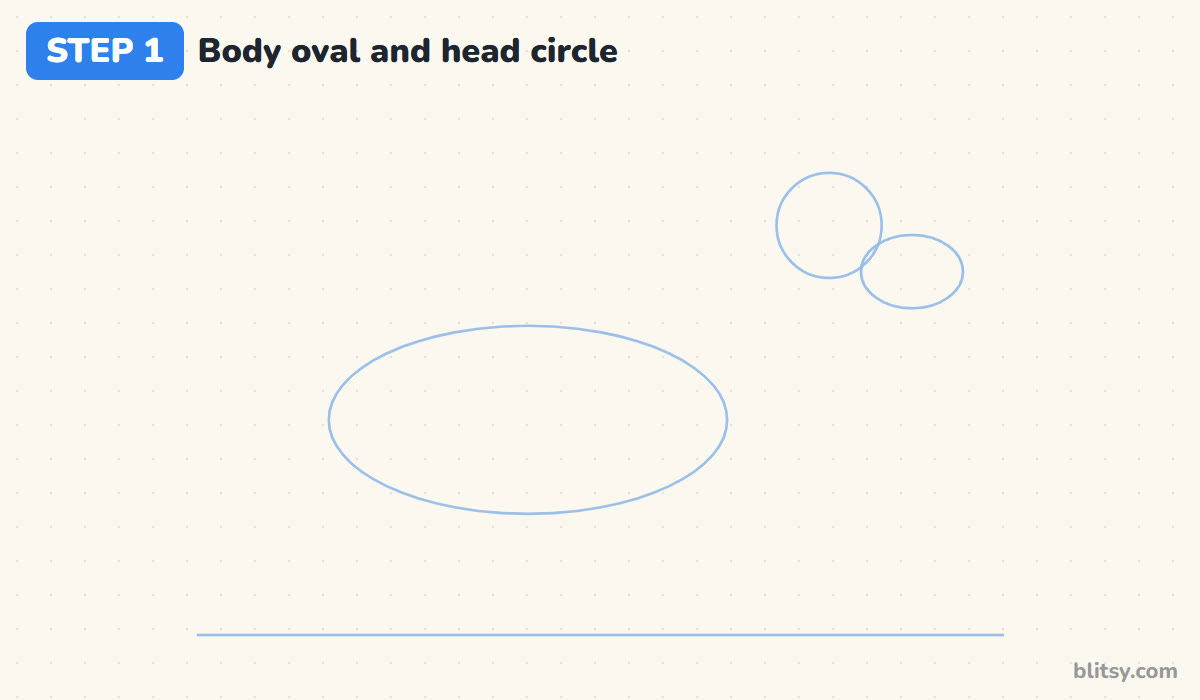
Draw a light ground line near the bottom of the page. Above it, sketch a long, wide oval for the body, a bit left of the middle. Up and to the right, add a circle for the head, then a smaller oval for the snout that overlaps the lower right of that circle.
💡 Tip: Leave a gap of about one head width between the oval and the head circle. That gap becomes the neck.
Step 2: Add guide lines for neck and legs
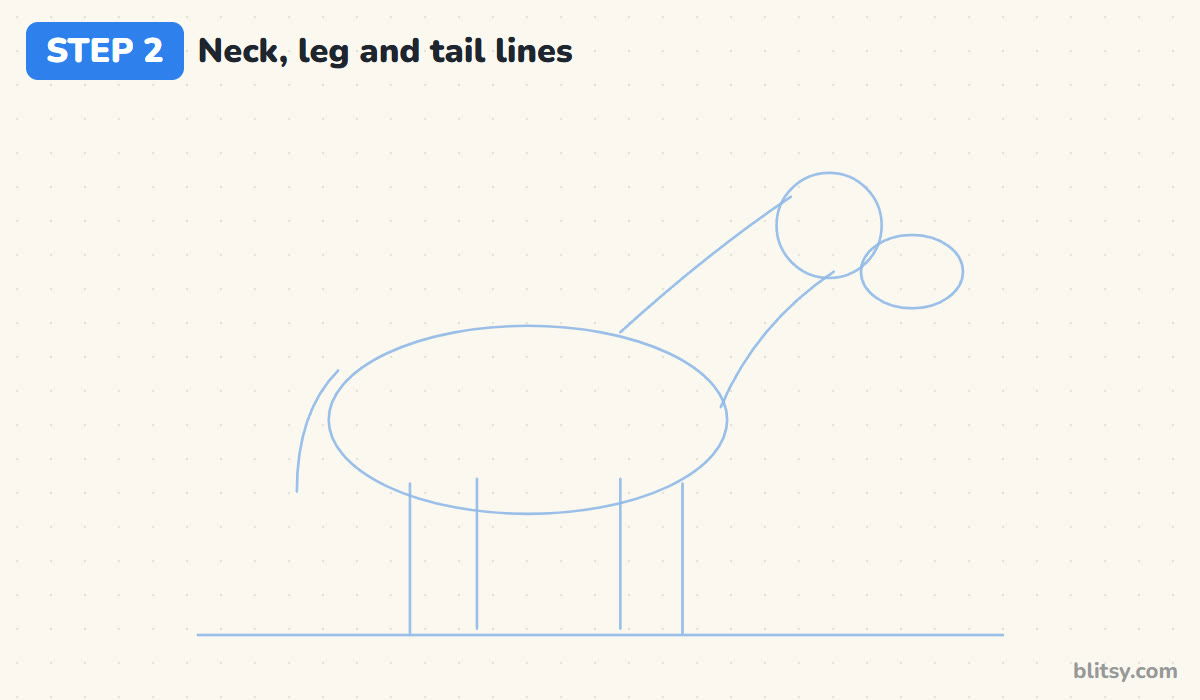
Join the body to the head with two curved lines: one from the top of the oval to the back of the head, and one from the chest to the bottom of the snout. Drop four straight lines from the body to the ground for the legs, two near the front and two near the back. A short curve hanging off the rear is the tail.
💡 Tip: Keep the two front leg lines close together and the two back ones close together. Spread evenly, they look like a table.
Step 3: Outline the round body and thick neck
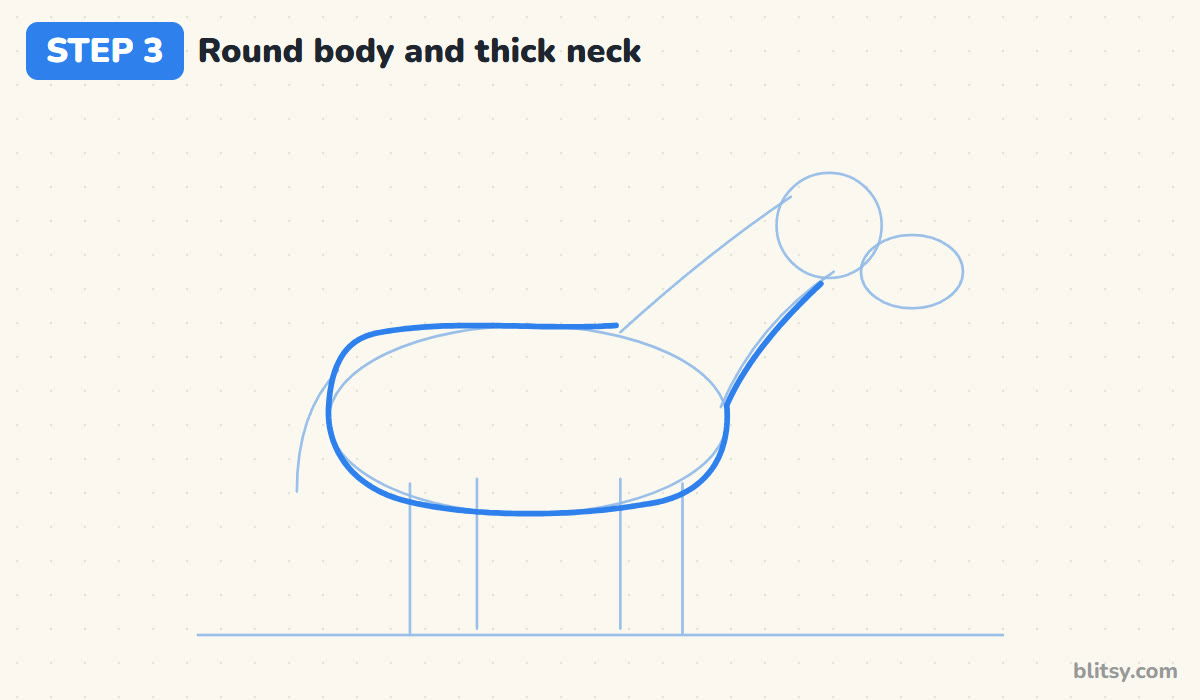
Now trace one smooth, firm line around the oval and up the neck. Let the back dip just a little behind the shoulders, and let the chest bulge out at the front. The neck should be thick where it meets the body and narrower near the head.
💡 Tip: A cartoon zebra looks friendlier when it's a little chubby, so don't slim the belly.




Step 4: Draw the big head and dark muzzle
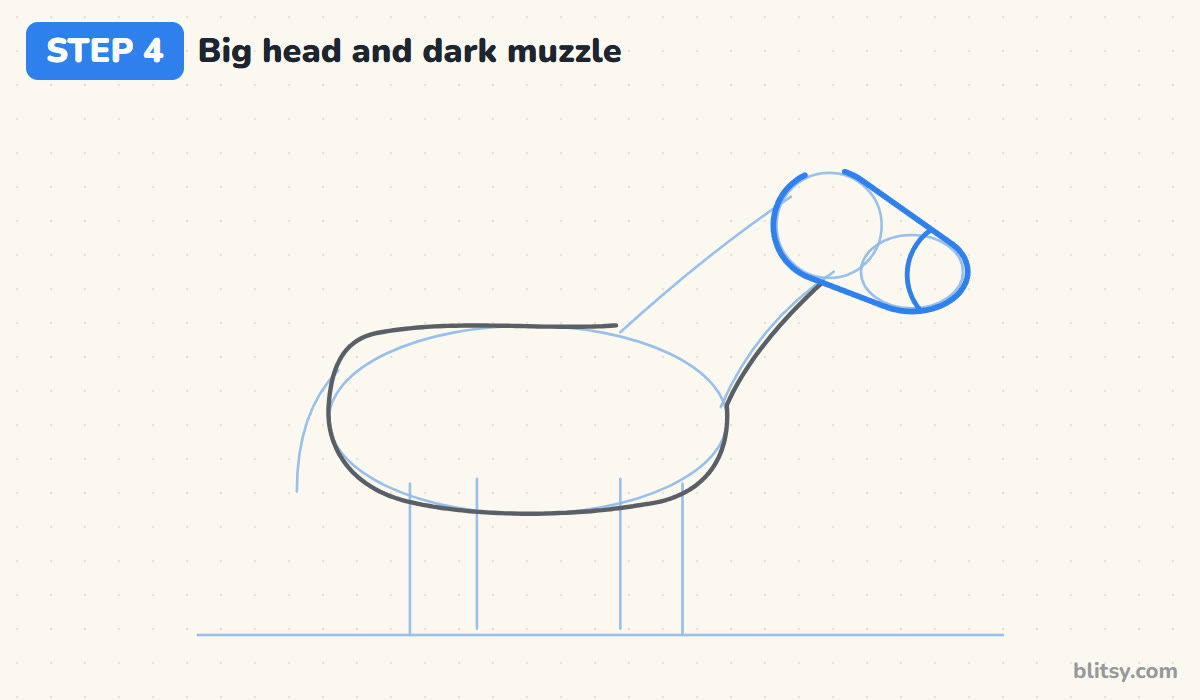
Wrap a line around the head circle and the snout oval so they become one rounded shape, a bit like a peanut. Then draw a curve across the front of the snout. Everything in front of that curve becomes the dark muzzle later.
💡 Tip: I make the head bigger than a real zebra's on purpose. Big heads read as cute.
Step 5: Add pointed ears and an upright mane
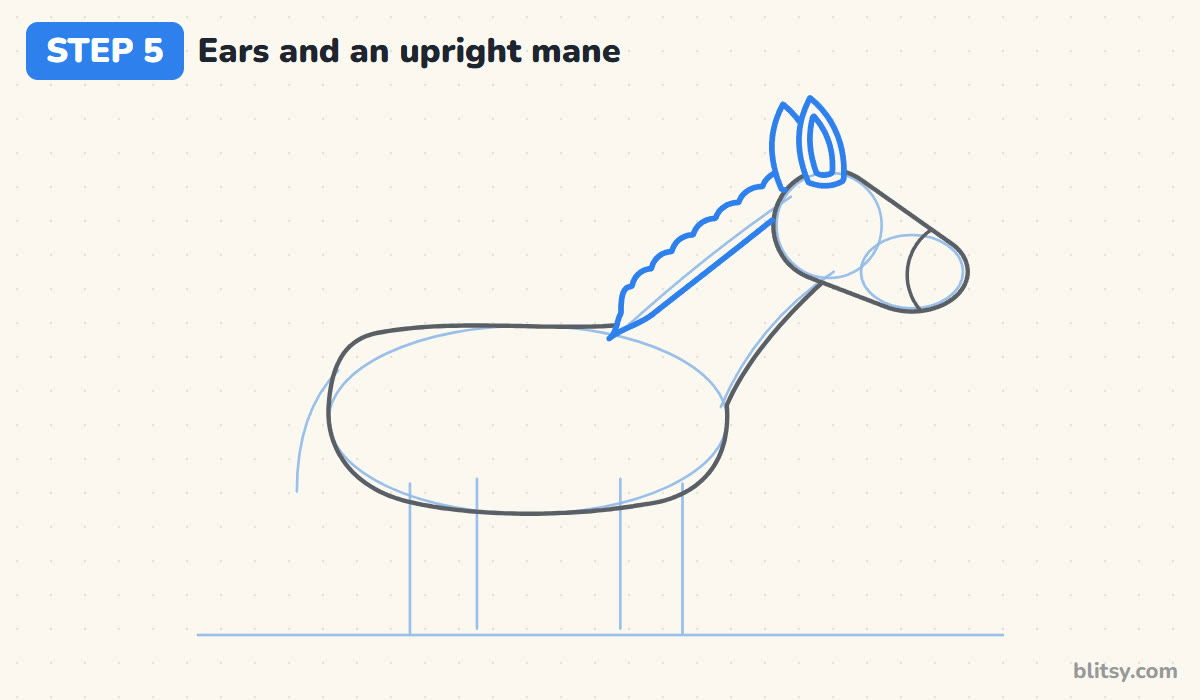
Put two leaf-shaped ears on top of the head, one in front and one peeking out behind it, with a smaller leaf inside the front ear. Then draw the mane along the top of the neck. A zebra's mane stands straight up like a brush, so give it a short, bumpy top edge instead of long hair falling down.
💡 Tip: If your mane flops over the neck like a horse's, it stops looking like a zebra. Keep it short and standing.
Step 6: Draw four legs with hooves
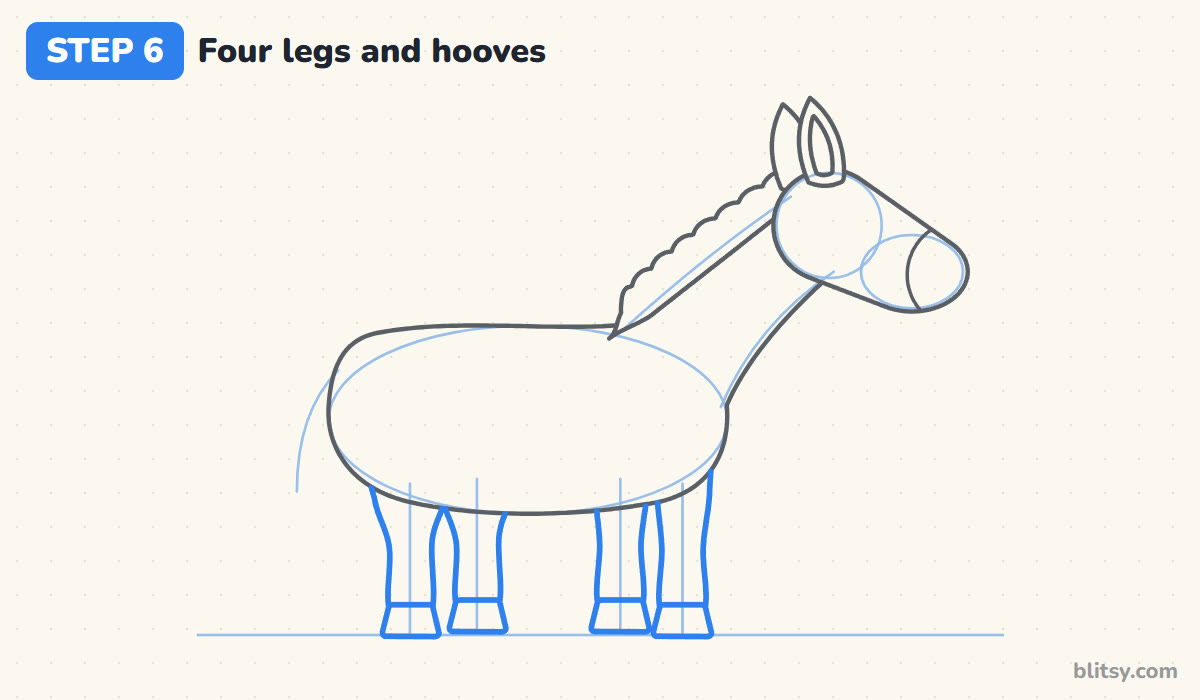
Turn the two nearest guide lines into sturdy legs, each about as wide as a thumb on your paper, with a flat dark hoof at the bottom. The two far legs go just behind them. Only their lower parts show, because the near legs and the body cover the rest.
💡 Tip: Draw the near legs first. Then you can see exactly how much of each far leg is still visible.
Step 7: Give it a tail tuft and some grass
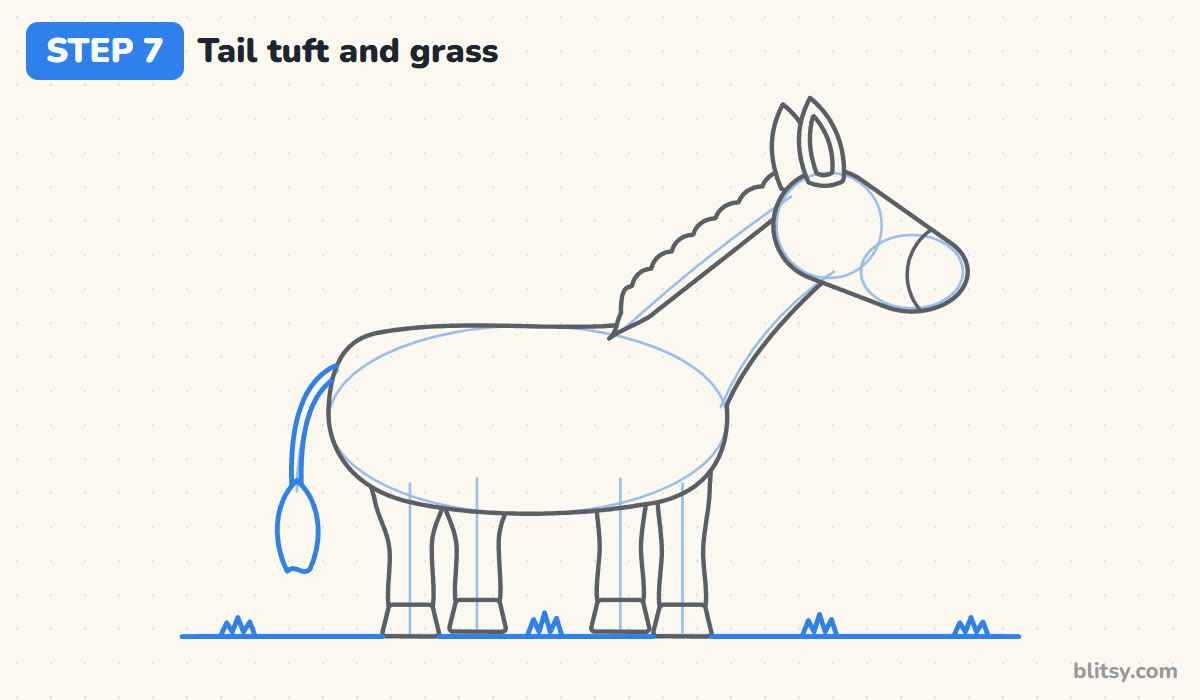
Follow the tail guide with two thin lines that hang down from the rump. At the end, add a teardrop-shaped tuft with a couple of small points at the bottom. Finish the scene with the ground line and a few little grass tufts.
💡 Tip: Keep the tail thin. A thick tail makes the tuft look small.


Step 8: Draw the eye, nostril and smile
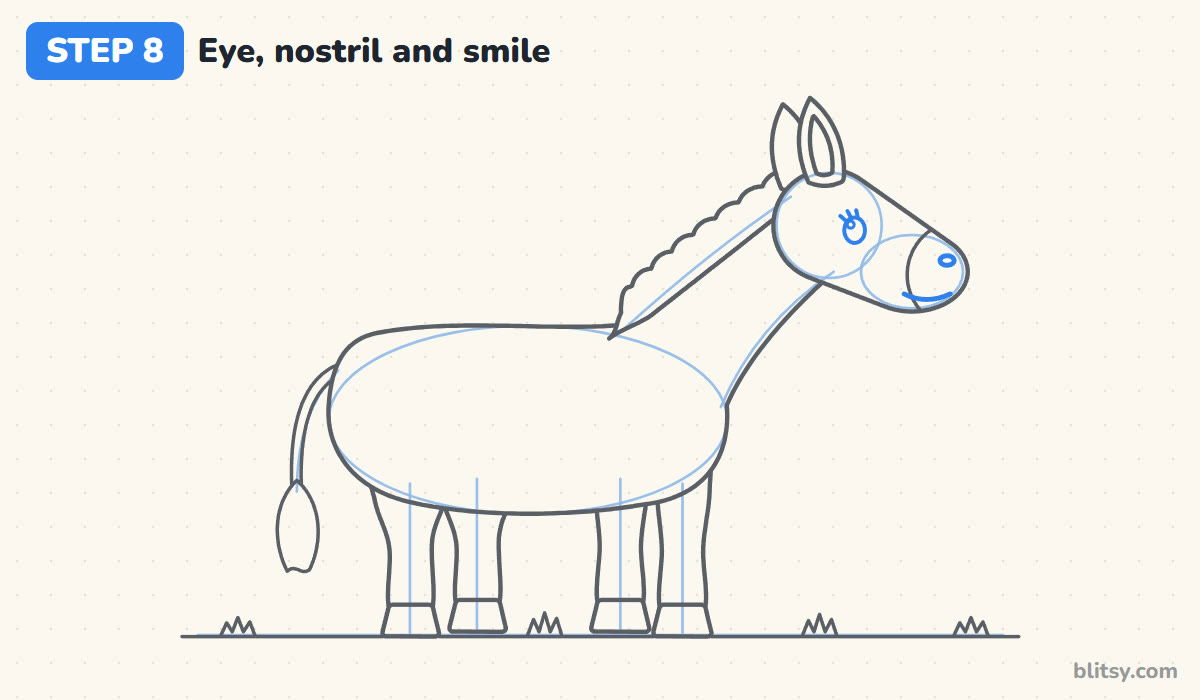
Place a small oval eye in the head circle, slightly above the middle and toward the front, with a tiny circle for the shine and three short lashes. On the muzzle, draw a small oval nostril near the top and a gentle smile curve along the bottom.
💡 Tip: Put the eye closer to the ears than to the nose. Halfway down the face makes it look like a cow.
Step 9: Draw stripes on the body and neck
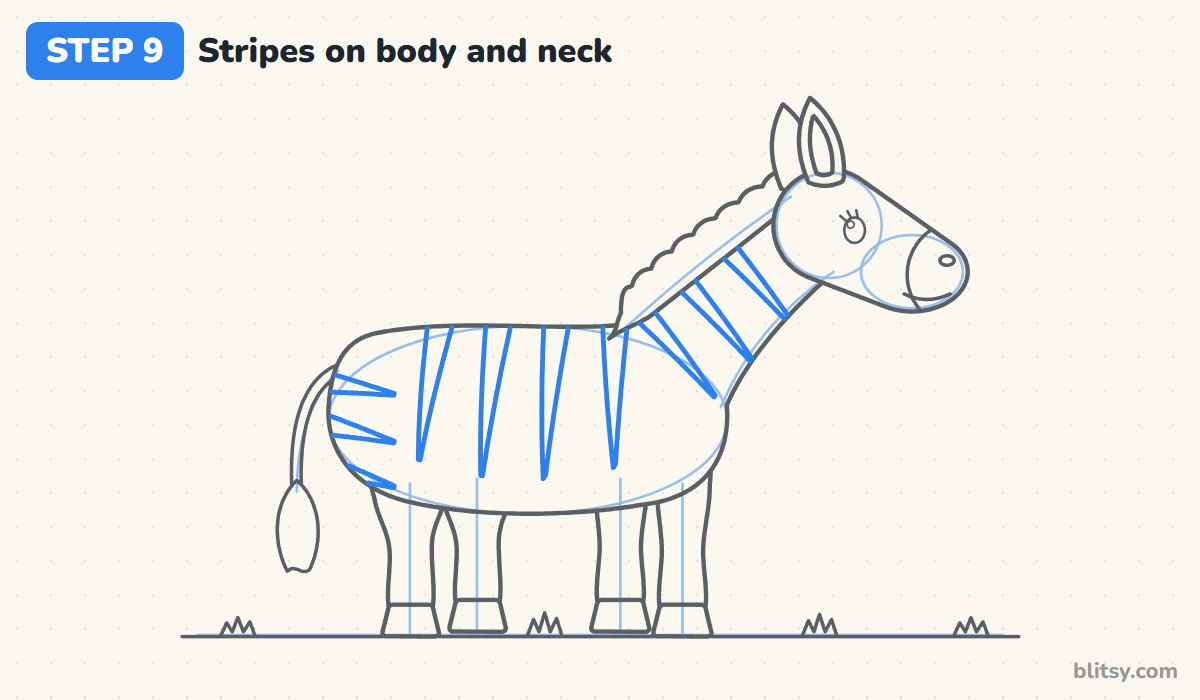
This is the fun part. On the body, draw tall stripes that start wide at the back line and narrow to a point before they reach the belly. On the rump, the stripes run sideways from the back edge. On the neck, draw bands that go across from the mane toward the throat.
💡 Tip: Leave white gaps that are roughly as wide as the stripes. Too many thin stripes turn into gray mush once colored.
Step 10: Stripe the legs, then the head and mane
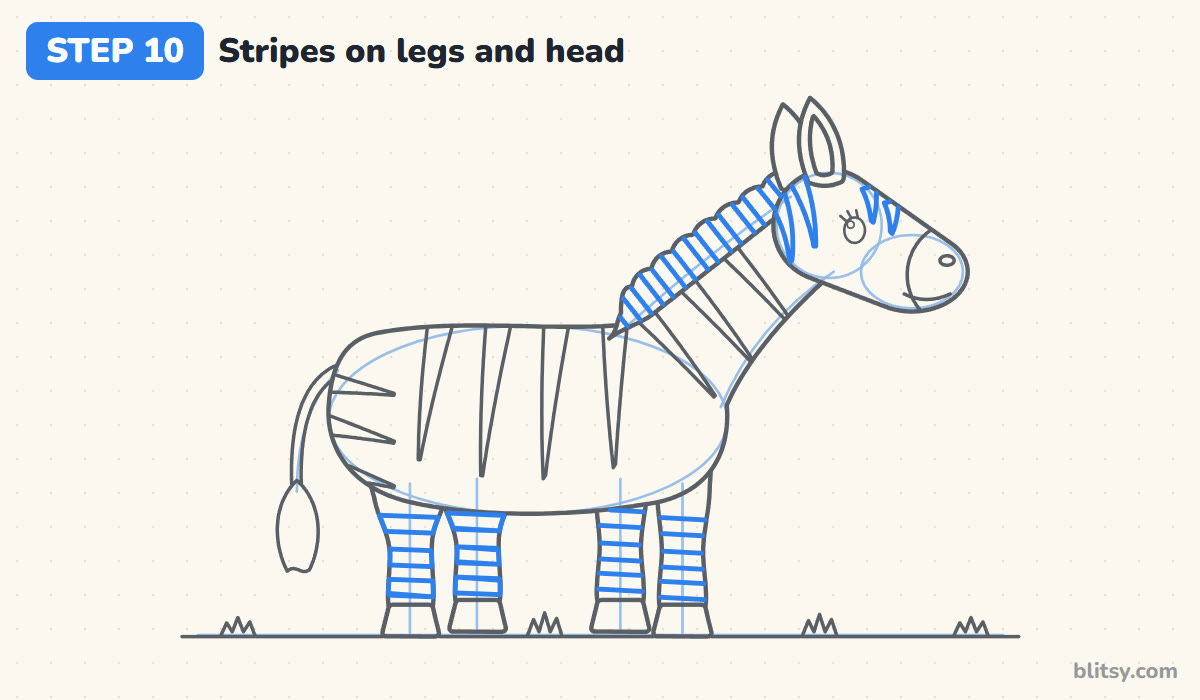
Wrap three bands around each leg, running straight across. Add two stripes on the back of the head and two short ones on the nose bridge, keeping them away from the eye and the muzzle. Last, divide the mane into black and white sections with lines that cross it.
💡 Tip: Check that every stripe ends at an outline or comes to a point. Loose ends look like scribbles.
Step 11: Ink the zebra and erase the guides
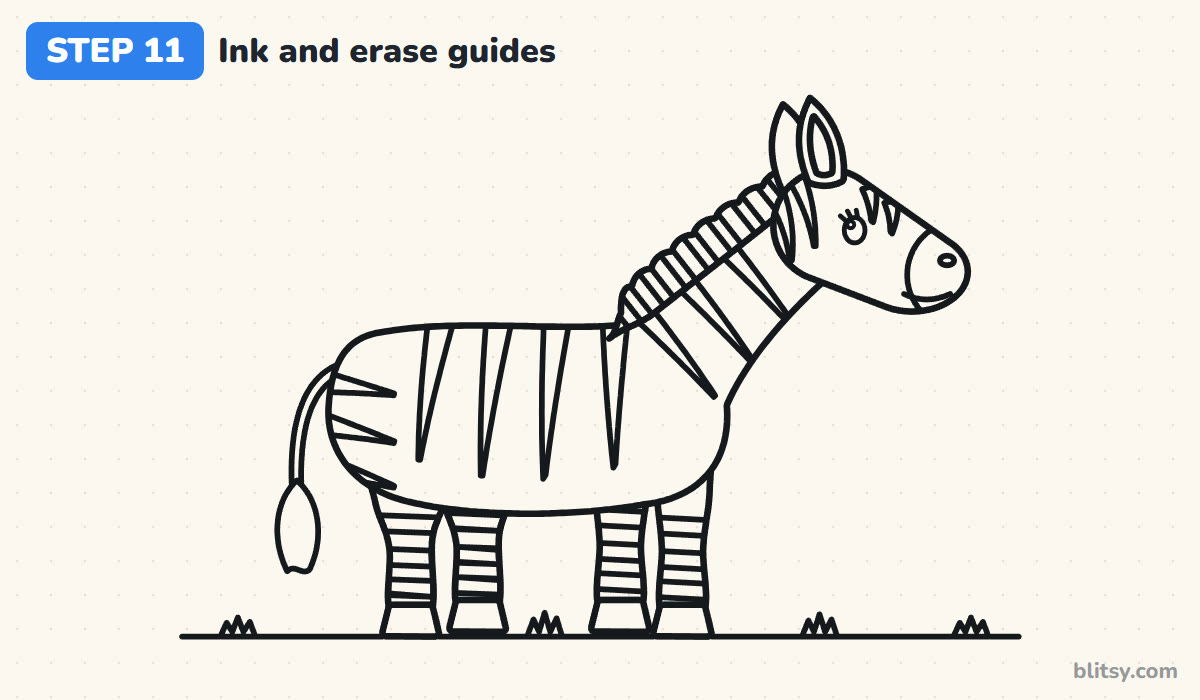
Trace every keeper line with the black marker, stripes included. I go slowly around the stripe tips so they stay sharp. When the ink is completely dry, erase the oval, the circles and the stick lines.
💡 Tip: Rub the eraser in one direction only. Scrubbing back and forth can smear fresh marker.


Step 12: Color your zebra
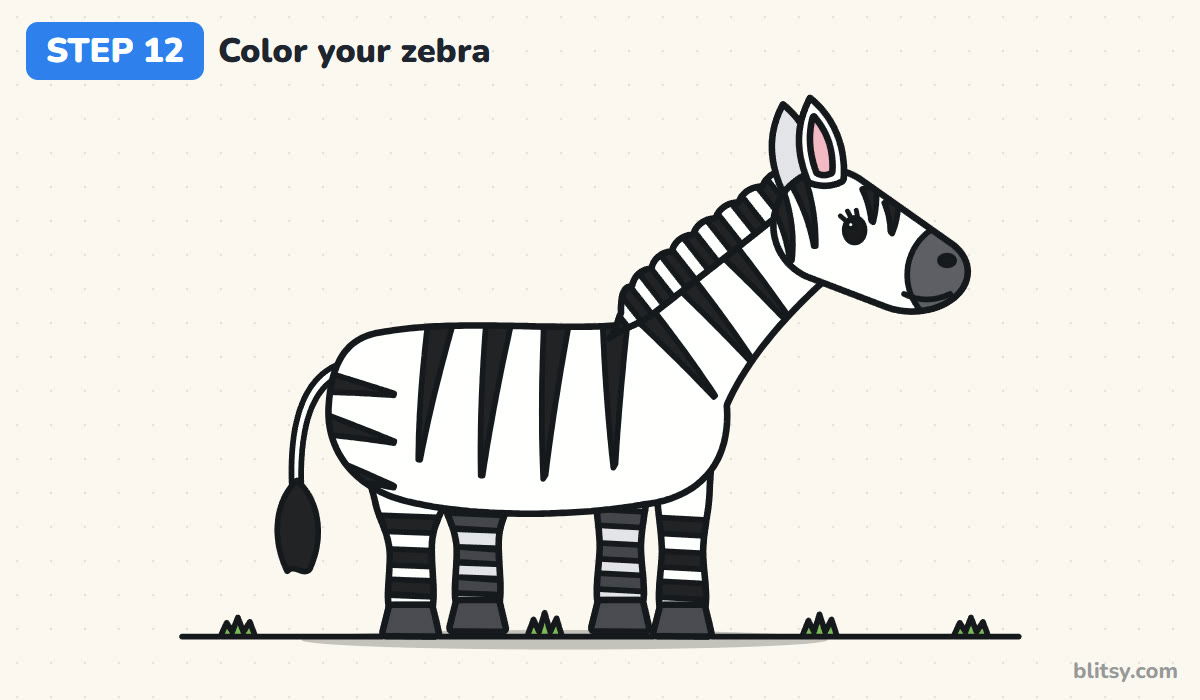
Fill every stripe, the mane bands and the tail tuft with black. Leave the body and head white, and the near legs too. The muzzle and hooves get dark gray, and the two far legs and the far ear get light gray so they sit behind. Finish with pink inside the ear and green on the grass.
💡 Tip: Color the stripes first, then go back with a light gray only where you want shade. White paper does most of the work.
Zebra Drawings That Turn into Horses
- Stripes that spill past the outline. They should stop at the edge of the body or fade to a point inside it. Draw the outline first, stripes second.
- A long, flowing mane. That's a horse. A zebra's mane is short and stiff, with stripes.
- Stripes all the same direction. Real zebras have up-and-down stripes on the body, sideways ones on the rump and rings on the legs. Mixing the directions is what sells it.
- Forgetting the far legs. With only two legs showing, the zebra looks flat. Two lighter legs behind the near ones fix it.
- A white muzzle. The dark nose is a small detail, but without it the face reads as a pony.
Giving Your Striped Friend a Twist
The body here is basically a chunky horse, so if you want to compare the shapes, try my horse drawing tutorial next. You can also turn the head so the zebra looks at you, add a baby zebra with brown stripes, or swap the black for rainbow colors for a fantasy look. Little kids can skip the leg stripes and the mane bands and it still reads as a zebra. For more practice with stripes on a big cat, the tiger drawing step by step lesson uses the same stripe tricks.
Free Zebra Coloring Page and Printable Steps
The free zebra coloring page has a colored zebra at the top to copy, a small key with the colors, and a big outline below where the stripes are already drawn, so kids just fill them in. The step-by-step PDF guide holds all 12 steps with pictures and tips. Both print well on Letter or A4.
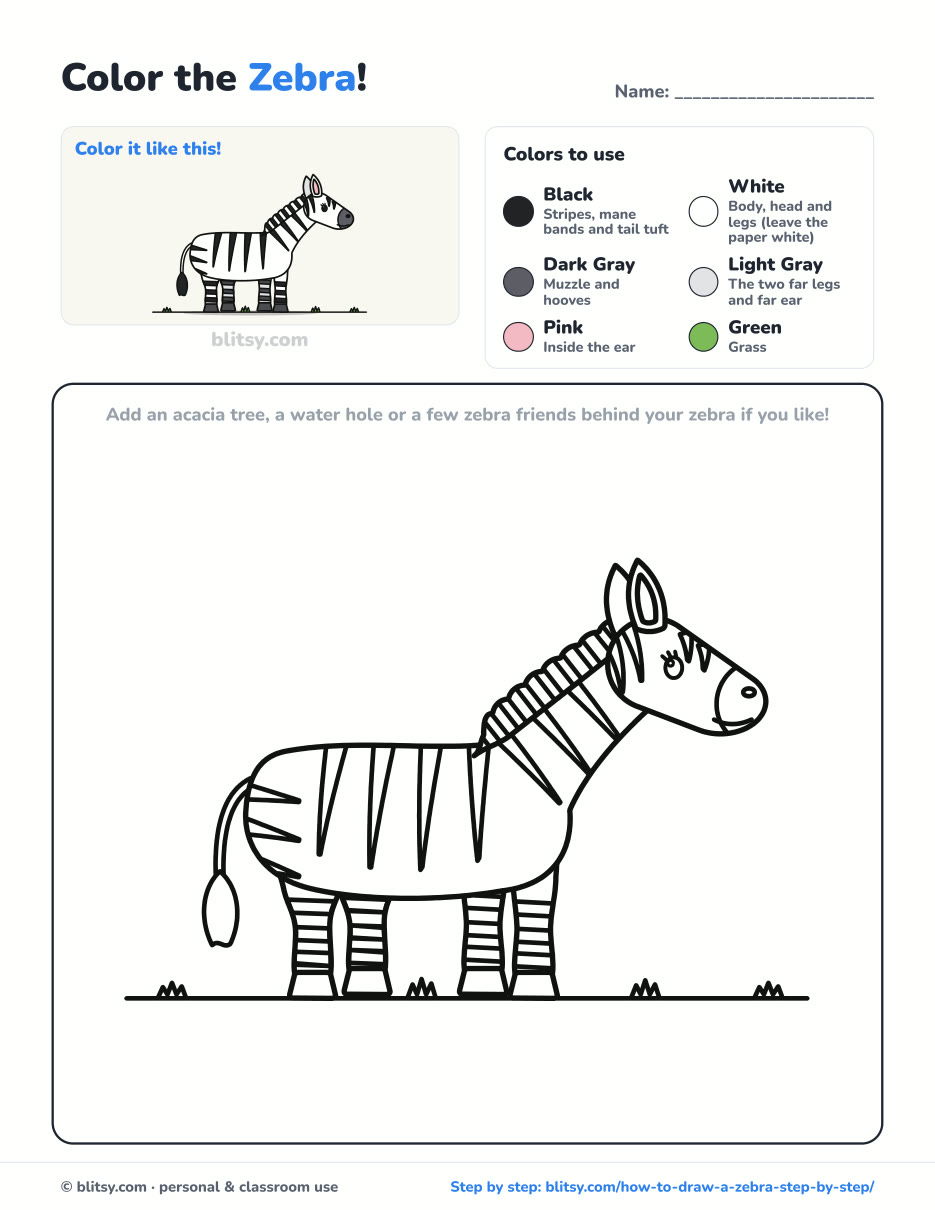
Black outlines with a colored example and the color names at the top. Ready to print and color.
⬇️ Download Coloring PageEvery step picture with its instructions and tips, to keep beside your paper while you draw.
⬇️ Download Drawing Guide📱 On a phone? Tap a download button, then open the file and choose Share → Save to Files or Print. On a computer, the PDF opens or saves straight to your Downloads folder.
Keep the Zebra Steps Handy
More Animals to Draw After the Zebra
Each of these is a full step-by-step lesson with a picture for every stage, so the same simple-shapes method carries straight over.
- Lion Drawing: A friendly sitting lion with a big scalloped mane and a tufted tail in this how to draw a lion step by step lesson.
- Elephant Drawing: Draw a gray-blue elephant with a huge ear and a curling trunk in this elephant drawing tutorial.
- Leopard Drawing: Practice spots instead of stripes with this leopard drawing step by step guide.
- Cow Drawing: Another black and white animal, with patches this time, in the how to draw a cow tutorial.
- Unicorn Drawing: Add a horn and a pastel mane to a horse shape in this unicorn drawing tutorial.
Zebra Drawing Questions From Young Artists
What is the easiest way to draw a zebra?
Start with an oval for the body and a circle for the head, join them with a neck, add four straight legs, then put the stripes on at the end. Drawing the outline first keeps the stripes easy.
How do you draw zebra stripes so they look right?
Make them wide at the back and pointed toward the belly, run them sideways on the rump, and wrap them around the legs. Keep the white gaps about as wide as the black stripes.
Is a zebra white with black stripes or black with white stripes?
Zebras have dark skin, so many people say black with white stripes. For drawing it doesn't matter. Leaving the paper white and coloring the stripes black is simply quicker.
How long does it take to draw a zebra?
Most beginners need about 30 to 40 minutes including the coloring. The stripes take the longest, so give yourself time there.
Grab a black marker, give your zebra its stripes, and see if anyone at home can tell it apart from a horse. 🦓✏️
Related posts:
 How to Draw a Car Step by Step (Easy Drawing for Beginners)
 How to Draw a Whale Step by Step (Easy for Beginners)
 How to Draw a Rat Step by Step (Easy for Beginners)
 How to Draw an Arctic Fox Step by Step (Easy for Beginners)
 How to Draw a Shark Step by Step (Easy for Beginners)
 How to Draw a Chicken Step by Step (Easy for Beginners)
 How to Draw a Fish Step by Step (Easy Goldfish for Beginners)
 How to Draw a Snowman Step by Step (Easy for Beginners)
 How to Draw Hands Step by Step (Easy Palm View for Beginners)
 How to Draw an Airplane Step by Step (Easy Jet for Beginners)
 How to Draw a Mouse Step by Step (Easy for Beginners)
 How to Draw the Joker Step by Step (Easy Chibi for Beginners)

