
Zombies are really just people drawn a little sloppy on purpose. Torn edges, droopy eyelids and arms held straight out do most of the work, and none of it needs blood or anything gross. Here's how to draw a zombie step by step, the silly cartoon kind that kids love to draw for Halloween and laugh at afterwards. If you can draw a stick figure, you can draw this one.
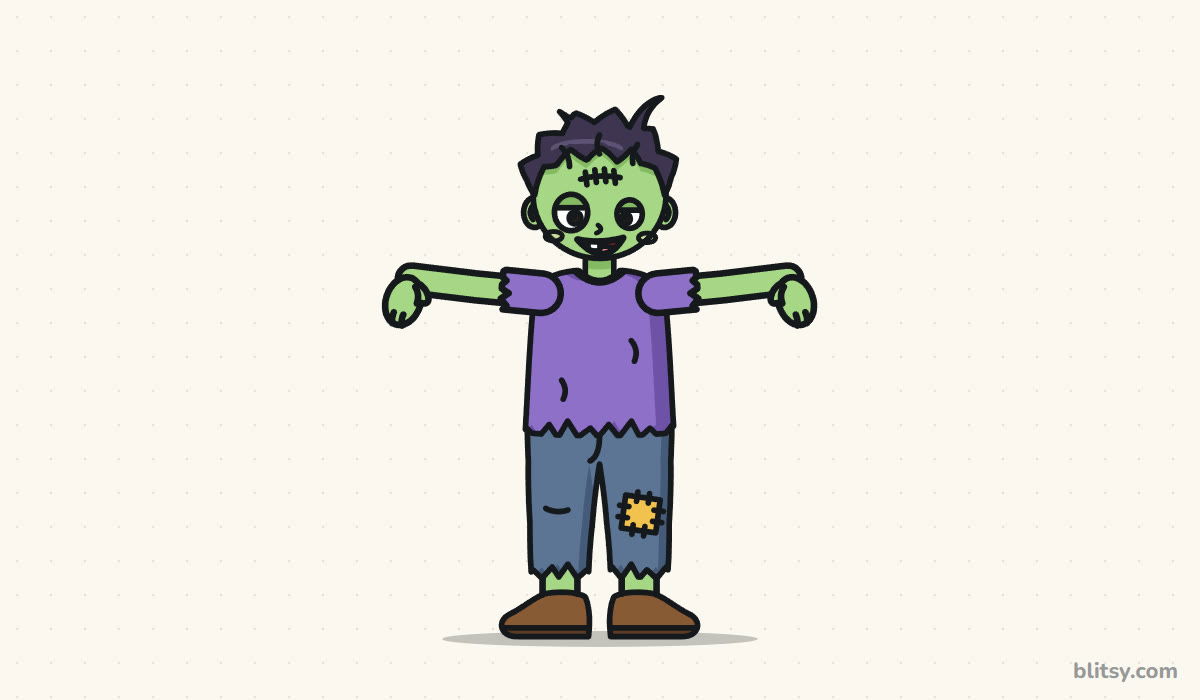
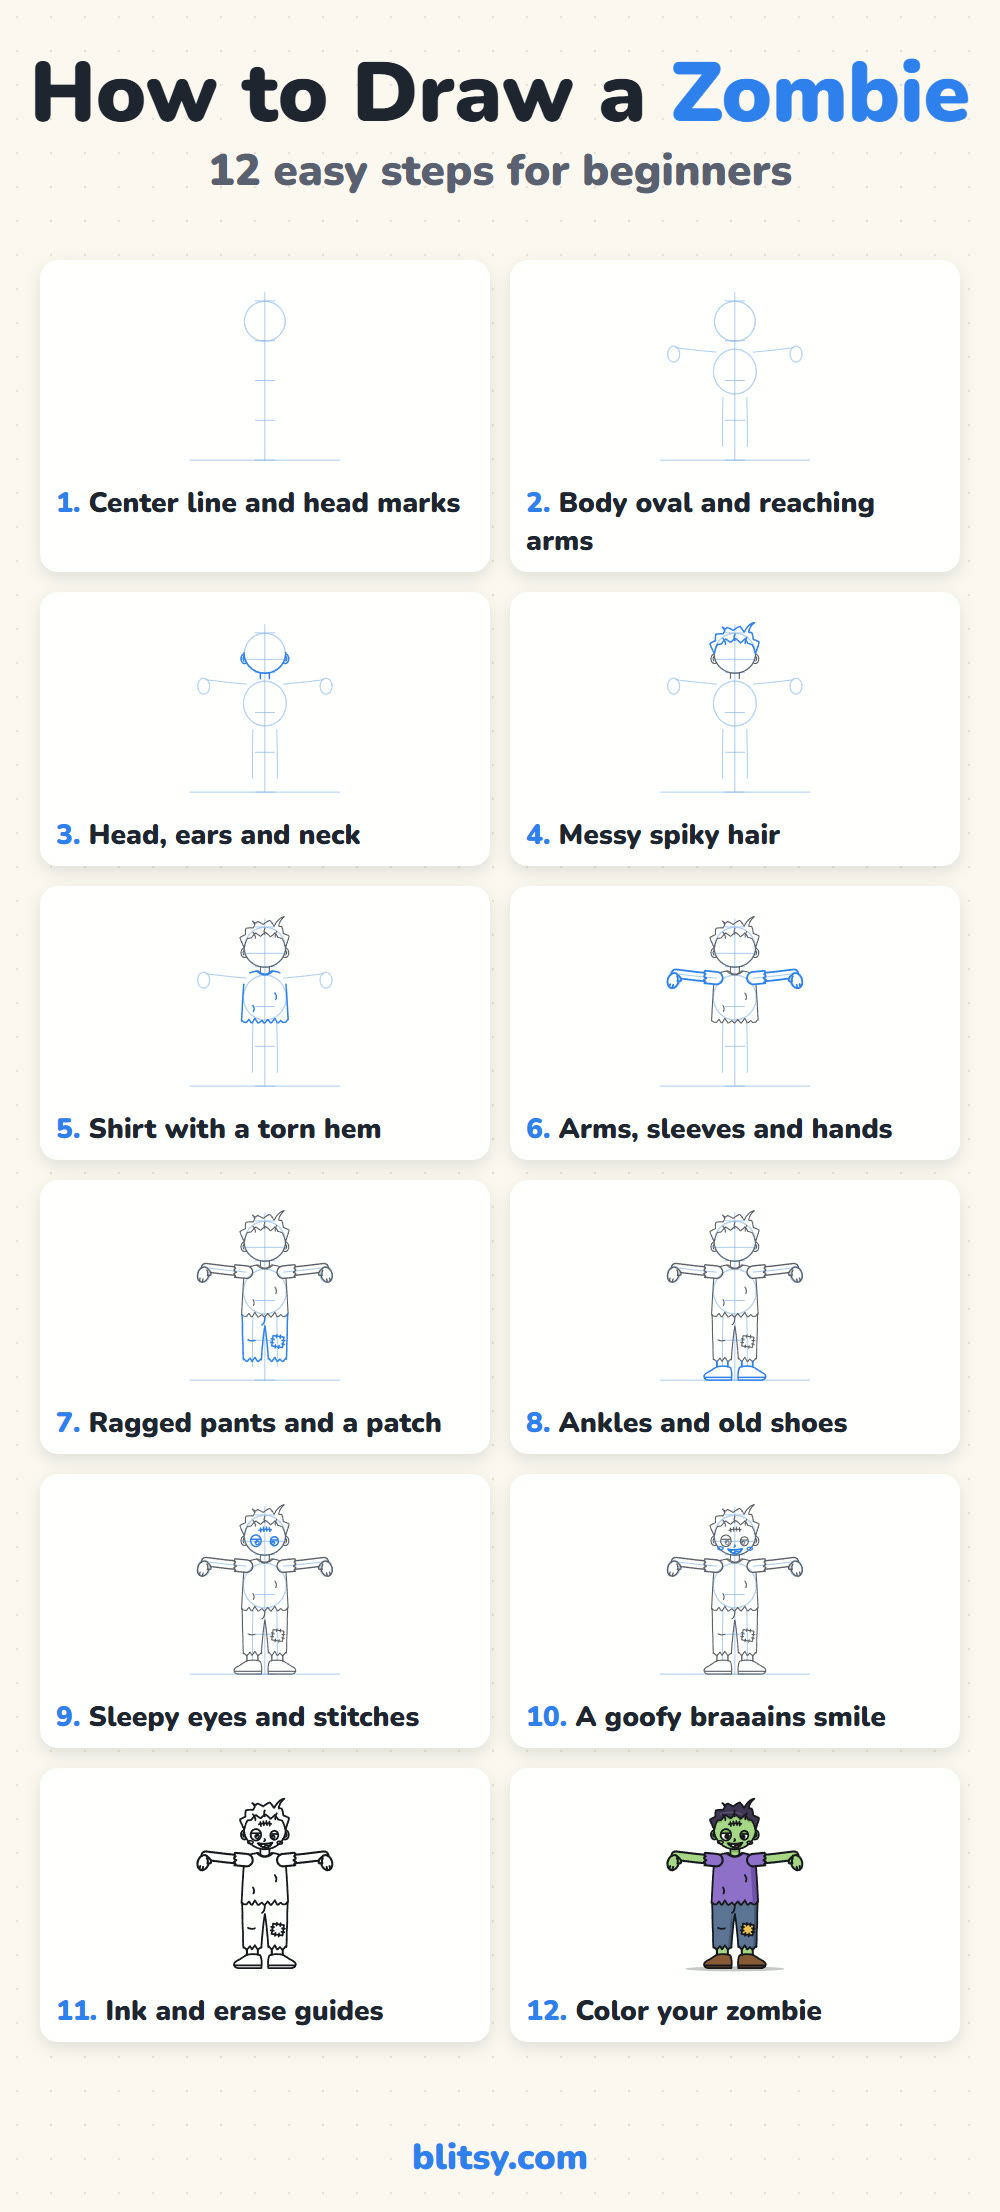
In each step picture the fresh lines are blue and the parts you already drew are gray. Copy only the blue bit, then check it against the gray before you move on.
Quick overview
⏱️ Time: about 30 to 40 minutes, coloring included
🎯 Level: easy, fine for kids from about 6 up
✏️ Steps: 12
🧟 You'll draw: a friendly cartoon zombie with reaching arms
Supplies for a Silly Zombie Sketch
- A pencil you can press lightly, such as an HB
- A soft eraser for the guide lines
- A black marker or fineliner for the final outline
- Colored pencils or markers in light green, purple, blue, yellow, brown
- Plain paper turned sideways, because the arms stretch wide
Any green works for the skin. Some kids pick gray or pale blue instead, and that reads as a zombie just as well.
How to Draw a Zombie Step by Step
Step 1: Draw a center line and the head circle
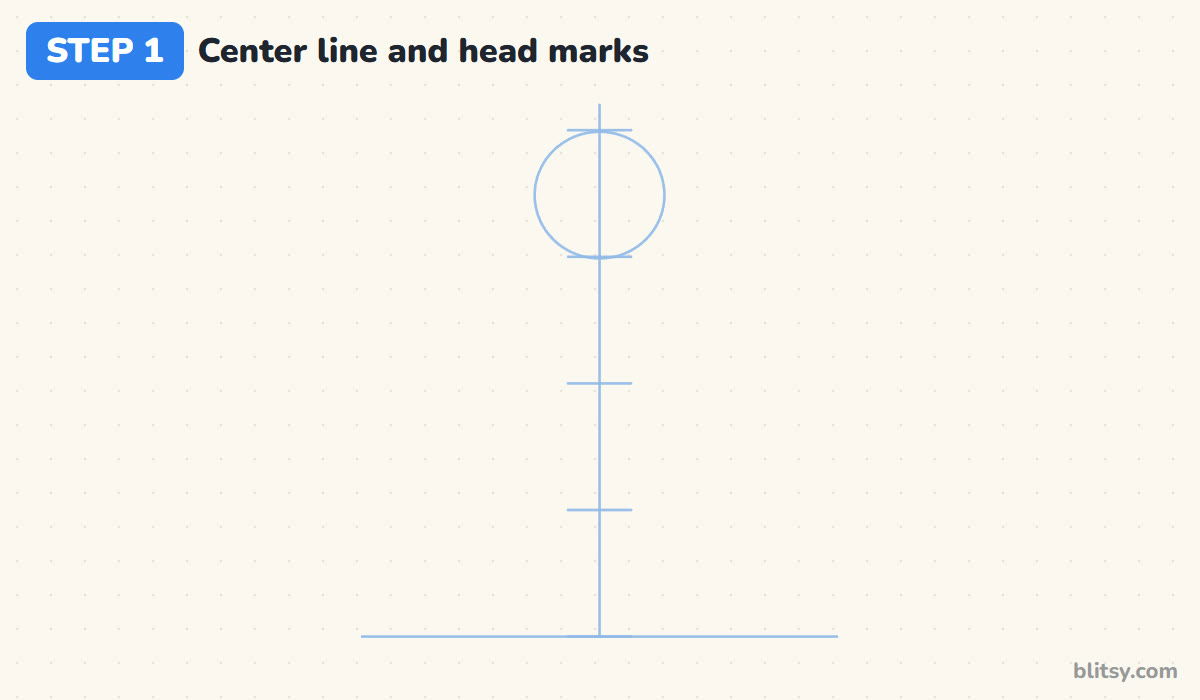
Draw a light ground line near the bottom of the page and a straight line up the middle. At the top, draw a circle for the head. Then add short marks down the center line, each one a head height apart, until you reach the ground. I stop at four head heights, which keeps him cartoony instead of creepy.
💡 Tip: Make the circle a bit bigger than feels right. A big head is what makes a cartoon look friendly.
Step 2: Add a body oval and reaching arm lines
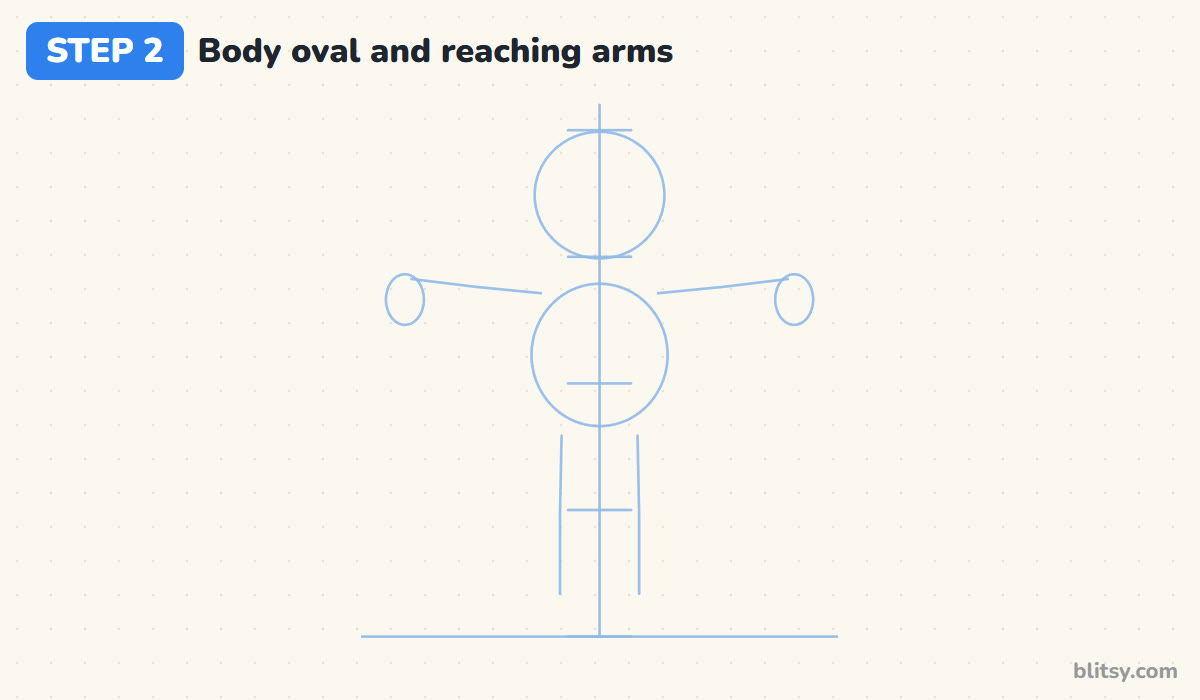
Under the head, sketch an oval for the chest and tummy. From the top corners of the oval, draw two arm lines that go straight out to the sides and tilt up a little. This is the classic zombie reach. Bring two leg lines down to the ground, and put an oval at the end of each arm for the hands.
💡 Tip: Keep both arms level with each other. If one dips, he looks like he's waving instead of shuffling.
Step 3: Outline the head and add ears plus a neck
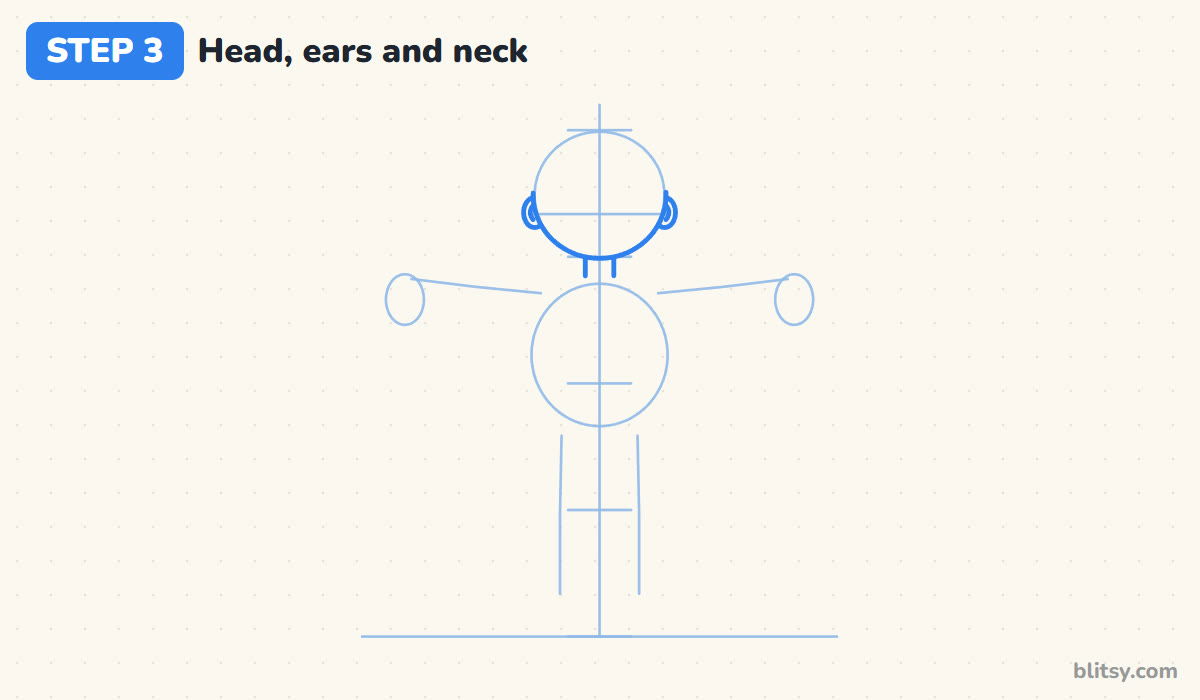
Trace the head circle with a firmer line, slightly wider than tall. Draw a light line across the middle for the eyes, then a small C-shaped ear on each side right on that line. Finish with a short, wide neck under the chin. It should be almost as wide as the gap between the eyes, so the head sits on it naturally.
💡 Tip: Ears go level with the eyes. Put them higher and the head starts to look like a mouse.




Step 4: Give him messy, spiky hair
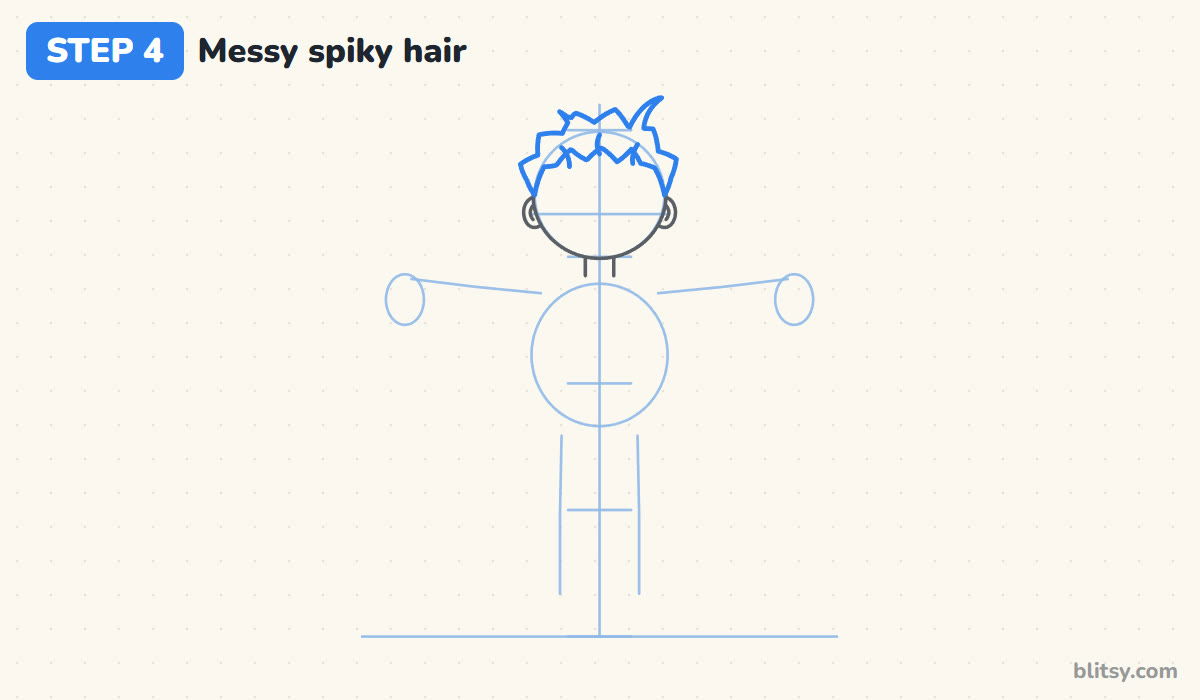
Zombie hair never gets combed, so I make it as messy as I can. Draw a bumpy cap of hair over the top third of the head, with uneven clumps sticking out on both sides. Add two spikes on top that lean away from each other, then a few short curved lines inside the hair for texture. Leave the forehead clear, because the stitches go there later.
💡 Tip: Draw the bumps different sizes on purpose. Even bumps look like a neat haircut.
Step 5: Draw a shirt with a torn hem
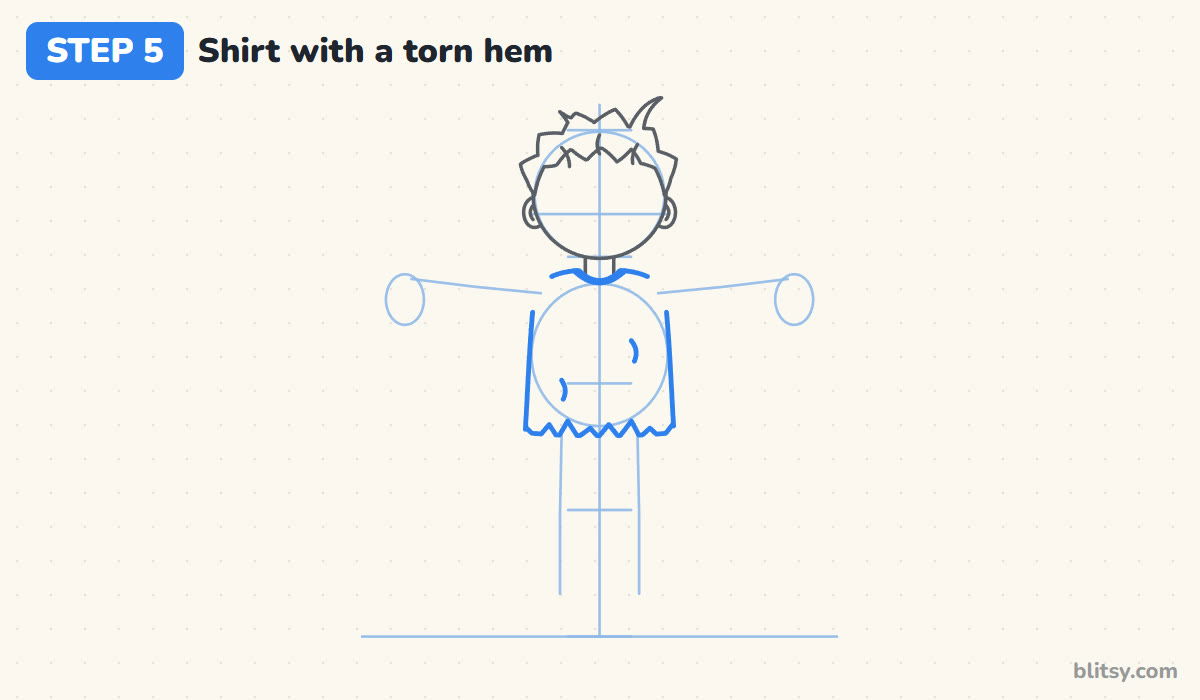
Starting at the neck, draw the shoulders sloping out, then the sides of the shirt down past the body oval. Instead of a straight bottom edge, zigzag across with small uneven points. In my experience that torn hem says zombie faster than anything else. Add a curved collar and two small tear lines.
💡 Tip: Mix big and small points along the hem. A perfect zigzag looks like a crown, not a rip.
Step 6: Add the arms, torn sleeves and droopy hands
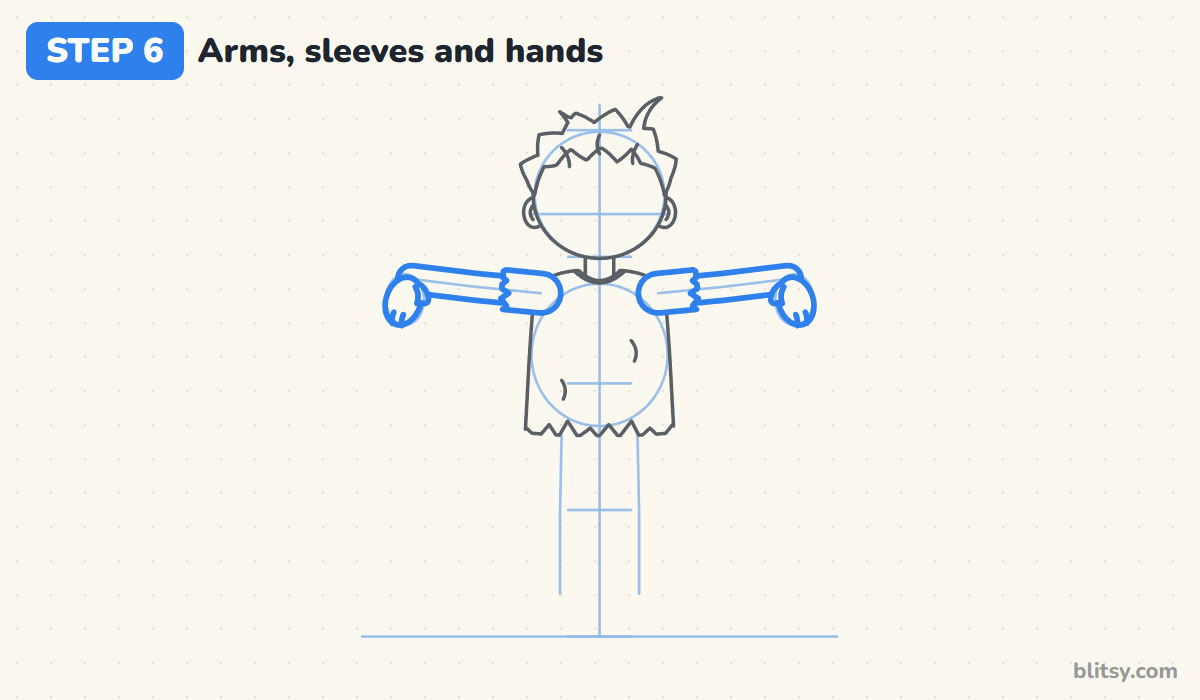
Draw a short sleeve at each shoulder with a ragged end. Follow each arm line out with two lines about a thumb's width apart, so the arms have real thickness and aren't sticks. At the end, the hands hang down like wet mittens. Draw a rounded mitten shape below each wrist, a little thumb bump on the side nearest the body, and two short finger lines.
💡 Tip: Let the hands droop down from the wrist. Hands pointing straight out look like he's swimming.
Step 7: Draw ragged pants and a knee patch
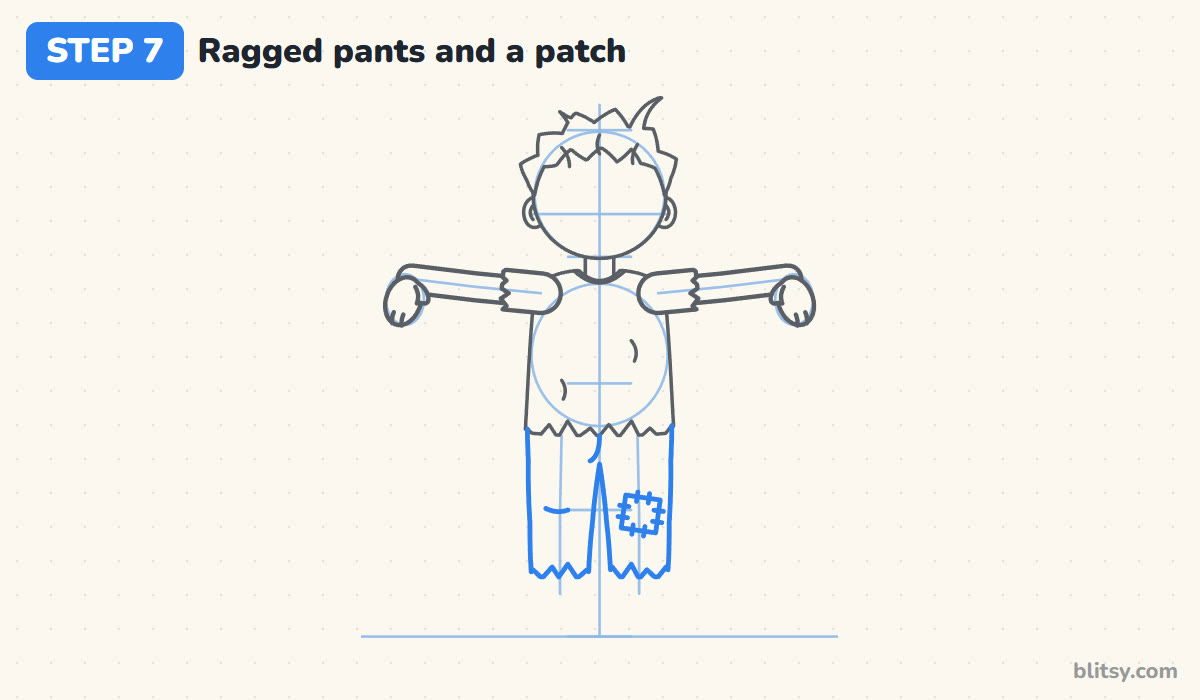
From under the shirt, bring the pants down the leg lines. Leave a small gap between the legs so he doesn't look like he's wearing a sack. Stop a little above the ground and zigzag the bottom of each leg. On one knee, draw a slightly tilted square patch with short stitch marks across its edges.
💡 Tip: Tilt the patch a little. A straight patch looks printed on, a crooked one looks sewn on in a hurry.




Step 8: Add bare ankles and old shoes
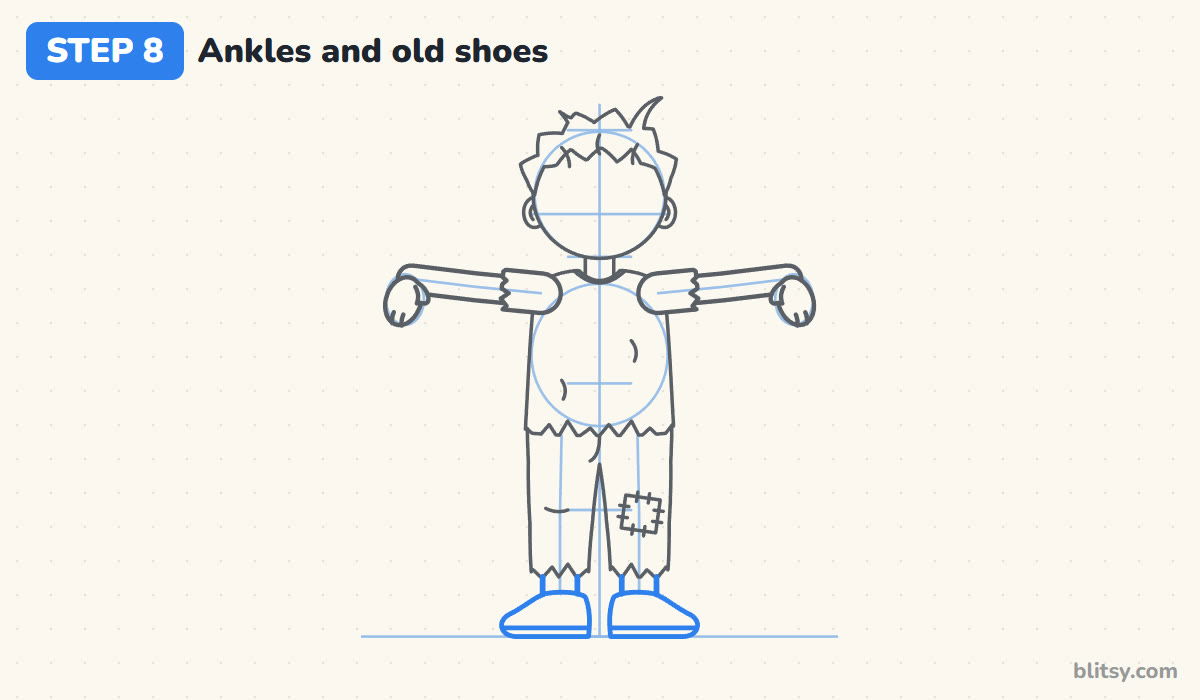
Below each ragged hem, draw two short lines for the ankles. Because the pants are too short, a bit of green skin shows, and that's part of the joke. Then draw a rounded shoe on each foot, toes turned slightly out, with a line along the bottom for the sole.
💡 Tip: Turn the toes out a little. It makes the zombie look like he's waddling, which is funnier.
Step 9: Draw sleepy eyes and forehead stitches
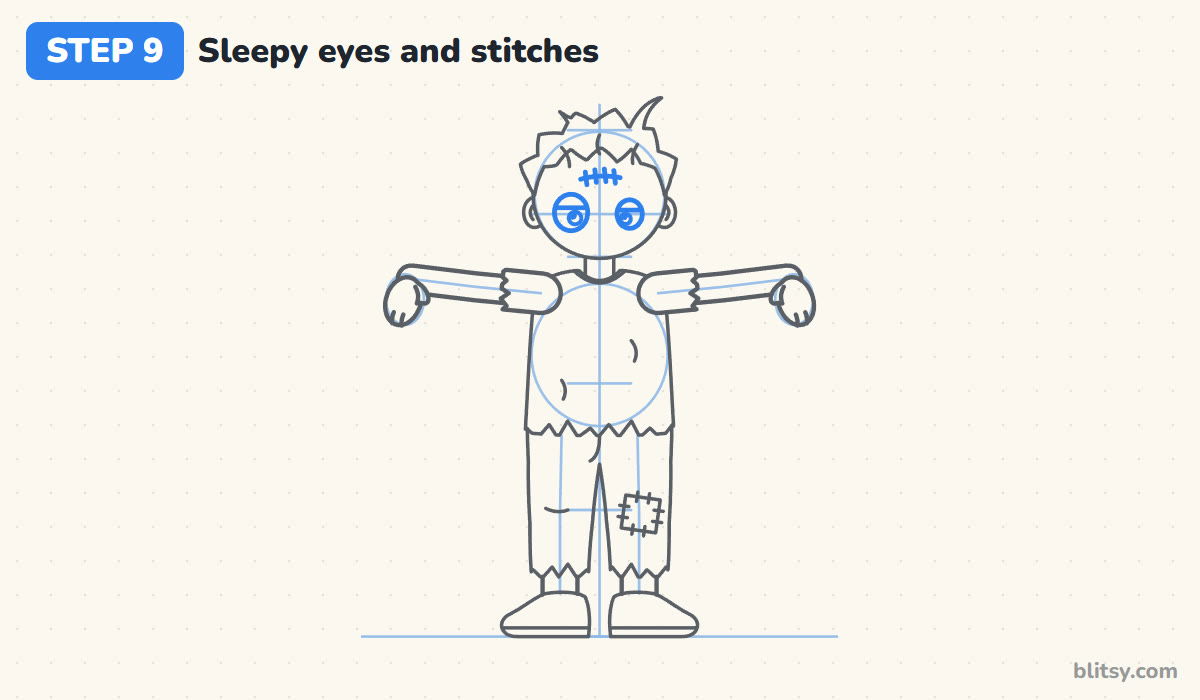
Draw two eyes on the eye line, the left one bigger than the right. A heavy eyelid line cuts across the top of each eye, so he looks half asleep. Add a round pupil in each, pointing in slightly different directions for a dopey look. On the forehead, draw a curved line with a few short ticks across it for stitches.
💡 Tip: Uneven eyes are the secret. Matching eyes make him look like an ordinary kid.
Step 10: Draw the goofy braaains smile
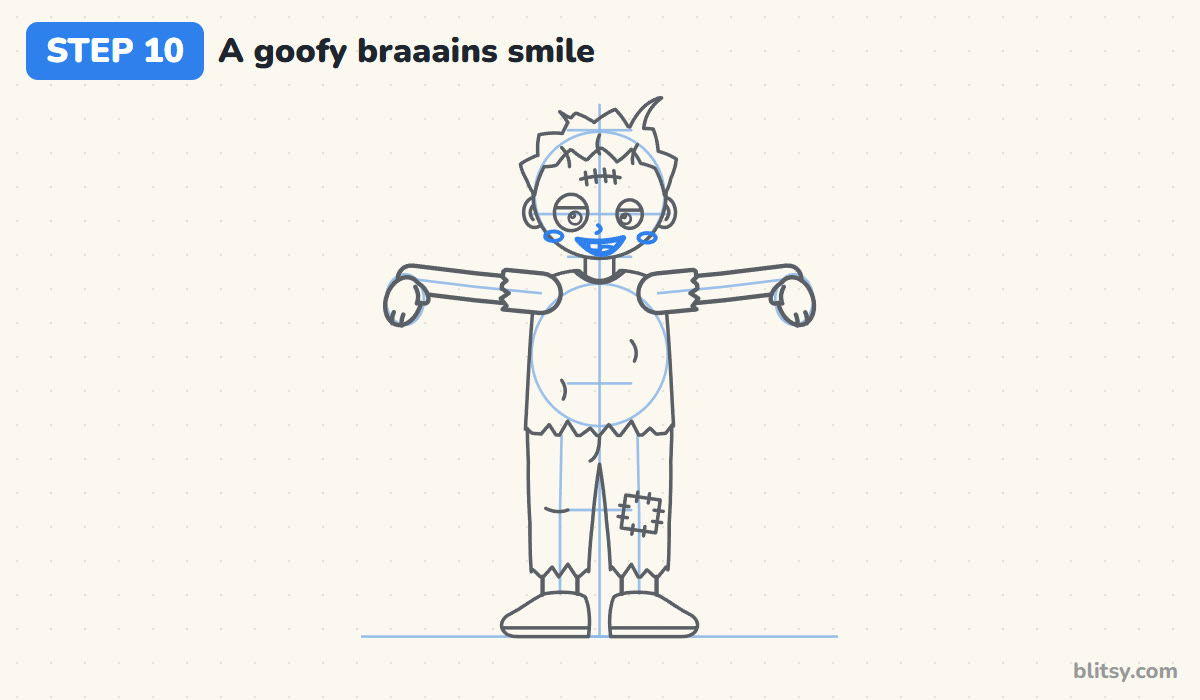
Add a small hooked nose between the eyes. Below it, draw a wide open smile that's a little lopsided, with one square tooth sticking down from the top and a small tongue at the bottom. Finish with an oval on each cheek. I keep the mouth fairly small, because a huge dark mouth turns funny into scary fast.
💡 Tip: Ask your kids to say braaains while they draw the mouth. It always gets a laugh.
Step 11: Ink the lines and erase the guides
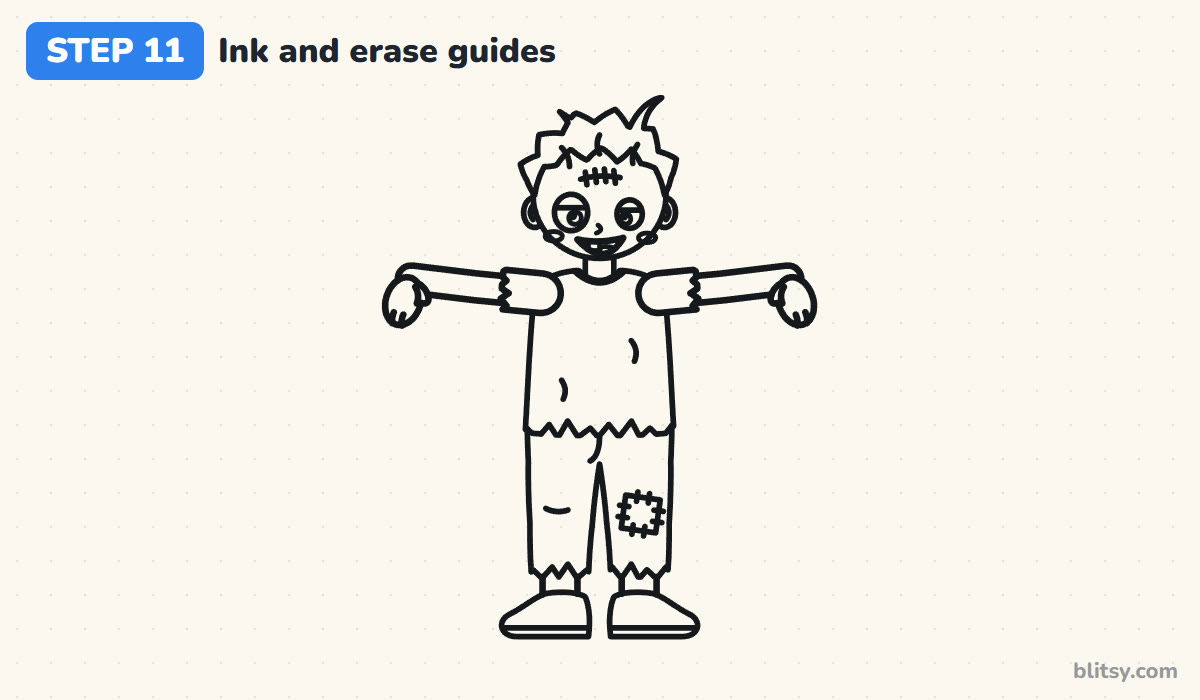
Go over every keeper line with a black marker or fineliner. I slow down on the zigzag edges so each point stays clear. Wait a minute for the ink to dry, then erase the center line, the head marks, the oval and the arm and leg lines.
💡 Tip: Erase in one direction with light strokes. Scrubbing back and forth can tear the paper or smear the ink.




Step 12: Color your zombie
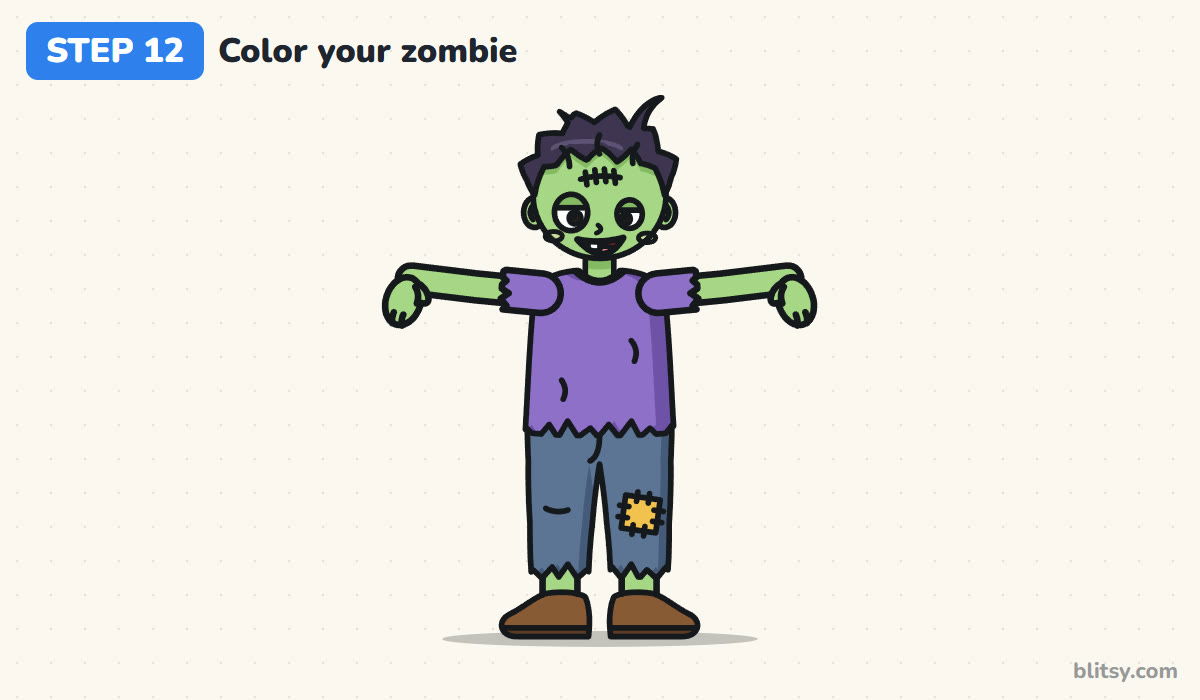
All the skin parts get light green, and shade the top of the eyelids a slightly darker green. Use dark gray for the hair, purple for the shirt, blue for the pants and yellow for the patch. The shoes are brown, the tongue pink, and the eyes stay white with black pupils.
💡 Tip: Press harder on the side of the shirt and pants to make a darker stripe. It looks like a shadow.
Where Cartoon Zombies Turn Too Creepy
- Blood, wounds or bones. These turn a silly character into something younger kids find upsetting. Stitches and a patch tell the same story without the gross part.
- A giant dark mouth. A big black mouth reads as a scream. Keep it small and add a light tongue and one tooth.
- Arms like sticks. Single lines make him look unfinished. Give each arm two lines a thumb width apart.
- Neat clothes. A straight hem makes him look like a normal kid with green paint. Rip at least the hem, the sleeves and the pant legs.
- Matching, wide-open eyes. Those look alert, not undead. Make one eye bigger and drop a heavy lid over both.
Torn Suits, Pigtails and Monster Pals for Your Zombie
Once the basic zombie feels easy, change him up. Swap the T-shirt for a torn suit and tie, give him a baseball cap, or add a sock hanging out of one shoe. A zombie girl works with the same stick figure, just add pigtails and a ragged skirt over leggings. For another friendly spooky character built from a stick figure, try the skeleton drawing tutorial next. The fluffy one-eyed creature in the monster drawing tutorial makes a great zombie sidekick, and the boy drawing tutorial shows the same head-mark trick on a regular kid.
Free Zombie Coloring Page and Printable Steps
Prefer to color first? The free zombie coloring page has the clean outline, a small colored example and a key that shows which color goes where. The step-by-step guide PDF fits all 12 steps and tips on a few pages for Letter or A4 paper, handy for a Halloween class activity.
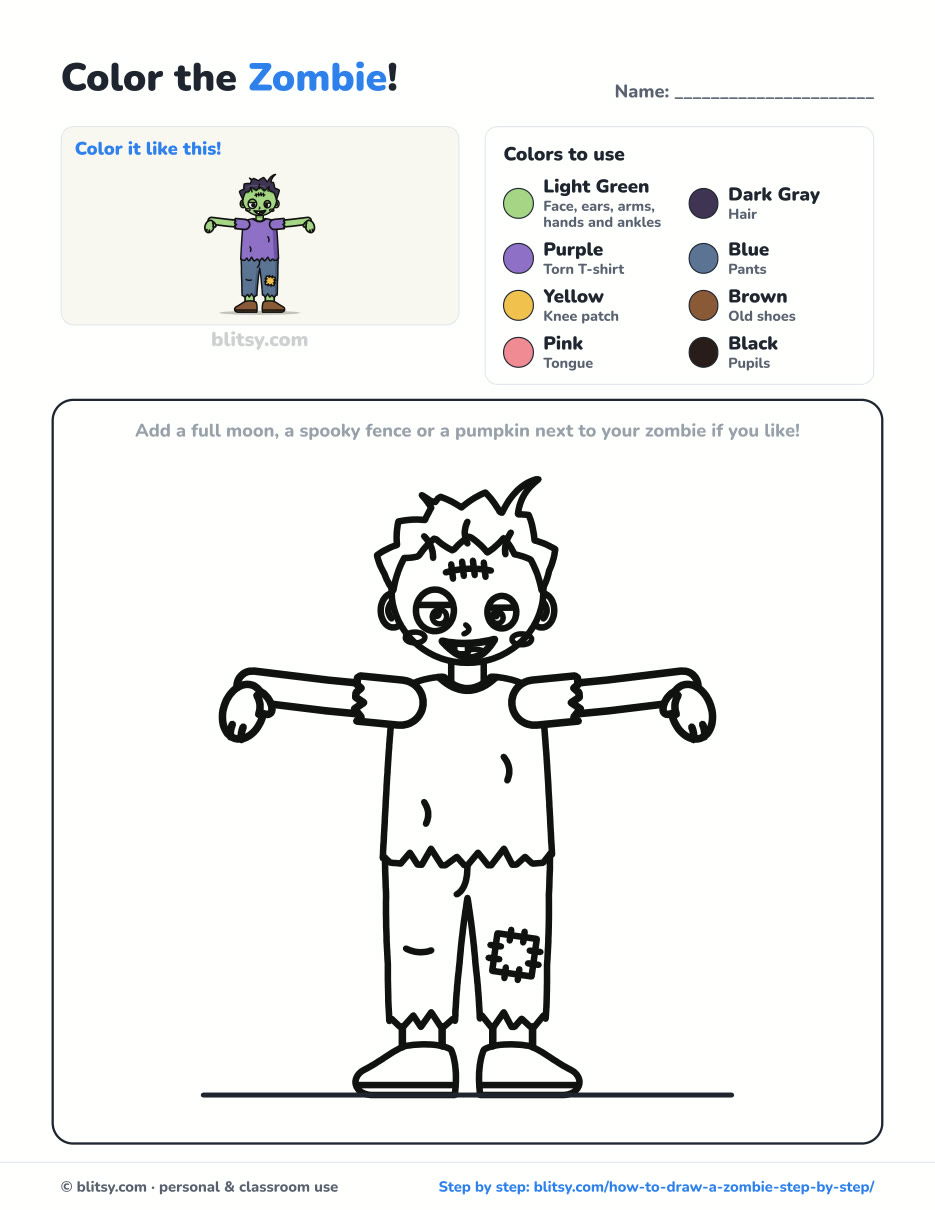
Black outlines with a colored example and the color names at the top. Ready to print and color.
⬇️ Download Coloring PageEvery step picture with its instructions and tips, to keep beside your paper while you draw.
⬇️ Download Drawing Guide📱 On a phone? Tap a download button, then open the file and choose Share → Save to Files or Print. On a computer, the PDF opens or saves straight to your Downloads folder.
Pin the Zombie Steps for Halloween
More Spooky but Friendly Drawings to Try
Each one below is a full step-by-step tutorial with a picture for every stage and a free coloring page.
- Ghost Drawing: A waving ghost floats next to a baby ghost and a pumpkin in this ghost drawing step by step guide.
- Witch Drawing: A little witch zooms across a full moon on her broom with this witch drawing tutorial.
- Halloween Drawing: Draw a friendly haunted house, bats and a grinning pumpkin with this Halloween drawing tutorial.
- Pumpkin Drawing: Learn how to draw a pumpkin step by step, ribs, stem and all.
- Skull Drawing: Build a friendly front-view skull from one circle in this skull drawing tutorial.
Zombie Drawing Questions from Young Artists
What is the easiest way to draw a zombie?
Draw a normal cartoon person first, then make three changes: arms straight out, torn edges on the clothes and sleepy uneven eyes. Green skin finishes the look.
How do you draw a zombie that isn't scary for kids?
Skip blood and wounds, keep the head big and the mouth small, and give him a goofy expression. Stitches and a patch hint at the zombie idea in a silly way.
What colors are zombies usually?
Light green is the classic skin color, but gray, pale blue or even purple work too. Pick clothes that stand out from the skin.
How long does it take to draw a zombie?
Most beginners need about 20 minutes for the pencil and ink stages and another 10 to 15 for coloring. Younger kids can skip the patch and the shading.
Grab a green pencil and let your zombie shuffle onto the page. Show him to someone and see if they say braaains back. 🧟
Related posts:
 How to Draw a Whale Step by Step (Easy for Beginners)
 How to Draw Lungs Step by Step (Easy Science Diagram)
 How to Draw a Pineapple Step by Step (Easy Crown and Slice)
 How to Draw Iron Man Step by Step (Easy Chibi for Kids)
 How to Draw a Dress Step by Step (Easy Party Dress)
 How to Draw a Chicken Step by Step (Easy for Beginners)
 How to Draw a UFO Step by Step (Cute Alien Saucer)
 How to Draw Flames Step by Step (Easy Campfire Drawing)
 How to Draw a Moon Step by Step (Sleepy Crescent + Phases)
 How to Draw a Sunflower Step by Step (Big and Bright)
 How to Draw a Fall Leaf Step by Step (Maple, Oak and Birch)
 How to Draw a Mushroom Step by Step (Easy Storybook Toadstool)

