
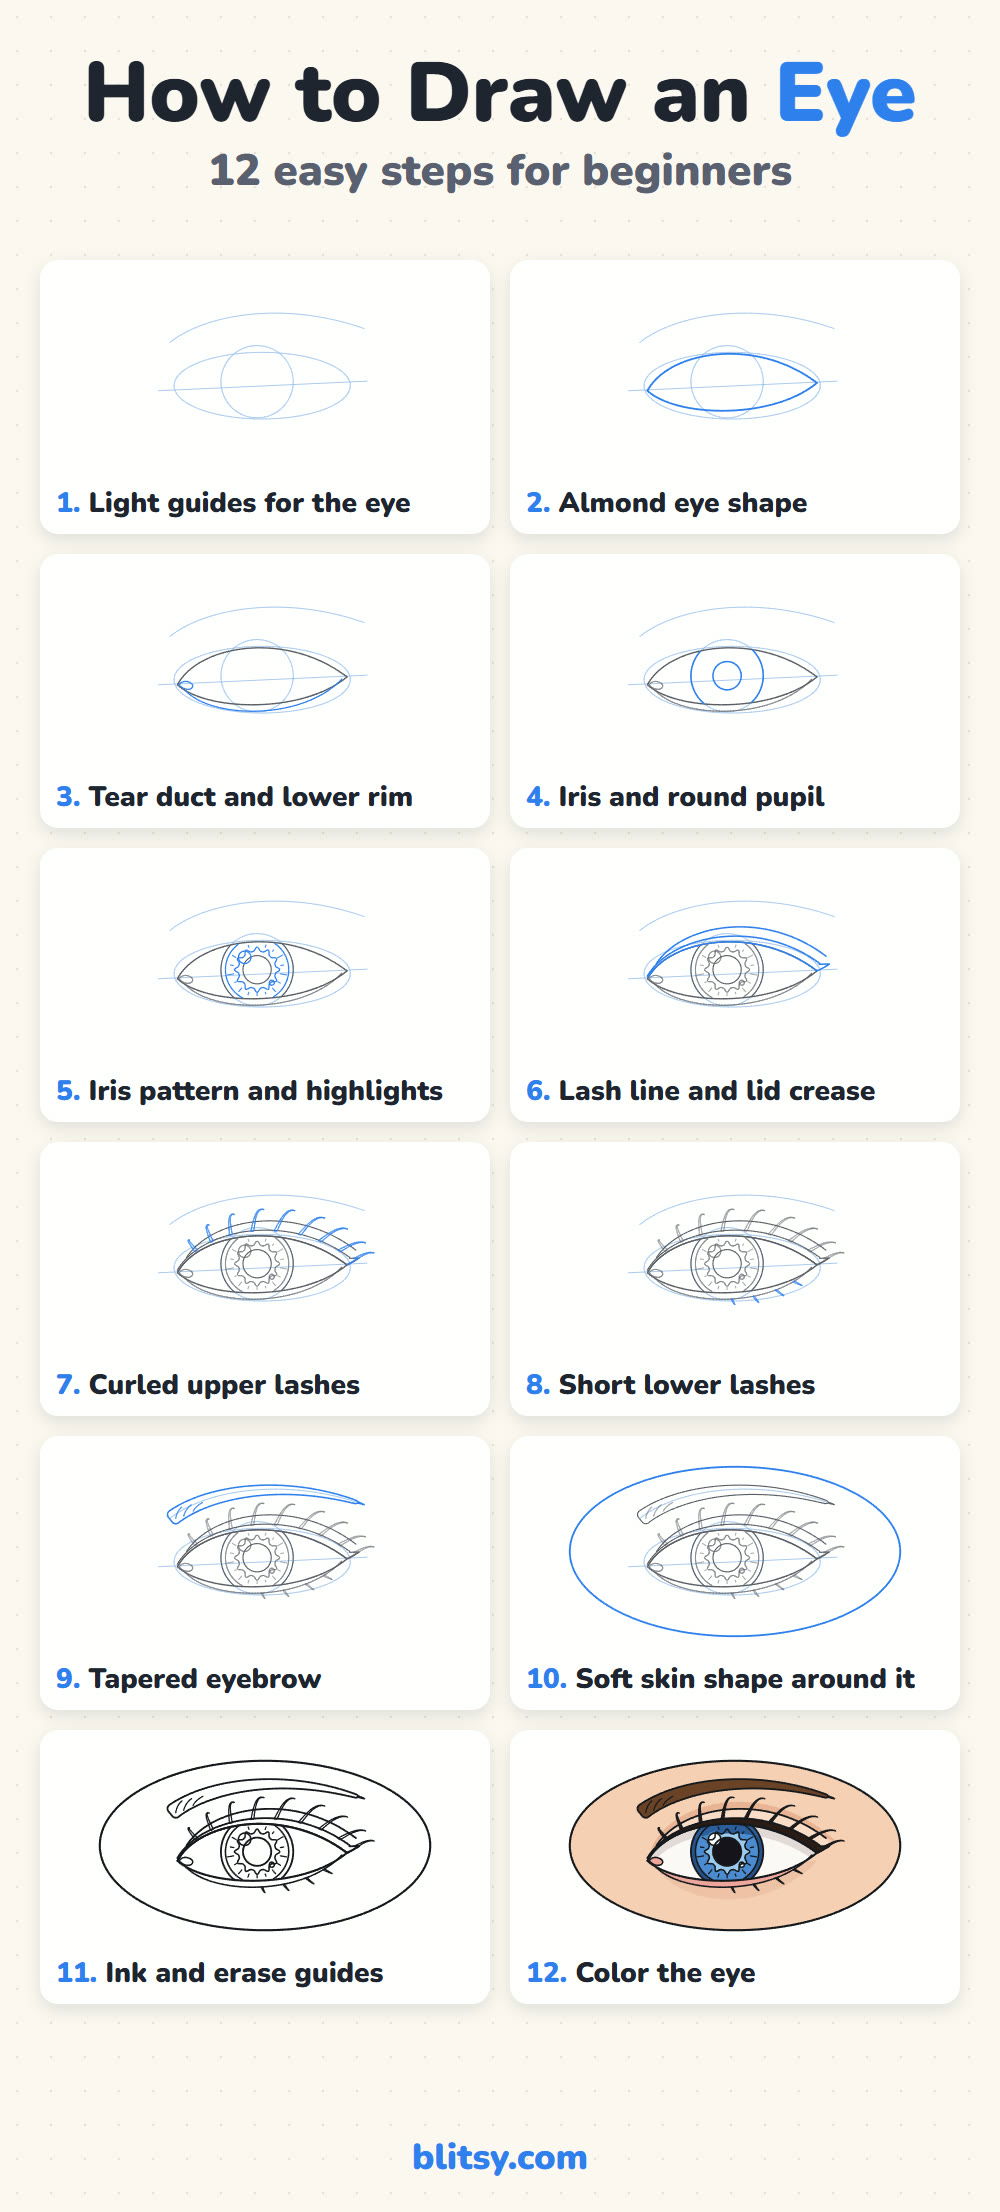
Eyes scare a lot of beginners, but a believable eye is really an almond, a circle and a few well placed curves. Get those three right and the lashes and shading almost take care of themselves. This lesson shows you how to draw an eye step by step, starting from light guides and ending with a colored human eye that has a blue iris, a shiny highlight and a soft eyebrow above it. Take it slowly and you'll be surprised how real it looks.
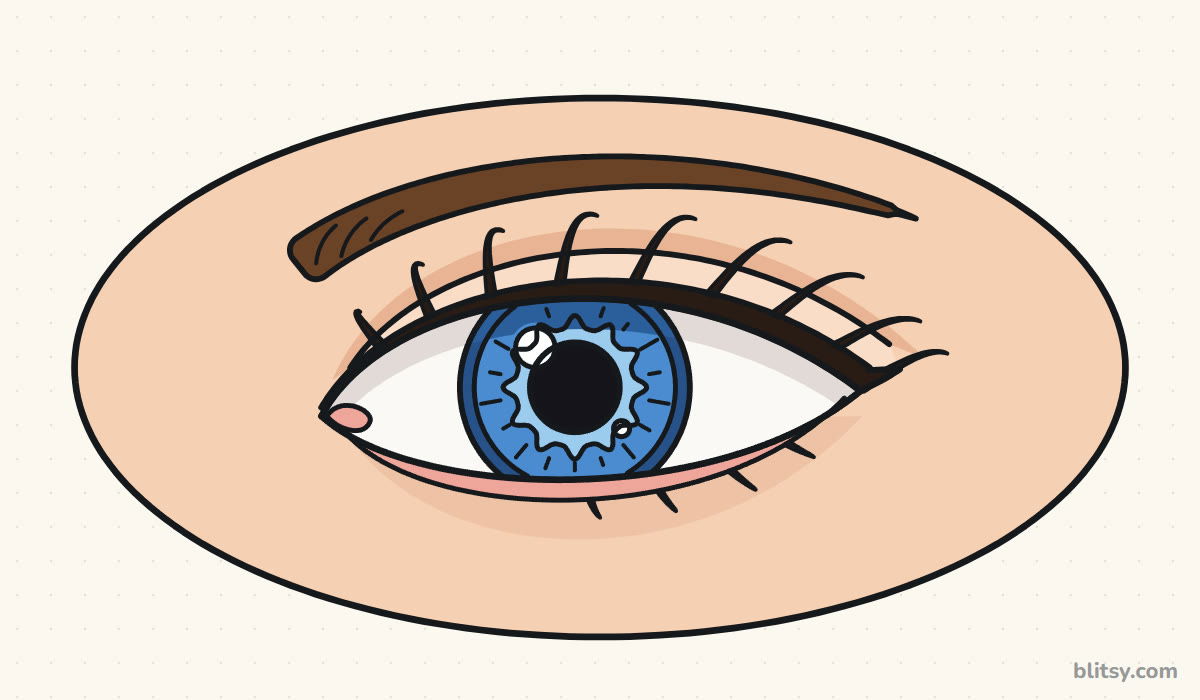
Watch for the color change: fresh lines in a picture are blue, and the parts from earlier steps fade to gray. Copy the blue, then check your shapes against it.
Quick overview
⏱️ Time: about 30 to 40 minutes, coloring included
🎯 Level: easy to medium, good for kids from about 8 and adults starting out
✏️ Steps: 12
👁️ You'll draw: a front-view human eye with lashes, a blue iris and an eyebrow
Tools for a Clean, Clear Eye
- A pencil you can keep light (HB or 2B)
- A soft eraser, or a kneaded one if you have it
- A fine black marker or fineliner for the final lines
- Colored pencils: blue, dark blue, light blue, brown, peach, pink, light gray and black
- Smooth white paper
A sharp pencil point helps a lot here, because the iris lines and lashes are small.
How to Draw an Eye Step by Step
Step 1: Sketch the light guides
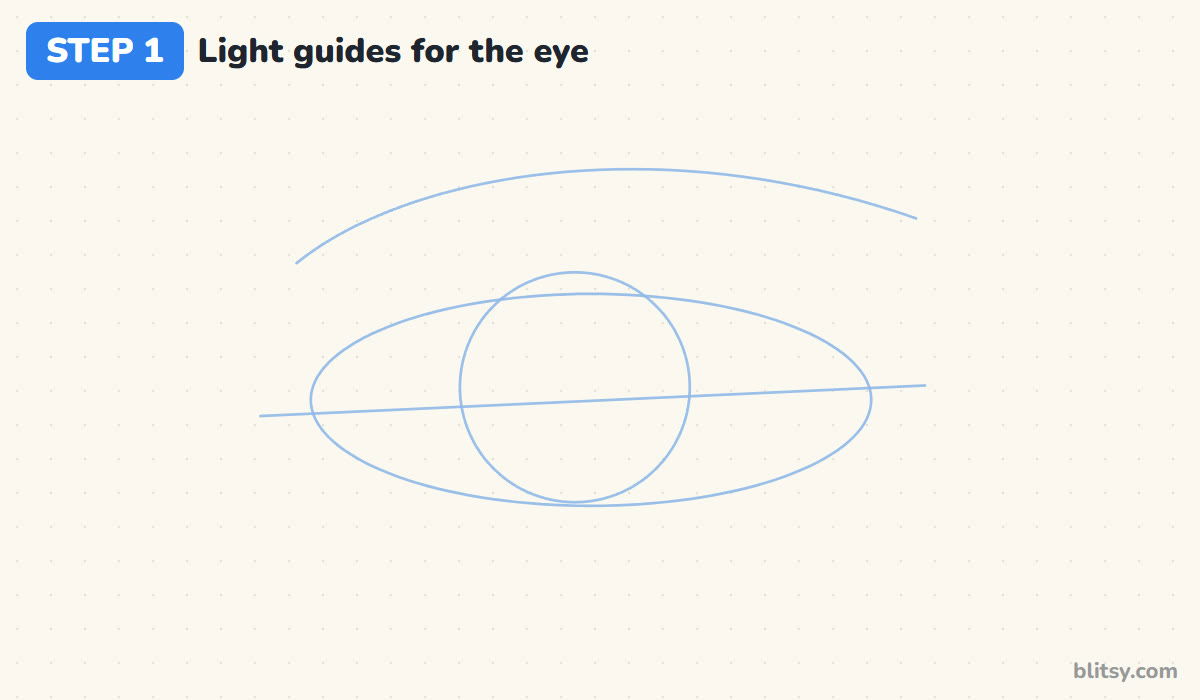
Draw a long, slightly tilted line across the middle of the page, a little lower on the left. Around it, sketch a wide flat oval about two and a half times as wide as it is tall. Put a circle in the middle of the oval for the iris, and a soft arch above everything for the eyebrow.
💡 Tip: Keep the oval wide. A tall oval turns into a surprised, staring eye.
Step 2: Draw the almond eye shape
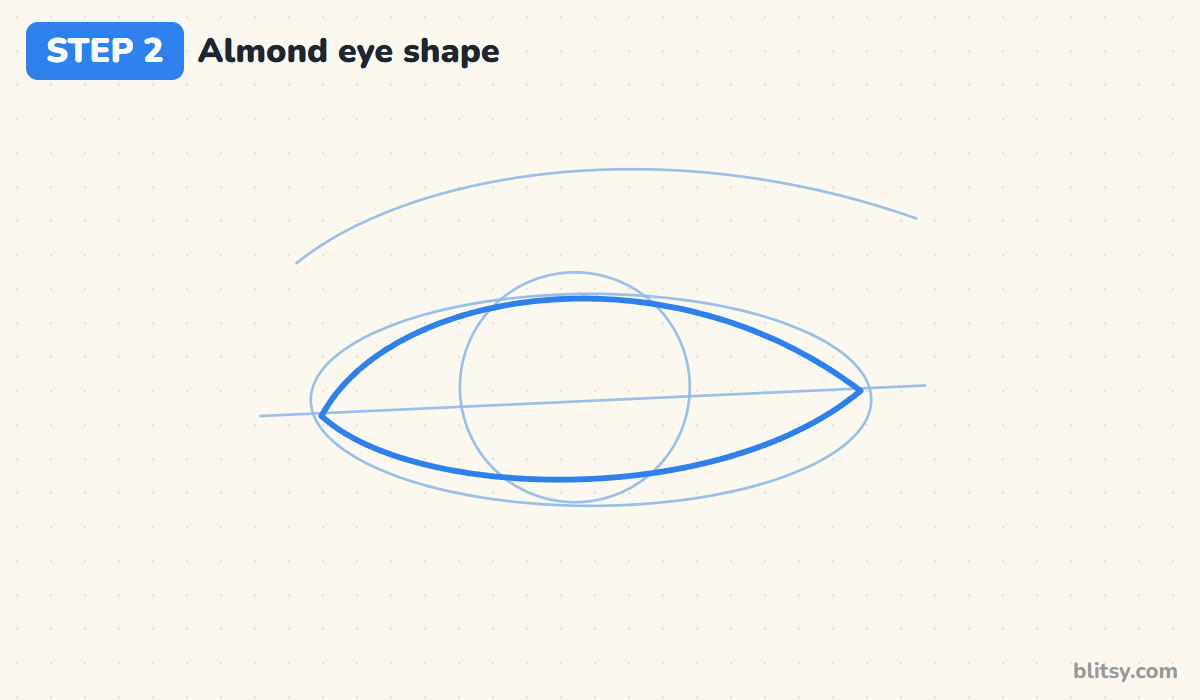
Now turn the oval into an almond. The upper lid arches highest a little to the left of center, while the lower lid is flatter and dips lowest toward the right. Both curves meet in a soft point at each corner, with the inner corner (left) sitting a little lower than the outer one.
💡 Tip: If both lids are mirror images, the eye looks like a lemon. Shift the high point of the top curve toward the nose side.
Step 3: Add the tear duct and lower rim
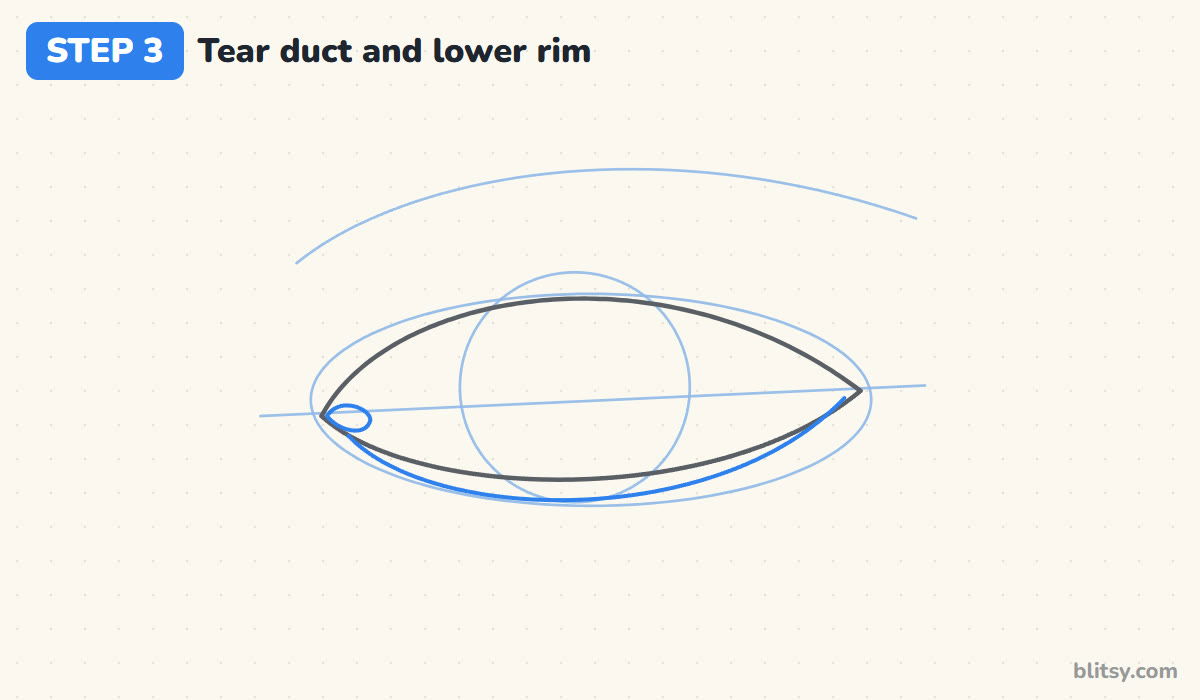
In the inner corner, draw a tiny teardrop pointing into the corner. That's the pink tear duct, and it's a small detail that makes an eye look human. Below the lower lid, add a second line that follows it closely, so the lower lid gets a thin rim of its own.
💡 Tip: Let the rim line fade out before it reaches each corner rather than closing it into a box.


Step 4: Draw the iris and pupil
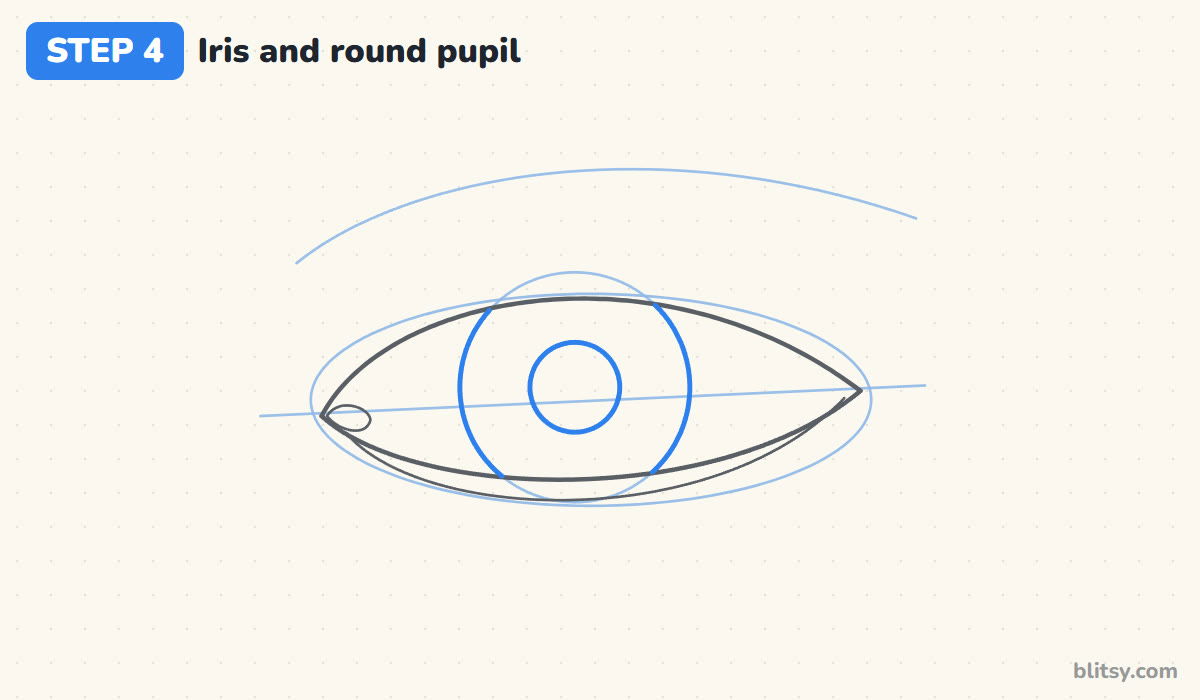
Trace the iris circle firmly, but stop where it meets the eyelids. In a relaxed eye the upper lid covers the top of the iris and the lower lid just touches or covers its bottom. Then add a round pupil in the exact center, a bit less than half as wide as the iris.
💡 Tip: Never draw the whole iris circle with white showing all around it. That only happens when someone is shocked.
Step 5: Add iris details and highlights
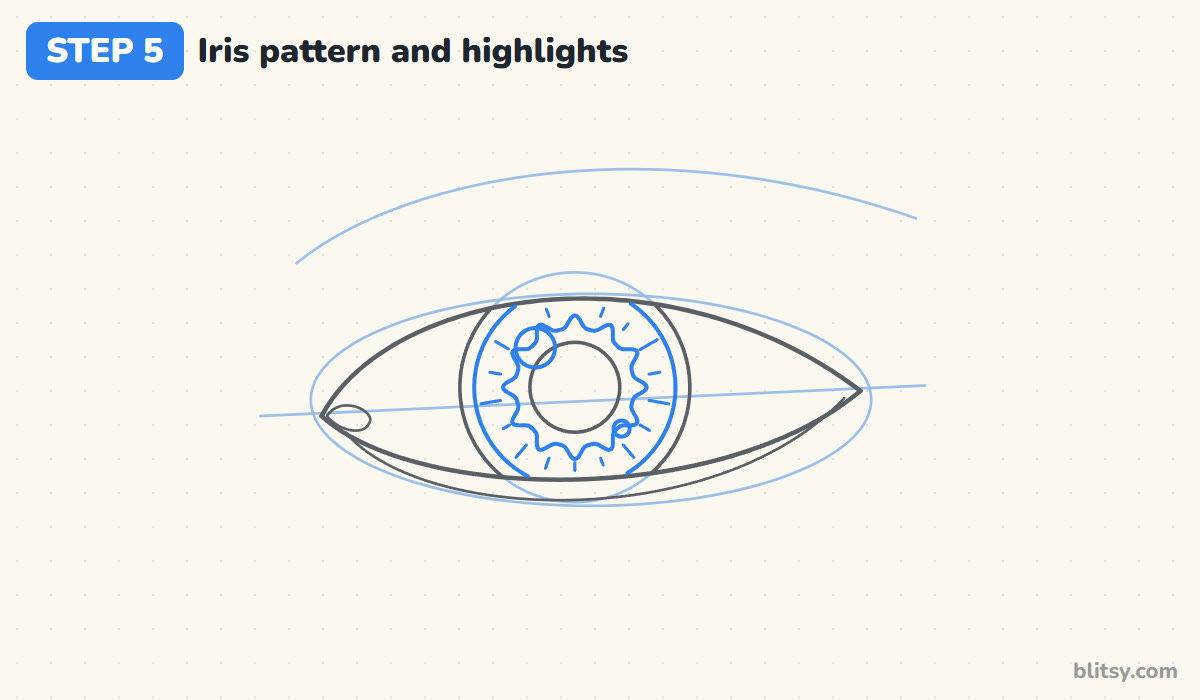
Draw a second circle just inside the iris edge for the darker outer ring. Around the pupil, sketch a wavy star shape, then a ring of short lines pointing outward from it. Last, add one bigger circle for the highlight at the upper left, overlapping the pupil a little, and a tiny one at the lower right.
💡 Tip: Put the highlights in the same spot on both eyes if you ever draw a pair. Mismatched shines make a face look cross-eyed.
Step 6: Draw the lash line and the lid crease
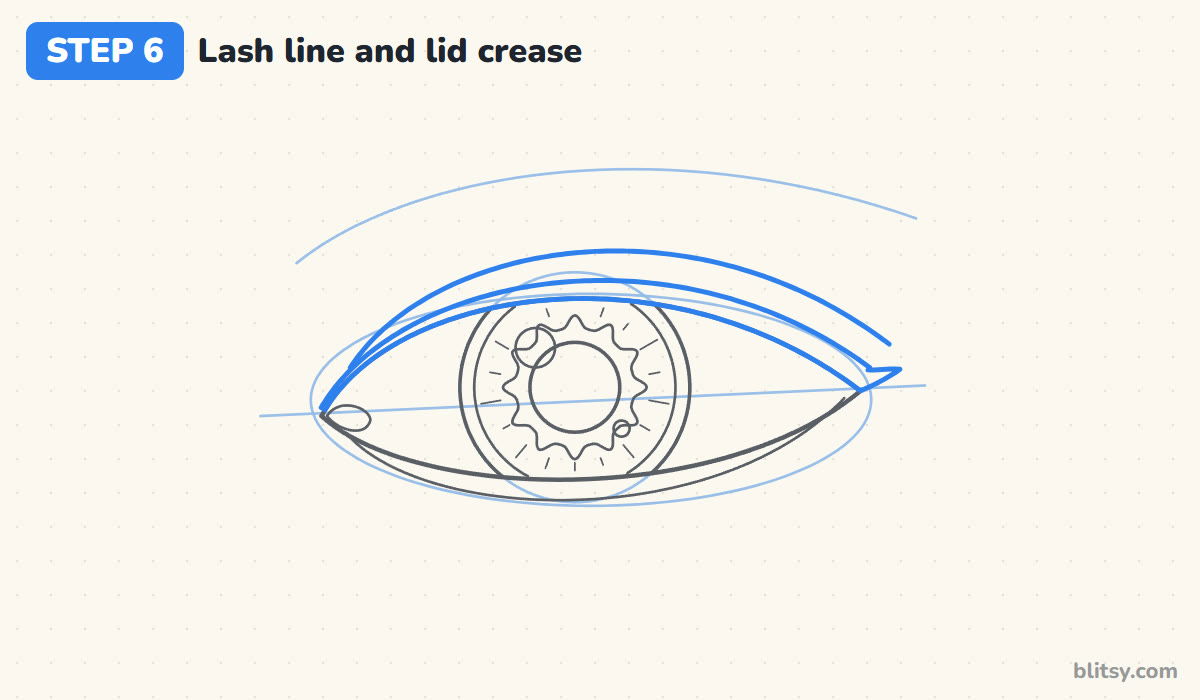
Thicken the upper lid into a dark band that starts thin at the inner corner and gets wider toward the outside, ending in a small flick past the corner. Above it, draw the crease of the eyelid as a long curve, close to the eye on the left and with more room on the right.
💡 Tip: The crease never touches the lash line. Leave a gap so the eyelid has some skin to show.
Step 7: Curl the upper lashes
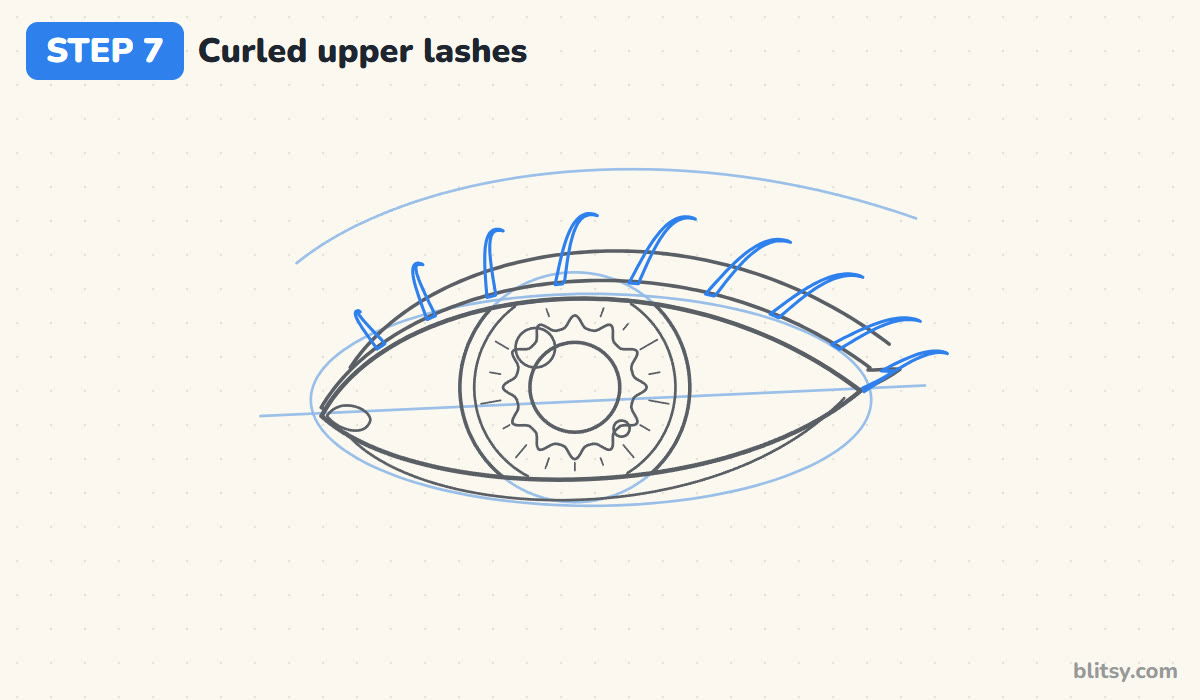
Each lash grows out of the top of the lash band, curves upward and then flips out toward the outer corner. I make them short near the inner corner and longest around the outer third, and I tilt each one a little more to the right than the one before. Nine lashes are plenty.
💡 Tip: Flick each lash from the root outward in one quick stroke. Slow lashes come out wobbly and blunt.



Step 8: Add a few lower lashes
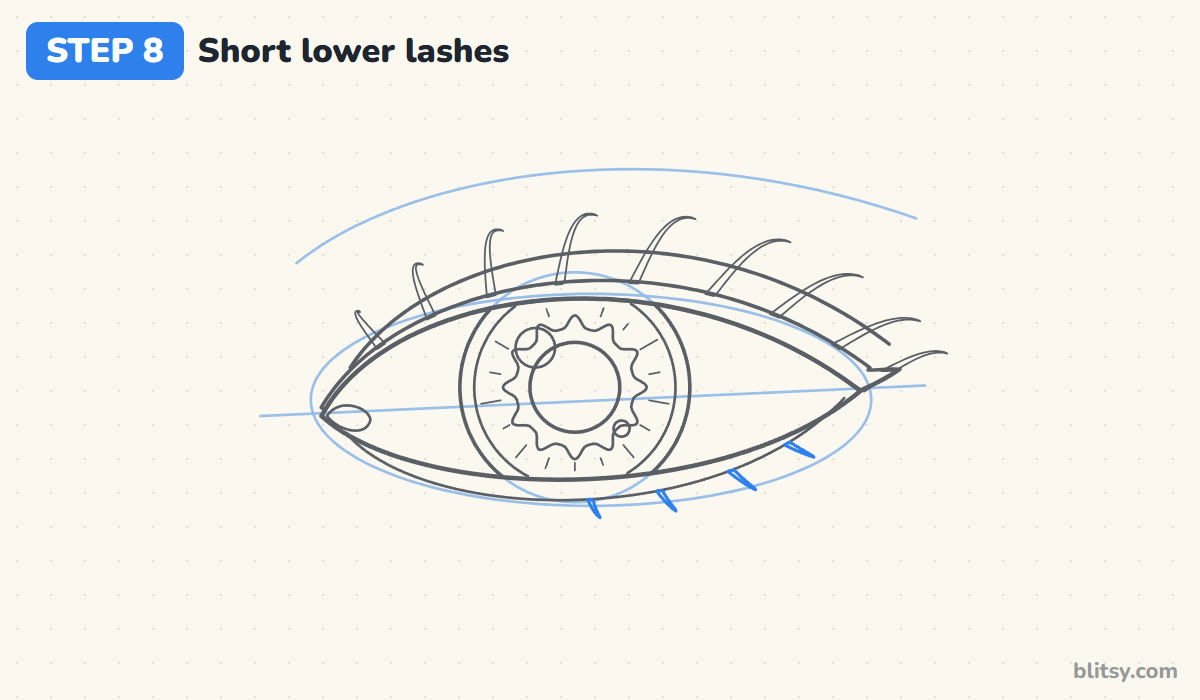
Under the lower rim, draw four short lashes on the outer half only, leaning down and out. Lower lashes are much shorter and fewer than the top ones. Skipping the inner half keeps the eye from looking heavy or tired.
💡 Tip: Keep a small space between the lashes. A solid row of them looks like a fence.
Step 9: Shape the eyebrow
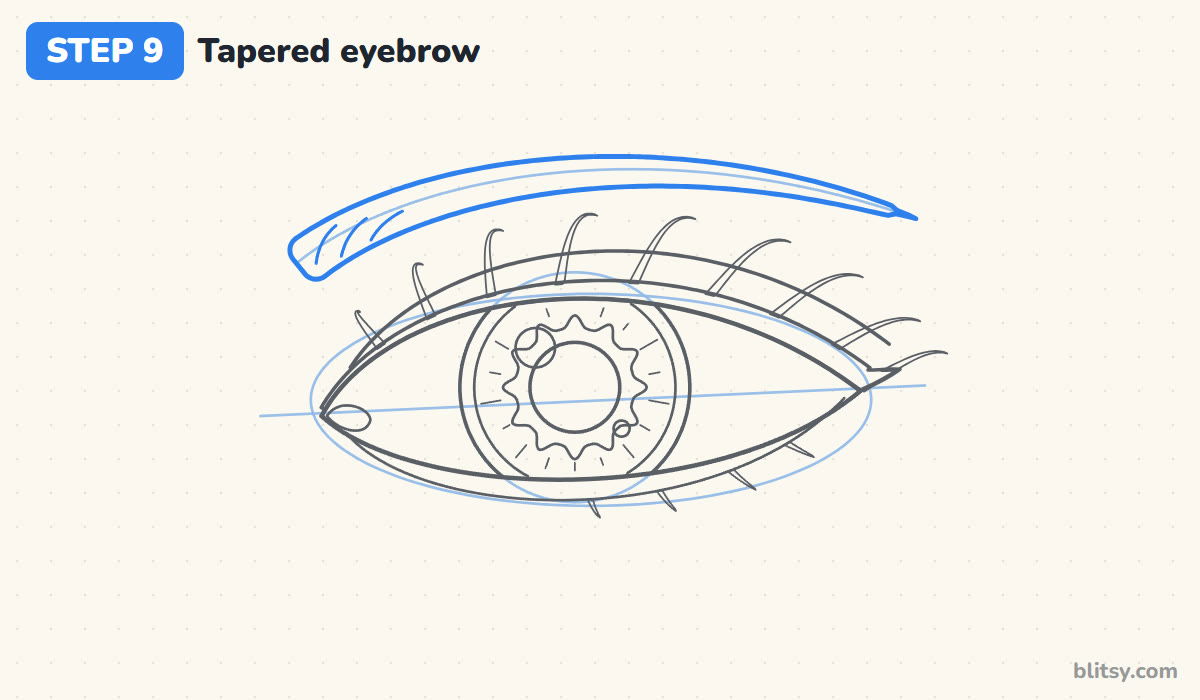
Follow the brow arch with a shape that's thick above the inner corner and narrows to a fine point past the outer corner. Its highest spot sits roughly above the outer edge of the iris. Add three short hair strokes at the thick end, pointing up and out.
💡 Tip: Start the brow just above the tear duct, not in the middle of the eye. A brow that starts too far right looks raised.
Step 10: Draw a soft skin shape around it
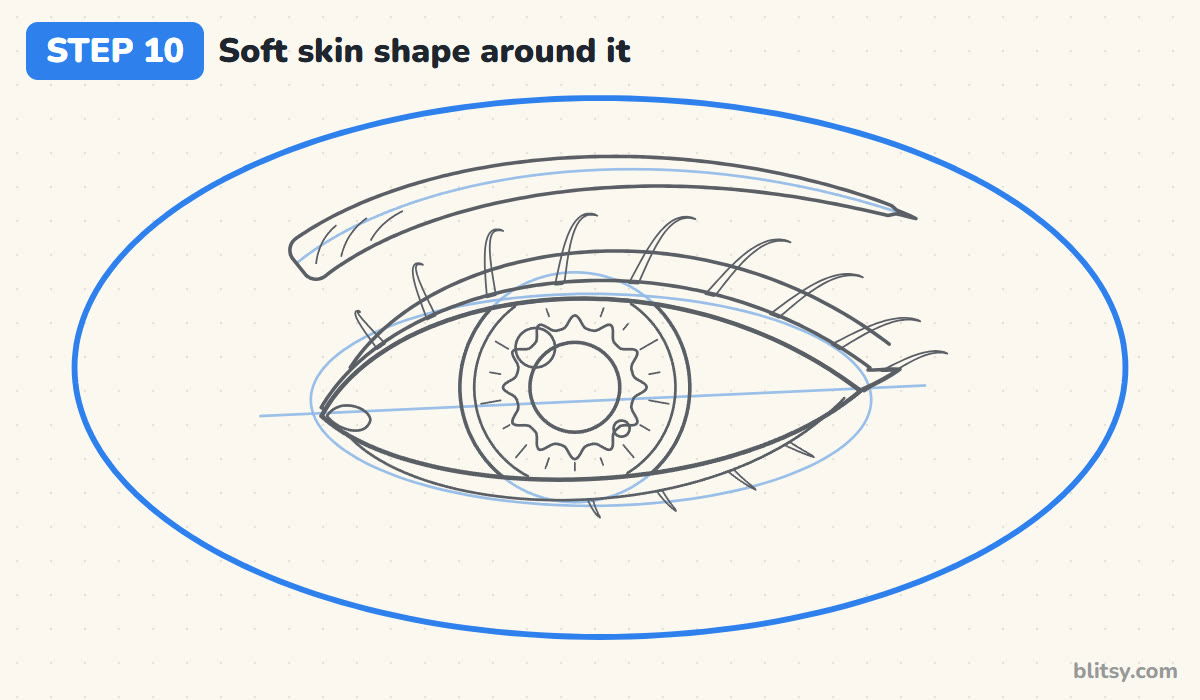
Wrap a big, smooth oval around the eye and brow with space on every side. It works like a little window onto the face and gives you room for skin tone and shadows. You can skip it if you plan to put the eye on a face later.
💡 Tip: Keep the oval wider than tall so the eye sits comfortably inside without touching the edge.
Step 11: Ink the eye and erase the guides
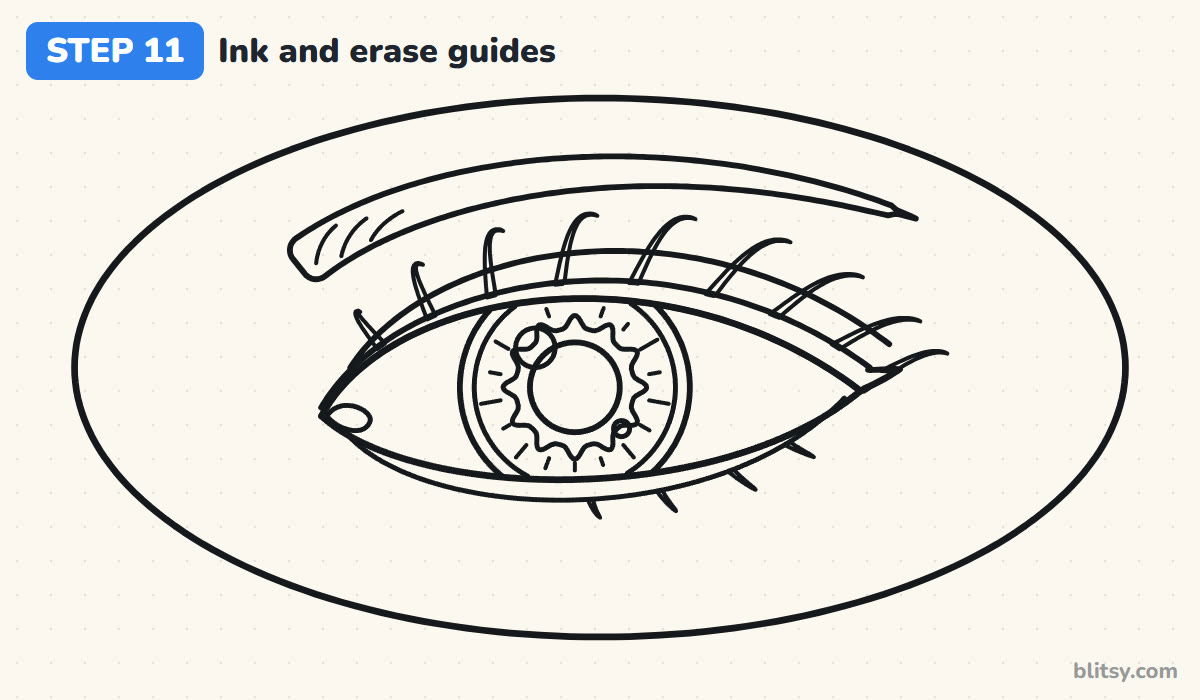
Go over all the keeper lines with the black fineliner. I ink the iris and pupil first while my hand is steady, then the lids, then the lashes and brow. Wait a minute for the ink to dry, then erase every pencil guide.
💡 Tip: Turn the paper so you always pull the pen toward you on the long lid curves.


Step 12: Color the eye
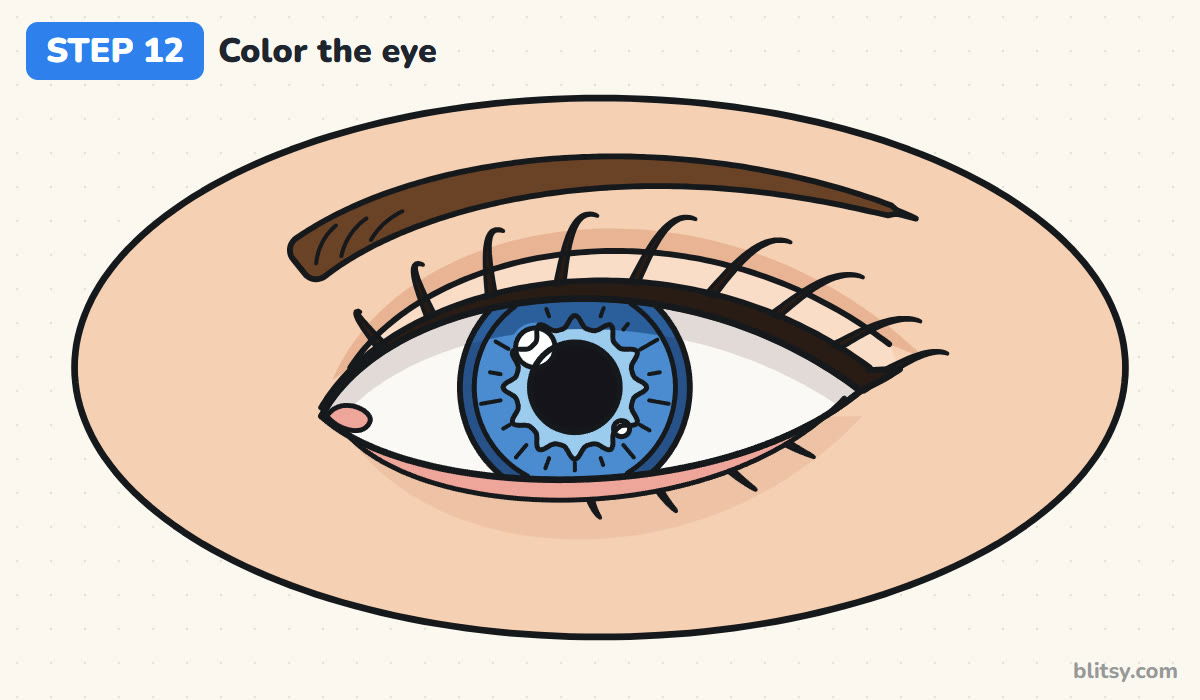
Color the skin peach and the eyelid a touch lighter. A darker peach goes above the crease and in a soft crescent under the eye. The white of the eye gets a light gray band under the upper lid. Color the iris blue with a dark blue ring and a light blue star, then make the pupil, lash line and lashes black and the brow brown. Leave both highlights white.
💡 Tip: That gray shadow under the lid is the secret to a round eyeball. A pure white eye looks flat and pasted on.
Where Eye Drawings Usually Go Wrong
- A perfectly round or lemon-shaped eye. Real eyes are almonds that aren't symmetrical. Keep the high point of the top lid toward the nose.
- The whole iris showing. A full circle with white all around reads as shock. Tuck the top under the upper lid.
- Lashes drawn straight out like spikes. Lashes curve up and then sweep toward the outer corner. Draw them as little hooks.
- Forgetting the highlight. Without that white shine, the eye looks dull and lifeless. Plan it before you color the pupil, so you don't color over it.
- A brow floating too high. The brow sits close above the crease. A big gap makes the eye look startled.
Changing the Eye's Color and Mood
Swap the blue for green, hazel or a warm brown and the whole eye changes character. Draw the lower lid a little higher and the brow a little lower for a friendly, smiling eye, or flatten the upper lid for a sleepy look. Younger kids can skip the iris lines and lower lashes and still get a clear eye. Once one eye feels easy, put two of them on a whole head with the face drawing tutorial, which shows where eyes sit on a face. For a fun contrast, compare this human eye with the slit pupil in the cat eye drawing step by step lesson, and finish the face with the nose drawing tutorial.
Free Eye Coloring Page and Printable Steps
The free eye coloring page puts the colored eye at the top as a model, with a key that matches every color to its part, and a large outline below to color yourself. The step-by-step PDF guide has all 12 steps with pictures and tips, so you can practise away from the screen. Both print on Letter or A4.
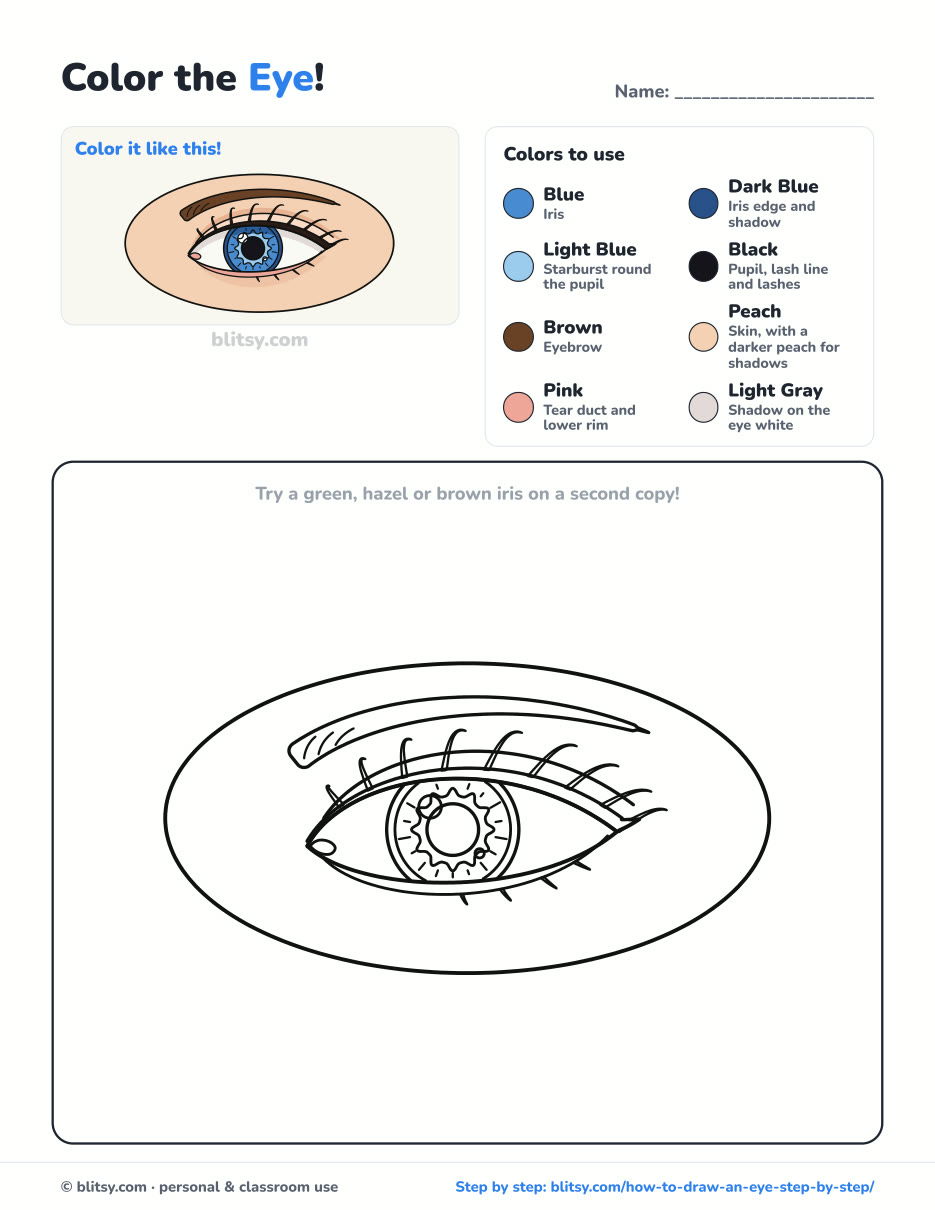
Black outlines with a colored example and the color names at the top. Ready to print and color.
⬇️ Download Coloring PageEvery step picture with its instructions and tips, to keep beside your paper while you draw.
⬇️ Download Drawing Guide📱 On a phone? Tap a download button, then open the file and choose Share → Save to Files or Print. On a computer, the PDF opens or saves straight to your Downloads folder.
Keep the Eye Steps on Your Pinterest Board
More Faces, Features and Eyes to Draw
Every link below is a full tutorial with a picture for each step, so you can keep practising faces one feature at a time.
- Face Drawing: Place the eyes, nose and mouth on a few measured lines with this face drawing tutorial.
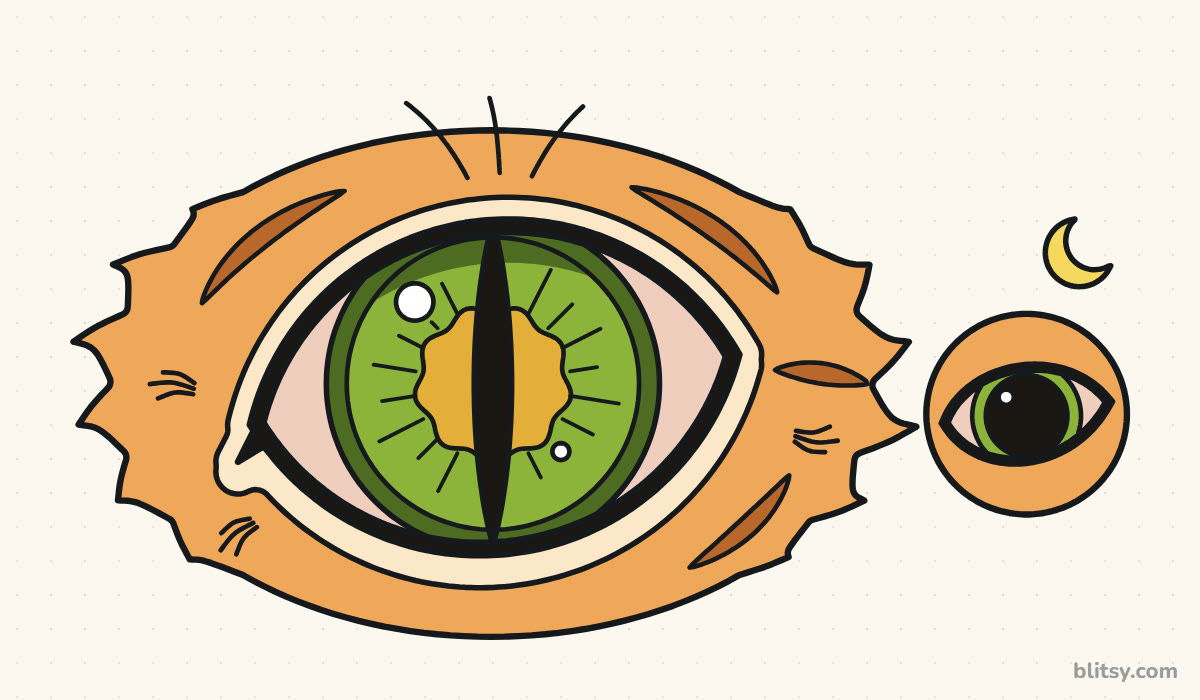
- Cat Eye Drawing: Draw a big green-gold cat eye with a tall slit pupil in this cat eye drawing step by step lesson.
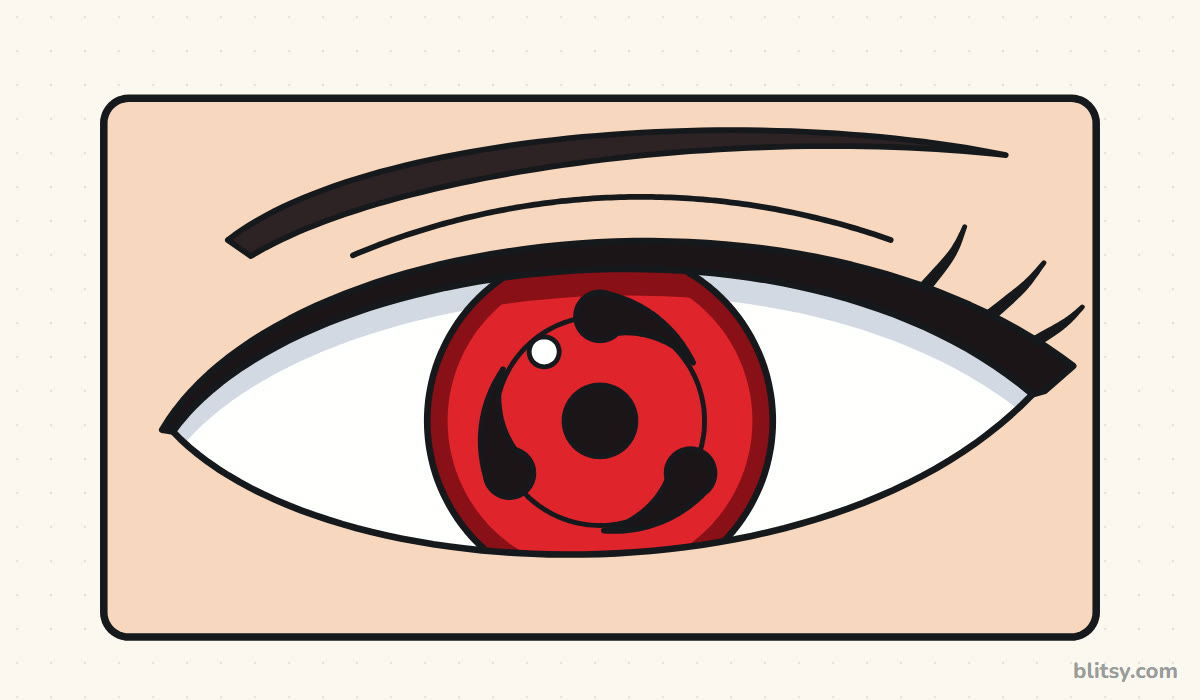
- Sharingan Drawing: A red anime eye with three comma-shaped tomoe comes together in this Sharingan drawing tutorial.
- Nose Drawing: Build a front-view and a side-view nose from one ball and two wings with this how to draw a nose tutorial.
- Male Face Drawing: Use the classic proportion lines for a friendly man's face in this male face drawing step by step guide.
Eye Drawing Questions From Beginners
What is the easiest way to draw an eye for beginners?
Start with a wide almond shape and a circle for the iris that tucks under the top lid. Add a pupil and a white highlight, then a lash line and a few curved lashes. Those few shapes already read as a real eye.
How do you make a drawn eye look realistic?
Three things do most of the work: a highlight in the pupil, a soft shadow under the upper lid on the white of the eye, and a darker ring around the edge of the iris.
Which part of the eye should I draw first?
Draw the almond outline first, then the iris. Lashes and the eyebrow come last, because they depend on where the lids and iris ended up.
How long does it take to draw an eye?
About 30 to 40 minutes with coloring. Inking and the lashes take the longest, so give yourself time there.
Draw the almond, tuck in the iris and don't forget that tiny white shine. Your eye will look right back at you. 👁️✏️
Related posts:
 How to Draw Sharingan Step by Step (Easy Anime Eye)
 How to Draw a Cat Eye Step by Step (Slit and Round Pupil)
 How to Draw a Car Step by Step (Easy Drawing for Beginners)
 How to Draw a Whale Step by Step (Easy for Beginners)
 How to Draw an Arctic Fox Step by Step (Easy for Beginners)
 How to Draw a Shark Step by Step (Easy for Beginners)
 How to Draw a Chicken Step by Step (Easy for Beginners)
 How to Draw a Fish Step by Step (Easy Goldfish for Beginners)
 How to Draw a Snowman Step by Step (Easy for Beginners)
 How to Draw Hands Step by Step (Easy Palm View for Beginners)
 How to Draw an Airplane Step by Step (Easy Jet for Beginners)
 How to Draw a Mouse Step by Step (Easy for Beginners)

