
Volleyballs look tricky because of all those curved strips, but the pattern is simpler than it seems. Three groups of three strips meet in one spot, a bit like the letter Y. Once you know that, learning how to draw a volleyball step by step comes down to one circle, one light Y and a handful of gentle curves. You'll finish with a bright yellow and blue ball with white strips, resting on the ground, ready for the beach or the gym.
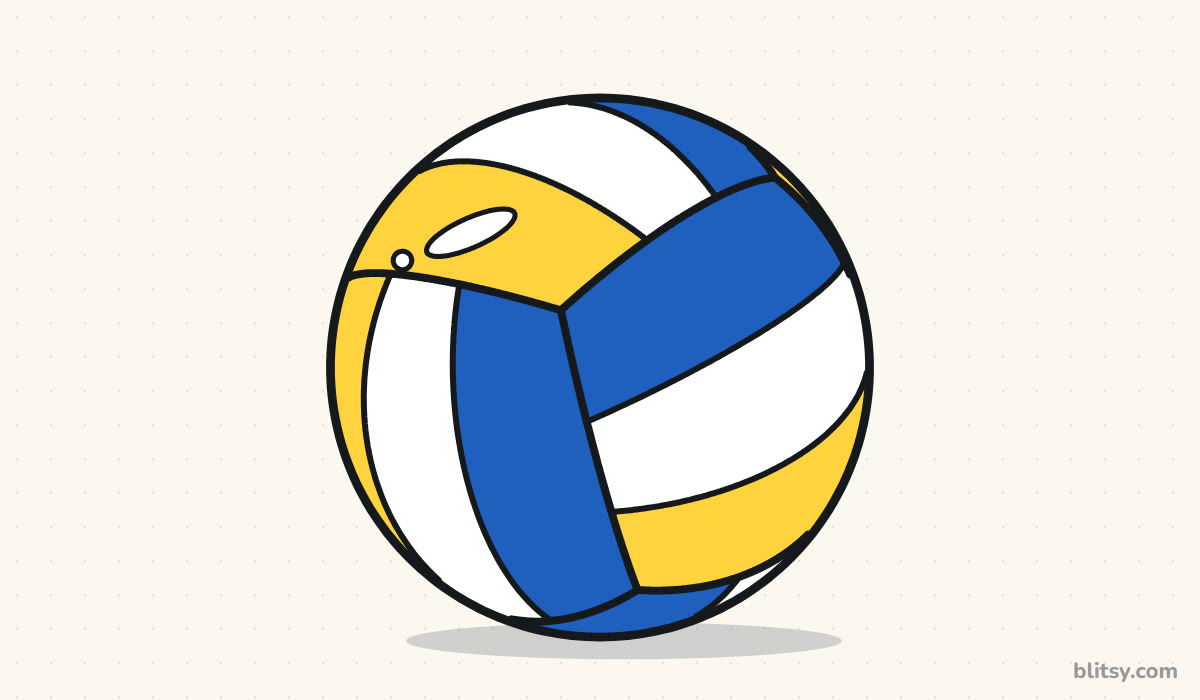
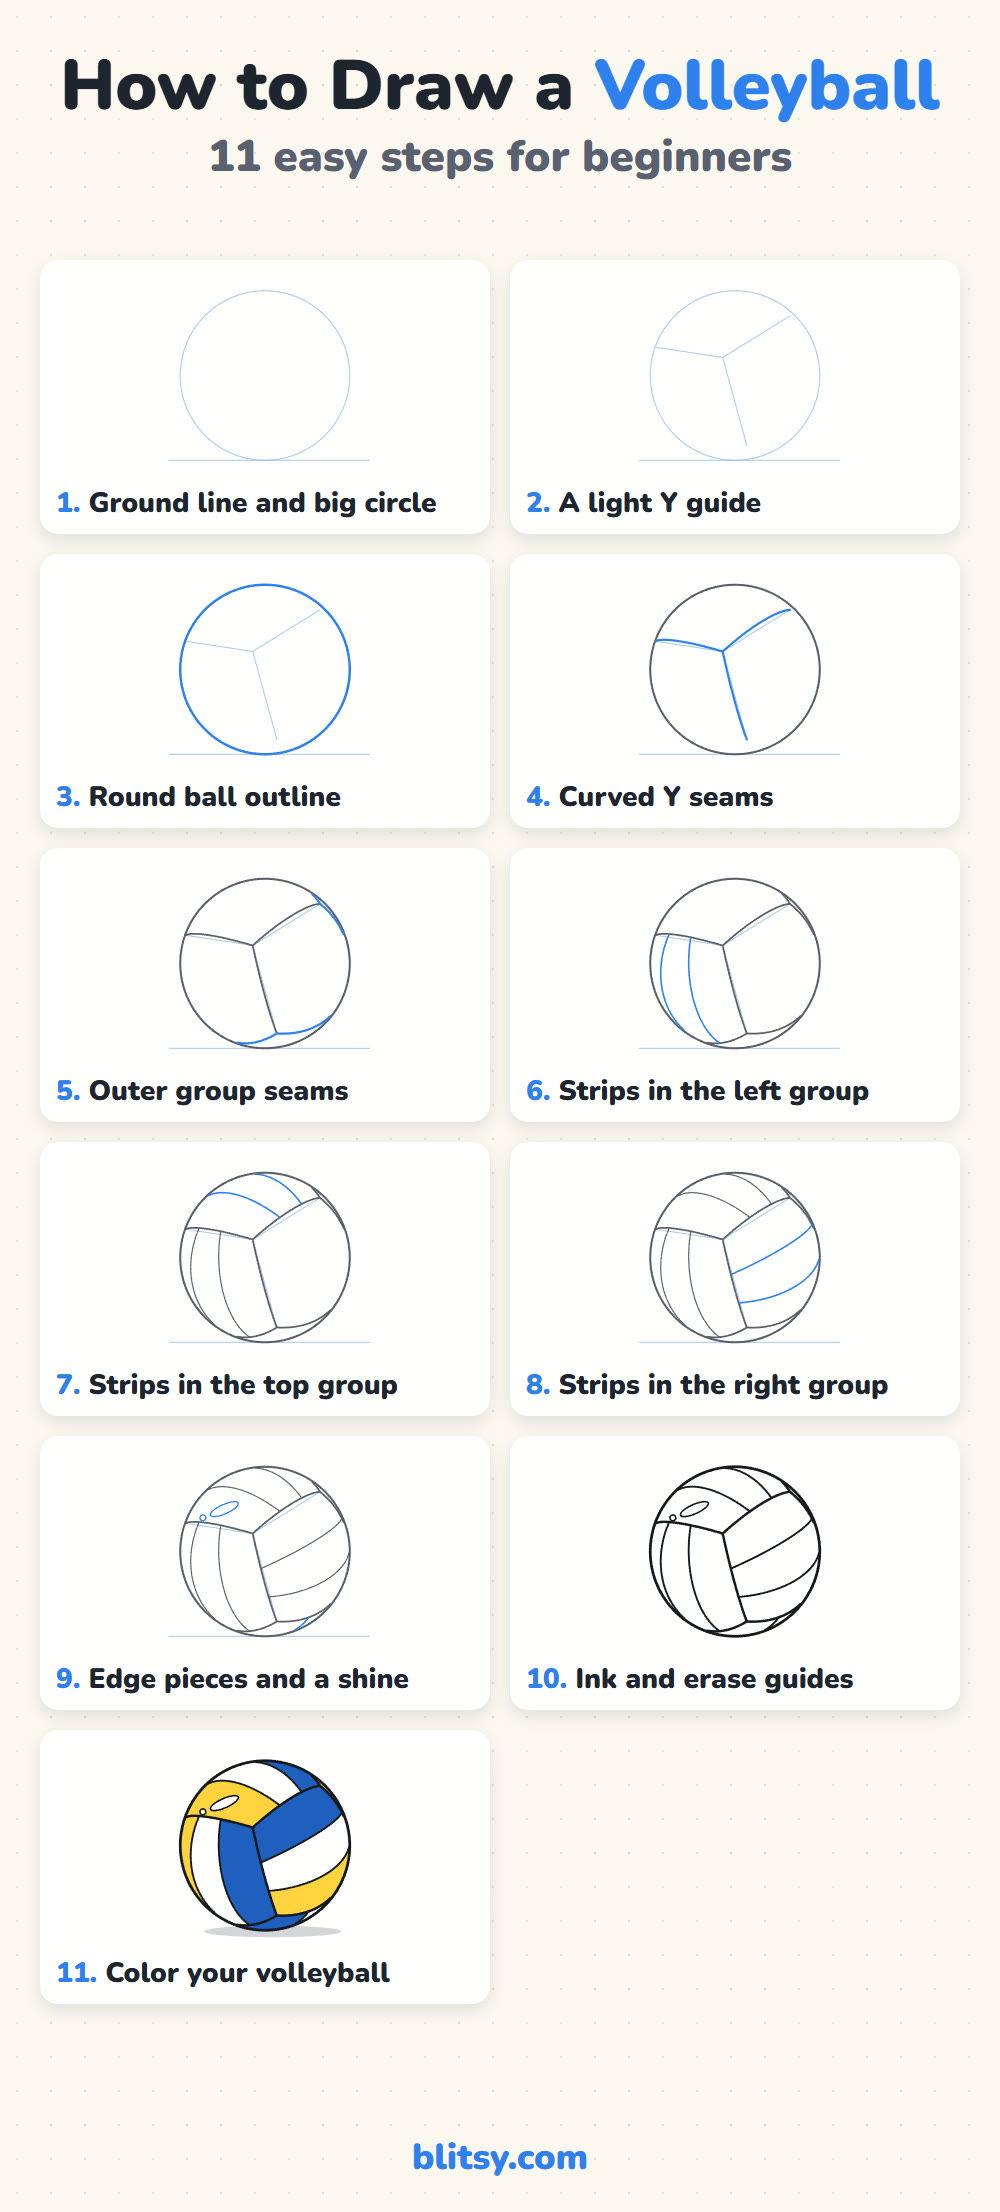
Two colors do the teaching here. Blue lines are new in that step, gray lines are finished, so copy just the blue before going on.
Quick overview
⏱️ Time: about 25 to 30 minutes with coloring
🎯 Level: easy, good for kids from about 7 up
✏️ Steps: 11
🏐 You'll draw: a classic three-color volleyball resting on the ground
Gear for Your Volleyball Sketch
- A pencil you can press lightly with (HB works well)
- An eraser for the guide lines
- Something round to trace if you like, such as a cup or a roll of tape
- A black marker or fineliner for the final lines
- Colored pencils or crayons in yellow and blue, plus a light gray
- A sheet of plain white paper
Tracing the circle is fine. The seams are where the real drawing happens.
How to Draw a Volleyball Step by Step
Step 1: Draw a ground line and a big circle
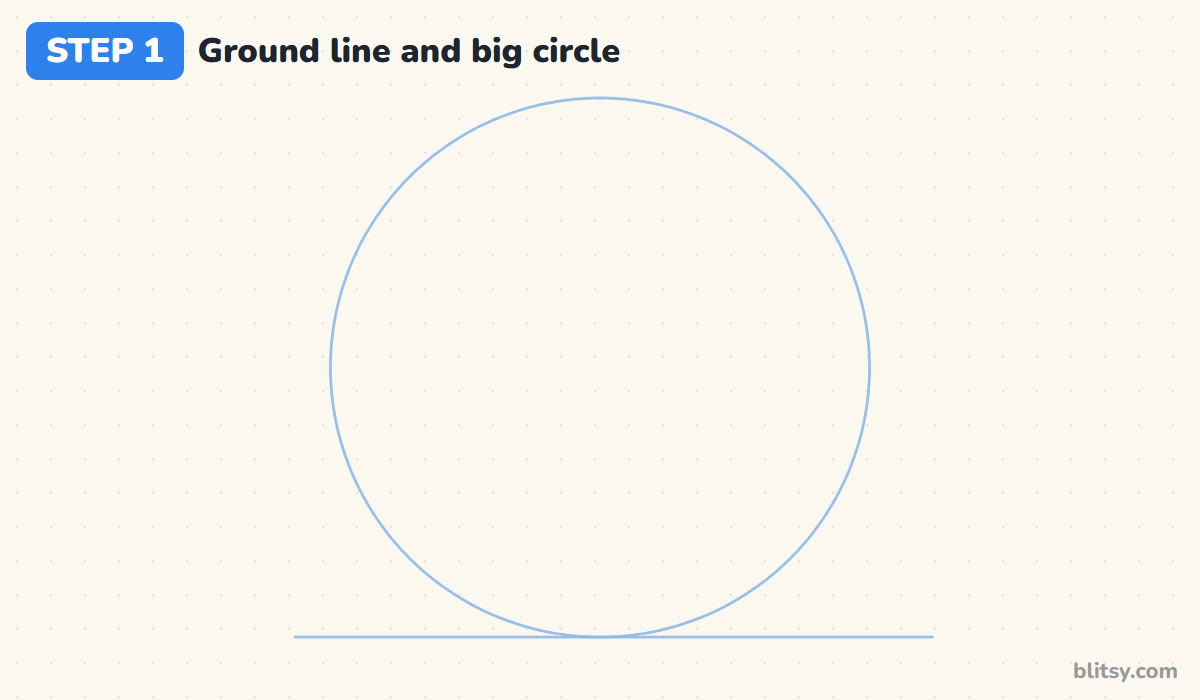
Draw a light flat line across the lower part of the page. Sit a big circle on top of it so the bottom of the circle just kisses the line. Make the circle large, about two thirds of the page height, because the strips get narrow near the edge and you want room for them.
💡 Tip: If your circle comes out a little lumpy, trace a cup or a roll of tape instead. Nobody will know.
Step 2: Sketch a light Y guide
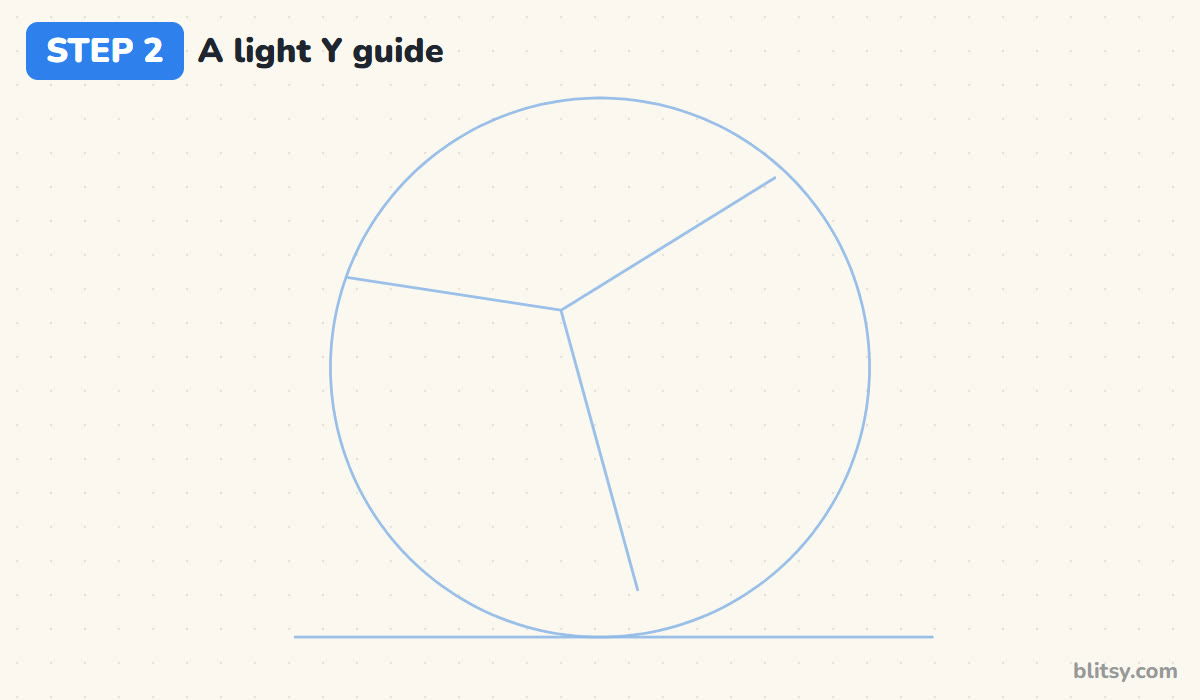
Put a small dot slightly above and to the left of the circle's center. From that dot, draw three straight lines out to the edge: one to the left, one up and to the right, and one almost straight down. Together they look like a tilted Y. I keep the three lines roughly the same length from the dot, so the three groups end up a similar size.
💡 Tip: Keep the dot off center. A Y right in the middle makes the ball look flat, like a peace sign.
Step 3: Go over the ball outline
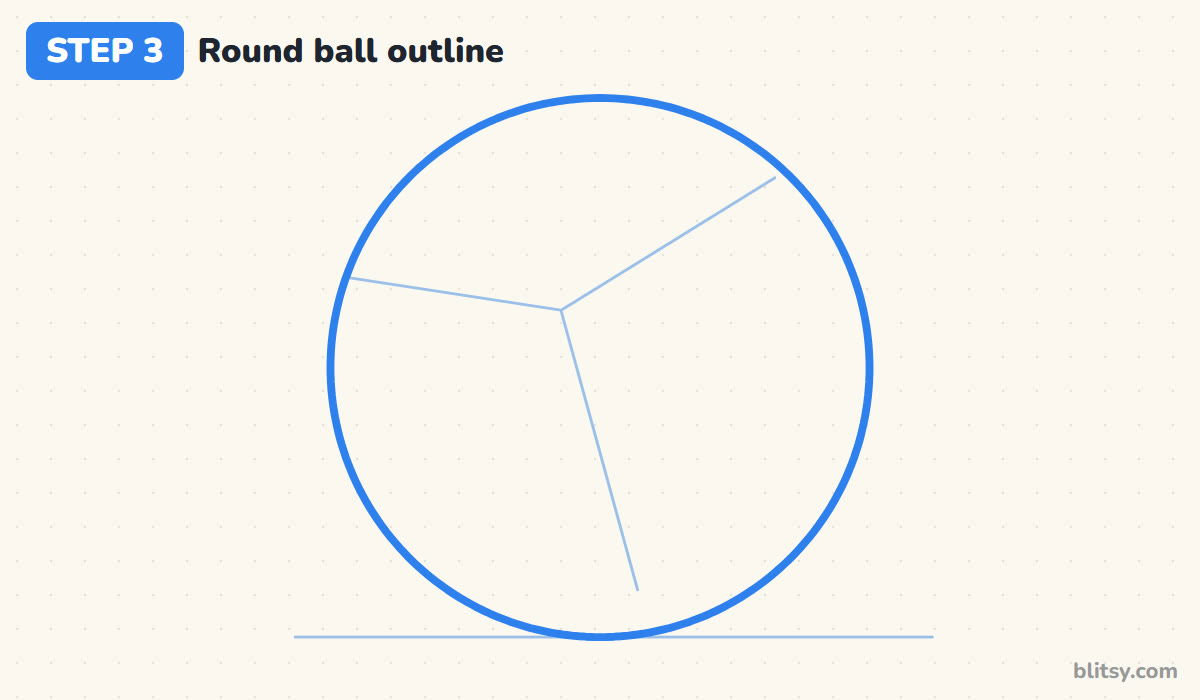
Trace the circle again with a steady, slightly darker line. This is the outline you'll ink later, so take your time and turn the paper as you go. The Y guide stays light underneath it for now.
💡 Tip: Draw the outline in four quarter-arcs instead of one long sweep. Short strokes wobble less.




Step 4: Curve the three Y seams
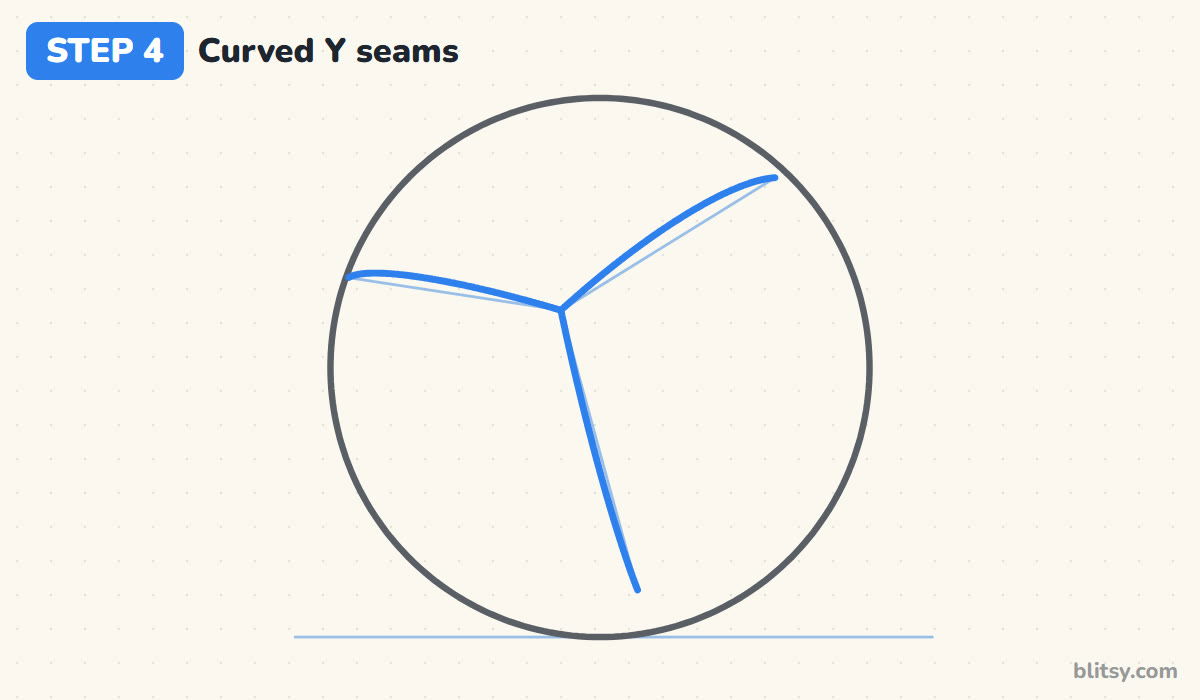
Now turn each straight Y line into a seam that bends with the ball. The arm going left bows upward a little, the arm going up and right swings out in a gentle arc, and the lower arm stays almost straight. Curving them is what tells the eye this is a round ball and not a flat circle with lines on it.
💡 Tip: Picture the lines as rubber bands stretched over the ball. They always bend toward the edge, never away from it.
Step 5: Add the outer group seams
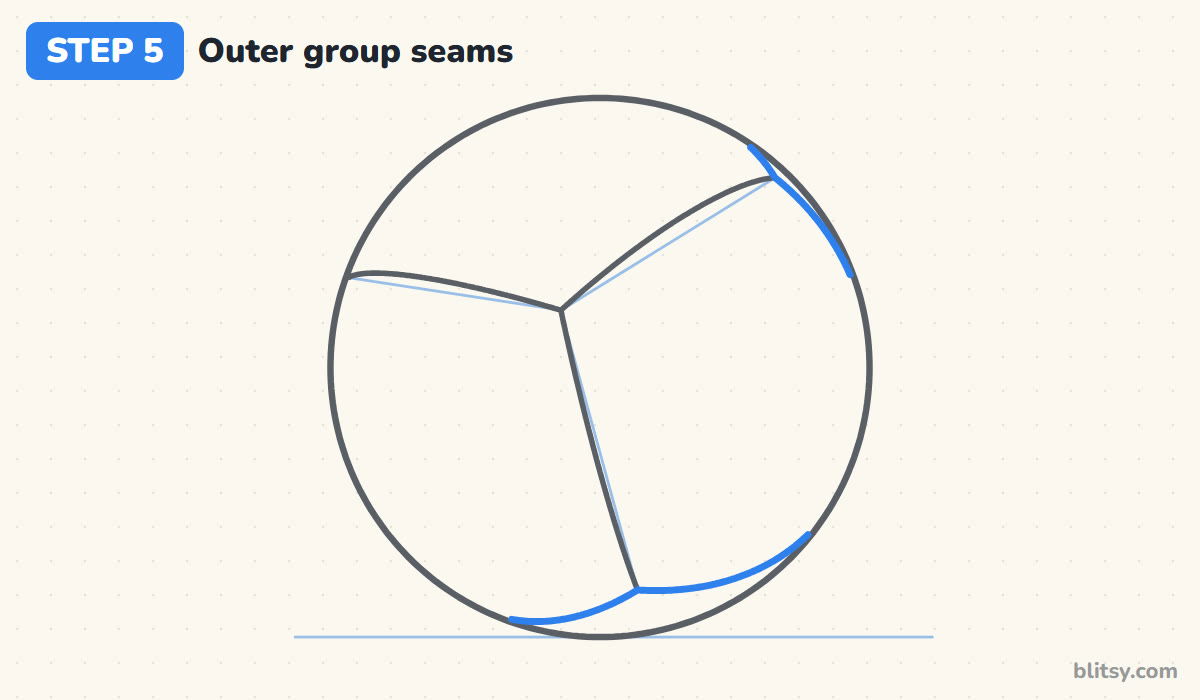
Each group of strips is a rounded square, so it has edges farther out too. From the end of the lower Y arm, draw two short curves: one down to the bottom of the ball and one up to the right edge. Near the top right, add a short curve close to the outline.
💡 Tip: The outer seams are short and sit close to the rim. If yours reach the middle of the ball, they're too long.
Step 6: Draw the strips in the left group
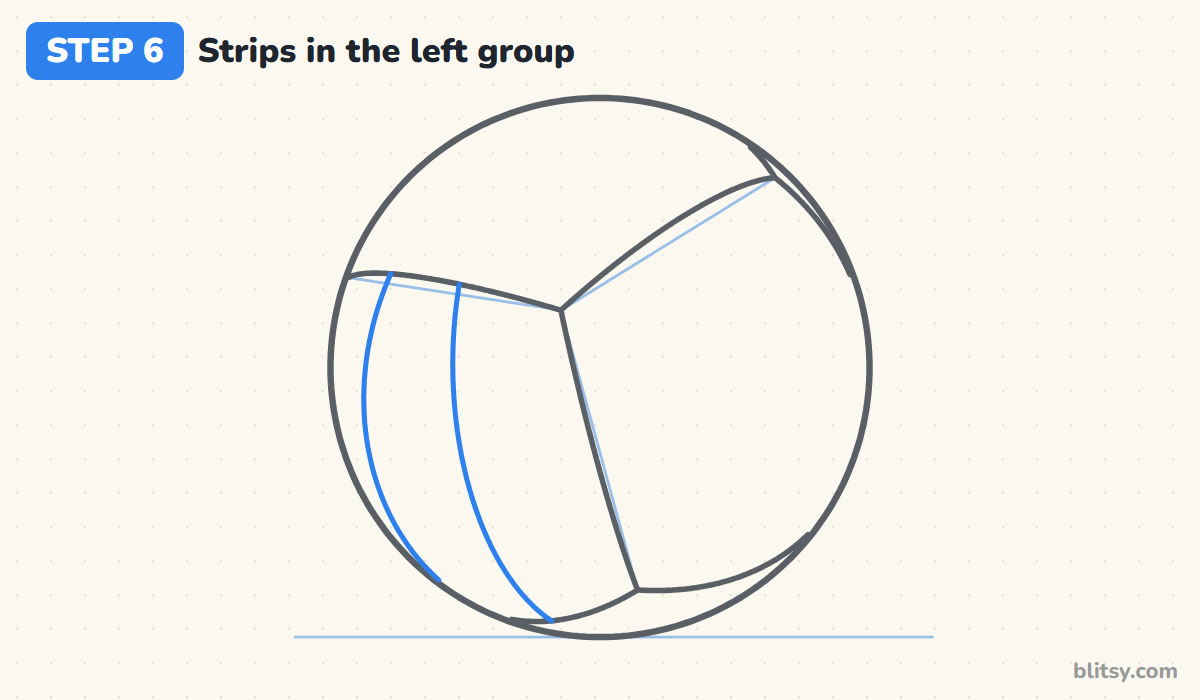
The left group is the big shape between the left arm and the lower arm of the Y. Split it into three strips with two long curves that run from the left Y arm down to the bottom edge. They follow the direction of the lower Y seam, and the one nearest the edge bends the most. The strip next to the lower seam faces you, so it's the widest, while the strip by the rim looks thin.
💡 Tip: Strips near the edge always look skinnier than strips in the middle. That squeeze is what makes the ball look round.
Step 7: Draw the strips in the top group
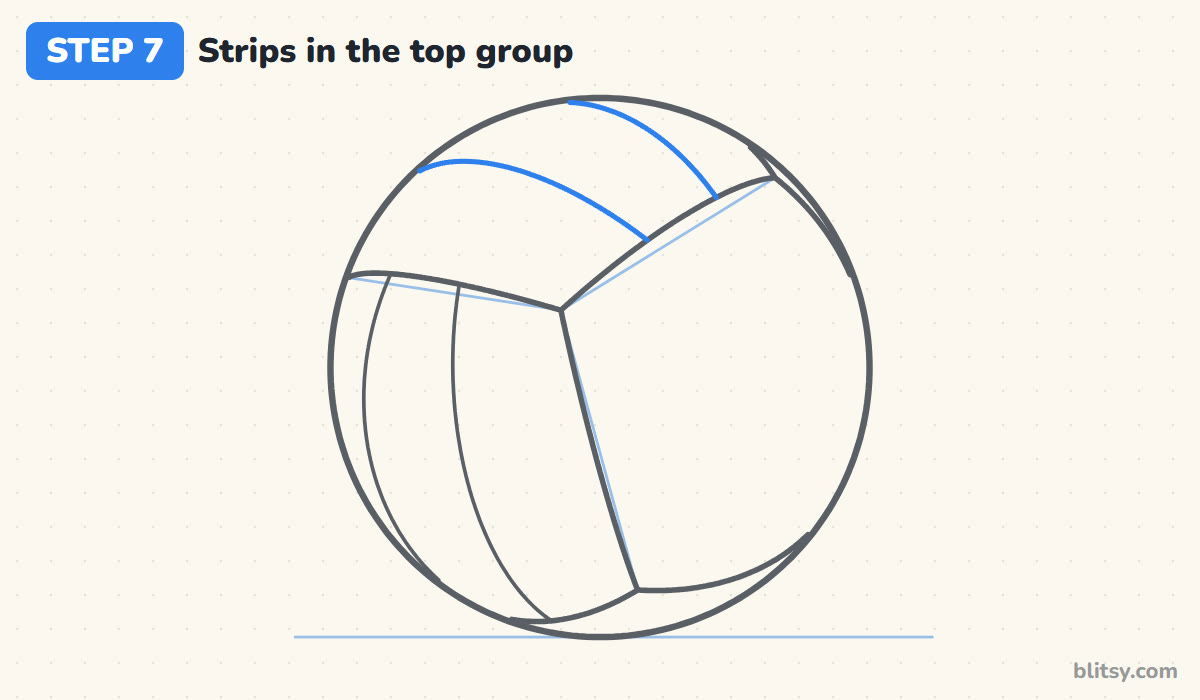
Move to the top group, the shape between the left arm and the upper arm of the Y. Its strips run the other way: draw two curves across it from the left edge toward the upper right, each one arching up like a rainbow. The top strip is thin and squeezed against the outline, and the lowest one is wide.
💡 Tip: Turn your paper so the arches go the way your hand likes to move. It's easier than twisting your wrist.


Step 8: Draw the strips in the right group
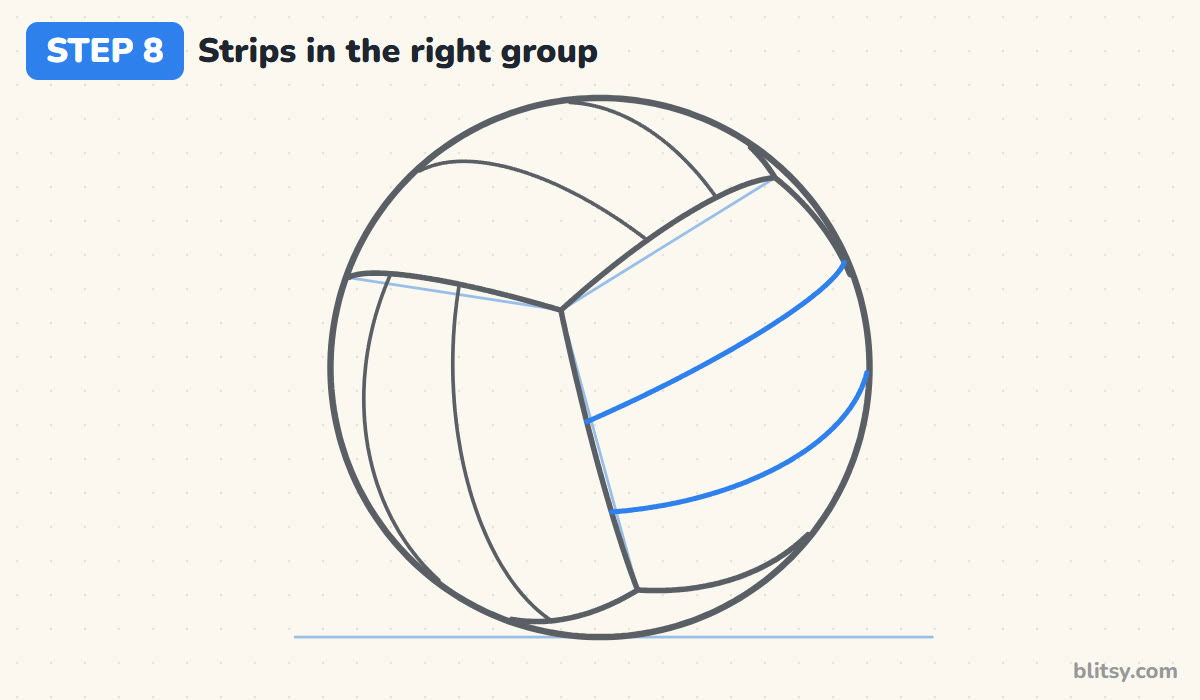
The last group sits on the right, between the upper arm and the lower arm of the Y. Draw two long curves from the lower Y arm out to the right edge, rising gently as they go. Space them so the three strips look about even, with the outer one a little thinner.
💡 Tip: Check that each group's strips run at a right angle to its neighbour's strips. That crossing pattern is the real volleyball look.
Step 9: Add the edge pieces and a shine
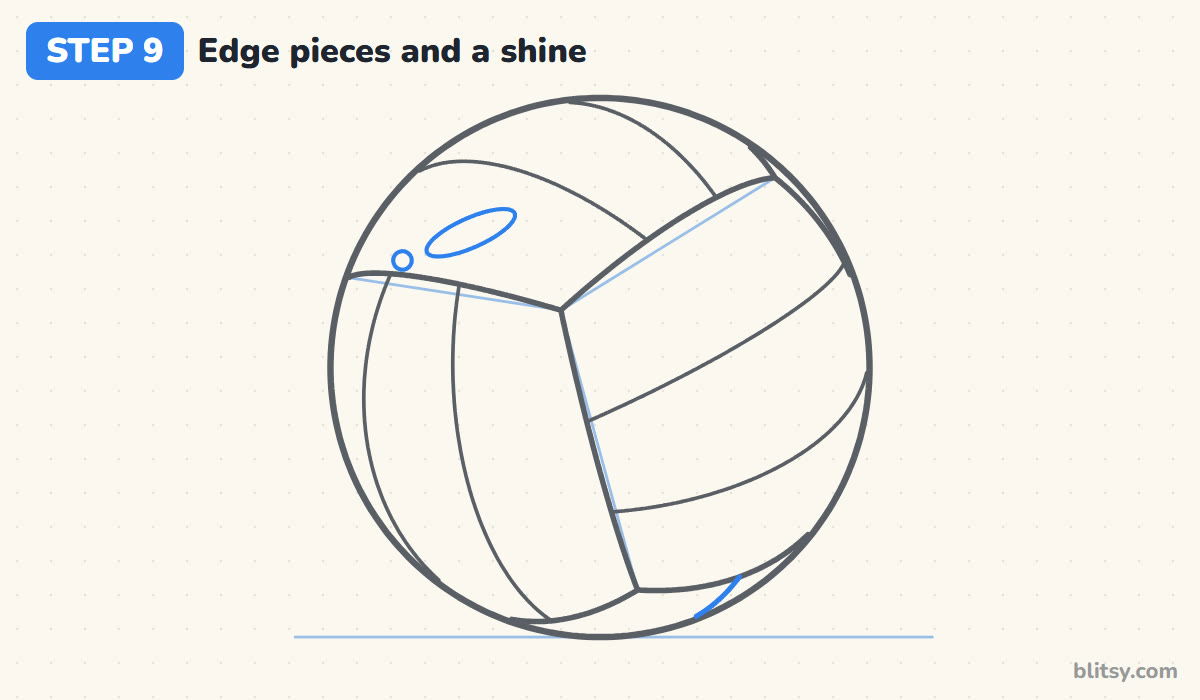
Look along the outline at the bottom of the ball. A small piece of a group on the back side peeks out there, so add the short curve you see in the picture. Then draw a long, thin oval tilted on the upper left yellow strip, with a tiny circle beside it. That's the shine from the light.
💡 Tip: Put the shine on the same side every time you draw balls. The light should come from one direction.
Step 10: Ink the lines and erase the guides
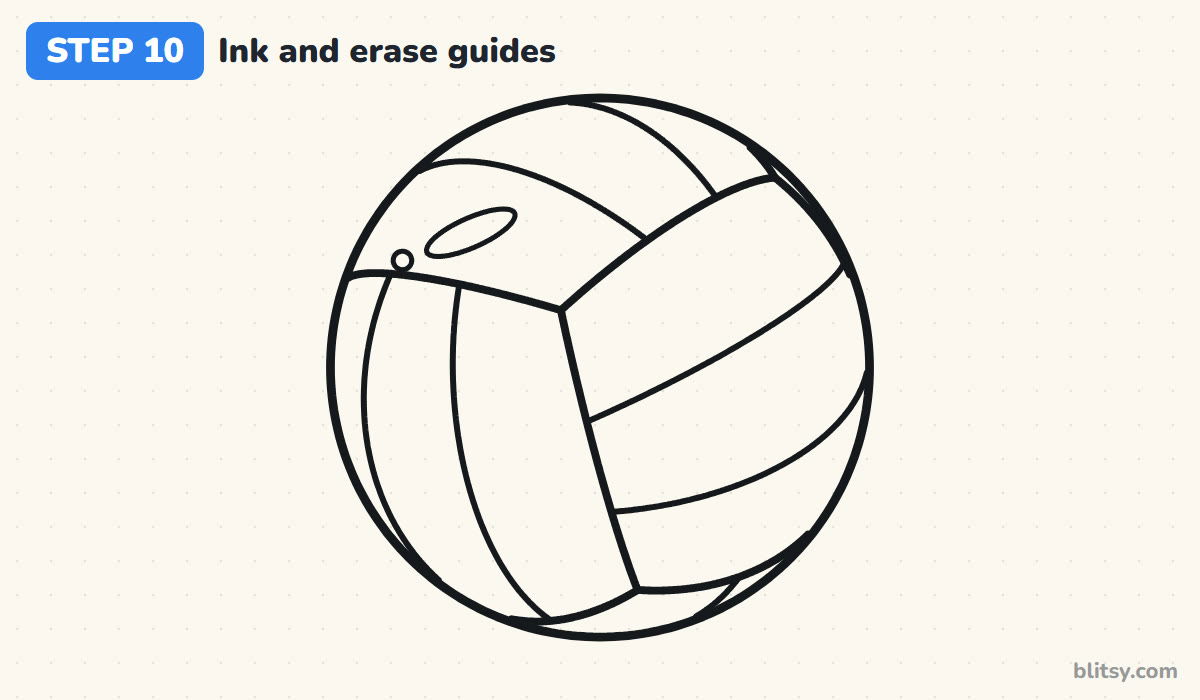
Go over the outline, the seams, the strips and the shine with a black marker. Use a slightly thicker line for the outline so the ball stands out. Wait until the ink is completely dry, then erase the pencil circle, the Y guide and the ground line.
💡 Tip: Ink the long seams in one smooth pull. Stopping halfway leaves a little blob.
Step 11: Color your volleyball
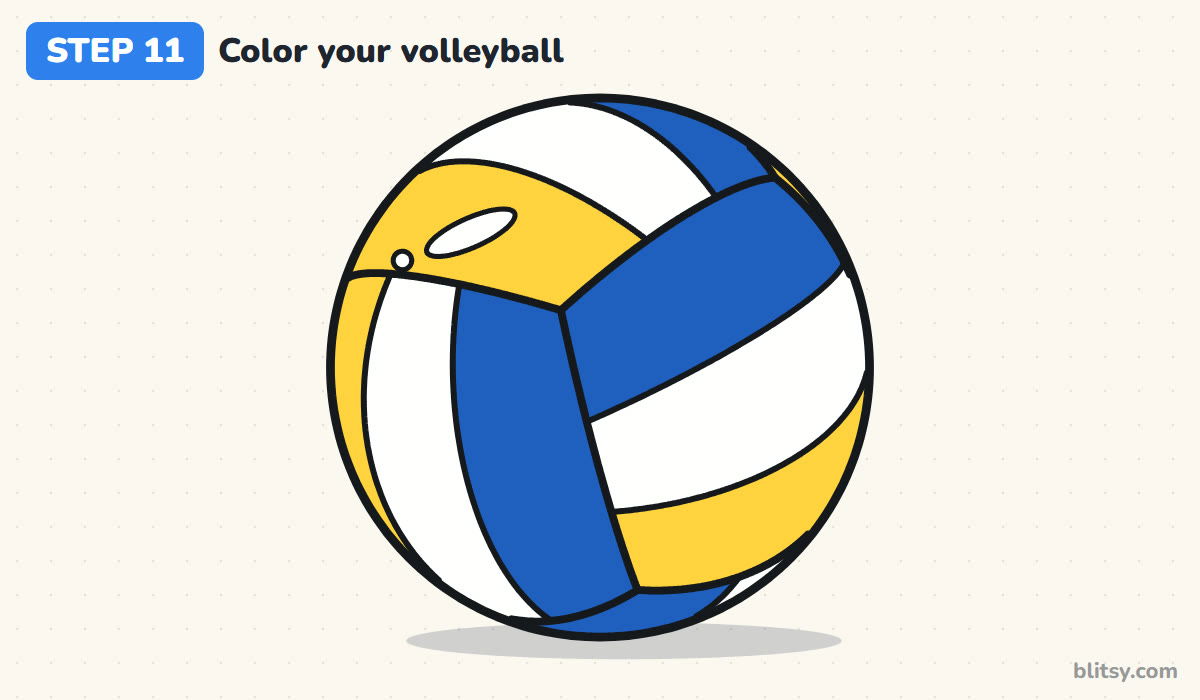
In each group, color one outer strip yellow and the other one blue, and leave the middle strip white. Keep the shine white too. For shading, add light gray along the lower right edge of the ball, then a soft gray oval on the ground under it. I go lightly with the gray, because a heavy shadow makes the white strips look dirty.
💡 Tip: Color every strip in the same direction as its seams. The strokes then curve with the ball and add to the round look.


Where Volleyball Drawings Go Flat
- The Y sits right in the middle. Shift the meeting point up and to the left. An off-center Y makes the ball turn slightly toward you.
- Straight seams. Every seam on a ball should bend. Even the arm that looks almost straight has a slight curve.
- All strips the same width. Make the strips in the middle of the ball wide and the ones by the edge thin.
- Strips that all run the same way. Each group's strips run across its neighbour's. If they all point one direction, it reads as a striped beach ball.
- A dark, heavy shadow. Keep the gray light and only on the side away from the shine.
Serving Up New Volleyball Looks
The colors are easy to swap. Try red, white and green for a ball like the ones in many school gyms, or orange and white for a beach volleyball. Add a net behind it, a sandy court with footprints, or motion lines to make it fly. Younger kids can skip the edge pieces in step 9 and the ball still reads clearly. When you're ready for another ball with curved seams, my basketball drawing tutorial uses the same wrap-around idea and adds a hoop and net. For a different sport, the baseball bat drawing step by step lesson is a good next pick.
Volleyball Coloring Page and PDF Steps to Print
The free volleyball coloring page shows a finished colored ball at the top with a key for each color, and a large outline below for kids to color in. The step-by-step PDF guide has all 11 steps with pictures and tips, so you can practice away from a screen. Both print on Letter or A4 paper.
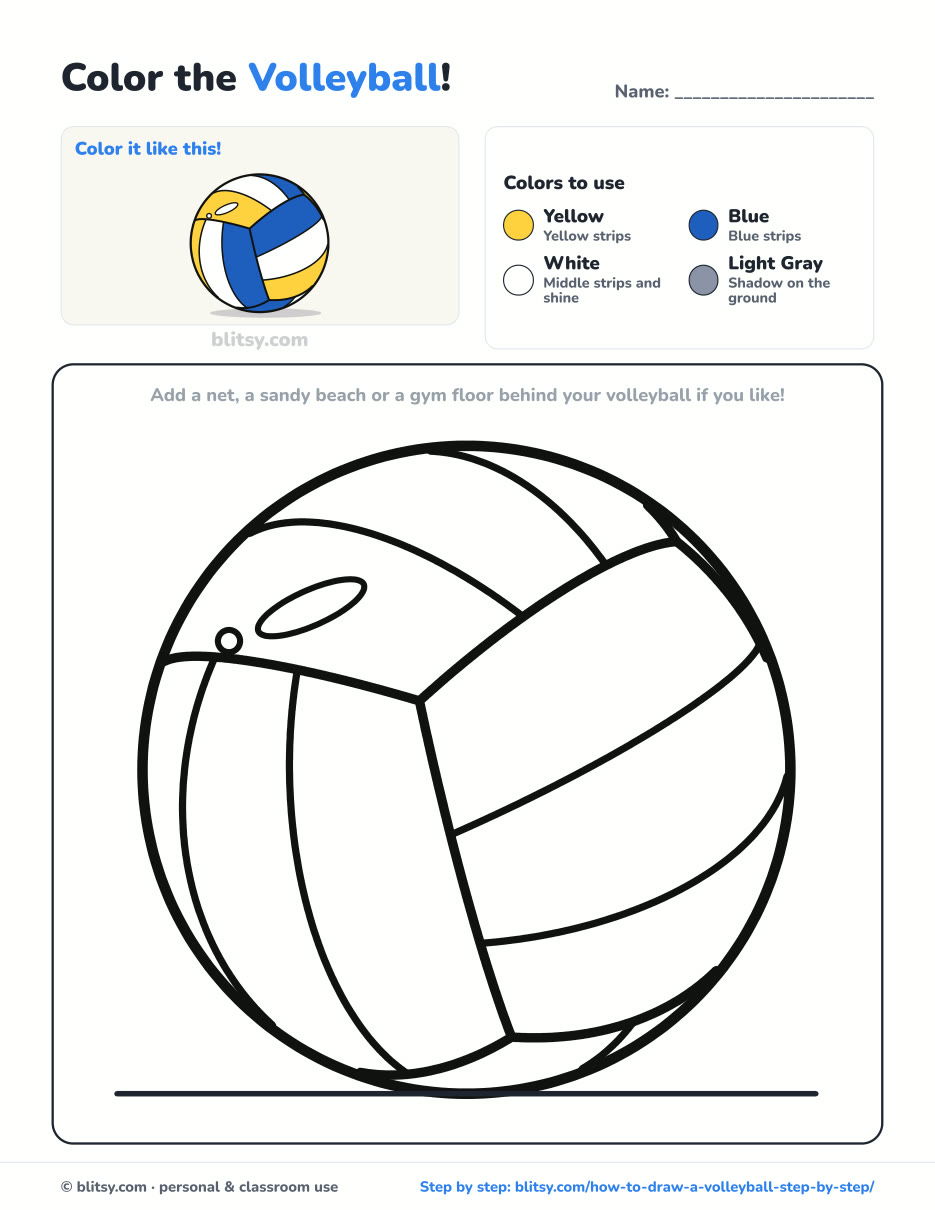
Black outlines with a colored example and the color names at the top. Ready to print and color.
⬇️ Download Coloring PageEvery step picture with its instructions and tips, to keep beside your paper while you draw.
⬇️ Download Drawing Guide📱 On a phone? Tap a download button, then open the file and choose Share → Save to Files or Print. On a computer, the PDF opens or saves straight to your Downloads folder.
Keep the Volleyball Steps on a Pinboard
More Round Things to Draw Next
Every one of these is a full step-by-step tutorial with step pictures, tips and a free coloring page.
- Earth Drawing: Shade a round planet with blue oceans and green land in this how to draw the Earth step by step lesson.
- Balloon Drawing: Draw a shiny balloon with a curly string using this balloon drawing tutorial.
- Sun Drawing: Start with a circle and add rays all around in this sun drawing step by step guide.
- Solar System Drawing: Put the planets in order around the sun with this solar system drawing tutorial.
Volleyball Drawing Questions, Answered
What is the easiest way to draw a volleyball?
Start with a circle and a light Y whose center sits a little off the middle. Curve the three arms, then split each of the three sections into three strips. The Y does most of the planning for you.
How many panels does a volleyball have?
A classic indoor volleyball has 18 panels in six groups of three. From any one side you see about three groups, which is why the drawing shows three groups meeting at the Y, plus small pieces near the edge.
Is a volleyball drawing good for kids?
Yes. It's mostly curves and coloring, with no faces or hands. Kids around 6 can trace the circle, draw the Y and color the strips, and an adult can help with the seams.
What colors should I use for a volleyball?
Yellow, blue and white is the classic look and the one used here. Red, white and green or plain white with gray seams also look right, so pick whatever matches your team.
Your court is ready: draw that off-center Y and serve up a volleyball of your own today! 🏐
Related posts:
 How to Draw a Car Step by Step (Easy Drawing for Beginners)
 How to Draw a Whale Step by Step (Easy for Beginners)
 How to Draw an Arctic Fox Step by Step (Easy for Beginners)
 How to Draw a Shark Step by Step (Easy for Beginners)
 How to Draw a Chicken Step by Step (Easy for Beginners)
 How to Draw a Fish Step by Step (Easy Goldfish for Beginners)
 How to Draw a Snowman Step by Step (Easy for Beginners)
 How to Draw Hands Step by Step (Easy Palm View for Beginners)
 How to Draw an Airplane Step by Step (Easy Jet for Beginners)
 How to Draw a Mouse Step by Step (Easy for Beginners)
 How to Draw the Joker Step by Step (Easy Chibi for Beginners)
 How to Draw a Zebra Step by Step (Easy for Beginners)

