
Rays that bunch up on one side are the reason most sun drawings look a little off. This lesson fixes that with one trick borrowed from a clock face. You'll learn how to draw a sun step by step, from three faint circles to a grinning sun with long wavy rays, short pointy ones in between, and two clouds drifting past. If you can draw a circle and a few straight lines, you already have every skill this needs.

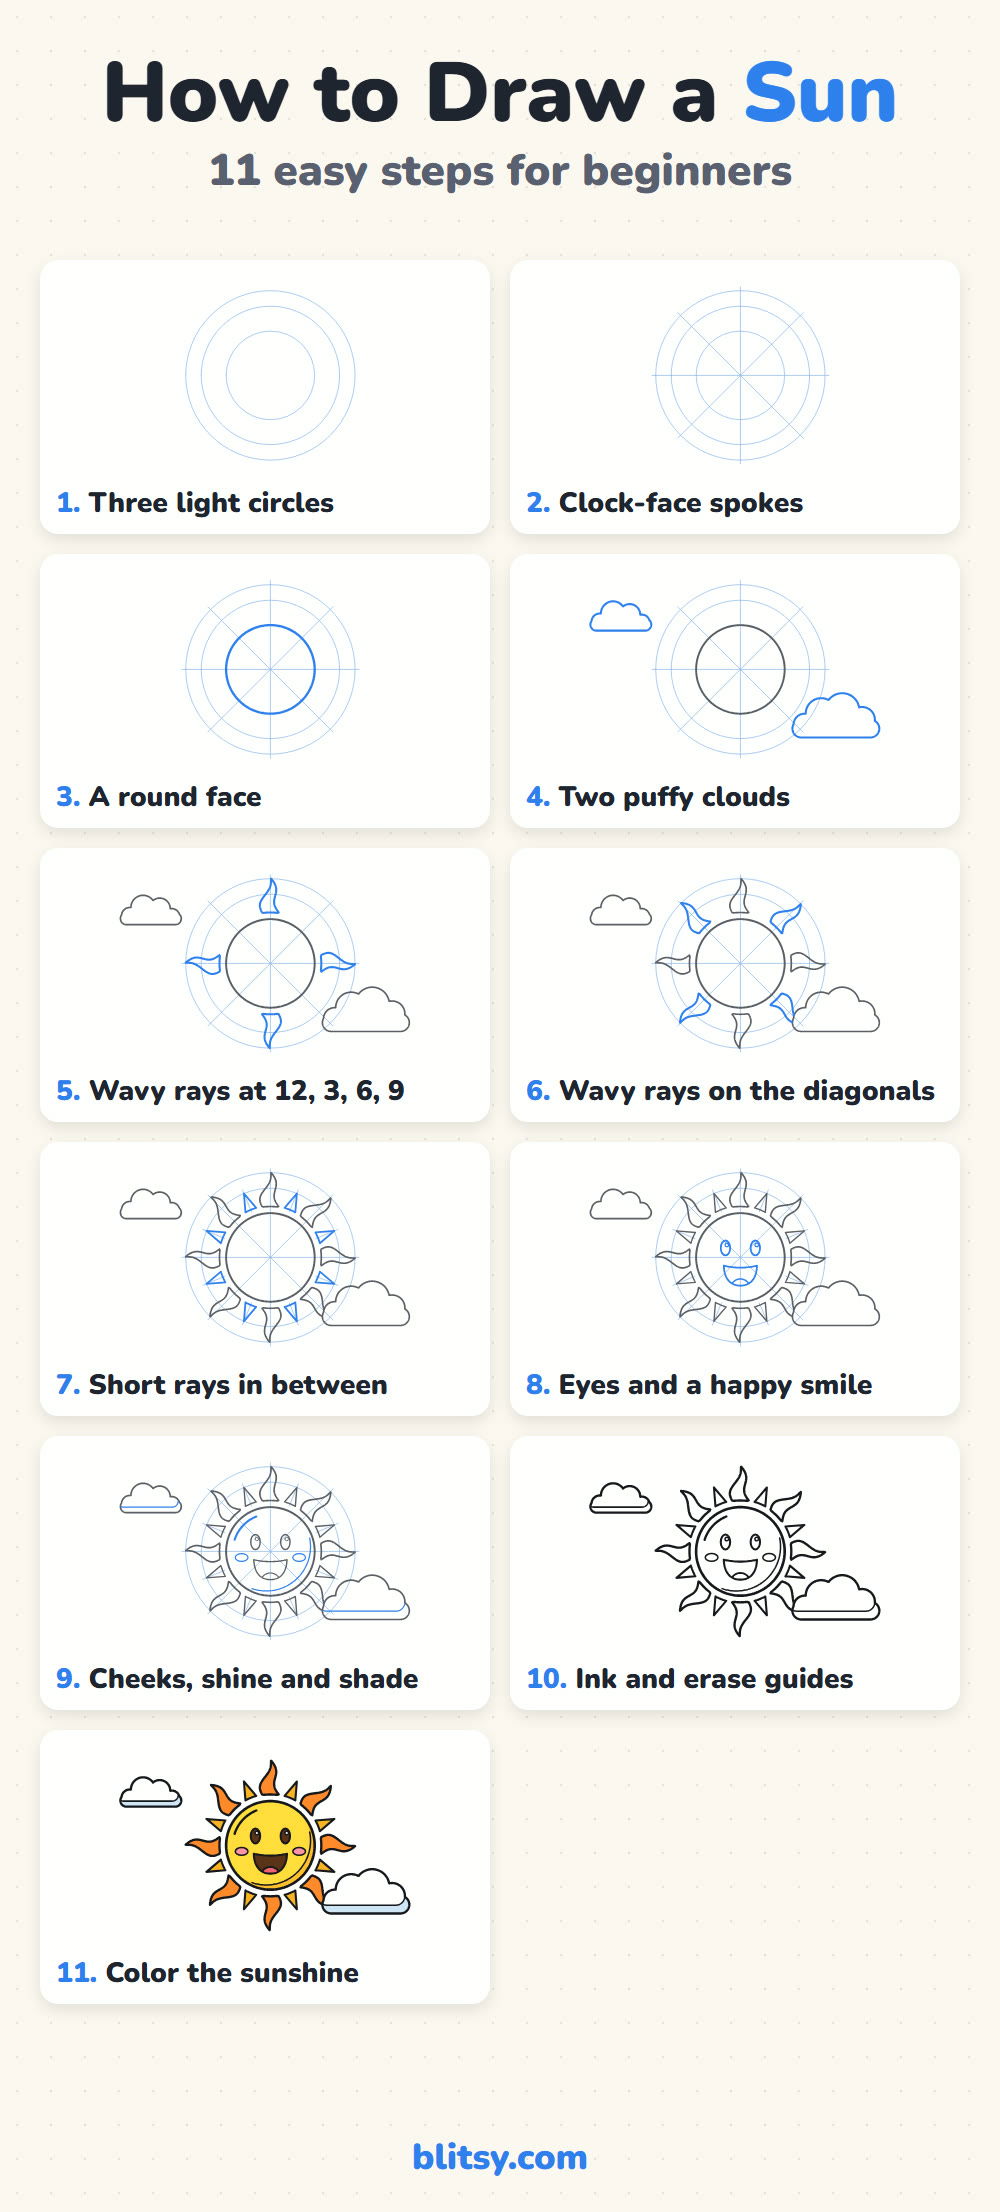
Blue marks the new part in every picture. Everything in gray was drawn in an earlier step, and the pale blue circles and spokes are helper lines you'll erase near the end, so press very softly when you draw them.
Quick overview
⏱️ Time: around 20 minutes
🎯 Level: beginner, fine for kids from about 6
✏️ Steps: 11
☀️ You'll draw: a smiling cartoon sun with 16 rays and two clouds
Sunny Supplies to Set Out First
- A pencil you can press lightly for the guide lines
- A clean eraser
- A black marker or fineliner for inking
- Coloring pencils or markers in yellow, dark yellow, gold, orange, pink, brown, red, light blue
- Plain paper, turned sideways
- A cup, a jar lid and a small plate to trace the circles (optional)
Tracing round objects for the three circles is a smart shortcut, not cheating, and it leaves your energy for the fun parts.
How to Draw a Sun Step by Step
Step 1: Draw three light circles
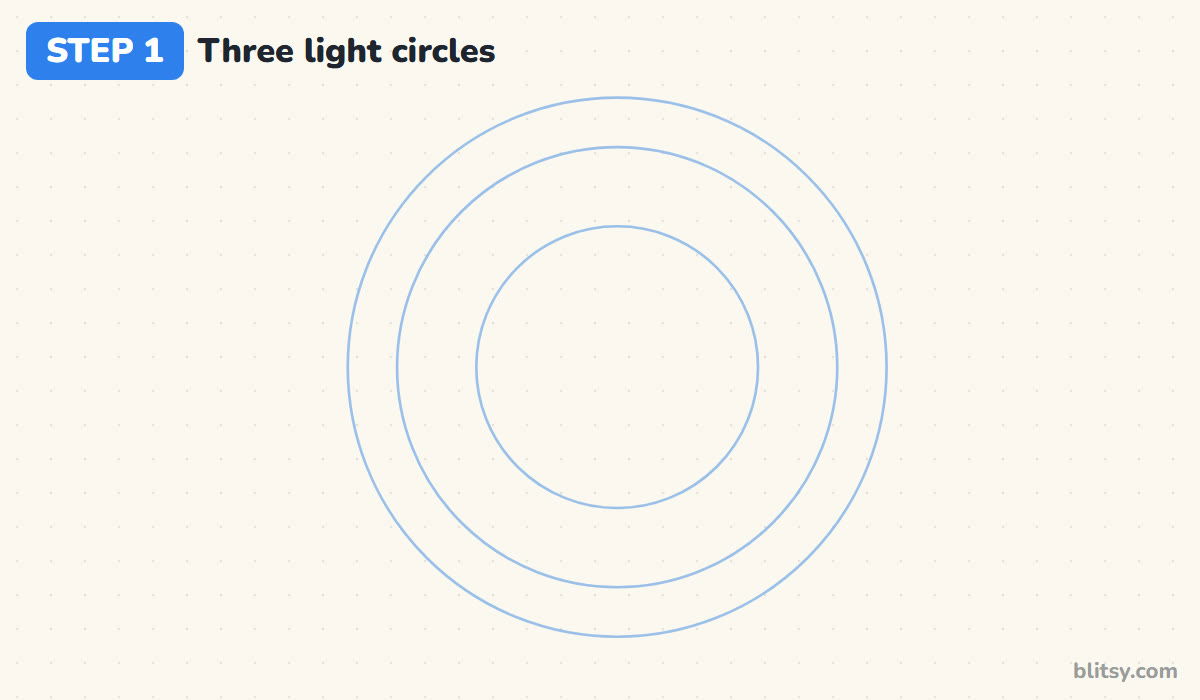
Place a dot in the middle of your paper, then draw three circles around it, one inside the other. The small one is the face. The middle circle marks where the short rays end, and the big outer one marks the tips of the long rays. Keep the gaps between them roughly even, and press so softly you can barely see the lines.
💡 Tip: Keep the big circle small enough to leave space on both sides for the clouds.
Step 2: Add spokes like the hours on a clock
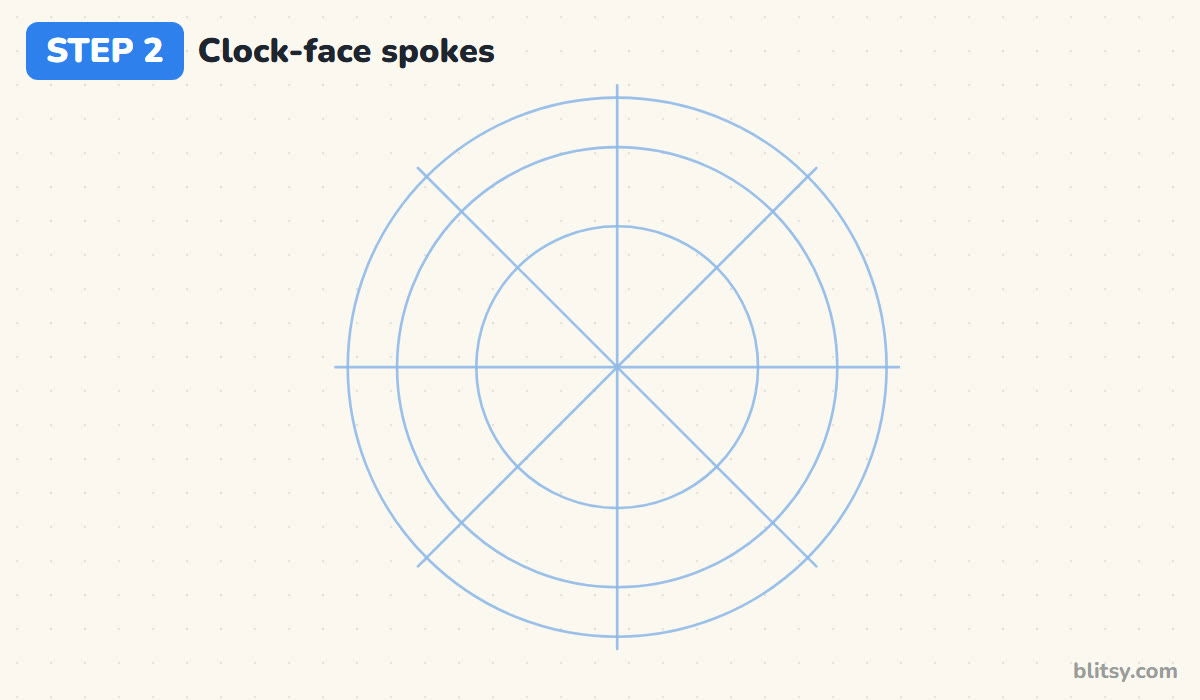
Think of the circles as a clock. Draw a straight line from 12 down to 6, then one across from 9 to 3, both passing through your center dot. Now split each quarter in half with two slanted lines. You end up with eight spokes, and every long ray will sit on one of them. This is the step that keeps the rays even, so I never skip it.
💡 Tip: Turn the paper a quarter turn to check the cross looks square from every side.
Step 3: Trace the round face
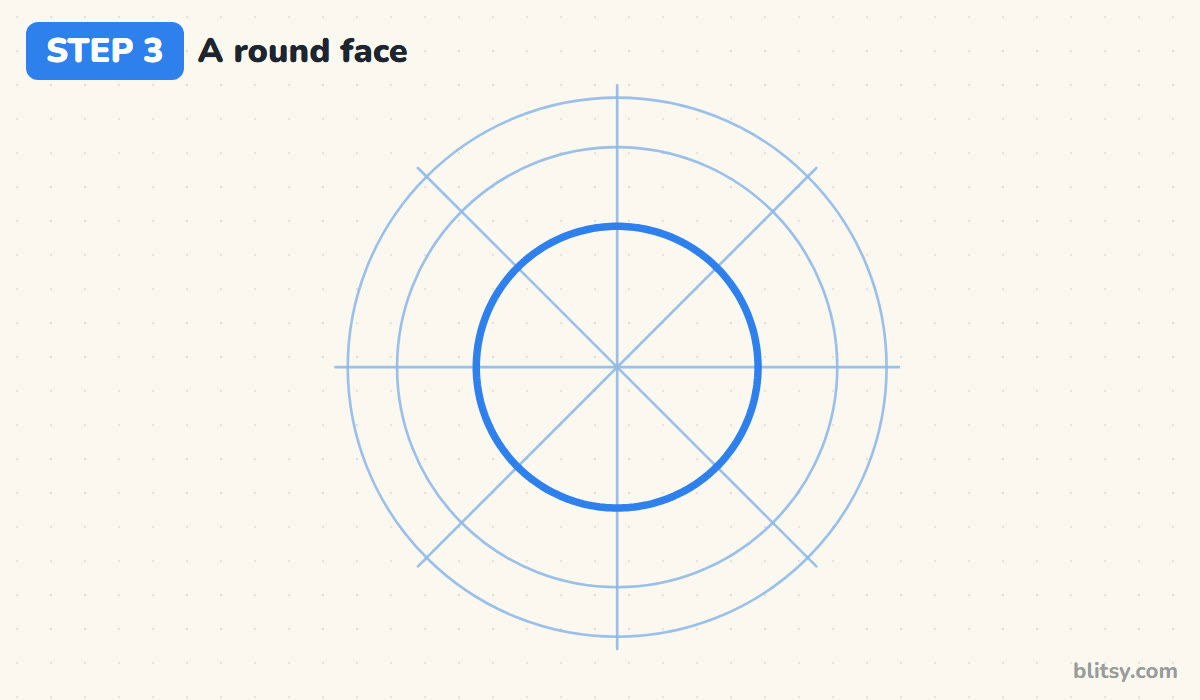
Go over the smallest circle with a firmer pencil line. Smooth out any bumps as you go. A clean face circle matters more than anything else in this drawing, since every ray is measured from it.




💡 Tip: Draw the circle in four short arcs rather than one long sweep; joins are easier to hide.
Step 4: Sketch two puffy clouds
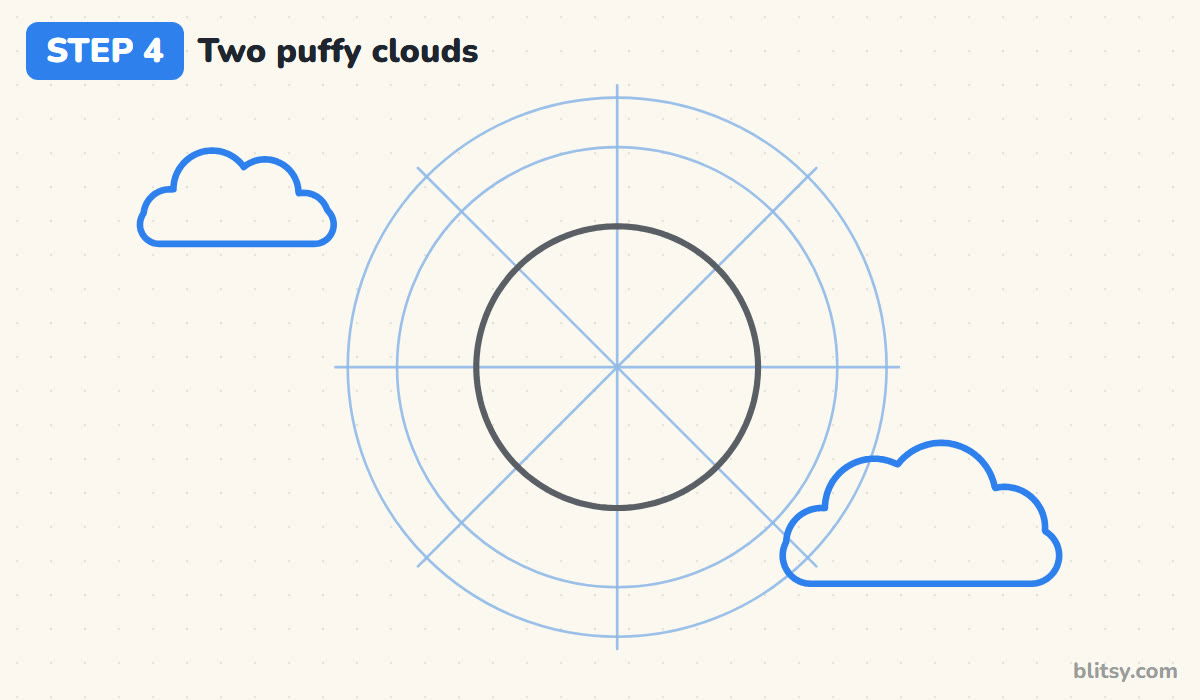
Before any rays, draw the clouds. The big one goes at the lower right, overlapping the outer circles a little. Make a flat, rounded bottom and stack three or four bumps on top, the middle bump tallest. Add a smaller cloud high on the left. I draw the clouds first because they sit in front of the sun, and the rays can simply stop where a cloud begins.
💡 Tip: Vary the bump sizes; four identical bumps look like a caterpillar.
Step 5: Draw wavy rays at 12, 3, 6, 9
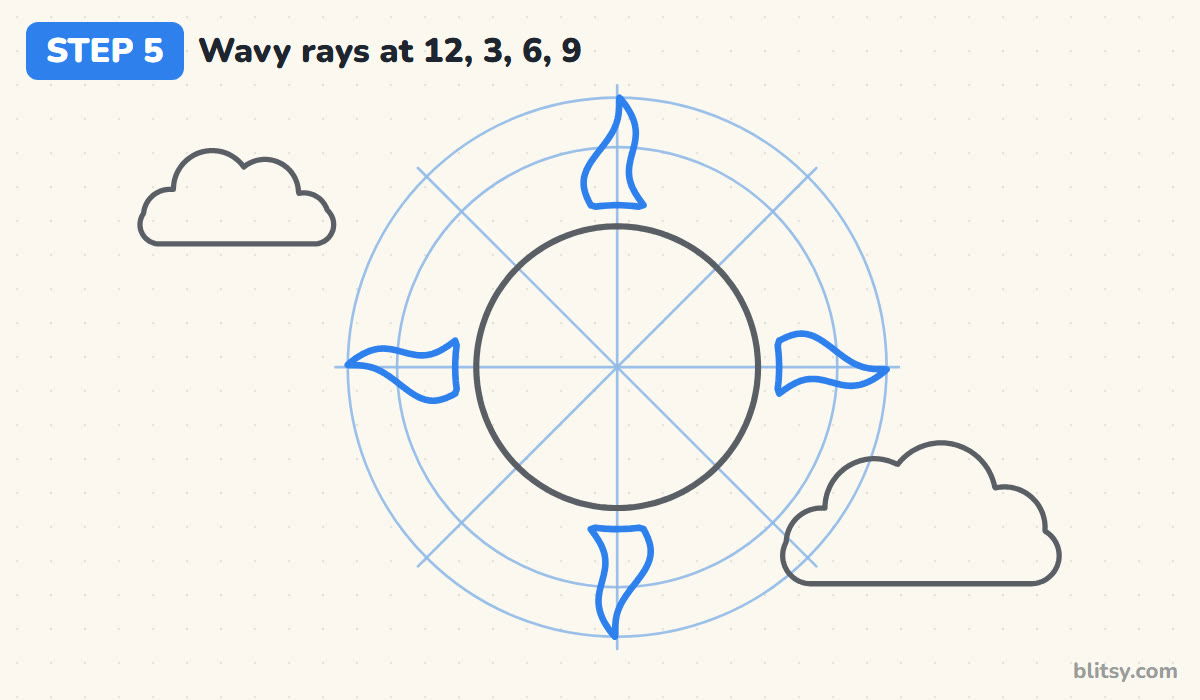
Start at the 12 o'clock spoke. Leave a small gap above the face, then draw a ray shaped like a candle flame: wide at the bottom, swaying once to one side, and ending in a point on the big circle. Repeat at 3 o'clock, then 6, then 9. Give every ray the same sway direction, like a pinwheel, and the sun will look like it's spinning gently.
💡 Tip: Draw one side of the flame, then the other, meeting at the tip.
Step 6: Fill in the diagonal wavy rays
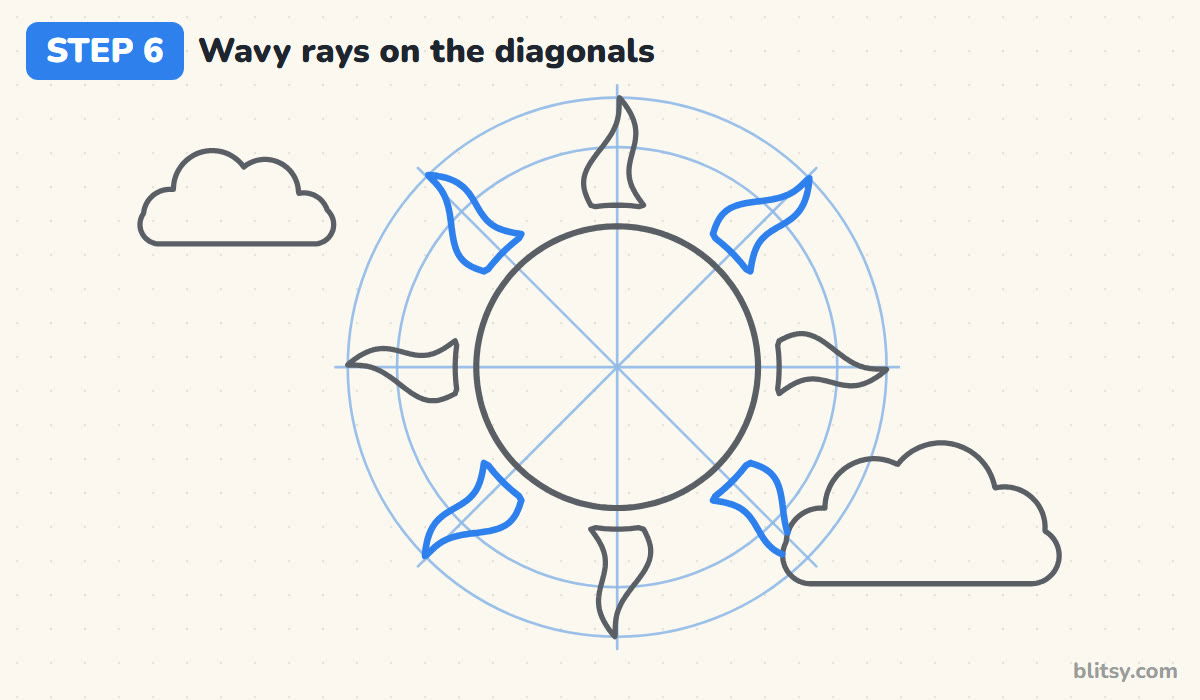
Now add four more flame rays on the slanted spokes, the same size and sway as the first four. The ray at the bottom right runs into the big cloud, so just stop your line where it meets the cloud's edge. That tiny detail makes the cloud look like it really floats in front.
💡 Tip: Compare each new ray with its neighbor before moving on, not at the end.
Step 7: Add short triangle rays in between
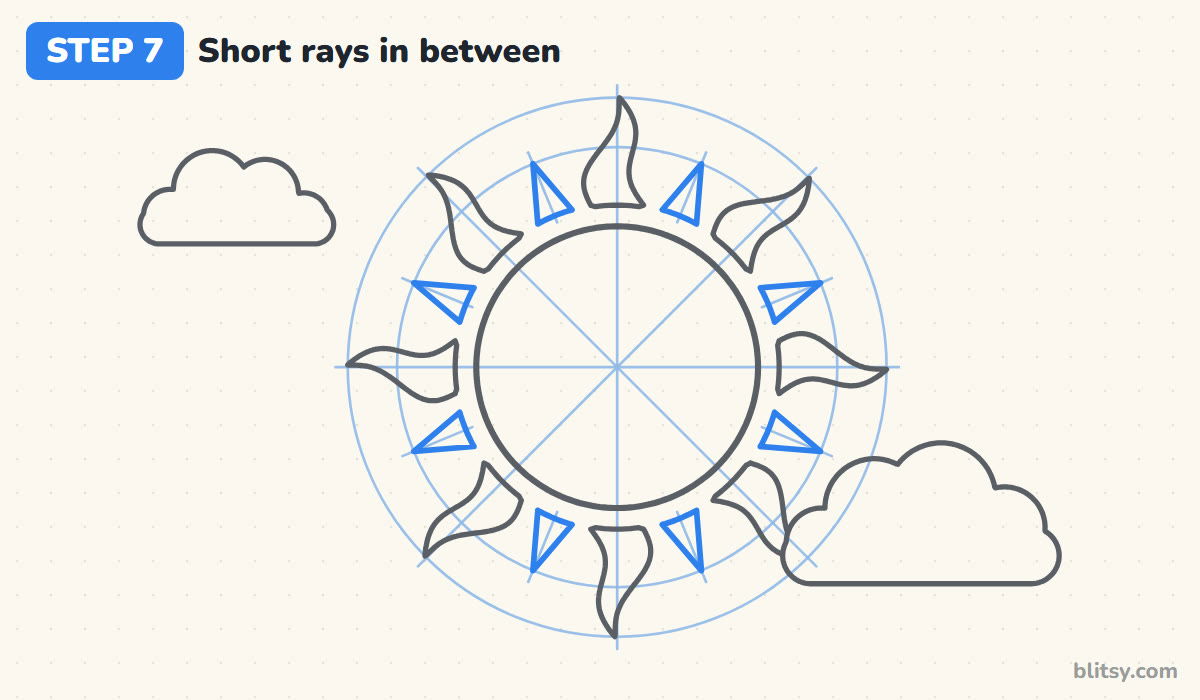
Halfway between each pair of long rays, make a light mark. On each mark, draw a short, pointed triangle whose tip touches the middle circle. Keep the base the same small gap away from the face as the long rays. These short rays give the sun two rhythms, long against short, which is what makes it sparkle.




💡 Tip: Make the triangles slimmer than you think; fat ones crowd the wavy rays.
Step 8: Give the sun eyes and a big smile
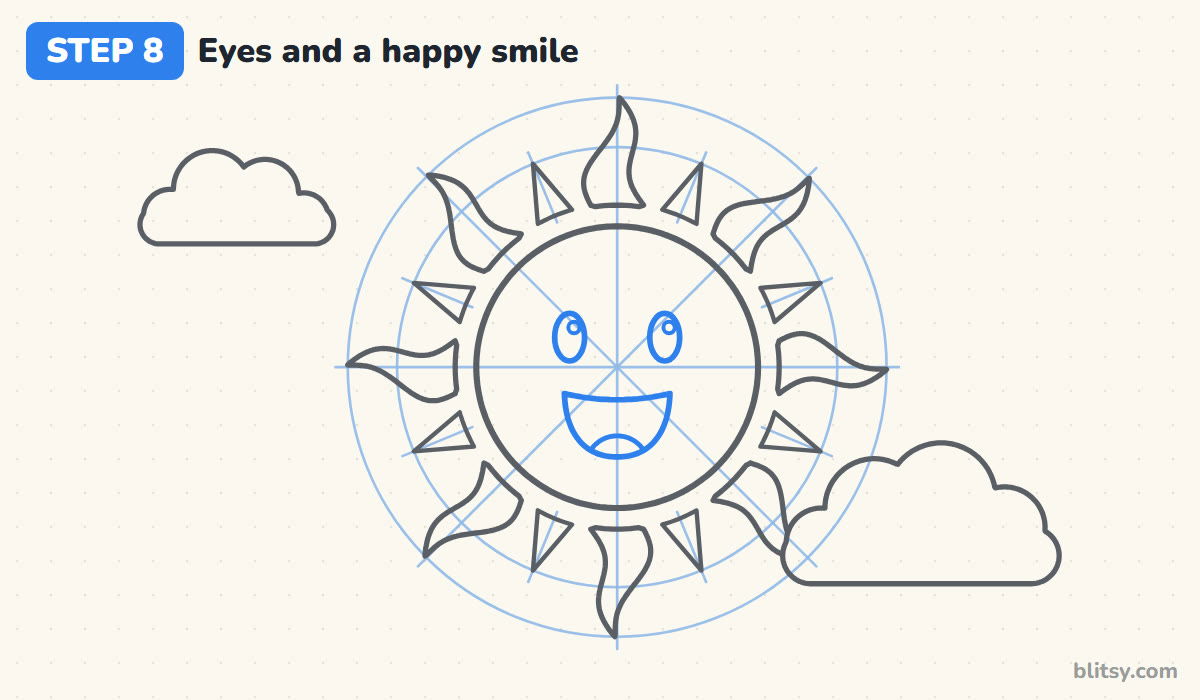
Use the 3 to 9 spoke as your eye line, and place two tall ovals just above it, an equal distance either side of the center. Add a small circle in each one for a shine. Below the middle, draw a wide open mouth shaped like a bowl with a nearly flat top, then a round hill at the bottom for the tongue.
💡 Tip: Put both eye shines on the same side, or the sun looks cross-eyed.
Step 9: Draw cheeks, a shine and shade lines
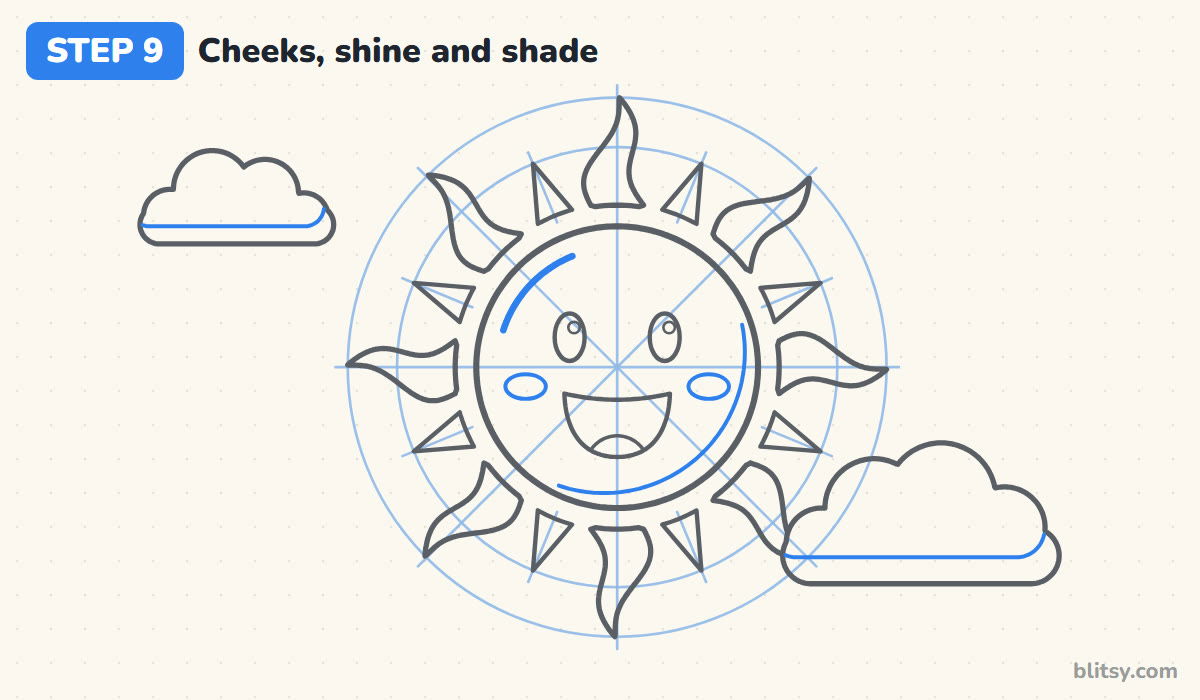
Add a flat oval cheek beside each corner of the mouth. Next, draw a short curved stroke inside the upper left edge of the face; that's the shine. Then draw a long curve inside the lower right edge, close to the outline at both ends. Finish with a gentle line across the bottom of each cloud for its shadow.
💡 Tip: Keep the shine and the shade on opposite sides so the light feels like it comes from one place.
Step 10: Ink the lines and erase the guides
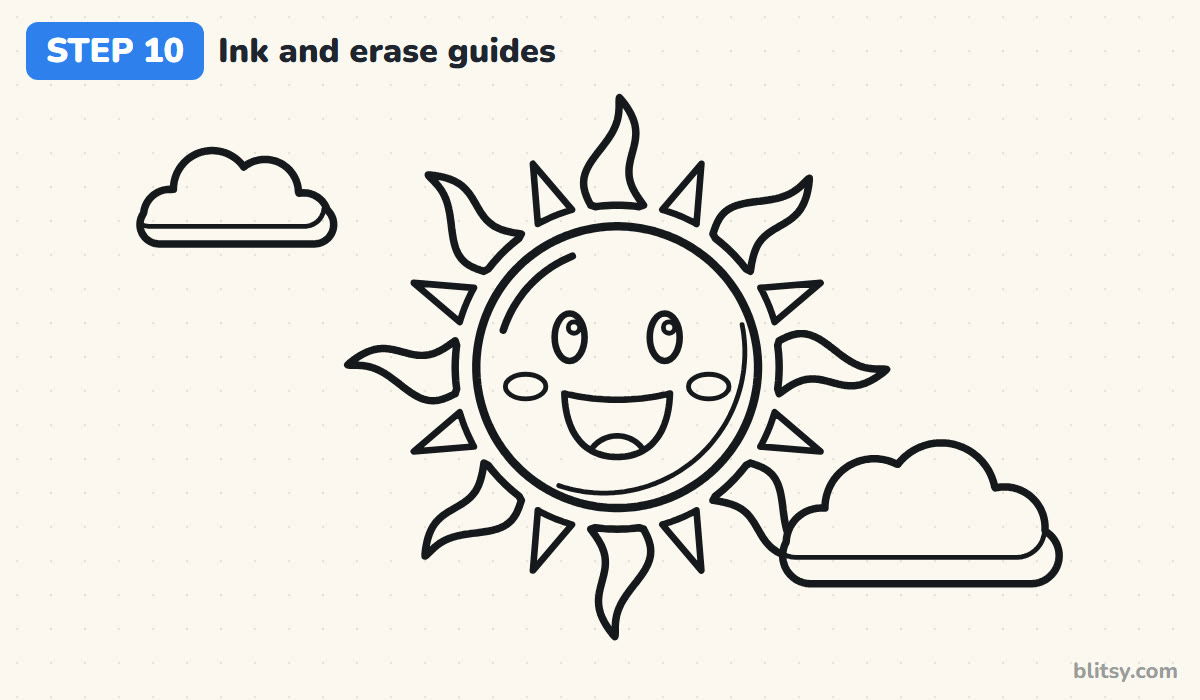
Trace every line you want to keep with a black marker: face, features, all 16 rays, the clouds and the little shading curves. Give the ink a minute to dry. Then erase all the circles, spokes and marks. This is my favorite moment, because the sun suddenly looks finished.
💡 Tip: Ink the rays from the base toward the tip so the points come out sharp.
Step 11: Color the sun and clouds
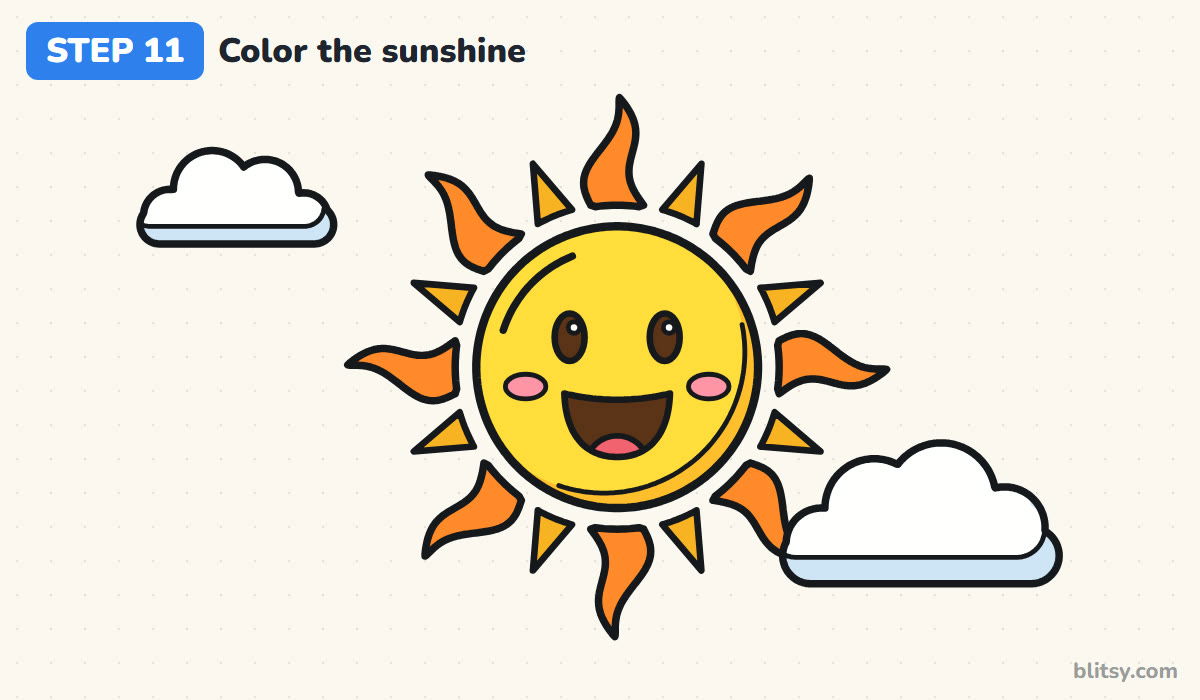
Fill the face with bright yellow and the shade crescent with a darker yellow. Color the long wavy rays orange and the short ones gold, so the two rings stay easy to tell apart. Cheeks go pink, the eyes and mouth brown, and the tongue red. Leave the clouds white and color their bottom strips light blue.




💡 Tip: Color the big yellow face first while your pencil is sharp, then the small parts.
Where Sun Rays Usually Go Wonky
- Drawing rays without spokes. They drift together on one side and leave a bald patch on the other. Mark the four main clock spots first; the rest falls into place.
- Gluing the rays to the face. Rays that touch the circle make the sun look like a spiky ball. Leave a thin, even gap all the way around.
- Every ray a different length. Use the outer guide circle as a finish line for the long ones and the middle circle for the short ones.
- Rays running through the cloud. If you draw the rays first, you'll have lines to erase inside the cloud. Draw the cloud first and stop at its edge.
- Coloring the whole sun one yellow. It turns into a flat blob. Orange long rays, gold short rays and a darker yellow shade keep every part readable.
Sunglasses, Sunsets and Other Sun Ideas
Once the clock trick feels natural, try changing one thing at a time. Swap the oval eyes for a pair of sunglasses, close the eyes into sleepy arches for a sunset sun, or give it a wink. Straight triangle rays all around make a simpler sun for little kids, while three rings of rays look grand on a poster. Drawn the daytime sky already? Its night partner is waiting in the moon drawing tutorial, and how to draw a cloud shows the shapes that can drift past your sun.
Free Sun Coloring Page and Printable Drawing Steps
Prefer paper? The sun coloring page has a small colored example and a color key at the top, so kids can match the orange, gold and yellow, with a big bold outline underneath and space for a sky. The step-by-step guide PDF holds all 11 steps and tips. Both print on Letter or A4.
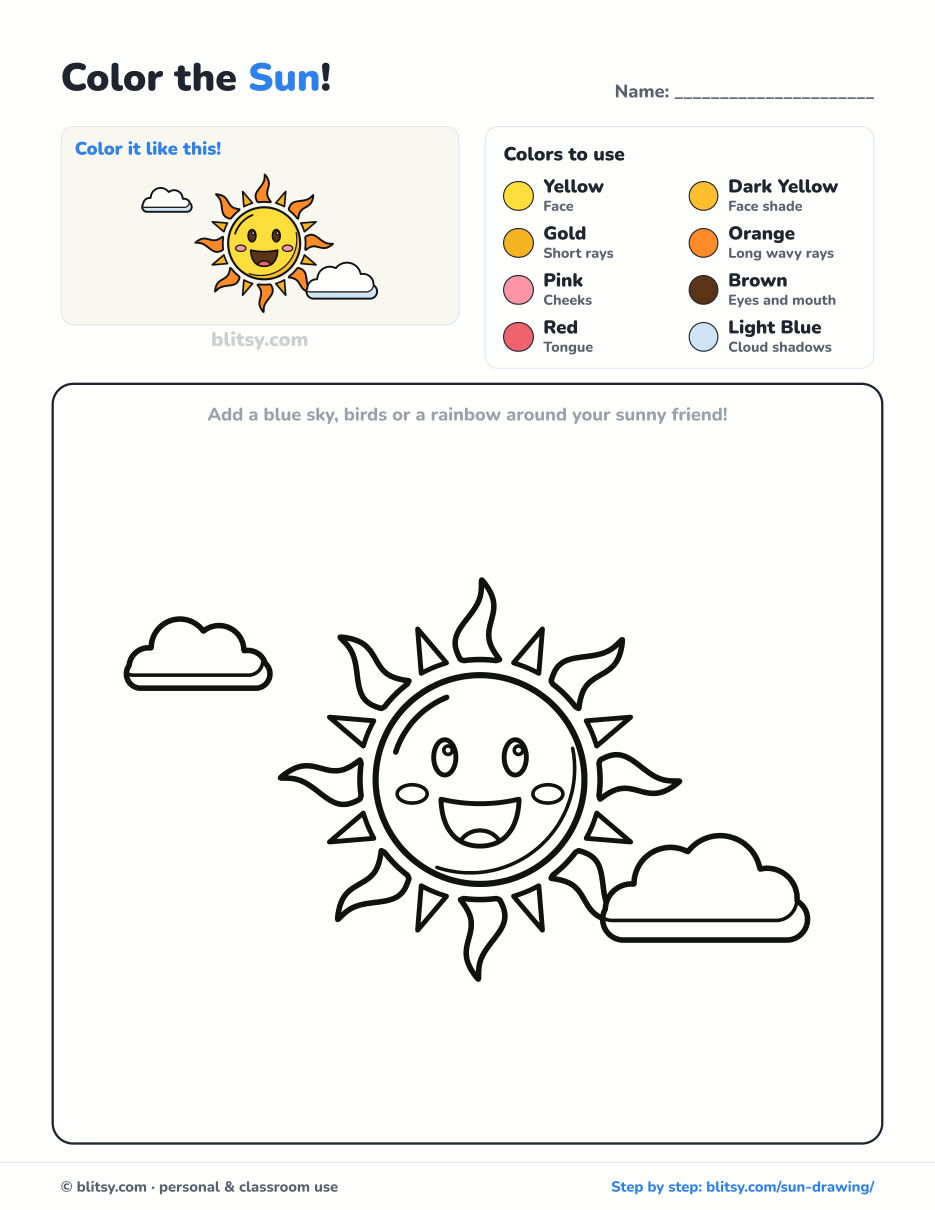
Black outlines with a colored example and the color names at the top. Ready to print and color.
⬇️ Download Coloring PageEvery step picture with its instructions and tips, to keep beside your paper while you draw.
⬇️ Download Drawing Guide📱 On a phone? Tap a download button, then open the file and choose Share → Save to Files or Print. On a computer, the PDF opens or saves straight to your Downloads folder.
Keep the Sunny Steps on One Tall Pin
Sun Drawing Questions From Young Artists
What is the easiest way to draw a sun?
Draw a circle, then add short lines or triangles around it. To keep them even, mark the top and bottom, then both sides, and fill in the gaps.
How many rays should a sun drawing have?
There's no rule. Eight is easy to space, and 16 (eight long and eight short) looks fuller. Any even number works well with the clock method.
What colors do I use for a sun?
Yellow for the face with a darker yellow for shade, plus orange and gold for the rays. Some artists add a red outer ring for a hot summer look.
Can I draw the sun by looking at it?
No, never look straight at the real Sun, even for a moment, because it can hurt your eyes. Draw it from pictures, from memory, or from this tutorial instead.
Hang your sun somewhere you'll see it on a gray morning, and let it grin back at you. ☀️
Related posts:
 How to Draw a Whale Step by Step (Easy for Beginners)
 How to Draw Lungs Step by Step (Easy Science Diagram)
 How to Draw a Pineapple Step by Step (Easy Crown and Slice)
 How to Draw Iron Man Step by Step (Easy Chibi for Kids)
 How to Draw a Dress Step by Step (Easy Party Dress)
 How to Draw a Chicken Step by Step (Easy for Beginners)
 How to Draw a UFO Step by Step (Cute Alien Saucer)
 How to Draw Flames Step by Step (Easy Campfire Drawing)
 How to Draw a Crow Step by Step (Easy for Beginners)
 How to Draw a Tiger Step by Step (Easy Walking Pose)
 How to Draw a Heart Step by Step (Even, Symmetric Shape)
 How to Draw a Jellyfish Step by Step (Cute, Easy Guide)

