
Three ovals and a triangle. That's really all an ice cream cone is before the fun details go on. In this lesson I'll show you how to draw ice cream step by step, stacking chocolate, strawberry and vanilla scoops on a crunchy waffle cone, then finishing with drips and sprinkles plus a shiny cherry. Kids can follow along, and it's a relaxing one for grown-ups too.

In every picture the lines for that step are blue, and everything you already drew stays gray. Add only the blue part, check it against yours, and go to the next one.
Quick overview
⏱️ Time: around 25 to 30 minutes including color
🎯 Level: easy, fine for kids from about 6
✏️ Steps: 11
🍦 You'll draw: a waffle cone with three stacked scoops and a cherry
Supplies for a Triple Scoop Cone
- A regular pencil you can press lightly
- A soft eraser
- A black marker or fineliner for the final outline
- Colored pencils, crayons or markers in light brown, brown, pink, cream and red
- A few bright colors for sprinkles
- Plain white paper
Hold the paper upright this time, because the cone and its scoops make a tall drawing.
How to Draw Ice Cream Step by Step
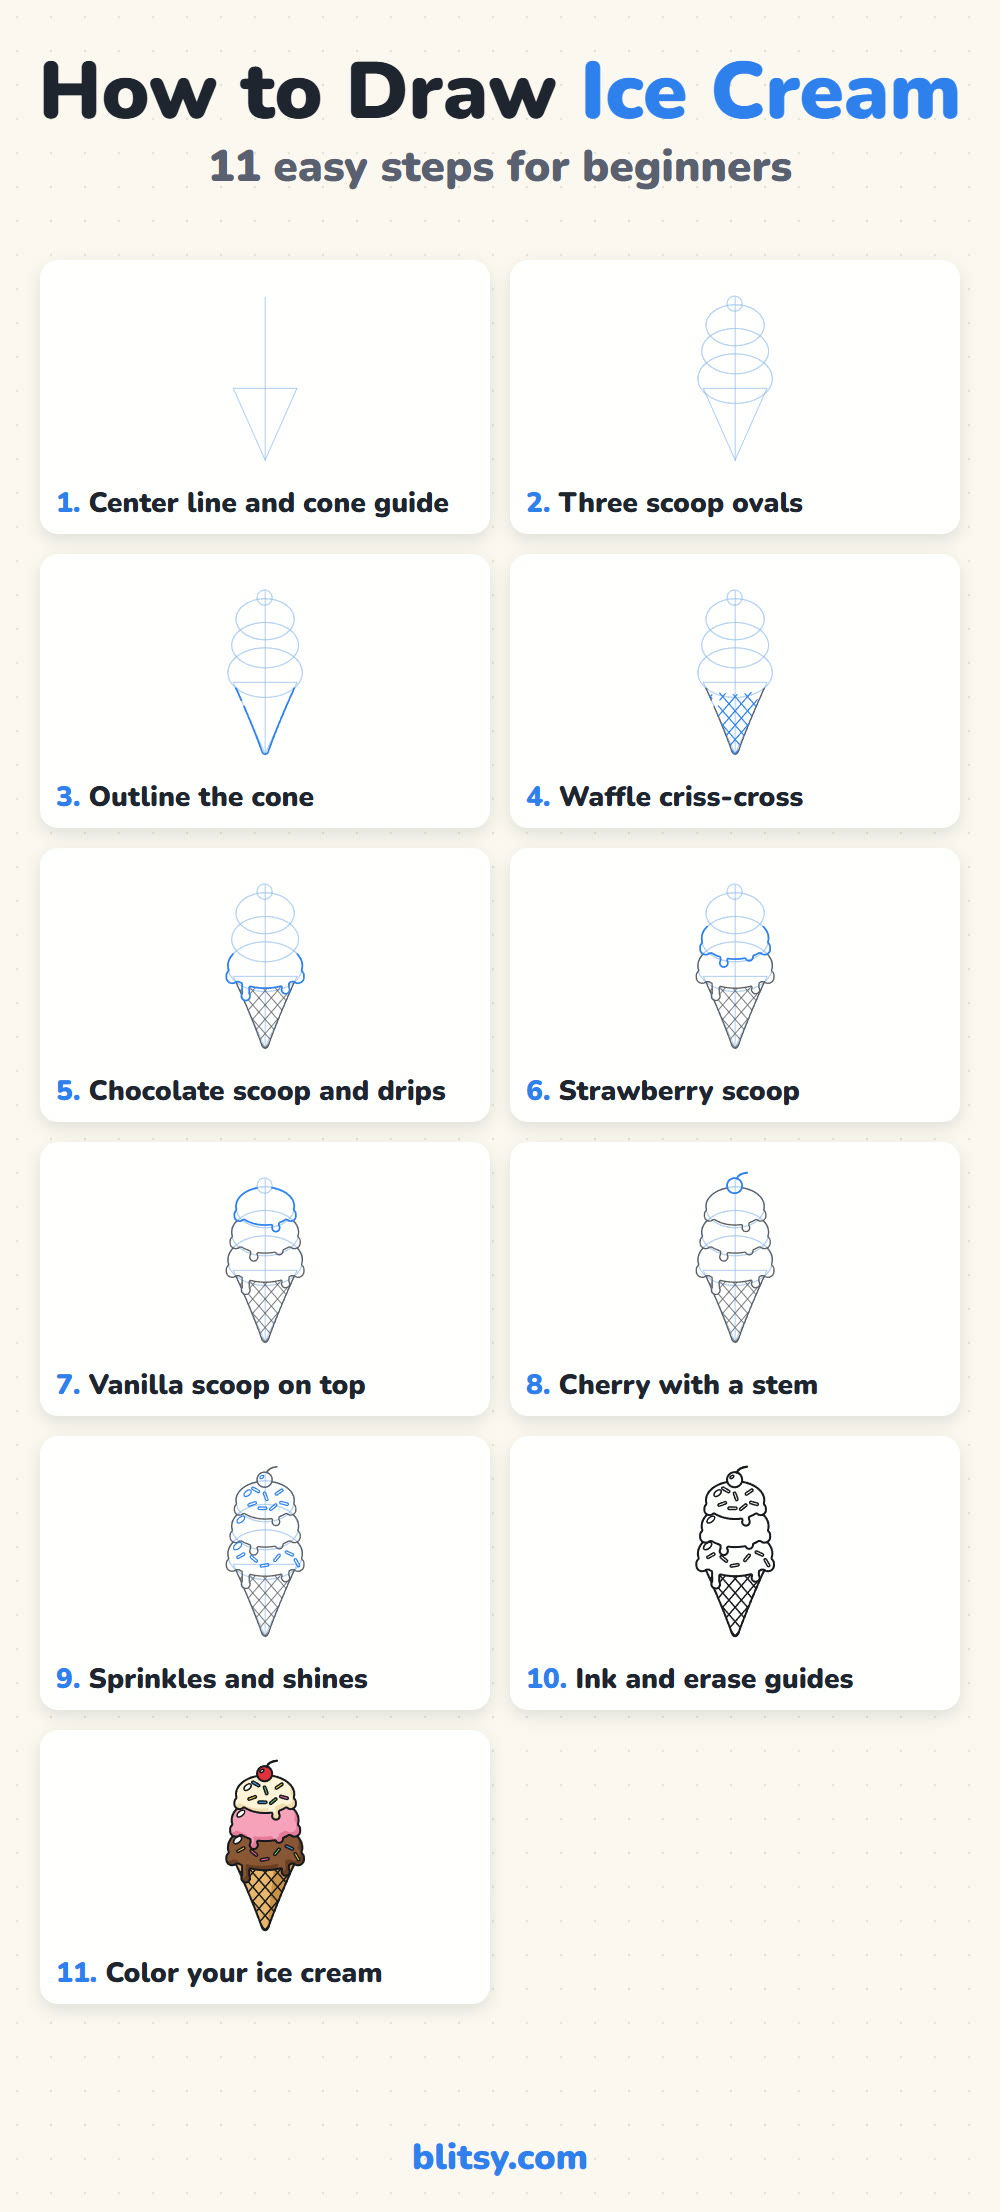
Step 1: Draw a center line and a cone triangle
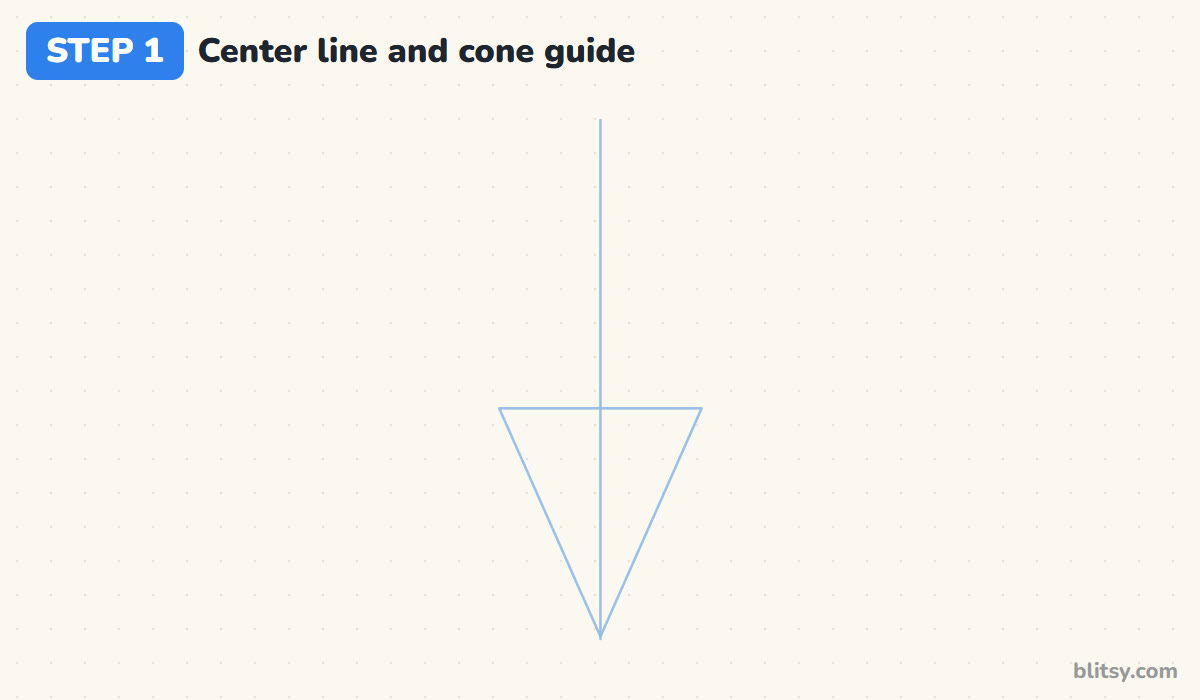
Start with a light vertical line down the middle of your page. In the lower half, draw an upside-down triangle centered on that line, with its point near the bottom edge. The top of the triangle should be roughly as wide as the triangle is tall, maybe a bit less. That keeps the cone from looking like a carrot.
💡 Tip: Press so softly that the line almost disappears. Every guide gets erased later.
Step 2: Stack three ovals for the scoops
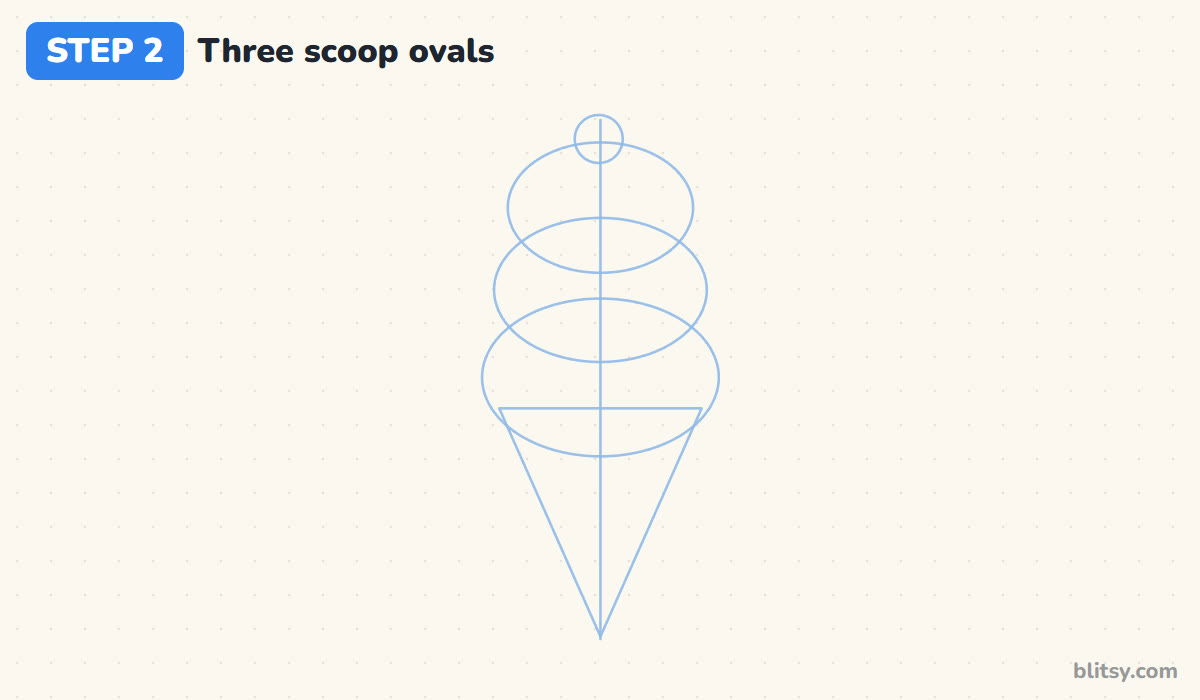
Draw a wide oval sitting on top of the triangle, slightly wider than the cone's top edge. Stack a smaller oval on it so they overlap. A third oval, smaller still, goes on top of that. Each one should cover the bottom of the next. I finish with a little circle on the very top for the cherry.
💡 Tip: Shrink each oval a little as you go up. Equal sizes make the stack look like a snowman.
Step 3: Outline the cone
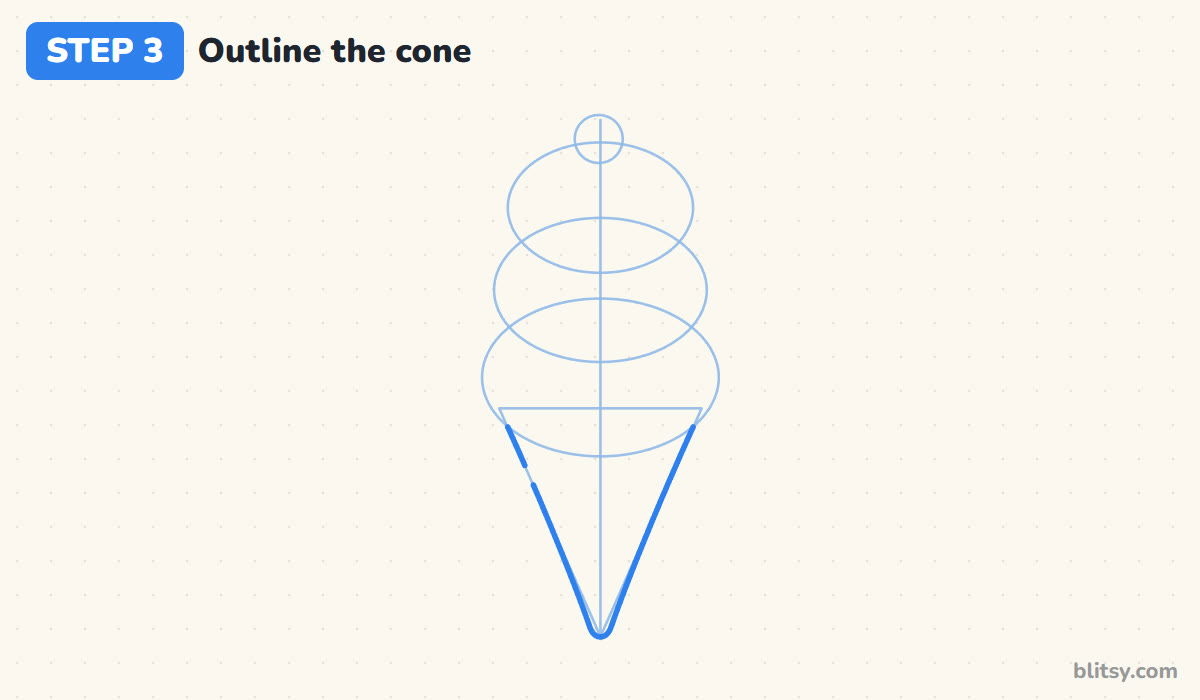
Go over the two long sides of the triangle with firmer, straight lines and round off the tip. You don't need the top edge, because the first scoop will hide it. A soft, round tip looks friendlier than a sharp needle point.
💡 Tip: Draw one side, then turn the paper and draw the other in the same direction so they match.




Step 4: Add the waffle criss-cross
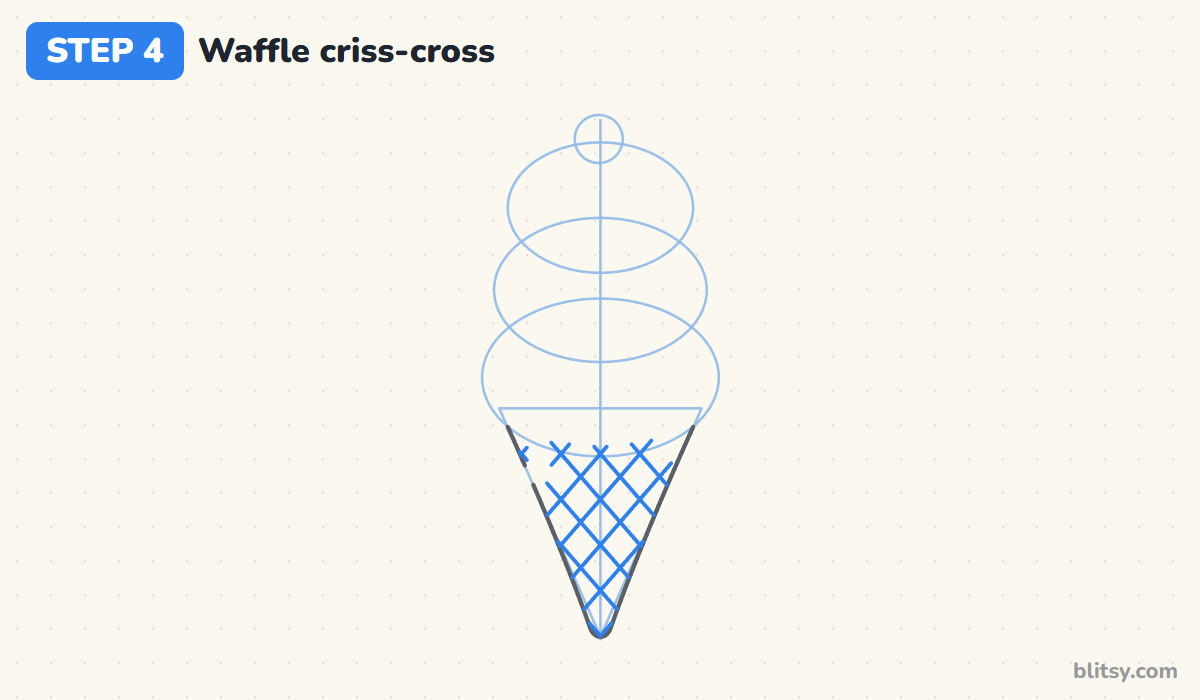
Draw a set of evenly spaced slanted lines across the cone, all leaning the same way. Then add a second set leaning the opposite way so they cross into little diamonds. Stop each line at the cone edge. Most beginners space them too tightly, and the cone turns into a dark smudge, so leave room between them.
💡 Tip: Use the first line as a ruler for the gap. Matching gaps matter more than straight lines.
Step 5: Draw the chocolate scoop with drips
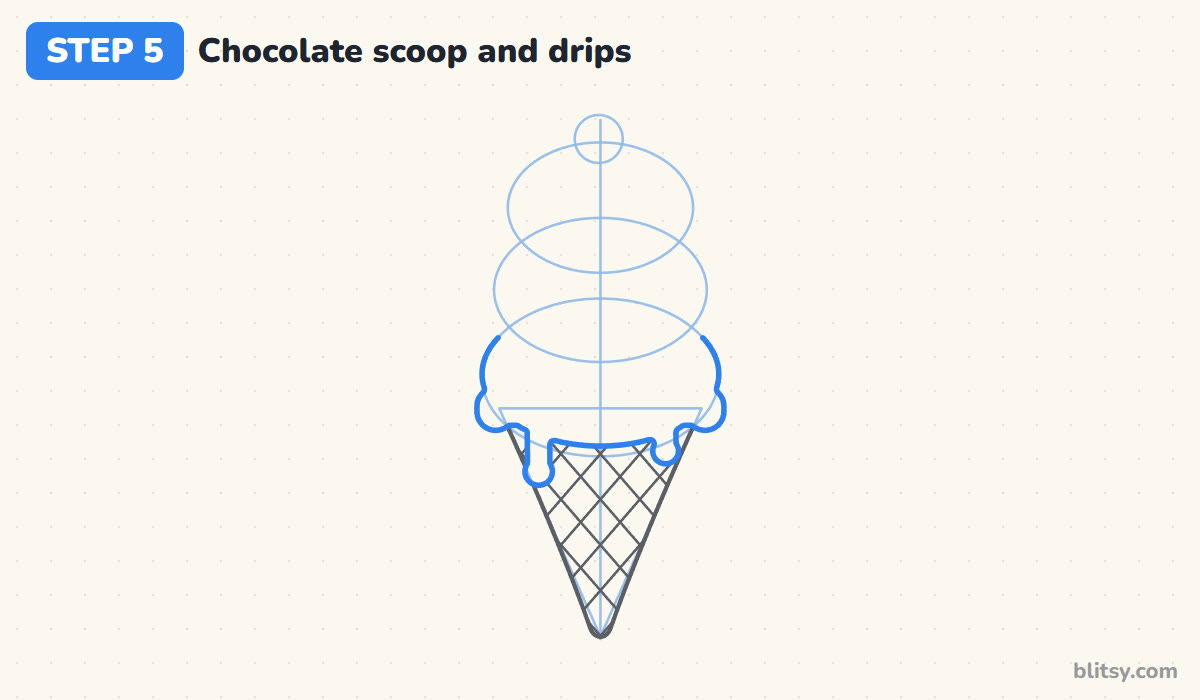
Trace the top of the bottom oval as a round dome. Its lower edge is the fun part: draw a row of small bumps, like a ruffle, that sticks out a little past the cone on both sides. From that bumpy edge, let two drips run down over the cone, one long and one short, each ending in a round drop.
💡 Tip: Make the drips different lengths. Two matching drips look stiff, uneven ones look melty.
Step 6: Add the strawberry scoop
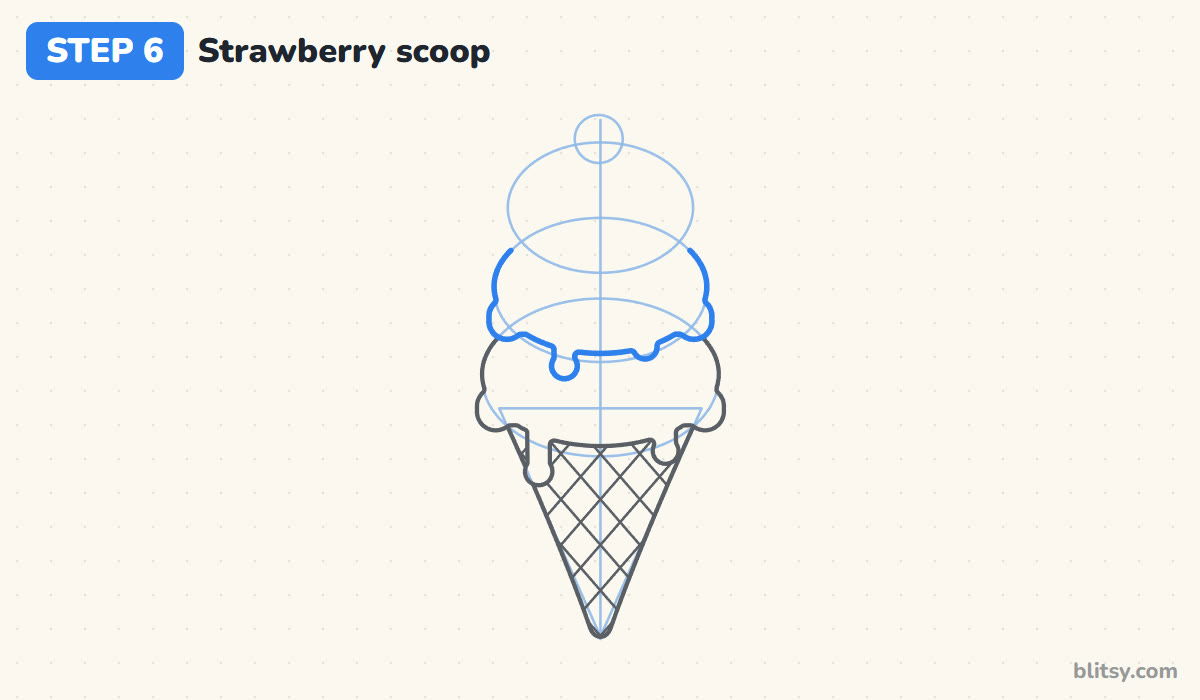
The middle scoop is built the same way, just a bit smaller. Draw its round top over the second oval, then a bumpy bottom edge that sits over the chocolate scoop. Add two short drips that hang onto the chocolate. Erase or simply ignore the chocolate lines that end up under this scoop.
💡 Tip: Keep the bumps on each scoop roughly the same size, or the edge starts to look torn.
Step 7: Finish with the vanilla scoop on top
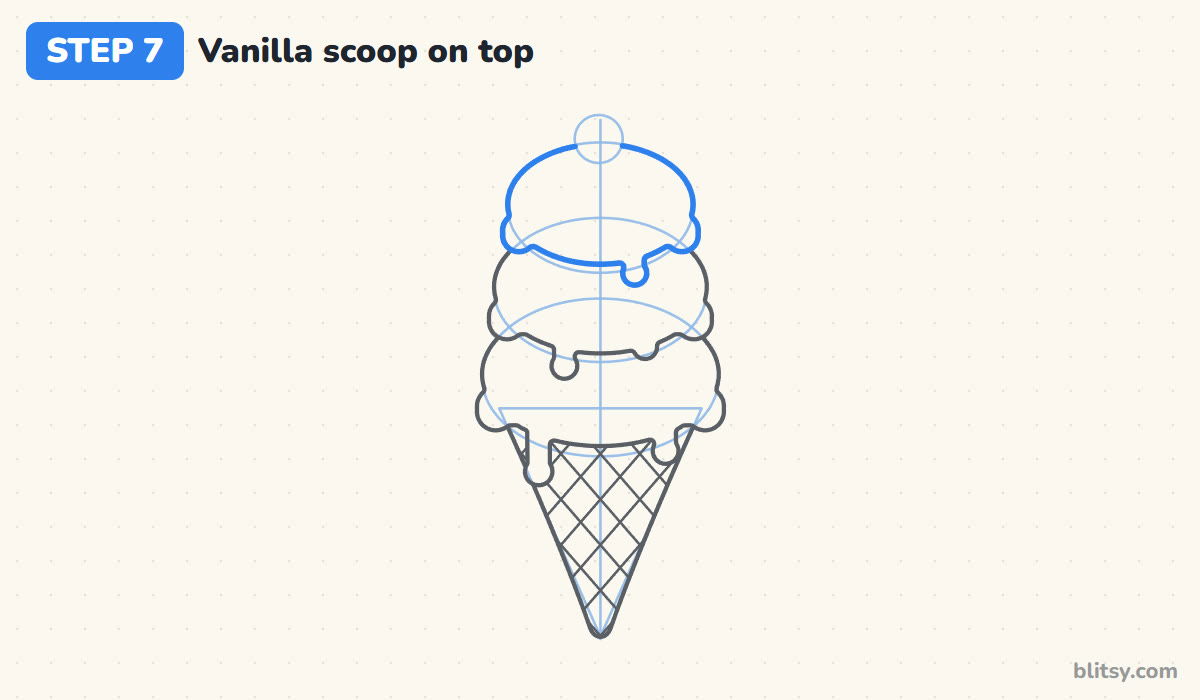
Now the smallest scoop. Give it a round top, a ruffled bottom over the strawberry, and just one drip on the right side. I like the top scoop to be the roundest of the three, because it's the part people notice first.
💡 Tip: If the stack leans, fix it now while everything is still pencil. Line the scoops up on the center line.




Step 8: Place a cherry with a stem
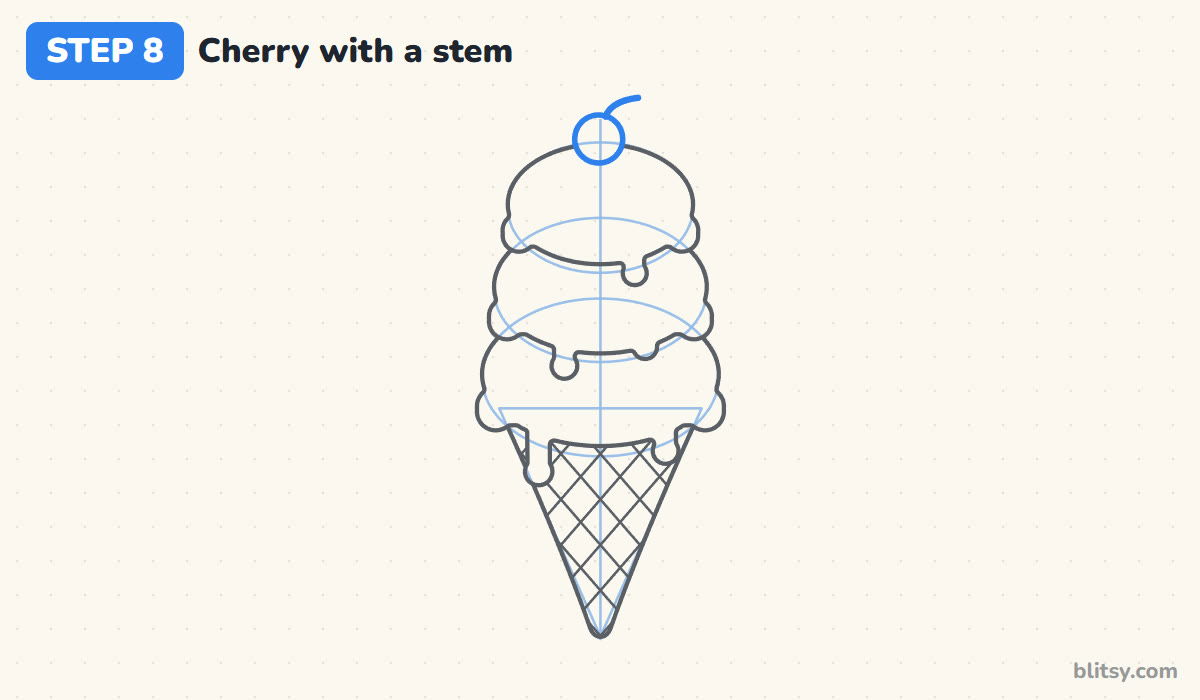
Draw a round cherry on top of the vanilla scoop, sinking into it slightly so it looks heavy. From the top of the cherry, pull one curved line up and to the right for the stem. A thick line works fine here; there's no need to draw the stem as two lines.
💡 Tip: Keep the cherry small, about a quarter as wide as the top scoop.
Step 9: Sprinkle it and add shines
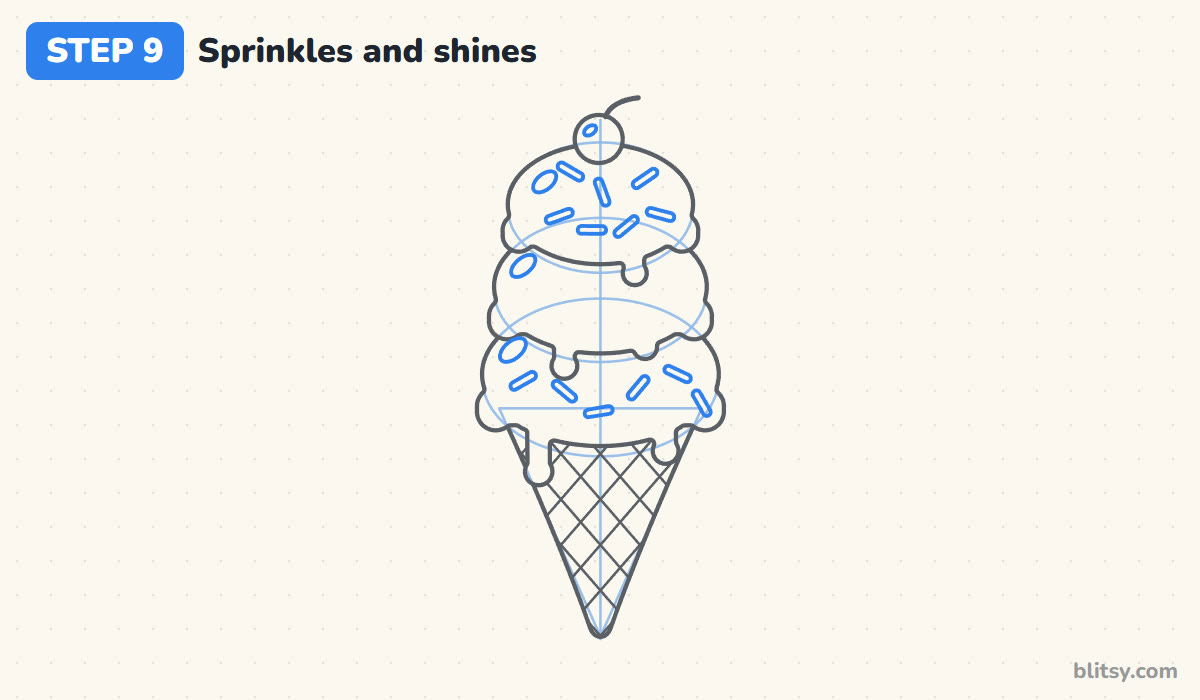
Scatter short rounded sticks across the vanilla and chocolate scoops, pointing in different directions. Leave the strawberry plain so the eye has a place to rest. Then draw a small slanted oval near the upper left of each scoop and one on the cherry. Those shines tell the viewer the light comes from the left.
💡 Tip: Seven or so sprinkles per scoop is plenty. Too many and the scoop disappears.
Step 10: Ink the lines and erase the guides
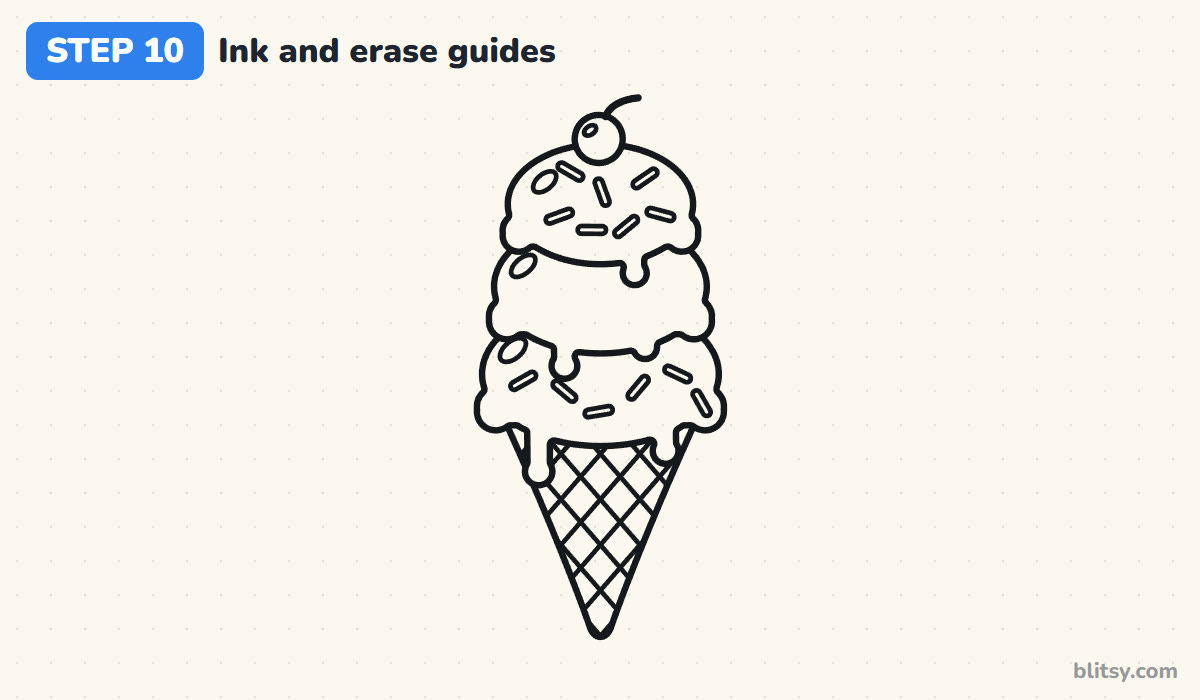
Trace every keeper line with a black marker: the cone, the waffle lines, all three scoops, the cherry, the sprinkles and the shines. Skip the center line and the ovals. Let the ink dry for a minute before you erase, or the eraser will smear it across the whole cone.
💡 Tip: Ink the waffle lines with a lighter hand than the outline so the cone shape still stands out.
Step 11: Color your ice cream
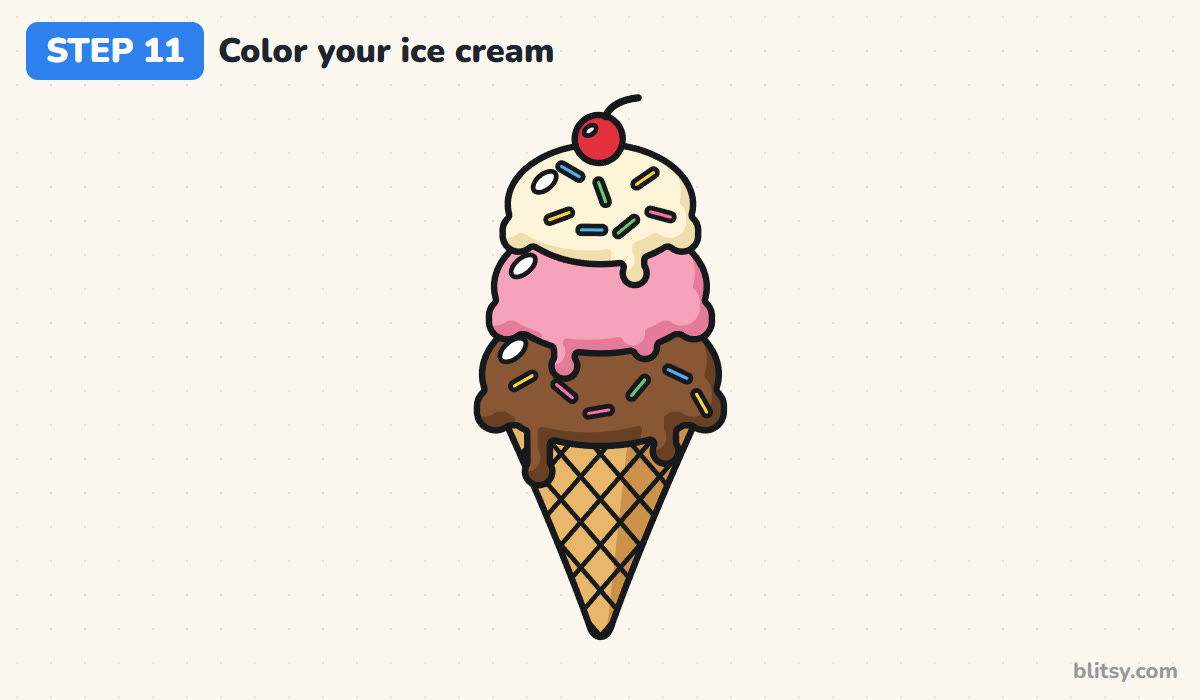
Color the cone light brown and press harder on its right side for a shadow. The bottom scoop is chocolate brown, the middle one pink and the top one cream. Add a slightly darker shade along the bottom of each scoop. Make the cherry red, leave every shine white, and give each sprinkle its own bright color.
💡 Tip: For cream, a very light yellow works if your set has no cream pencil.




Cone Drawing Slip-Ups and Their Fixes
- Scoops narrower than the cone. The ice cream should spill over the edge a little. Make the bottom scoop wider than the cone top.
- Smooth bottoms on the scoops. A plain curved edge looks like a ball sitting in a cup. The small bumps are what say scooped ice cream.
- Waffle lines drawn too close. Tight lines fill the cone with gray. Space them out so you can see clear diamonds.
- Drips that float. Every drip has to start from the bumpy edge of a scoop, not from the middle of the next one.
- A stack that leans. Without the center line the scoops slide sideways. Check it before you ink.
New Flavors and Toppings to Try
Once the stack feels easy, swap the flavors. Mint green with dark chips, blue bubblegum or a purple berry scoop all work with the same shapes. You can draw just one scoop for a quick version, or turn the cone into a cup by drawing a short bowl shape instead of the triangle. Small kids can skip the waffle lines and color the cone with dots. If sweet things are your favorite subject, the cupcake drawing step by step tutorial uses the same bumpy frosting idea, and the strawberry drawing lesson gives you a fruit to put next to your cone. For more coloring fun, try these ice cream coloring pages.
Free Ice Cream Coloring Page and Step Guide
The free ice cream coloring page shows the finished cone in color at the top, with a small key that matches each color to its part, and a large outline underneath for coloring. The step-by-step PDF guide has all 11 steps with pictures and tips, so you can draw without a screen. Both fit Letter or A4 paper.
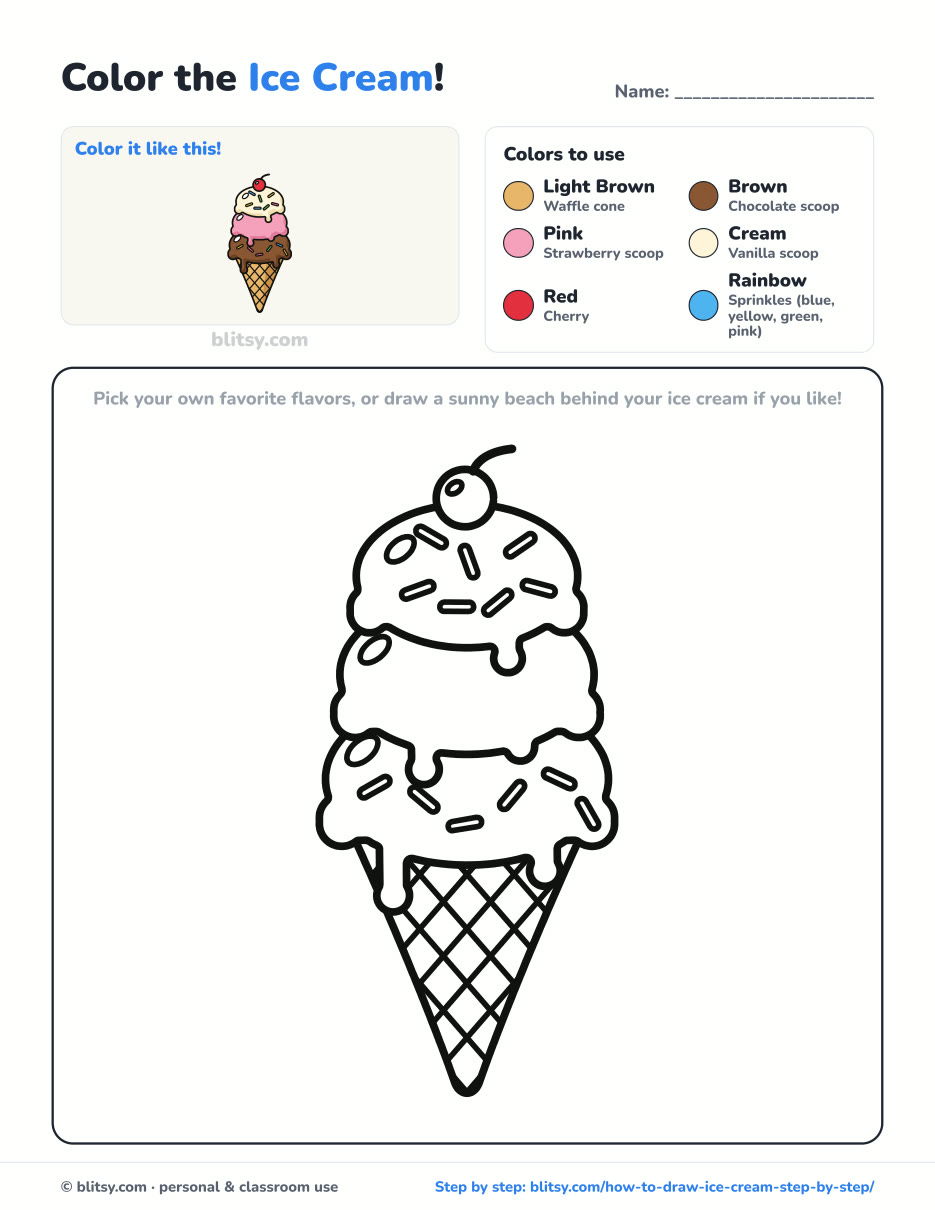
Black outlines with a colored example and the color names at the top. Ready to print and color.
⬇️ Download Coloring PageEvery step picture with its instructions and tips, to keep beside your paper while you draw.
⬇️ Download Drawing Guide📱 On a phone? Tap a download button, then open the file and choose Share → Save to Files or Print. On a computer, the PDF opens or saves straight to your Downloads folder.
Pin the Triple Scoop Steps
More Sweet Treats and Fruits to Draw
Every tutorial here walks through one subject with a picture for each step, the same way this cone did.
- Cupcake Drawing: A pink swirl of frosting with sprinkles and a cherry sits on a striped liner in this cupcake drawing tutorial.
- Birthday Cake Drawing: A two-tier party cake with frosting drips and three lit candles sits on a stand in this birthday cake drawing step by step lesson.
- Strawberry Drawing: A plump berry with a leafy cap sits next to a cut half in this strawberry drawing tutorial.
- Pizza Drawing: A whole pepperoni pizza with one cheesy slice pulled aside starts as a flat oval in this how to draw pizza step by step guide.
- Fruit Drawing: Five fruits built from circles and ovals fill a blue bowl in this fruit drawing tutorial.
Ice Cream Drawing Questions Kids Ask
What is the easiest way to draw an ice cream cone?
Draw an upside-down triangle for the cone, then a round scoop on top with a bumpy bottom edge. Add crossing lines on the cone and you're done.
How do you draw melting ice cream?
Let a few drips of different lengths run down from the bumpy edge of a scoop, each ending in a round drop. Uneven drips look the most melty.
How do I draw the waffle pattern on a cone?
Draw evenly spaced slanted lines one way, then a second set the other way so they cross into diamonds. Keep the gaps wide.
What colors should I use for ice cream?
Light brown for the cone, then any flavor colors you like: brown for chocolate, pink for strawberry, cream for vanilla, red for the cherry.
Go pick your three flavors and stack them high. Nothing melts on paper! 🍦✏️
Related posts:
 How to Draw Todoroki Step by Step (Easy Fire and Ice Guide)
 How to Draw a Whale Step by Step (Easy for Beginners)
 How to Draw Lungs Step by Step (Easy Science Diagram)
 How to Draw a Pineapple Step by Step (Easy Crown and Slice)
 How to Draw Iron Man Step by Step (Easy Chibi for Kids)
 How to Draw a Dress Step by Step (Easy Party Dress)
 How to Draw a Chicken Step by Step (Easy for Beginners)
 How to Draw a UFO Step by Step (Cute Alien Saucer)
 How to Draw Flames Step by Step (Easy Campfire Drawing)
 How to Draw a Moon Step by Step (Sleepy Crescent + Phases)
 How to Draw a Sunflower Step by Step (Big and Bright)
 How to Draw a Fall Leaf Step by Step (Maple, Oak and Birch)

