
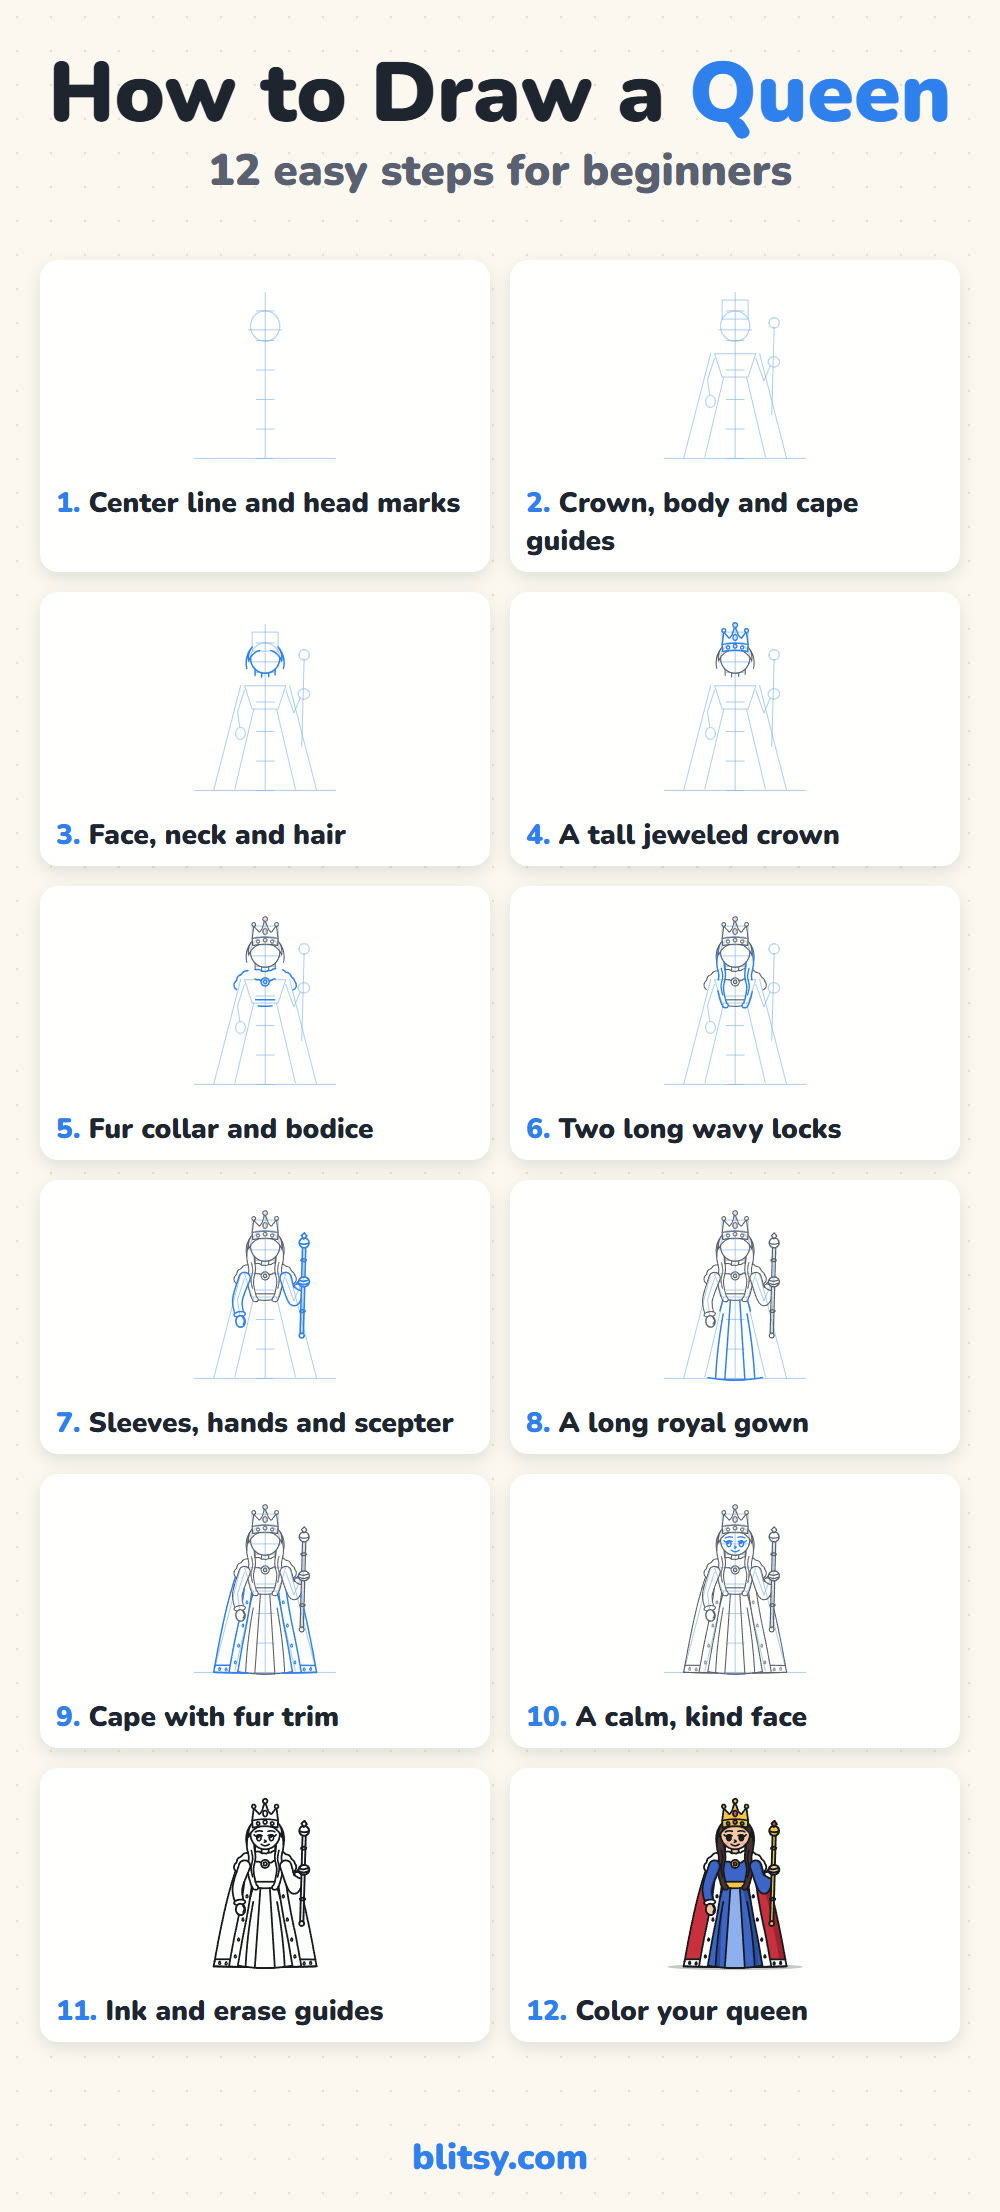
Kings and queens show up in almost every story kids make up, and the queen is usually the one in charge. A queen looks harder to draw than she really is, because most of what makes her royal is the costume. Here's how to draw a queen step by step, starting from a straight line and a few head-sized marks. Mine is a friendly fairy-tale queen with a tall crown, a red cape trimmed in spotted white fur, and a gold scepter.
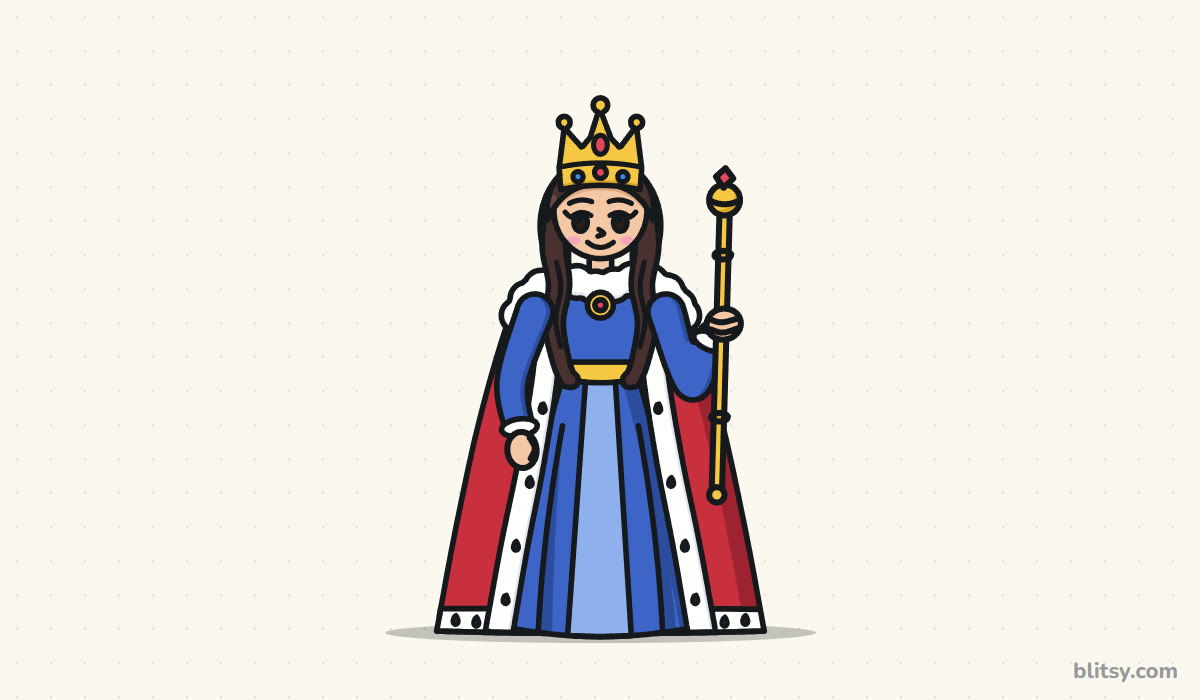
Only the blue lines are new in each picture. Gray lines are the parts from earlier steps, so you always know exactly what to copy next.
Quick overview
⏱️ Time: about 35 to 45 minutes with coloring
🎯 Level: easy to medium, good for kids around 7 and up
✏️ Steps: 12
👑 You'll draw: a standing fairy-tale queen with a crown, cape and scepter
Royal Supplies for Your Queen Sketch
- A regular pencil for light guide lines
- A clean eraser
- A black marker or fineliner for the final lines
- Crayons or colored pencils: red, royal blue, light blue, yellow, dark brown, peach plus black
- A sheet of paper held upright, the tall way
Hold the paper upright, because she's tall and the crown needs room at the top.
How to Draw a Queen Step by Step
Step 1: Draw a center line, head marks and the head
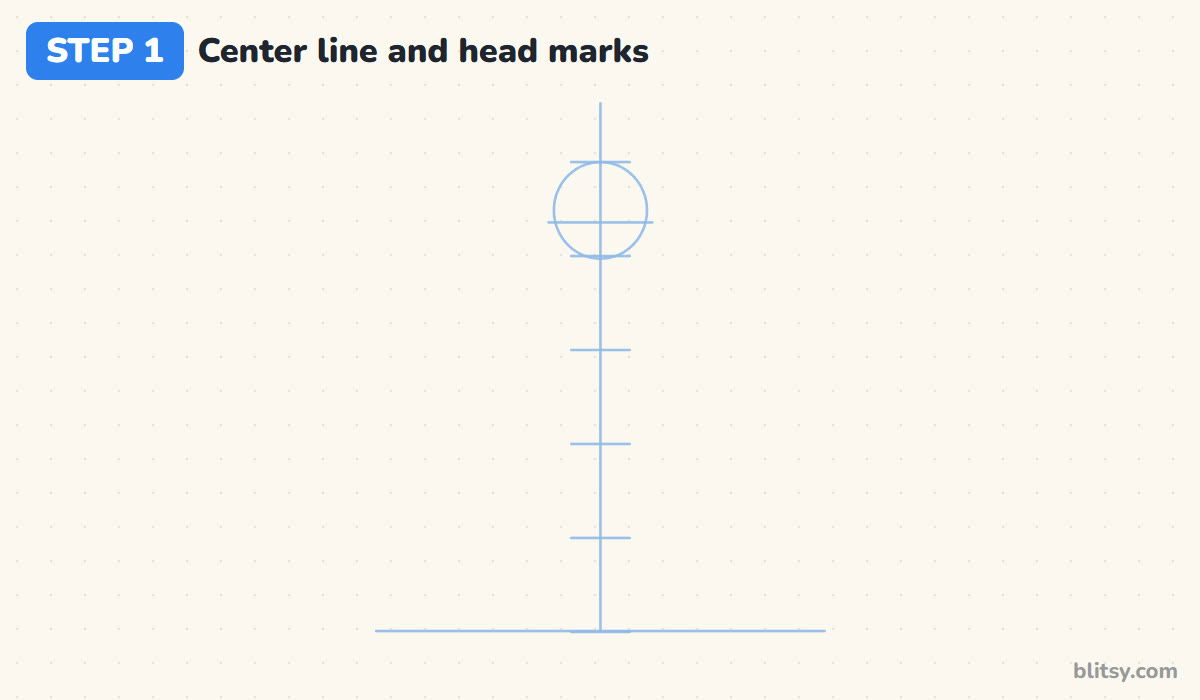
Draw a light ground line near the bottom of the page and a straight line up through the middle. Split that line into five equal parts with short marks. Draw the head as a circle inside the top part, then add a light cross line a little below its middle for the eyes. Five heads tall makes her look grown up, which already sets her apart from a little princess.
💡 Tip: Press very lightly here. None of these lines will stay in the final picture.
Step 2: Sketch guides for the crown, the body and the cape
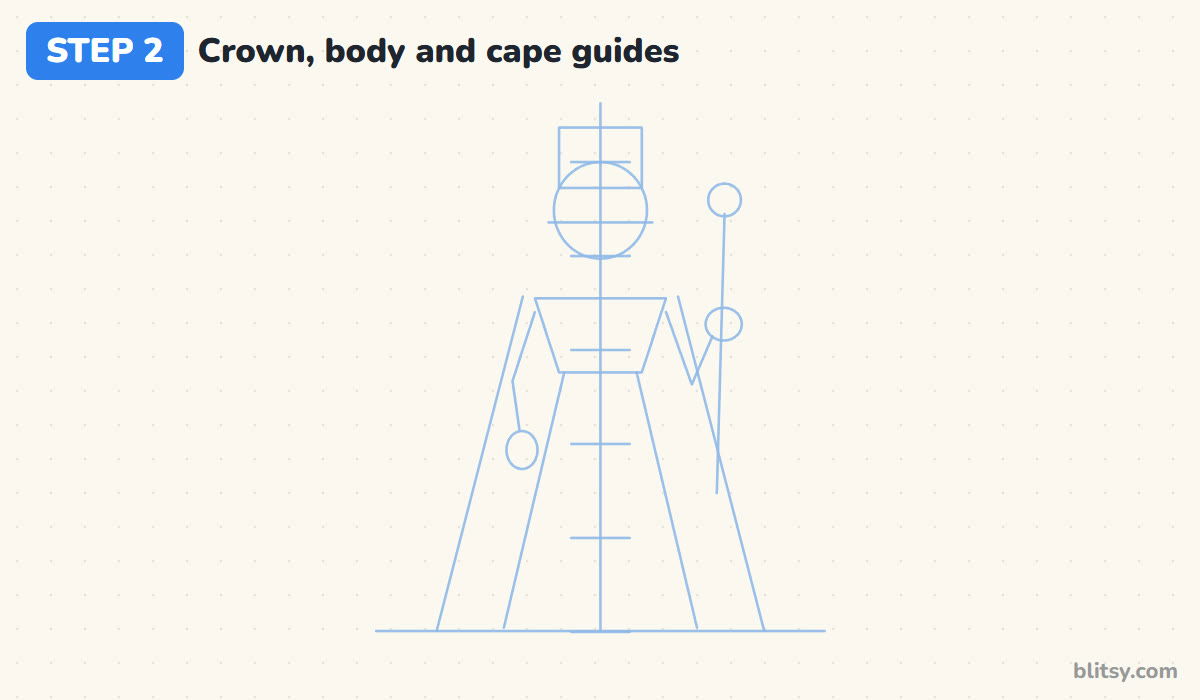
Put a tall box on top of the head for the crown. Under the head, draw a box for the upper body that gets narrower at the waist. From the waist, two slanted lines go down to the ground for the gown, and two wider lines outside them mark the cape. Add stick arms, small hand circles and one long scepter line on the right with a ball on top.
💡 Tip: Make the cape lines start at the shoulders and spread out wider than the gown at the bottom.
Step 3: Draw the face, the neck and the hair
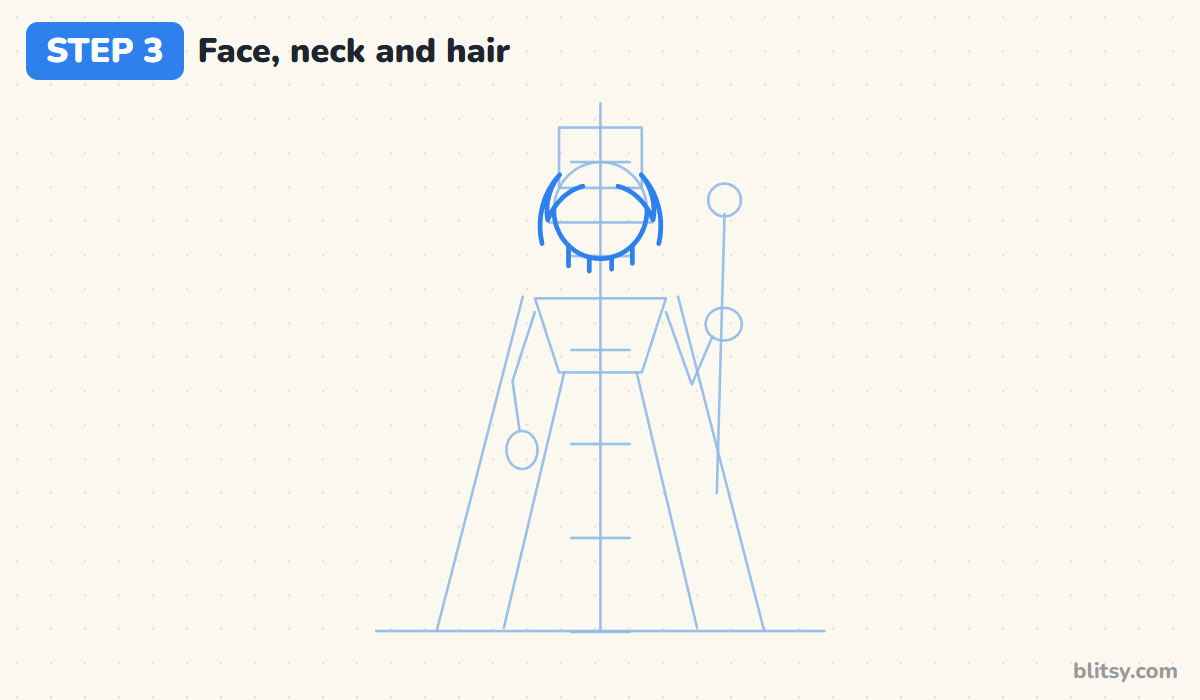
Go over the head circle with a firmer line and draw a short neck under it. Then draw the hair around the head, a little outside the circle, so it looks thick. It falls down past her jaw on both sides. Leave the middle of the forehead open for now, since the crown will sit right on top of it.
💡 Tip: Keep the neck about as wide as the gap between her eyes, so the head sits naturally on it.



Step 4: Add a tall jeweled crown
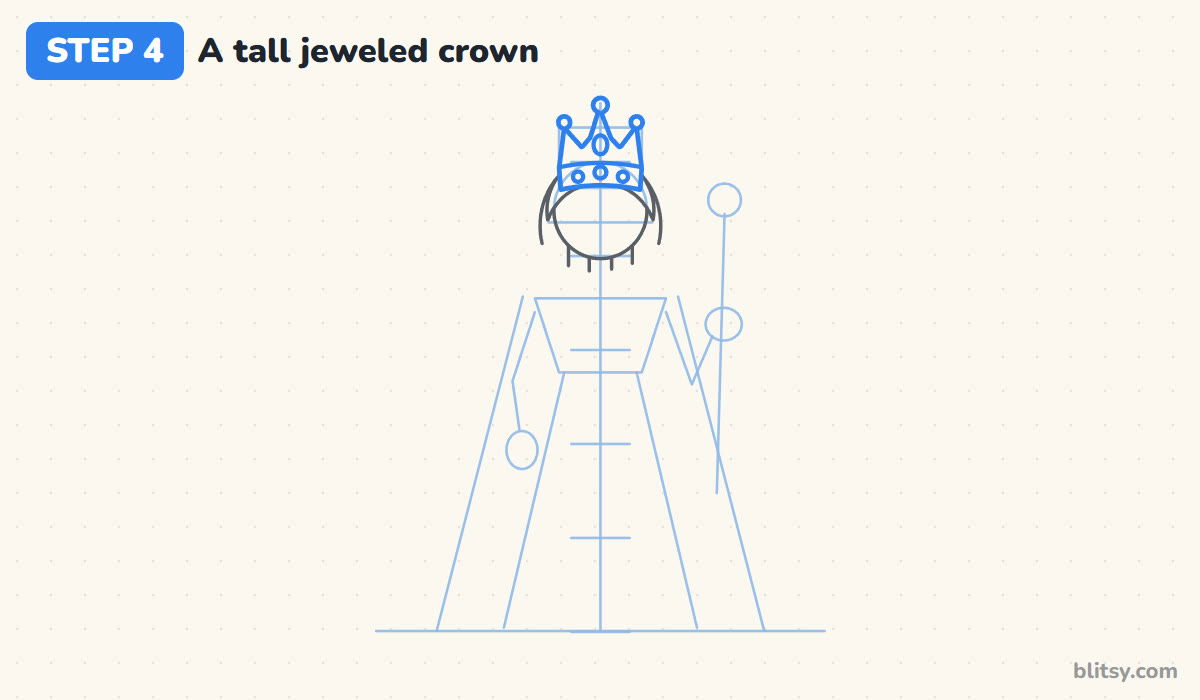
Inside the crown box, draw a band across her forehead first. On top of the band, draw three tall points: the middle one highest, the side ones a bit lower. A small round pearl sits on each tip. Then add an oval gem in the middle point and three round gems along the band.
💡 Tip: Draw the band slightly curved, like it wraps around her head, not perfectly straight.
Step 5: Draw the fur collar and the bodice
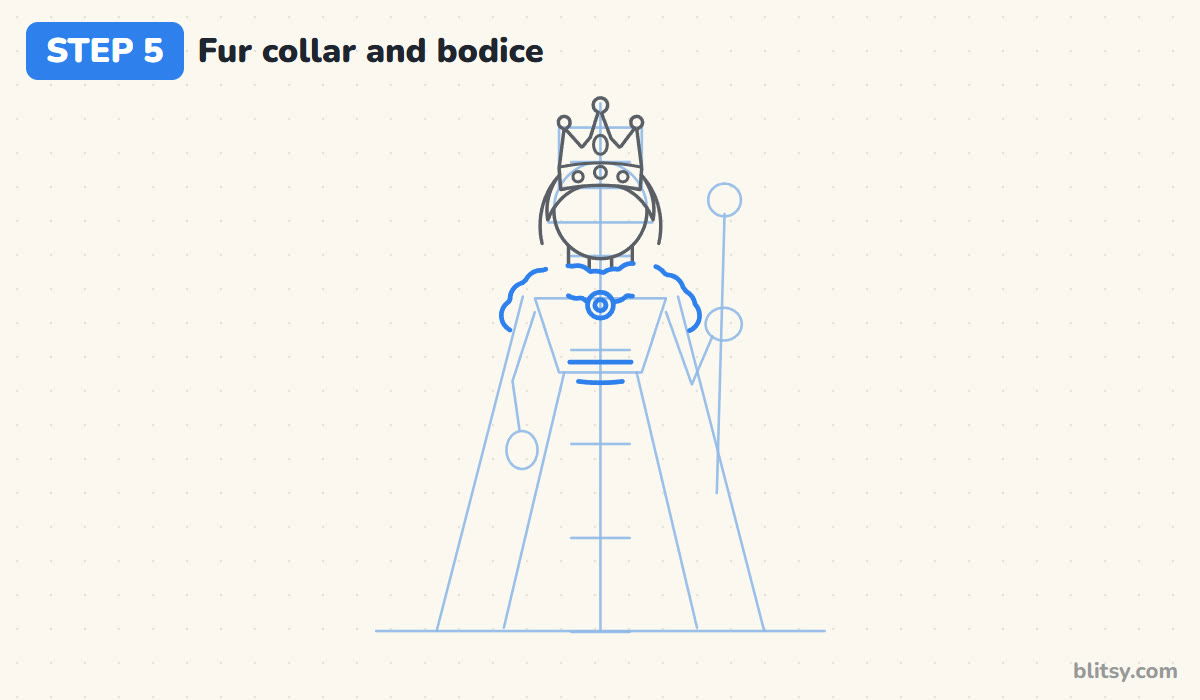
A fluffy fur collar wraps around her shoulders. I draw it as a cloud-like band of bumps from shoulder to shoulder. Under it, the top of the gown narrows down to the waist, where a gold belt sits. A round brooch at the top of the bodice holds the collar together.
💡 Tip: Make the bumps different sizes. Perfectly even bumps look like a flower border, not fur.
Step 6: Add two long wavy locks of hair
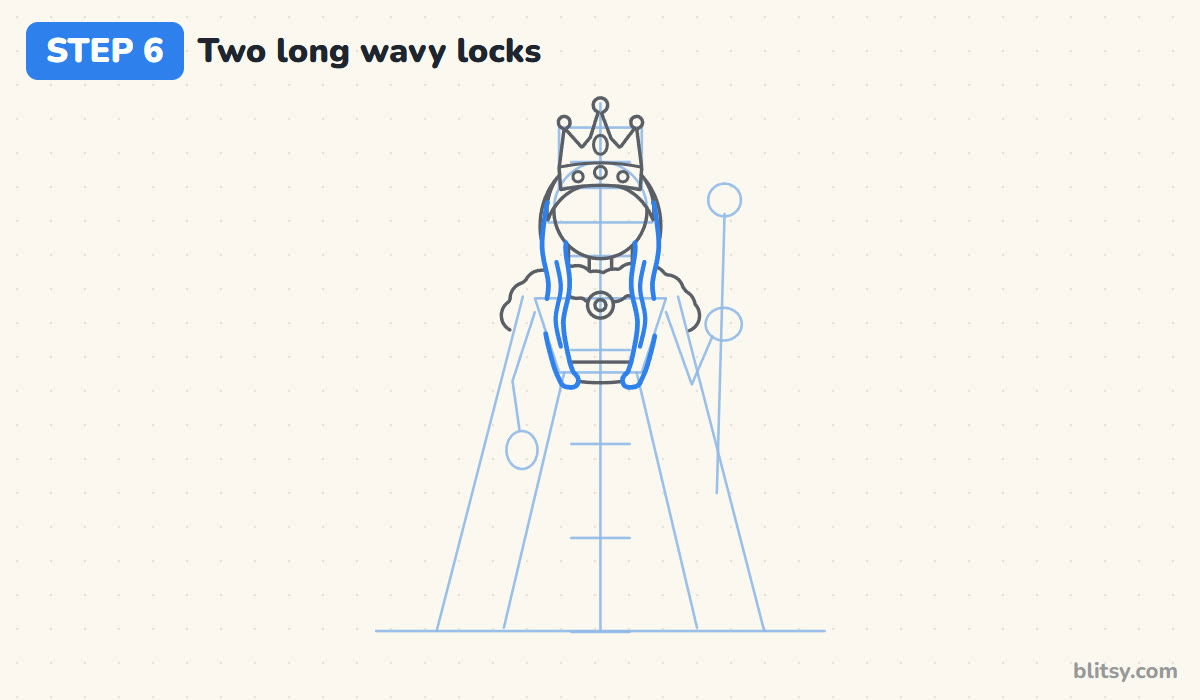
Her long hair comes forward over the shoulders and falls onto the front of her gown. Draw each lock as two wavy lines that come close together at the end, stopping a little below the belt. One thin line inside each lock shows the strands.
💡 Tip: Let the waves on both locks go the same way, so they look like one head of hair.
Step 7: Draw the sleeves, the hands and the scepter
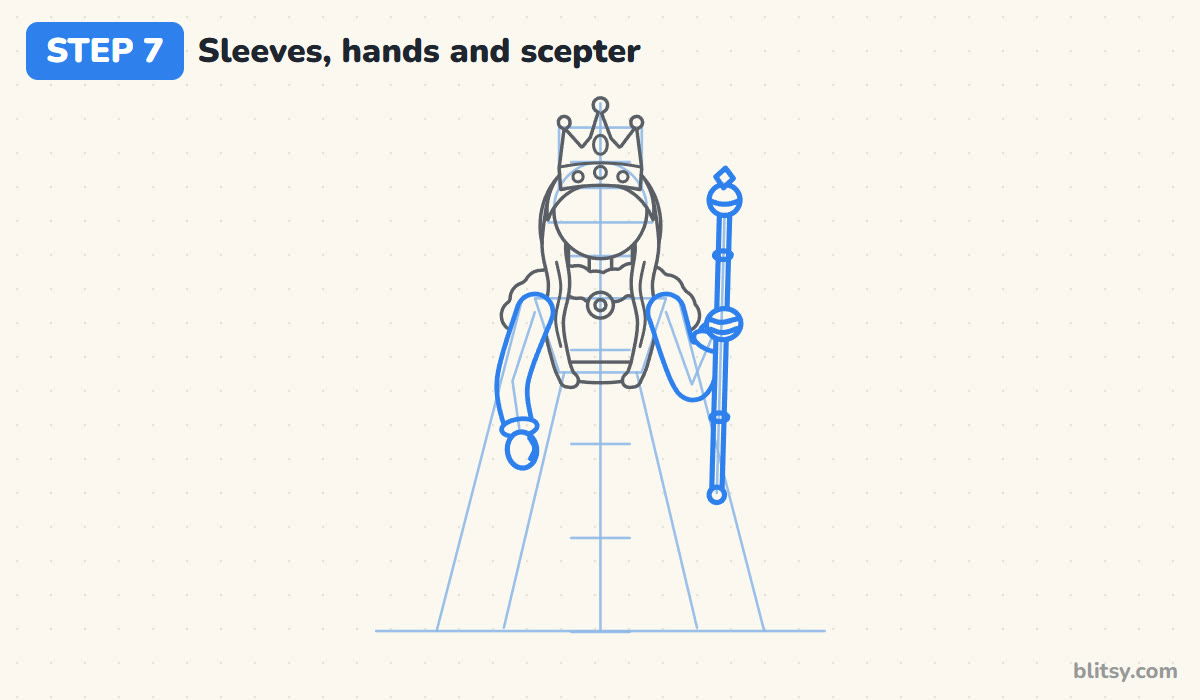
Follow the arm guides with two lines each so the long sleeves have real width. Add a small fur cuff at each wrist and round mitten hands. Her left hand hangs at her side, and the right one comes up to hold the scepter. The scepter is a long gold rod with two rings, a ball at the top and a small diamond gem on the very tip.
💡 Tip: Draw the hand over the rod, with two finger lines across it, so she's really gripping it.




Step 8: Draw the long royal gown
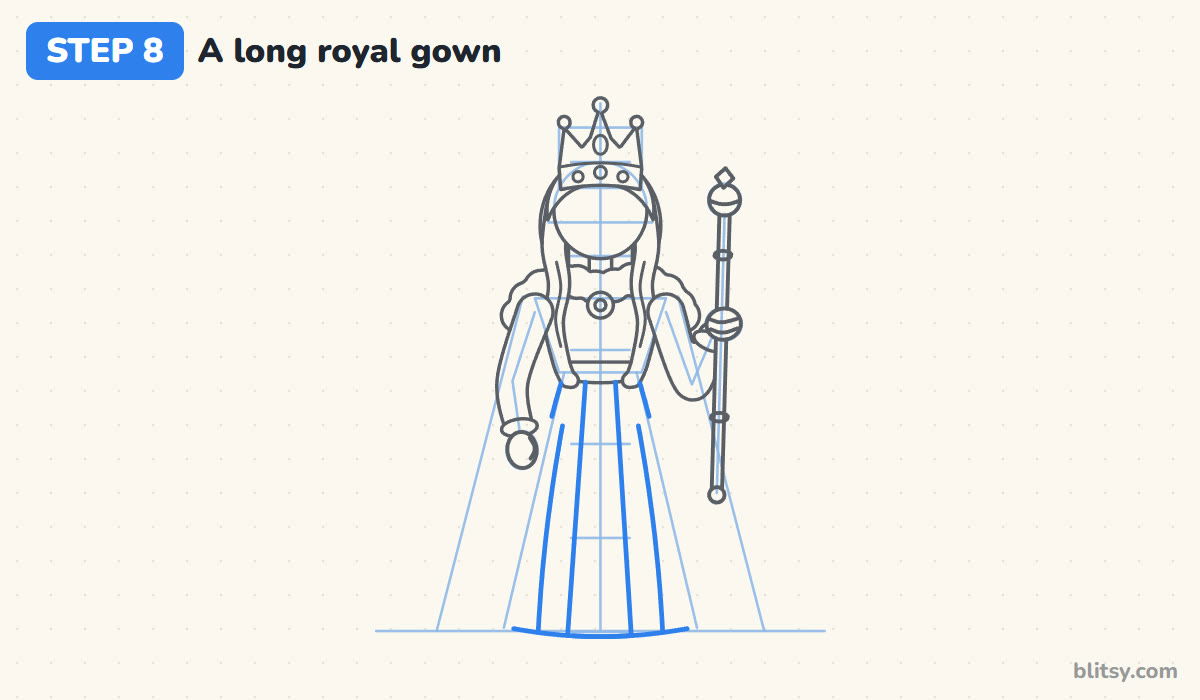
From the belt, the gown spreads out in a long A shape all the way to the ground. Curve the hem down a little in the middle. Then draw a narrow front panel down the center that gets wider toward the hem, and one long fold line on each side.
💡 Tip: Stop the gown lines where an arm or a lock of hair is in front. Gaps there make the layers clear.
Step 9: Add the cape with fur trim
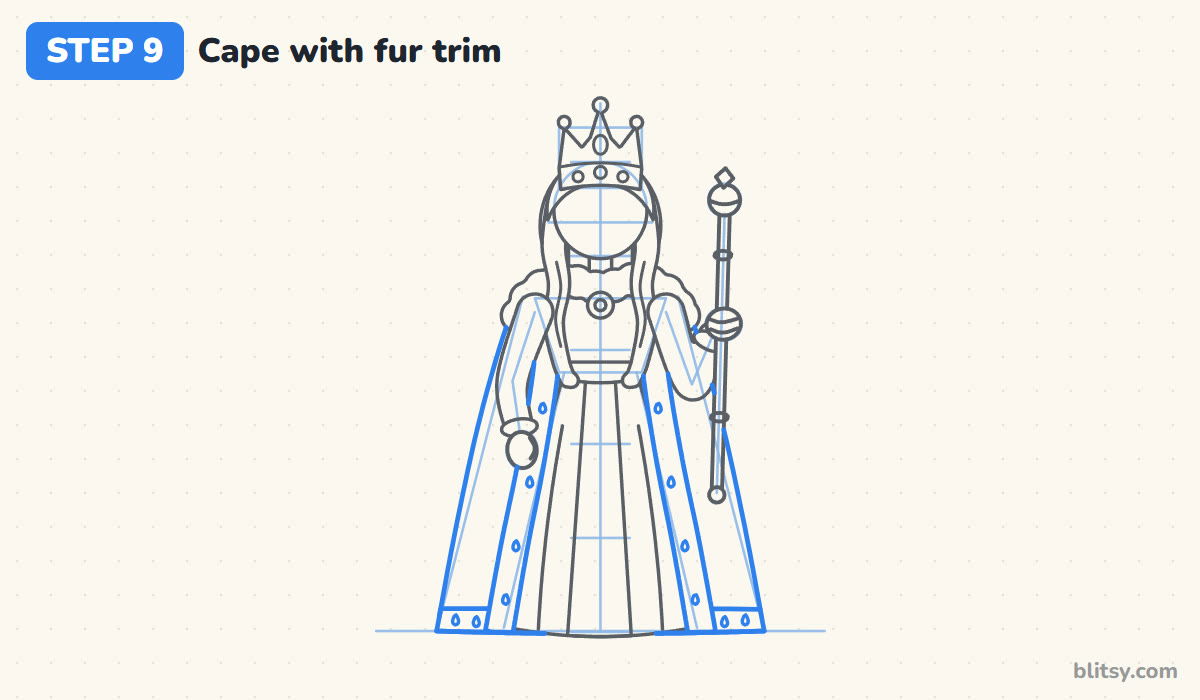
Now the cape: two long lines from behind the shoulders out to the ground, wider than the gown. Down the front edges, draw two bands of fur that run all the way to the bottom, and a band of fur along the hem. Small teardrop spots on the fur are the classic royal touch.
💡 Tip: Space the spots out evenly and point them all the same way, tip up.
Step 10: Give her a calm, kind face
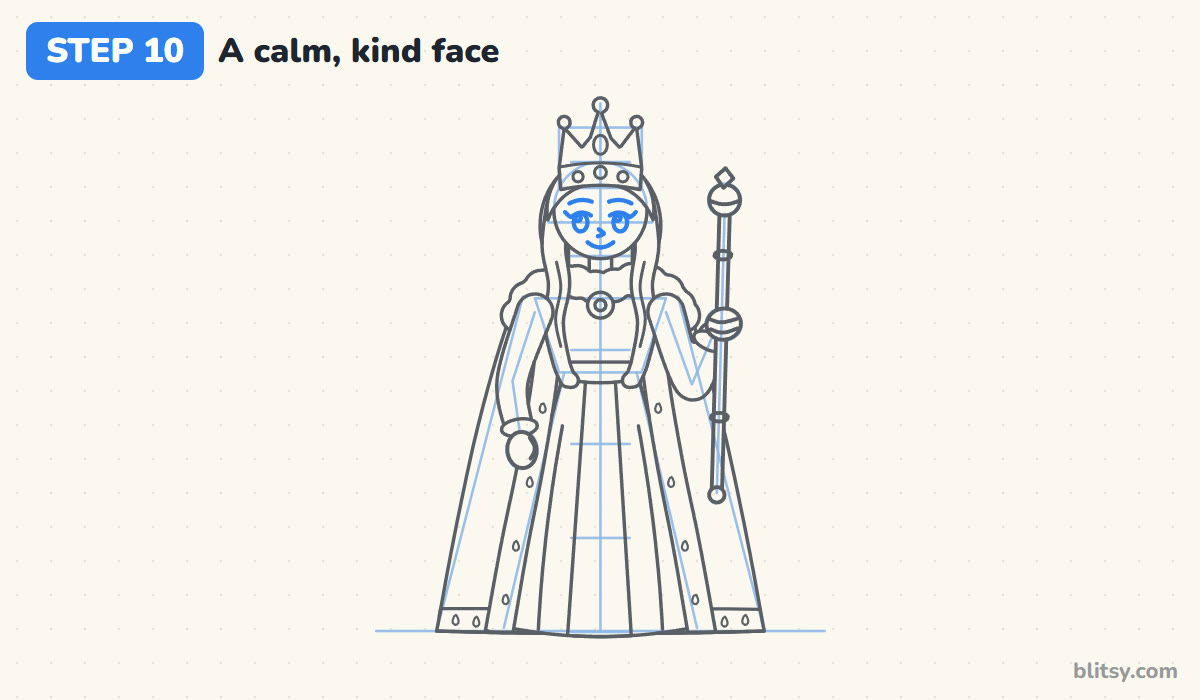
Sit two oval eyes on the eye line with a shine dot in each. A curved lid line above each eye, with a little flick at the outer corner, makes her look calm and grown up. Add soft brows, a tiny nose and a simple smile. The pink cheeks come later, with color only, no outline.
💡 Tip: Keep the eyes smaller than a princess's. Smaller eyes read as older right away.
Step 11: Ink your lines and erase the guides
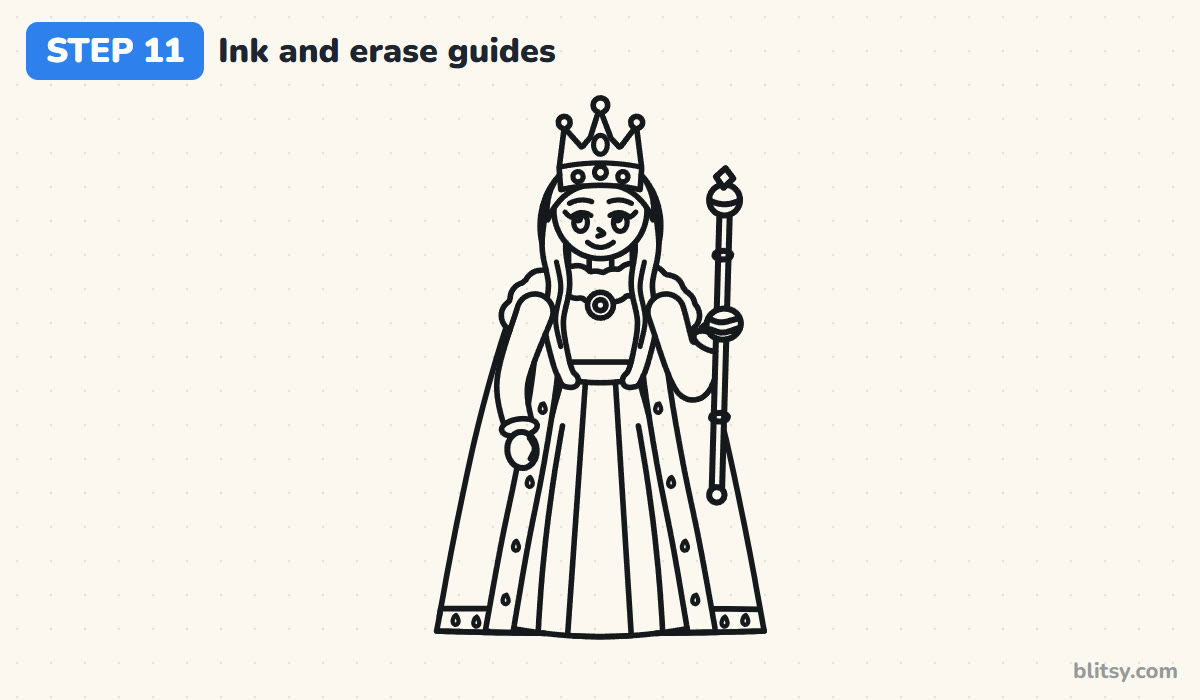
Trace every keeper line with the black marker. I start with the face and crown, while my hand is still fresh, and finish with the long cape lines. Let the ink dry, then erase all the pencil guides.
💡 Tip: Turn the page as you ink the long cape lines, so you always pull the pen toward you.




Step 12: Color your queen
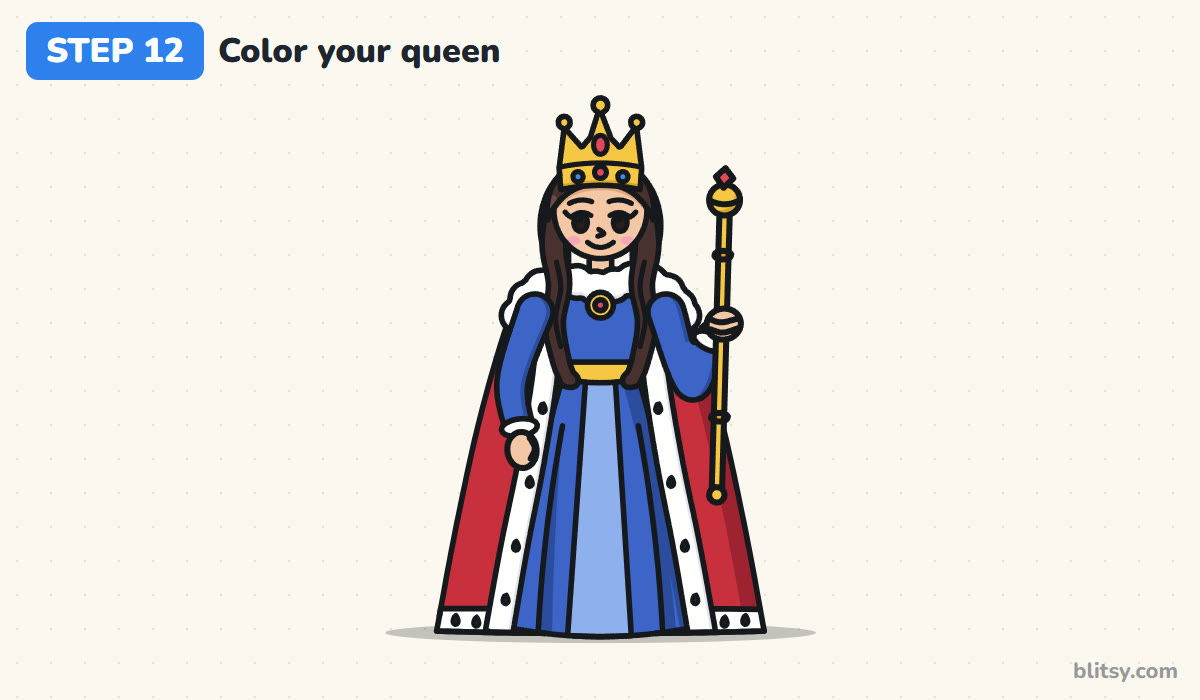
Color the cape red and the gown royal blue, with the front panel light blue. The crown, belt, brooch and scepter are yellow. Leave the fur white and fill the spots black. Her hair is dark brown, the skin peach, and the gems red and blue.
💡 Tip: Add a darker red down one side of the cape. That one shadow makes the cloth look heavy and soft.
Where Queen Drawings Lose Their Royal Look
- A crown that's too small. A tiny crown turns her into a princess. Make the crown almost as tall as her face.
- Forgetting the cape. Without the cape she looks like she's in a party dress. The red cape behind her is what says queen.
- Stick arms. One line per arm looks like a stick figure. Draw both sides of each sleeve.
- A wobbly scepter. A bent rod looks like a garden stick. A ruler helps with the guide line.
- Fur that looks flat. A plain white band can look like paper. Bumpy edges and black spots make it read as fur.
Crowns, Capes and Other Royal Swaps
Once the five head marks feel easy, change the costume and she becomes a new queen. Give her a purple cape, a green gown or golden hair in a bun. If you'd like her younger daughter standing next to her, my how to draw a princess step by step lesson draws a smaller girl in a ball gown with a star wand. A queen also needs a home, and the castle drawing tutorial gives her one. For more practice with long hair, try the long wavy hair drawing guide.
Free Queen Coloring Page and PDF Steps
The free queen coloring page shows a colored example at the top and a key that matches every color to a part of her, with a big outline underneath. The step-by-step PDF guide has all 12 steps with pictures and tips, so you can draw her at the table without a screen. Both print on Letter or A4 paper.
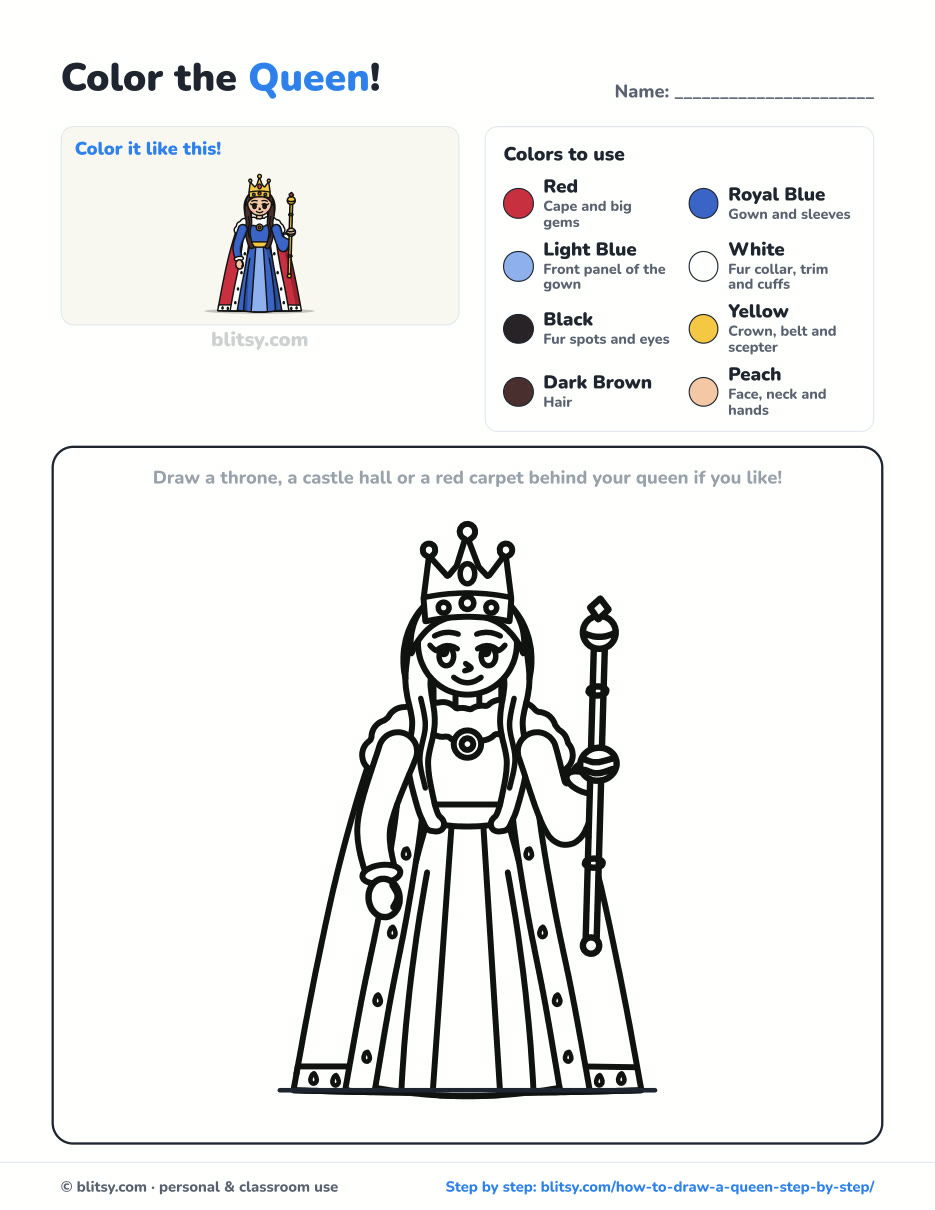
Black outlines with a colored example and the color names at the top. Ready to print and color.
⬇️ Download Coloring PageEvery step picture with its instructions and tips, to keep beside your paper while you draw.
⬇️ Download Drawing Guide📱 On a phone? Tap a download button, then open the file and choose Share → Save to Files or Print. On a computer, the PDF opens or saves straight to your Downloads folder.
Pin the Royal Queen for Your Next Drawing Day
More Fairy-Tale Drawings to Try Next
Every lesson below has a picture for each step, just like this one, so you can build a whole storybook scene.
- Princess Drawing: A young princess with a long braid, a small crown and a lilac ball gown in this how to draw a princess step by step lesson.
- Castle Drawing: Towers, a gate and pointed roofs make a fairy-tale home in this castle drawing tutorial.
- Dragon Drawing: Wings, horns and a long tail, built from simple shapes in this dragon drawing step by step guide.
- Unicorn Drawing: A cute unicorn with a spiral horn and a flowing mane in this unicorn drawing tutorial.
- Sword Drawing: A knight's longsword with a cross guard and a shiny blade in this sword drawing step by step lesson.
Royal Drawing Questions From Kids and Parents
How do you draw a queen easy for kids?
Start with a circle for the head and a triangle shape for the gown. Then add a big crown, a cape behind her and a stick with a ball for the scepter. The costume does most of the work.
What is the difference between drawing a queen and a princess?
A queen is taller and older, about five heads tall instead of four, with smaller eyes, a bigger crown, a cape and a scepter. A princess usually has big eyes and a wand.
How do you draw a queen's crown?
Draw a curved band first, then three tall points on top with a pearl on each tip. Add an oval gem in the middle point and a few round gems along the band.
How long does it take to draw a queen?
Most kids need about 35 to 45 minutes, coloring included. The fur trim and the face take the most time.
One straight line on a blank page is all it takes to begin, so go crown your own queen today. 👑✏️
Related posts:
 How to Draw a Castle Step by Step (Easy Fairy-Tale Castle)
 How to Draw a Fairy Step by Step (Easy Toadstool Fairy)
 How to Draw a Whale Step by Step (Easy for Beginners)
 How to Draw Lungs Step by Step (Easy Science Diagram)
 How to Draw a Pineapple Step by Step (Easy Crown and Slice)
 How to Draw Iron Man Step by Step (Easy Chibi for Kids)
 How to Draw a Dress Step by Step (Easy Party Dress)
 How to Draw a Chicken Step by Step (Easy for Beginners)
 How to Draw a UFO Step by Step (Cute Alien Saucer)
 How to Draw Flames Step by Step (Easy Campfire Drawing)
 How to Draw a Moon Step by Step (Sleepy Crescent + Phases)
 How to Draw a Sunflower Step by Step (Big and Bright)

