
Pumpkin pie looks tricky because of the wavy crust and the missing slice, but underneath it's just two ovals and a triangle. In this lesson I'll show you how to draw a pumpkin pie step by step, from a couple of faint guide shapes to a golden pie on a plate with one slice pulled out and a swirl of whipped cream on top. It's a fun one to draw before Thanksgiving dinner on November 26, and just as cozy any other time of year.
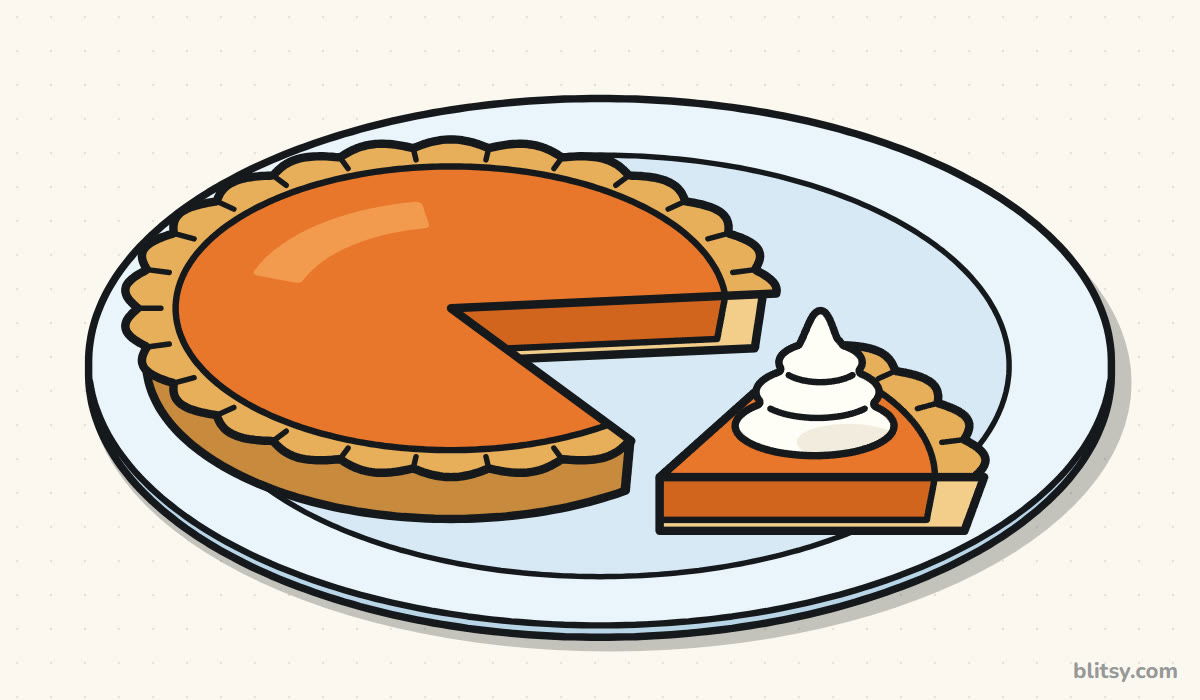
Fresh pie lines show up in blue in each picture, while gray lines are ones you drew earlier. Copy only the blue part.
Quick overview
⏱️ Time: about 30 minutes, plus 10 for coloring
🎯 Level: easy, fine for kids around 7 and older
✏️ Steps: 11
🥧 You'll draw: a whole pumpkin pie on a plate with one slice cut out
Supplies for Your Pie Drawing
- A pencil you can press lightly with (HB works well)
- A soft eraser
- A black marker or fineliner for the final lines
- Colored pencils or crayons in orange, dark orange, golden yellow, light brown, tan and light blue
- A sheet of plain paper, turned sideways
The plate is wide and flat, so a landscape sheet gives the slice room on the right.
How to Draw a Pumpkin Pie Step by Step
Step 1: Draw two ovals for the pie and the plate
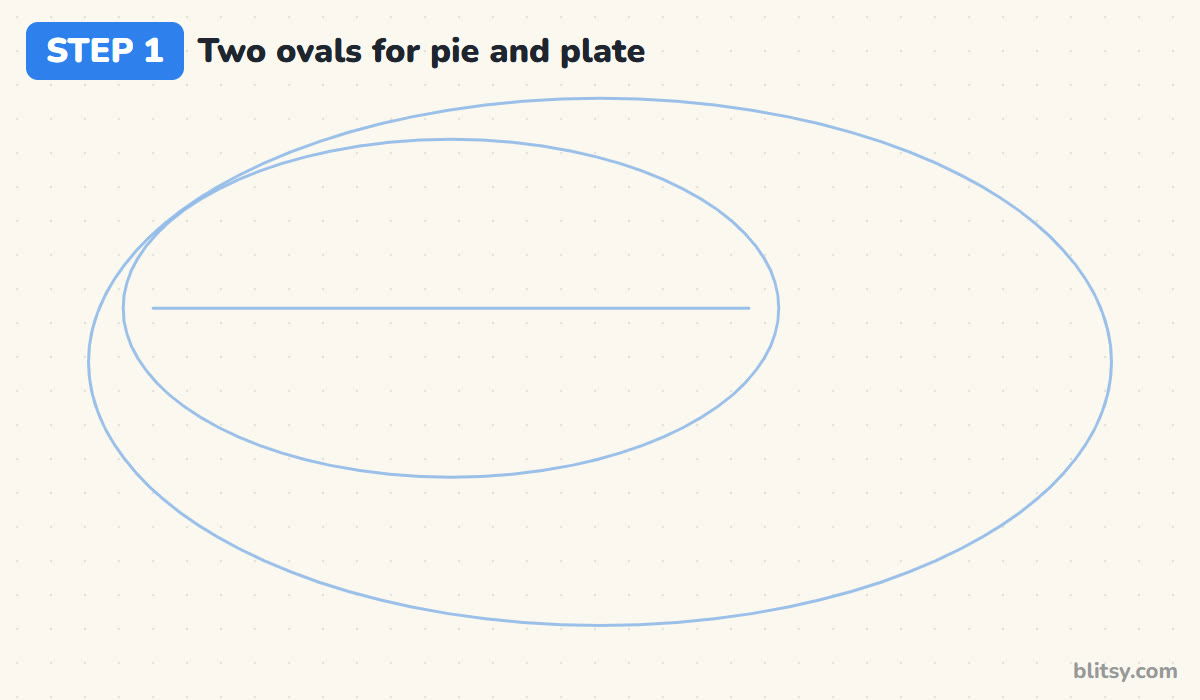
Start with a big, flat oval that fills most of the page. That's the plate. Inside it, a little to the left and higher up, draw a smaller oval for the top of the pie, about two thirds as wide, and a light line across its middle. Both ovals are about twice as wide as they are tall, which makes the pie look like it's lying on a table.
💡 Tip: Keep these lines faint. Every one of them gets erased later.
Step 2: Mark where the slice comes out
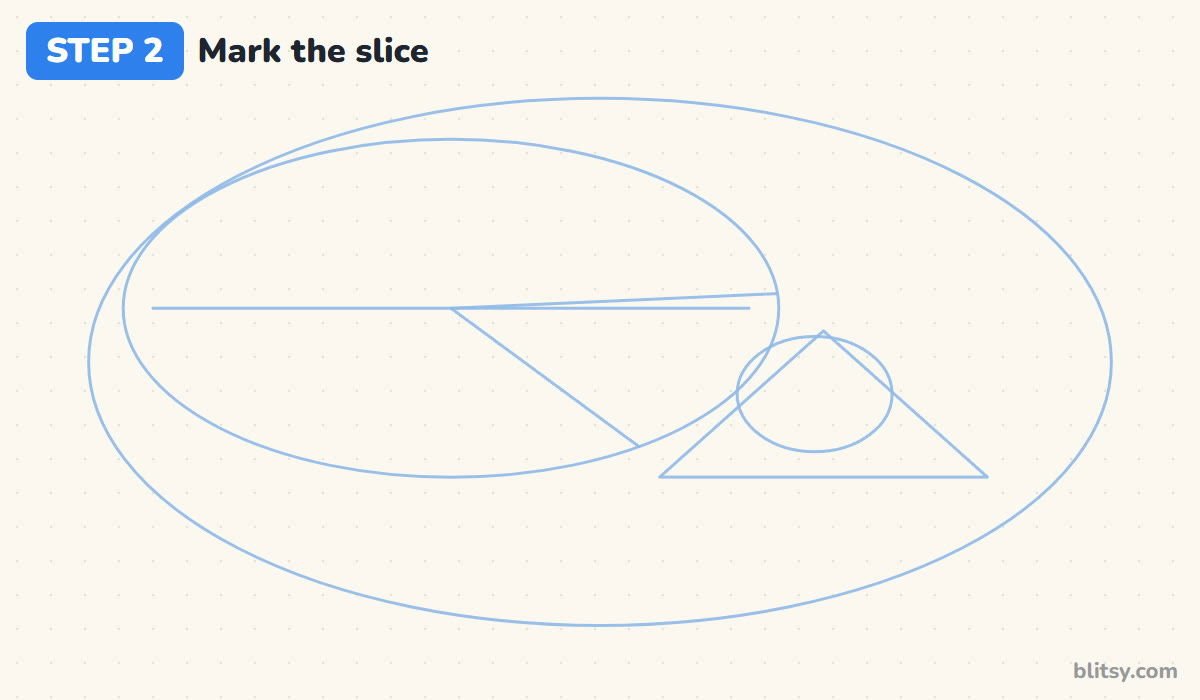
From the center of the pie oval, draw two straight lines out to the right: one almost flat, the other angling down toward the front. The wedge between them is the missing slice. Inside the plate, draw a flat triangle with its point on the left where the slice will sit, plus a small oval on it for the whipped cream.
💡 Tip: Make the missing wedge about one sixth of the pie. Too wide and the pie looks half eaten.
Step 3: Draw the wavy crust outline
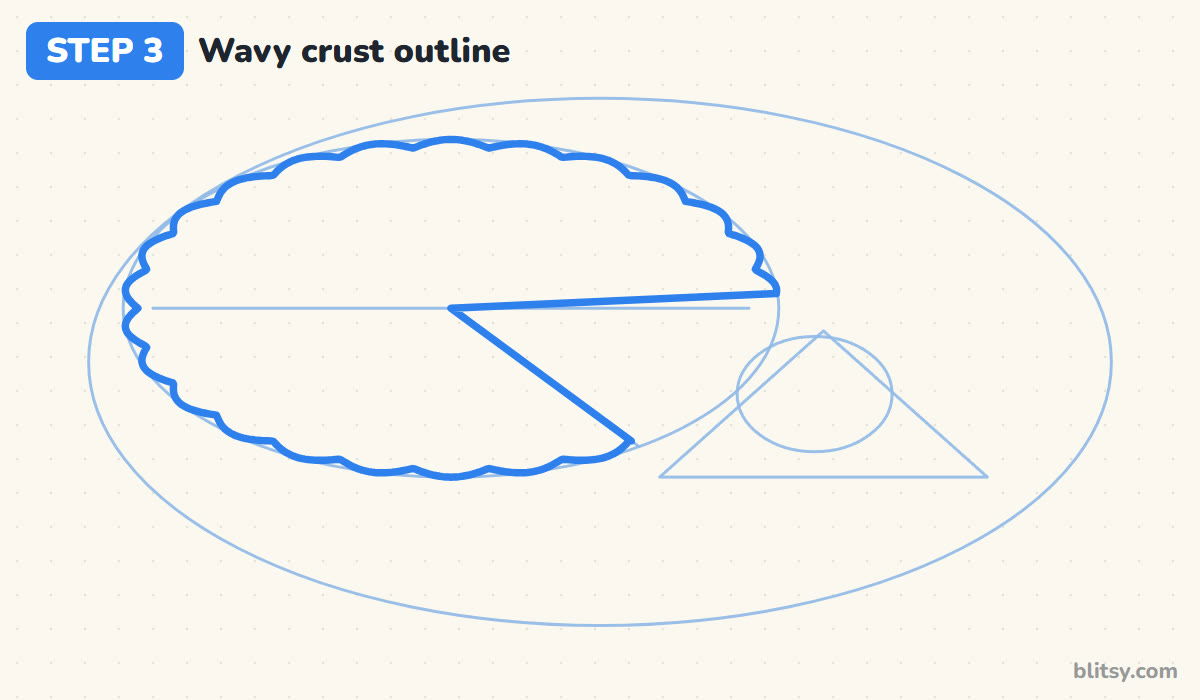
Trace around the pie oval with a row of small, rounded bumps. This is the crimped edge you see on a homemade crust. Stop at the two slice lines and go over them firmly, so the outline turns into a round shape with a notch cut out. I try to keep the bumps the same size all the way around, roughly as wide as my fingertip.
💡 Tip: Draw the bumps in short arcs and lift the pencil between them. One long wiggly stroke tends to drift.



Step 4: Add the pie's side and the cut edge
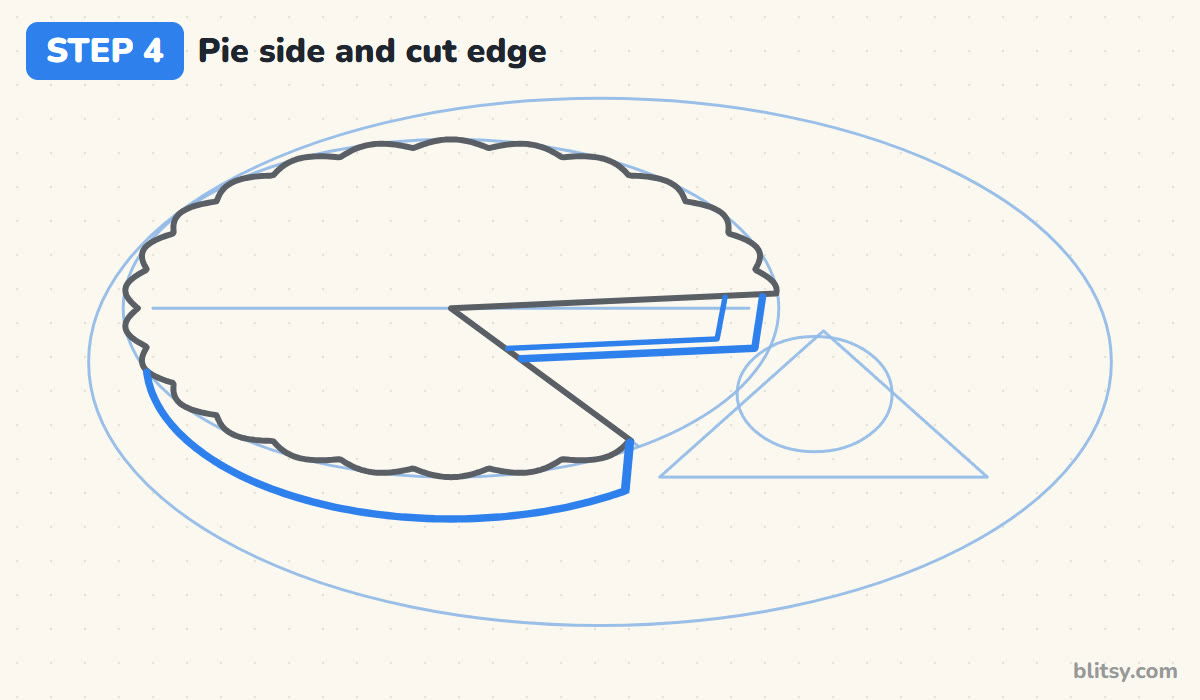
Below the front half of the crust, draw a curved line about a thumb's width lower and join it to the crust with short down strokes at both ends. This band is the side of the pie. Then hang a thin box under the flat slice line on the right, with one line near its bottom and one near its end. That's the cut you can see into: filling on top, crust underneath.
💡 Tip: Only the front of the pie shows its side. The back edge stays a single wavy line.
Step 5: Draw the filling edge and the crimps
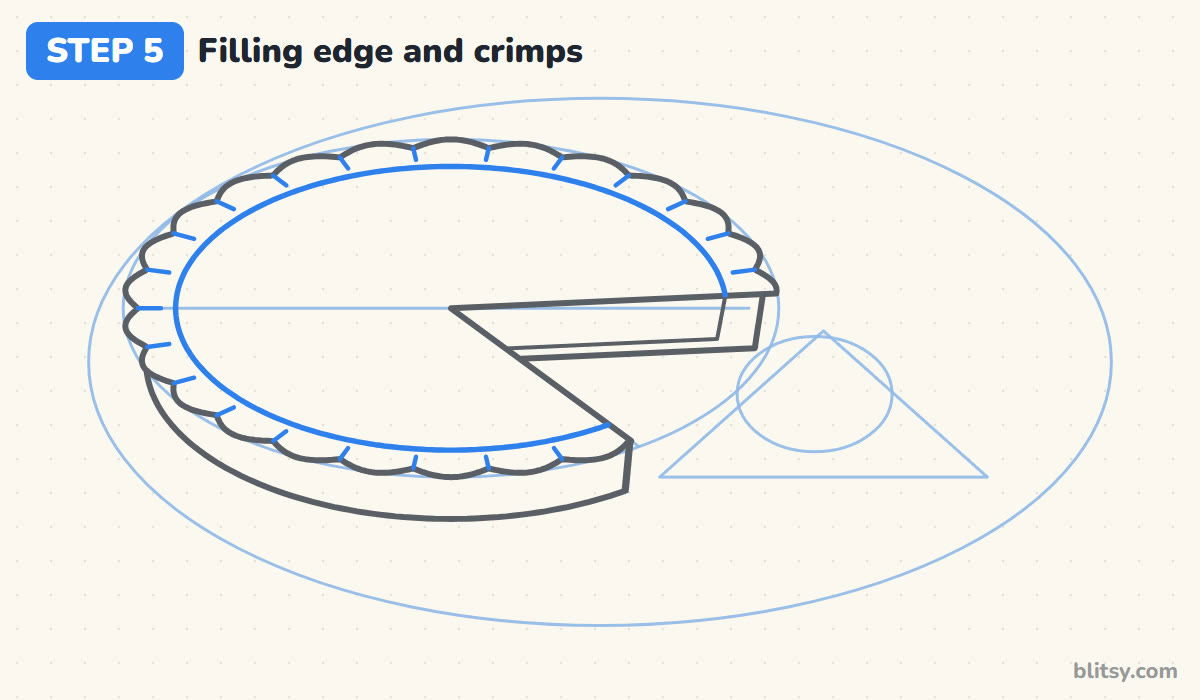
Inside the crust, draw a smooth oval a little smaller than the bumpy edge. The space between them is the crust ring, and everything inside is filling. Add a tiny line at each dip between two bumps, pointing toward the center. Those marks make the edge look pinched, like a real crust pressed with a thumb.
💡 Tip: Keep the crimp lines short. If they reach the filling, the crust starts to look like a sun.
Step 6: Draw the whipped cream dollop
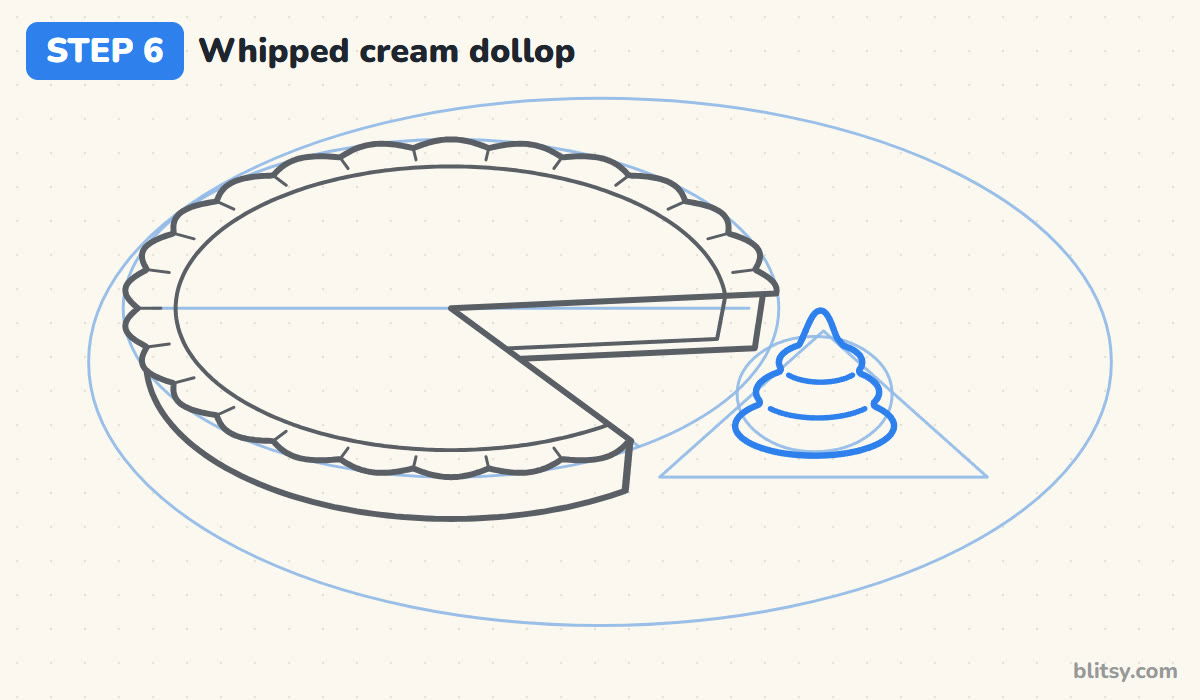
Inside the small oval on the triangle, draw a wide, rounded base, a narrower bump on top and a smaller one above that. Finish with a soft point that leans a little to one side, then two curved lines across the middle for the swirls. I draw the cream before the slice so the slice lines can stop neatly where the cream starts.
💡 Tip: Let the tip curl slightly. A perfectly straight point looks stiff, like a party hat.
Step 7: Draw the pulled-out slice
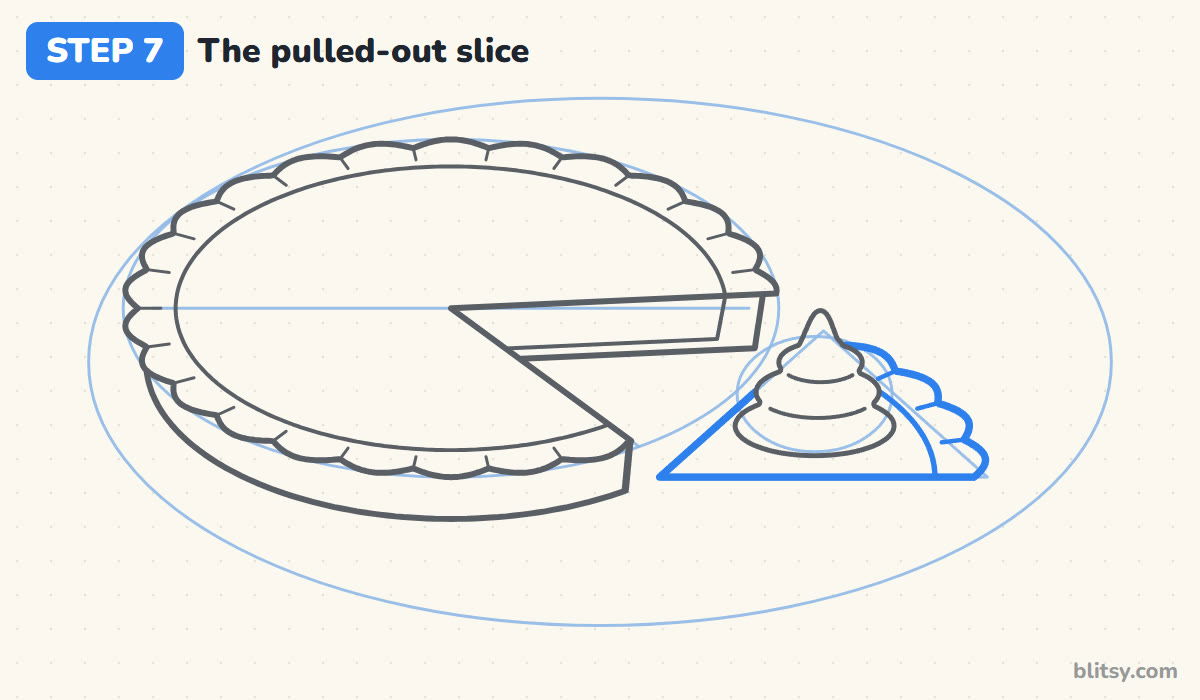
Go over the triangle guide to make the top of the slice. Its point faces left toward the pie, and the long flat edge runs along the bottom. Replace the right side with a curve of crust bumps like the pie's edge, then add a smooth filling curve inside it and a couple of crimp lines.
💡 Tip: The slice should be the same size as the gap in the pie. Hold a ruler against both to check.



Step 8: Show the slice's side and layers
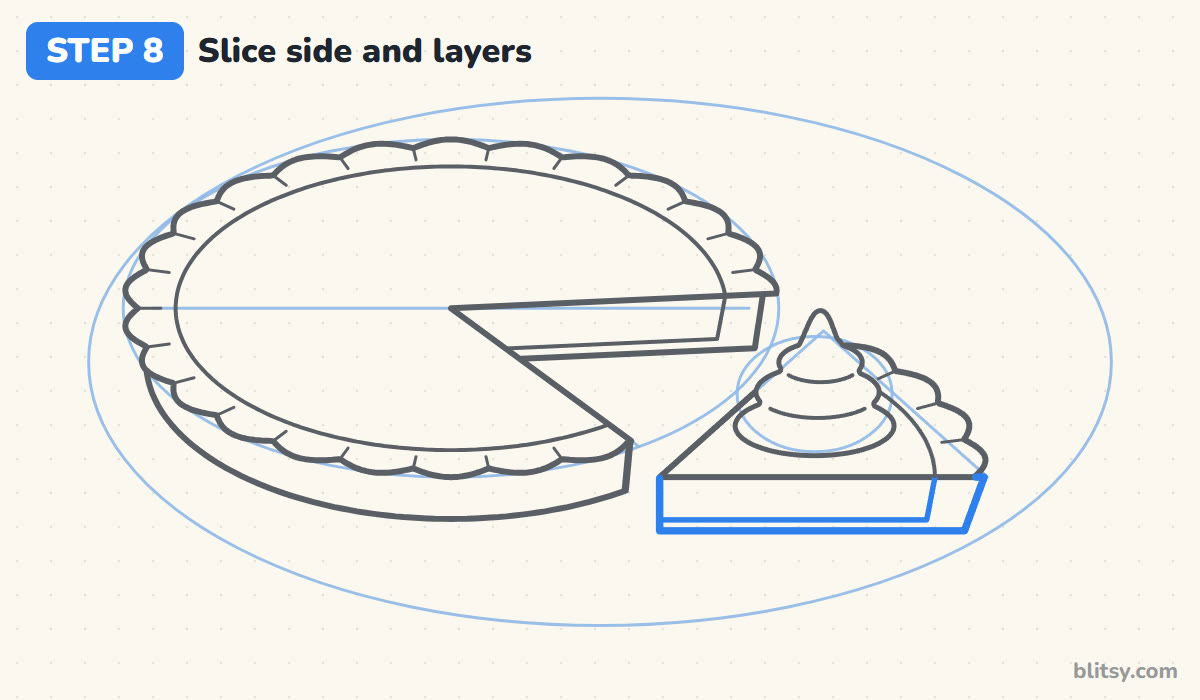
Under the flat bottom edge of the slice, draw a tall rectangle that ends in a slanted right side under the crust. This is the cut face you'd see if you looked straight at a slice on a plate. Draw a line near the bottom for the crust layer and a short line near the right end for the crust wall. The big space left over is the filling.
💡 Tip: Make the bottom crust layer thin. Pumpkin pie is mostly filling, so the crust is just a strip.
Step 9: Draw the plate under everything
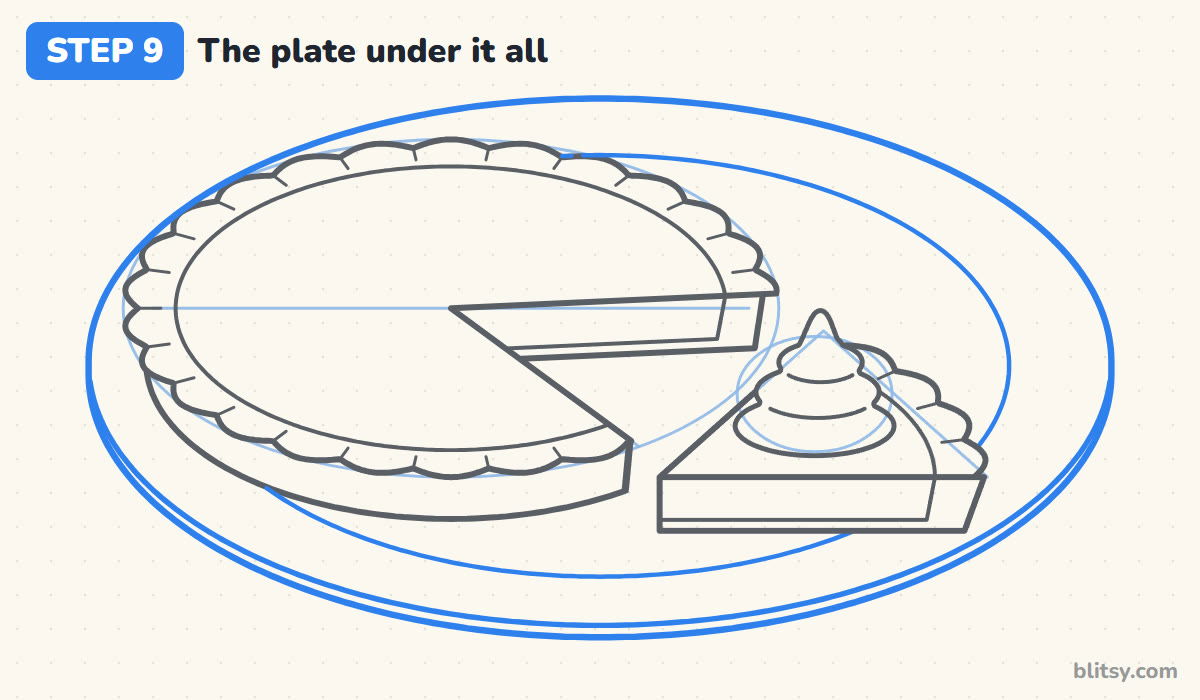
Go over the big plate oval, stopping wherever the pie or the slice sits in front of it. Add a second line just under the front edge for thickness. Then draw a smaller oval inside, about three quarters as big, for the flat middle of the plate. It hides behind the food too.
💡 Tip: Turn your paper as you draw the plate. Long oval lines come out smoother when your wrist doesn't twist.
Step 10: Ink the drawing and erase the guides
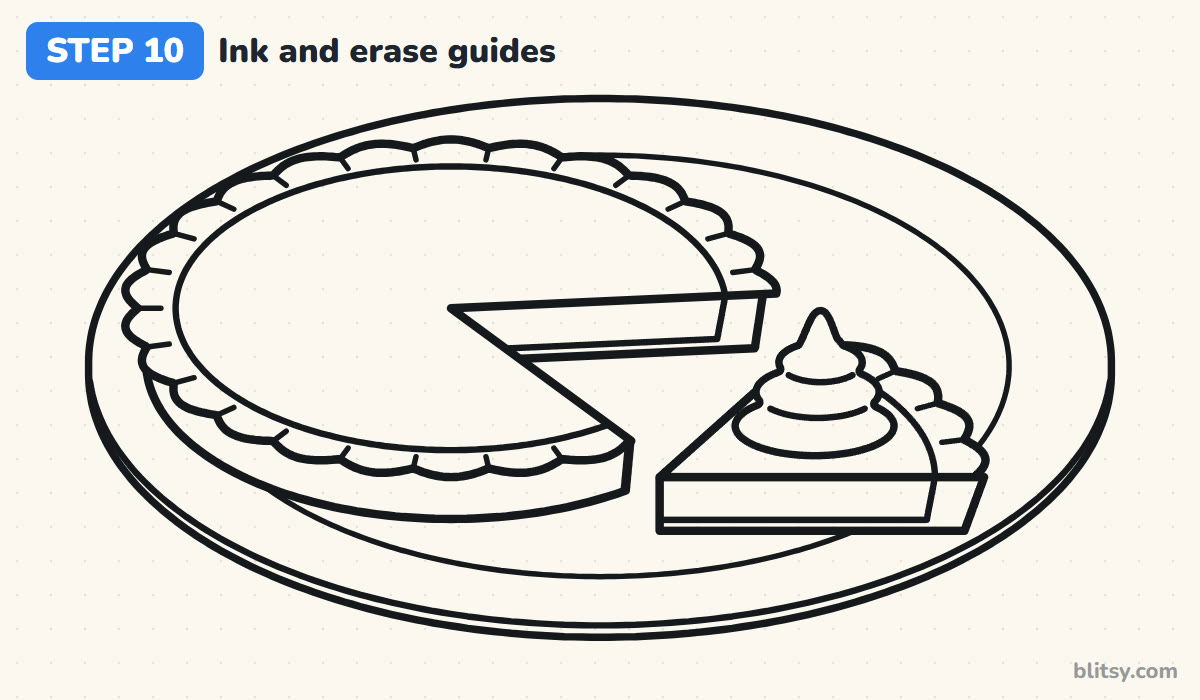
Trace every keeper line with the black marker. I start with the cream and the slice, then the pie, and save the long plate lines for last. Skip the guide ovals, the slice lines through the filling and the triangle. When the ink is completely dry, erase all the pencil.
💡 Tip: Wait a full minute before erasing. Marker smears easily when you rub too soon.
Step 11: Color the pumpkin pie
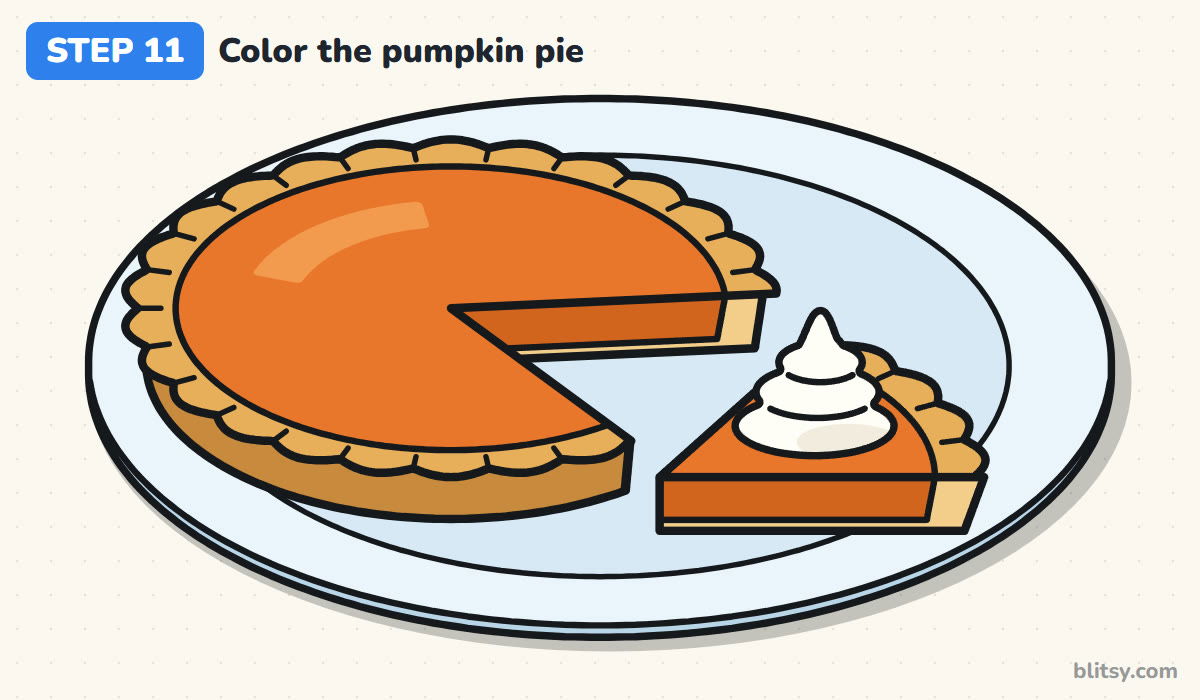
Fill the top of the pie and the slice with orange, and use a darker orange on the cut sides so they look shaded. The crimped crust is golden yellow, the pie's side light brown and the thin crust layer on the cut tan. Leave the whipped cream white with a faint cream shadow, and color the plate pale blue with a slightly darker middle.
💡 Tip: Leave a curved white streak on the filling for a shine. It makes the pie look fresh and glossy.

Where Pie Drawings Tend to Slip
- A round circle instead of a flat oval. A circle makes the pie look like it's standing up on the wall. Squash the oval so it's about twice as wide as tall.
- A slice that doesn't match the gap. If the slice is bigger than the hole, the eye notices right away. Use the same angle for both.
- Bumps of all different sizes. Uneven crimps look messy. Draw them slowly and keep each one about the same width.
- Forgetting the cut face. Without the side and the layer line, the slice looks like a flat paper triangle. The thick side is what makes it look like real pie.
- Drawing the whole plate first. Then you must erase plate lines behind the pie. Draw the food first and tuck the plate in behind it.
From Pumpkin Pie to Cherry, Apple and More
Once the shapes feel easy, change the pie. Make the filling deep red with dots for a cherry pie, or lay a crisscross lattice of strips across the top for an apple pie. Younger kids can skip the missing slice for a quicker version. A fork beside the slice or a few fall leaves around the plate also work well. To draw the vegetable this pie comes from, try the pumpkin drawing step by step tutorial. For another sweet treat with a swirl on top, the cupcake drawing tutorial uses a very similar frosting shape.
Free Pumpkin Pie Coloring Page and Drawing Guide PDF
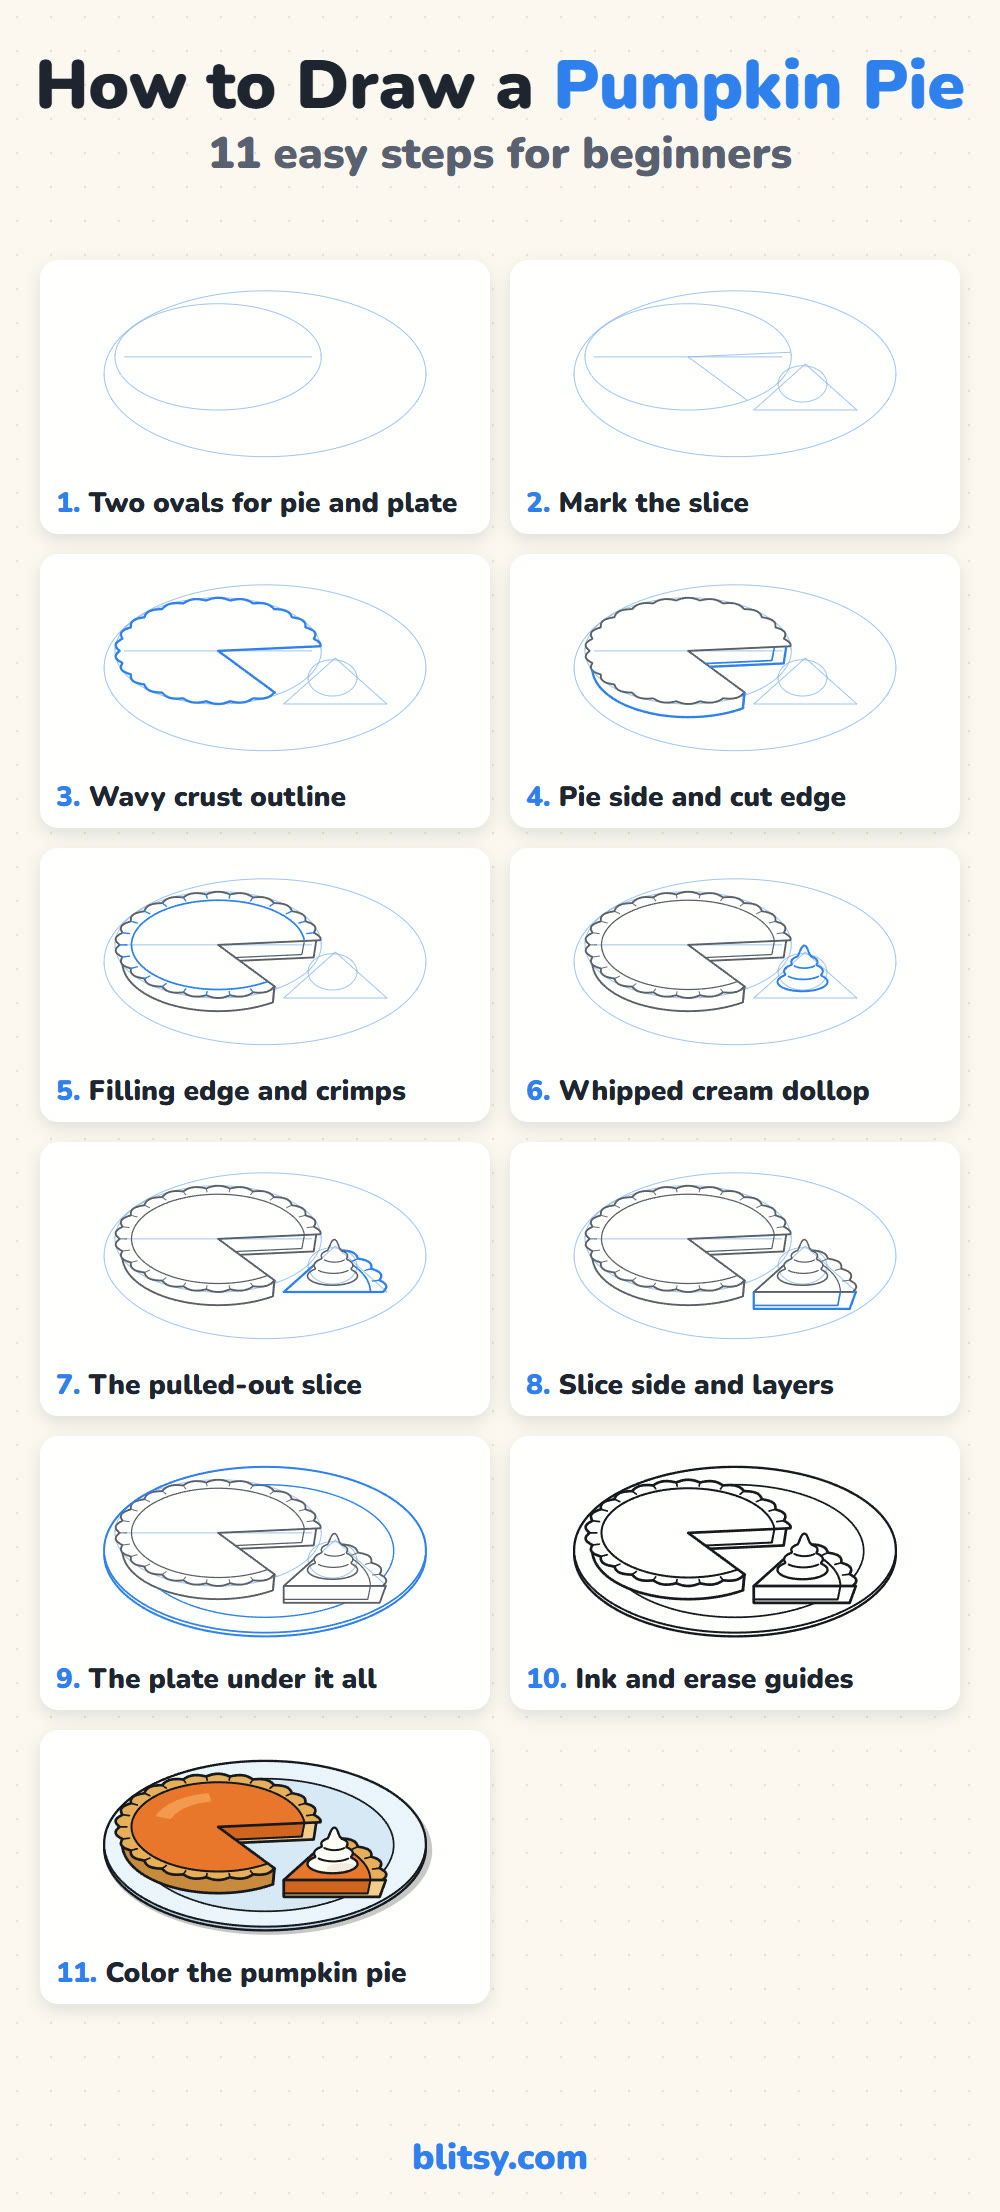
The free pumpkin pie coloring page has a small colored pie at the top to copy, a key that tells you which color goes on which part, and a big outline below for coloring. The step-by-step PDF guide holds all 11 steps with their pictures and tips, so you can draw at the table without a screen. Both print on Letter or A4 paper.
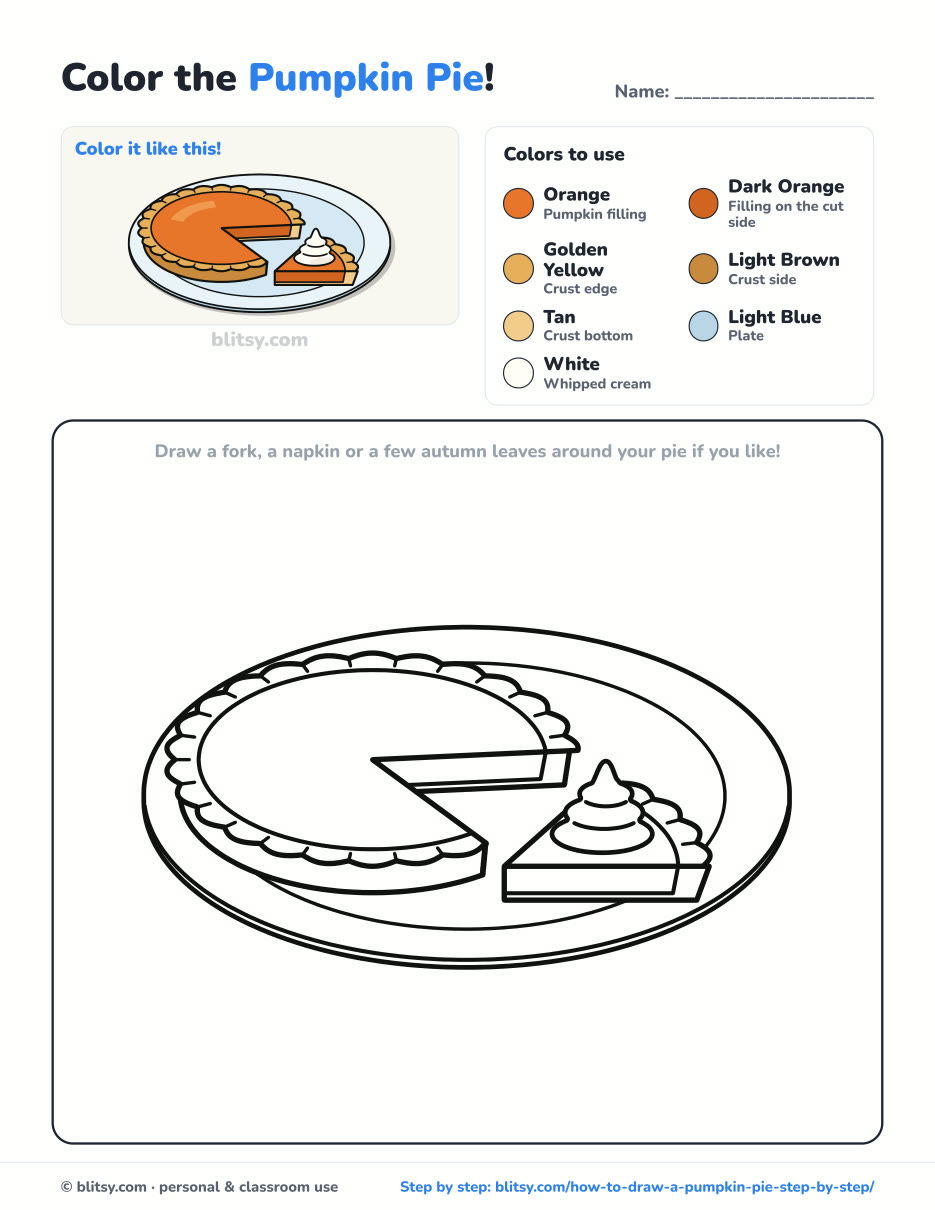
Black outlines with a colored example and the color names at the top. Ready to print and color.
⬇️ Download Coloring PageEvery step picture with its instructions and tips, to keep beside your paper while you draw.
⬇️ Download Drawing Guide📱 On a phone? Tap a download button, then open the file and choose Share → Save to Files or Print. On a computer, the PDF opens or saves straight to your Downloads folder.
Pin the Pie Steps for Later
More Food and Fall Drawings to Try
Each one is a full lesson with a picture for every step.
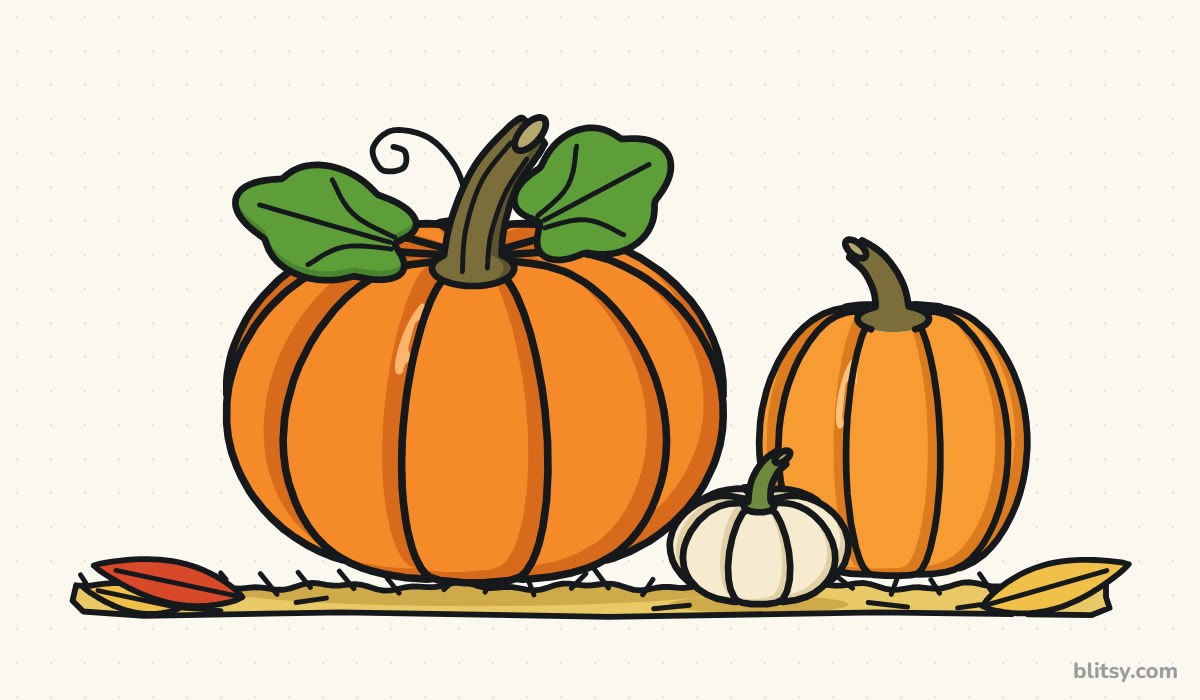
- Pumpkin Drawing: Three uncarved pumpkins sit on a line of hay, built from curved slices that meet under the stem, in this pumpkin drawing step by step tutorial.
- Cupcake Drawing: A pink swirl of frosting with sprinkles and a cherry sits on a striped liner in this cupcake drawing tutorial.
- Pizza Drawing: A whole pepperoni pizza with one cheesy slice pulled aside starts as a flat oval in this how to draw pizza step by step guide.
- Fruit Drawing: Five fruits built from circles and ovals fill a blue bowl in this fruit drawing tutorial.
- Fall Leaf Drawing: A red and gold maple leaf grows from one dot and five guide lines, with an oak leaf and an acorn drifting past, in this fall leaves drawing tutorial.
Pumpkin Pie Drawing Questions
What is the easiest way to draw a pumpkin pie?
Start with a flat oval, turn its edge into small bumps for the crust, and draw a smaller smooth oval inside for the filling. Add a band underneath for the side and you already have a pie.
How do you draw a slice of pumpkin pie for kids?
Draw a flat triangle with one curved, bumpy end for the crust. Add a thick rectangle under its long edge for the side, then a dollop of cream on top.
How long does it take to draw a pumpkin pie?
Most beginners need about 30 minutes for the drawing and around 10 more for coloring. The crust bumps take the longest.
What colors do I need to color a pumpkin pie?
Orange and dark orange for the filling, golden yellow and light brown for the crust, tan for the bottom crust, white for the cream and a pale blue for the plate.
Grab a pencil and draw your pie before anyone at the table asks for seconds. 🥧✏️
Related posts:
 How to Draw a Jack O Lantern Step by Step (Easy Pumpkin)
 How to Draw a Pumpkin Step by Step (Easy Autumn Still Life)
 How to Draw a Car Step by Step (Easy Drawing for Beginners)
 How to Draw a Whale Step by Step (Easy for Beginners)
 How to Draw a Chicken Step by Step (Easy for Beginners)
 How to Draw a Snowman Step by Step (Easy for Beginners)
 How to Draw an Airplane Step by Step (Easy Jet for Beginners)
 How to Draw a Mouse Step by Step (Easy for Beginners)
 How to Draw a T-Rex Step by Step (Easy for Beginners)
 How to Draw a Pig Step by Step (Easy for Beginners)
 How to Draw a Minion Step by Step (Easy for Beginners)
 How to Draw a Notebook Step by Step (Easy for Beginners)

